Transcripts
1. Pouch Design Intro: Welcome to my graphic
design course on how to create a food pouch. In this course, we're going to create a mechanical on
an actual die line, an illustrator that's
provided from your printer. We're going to use AI tools
to create our assets. We're going to bring our assets into Adobe Dimension and create a beautiful mock up
piece that you could showcase for a portfolio
piece or show a client. My name is Karence Yoka. I've been a graphic designer
and illustrator and package designer for major
brands for over 30 years. Welcome to my course.
2. Dieline and AI Assets: All right, so when
you're going to start your mechanical
for your pouch, you're going to need
to have a dial line. And the dial line
should be supplied by the printer that you are
getting the pouch printed at. He's going to supply you an illustrator file and it's to the specifications
that you ask for. This illustration is showing you where the zipped edges are, where the front is, the back, the gusted area, and
the sealed areas are. This is beautiful for you
to pop into Illustrator or open an illustrator and start
working on. Now here I am. I'm going to
generate some assets using AI for my mechanical. This is going to be for
my portfolio or maybe is for a client who wants
a mock up of the package. And you want to show
them the package, but you don't have
their product yet. What I did was I opened Photoshop file and I
made it 10 " by 10 ", 300 DPI and CMYK. This is going to ensure
that my image is going to be big enough when
it's AI generated. What I did was I made a selection in the
middle, it's a square. And I generated with a prompt on the bottom,
coconut Bliss balls. And you could see the first
one came out pretty good and the second one
is going to be a chocolate coconut list ball. Let's see what happens. It
comes out really amazing. It just takes a few seconds
and it saves me so much time. So if I had to go find a
product and photograph it, or maybe even cook it
myself and photograph it, it would have taken
me half of the day. Or I would have had to look
for stock photos all over the place and try to
find one that fit. But this way you can create something that is pretty
close to what you want. With your prompt, I
generated some bliss balls, and I think they look great. But what I really wanted was a cluster of them for the
front of the package. So I'm going to do
it one more time. We're going to select your area, it's just a square and we're going to generate
in the prompt area, I put three chocolate
coconut Bliss balls. And let's see what happens. It did generate just one, but it generated one from
above and one from the side. I think the one from the side, even though it was four
balls instead of three, I'm still going to use,
I think it looks great. And we're going to use this
for the front of our now. I'm going to continue
with it on the layer, we're going to grab
the object and grab the selection object
tool in the tool bar. It looks like a square within a square and it's one
of the selection tools. Then we're going to just select
around it and it's going to just go and select
the object itself. I copy pasted that to a new layer and turned
off the layer below it. Then I'm going to go
and take an ear brush, and on another layer just create a little drop shadow behind the little ball so
that it looks more normal. And I'm just going
to change opacity on there and maybe turn
it to multiply. And then after that,
we're just going to save this as a Photoshop file. Next, I'm going to
show you how I grab a photo from unsplash,
a free photo, and change it into a
beautiful texture that goes inside of our mechanical. Okay, I found this
image on unsplash. I thought it was a
really cute brush stroke and could be really
great texture for the back of our product. I did the same
thing we just did. So I selected it with my
object selection tool because it's so black and white. It did a really great job. Then what we're going to do
is we're going to bring this into Illustrator and do
an image trace on it. So what I did after I
selected it is I hit that little square
on the bottom of the layers palette
and made a mask. Then I realized I need
to apply the mask. We'll go up and apply
the mask layer mask. I want to invert it first because I want the
image to be black. In order to do an image
trace in Illustrator, it's got to be black,
otherwise it won't work. And then we're just
going to save it as a Photoshop file yet again, or J peg either one. Open my Illustrator
and I'm going to import my brush mark
image into Illustrator. And I'm going to ignore the white and you can select any color you want if you
had a color thing there. So we're just going
to ignore white and it's going to
trace the image. And then we're going to
go to our threshold and decide how much black and
white we really want to show. I want to show them
more white and I want to show them
more brush strokes. And when I'm happy with this, I'm going to hit the expand. And after that, I'm
just going to copy it and paste it
into my document. And save this one as whatever
you want to call it. In the next video,
we're going to start working on our mechanical.
3. Preparing Mech Font: In this video, we're going
to start preparing our mechanical to get
ready for the printer. Now, this is a fake mechanical. It's not a real mechanical. I'm going to design
it in front of you. But when you design yours, you're going to have your
layout already figured out, possibly before you start placing things on
the mechanical. Here I am, I'm showing
you what it looks like. There is the zipper and here is the gust and those dotted
lines there are where they do the gluing or the
heat to seal it together. And for us, we're going
to put that background in where it's not going to
touch the edges completely. It's going to be
maybe 16th of an inch or less away from the edge. Instead of bleeding out, it's going to bleed
out top and bottom, but it's not going to
bleed out on the sides. It costs more to have it
bleed out on the side than it does to have it top and bottom because it's
feeding through the machine. Here I have another art board on the same mechanical with all of my assets that I have
already figured out, how I want to design my layout. And you can see that
brush stroke is there, but I'm not going to
use that brush stroke. I decided that I'm going
to use the one on the left and I did it the same way I did the brush stroke in
the previous video. I also created a bunch of assets like the almonds
and the coconut. And I just found those
either on Adobe stock for free or on Splash for free. And I also created a Swatch library over there that we're
going to work with, like pretend that if you're doing something
for your client, they would have like a brand and they would have all
these colors they want that. It's their brand colors. For this demonstration, I use
the pan tone peach color, the peach fuzz as a main color, so we can get that in there. And then I went on pan tone
and I got another palette that seemed to work for me that was coordinated
with the peach. And I'm using that as my
color scheme for this purpose because I design this ahead
of time to save us time. I have a lot of layers here. When you're building
a mechanical, you really want to make
sure that you have all of your layers labeled to
what they actually are. You want your line in one layer. If you have a working folder
just like my board here, just make that a working and
then you delete it later. The actual everything on the die line that
sits on the die line, you want to be able
to have all of that on a separate
layer for each element. Like the type should
be on an layer and the background because usually you're working on
top of the background. So you want it on the
back and you want it to be separate from everything
you're moving around. Here I am, I'm drawing in the
background and like I said, I'm not bringing it all
the way to the edge. I'm bringing it just
shy of the edges, Maybe a 16th of an inch, if that, on each side. My measurement was 5.75
for the actual mechanical. So I made this 5.6 then I centered it in there and I'm going to
change the color. We want it to bleed to
the top but not the side. I'm going to push it
up a little bit higher so it has a little bit of a
bleed so that when it prints you don't have a white or a clear mark on the
top of your bag. And then we're just going to go ahead and make this a layer and lock it and create
a color for it, the background.
I'm going to go to my other art board that I
made here and I'm going to start grabbing my elements
and bringing them in to my mechanical. All of my elements
here are CMYK. And 300 DPI. And I'm bringing this typography over and I'm going to
turn it to Outlines. When I send a mechanical
out to a printer, I always have my
typography in outlines, but make sure you have
it somewhere else where it is live
type either you put it on a separate
layer and label it live and then turn the layer
off so it doesn't print. And then make another
layer that is outline type because you don't want to be sending fonts and
all that to the printer. Sometimes you're not
allowed to send fonts, but it just makes it easier
to have it in outlines, that the job goes smoothly and nothing really
moves or changes by accident. And I always like to
have, like I said, live type and also outline type. And every single document I use, I have it both ways because you have to come back and
make a change down the road. I made this package
design this year and then next year the
ingredients change or the formula changes or
the weight changes or something changes the packaging and you have to update it. You really want to
have that type in a live format somewhere
that you are able to. Because you're never going to
remember what font you use. You're never going to
remember everything you did. Just have that
insurance for yourself. Here I am, I made a
trademark because the Top Blissful
Bites is the name of the company and
the chocolate, coconut Almond Bites is the
name of the product itself. I'm going to bring
in my photograph, my AI generated product art, and I'm going to give
it a nice effect of an outer glow because it's the same value as
the back and you want it to stand
forward a little bit. The outer glow is really
going to make it look just more special and more
sparkly and more fresh. And then I'm going to grab the background image that I
have and I turned it off. Remember before that we did the brushwork and I tried
that and I was like, eh, I'm not sure And I also
found this other image in splash of paint on a wall. There's like pattern paint on a wall and I thought it looked a little grungy and geometric
at the same time. I brought that into Illustrator
and did a tracing of it. And I think it looks super cool. That's the fun of graphic design is that you get to change something that you would never think would be used
for that purpose. For that purpose, this
was actually paint on a wall in splash. I just actually had it size
before I brought it in here, so I knew that was
going to fit left to right exactly and fall
exactly where I wanted it. And it's trimmed perfectly
to fit in the bag, so it's going to be
on its own layer because you have to
move them around. And if you're moving
texts on top of it, you just want to stay still. So make sure that
you have them on separate layers that are completely labeled
the right way. I have too many layers
here because I have my working files on here as well. But you get what I mean. Now I'm going to go grab
these almonds which I got from Adobe stock for free. If you own the subscription
to Adobe Creative Suite, you can go on their Adobe Stock, look up free images and I
looked up free almonds. And these were perfect, they were part of
bigger pictures. I just isolated them
and brought them in the same way we did our
product in Photoshop, and I made them CMYK
and not too big. So when you bring things
in, you don't want them super huge because it's going
to make your file huge. Make it a little bigger
than you need it, so you can shrink it down. But don't make it too small. So you have to shrink, go up. You never want to do that. You always want to shrink down. I make it slightly bigger in case I need the
image for a poster. Maybe down the
road or a brochure or something where it
might be slightly bigger. I always try to think
ahead when I'm creating my mechanicals and the images
I spend a lot of time on. You want to make sure you
create images that down the road you can use
for other purposes that possibly may
be larger in size. Because like I said,
you can never shrink. You can't go up from when
you already sunk down. You have to go from being large. I'm just going to place
these. I'm going to place the rest of my
elements on here. In the next video, we are going to design the back, which is a little
bit more tricky. It's tricky because the back
side of it is upside down. When they are finished printing, they take the
plastic bag and they fold it and the heat
seal it on the edges. Now when the backside
upside down, the two tops will meet and they will both be right side up. I'm going to finish
placing this and I'll see you in the next video.
4. Mechanical back: Okay, get ready. We're
going to design the back. And I'm going to
go ahead and grab a few elements from my
artboard that I have there. And we're going to
grab the ingredients, and we're going to grab
the nutrition facts, and you're going to
grab the UPC code, everything that needs
to be on the back. You probably have to, whether
it's kosher or dairy, if you have that issue and the manufacturer
where they are located, that all has to be
on the back legally, of these package designs. Right now, my
mechanical, it's wrong. If I were to print this
on this direction, it would be upside down. So what we have to do is turn our mechanical 180 degrees
right on the bottom. I don't know if you could see
it on what I filmed here. But on the bottom
of your artboard, on the left there is the size. And you can literally rotate
your canvas 180 degrees, but you can't rotate
actual objects 180. You have to use the rotate tool, Otherwise, it makes a mess
and it just doesn't work. So you can start
by just, you know, playing it in and
just, you know, getting the fonts and the
size right and everything. And then you can
flip it and move everything around or just
flip it to begin with. And start from the, this is the nutrition facts box. You want to go on the Food and Drug Administration website and find out what the specifications are
for the nutrition facts. The font has to be
a certain font, They have to be a certain size. You have to have the Daily
Value on the bottom. And all of the information
that's inside that box, you have to have on food
packaging in the United States. I don't know where
you're coming from. Maybe not the United States, but in the United States, this
is what you have to have. You can get that information on the Food and Drug Administration
site and just type in nutrition regulations and you can download the PDF
for that information. Now, I generated this
nutrition information, the whole box, from
a company online. You can do paid and you can do for free. This one was free. I had to give my e
mail address away, but it did generate me a nutrition fact box because for this
purpose, it's perfect. Otherwise, I would want one where I can edit the
information myself. I have one in my own jobs
where I have a template and I edit everything in that nutrition fact every time I use it because we
do a lot of them. You can see here that
after I flipped my canvas, the type did not flip with it. You have to flip the type
using the rotation tool. And here I'm going to grab the background and
stick that back in. And you can see even like now, your artboard is on
the left side where it was before on the right side and everything is upside down. Yeah. So you just have to
work with that in your head. And I'm really happy that you
can flip the canvas around. In Illustrator, or used to
not be able to do that, sometimes it's hard to show somebody what it looks like
without printing it out. So you can literally
turn the paper around or fold it to
look like the bag. But now you can show people on your
computer if you have to, because you can flip
the canvas around and they can actually
read it the right way. A lot of food packaging
wants to have a window where that you
can see the product, the actual products,
through the window. Now, you don't want to
usually do this on the front, I don't recommend it,
and a lot of people do. If your product looks amazing, usually never, ever looks like the picture you
put on the front. It's very like look at
Mcdonalds, their hamburgers, and like Burger King, whatever, their hamburgers
look amazing online. And then when you go there, it's like this does not look anything like the
burger I see online. But the reason I
like to put it on the back and not too close to the bottom is for a
couple of reasons. The window, I mean, it's nice to show the product and people do want to see it, but if you put too
close to the bottom, sometimes crumbs
form And it looks all crumbly so you don't want it too close to the bottom
where you're going to see the crumbs and you
don't want it too big. You want to give an idea
to people what they're getting without them
seeing the whole package. Because, I mean, you don't
want to be dis, disappointing. And besides things tend to
get squished or, you know, packaging people
touch it or whatever, you just want to keep it looking fresh and beautiful
at all times. I poked out the window on this background purple and
it should be sufficient. But a lot of bags they
do a white background. That purple background
would actually need to have another exact
layer of that. Duplicate that layer and make it white and stick it
behind that layer. This layer that I have would be printed
directly on the plastic, which might make it slightly transparent depending
on the color. But most printers
will print white behind anything printed
on the mechanical. If you want to in
this mechanical, all you would have to do is take that background
and duplicate it. And the one underneath
make it white. And then you can
label that one white. Then you have the
background on top of it, and then you have the
white layer underneath it. The white layer
would print first and then the print color
would print on top of it. And I recommend this
and it's an extra step. But like I said, in the imagery may
look transparent. It's not completely opaque because it's ink on
a plastic clear bag. Now where I have that window, you just label that,
it is the window. So that window is going
to be clear substrate. So you might why
put window there, But maybe a better
word for that would be clear substrate right
over that window. So I thought maybe I'd
bring the product in the back as well and
repeat it on the back. I'm like, nah, I don't want to do that. I think
it's too much. So you design it
any way you like. I don't want to spend a lot
of time designing for you. I want you to understand the
ins and outs of creating a mechanical that
you need to send to a printer for a pouch. So as I'm doing this, I'm having another thought about another type of printing. So if I wanted my bag to look like a Matt finish,
you can ask for Matt. And everything would be Matt. It's not glossy, but if you want glossy just on a few areas. So if I were to do the
front of this label, if you looked at the
front of this label or just even the coconut right
there and the almonds, I just want that to be gloss. So what I would do is you have to do a clipping
mask around those objects. So you want to copy them
and make them a flat color, like a white or gray,
something like that. And it's got to go
on its own layer and then you're going
to name it gloss layer. This way the printer knows that anywhere they see that shape. So I would make a shape all the way around those bliss balls and the almonds and possibly
the logo of the company. I would also make that gloss. I would just take
all of those layers, all of those elements
and bring them into its own layer
exactly where they are. So you don't want to move them, they have to be exactly
in place and you would just label it gloss. The printer will know
and you have to write it out to the printer
when you send them in the mechanical
that everything that prints gloss is on that
layer that you named gloss. They will get back
to you and they will make sure that they're
on the right page with you and they have
everything because they will not print anything until you sign off on it and
you say it's okay. So you have to be
careful of how you word things and specify it on your mechanical,
There's no mistakes. So I am putting the Blissful
Bytes logo above the zipper. And later on we're going to be making a mock up of it
with Adobe Dimensions. But the mock up bag has the
zipper in a different spot. So it's going to look a little different than what we did here. So your mechanical
is always right. The mock is just a mock. It's not exactly, so you might have to explain
to your client that, well, the zipper is not
really there. This is a mock. It's not an exact thing because you don't
want to get, I mean, some companies will print out an actual prototype for you
and you have to pay for that. It's a couple hundred
dollar usually. But this is why I like
to make digital Max because then the client
can visualize what you're giving them without you spending a couple
hundred dollar on a digital prototype bag. One thing I noticed
that was missing from the front was the weight
in the United States, you have to put net
weight and ounces. If it's over 16 ounces, you have to have pound
and ounces with it. And every country probably
has different regulations. But you should talk to a compliance person who knows exactly what is
required on the package. It must go through that person before it goes to just to
have proof read it for you. The other thing that
we're going to do in the next video for this video, I'm just going to
finish up going through every single layer
and making sure I have them labeled right and everything
is on the right layer and nothing is straight off the wrong layer because
it's easy to do. On the next video, we're going to talk
about the swatches and the call outs and how to
output it for the printer. The one after that,
we're going to make our mock so we can just have a beautiful image of
our beautiful product. I'll see you in the next video.
5. Color Swatches: Okay. Let's talk
about color swatches. In this document, we have CMYK, we also have two spot colors, which is the PMS 19282 oh, and the PMS 121023. I go up and I check to see
if I have unused fonts, and it's showing me that
the CMYK is unused. All of those images are CMYK. They are not going to
print a solid color, so all of the images in this
document are actually CMYK. The purple in the background
is a PMS 1928 20 and the other peach
color is also that PMS number is called
out in the callouts. The black, the line black, two spot colors, the
CMYK and the white. The die line is not printing. All printers know that
it does not print, but it is called out over there. Okay, so now what we're going to do is turn
off all the layers and I'm going to
show you each layer. This is the substrate layer, this is the live type layer. If you click on that layer, you can see that I
have it to not print. Here it is going to print, and here it is not print. Since this layer is just sort
of insurance to help you. If you have to change a
type down the road and everything that you have
is already in outlines, you don't need to have that on, it should be off
and not printable. Then we have the white layer, which is the
background layer and then the background
layer on top of it. Then all of your art and then your call
outs in your die line. Now your mechanical is
ready for the printer. Let's package it and get
it ready for the printer. What we're going to do is save our document because when you go to package it and packaging it is going to
collect all the fonts and all of the images. If we have any linked
images in our package, they will show up in the
folder that it creates. But most of my images in this
document I have embedded, so they will not show up in
the folder that we create. I'm selecting where
my folder is going. I'm just going to
select package. Go ahead and hit package. We're going to collect
the links and re link. This is just giving you the
warning about the fonts. You don't have to keep that on. You could say don't show
again, if you don't want to. It has successfully packaged. Let's look at it. There it is. What we want to do now
is create a PDF that is good for the printer
as well because they often like to just print
off of a PDF file. Let's go and go to save a copy. Save a copy, then we're just going to go
down and select PDF. And then we're going to save
it as a press quality PDF. And you are all done and ready to send this off
to your printer. In the next video, we're
going to talk about maps.
6. 3D MOCK: Okay, here we go.
We're going to create our mock up and
we're going to be an adobe dimension and
we're going to pick the food pouch and we're going to move
it towards the front. Now we're going to go size it. We'll get it positioned
the way we want. Then we're going to go up
to our properties panel. We're going to go to the
x position and make that 5.75 for this mechanical
that we have. The Y is 7.375 That's going to
make it the exact dimensions of our pouch. We're going to go click on the Import to put on
top of our image. And we're going to
import our image. And drag it on there. And size it to fit that
circle there helps you size. It's not always perfect, but it does work pretty good. You'll notice that
the blissful bites is right on top of the zipper. We cannot help this because the way this is
rendering this particular shape, the zipper is in the wrong place compared
to our mechanical. But it's still pretty
good rendition of what the plastic container is going to look like the food
pouch is going to look like. Now I'm bringing in another one, and it's pretty
much the same size. We didn't change
it, and we're just going to put the
back image on there. I previously had taken a J peg of the mechanical
that we created. Export it as a J peg, and then took the
back in the front and separated it just
two separate files. And this is what
I'm importing to put place onto the packaging. I'm importing the second
graphic, Import graphics. It says, we're going to place it on the back and move it
around exactly to fit. I don't think that I trimmed my actual file that
I'm placing here exactly correct
because the window is too close to the bottom. And we talked about that
in a previous video. But that's okay for this
demonstration, It's fine. You can purchase a
Photoshop mock on places like Invado Elements and possibly even
create a Fabrica, where somebody created
a pouch that has a smart object in it
to place the file. Whatever you find that works
for you and you can afford, that's what you should do. But I'm just showing you this
method that I use a lot. When you're happy with
how it is placed, we want to just take a quick PNG file or
you can render it. Rendering takes a long time, but it makes maybe
a better file. But for me, I just do the PNG and this is
what it looks like. I thank you for
taking my course and I hope to see you in
my future courses.
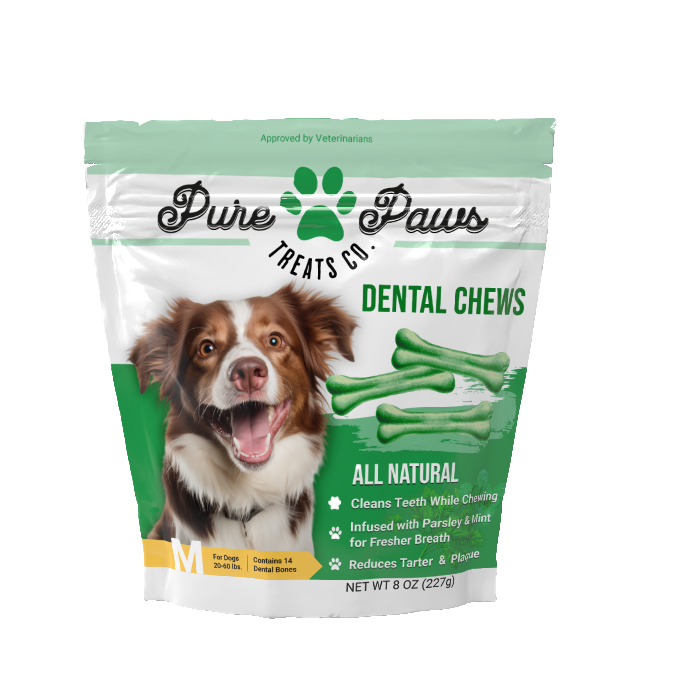
7. Chat GPT: Chat PT is a wonderful way to
create a beef for yourself, to make a portfolio
item for our project. Today for my course, I asked Chat GPT to give
me 20 product names and 20 company names. And then when I settled
on a product and a name that it helped
me come up with, I went with the Bliss Balls. Then it gave me a recipe
for Bliss balls and it gave me the nutritional facts
for the bliss balls. So I pretty much had everything I needed to create my brief. You can even ask Chat GPT to write you something friendly, like a little bit of a quote
to put on the bag itself. I also did this for my pure
Paws bags that you see here. So in the future, use Chat GPT to help you
create your portfolio items.
 Karen Ciocca, Graphic Designer, Illustrator, Fine Artist