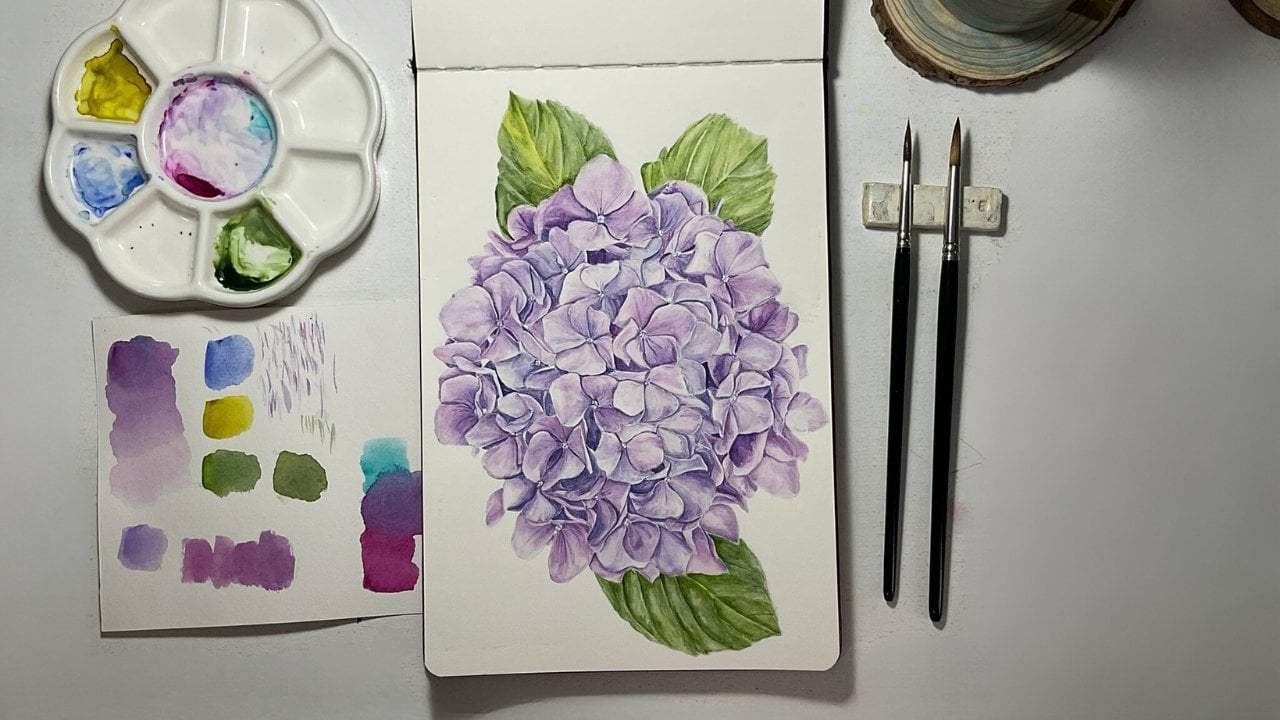
Transcripts
1. Class Introduction & Expectation: Watercolor realistic subjects
can be intimidating. But when you learn the techniques
and the brush strokes, you'll get more confident in
painting realistic subjects. You'll realize that painting realistic subjects is
not very intimidating. The brush strokes and the
techniques are repetitive, but you need patients to
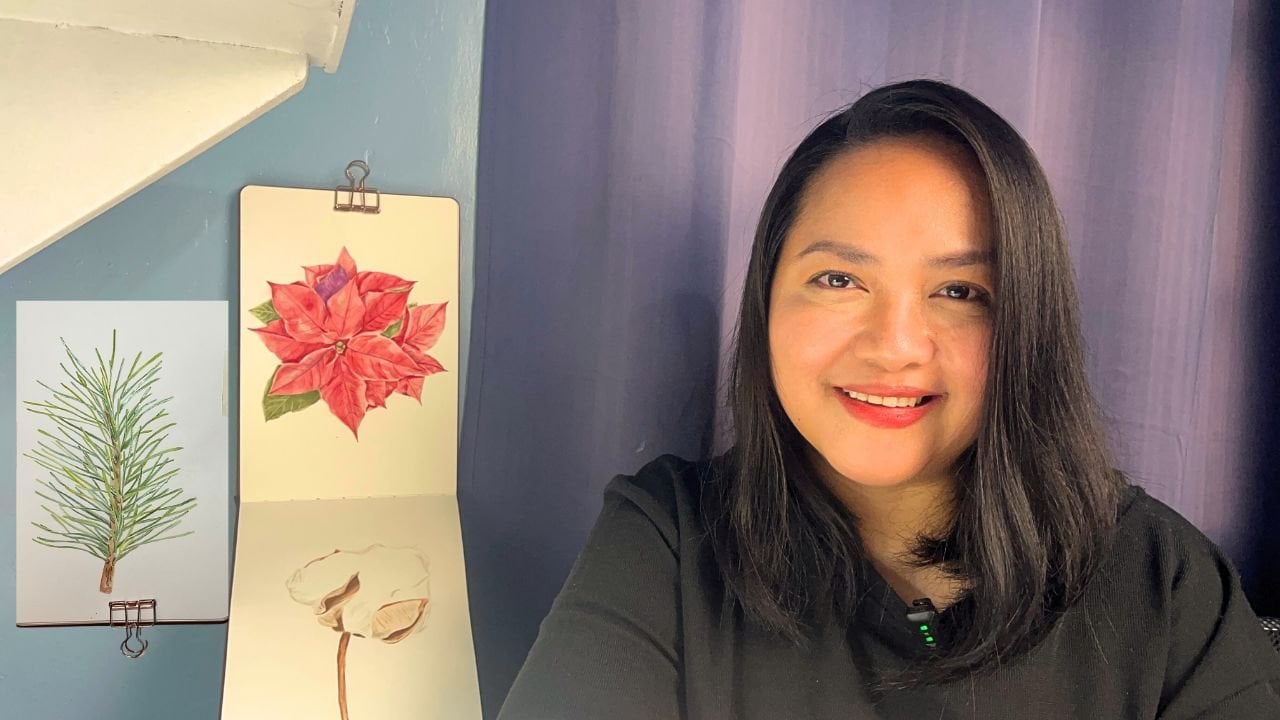
achieve good results. Hi, I'm Bianca. I am a watercolor artist
from the Philippines, and been painting
watercolor since 2019. This class is for beginners to intermit it in
watercolor painting. For those who would
like to switch from painting loose to realistic, and for those who paint
with other mediums, but would like to
try watercolors. I will guide you through
the process step by step from the materials, transferring the drawing to your paper, watercolor
consistency, brush strokes, right in
shadows, negative painting, and how you can
transform a drawing into a realistic and three
dimensional watercolor painting. These class has two projects. First is just one apple
with a background, and second is with six
apples with a background, if you want more challenge. I'm excited to see your
versions of the apples. So let's start
with art supplies.
2. What you will need: Here are the art supplies
needed in this class. I'm using Bau Hong
Academy, watercolor paper. This is 300 GSM, 100% cotton. I have a loose watercolor
sheet that is seven by 10 ". If you are new to watercolors, this is the brand
I can recommend. This is a student grade paper, but it's 100% cotton paper, and it's 300 GSM, which can hold a good
amount of water. This is more affordable than
the arch, watercolor paper. Either of the two
papers are good. If you can't find this brand, find any that says 100% cotton. You may also use a
watercolor block like this. It's also from Bau Hong Academy. This paper is glued
on all sides, and there's a small
area at the top, where you can take off
the paper after painting. Next, I have two
small jars of water. One is for washing the
brushes while painting, and the other is for
wetting the paper. That should be always clean. Next, I have a diluted
liquid dish washing soap. I use this whenever I
apply masking fluid. I have a masking fluid. This is from graphic gum. You may use any masking
fluid you have. I have a masking tape
for taping my paper. I have here a ceramic
mixing palette. You may use any mixing
palette you have available. Next is watercolors. This is from different brands. I'll use only a few
colors and I'll tellor, which colors to use
for the class project, but it's important to
have the primary colors. I have a flat brush
to what my paper, especially in painting
the background. Also have an old
synthetic round brush from Princeton Select. I use this to apply mask fluid. I have a Princeton Neptune
round brush size eight. This can hold a lot of water, and I use this to
wet the apples. I have a mix of synthetic and natural
fiber round brushes. Sizes four and seven. These brushes are great
for painting details, especially this size four, which has a very pointed tip. I also have a four H pencil and needed eraser four drawing. This is a rubber
cement pickup or rubber eraser to take
off the masking fluid. I always have a towel
beside me whenever I paint, or you could use a paper
towel or tissue paper. I have a leaf blade
that I used to remove the paper from
the watercolor block, or you may use any flat
thing like this ruler. I have a art board
where I take my paper, and I will also
use a light pad to transfer my join to
my watercolor paper. I also provided
printable outlines, one apple four Project one and six apples
for project two. You could check the projects
and resource section for the list of art supplies
and the printable outlines.
3. What is watercolor consistency: I Welcome back to my
class in this lesson, we'll be talking about
watercolor consistency. Okay, so I will be using
Winsor red for this exercise. I pretty we think
this is my winds red. Already prepared just
a small amount of my water here of my winsor red. As you can see, this is quickly
moving into my palette. This is t consistency.
All right. If it's quickly
moving to your palte, it's very light to wash. It is t consistency. Okay. There. It's easily moving. I will just put this
on my paper here. You can also rase your
brush or deeper brush to your water and get more. It will be depends on how light your water color would be, or if you would
like to get pink, and you don't have pink. You can also use your
red, water it down. That is the beauty
of water colors. You can just add water to have lighter value
of your paint. And then You will also get a light wash.
That is consistency. I won't add water here anymore, but I will get more paint. See from lighter
red, it's darker. It is still consistency. I will get a little
bit more of red. Here. For next consistency, it
would be coffee consistency. For the coffee consistency, it is still moving
to your palette, but not as quickly as
the ta consistency. This is coffee.
It moves quickly, but it's darker than
the previous one. I will add this to here, I will just watch it. There you go. Again, this is the
tea consistency. This is the coffee consistency. It still moves to my palette. Here, for the tea consistency. As you can see, it's very light, it moves quickly to your
palette, and it's very light. You can water it
down as much as you want to depends on
what you're painting. Next would be milk consistency. I will get more
of my paint here. This is the winds are red, and I will add this to my
mixing palette, the same. The same pale I did not mix
another one is the same. I just added more paint. As you can see, moving
around my palette, red is not moving that
much in my palette. And it's thicker consistency. This is milk consistency. If you think of the drinks, The tea is very light. Coffee is thicker.
When you go to milk, it's more of creamy. Okay. Talking about creamy. Let's go to the
cream consistency. It did not wash my brush, but I'm getting
more of my paint. Add it here on my palette. If you could see it's
not moving that much as well and thick, darker. I added here. As you can see,
there's already difference. Adding this color to this one, this is more darker than the
previous ones even here. Next, we have the
butter consistency. If you see butter
even in the kitchen, it's more of like
creamy texture. It's more of thick. Most of the time, if I
do butter consistency, I do not already mix it
on my mixing palette. It doesn't move on
my palette anymore. It's very thick and creamy. I did not wash my brush because if I wash my brush,
there would be water. I get the paint directly
from my palette. I will put the paint here. You can see this is butter. If you see some
unpainted part here, it means that my paint is
in the butter consistency, it's, it's getting dry. There you go. This is
helpful if you are painting, for example, sand,
that is butter. For this class, we
will be doing from t, coffee, milk, and cream. I use butter
consistency sometimes. But as for beginners
as I can see, most of the beginners I can see, they stick to tea to
coffee consistency. You can use to
cream consistency. Do not be afraid to add
more pigment to your paint. Do not water down too
much if you like to paint with with saturated color. For saturation, that will be talking about
later on after this lesson.
4. What are values in watercolor: Welcome back to M class. Now we are going to
talk about values. Okay. Earlier, we talked about the watercolor consistency here. Now this we'll
talk about values. As you saw me earlier,
I painted this. I water it down and it get me a light or pink color of my red. Okay. This lighter value, this is darker value. Okay. And as you get to butter
consistency, even the cream, that is already high saturation
and also darker value. Okay. What I like about water colors is that you
can just water this down, and then you can get lighter
value of your paint. So I wash my brush earlier. But I will get more of
I will still rinse it. I will get more of the red here, and I will put it here. Okay. So Here, as for
milk consistency earlier, I will just add water, I will water it that
rains little more and add more water as I paint. What I like about water
colors is that you can in it as long as you ranse your brush
or add water. Add water. You just need to add water. You can go up to the
lightest color of your water color as
long as you add water. Now, if you would like to
add saturation or more red, what I did on my
watercolor paintings as I will show you on the Project one and Project two of my class, is that I did not just add red. I did not use the
butter consistency. I cream consistency, milk to cream consistency
of my water colors. But like for the cast shadows, we do not add black or we do not use black as for the
shadows of the apples. What I do is you will get a darker shade of your
color of your red, for example, for the apple. Use the ber consistency, but it will take you
time to paint it. But if you would like to get
more darker value of red, you can do two things. You can get a
darker value of red as this is perm serine crimson. You can use any darker value of your red of the same
color and mix it, and you will get a darker shade. You may also mix
with other colors, as long as you will
get a darker shade of red that is darker than the natural color of the
red that you are painting. Now, as per the color wheel, if you study the color wheel, you may get a little
amount of green. We still have green
mix here from earlier. As you can see, when I added the green the red here on
the green, it gets darker. Attle bit of green, you can add it to your paint, and as you can see it got
darker. Okay. There you go. As for the painting, we do
not use black or I do not add black or neutrotant, or paints gray to make
my colors darker. I use complimentary colors or a darker value of my colors. In that way, when you
add a task shadow, it won't look like it's black. Our eyes will
perceive it as black, but the truth is you use a darker shade of
the same color. So that is for the values, and I'll see you on
my next question.
5. How to transfer drawing to watercolor paper: In this lesson, I
will show you how to transfer an outlide drawing
to the watercolor block, since we cannot use a light pad on this
because it's a block. So what you can do if you
have the outline drawing, I will get here another cancel. This is a student cancel
that my son uses in school. I will set this aside first. And what I will do is I will scrabble the back
first is like I am going to draw I will put
graphite on the back of it. So this is the back of
the outline drawing. I will scribble and make sure
that this is already dark. So in transfer the drawing, if you're going to scrabble, what you need is a dark pencil that do not smudge as well. So just scribble the drawing. Make sure that you darken
all of the outline or Make sure that
it is dark enough, but also the pencil that you be using won't smudge
on your paper. Because if it does, if you use B pencils, the B pencils are actually soft, then what will happen is the graphite will
smudge on your paper, and we don't want that. We just want to transfer
the rowing without a mess. You can use an HB pencil. This is among number
one pencil that my son uses in
school to make sure that it is dark and
dark enough that you can transfer the graphic
to your watercolor paper. I do not use any carbon
paper because that will also a carbon to the paper that is hard to remove
and I like that. Okay. Now I'm done scribbling
on the back of the apply. What I will do is I will put
it on my watercolor paper. I will also use a
masking pap so that. It will avoid the paper to move around while
I'm transferring. I will fold this area. Before I will
transfer the drawing. My paper won't move. We don't want to move
your paper whenever you are working because it
will ruin the transfer. Here we go. I will just put
the tape just one side here. I will just leave
this open so that I can see so I can see it. There we go. I will
just put this there, I just secure this. So that it won't move that much. My paper is A four size. That's why and I am
using a small paper. You could use any size of the watercolor
paper that you have. You don't have to
use the same size, but if you are starting and this size is comfortable,
that would be fine. Be when I was a beginner, A five size is comfortable
size to paint. So and that's why I
still have defect sides. Okay. Now what I will do, I will use dis pencil to outline just slowly. I make sure that I will transfer
the outline to my paper. When you clip it, you can see that there
is already pencil lines. There it's light, it's fine. But what you can do later is darken it if it's
too light for you. I will just I will
finish transferring the and I'll exp to
you the next process. Okay. Now, I'm done
transferring the drawing. So when I look at the so here is transfer.
It's very light. Okay. So I will just remove
this up from drawing. I will set aside and this one. So I have here I have here a four H pencil
that I normally use. So what I will do, I will
darken the pencil lines. So it will be easy for me
to pit and see the lines. Okay. Okay, so I finish darkening
the pass the lines, so it will be easy for me to on top of it and I can see
the lines and this time. H
6. How to transfer drawing using a light pad: Oh Welcome back to my
class in this lesson. I will show you how to
transfer the outline owing to my watercolor paper
using a light pad. Okay. So this outline owing is in the projects
and sce section, so be sure to check it out. What I do is before taping the watercolor
paper to my artboard, I make sure that the
outline owing has been re transferred or traced
to my watercolor paper. So this is my light pad. I will put the
outline owing on top, and I make sure to use the tape and tape
my my drawing down. I do not put tapes
on all of the sides, just on both sides and
that would be fine. Now, I make sure also that my paper is also aligned
to my outline drawing. I will plug my light pad first, and then I make sure that I
can see the outline drawing. I will turn off the lights
so that I can see clearly. Before chasing, I also make sure that my
paper is aligned. That's also I put also
tape on two sides. The same on the outline showing. You you don't have to put
tapes on all of the sides. It's just small tape because you're going
to remove it anyway, and then you will need to tape your paper to your artboard. There it is. I turned off then, I will chase the outline
showing using a four H pencil. I will turn off the other light and I will speed
it up the process. I I.
7. How to use a watercolor block: This is the watercolor block. This is Balcom Academy, s with 100% court. This size is seven by 4.9 ", as you can see, this is
glued on four sides. There you go. There's a small
part there that is open so that you can remove the
paper after the paint. And later, after
finishing the painting, I will also show you how to remove the paper from the block. So first, what we are going to do is we will paint
first on top of it. You don't have to
remove the paper yet. You need to paint on top of it. You don't have to take it because it's already
stretch out for you. So this is a sle flee that you don't have
to take your paper. It's all stretch out for you. And you don't have to worry about damaging the
paper with your tape. So if you're having
a hard time looking for a tape that you could
use for watercolors, you can also use a
watercolor block. Well, anyway this academy
is student grade paper. There's also an artist
grade of bac or you could also use watercolor block, whichever that is
suitable for your budget. If you are still studying
or learning how to paint, this one is really
good because this is already 100% cotton.
8. Watercolor Techniques Part 1: Welcome back to my
class in this lesson, we will be painting a leaf. And this is also practice for our watercolor techniques
and brush strokes. Okay. The first one would
be wet on wet technique. It is also the reason that I always have two jars of water. One would be for
cleaning our brushes, arranging, and one would
be for wet on wet. Okay. I will also have this outline drawing
on our project section so that you can also trace or you can draw free
hand of this leaf. This is one of the leaves
that will be painting on the second project
that has six apples. Now, as we talk
about wet on wet, and we would need to know how much wet should
our paper be. Okay. Also, first
washes would be always painting very lightly
in t to coffee consistency. Okay, so I have here T
to coffee consistency of my green mix and French ultramarine blue
for under painting. I'm wetting this brush. This is my bigger brush. I will be painting this
one first, this area. First, we need to know how
wet our paper should be. I will be painting
on this area first, so I will wet it with my water. Okay. When you do wet on wet, as you can see, I
remove the excess water here because it has to water. You would know if it's too water if there is bottles
creating on your paper. It should be just enough shine. Make sure that your paper absorb the water first before
you apply the paint. Here, I'm letting the
paper absorb the water. And I'll show you this in
different angles so you can see how wet is my paper. Now in this angle,
you should be able to see my paper and how wet it is. As you can see, there is
no puddling creating, I'm letting the paper
absorb the water. It is shiny and there's
no puddles creating. If there are puddles
on your paper, it has too much water, your paper won't be able to
absorb the paint as well. If I'm going to drop
my inconsistency, I will be using blue. Because let's say
this is the part of the leaf that as you
can see it's folded, but this is the part
of the leaf that is on the top and this is
the darker leaf. You can see my paint flows very easily to my paper,
especially here. When I added the paint,
it flows easily. There we go. As Brush
Strokes As gets, I painted this following
the shape of my leave. This is dry. I will
just rains it. If this happens that there is a dry that there is
this you painted here, and it looks like it will
dry with harsh edges. I will just get a damp brush, this is not too wet.
It's just damp. I will just soften it. Another technique that
you can also do in your watercolor
painting is smoothing or softening your edges. I also do that in
most of my paintings. Painting on the
leaf at the bottom. This is the bottom leaf. Now, this leaf appears to be lighter than this
one that is on top. I will just soften
this or smoothing it. So what I do with this is
I paint also very lightly. Then I will be
following the shape. If you do not follow the
shape of your subject, what will happen is that, your painting will look flat, and we do not want
that on our paintings. I putting water on this area, I will be painting on wet. For our paintings,
the first wash, will be always wet on wet. That's what I do.
Because on wet on wet, you can easily edit or
you can make changes, you can lift the paint easily. While it's wet. Once your paint has been
dried on your paper, it will be very difficult
to lift up the colors, especially if you are using a staining color
like wins are red, that is very staining and it's very difficult to
correct your mistakes. Aside from that, if you are
going to do wet on wet, especially on the first wash, always use only tea to
coffee consistency only. And we'll be talking
about that later. It means that your
paper should be when I say tea to
coffee consistency, your paint should be moving
very quickly on your palette. Here, as you can see, I painted this just water. I let the paper
absorb the water. My water is not
puddling on my paper. It's just enough. There will
be just, but no puddles. I will be painting
the area with blue. I will just follow the shape
of my leaf and here as well. And here. I also
do the same here. I will softening this
or smoothing this. I spread the color
going up there. I will lease my brush because
I will be adding green. Every time I rinse my brush, I also remove excess
water on my towel here. I will add green
here As you can see, I follow the shape of the leave. Because if you
paint up and down, I love to write your
painting will look flat. This area is still. I should have waited for
it to dry, but it's fine. I can paint the green here. This time it's damp. This happens when
your paper is damp. Your water color spreads
a little on your paper, it doesn't move
around that much. But I will just let this dry first before I apply
the second layer. I'll just lease my brush. Okay. The next technique that I will be talking about
here is glazing. Okay? This is a mistake that
I did earlier that I put green while my painting is
still wet on this area, I should have let it dry. Because if that happens, as you can see it blends the green and the blue
here, but that's okay. This is a mistake that
you should not do. I felt a little bit excited, but I will let this dry. Okay. Once it's dry, I will paint with a
very light also of green with t consistency
of my green mix here. Aside from that, this is
what we call glazing. Glazing, it means that layer
your colors very lightly. So like this, I painted te
consistency, what on what? And then I let it dry. And then I will paint a thin
layer of paint on top of it. That is glazing. Then you will let it dry, and then you can paint another
thing thin layer again. That is glazing. I always do that also on
my watercolor paintings. I do glazing for like three to four layers
of my painting, that will be depends on the
painting that I am doing. Okay, so now this area is dry. I can do glazing now here. All right, so I will
rewet this area. I will be doing
this area by area. Of the sleeve. For this, I'll just
leave it like that. I will just leave it there. But as you can see, if you
painted wet on dry right away, it would be difficult to
remove or lift up the color. Okay. That's why I always
do wet on wet first. I showed you that so you
could see that it would be difficult to
paint wet on dry. On the first wash, I
always do wet on wet. You can see there are
thin lines there. I will skip the thin
line and I will just paint on beside it. Again, following the shape. As you can see is just I'm doing an upper S stroke, like that. I curve my brush
stroke. There you go. Here I will be smoothing it. This is another technique
smoothening or softening. At the same time, I remove
the excess water because if you smoothen this,
it's also lifting. It leaves the color there, but the paint goes
to your brush. We need to clean your
brush. I lease it. Now, this brush is wet. I will still use this bruh. This is a bigger brush and paint the next part of my leaf. I skip the lines there, or that would be the veins. I cut my green
here and painting. This, as you can see, I do not just go up and
down or just diagonal. I curve my brush. Your brush strokes matter. Okay. There you go. I made a mistake here. I accidentally put
my brush here, so I will just soften
it or smoothing it. Softening your brush strokes is also helpful
with your painting. Most of the time, I correct
my brush strokes with that. There we go. I'm just
painting with water. Secrecy is just
shiny, not too wet. Then I will just brush it
again. Following the shape. Remember to follow the
shape of your subject. Apple is round. When you go paint the apples, you should also paint and curve. I'll show you that also later. Here, which just move my paint. Then there's a lot of water here that end and harsh edge here. This brush has too much water, so I will remove the
excess water, you paint, and then I will soften
this. There you go. I just drag the paint
that is left on my paper, go into the edge. There you go. So just to recap, the techniques that
we did wet on wet. Remember to wet the paper first, do not let puddles
on your paper. Let the paper absorb
your water first. Next technique is glazing, that will be painting, light wash, and then
let it dry and then paint another layer of
another thin layer. Also, we talk about smoothing or softening your brush strokes. And as for the brush strokes, we follow the shape by
curving our brush strokes, not rushing left to
right or up and down. So avoid that. Follow the shape of your leaf. I will let this dry, and I will talk about later
on, negative painting.
9. Watercolor Techniques Part 2: Okay. I'm still waiting for
this part of the leaf to dry. But what I will do is I will
glaze this area with green. So I we'll glaze it
with doing wet on wet. Okay. I will also
start here so I can paint green the tip
of the leaf here. For the first layers, again, I will just do tea to
coffee consistency. That means that I have a
lot of water than my paint. My first wash would be first two layers
would be very light. Then on the third layer, that is the time that I will
start building up my colors. Very go. So you can see, just follow
the shape of your thinking. I just follow the
shape of my leaf. Painting these
parts of the leaf. I will do it with my green, but this time, I will
do negative painting. When we say negative painting, it means that we are
painting around. We'll be painting
around the veins. We will be avoiding the veins. I will just get my
green, green mix. This is a shade of green. I will start here. I will be painting here. I'll be doing this wet on wet. As you can see,
just wet this area. I did not wet the entire leaf. This area. And painting it
again with my darker shade, the same following
the shape of my leaf. But this time I will be avoiding this area the veins area. There Okay. I will add more dark green here. Okay. Now, I will
get this big brush. I will soften this part. At the same time, I
will use this brush to soften this part. So it will have a good
smooth transition of the paint and water there. Just make sure that
when you soften and smoothen your brush strokes, it is just damp and
not too much water. Because if it has
too much water, it will create blooms on
your watercolor painting. Less if that is what
you intend to do. I do only blooms. Whenever I paint a background. Here, going to this area, I'm wetting this area
and I avoided the veins. I let my paper absorb
the water first, brushing the water to
this part of the leave. I did not touch anything on
the right or on the left. I'm letting this on the
left dry first time I'm getting from the
lighter part of my mix. Be ping from here
going up. There we go. As you can see, I curve my
brush stroke, like this. From left to right here and
then going on this stroke. It's like an S stroke. There. In here, I will
just soften this. S I remove the excess,
grain my brush, remove the excess water, and then soften
it, softening it. There we go. There. Here, as you can see,
there's already a vein here, because for the leaves, most of the time, if
you look at the leaves, the veins are lighter
than the actual leave. For some artists who
paints loose florals. When they do the
veins on the leaves, they use darker color. But when you look at
the reference photos and you look into the leaves, the actual leaf, if you
have any plants around you, check on the leaves, and you will see that
most of the leaves has lighter color on their
veins, not darker veins. So that is what I am doing now. Next, I will be painting this area. I will
be finishing this. Again, I will paint negatively. It means that I
will paint around the veins here and as
for my brush stroke. I'm painting like
an stroke here. Following the shape
of my subject. I will keep this part. I will get a damp
brush, I will soften. And soften here. I will just continue
painting the leaf. As you can see,
the brush strokes and the techniques
is just repetitive. That is what I like in
painting realistic subjects. You don't have to master specific brush
stroke or whatever. The same technique
and brush strokes. You will be using that on all of your paintings is just going to repeat those brush
strokes and techniques. Then very light, then
following the shape of my leave. There we go. I will just leave
it like that and I will just softening here. I will also soften this
area. There we go. Now, as I can see,
there are more paint here than on these veins. So I accidentally added paint here because the veins
here are very thin. Okay. So my brush is too wet. I will just remove
the excess water, make sure that you are
using a damp brush. Now we'll be lifting. So this is lifting. You use a damp brush, not wet, but damp. And then lift up the color. When you lift the
color, the paint or the pit will
go to your brush, so we need to clean it again. It would be very helpful if
you are using a stiff brush. For example, Princeton
snap or Princeton select, they are very stiff, and it would be easy
to lift up the color. This brush is not very stiff. Okay. So lifting. When you lift, it means that you are getting the pat
out of your paper. Next, we'll be talking
about wet on dry.
10. Watercolor Techniques Part 3: Okay, now we are on the
third layer of the leaves. So this time, I will be
talking about wet and dry. Wet and dry, it simply means
that you will put wet paint. Of course, it is watercolor. Your paint is wet, and you will be
painting on dry paper. For other artists, they use
wet on dry the first wash, but I don't, and
most artists don't because when you do
wet on dry right away, it will be difficult
to lift up the paint, especially if you are
using staining colors, that will be difficult to
lift up and difficult to correct once your paint has
been put on your paper, and I showed that to
you earlier when I added a small part
of green here. Now, for wet on dry, as for my brush, I do
not use very wet brush. Okay. It's just damp and
I will get my green here. I will do wet on dry on
just here on this area. First, If you could
see it. All right. If this happens, it means
that your brush is too dry. Okay. I do this for
some of the details. Also, it will be helpful if you are going
to use this, for example, if you're painting a
landscape and the sand, you can also do this technique. This is a dry brush technique. Okay. But I'm not
going to do dry brush. I will be just doing wet on dry. So it means at my
brush, it's too dry. So I wet my brush. And then I will paint
here mostly on this area. This is a big leaf. And when I do this on the apples that I
painted, it's small. There I was able to
paint it very nicely, but this is a big leaf. For this, I will just soften
or smooth in this area. Remember, it brush
should be damp and not to wet when you do lift softening or
smoothing your brush. As you can see when you
smooth in your brush stroke. Again, smoothing. This
is how you do smooth in. I showed you different
ways to smooth in and different scenarios to
smooth in your brushes. That's why I like to finish this leaf so that you could
see how I do smoothing, how I do lifting, and finish the painting. I would like to have
darker green in this part. Okay. Now, I will do wet on dry on some
part of the leaves. For example, I would like to add or define the shape
of the veins here, I will do wet on dry. As you can see, now, I'm using the tip of my brush, and this is I'm using fine
brush stroke that I use only the tip of my
brush and painting very very thin strokes going up. Again, following the shape. Of my leave. At the same time, I am going to do negative
painting because I will leave a space
here for the veins, and then I will paint negative. With with what on dry and
using my tip of my brush. Tip of my brush. There
we go. W on dry. Here, I am actually painting the details,
almost the details. I use saturated or tcsistency of my grain
and also on dry here. Okay. It's my brush
is already too dry. I will get more pigment
later because I ran out. There as you can see
my brush strokes. I'm just using the
tip of my brush. It will be helpful
if you are using a brush like this that
has a very pointy tip, but is synthetic brush. Now, this time I'm painting. The tip of my brush, doing the fine lines on on I'm
painting the details. And will be adding more here. Here again, negative painting. As you can see, if once I added darker color on this area, the lighter color
here that I did not paint that I avoided
because it is the veins, it becomes more visible. That is and that is the reason
I do negative painting. Here. If you could
see as lowly as I paint with darker color here. It creates a shape of the leaf. Here, I will just
soften this part. You may do the same brush
strokes in different direction. That will be depends
on the shape of what you are painting. So just follow the shape. Using the tip of my brush here. We can do this fine
tip brush strokes in different directions. You can practice on the paper
just by just by doing this, using the tip of your brush. You could do this on
different directions. You can do an S, or
you can do round, it will be depends on the
subject that you're painting. That's why in this
exercise in this lesson, I would like to paint this leaf because to show you how I
apply the brush strokes. Not only the brush strokes here. And then I will smooth in this. I will continue I will
finish this painting, but I will be on speeded up mode because
I was just doing the same brush strokes. Okay. So this is
our finished leaf. As you can see that
there is already life shape and form
on the leaf after we painted this with fine
tip brush strokes also following the
shape of the leaf. As you can see, here I did not add more paint here
and also here. That also helped
the leaf to show that there is shape
and form on the leaf. And we also do negative
painting also on the veins. LC on my next lesson.
11. Let's practice painting an apple Part 1: Welcome back to M class. Earlier, we talked about values. We talk about also watercolor techniques
and also brush strokes. Now we're going to apply those techniques to
practice painting an apple. So I have here an apple. Aside from that, we'll
be talking about light and shadow in
painting this apple. If you have a light source, the opposite would be,
there would be shadow. Like what I painted
here on the leaf, my source of light would
be at the top, mostly, but I have also source
of light here or directly from from the top here. So I have my light source there. If you are going to paint
a shadow, you can see, just looking at my hand, I have shadow here because I have light
source coming from here. So the light source from here, it create shadow or
cast shadow here. I also have three more
source of lights. That will be from the right,
that will be from here, and also the ceiling. We'll be focusing on the
cast shadow. A right? And how you're going to apply
it on painting the apple. Here, I still have my mix
of blue and red here. We create a natural
shadow of the painting. I paint the shadows first
using an underlying colors. Let's imagine that
the light source of our apple would be
coming from here. The light source
coming from here and also directly from above. Let's see there would be
sunlight directly here. The shadows would be
the opposite would be here in this area. For example, it's a
daytime and you're out. Most of the shadows
would be here. This shadow there
would be shadows here because this is like
going inside the apple. There will be
shadows here because this is from the top going down. There would be shadow here. For example, there would be a
leaf that is folded behind. You will also see this in our projects that is a
leaf behind the apple. You will see there. You
will see a leaf there. There would be shadows here as well because this
leaf is behind. What I do when I'm
painting the shadows, I paint it with blue first. I will have a t
consistency of blue here. Of course, I will be painting this apple first with shadows. Is not supposed to
wet the entire thing, but there would be
shadows in this area. Let's say, I won't
paint the entire thing. But I will let the
paper absorb the water. Remember as we talked
about earlier, Then I will get my t
consistency of my blue here. This is a t consistency
of my blue, it should not be too dark because if that
will be too dark, it will show us darker
color later on. I'll just remove
the excess water. I will add the blue here. This is my blue and
I will add here. Here I forgot to add blue here. If you've added
darker color of blue, your shadow would
be beer as well. But for the shadows, I use only tea to coffee
consistency and very light wash. Here I will just soften this. Let's say I will add the
dark blue here because this leaf is behind an apple. There. There will be shadows here. Okay there. I will just let this dry. My blue is almost dry. But there are some also apple
that is like light red, and sometimes there would
be like yellow underneath. So I will add some yellow here. And also, I will show you how to paint the highlights as well. So I will have yellow on
this part of the apple. Course, let the paper
absorb the water. Remove the excess water there. Then I will add
some yellow here. As you can see, as we
talked about earlier, I painted following the shape. There you go. Let this dry completely
and on the second layer, I will be painting red.
12. Let's practice painting an apple Part 2: I Okay. My apple here is dry. Now, what I'm going to do
is I will paint this again, wet on wet with the tea consistency of this
red that I mixed earlier. Okay, so again, this
is tea consistency. It might be darker than
the te consistency that I made here because it is the
lightest t that I created. But this is still tacsistency. As you can see,
the paint is still moving around quickly
on my palette. It's just the value is more like here just to show you
as an example earlier. The second layer of the apple, I will be painting
this wet on wet. I will be painting it
using this big brush, as you can see, I follow
the shape of my apple. I will be painting
on this area first. Of course, as we
talked about earlier, when we do wet on wet, we are going to let the
paper absorb the water, avoiding puddles, so you can remove excess
water from the brush. I will avoid the leaf
here on my right. Make sure that the
apple is wet enough. Now I will use and we
get my paint here, and I will paint following
the shape of the apple. As you can see, I did not paint up and down
or left height. I follow the shape. Here, it's going down, so I will paint this
going here and here, and you don't want your apple
to look like a ball here. This will and with the
harsh edge, so I soften it. Now, I'm going to move my water here since
this part is drying. Then I will add pink here, so S. Now I am on the right side and I follow
the shape of the apple. I will just paint this
with a few layers because this is just a sample
and practice of the apple. Here it should be
going down here. Here, it should be left
from going to left, following the shape
of the apple. It's dry here, so
I ret this area just to make sure that I have a good blend of
water color here. As now, we are doing glazing. We are painting another layer, very thin of the apple. Take consistency and here. This is dry. I will soften this edge
before it will dry. For some part, I will
just fix it later. There we go. I won't paint on the first on the right side
because it's still. Softening here. Okay. Now I will let this
apple to dry and later I will be painting it with
a darker value of red. This apple is totally dry. So the next thing I will do
is I will mix first my red. So we used earlier a ta
consistency on this. Now I will be preparing
my color here, and I will make a milk
consistency of my red. Okay. Sorry. This is coffee
consistency, I will add more. Okay. Just to check, if
the color is running Fast. If it is, then I will need
to add more red. So this is already
in milk consistency. So we'll be going to this, okay? Just to check. I will paint here. My brush is dry. There you go. So here, it's saturated, more red color. So for the third layer, I will be wetting this
again because I will be painting this wet
on wet one more time. Okay. So beaches within this area. Let's say also that there is a shine on our apple that
is touched by light, so we have a highlight. With that, for highlight. What I do is I avoid painting
the highlight too much. That's why my first
two layers are light in t consistency
as much as possible. T or T to coffee consistency, depends on what I am painting. So I make sure that
the whole apple is wet and let the paper
absorb the water. Now I will get my brush here. We'll get my red. I will start painting
here from the top. There going round. Let's say there is a highlight
just like in the middle. What I do is I avoid
painting that area. I will continue here. If I will paint here, I will just drag the paint
whatever left in my brush. But here I am just painting
very lightly here. Whatever left on my brush. Here I am just using
the tip of my brush. Sometimes I just
leave it unpainted. Depends on what I am painting. Here my right side is drawing. I'm painting quickly here. This one, this part
is already dry. I suggest that I rewet this. If you are living
in a place that is made like the
Philippines where well, you need to rewet your paper. That's ok. Here. There we go. Again, following
the shape of our apple, this area is dry. There you go. As you can see, as we
painted this area, it's darker than the ones
that we have yellow. Here I will be starting
to paint the top here, and I will be starting to
build the color on our layer. When you add
contrast or shadows, more saturated color, your painting will
start to look lively. That is the time that you will see depth on your
watercolor paint. There we go, I will
just soften this. This is basically
the third layer and I will let this dry.
13. Let's practice painting an apple Part 3: Okay. Now fourth layer. Okay. So I will be still using milk consistency
of the watercolor. I will still pre wet my apple. So this is the fourth layer
of this apple practice. I will just wet the
left first because my paper is drying quickly
since I live in humid country, the Philippines and my
paper is drying quickly. I will add more red here. As you can see, this is
the top of the apple. What I do is I paint
from the direction. This is the center top that
there is a hole there. There you go. I won't leave that dry with harsh
edge, also this. Now I will wet this area. Now I'm avoiding the highlights and I will leave that unpainted. Now, this part of the apple, Okay. Now I'm going to rewet this
area softening. There you go. Then here instead of
going on circle here, I will just go down. Now I'm using the
tip of my brush and whatever left on my brush. Most of the apples have
also shadows here. I will be working
on this later on. I am softening,
smoothing this area. When I so I accidentally brushed that area with a
clea very light red, so it's easy to erase. Now, I will be moving on to
the right side of the apple. We're t this area. On the first wash, that
is the wash that I let my paper absorb that much, like I actually wet
my first layer. If you noticed earlier, that I rewet my paper multiple
times for the next layers. If that will be second,
third, fourth layer, you can just rewet your paper, even just one time,
and that's fine. We just continue here. And then I'm going to
add more of red here, also in this part. I'm painting with the
belly of my brush, that I press my brush harder so that my brush will release the paint that is on its belly. Here, I am going
to pa going there. If you see direction
of my brush changes, Because if I paint
continuously round, my apple will look like a
ball and I don't want that. I left this part painted
on the first layer, but I will be working
on that leaf later. Whatever paint left on my brush, I will just continue
painting near the center, near the highlights,
whatever left on my brush. It's getting dry. That's why it creates
that effect. Okay. Here, I will soften it. Remember, if you're going to
soften your brush strokes, your brush it be damp
and not too wet, or else it will create blooms. Unless if that is what
you're trying to do. Now, while waiting
for the apple to dry, I'm going to get more red here. This time I will be doing a
cream consistency of my red. It is saturated. The red is st than earlier. My apple is getting dry for now. Then I will just paint here. I will start here. And I will be painting more
of the apple here. Okay. Here, I will paint more of going here. This part is somehow damp. I will soften this part
and paint like that. I will soften this area. Still paper is getting here because I forgot
to move my paint here. I focus on the top. Now here. More saturated
red, there you go. And softening this area, and rewetting the other
parts of the apple. I'll be continuing painting
here and here as well. Moving on to the
center of the apple, I ret this area. Okay. There we go. We have a high light
there that we will avoid. But whatever left in my brush, I just dry it there, soften the to raise there. Whatever left in my brush, I'm dragging there near
the center of the apple. Let's say that our
apple has lights or a light source in front of it directly in the
middle, that's it. I for your practice, you could put your
highlights anywhere, right or you could look for the reference photo on
the project section, and you could practice
any of those apples, any one of those six. But I am just painting
now from my imagination. Okay. Here I will
add what red here, building the colors
as you can see. Now, the blue is gone. You cannot see
that blue anymore. Actually even the third layer. But here I will just
paint the apple here. This part. I will just drag my color, whatever left or my
brush to this area because there is a highlight here and we don't
want to disturb that. We don't want to add more
colors there. There we go.
14. Let's practice painting an apple Part 4: Now on the last
layer of the apples. That would be six layer. I will use the red
that I mix earlier. The wings are red with a
lizarn crimson with a bit of green mix that I have
here. I will just use that. And I will start painting here. This is the top of our
apple that has stem here. I will soften those. There you go. Now here, I will be adding, let's say that there
is cast shadow here, so I will use this. I will paint the side
with a dark red mix here. Now, as you can see, I
did not wet my paper. I'm painting on, and also the consistency of my water color is
very very thick. This is cream to
water consistency. If I will use just one color, then I will just get my I will just pick up color and do
not place it on my palette, I will go directly on my paper. Here, let's say there is
cast a shadow on this part. Now, I will just
soften this like that. To make sure that your
brush is damp when you soften. There we go. Let's say that we have
some shadows here. Again, I'm painting wet on dry. There we go. Now this time, I
will be painting the leaf that is left here. Since this part is very small. Instead of painting
this on what, I will be painting this part, what on dry instead. Since for the second
layer of the leaf, I will just get my green mix
and I will paint it here. Of course, this would
be the second layer, so my paint is t to
coffee consistency. I won't use thicker
consistency as of this moment. H. Now, for this stem, I will just mix red and green. That's what I have
here is to get brown. You can also use any brown. You can mix colors
if you want to. Since is just a practice. I will just use whatever
I have in my palette. I'm painting also
because it is just a thin Now for I will go on the third
layer of the leaves. I will get a darker green. I will paint more of green, just right beside the apple to show that there
is shadow here. Okay. For me, I am painting the apple like on
the top of the tree. No somewhere on the
table or whatever. That's why I do not
put shadows here. So recap. When when you paint an apple, follow the shape of the apple. There would be any ca shadow, you will use a darker value
or mix of your colors. This is a practice, and then if you're ready, you can go to the project
one and project two.
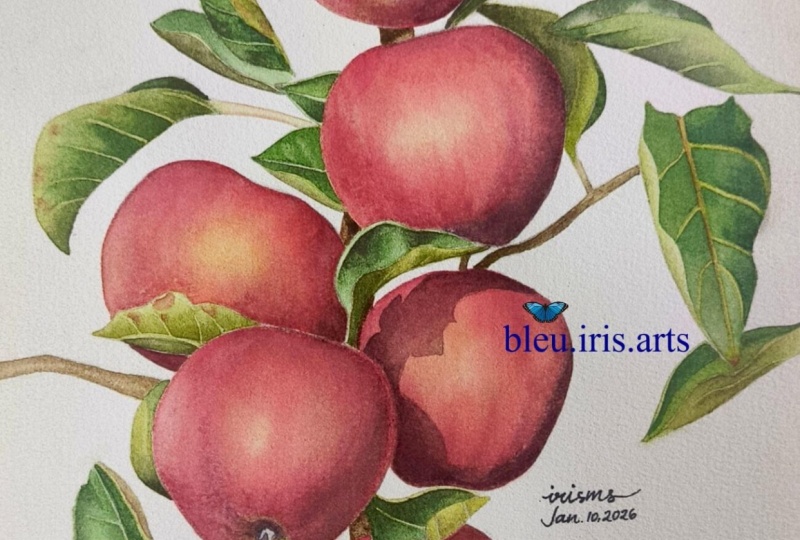
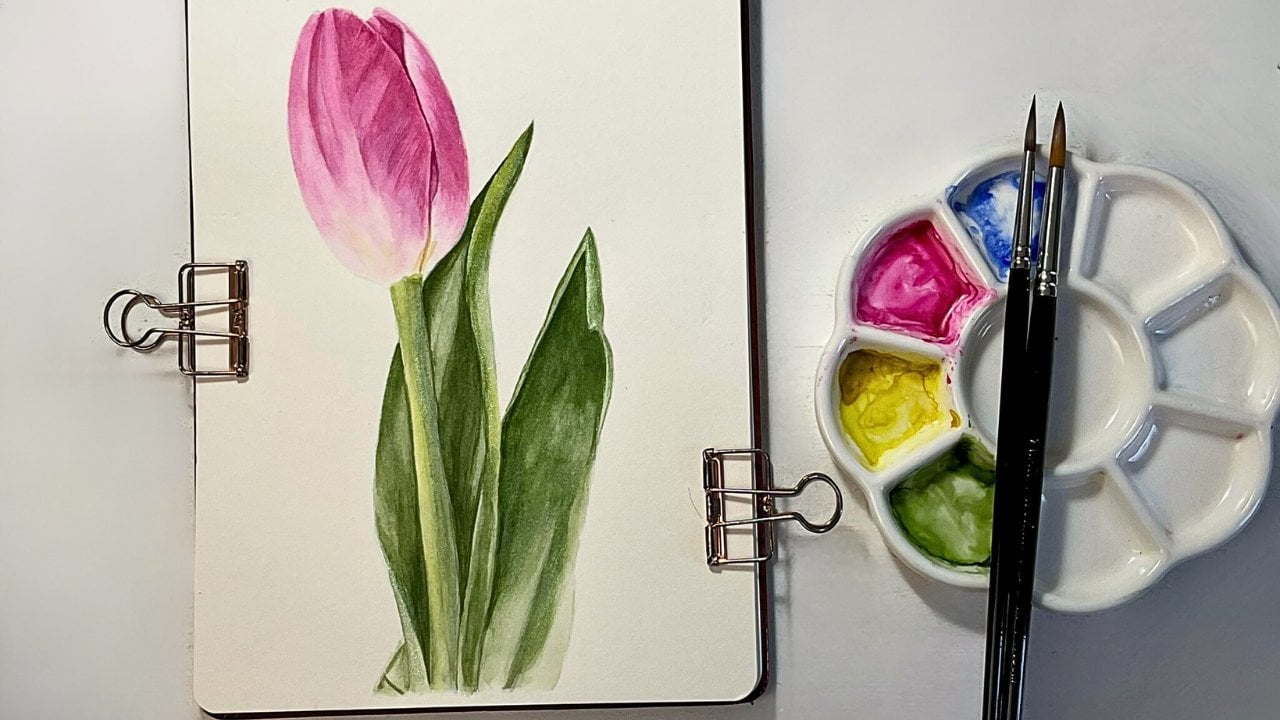
15. Project 1 Apple & Leaves Part 1: For this one apple, the apple that we are going
to paint is this one. So if you have the
reference photo, you will be you will be
painting this apple. This would be the the
second apple on the left. So if we are going to
study the reference photo, there is a highlight here, and then there is best a shadow on the side
and also on the top. And also there are dark as here. This is a small painting, and I'll show you
how to this one. Okay. So we're going to translate this reference
photo to the painting. So let's start. I will just prepare the colors that I will be using
for this painting. I will be for take the paints. For this painting,
I will paint first the apple before I
pat the background. For this painting, I won't
use a masking fluid. But later on, on
the bigger project, I will be using masking fluid. So you have two options, whether you would like to
take the background first or you will like to paint
the apple fruits. This time, I am preparing some
colors that I will paint. I will use this Windsor
red Windsor nein. I also used lemon. I will just paint
with t consistency. This time, I will also
prepare a French to Marine. I will also prepare green. This these are just
the first colors that I will be using. Before I start painting, I will lighten the
pencil lines first. If it's too dark, you can lift some graphite. I am using a needed eraser and this needed eraser doesn't
damage your paper. So you can shape it on any
shape that you would like. You can roll it to your paper to lighten
your pencil marks. You don't want to
have any pencil lines showing after you finish your painting because
pencilins are hard to remove. So this is already
good enough for me. I darken the pencilins
earlier, I know, but sometimes it gets dark. Now, we start painting
the apple fur. What I will do is, I will do this wet on wet. I will be using this Princeton size eight Prison net size. I'm getting water
from the clean jar. This is the water
that I will be using. I will be wetting
the cool apple. I will paint the
leaves later on. I will start with
the apple first. And I will paint first
the I will paint the apple with light
color consistency to coffee consistency
of the apple, this would be wet
on wet so we can have easy flowing of water. You don't want your
brush or to wet the part that is that you won't paint yet like
the lease or the sides. Because if you went
out of the line, it will the water color will flow to that area
that we do want to. Wet the apple as
much as you can. The water is not
puddling on my paper. We do not want to have
a puddle of water on your paper because if that
happens, the paper will lift, and then you will
and then when you put the paint the paint
will go to the side, we do not want that to happen. So there you go. So carefully wet the Where the apple. I will be painting the
lightest color first. I have here the round
brush size f. I will use yellow first
with ti consistency. I will paint this part first. With the consistency of yellow. There will be also some
parts of the apple, that I will paint with blue. By this time, I'm just
going to build colors. We are starting
the apple lightly, and then we will build the
colors later on as we go. There you go. This is
just the first day, I will rise my brush, remove the excess water, and then I will get this
French ultramarine. I will put the French
tra Marine here on this side because this
is a side that has shadows, a lot, there. And this part here as well. This part also. And here. It's very helpful that you are using a brush that has a
very pointed tip so you can reach some tiny areas that
other brush cannot reach. I will add here as well, and some of here. My paper is drying. I will lease my brush
and I'll get rinse red and I will put some
red color here. And some red here as well. And here I will just maintain this area light
as much as possible. Then I will add on some parts here. There we go. Whenever we paint, make
sure that you also paint on a round motion. I added the colors
here and it has. That's fine because it
will lighten as long as you add two d and
that will be fine. This area is dry, so I'll get my brown brush here. I'll wet it a little
bit so that it can help to flow the colors here. Later on, I will still
add more of the colors. Later on, so this is just the
first layer of the colors. It's still wet here.
I basing my brush. Remove the excess water. I will just run my brush here. Because this area is light. So I don't want to
add more colors here. I just want to move the color that I have on
my brush and on my paper. Is my brush. Moving around whatever I have paint that
I'm picking up on the paper. There we go. This is just the first layer of the apple and I
will leave it dry. I don't want to add
more at this time here, but I will move
on to the leaves. I will use this symthetic
brush size seven. I will leave and I will just add the color and an
undertone color here, which is yellow because this
leaf is very, very light. This is the leaf that
is touched by the sun. I will just wet this area. Then I will get yellow. I will drop the color here. I has to water on your brush, remove it by tapping
it on your towel or tissue or kitchen
towel that you have. But I like painting with
the towel beside me. There you go. S my brush again. This time I am going to
move to this leaf here. Still wet on wet. There we go. I will just move the paint around
in this area. Okay there. Next, I will paint this
area first. This one. This cliff is folded. Okay. This is like the back of the leaf that is lighter
than the front leaf. So I added too much water, so I'm removing and
lifting the water and putting on my towel. So have yellow here. I will and the color here. As you can see, I just
added very light color. We do not want to have a
saturated color by this time. This is the area that is
touched by the light, we don't want that to be dark. This area, this leaf
here is the back, the reference photo, and
there is a shadow here. Instead of yellow,
I will use blue. I left this dry did not touch the other side yet
because this area is wet. There. I have blue. I reach my brush,
remove excess water, and I will move
the paint around. If it comes water reaches, remove the water on the towel. Now, this part is somehow dry, so I will go back to it. I did not paint it
earlier because I didn't want the paint to mess up. So I want the water color run down to the other areas
that I do not want to. Instead of yellow here, I will put blue because these is the area of the
leave that is darker. So the shadow color here that we are using and the
undertone would be blue instead of yellow. There you go. I did not
paint anything there, but I can paint it with yellow. This tiny area here
is very small. I won't do on on this area, but just hit amount. This is the first
layer of your apple, and I will try and we'll
go back to it later.
16. Project 1 Apple Part 2: This is the color
that we have here. Is red and green that I can use for the
shadows here. A right there. So the first layer of
my painting is dry. You would know if it's if
the paper is really flat. Okay. So this time, what I will do is I
will again the apple. I will wet it as
much as possible. I won't wet the entire apple. I live in a very humid country, which is the Philippines. By this time, even
if the EC is on. My paper is quickly dry. Even if I use watercolor paper, my paper is still
dry very quickly. So I need to work
very quickly as well. What I will do is I will wet the left part of
the apple first. And paint it before I move
on to the right side. You can make sure that the water is absorbed by the paper
before you adding paint. Okay? I think that's it, I will just wet
this area later on. Okay. This time, I
will get wings red. I will get more red here. So right now I am using
milk consistency of red, and I will just
starting on the top, using the tip of my brush. And when I press heavy, the paint releases by the brush. Brush can hold water and paint on the belly because
it has a big belly. There you go this time, I will add more here this
area in this part as well. I do not touch one
yet, but if see, I do not press my brush. But I just going to run through my brush very
likely just the tip of my brush because
this area is light. But here, I can
press heavy here. I can add more paint in this area because
this area is darker. Here I will paint
going up going here. There you go. To this area is
darker at the bottom. But then goes lighter here. This area is not wet, so I will wet this area. There, so I can run my brush again and to get
smooth transition. If if you are living
in a cold area and your paper doesn't dry
very quickly. That's good. You can continue adding more
paint wet the whole apple. This time I'm adding
another layer of red hair before it gets dry. And then here
before it will dry, I will soften it. Now, this time I'm
done on the left side. I am going to move
on the right side. I did not add a second layer
here of paint that much. So it's fine. I'm wet right side of
the apple and part here. All right. So this time, I will get I will add more here. This area is a little bit darker because there are
shadows here of the apple. I will add more
saturated colors here. There we go. Then if that happens, it means that paper
is d in this area. I'll just soften it
with a wet brush, and we don't want to leave like that because it will
give you a hard edge. So there you go, I just wet it again and move the paper around. So if you are living in
a humid country or area, this trick is what you can do. If if you're living in a cold country and your
paper doesn't wet, that doesn't dry easily, you won't have the same
problem like I do. There we go. We'll just add more
colors in this area. Here. This area is going down. Instead of going right or left. There. I will soften
this area as well. I see I am just using
now the tip of my brush. I'll add more I will
leave that first, and then I will continue
painting that later, but I am painting
this area first because it will dry easily
again and we don't want that. There you go. If it gets too dry, you can wet your brush. I'm getting mix here, a little more red here. There we go. For
this area, see it. What I will do this area. Not too. Absorb. Then I will just
thing here and there. This area is not round, but it's like straight. So instead of because
we don't want to have a very an orange. Here, this area
is somehow light. What I will do, I will just put my some of the color here first. And then here, I'm just
going to run my brush, whatever paint I
left on my brush. Okay. If that happens, my my
brush again, softening it. And this these area as well. We do not want to leave. We want to leave those
harsh brush strokes there. We need to soften them. This area, I will area, and then I will
run my brush here. There we go. Rings, and then I will
run my brush here. So there we go. Okay. This time, I'm
just painting this area. I left some small areas here
painted on the second layer. So just running using
the tip of my brush. This is the reason I
like pointed bruh. I make sure that
I won't go out of the line because I'm afraid that it won't look
like an apple later on. So there you go. Here, I will just
add more red here. I'll wet my brush and I
will get some red here. This area is a little
bit more redish than the other also
that is near here. I lense my brush and then move the paint
that I have in my brush. There you go. My paper is getting dry. Again, I'm just moving
the paint around. I will do is I will get this
big brush and soften this. I don't want to let my paper
like that. There we go. This time, I will
paint this site. This site is somehow. There are shadows here. But later on, I will
teach you how to add test shadow on this area. And the reason that we also added blue here so that for
the shadows of the apple. I will look like there is a natural shadow on this
area. There you go. Okay. There we go. Here. For this area, I will again, this would be layer.
17. Project 1 Leaves Part 2: How this apple getting dry. So what I will do
first is I will think this area or this area, I can work here because
this area is somehow dry. So I will use this big
brush and wetting it again, just make it ale d not wet. So I have my sap ring here. Just a touch of green is fine. I think it starts,
I lease my brush, and then I use the water
that I have here on my brush to wet the area or
color this part. I just move the paint around. Because we don't want to
have very dark green here. Remember, this part of the apple or the leaf
is touched by the sun, so we don't want it to be dark. You want it just right. Okay. That's it. I'm just going to leave it dry. And then I will move
on to this leaf. This part of the leaf
is touched by the sun, so this is touched by the sun, so it's very like this
upper area and below it, it has some shadows. But we will pairs with green. I will just this area first. Get my green mix here. We'll start here and
move around the paint. I will use the belly of my brush and you can see
that it will more paint. I have the green and then I'm going to add the water there. I will paint of green
here and there. I'm just painting those
areas with showing with a little bit darker
green and here as well. Those areas with shadows
or dark area here. These parts it has the shadows. So I paint it here. There we go. I will just leave this area dry and I will
move on to the next one. If you could see this leave
in the reference photo, this part is the lightest part, and there are some
shadows on the area. Okay. There's also
a tiny part here. I will this one first, this yellow part of the leave. I got too much of the green, so I will get wet my brush, remove the excess water, and then I will just use
whatever color left on my brush, and I will just move
around the paint. Is this part of
the leaf that is. So we just want this
area to be as possible. Let we go. Then I will move on to
the other part here. This is Okay. Although although this
leave is not yet dry. I'm just going to be
carefully wet this area. Okay. I'm starting
with this area, not touching the parts that are very close to
what I've just painted. Okay. At my green. There you go. It has too much water, what I got earlier,
but it's fine. I just use whatever left
on my brush to paint, and I just move around the. Okay. Okay. Dry very quick. So raise your brush and we
again. These areas somehow. Okay. Then If you want to help the light
color to pop up more, you need to add darker color. And that helps it also help the darker color also will help to give dimension
to your painting. There is and it's darker
on this area as well. It's fine here. I can add more green here
and more green on this area. And here also. I will wet it again
because it's really dry before I add another shade
of another green here. I hope that looks
more realistic now. Somehow our painting
is is having life. Now I will lease my brush, just one time, remove
the excess water. I have somehow green here, and I will just p here. If you ase that much, get green, just a little bit use the tip of your brush. There you go. Now, this area. This area and this area is hiding behind the apple
and it has shadows there. What I will do here, I will add more of
the green here. This would be the darkest
leaf that we have because it has shadows and hiding from
hiding behind the apple. There it is. I'm going to rinse my brush, remove the excess water, and then drag the paint down. There you go. Okay. So we're done on the leaf.
18. Project 1 Apple Part 3: I let this right area dry, but I'm wedding these area, so this would be
like my third layer. And this time, I will add more saturated red to
cream consistency, milk to cream consistency
of red that I have. There I will start here
and says the water c flow, I will just let it
flow and here is if we don't want paint it to
look like it's a ball like it has a paint on
left right stroke. So I paint going
downwards. In this area. I let this I left this and let my watercolor left on my brush, through, but I run back here so that I won't
leave this area try. If that happens, soften it. Soften this area too. And you see the big rush now. I run through this area. So it won't look like it's
it's to it's too white, but we would like
to have it shiny, but it has a hint of
a color. All right. This time I am
hinting on this area. The have some shadows
on this area. Okay. This part is dry
for some reason, but even if I wet this area, so it's fine, just wet again. Okay. I still have wet in my
brush, but it's fine. I'm using it to move
the paint around. Here. Whatever paint that
I had is left on my brush, I'm just running through
it on the apple. Again, we do not
want to show that this area is to is to white, but there's a hint of color. Here, I will be starting
to paint the shadows. I still have this brush and I'm running through the
color here and there. Making sure that the air will be painted
and I won't go out of the line I'm using the
tip of the brush here. Here, since it's the red. I'm getting this mixed
of red and saping. I add the paint there. Okay. So let that color flow. I release my brush. Then I will just
erase a brush and then I'm going to move
the color around. Okay. So we have that shade of
the shadow bear the green. There we go. Be around it. Now I'm going to waste my brush, remove the excess water. The towel. Softening
softening it. Then I can just
leave this area dry. What I can do now here is I'm
going to paint this area. This small area here
that I left here. I wet it first. It's not too wet, It's not
cott but it's just enough wet. I'll get saturated red here. And paint from the bottom four for not
comfortable with that. We can paint from
here going down. I will raise my brush again, move it says water. Then I'm going to use
whatever water that left on my brush to paint and
move the colors here. Because if we add more color, it will darken it. We don't want to super dark
this area, but just right. I added blue here earlier for
the shadow, so it's fine. I will just add a little
bit more of red since some part of the reds here
are not moving anymore. So that's it. Then I will leave this apple dry this time
and move on to the.
19. Project 1 Leaves Part 3: Okay. Now I will move on
to the leaf here. So this lower a is darker. So I will get that green here. I did not add water. I will paint on this area. I will just go in to
paint the area so that has dark color
or if it has shadows. Here as well. Some of parts of the leaf here, I won't touch it anymore especially on the upper
area of this leaf. I'm just using the tip of my
brush to get that in and do not want to get a of
paint on my brush. I'm just using the
tip of my brush. And painting this time area. Okay. I will do the same here to again this
time I'm painting wet on dry because I'm
already painting the details. There I go. Here as well. And just painting like the sides of the
lines of the leaves. I did not paint on the middles. So by this time we're
doing negative painting, it means that we're painting
around. There we go. I will add more by this time, I press it a bit
harder on my bruh. There we go. I will raise your brush on time, remove the excess water
and remove the pin. Go up. We'll add a bit more here. A little bit more of
green on the area. And part here. I lease my brush, and then going to
soften those edges. Then dark red here. Well drop some red here, which is p brush. I will add red here. By this time, just using
the tip of my brush, wet on dry on this area. Next, I will move on to
this part of the leaf here. I will add more green on
the light area of the leaf. There is the line there, I will just paint around it. I will add more green here. Okay. If it's wa if
your brush is watery, remove the excess water. Okay. I'm just
adding some breeze, but I did not the whole thing. There you go. You will use this brushes set. I will just wet
this sll area here, and I will add some
green on this area. There we go. If you have a water brush, remove the water using
the towel beside you. That's why I always
have towel beside me. I will add more green here. Using the tip of your bruh. S. And some parts here. You don't have to copy as what you can see on
the reference photo, but you can add
paint on some areas. But you don't have to paint everything with a
darker shade of green. You can just leave some
color of the first layer. So our leaf won't look flat. There you go. And I will use. I will also add a
little bit here. There, I will get more
green color of the green, and then I will add more
green on this area. It will help to pop this
slight area of the leaf. More. Okay, moving around the paint. Okay. So if you want part of
your paint to pop up more, you need to add a
darker color beside it. All right. And more of more of the green here. Now we have one last. So I will get a saturated color
of the green and I will add the green here. I will wet my brush to. My brush is not too wet, but not too dry I just adding
green on a lease area. I just down. I raise it, reraises water, and then move the
paint going down. This part of the apple. I'm sorry. This part of the green of the
leaf here is darker. There we go. I think I will add a little bit a tiny
amount of gen on the lei.
20. Project 1 Apple Part 4: I We're almost done
with the apple. But before we continue, I'm going to mix. I'm going to mix new colors. F I will be using
for cast a shadow. I will mix ac magenta. I can have a darker red
color and I will mix it with transparent py orange. Orange. There we go. I added more magenta. There we go. This is what I'm going to
use forecast a shadow. It is more darker
than the wins red. Now it's time to paint
the last layer and also. This would be another
layer of the apple. I will be wetting
this area first. I will just wet the areas that I'm going to add more paint. Here I'm just going to add
more shade of red here. I will be using just wins
red on this area first. Okay. And also building up
the shape of the apple. It will leave a hard edge there, so I'm softening it, and then move here. Then going to add more of. This area is dry. So I'm just going
to wet it again. So even if I move some
red here, it's fine. Again, I don't want it to be, but should be a hint of color. So painting I'm adding more on this area, wet my brush, remove
the excess water. There you go. Then I will
just move around the color. Here well. Das area. So just adding the color. I will get more of wins. So this is a very saturated
color of wins and adding. So By this time, you'll see the apple look
like round or like a ball, but there is shape of apple. It's not too much
round like earlier, but a circle motion, but there, you should see
already dimension on this area. Just using the wet
I the big brush to wet and move around the paint that
is left on my brush, wet in this area as well. Okay. At this time, I am going to add more of the red and I will transition it to the new
color makes it eye prepared. Okay. For color for the past shadows, this is the color, this is the magenta and the
mix of magenta and s cart. To At this time, I'm adding paint here. I'm going to move around here. This is a big brush
that is wet and moving around the paint
on the right side. I'm just using whatever
left on my brush. Here as well. This has cast
a shadow here of the leaf, so I'm painting this area. And I will add more
shadow on this area. My paper is quickly
drying, but it's fine. I will just soften
the edge here. For the cast shadow, even if you paint it on top
and the paper is, it's fine. I left part here that is
not painted with that. I will just darken this area. And I will paint it re red. Not too dark. Just the same consistency of win red that I have
here. There you go. And then move around
the paint. There we go. Hopefully, somehow we could see that this is already
shaped of an apple. Now, I will raise my brush. I will this area because I don't want to leave
hard edges there, but I will get the dark red here and I will add
more paint here. There we go, and here as well. These are the area that has past shadow and
shadows of the apple. There. It's really I'm
not painting wet on dry, not wet on wet anymore. Hope you notice that. But still softening
some strips here that I do not want my
paper to show that there is harsh edges of the paint Then I will add more color here. This area is somehow
damp because I wet the area and
move the water here. There we go. Right there. This time, I'm going to add some colors on the
Apple below here. So my brush is damp. I am painting now on. And this is darker
consistency in red. Here, I'm going to paint
more of red in this part, but this time I'm going
to wet this area. I don't want to paint with I don't want to
paint this wet on. I want to have smooth tation
of the color on this area. Remember, I did not
paint this area, but I just run th my
brush ir and some colors. I did not clean my brush, but I'm going to get
the other darker red here and I'm going to
brush off some color here. If this happens that is going to try so,
I will soften it. I will have smooth transition. I will work on this area. I will wrap this top a little. I didn't clean my brush, I used the same color that
I have here in the brush. There we go. I'm almost
done with this layer, but here, I'm going to add more color of the
dark green here. So this is wet on dry. I will clean my brush ins and then remove that says water. I'm going to soften
the edge here. There you go. Then here, we'll add more color here. Dark red on these areas. I'll just wet the area
that I'm going to paint. I will use the dark
red color to add more D on this
part of the apple. I look like when you
add more dark color, it will help you to show that what you're painting
on is as dep on it. Okay. So there my bruh. Then just softening the edge of the part of the w I painted on this
area and moving on, I just move the
paint around here in my brush and then
move the paint here. Go. I will just leave the apple one first and then I will
move on to the leaves.
21. Project 1 Apple Part 5: I'm using this mix of red
and green here and be here. If your drawing has been coed
by the paint, it's fine. He pitches draw as you paint. I raised by brush, remove the excess water, and then I'm going to lift. So part of that. Then if you're going to
remove the excess water, remove the excess paint, B you're picking a color. Go. Now, I'm going to paint on the casting shadows
of leafs apple. Okay. So we have a shadow here. So this brush is not very wet. I'm using this dark color here, and I will add the
shadow of the leaf here. Okay. I will add a little bit
more of this color here. My paint is also quickly. A reds for brush, I move the excess water. I'm going to soften this area. Now I'm going to add
casting shadow here. This red I have, and I will get a little bit
of green and I will add it to the red air to have more red. There we go. I
added that shadow. I will get this big brush. I will go to soften
the edge here. I will need to add
a little bit more. Now I'm going to add
more of the same color. We'll add a little
bit more here. So there is amount
of gas shadow here. There is a leaf on top of it. Then we soften the edge here. Now we'll add more of
the red on this area. This not actually cast a shadow, but just the shadow of
the apple and here. Adding this color will help to show the
shape of our apple. D here, and then we'll add more of dark red
here in this area. So again, this is already
painting wet on dry. There we go. Shadow here. I will add more of color here. It's ready with consistency. I will raise of a brush. I will soften this area here. Death the apple, I
will add a little bit of green on this area so that it honor of at a darker green here. I show the and this part
of the leaf is folded. There go. We a bit here. And the and also on this area. I will raise this brush, remove the excess water. I'm going to soften
this part here. Now, I'm done with the apple. What we can do now is we are
going to lift some colors. You say the damp bruh. I will move excess water here. I will just try to lift some co. The ruh and it. There are some green
dots on the apple. In my brush to remove whatever color to pick
up from the paper. The the colors. But if you are having a hard
time lifting, it's fine. You don't have to lift
all of the colors. There you go. This apple is not if you are fine
with it, it's good. I'm thinking of adding
a little bit more of shadow to connect
to this area here. V. Area as we. There we go. The apple is done, so you can stop here. But if you want to add
color or background, I'll stay with it,
go to the next ps.
22. Project 1 Painting the background: Now I'm going to
paint the background, but before that, I am
preparing the color, so I still have sap green
and the red mix here, but I added the green there. I will add a little
bit of sepia, and a little bit of ma, which is to bet the
brightness of the green, a There we go and more
of French ultra Moline because I still I just have
a tiny amount of paint. So for this background painting, it will be just easy and light. Okay. So I'm going to paint
the section by section. I will paint from
the apple going out. I will start painting
from this area. Using the prints stan. My brush is dirty. It's fine because I'm
going to add paint anyway. Even if there is some color left on this brush, it's fine. But if you can use clean water, or clean brush, that
will be awesome. I will chose Paint
carefully with water, especially the sides
that has those leaves or the apple because you don't want to destroy your painting. Where it is. And wetting the area will
paint section by section. I will use this bigger brush. I will use this
French ultramarine. Then I will just drop the
French ultramarine here. I will just paint as light
as possible with the blue. Because I'm thinking
this is like the sky area when you look up. There I tilted my paper like this so it can
help my pain to flow. Okay. But of course, it will just flow on the
areas that has water. Okay. I will soften this. I do not want to
leave it like that. Okay. Now, I will add
more water on this area. Okay. So imagine that you're
looking up at the apple. There is the sky up
there, bright and blue. That is what I am
doing right now. If you notice I did not
paint the entire thing. I left white spaces. There I used wrong brush there we go. You could stip, it's fine. As long as you do not disturb
painting that you did. Imagine that you're looking
at the apple up on the tree, and then There you go. You can see that
clear light blue sky. We're looking a tree. And carefully painting
on this area. Okay. That's why I prefer
painting the background first because it's quite
tricky when you paint the background flass because you don't want your
painting to ruin. The area is this top is. I will blue here. Remember that you can
always steal your paper. I just simple bruh and
let the water color flow. I'm not thinking of
anything right now. I just enjoying
dropping the colors. That is I move do, I'm going to change
colors because Well, there are a lot of apples
in the background. So we can add brown like four colors of the
branches of the of the trees. So I leave some white
spaces as my brush, a as the other brush, and then going to
add more of water here and soften those
brush strokes there. There we go. And then
move downwards. There. Here, I'm going to get some red. Like you imagine there
are some apples there. In the background. You
can trap some greens. Like if we could see there are some leaves there
in the background. There are a lot of apples there. We'll just wet the area. It's easier to paint the areas that there are no
painting beside it. Then these area that has like apple in the leaves that you don't want
to disturb and. There you go. I will
just add colors. You could use any colors
that you would like. But I prefer like colors. I can imagine like this is an apple that that I can see right now on
the top of the tree. All right. This is why I'm
painting where the green. For the green, I added, you can add a little bit of red, a little bit of blue and purple. There you go. You can leave
some white spaces there. You don't have to paint the entire thing
like just one color. If you do that, your
painting will look flat and it doesn't
doesn't look good. There. I drop some colors here. I'm just using whatever
left on my palette. You can add more
colors if you want to, but I'm just using what I have. You can mix other
colors as well. But painting red and green. These are complimentary
colors it's good to the eyes. Just avoid butting on the paper. I leave white spaces there. Use the same brush, and then just move
the paper around. You can have dark
colors in d value. We want to it's up to you. It's falling here
and I'm trying to move the water around. Okay. There you go. I will move this
water around there. I can think the back now
and everything here is wet. This area, I have to be careful. You can add, add more green. Imagine that there are
some apples behind it. I also have yellow in the cat, so I can also use that. That's also put color. Okay. So just tickle
my brush there. I not thinking of anything. So I'm now moving upwards. But before that, I would like
to get more of green color now thing with this and
going to soften lease here. I make some color of green
here to add to a background. There you go. I like anything with background because I think without
background, it looks. I would like to have
background colors. I would like to add
more brown on the. If you think that
you painted darker, as long as your paper is wet, you can drop some colors
there and I blooms. That aul may not always good effect on most
of the paintings, but it's also very useful
and creating backgrounds, and also adding texture. Some artists do not
like to have blooms or creating blooms
on their paintings, but I like them. It creates beautiful
effect on the painting. But make sure to use it properly because sometimes
it may not work. These may not work
also on on the apples. These areas started to dry, so I'm softening those cos. Okay. If you are using a bigger paper, it's somehow
difficult to manage. If you are painting
paint like this and painting one area at a time. That is why I paint
one area at a time. You don't have to pat
everything in one. Here we go. Here, I will
add green I'm sorry blue. The name of the blue here
on the so Somehow it turns that it's bluish green
background, but it's fine. I'm just using
whatever have been co. There we go. So for some created texture. There are measure there
are some apples behind it. And you are an apple
and you can see the. This is the final painting. Next, I will show you how to remove the paper from
the watercolor block.
23. How to remove the painting from watercolor block: Now our painting
is completely dry. We can now remove the
painting from the block. You would know if it's dry, if your painting is flat. I will use this leaf
blade from Bag Hong, or you can use
something flat like a or a bone folder
or a bread knife. I will insert the blade
here at the opening at the top and glide slowly. And here, this is the painting, and I have a new
clean sheet here. I will put this aside. This is our final painting, so I can frame it, and this is the project. If you want to continue
and challenge, go to the next project
with six apples.
24. How to apply masking fluid: In this lesson, I'll be using
graphical masking fluid, an old synthetic
round brush size four and diluted liquid
dish washing soap. I washed my brush and the
jar of dish washing soap. This will prevent the
masking fluid from sticking to the brush and avoid damage. I remove the excess water
using the towel beside me. Then I pick up masking fluid, which I poured a small
amount into the bottle cap. Then I applied the masking
fluid to my paper. I was careful in applying the masking fluid and
as much as possible. I avoided going
out of the lines. Then I washed the brush into the jar of
dish washing soap. And I repeated the same process until I finished applying
the masking fluid. Once I'm done, I just
leave it before painting.
25. Project 2 Painting the Background: In painting in the background, I use French uterine, Sap green, and a mix of nac magenta and
transparent pyal orange. Using a flat brush, I we the paper at
the upper left, and then at the upper right. Then I went down to the middle. I made sure the whole
paper was evenly wet and shiny and with
no puddles of water. It's very humid in our country, and even when I paint
with the AC on, the paper dries quickly. So I wet the paper multiple
times because I let the paper absorb the water before adding
another layer of water. This is the reason that a flat brush helps
to paint big areas. I use the Princeton neptune
round brush size a to pink with a t to coffee
consistency of my watercolor mix. I added the blue at the top, just like the sky color. When you look up at the tree, I picked it with
horizontal strokes, and I added more blue
next to the mask areas. I would like to have a light background with
a saturated subject. It's a photo with a light blur background that
focuses on the subject. In painting the sky area, you may tilt your artboard and let the water color flow down. That's optional, but
it's also good to have a smooth flow of
the paint on your paper. I lease my brush, remove the excess
water and pick up. I dropped sap green at the top and let it
bland with the glue. I also added sap
green in other areas like there were some leaves
in the blurry background. I held my brush near the
end because I wanted to paint a loose background
as much as possible. The bottom of the paper
was about to dry. So I brushed it
with a flat brush. And then I added more
grain in the middle. I also added red
to other areas of the painting to show there were some apples
in the background. While painting the background, I was looking at the reference. So I have an idea of where
I will drop the colors. I continued adding
Sap green below the paper to represent
please in the background. I always recommend having the reference photo beside
you when you paint, so you can zoom in and out to see even the
smallest details. I wanted my background to
be as light as possible, but you make paint a more saturated background.
It's up to you. I scattered some water
into my background as the painting slowly dry to
create a blooming effect. Once you are happy with
your background colors, you may leave your
painting to dry, but avoid using any
heating tool when you have masking fluid in your
paper to prevent damage.
26. Removing the masking fluid: I use this rubber eraser or rubber cement pickup to take
off the dried masking fluid. Make sure the
background painting is dry before you remove
the masking fluid. I find this rubber eraser, the easiest way to
remove the mascul fluid. I just rub it off. It takes me less than 5 minutes to take the mascu fluid off the paper than using my
fingers or art eraser. Make sure there is no
maskin fluid left on your paper before
painting the apples.
27. Project 2 Apples Part 1: In this lesson, we will be painting the first
layer of the apples. I'm starting to wet the apples. I'll do a wet on wet technique, and I'll add an blue to the
darker or shadow areas. Yellow to the areas of the
apples that are light. The colors. I have
RNT consistency. I'll build up the
colors as I go. Remember to leave some white
spaces for the highlights. I'm wetting the apples
multiple times because I'm letting the paper
absorb the water before I add another
layer of water. It's humid in the Philippines
and my paper dries quickly. The apple should be wet. Avoid having the water run outside of your
drawing or else, the water color will flow to the area that you
wouldn't want to paint. Also, avoid having
puddles of water. If you do, dry your brush
and lift the water. It's the reason I use a mix of synthetic and natural
fiber brushes like to have control
of the water. I follow the shape of the
apples as I paint them, or else the apples
will look flat. Your brush strokes can help to define the shape for the apples. It's, so my brush
strokes are as well. I'll do the same technique
to the other apples. I'll spe the video for now. But remember to look at the
reference photo as you paint. Oh. Oh. I'll just leave this. I'll take a break, and I'll
see you at the next lesson.
28. Project 2 Leaves Part 1: For the first layer, I will use cadmium lemon, French ultramarine, Sap green, a mix of inacoon magenta and
transparent parle orange. I will mix sap green. And winds are red
for the shadows. All of these colors
are in t consistency. I also have winds are red. For the first layer, I will do a wet on wet technique for a soft and smooth
transition of the colors. I started wetting the
leaves at the upper left with my side seven
synthetic round brush. I make sure the leaves are wet enough and shiny and
no puddles of water. Letting the paper
absorb the water first before
applying the colors. Then I will use
the cadmium lemon to paint with my size
for round brush. For the like green leaves, I will paint yellow
for the first layer. I add windsor red to
the middle of the leaf. Then I move on to
wetting the next leaf. I switch brushes every time. I use the side seven to what
the area I want to paint, and I use the size
four to paint. I move to the last
leaf at the top, wetting it first before I
apply the cadmium lemon. As I paint the leaves, I do not paint the whole leaf, but I leave some white spaces. I make sure my brush
is not dripping wet and as much as possible, I avoid wetting the areas. I do not want to run the waters. I carefully painted
section by section. I am adding a bit of red
and blue in some areas. I look at the reference
photo as I paint, and there I see where to
add the red and the blue. Then I move to the other
leaves on the left, doing the same process. I got the leaves first
before I add the colors. I am adding yellow to this leaf, as it's shown in the
reference photo. This is a light green leaf, and I will speed up the
video because I'm doing the same process in painting the first
layer of the leaves. Oh. I'm adding some red on
the stems in the leaves. I paint as I look at the reference photo on my
phone so I can zoom in and out to see the
details rather than printing the reference
photo and you can o it in. After painting the first
layer of the leaves, I let everything and I'll
see you in the next lesson.
29. Project 2 Apples Part 2: In this lesson, we will paint the next layers of the apples. I'm starting to write the
first apple at the top. Then I add Winsor red
with coffee consistency. I re wet the apple because my paper dries quickly
due to humidity, even if I use 100% cotton paper and I paint in an air
conditioned room. If you are in a cold country, you won't have the same problem. You can continue adding red to the apple as long
as the paper is. As you can see, when I
add the windsor red, the area that has a blue underpainting looks darker than the one with
yellow underpainting. Remember your highlights
as you paint, leave white space
for your highlights. I continue to layer
the colors on the side to slowly show
the shape of the apple. Whatever paint I have
left in my brush, I just use it to brush
the center of the apple. Remember this is the apple that is touched by the sunlight. Keep in mind to make the c. This time, I rebut the apple
because I'll paint the third layer of the apple with milk consistency
of Winsor red. I paint layers of layers
of colors and having 300 GSM of watercolor paper helps a lot to hold multiple
layers of watercolors. Slowly as you paint, you are bringing the apple to life when you add
layers of colors. For the center, whatever
paint is left in my brush. I just bring it to the center
by pressing a bit harder on my brush to release the paint that is in
the belly of my brush. I'm using the tip of my brush to paint the lower part following
the shape of the apple. When your brush strokes follow the shape of the
subject painting, it will help to
show the shape of the painting on a flat paper. In other words, slowly, your painting will look
three dimensional. If your paper is drying, just brush it again with a light amount of
water like I do. In painting the highlights, you can bring the paint to the area where the
highlights are. In this way, you can add a head of color to the
highlighted area. Some highlights don't
have to be all white, but you can have a
tiny amount of paint. I'm wetting the apple on the left and adding
red at the bottom. If you observe how
I paint the apple, I follow the round shape of the apple instead of brushing
with straight lines. If you paint with
straight lines, the apple will look flat. I'm adding colors, there are some parts of the apples
I add more colors, and some parts of the
apples are lighter. Remember to paint by looking
at the reference photo. You don't have to copy as it
is in the reference photo. Our goal is to learn to paint the apples as a painting
and not a photo. What you need to look at in the reference photo
are the lights, shadows, highlights,
color shapes, and values. In this stage, I'm applying
the third layer of the apple and adding milk consistency to the darker areas
of the apple. Whatever paint is
left in my brush, and dragging it to
the highlighted area. By this time, you should be able to see how important we do the first layer with the
yellow and blue underpainting. Since water colors are transparent and as
I layer the colors, the first layer
is still showing. Don't be afraid to layer the colors because as
the painting tries, the painting will look lighter. Slowly build up the
colors by layering them and slowly use thicker
consistency as you go. When I was starting
with watercolors, my mistake was not being confident in applying
saturated colors, not following the shape of the subject and not
layering colors. It is common mistake for
beginners in watercolors, and I usually see it in
watercolor Facebook groups. I'm still using winds are red, and I will use the mix of acro magenta and transparent
parle orange later. So in this lesson, I'm painting two layers
at a time on each apple. I'm using the same technique
as I finish this stage. For now, I will keep quiet so you can watch how I
paint the apples, and hopefully you can
paint along with me. Oh. D. A Now, we're done with the stage. Let's take a break, and I'll
see you at the next lesson.
30. Project 2 Leaves Part 2: In this lesson, I'll
show you how to paint the second
layer of the leaves. I started on the leaf at the top using a wet
on wet technique. I did the same process
and used the same color, which is sap green
in milk consistency. I didn't paint the entire leaf with the same value of green. Some parts of the
leaves are lighter and some parts of the
leaves are darker. It depends on the
reference photo. Remember to always have the reference photo
with you as you paint because it will guide
you on your painting process. I added a small amount
of red and yellow in the middle of this leaf as it shows in the
reference photo. I look at the reference
photo as I paint. I added more green to the areas of the leaves
that are darker. I put the reference below, but I'll remove it later. I added inconsistency of sap green to the
lighter leaves to show a hint of color because those are
the lighter leaves, the back of the leaf, or the
leaves that are touched by the sunlight without or with
a small amount of shadow. This leaf is half
yellow and half green with some
red or brown dots. So in painting this leaf, I used yellow on the left side. And while it's, I and I painted the lower
right part with green. With the white on white
technique and sap green, I painted the right side
of the leaf and left the other side unpainted to show the shadow and
divisions of this leaf. I also added a small amount of in the middle or the pet and I painted the inside leaf
with a sap green in consistency to show
the fold of the leaf. I wat the small parts of
the leaves in the section, and then I added a coffee
consistency of sap green. I added more sap green to these folded parts of the
leaves and on the patios. On the inner leaf of the, I wat it first and added milk
consistency of sap green. Adding saturated colors
in contrast can help the lighter colors to pop up more and it can add dimension. I added more sap green beside the veins to show the
division of the leaves. This technique is called
negative painting because I was
painting the veins. It's a helpful technique to show depth and I mentioned
interpainting. It can be challenging at first
because you are painting around the subject
and not the subject. I. This leaf is curved. I painted the middle
of the leaf yellow and sap green on the corners to emphasize the shape of the leaf. The reference photo has a lot of curved and folded leaves, which I find interesting to paint with a
little challenge. Moving to the leaf on the right, I we the outer leaf and painted
lightly with sap green, and then I added more sa
green beside the veins. I wt the inner leaf
and painted it with mecsistency of sap
green and the petals. This will help to show
the leaf was folded. I did the same on the leave. I left unpainted earlier because I was waiting for
the leaves beside it to dry. Remember, in this
stage, I'm painting, which can help the paint to
easily flow on the paper. I clean my brush, remove the excess water and brush some parts of
the leaf to lift, some paint to lighten the leaf. If you lift some pigment
on your painting, remember to wipe your brush, because when you lift the
paint from your paper, the paint will go to your brush. To lift some paint again, you need to clean
your brush before, putting your brush
back on your paper, or else the paint will
go back to your paper. Then I move to the next
leaves on the right with a mil consistency of sap green and I painted
these leaves wet on wet. Just be careful
that to go out of the line or flow the
paint to unwanted areas. Then I move to the next
leaf in the middle. I w the leaf first, and then I painted it
with a lighter sap green and drop a bit of red as you
see in the reference photo. I avoided painting the
veins in this leaf, but I painted around the veins. I move to the next leaves
on the right and I painted the outer leaves first with a
lighter value of sap green, then I painted the inner leaves
with a darker sap green. If you don't notice, I skip some leaves, but
I go back to it. I just the wet a dry before I paint the
next leave beside it, or else the paint will float to the other parts of the
painting w I didn't intend to. I lifted some paint from these leaves to
lighten some areas because these leaves
were small and it's a bit hard not to
paint on the whole leaf. I painted the small
leaf in the middle with a mill consistency
of sap green in the wet on dry technique because it's too small
to do wet on what. Moving to the big
leaf on the right, I started painting what on on the left apart with a
small amount of sap green. Then I wt the big part
of the leaf and then I drop red in the middle and
let the paint flow a bit. While the leaf was still wet, I dropped so green on the leaf. I followed it with another layer with a thicker
consistency of paint, and I avoided adding
paint on the veins. I did the same on
the other side. Going down to the leaves below, I painted yellow
on the stem with a bit of red and the
wet on wet technique. Then I added sap green on the outer leaf at the
bottom, avoiding the veins. I moved to the next leaf above. I painted the outer
leaves first, and I did the same
on the other leaves. I did decative
painting by avoiding the veins and painted
only on the leaves. These leaves are folded, so I added a darker tone of sap green to add depth and
dimension to the leaves. I added another layer of dark sap green while
the leaf was wet. I painted with a negative
painting technique by avoiding painting
the veins of the leaf. I painted the leaf behind with a darker sap green to emphasize
the death of the leaf. I went back to the
leaf on the left to paint the inner leaf
with a darker screen, and I did the same
on the upper leaf. I lifted some paint on the leaf to prevent the
leaf from looking flat. Moving to the last two
leaves on the right, I painted the outer
leaves first. And added a darker
green on the er leaves. Lastly, I painted
the branches bro. This is a mix of
windsor red and green. Then I will leave this painting to before moving
to the next step.
31. Project 2 Apples Part 3: In this stage, I
painted the apples in milk consistency using
a wet on wet technique. This is the third
layer of the apples, and this is a stage
where you can continue to build the
colors by adding more red. I added sap green near the bottom of this
apple or the calyx. It is a star shape
near the bottom. I also added a small
amount of brown to the Cx. I use a small brush to spread the color on the lower
side of the apple. Then I left this apple try, and I moved to the
next apple below. I went the apple first. Then I added red on the left, a little on the top, and the right side of the apple. Remember in painting the apple, follow the direction of
the shape of the apple. It will help to
show the shape and form of the roundness
of the apple, and it can prevent it
from looking flat. If your paper is drying, you can rewrite the apple, you are painting on before you apply the colors
like what I did. I added a small amount of dark
red mix to the lower right because I started to build up the colors of
the form shadow. I added brown to the
bottom of the apple, and later I'll add the ca. I move to the next apple below, and I wet the apple first. I wet the upper part of the
apple that is above the leaf. Then I added red on
the upper left on the top part and the part of the apple
between the leaves. I love the small area
near the middle touch because that is
the area that has highlighted where the
sun touches the apple. I added a dark red mix at the upper right of this
apple for the form shadow. Then on the highlighted part, I added a small amount of light red to give
a hint of color. And then on the bottom
part of the apple. I wt first and I added
a dark red mix to it. This ara should be darker because this is the
part of the apple that is behind the leaves and
shadows are forming on it. Moving to the next apple below, I w the sides. I avoided the highlighted
area in the middle. Then I added red on the left, going to the bottom. I also added red on top of the highlighted area and whatever paint was
left on my brush. I brushed it to the
highlighted part to add a hint of color. Then I wt the right
side of the apple. Then I added red on top and a small amount of pink
on the highlighted area. Then I started adding red on the right side and slowly
layering the red here. My paper was drawing quickly, even if I used 100% paper. This is because of the hot
weather in the Philippines. So if you live in a hot place, you can rewrite your
paper as you needed. I skip the apple behind, and I move to the
last apple below. I I wet the apple first and I added red
on the upper left. Then on the lower left. Whatever paint was
left on my brush, I brushed it to the
highlighted area on the left. Then I slowly built up the color on the right
side of the apple, but I avoided highlighted areas. I let the apples dry, but I will paint the next
layer of the leaves.
32. Project 2 Apples Part 4: Turn the fourth
layer of the apples. The focus of this cid is painting the calx and
adding the shadows. I mix the primary colors
I had to get brown, and I started painting the
calyx of the apple on the top. In the middle of the calx, I painted small strokes going down using the tip of my brush. Then I spread the paint
from the middle of the Cx, moving to its sides. Then I move to the
next apple below. I painted brown on the
bottom of the apple, and I spread the paint
from the bottom going up and following the
shape of the apple. The paper has dried, so I rebut the paper. Then I pick up my brown
mix to paint the bottom of the apple and a bit dark red mix from the bottom going up. I move to the next
front apple below. I painted them with
brown and green. This area should
be because this is the part of the apple
that is behind a leaf. I pick up my dark red mix, and I painted the right
side of the apple on top. The dark red will
show as a shadow. This time I'm
painting wet on dry. I did the same on the
next apple below. Again, I'm painting wet on dry. I also painted on the small part on the
left side of the apple. I did the same on
the right side. These parts of the
apples are under the leaves and
some other apples, and cast shadows form
when an object is against the light and covered or likely covered by
another object. Remember to look at the
reference ph as you paint. I move to the next apple below, which is likely behind another apple and
painted the left side. I also added a dark red
mix on the right side. I found the center
very light and bright, so I added a touch of red. Then I moved the
apple on the left. I accidentally drop
green in the middle, so I corrected it by lifting
the paint with e water. I painted the right side with a dark red mix on the
wet tried technique. I also added dark red on small parts on the
left and the top. I moved to the apple below. I painted the bottom
and the right side. Some strokes I made were harsh, so I softened them
with a bigger brush. If you did the same, remember, the wet brush is
not dripping wet. Then I painted the
shadow on the leaf in front of the apple copying
the shape of the leaf. Next, we will finish the
leaves and the branches.
33. Project 2 Leaves Part 4: In this lesson, we will finish the apples by painting the branches with
the same brown mix. You may use a smaller
brush at this stage. I painted on the dark areas
and intensify the colors. I painted some stems
with the dark red mix. Now the painting is done. It's time to take off the tape. Whenever I remove the tape, I gently and slowly
a from the paper. And here is our
finished project.
34. Final Thoughts: You finally made it this far. I hope you learned in my class, and I hope you are more
confident in painting more realistic subjects
like the Apples. I would like to see
your watercolor apples paintings in the
project section. Thank you.
 Bianca Santiago, Watercolor Artist