Transcripts
1. Introduction : Hello and welcome to
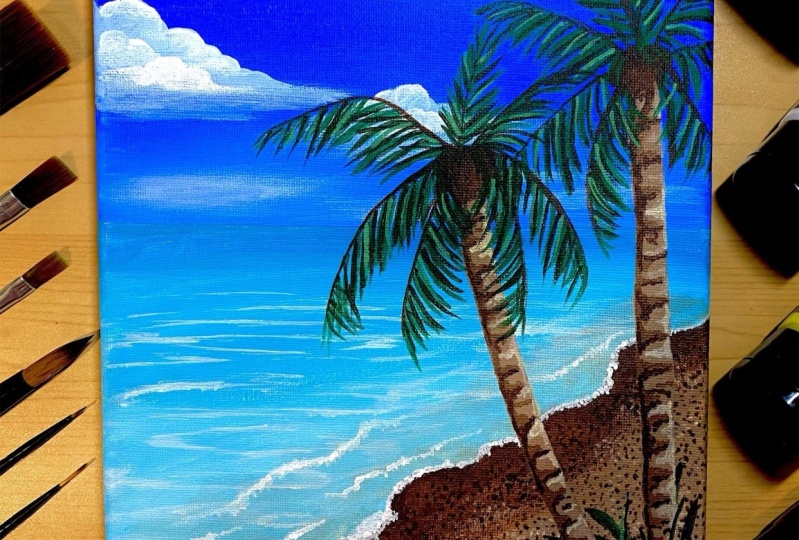
the class painting a tropical beach scene
with acrylic paints. In this class, I will teach
you everything step-by-step, from clouds, tropical water, sand, and palm trees. When you're finished
with the class, you'll be able to pay your
very own tropical beach scene.
2. Supplies: The supplies I will be using
for this class include a blank, prejudice owed Canvas. I am using an eight by ten size. You will also need
acrylic paints. I use Liquitex basics bread. I would tell you
which colors I use as I am using them in this class. You will also need several
sizes of flat brushes, several sizes of detail
brushes, and around rash. Will also need a cup of
water and some paper towels. So grab your supplies
and let's get started.
3. Sky: The first step to painting the
sky is to put down masking tape where the ocean and
sky are going to meet. Make sure it's straight. And then press down to make sure that no
paint is going to leak in between the cracks there so it keeps
a straight line. This is completely optional. This is just a
personal preference. I like crisp fresh line where the ocean is
going to meet this guy, but you don't have to do it. In fact, if you
do want to do it, this is just put the masking
tape across the campus. Let's mix the paint.
For this guy. I'm going to use
cobalt blue hue. Put some of that down on
our Padlet and mix it with a very tiny amount
of titanium white. It actually first I'm going
to use some cobalt blue straight out of the tube
for the very, very top. Before I started adding
a lighter shade. So let's, let's put a little
bit of that cobalt blue hue. The top. Personal preference. Again, if you have a canvas like this painting, the
edges are not. I like to paint the edges. You don't have to. I'm just using our standard, just a flat brush to do this. I think fancy. Now let's mix the
white, the cobalt blue. Well, start laying that down. But first we're
going to get most of that paint on our brush before
we start blending upward. Once the paint is mostly off of that
brush, blending upward. You do this when you still have a lot of paint on your brush, it will completely get rid of that first layer that
we just painted, which was the street
cobalt blue color. But if it's pretty dry, the brush is pretty dry. So we want to dry brush up into the darker blue like that. Now, we're going to
add some more white to the palette and mix that
color you had before. And now you have a
lighter shade of blue. And that is going to go
with the very bottom of the horizon here, where this guy is going
to meet the ocean, usually in nature,
that's lighter. We're going to emulate that. Make the bottom here
where the ocean touches. And even lighter variation
of the blue we just mixed. Again. We're going
to get that off the brush until it's
pretty dry and we're going to brand new truck crash. That is, it. Makes sure you fill
in any blank spots that you have on the cameras. I had somebody that
is it for this guy.
4. Clouds: Now that is dry.
For the next step, we're going to paint in the
nice, fluffy tropical clouds. Just another small hand devote
acrylics for the clouds. I'm going to use a round brush. And I had previously used this, but I washed it out very good, but it was kind of steps. So I just I just put it in water and then dab off the excess water and
then that makes, that makes it much more
pliable and supple. Which that's what
we're gonna watch. What aware, painting the clouds. I am going to use white. And I had some leftover from when I was mixing
the paint before. I'm going to use that. And it has a little
blue tinge to it, but that's okay because they're glad they're not
pure, pure white. But we can go in and
highlight later. But we're just going to
get the basic shape of the clouds that we want right
now with the round brush. Just go in and start making
fluffy cloud shapes. Now, trumpet,
tropical clouds are usually flat at the bottom. We're going to emulate that, but let's the top part. Again, I paint on the sides. That's like I said, a personal preference, you don't have to. I liked to. The bottom of this, tropical clouds is going
to be kind of wispy. We just use the brush. I am going to put another
small one, maybe right here. If you want to look at
reference photos on Google to get an idea of
how tropical clouds look. That's always a good idea. I just wing it like the
bottom of that one. Then we are also
towards the horizon. Where are these guy
beats the ocean? Going to add a street. Like it gives the illusion of wispy clouds like
off at a distance. Just keep blending that white. I'm okay with that. And now I'm going to wash out this brush and I'm going
to get a smaller brush and I'm going to get
pure titanium white. That gave that also a
little bit of time to dry. And I do have a very, very tiny detail brush. And so I was able to
look on my palette and get that pure titanium
white offer there. Now I'm going to use this
small detail brush. Go back. Put some highlights on
the tops of the clouds, where the sun would
kind of blended down. You can also create inside of these shapes that
you've created. Then you can also add more
of a rounded cloud shapes. Give it dimension. I used to struggle with clouds
at first with acrylics, but after a while I just
kind of relaxed and just not put too much thought
into it and just kind of just go with the flow. I guess. That seemed to work out better
for me after that and not put so much emphasis on thinking they
have to be perfect. Just kind of let them naturally come out.
As I'm painting them. Again. Use the pure titanium
white to add more of those cloud shapes over that really light blue that
we had put down earlier. You can also use bit of
water and dab it off. That can help you blend. Also. If it seems like it's
getting too thick, the paint on the canvas
doesn't want to spread. That's how I do that. And honestly I'm going to leave it like that
because like I said, I'm not going to
spend a lot of time trying to make clouds perfect because clouds aren't perfect. And also we're going
to have palm trees and ocean and plenty of other things that our eyes
are going to be looking at. And the clouds are
not the main focus. So keep them simple. Keep them just flowing. And they have some
tropical class.
5. Ocean: The next step is going
to be the ocean. So now that we have
this part dry, we can very gently
remove the masking tape. And that gives us our
beautiful crisp line between where the ocean and
this guy is going to be. I am going to now use a pencil. And I am going to draw the line where the
shoreline is going to be now you don't want to make
like a straight shoreline. I try to make Let's see, Let's get this
started over here. I tried to make organic, wavy type of shoreline that helps emulate movement. Like the waves are coming in. That just gives us an
idea for the ocean color. Tropical ocean. I still have some
blues on my palette. Let's grab some
bright aqua green. Let's try that
first and see if it makes a nice tropical
ocean color. Let's see if we need
to add anything else. Let's see, I'm going to use
probably this smaller brush. I'm going to mix us up some
nice tropical green ocean. Yes, yes, yes. Turquoise. We start with our dark first
because at the horizon, as always, the darkest
shade of ocean. We're gonna follow
along a crisp line. Putting this darker aqua, turquoise ocean beautiful
color down here. Again, the edges, you're
going to do that. Let me see that. Now that you have that
lines marked off, we can use the flat brush paint. Now to the paint that I
already have on the palette, we'll start adding white, getting lighter and lighter, blending the color that
we just laid there. You see I'm not blending
up there yet because my brush is still pretty
loaded with paint. And if I start going up into the dark color that
we just put down, what kind of blend
away that dark. And we don't really want that. We want to keep
that dark up there. So I used the downward motion, kind of get the paint that's loaded on their
off the brush first. Now, you can see not
much paint on the brush. Now we can go back up and
blend the light and the dark. And it won't blend away
the dark color completely. I think I'm going to take
some of that dark color, fill in a little bit
there with a brush, kind of picked some up. Now, I still have some
white right here. So we're going to make an even. It's lighter, really light. That's where it's going to
be closest to the shore. Really light. Aqua. Aqua green, blue will go to where pencil lines are. Where the ocean meets the sand. Again, this doesn't
have to be super perfect because we're
going to be adding sand and we're going to be
adding this ego, the waves. So don't stress too much
about perfection right now. Can be loose at this point. Okay, so paying attention
to the brushstrokes, you can see I started
to move downward. Kind of want to go the direction that the waves
would be coming in. This way. You can also add a little
bit of water to the paint. Starts to feel too
thick and Dr. rough. Like it's like it's not going
smoothly onto the canvas. Add a tiny bit of water. It'll smooth write out
too much water though, unless you're doing
what's called a glaze and we're not doing that just yet. You need to fully cover
the canvas with the paint. I'll explain the leaves later. But for right now, don't add too much water. Because we went to a nice plan. Sorry, we want a nice coat over this campus coat of paint. That color into
the color violet. We're going to let that dry. The next part is to
add the light like the ripple effect of
the tropical oceans. So I'm going to get
some titanium white. I'm going to mix that with the lightest color
that we had over here. To make a really, really, really light, light blue. We don't want pure white
because honestly nothing in nature is really,
really pure white. So we'll make it like an off aqua colored off white
aqua color like that. And start going in there with squiggly line strokes. And you can go back and forth
with your brush size with depending on which one
has the most paint on it. Or if you want to blend, you can use the other side. I'm just going to very
lightly add a line. And then I guess I explained it, kinda making a motion like this. Make a semicircle. You can do that both ways. So you have some going that way. And so I'm going that way. You can see how that creates
tropical ocean effect. Again, going the direction
that the wave would be moving. Which will be this way. You don't have to worry too much about detail on the sides, but we do want it to be congruent with what's
going on on Canvas. So I do try to carry it over
a little bit onto the edges. Now. We can take the
tiny, tiny detail, brush a little bit of
water, dab it off. Again, use some of
that light, light, light aqua green that
we just created. You don't want to
overdo this too much. Just started to
bring out a few of those wave highlights or another reflection. Whatever that would
be called that makes, makes the squiggly lines
probably the light reflection. Again, like I said, we
don't want to overdo that, but we do want to add a
few do straight lines, the semi-circles, complete
circles of variety, variety of different shapes. Sparingly. Even
out here further. Because usually there's
not just one wave. There could be
several out there. So maybe we can try to make this color and detail brush that's almost at the shoreline but hasn't quite made it yet. Over. Don't do not
overdo the detail. Brush to bright lights on there and starts to
look a little hokey. You just kind of
keep it congruent like that where you got the
nice shades of the darker, the lighter than the lightest. Alright, Next we will
work on the sand.
6. Beach Sand: The sand, I'm going
to use unbelief, titanium and burnt umber. We'll start mixing. Find a clean place on
my palette over here. Start mixing mostly
bleached titanium. Little bit of the burnt umber. We don't want it too dark, so let's, let's
see how this goes. My bath, just our first
layer of the sand. There's going to be more
so you don't want it too dark and you don't want it to say just just want
an in-between. We're part, start putting
that color onto the canvas and nice sandy layer here. On the edges. Again,
on the shoreline. We don't have to
be super perfect, but we can start getting a better idea of how that
line is going to look. Now we have a good foundation
for the sand area. Now, this is where it gets into a technique called glazing
that I had mentioned earlier. We're going to utilize
that right now. For that. I'm going
to use a round brush. What we're going
to use it for than the basic idea is you use a
lot of water and you mix it with the paint color that
you want and you're going to just lightly glaze over
the previous dry layer. So it's going to sit well, you'll see because in an ocean situation
like we have here, where the sand and
the water meet, there's going to be a
little bit of sand color because that water is gonna
be so clear in real life, you know that
there's going to be some sand colored in the water. But if we put down
a straight color, it's not going to
look very realistic. So the glazing is the answer. So you get a lot of
water on your brush, put down the canvas, pick up a little bit of paint. You can see how watery that is. Then you started going
over the blue color. And you can see that it adds
the blue I mean, I'm sorry. That's that's the
brown sandy color. Without over
saturating a doughnut still leaves the
blue underneath. It gives the illusion that the sand is
underneath the water. If you added too much, it's very easy to blend out. And also even if you
added too much water and get a paper towel and pick
that up off the canvas. You can see that
I picked some of this sand color up,
but that's okay. Once it dries, we can add there's gonna be
waves there anyway, and darker sand color. So it's not gonna in a matter of water even more so you could
see how it dissipates. Okay, so we're going
to leave it like that for now and let some of this dry out before we start putting on the next
layer of the sand, this is completely dry. We can continue building up
the texture of the sand. For that, I'm going to use burnt umber and bleached titanium mix, some of that together. And we want this pretty dark
because this is going to be the sand where the water actually comes
and touches the sand. That doesn't look dark enough. Add more burnt umber. We get the shade. That looks like it's
gonna be dark enough. Yes, that should be good. We'll start putting this along
the shoreline like this. I'm using this round
brush for this, but you could use
a flat brush also. Now we have the dark
area and I'm going to add a little bit of
water and rinse that brush out a bit
because I'm going to blend it out like this. We don't want a sharp line
and sand and water there. There would be no sharp line
or that will blend it out. Don't get your brush too watery. Need to have some water on there to blend it out a bit like this. What you're going
to use, a very, very small detail brush. We're going to just
start stippling, dabbing the brush to make tiny, see if I can zoom in on that. Tiny dots. Going to help
give the sand texture. Now you can't use
the flicking method, which you use a fat brush, load up a flat brush, and load up the paint and then
just bladder it on there. But personally, I don't
like to do that at all. I don't like the mass, but that's just my
personal preference. I'd, I'd rather have control
of it and use this method, just stippling,
adding tiny dots. And you can put some water
on your brush gently. If it gets too dry. To make a variation of dot sizes, they won't all be the same size. So that gives it even
more interesting texture. I am going to do this for
this whole, entire area. And I will come back
when that's finished. This is what it will
look like after you have the darker other stuff
bolt on to the next, we're going to add
a little bit more of the bleached titanium. Going to make a lighter color. We're going to repeat
the stippling process. The sand. We're not gonna go too
far into this dark area because that's we could
put a few here and there. But most of it is going to
be in this area down here. So I'm going to do that
with the light color. And I will show you
what that looks like. When I'm finished. That's what it will
look like after you add the lighter color sand. Now, notice that I didn't
put it everywhere. I just picked some areas to add a little bit
of those highlights. And also I found that the color that I mixed
wasn't quite light enough. So I use just some of the
pure unbelief titanium to make those highlights stand
out even more sparingly. Here's what it looks
like up to this point. Next, we will start working
on the falling edge.
7. Foliage : The next thing that
we're going to work on is the foliage that is down here in the corner at the
base of the palm trees. Now there's going to be
a few phases in this. So we're going to first
start with a dark green, cobalt blue, cadmium yellow. We might need a little
burndown word to make it a little darker. But let's start with
the cobalt glue. We don't need a lot here because it's not a
really big area. So what does put up it
squirts each one of those. I am using a very small flat
brush for this cat hair. I will mix those
two together and see what kind of
green we have so far. That's not bad. That's a pretty, pretty dark
That's a pretty dark green. Let's mix just a
tiny bit. Over here. It's pretty dark. So we'll take they're above the burnt umber and we'll
take some of this green. Will darken that up a bit. Because like I said, this is, this is going to be the
base layer and we're going to add brighter greens
on top of that. Some of that will happen after
we finish the palm tree. So this is just the first, the first step for the foliage. So we're just going
to go in and start painting leaves that
are coming out. Paint some other shapes. There will be other leaves. Like I said, don't stress too much about this because this
is just the base layer. Just to get an idea of where
this voltage is going to go. I paid on the sides and
the bottom of the campus. Welcome back. Then leaves like grass growing from
the base of the palm tree. I'm just going over
the lines that I painted earlier
to darken them up. Now, we have our foliage
right here in the corner. We're going to let
this dry completely. And then we will start adding some of the lighter
green on top of this. All right, now that that
isn't dry, we will use, I'm going to use a
very small flat brush for this because
we're going to start creating leaves and foliage with this lighter green color
that we created earlier. Right here. I wet the
brush a little to make it not so stiff and pick up
some of the green paint. And you can start
making leaf shapes. And also some of the
thin grass shapes, like we did earlier. That beside the darker shades or have them on their
own. Either way. You don't want to
completely cover up the darker area because
that's what's going to show through and
that's what it's going to give it some depth. There. Could use, use at least
three colors of green. We've got a darker green, a little bit lighter green. Now, I'm going to put some
more yellow over here. Then we're going to make
lighter yellowish green. Presumably went to let
that dry a little bit. If not, it will blend in, but that's not so bad either. Now we have some
more highlights here with the lighter green. I think that will do it for
the foliage for right now. Because we have to put the
palm trees and then we can add more foliage on
top of that so that the palm tree trunks look like they're
inside the following. So this will be like that. The background foliage. Once we put the palm trees in, we'll do foreground fall edge. Next we will do the waves because the palm trees are going to go on top
of everything. So we want to have everything
back here finished and then the palm trees can
go over this area. So let's do the waves next.
8. Waves: The waves, I am going to use this extra super
tiny detail brush. Very smart, very little bit. Titanium white. We really don't
need a lot of this. We are just going to begin
dotting the shoreline. Very small dots,
the titanium white. And this is what emulates the C phone waves
that get created. Just dot like that. You don't want
like perfect dots. They could compress
down with your brush. They don't have to be perfect. Circles like we
did with the sand, even those aren't
perfect circles. We don't need perfect circles, but we do want to
just very small dots that represent this
sea foam waves. I am going to continue. I will do this entire shoreline and I will come back and
show you when I'm finished. I have finished
dotting the shoreline with the white paint and
this is what it looks like. Now I'm just going to
continue kind of building on that where there would be
maybe more sea foam hearing. They're in different places
just so that it's not all one size all the way
across the shoreline there. So what kind of dot sum to make different shapes with
the sea foam hearing, they're just give it
some more emotion. Sometimes the bubbles
kind of stick in the sand like that. We just give the shoreline and
little bit more character. And then now maybe we will see more pure white into some
of these waves out here. That also gives it movement. Add another layer of great here. Just to give the illusion of these small gentle
waves coming to shore. I don't want to overdo that, so I'm going to
leave it like that. Next we will work
on the palm trees.
9. Palm Tree Trunks: Now we're going to begin
with the palm trees. I am going to mix some bleached titanium
with burnt umber. Going to get a nice light brown. Make sure everything
is dry on the canvas. And I'm going to
make two palm trees. In this picture. You can make as
many as you like, one or three or however
many you would like. But I'm going to make two
for demonstration purposes. So I am going to
start in the college. I am just going to move
upward into the ocean, into the sky and see where I want it to
end right about there. And then I can go back and fill in nice stump base with this light brown. Now I'm going to add my second
tree will be over here. Much straighter.
I'm a little tall. Again, go back and fill in any gaps that may have been created to read
this a nice solid color. We will let this dry
and then we will make darker brown and start adding
detail into the trunk. Now we're going to begin to add detail to the palm tree stumps. I'm going to hit
the burnt umber. My very small detail brush. I will add little bit of this, light brown and some of the
burnt umber mixed together. It's a nice variation of this, just a tad bit darker. Add some water anytime
you feel the paint is getting getting too
thick and that's spreading, you can dip your brush into the water and then add that to the paint and
it sends it out of bed. We're just going to use
the tiny detail brush. And you want to decide where the sun is going
to be coming from. It's coming from this way. The darker areas would
be on the right side. If the sun is up here
coming this way, the darker areas are going
to be on the left side. And that's what I am
going to do here. I'm just going to start
adding some palm tree looking texture
onto the left side of the tree, get
the right color. The darker. I'm just
going down the edge and then carrying it across
with a triangular shape. Just periodically, every now
and again. Pull it over. Doesn't have to be exact. I mean, make as many of these as you want or as
few as you want, but this is what
creates stretch, creating that palm
tree bark texture. I am going to go off camera. Use this technique to add the texture to this tree
stump and to that tree stamp. And I'll see you back here. All right, now the first part of the palm tree stump
texturing is complete. It will look like that. You just have some texturing going to look like the
bark of the palm tree. Next we will use, we're gonna make a
very dark color. So we use the burnt umber
and just pull a tiny bit of that previous dark color and mix that just so that it's
not pure out of the tube, burnt umber, that
it's got a little bit of character to it, but it's going to be very dark. Then we can continue, continue making the
texture on the palm trees. Using the dark. And just using what we've
already painted as guides. Just start adding some of
the dark color into there. You can add some on the
left side completely and just carry it over
into the actual trunk. Like almost just exactly like we did with the
other color except with the darker color
and more sparingly and you don't want to cover up the other brown color
that we just put down. We went to let that comes
through so that we can see color variations for the
different shades of brown. Notice that I'm putting
the darker brown under the lighter
brown because again, that's where the shadows
would would be produced. Underneath of the bark
that's kind of peeling up. Would be darker
under the bottom. I'm going to continue with that under for both of these stumps. And I'll show you what it's
like when I'm benefit. This is what I have now with the first color of brown that
we painted this dumps width and then the second color
to add some detail and then the darker color to
add even more detail. Now I am going to use the
and bleached titanium. Just put a tiny dab
of it straight. Then going to load my brush
up with water and this will be more go wash will make the paint
pretty thin with water. And with the tiny detail
brush, just start adding. See that's not done enough. We want to predict. Just
start adding some highlights. Every now and again. Very fan bleached titanium. The trick is you don't
want it too thin and you don't want it too thick. It's kind of experimental to get that perfect
consistency for a wash. You just have to play around with
it to get the feel of it. Again, just sparingly adding some highlights in some details. They can be various shapes. They don't have to be lines. They can kind of be
knots in the wood. Like that. Can be lines. Kind of rough. Highlight texture. I'm going to do that
to both of the tree stumps and I'll show you what it looks
like when I get back.
10. Palm Fronds: Now we're going to
begin to work on the leaves of the palm tree. So the first step is to do the darker the
details down in here. If they're coconut palms
and then also the froms, they're going to be this dark brown that
we created earlier. For the tree. We can, we can utilize that. I'm using this very
small fan brush. And we can just start adding some shapes like this that represent like the dried leaves that are underneath palm trees. And then also kind of
fill in because this is where the
coconuts would be or this is where all of the dead fronds would kind
of be stuck right in there. Now we're going to
create the actual spine. The palm fronds that are going
to get the green leaves. So we're going to
use the dark color. And we're going to
very carefully start placing where we want
the leaves to be. This is going to be the
spine of that frond. The leaves will come
out from there. Decide how thick you're
going to want your trees. What shape or direction, if there's any wind blowing
or anything like that, you can decide that. I like to just meet
very even nice. Make sure that there's
no area that is not going to have any leaves you don't
want like a bald spot. Start with the leaves will come over here over the
stump or the trunk here. That should be
fine for that one. And I will do the same
for the other tree. First we will make some
of the dead leaves. Coming down from here. The coconuts or
other dead degree from the leaves would
be accumulating here. Then again, we're going to decide where the leaves
are going to be, the branch, branches from
whatever they're called. And palm trees. Debt is the beginning of drawing
the palm fronds. So next we will start
adding the leaves. For the leaves, the first
thing you want to do is determine which trees in the back and which
is in the front. For me, this one is
going to be in the back. So that is where I want to
do the leaves first on, on that tree in the back. I'm going to use this
green that we had from earlier. Should be fine. So little water if
it got a little dry, not too much because we
wanted this isn't a wash, this is going to need
to be thick paint. Then I just start using
the detailed brush. Start painting individual leaves onto this stem that
we created earlier. And you want to be
mindful of the size as it gets down towards the tip was the leaves would be smaller. Ones. Closer to the trunk
can be longer. We're just going to go with
one color of green for now. And we're gonna add and
build up from here. Let's start, start with
his medium shade of green. First. As you're doing this, you're gonna be like
an addict going, Oh my gosh, what am I doing? This, this looks horrible. There's looks like a
third graders doing it. That's okay. That's,
that's perfectly normal. That happens. There's different stages of progression that you're
painting is going to take. And unfortunately,
one of those stages, it looks like a third grader. But don't worry,
it won't for long. Just keep adding these
beautiful leaves in here. Again, getting your paint
consistency just right. If it's too thick, add a little water. You don't want it too thin. I am going to do that all
the way around this tree. And also on this tree. Once this tree is finished with the basic
foundation of leaves, I will also do it. This tree. I will come back when that is finished and show you
what that looks like. I have added the green
palm leaves with our first medium shade of green. And this is what it looks like. I know you might be thinking, Oh my gosh, this looks horrible, this looks terrible. Well, you're right. It does, but don't worry, it's not going to look
terrible for alarm. We're gonna keep working on it. So don't don't be upset
or frustrated at all. This is part of the process and that's one of the
magical things to me is, is watching and watching
things take shape that at first look
kind of silly, and then then they
start taking shape. The next thing that
we'll work on is filling in these leaves with
different shades of green.
11. More Fronds and Foliage Details: Now we're going to start adding the darker and lighter leaf
colors, the palm trees. So I mixed up some cobalt blue and
cadmium yellow light and got a nice green. But then I am going to use, I'm going to divide that
in half because we're going to want to darker
shade, the lighter shade. Since we already have our
in-between green color. Now we're gonna do
darker and lighter. That's a lot of black. Let's just get ivory black mixed in. On this side. For a darker green side. We're going to use a
little titanium white, but let's get some of
that off of there. First. I got a lighter green
here, darker green, and then we still
have some of that medium green if we
need to work with it. That aside. Now I have a very, very long sand detail brush
that I'm going to use. And I'm going to finish
pretty much the, the tree that's in
the back because I want those leaves to
be in the background. And then once it dries, we'll be able to
paint the leaves of this tree that's in the foreground and
it will go over. So let's do that. Let's do the dark and light and finish everything on this
tree in the background. So we'll just go ahead the
darker shade and start creating some froms like we
did with the other color. I'm just going to keep going around all of these in
the background here, not this tree yet. We're just going to
do this backward. So I am going to paint
the darker leaves. I will show you
what it looks like. When I'm finished. Just a quick tip.
Anytime you start to notice that your
brushes dragging, leaving spaces in the
paint on your Canvas. There's like you can see through the paint
onto the canvas. Just dip the brush in water, debit and mix that wet
brush into the paint. You don't want to
add too much water, it will be too watery. Just takes a little
practice and experience. You'll be able to judge how much water to
use and how much to dab off onto the paper towel, you'll get used to it. So again, not not
not too watery, but you don't want it so thick that the paintbrush or just
drags across the canvas. Because you want
to be able to make very nice thin lines for the palm leaves like that. I will finish this
and I'll be bad. All right. I have now the dark green in the back
palm tree here. And I'm going to let that dry. In the meantime. Going to use this dark green also down here in the fall edge to
remember we added in the background and then
we added the palm tree. Not stamps what he
gathered the trunk. Now we're going to use
some of the paint here and paint foliage so that it's now going on top of the trunks. Paints a little thick, mix a little water, collides. Just add some small reads of seven quarters or
call tropical grass. Since we do have this
thin detailed brush, we can add some more over here. Just to add that right on top. For the light green, we're just going to do exactly
like we did with the dark green that into our leaves. I like to use the light green
a little more sparingly. It's just more like where the
sun would hit the leaves. You don't want to
do every single one like we did with the medium green and the dark green. So just very sparingly, some of that light
green in there. Actually now I have
some different color, medium green here, that I am going to add a little
bit of fat in here too. Just to kind of fill in those. Give it some color variation. Alright, I am okay with that. I have going to let
that dry completely. And we can then begin to do
the same for the front tree. Now that that one is dry, I'm going to use
the same technique to paint the darker leaves. The lighter leaves
on this front tree. Same technique or just using the long thin detail brush and making long thin
strokes for the leaves. Just make sure that your
paint is a nice consistency, not too thin and not too thick. And you can do that. I dipping your question water. Either dabbing it on a
paper towel if it's too wet or just adding
that into the paint. Nice consistency. Glides. To create these
thin palm fronds. I am going to do that with the dark and the light
like we did on this one. And I'll show you what it
looks like when I couldn't. Okay, so we have the
darker green tree and now I am just
going to go in with the lighter and add some of the highlights sparingly
it onto this tree. We're going to use
this light green now, also, the foliage.
Down at the bottom. Just added a variety of a different leaf shapes and
textures. Along with him. Grass. Here we have our final tropical beach
scene with acrylic paints.
12. Assignment : Your assignment should
you choose to accept it, is to create your very
own tropical beach scene using acrylic paints. You can use the techniques that I taught you in the class. Make your very own paradise. Be sure to upload your project
to the project section. I would love to see it. Thank you again for watching the class and as
always, have fun.
 LaVonne, Artist, Illustrator