Transcripts
1. Introduction: Hello, everyone. Paul here. I have been a skill share
teacher for many years now and a visual
artist even longer. Today, I'm going to
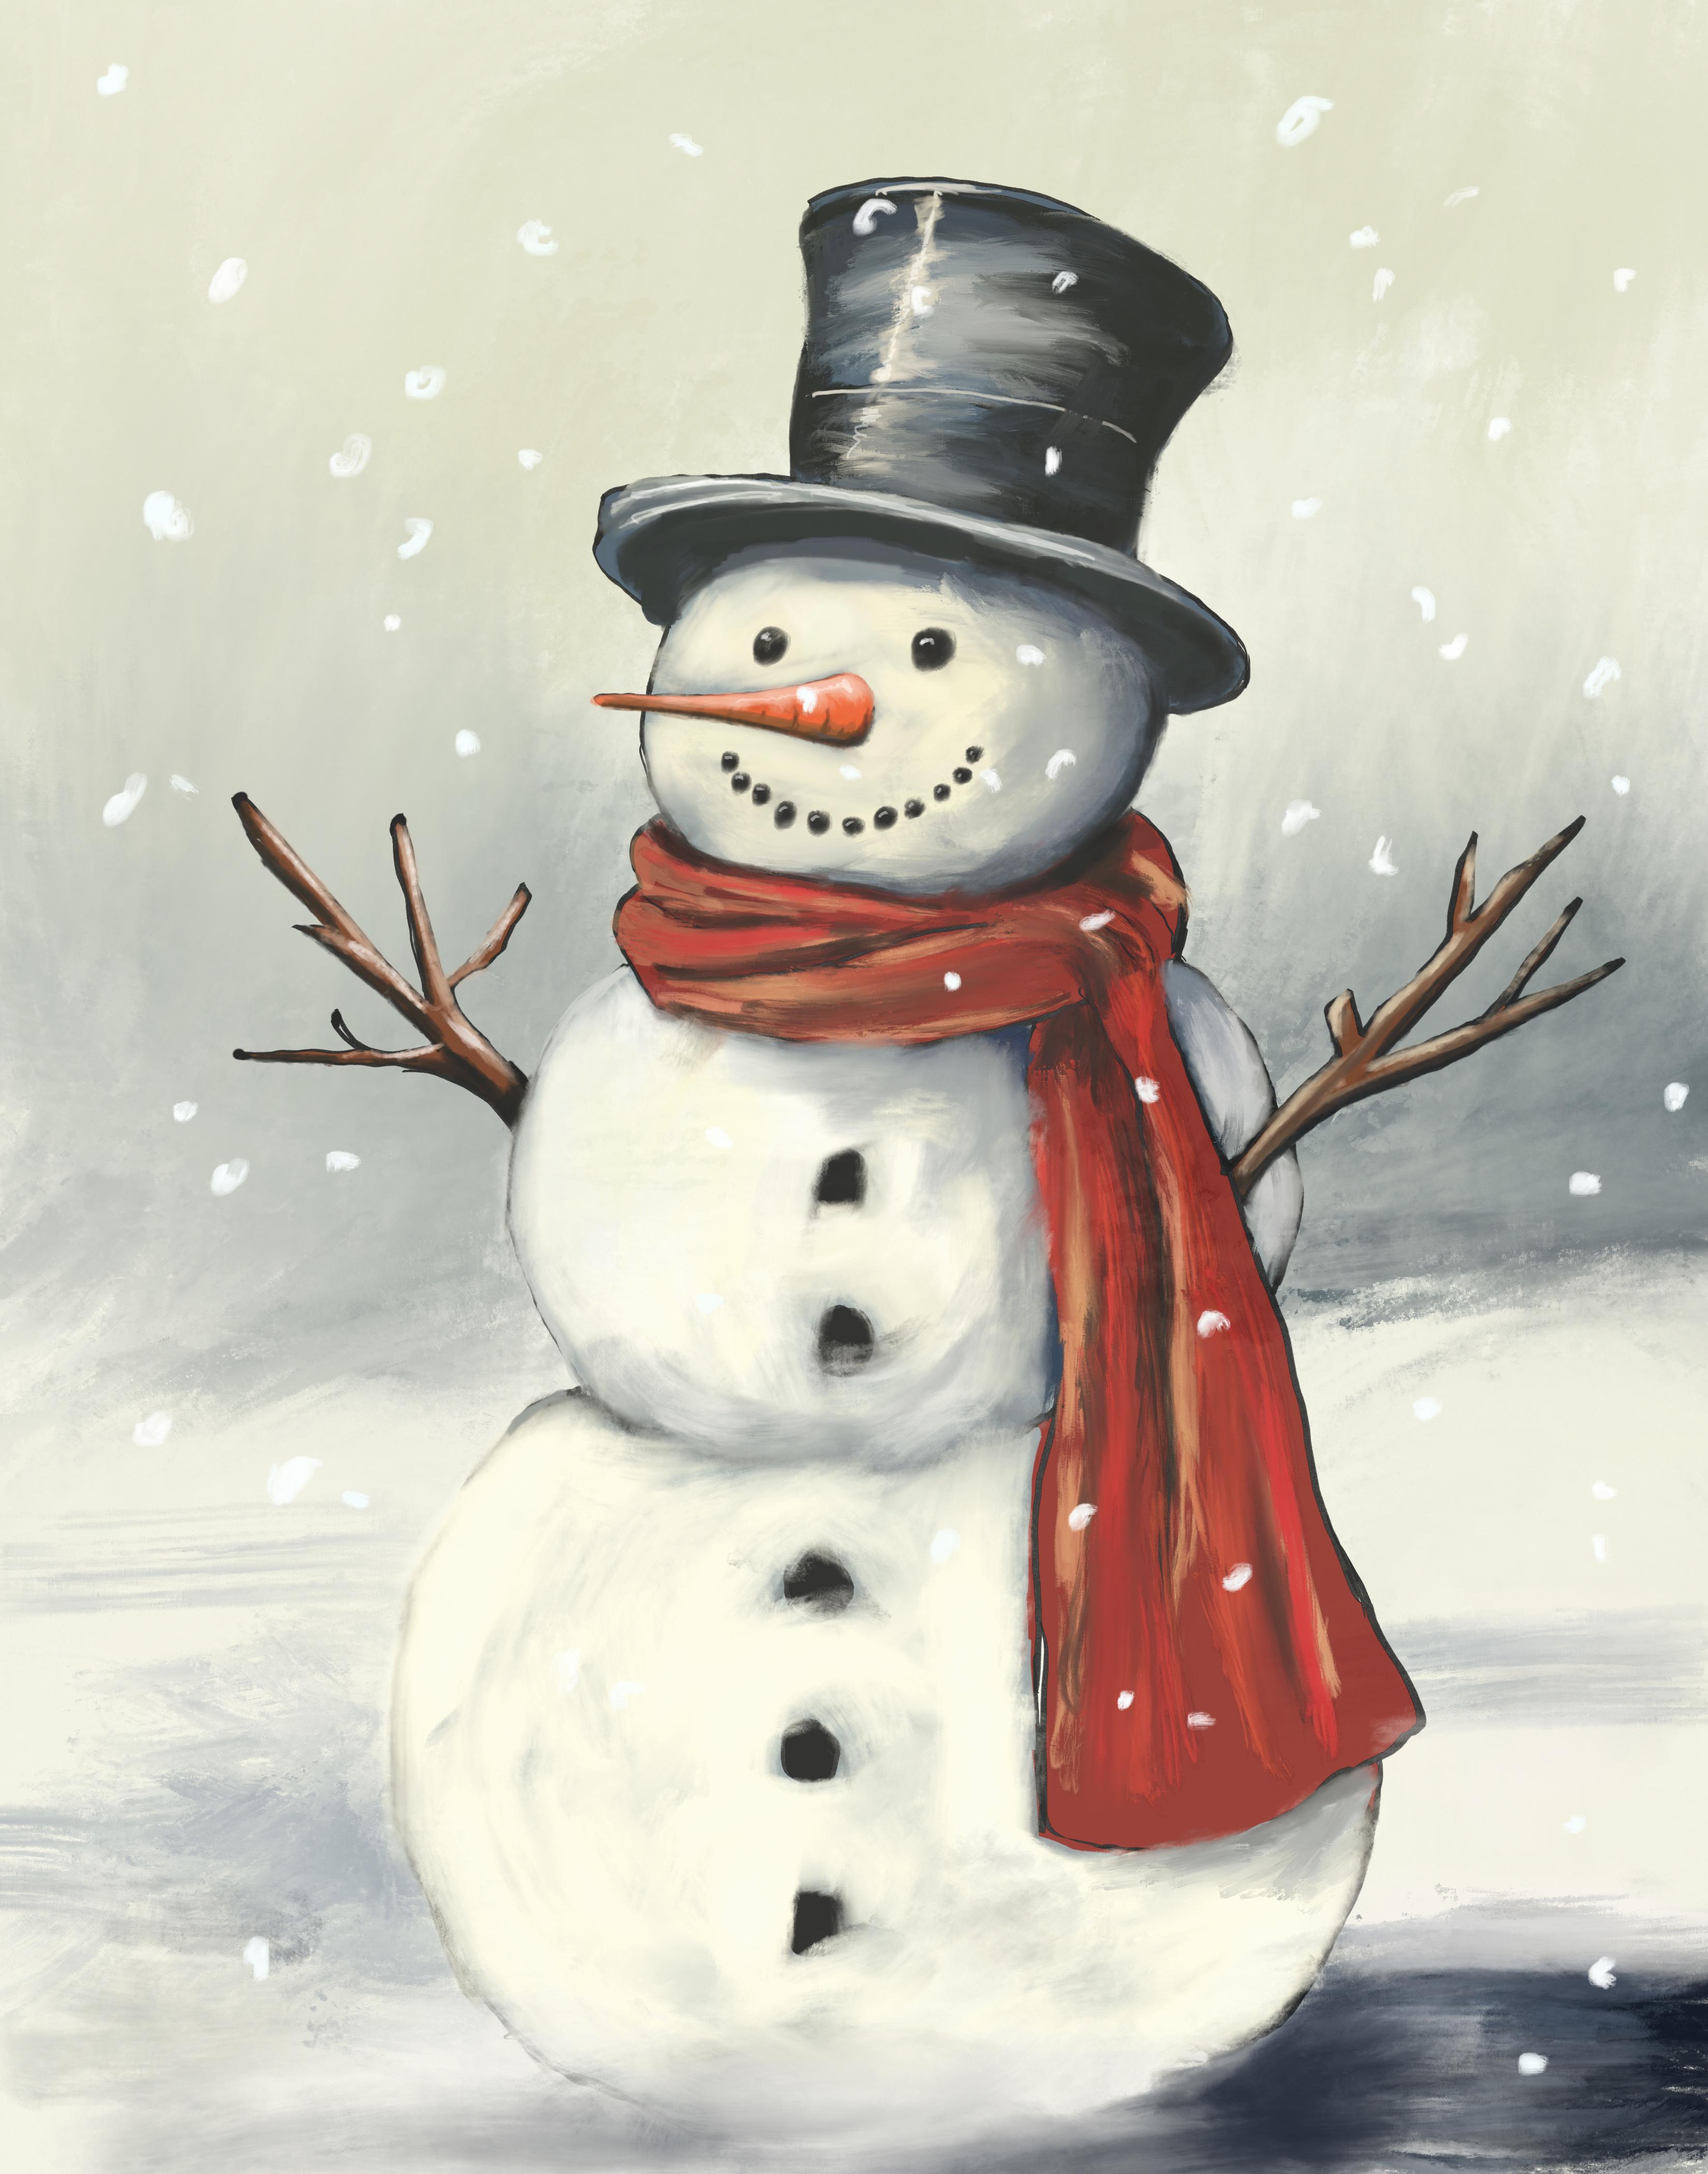
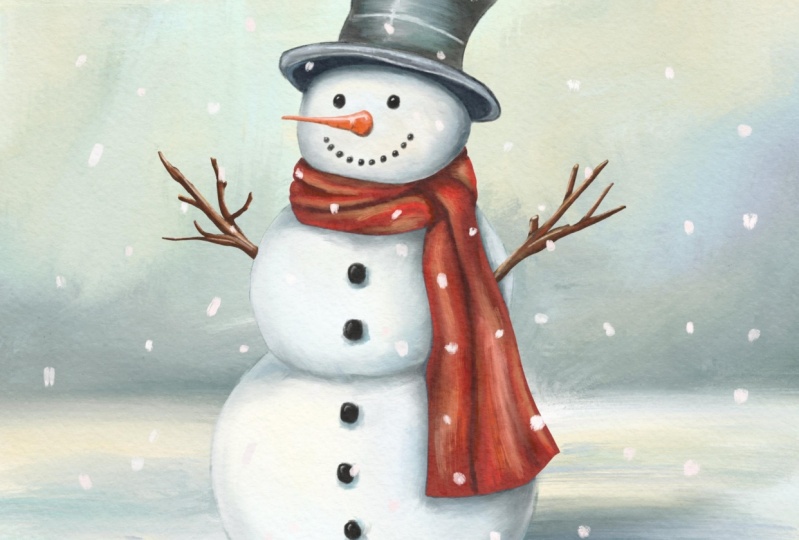
teach you how to paint this snowman in Procreate. You're going to use my digital oil painting brushes
that I made myself. I've included them for free. Along with the brushes, I've
included a sketch for you to paint on and a reference
picture to paint from. This class is perfect
for all levels. We will start off by importing the artwork into Procreate. We will then paint the hat, move on to the face and
the body, the eyes, the little buttons,
the nose, the hands, finally, the background,
and we are done. When you're finished
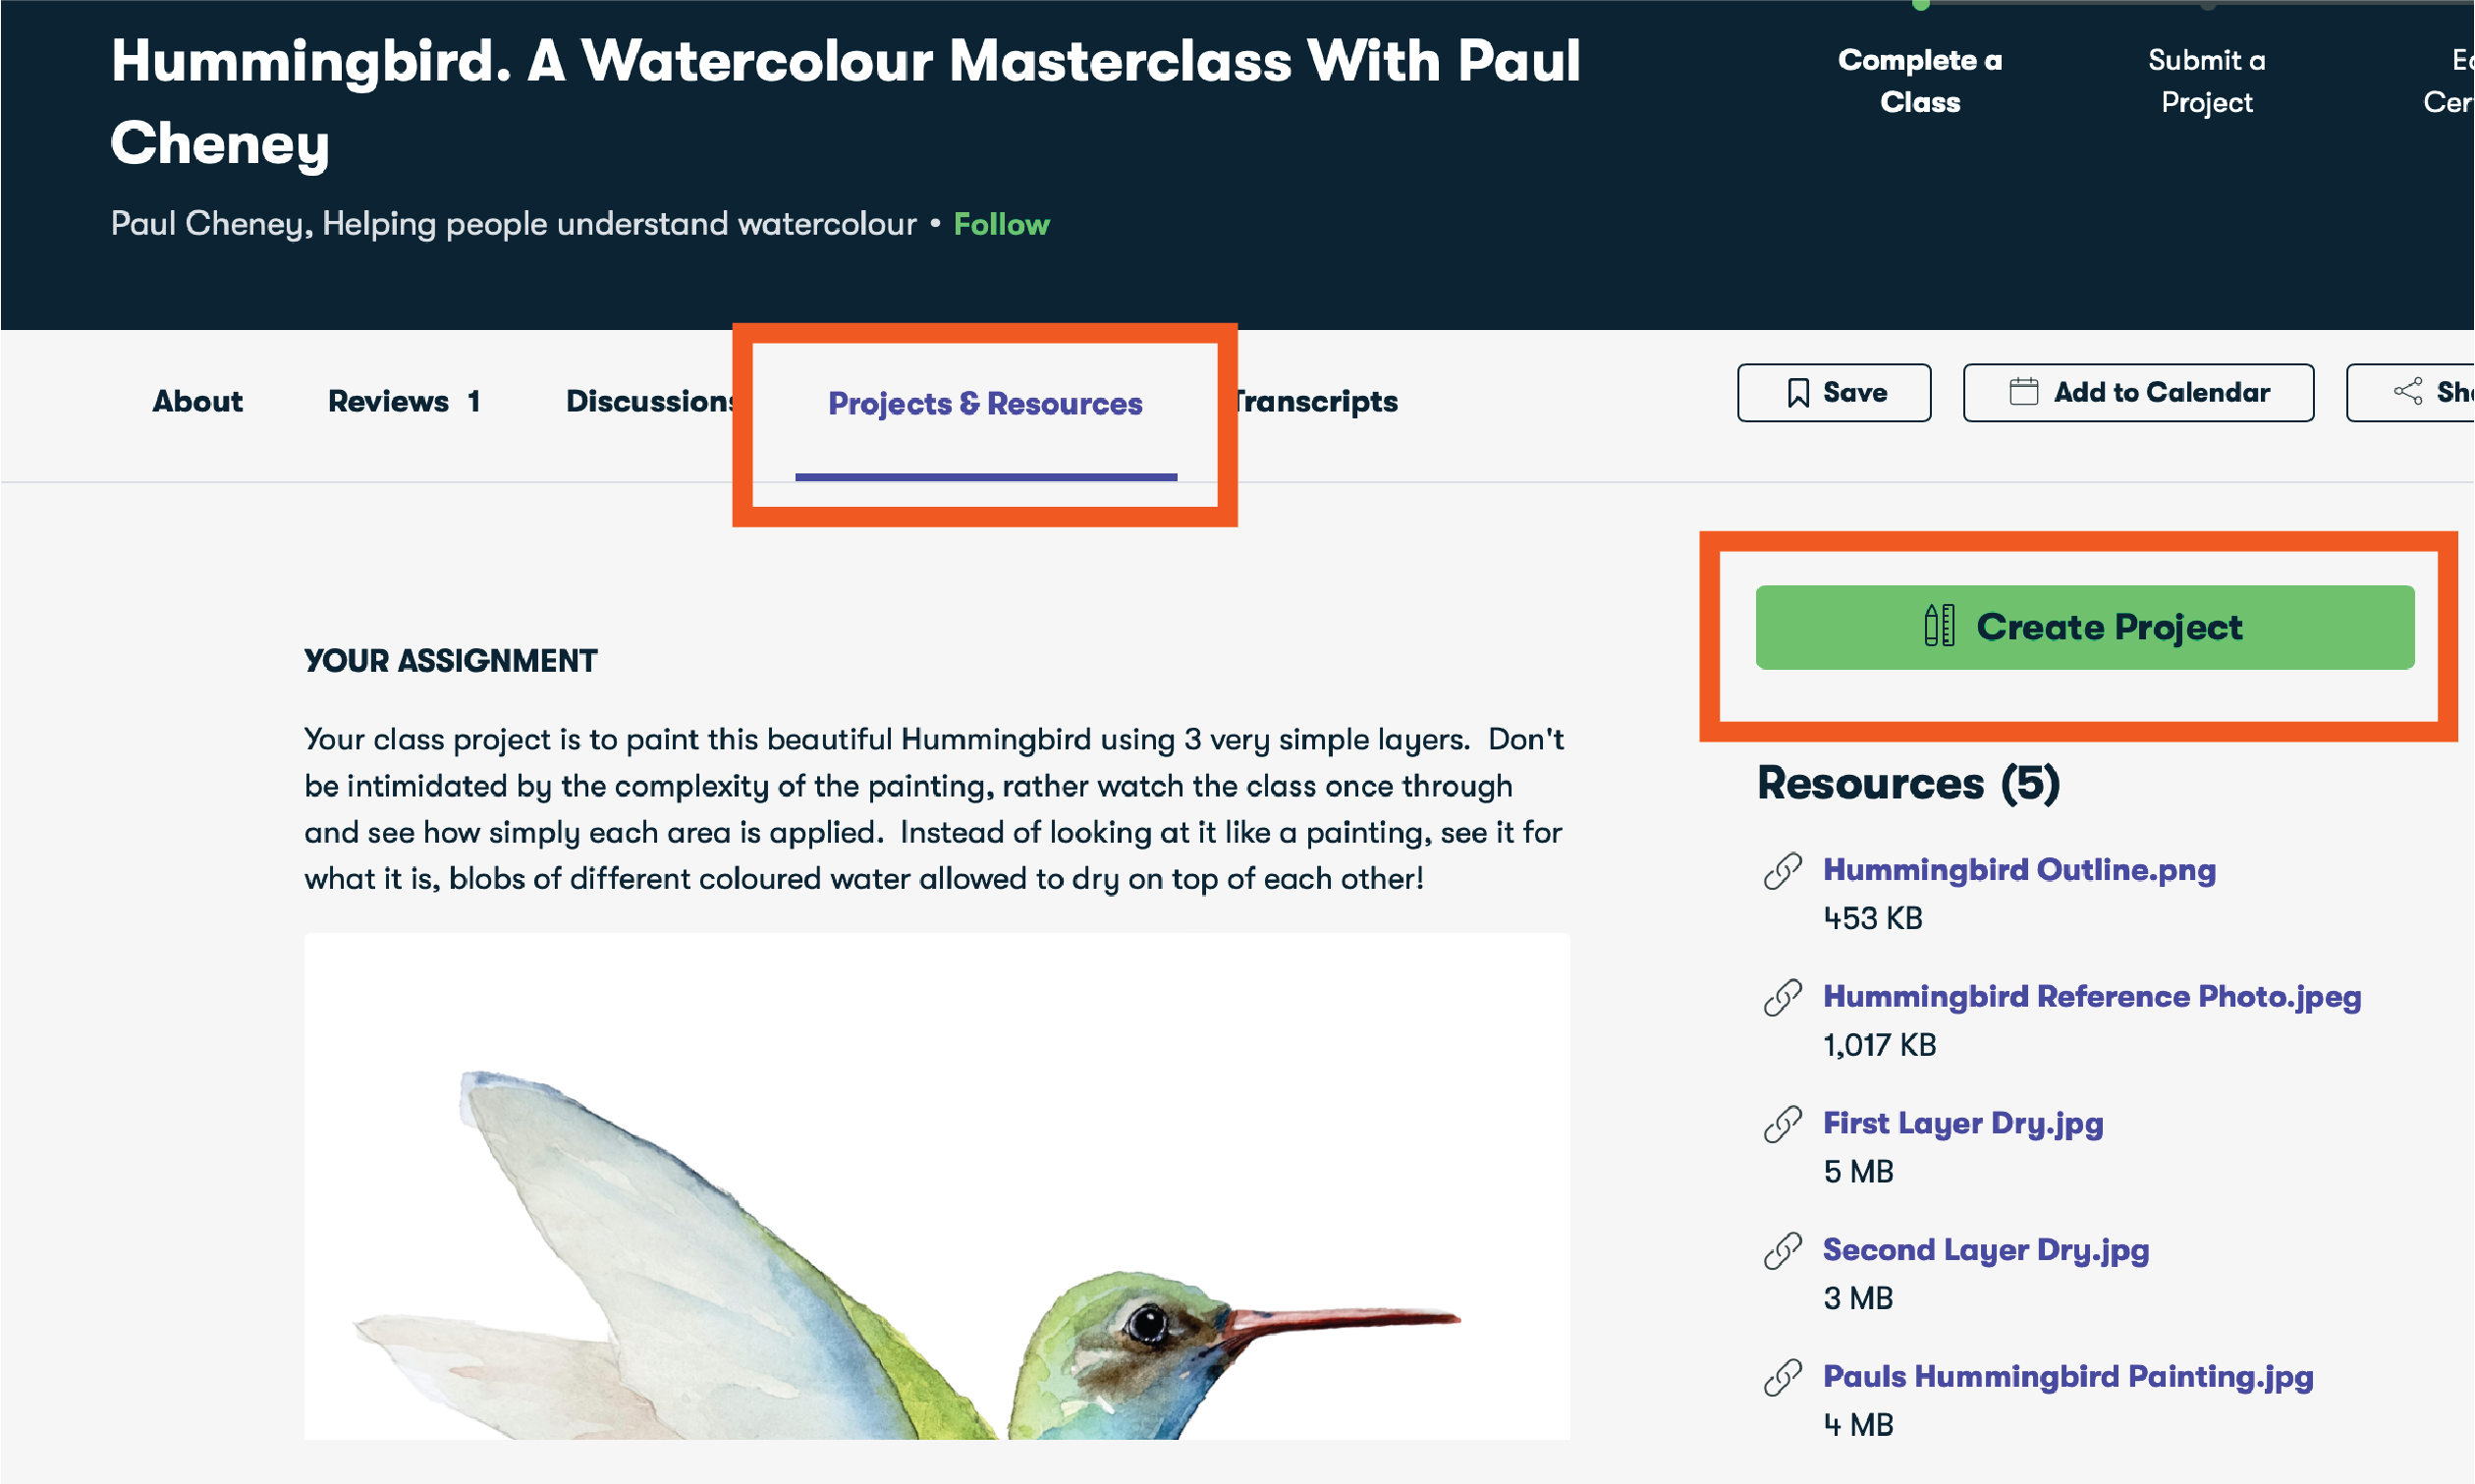
your painting, please make sure you posted in the projects and
resources section for others to be
inspired and so that I may critique your artwork. I hope you enjoy this class as much as I enjoyed making it. Thank you very
much for watching.
2. Painting the hat: So we've got our
snowman painting all set up here on my iPad, but let's get it
set up on yours. The first thing you're
gonna want to do is import the sketch that
I provided for you, and you're going
to want to import the reference photo.
Import the sketch. You can just go over
here to your little uh, wrench button there. You click on AD, which I've already
got selected there, and you can click
on Insert a Photo. You're going to need
to put these into the photos on your iPad because that's where it's going to want to pick them up from. So you're going to
click on Insert Photo. You could also use a
file, you have a file. But as long as you put the
two images that I have, just add them into your
Photos folder on your iPad, then you can pick that
up from right there. You're going to do
the same thing here. Your reference picture.
So to do that, we come over here to Canvas. We click on Canvas. And if you don't have this
button here selected, you will not see the
reference picture. Okay? So we're going
to come over here back to Canvas and reference. We're going to click
on that and Walla. Now, mine, just remember that I had this here from
before, but for yours, you're going to have your you're going to pick
this file here. So you're going to
click on the image, and you're going to click
on Image. Oh, I guess wr. I'd have to clear it. So
anyway, you click on Image, and then you select
the image from your photos and Valla then you've got your
reference photo. Now you can select and choose the colors from
this if you like. Or you can use your own colors just by coming over here
to the color palette. For example, for this black hat, I want it to be a
bluey color black, so I'm going to move my slider over here to the blue color, and I'm in the bluish
black colors there. And I can just start painting. But we want to know what
brush we're going to use. And for this brush, we're using my oil painting brushes here. These are the Paul Cheney oil painting brushes that I provided you with a link on where you can download those from
on my website. Uh, for the most part,
we're gonna use this here PC base oil Oops. We're base oil soft
blend. Ignore the names. I just make them up as
I'm making the brushes, and a lot of times these
brushes have been copied, like, from my library because
I keep changing them, so I'll make a duplicate
of it and then just change the name so that
it can be something, whatever, and then I end
up leaving the name. And I don't remember
why I called it that, but it is what it
is. Here we are. So we're gonna go with the PC base oil soft blend
on our brush. You want to have an
appropriate size. Obviously, if it's that
big, it's too big, and you can leave the opacity
at 100%. For now. Whoops. I hit the eraser
button by accident. Um, now we're going to make
our brush a decent size. We want to basically
with oil painting, you want to have the
brush as large as possible while still
being able to control it. So let's go here. We've got our layer here
with our sketch on it. I'm gonna lock this layer
because I don't want to paint on that layer. You can. There's no
reason why you can't. And in fact, if you
choose to, that's fine. The only thing is
then you've got to clean up the lines after versus just turn the layer
off and they're gone. So we're going to
make another layer. I'm gonna make another
layer over top. If you prefer, you can take
that layer and move it. Down underneath here. That way, you've got the
sketch layer over top, and you can still
see all the lines. It doesn't matter because
once it's gone, it's gone. You know, just for fun, I've got my painting here layer
right there as well. You can put that in to
check to see if you like, or you can just leave it off
and use the reference photo. So the first thing
we're gonna do is we're gonna start
with oil painting. We always start with our
darkest color first. So in this case, here, we're going to choose
this black color here. We're gonna come over,
and we're just basically going to start putting that on. Now, making sure that we're on our layer there,
the correct layer, we can't paint on that
one because it's locked, and I can't paint on that
one now because it's locked. I've got the correct
layer, I can zoom in to make more accurate and just
get that paint in there. Like so. Don't worry about how it's on
or how it's not on. Just get it on, fill it in. Easy peasy. Now, if
that's not dark enough, I'm gonna slide this
over to the blue, so you can always come down here and darken it quite often. I find the color picker. You know, when we're
seeing this on the screen, I don't know exactly
how it works, but it always seems
like the colors, then I pick the colors are
either a little bit darker or a little bit lighter
than what I wanted. So I don't feel like you have to be a slave to whatever
you pick there. I feel like you
can take that out. Now, I'm just basically choosing another color here
at this point, we're going to
start and blend it. And all we want to
do with the blending is we want to have this specular highlight down the middle
and we want to have some um, you know, a light to dark
kind of thing, right? I move that over
to the blue area a bit more. Come on, blue. There we go. It's just a cooler, black, cooler color you can
put in there if you want. Um, you can see in
there. I've got some blues and different things. We're gonna blend all this, so it doesn't really
matter, right? We're doing right now is we're just grabbing our colors
and we're putting them on. I want my darkest darks
around the edges there. Okay. Okay, now let's grab
our blending brush. And again, with the
blending brush here, we're using the
same brush library, the Paul Cheney oil paints, and we're using our
linseed oil brush. In traditional oil painting, you can use linseed oil
as a medium to help, you know, dilute your paints, but you can also use it to
blend things with your brush, or you can use a dry
brush or a wet brush. Using a wet brush, that would
be a linseed oil brush. So what you can see I'm
doing here is I'm basically moving these paints around. I'm not actually
painting. I'm just mudging what is already there. If it's too hard, you
can lower the opacity to get a more even um, look or a softer look
because, you know, sometimes it will grab
um, paints from all over. Alright. I'm I get down all
the way up to the top there. I'm just kind of
smearing this around like I would in a
traditional oil painting. Now, keep in mind, if you come over here where
this is white, it will see that canvas white, and it will blend that it still considers that to be a
color for some reason. I'm not exactly sure why. Speaking of which, I'm now
going to grab my canvas white. I'm gonna grab back
to my painting brush, make it nice and small, and I can now put on my
kind of highlight here. Now, you'll see
this line here on the sketch shows that white
kind of line on there. You can put that in or
you can leave it out. It doesn't really matter. I'll put it in 'cause
it's in the painting. I've got my rim up there. Shrink down my blending brush, just basically soften
that down a little bit. And now I'm going
to come back here. I'm going to grab
my solid black, and I'm going to shrink my
brush down even smaller. Here we go. Small brush and just make my little hard edge up here at the top a
little bit harder. If these lines like sketch
lines are too distracting, you can either turn them off, which makes it harder to
see what you're painting, or you can come over here. We're going to unlock
it for a second, and click on that little N, and this shows our
opacity there. Now we can see
they're very light. So now they're just a little
bit less distracting. I'll lock that again so
I don't paint on it. You'd be surprised how
often you will paint on the wrong layer if you don't make a
habit of locking it, so I always suggest you
lock whatever layers you want to leave untouched. Okay, we'll grab
our blending brush again to smear that out. How here in this for gonna. Smudge this out a little bit, 'cause we want that
hard line there. You know, it's Okay, I'm starting to get
there, looking good, looking good. Okay, small brush. Okay, so basically we've
got our top hat done there. You know, you can play
around with it as much as you like. I'm
gonna come along now. I'm gonna work on the
rim of my hat here. Gonna put some dark
paint underneath, make my brush a little
bit bigger. Okay. You can do this whole
thing if you want, but I'm gonna leave a
little space just so I know where I want to put the white ish area on there. What I'll do right
now come over here. Come down here, you'll see previous colors that
you've selected. You can click on one of those. And I'm just gonna put some lighter color on there so that I know
which is which. So I can tell where it
is from the background. And this is underneath, so it should be pretty dark
underneath here. You know, this is going
to be a shadow area. Okay. We can grab some
lighter color there, which we had a white
before, smaller brush. Just get a little bit
highlight in there. Alright. Look at that. We've got a hat. Okay. We come in here now, let's just fix this
up a little bit before we go any further. Let's tidy this up a bit. You can always come
in here and just click this on and
off just to see, like, where you know,
do you have enough? Like, are your
edges hard enough? Are they defined enough? Are they too defined? I'm just gonna tidy this up a little bit. This area up here left out. I got my rim under there, got my rim under here.
It's looking good. Never mind, this is an
impression of stop painting, so it doesn't have to
be perfect, right? We're not trying to make a
photo realistic snowman. I don't know that
that is a thing, even because snowmen
are not real, but well, maybe they
are. Who knows? Okay. Alright, so we
got our hat there, pretty happy with that hat. Gonna come back here. I'm
gonna turn on the rest of my snowman there. Now, what I would
suggest you do here is, let's use different layers for the different
parts of the snowman. And the reason being is, if I it just makes it a
lot easier, you know, by putting this underneath here than it is to try and
separate this out. Now, my painting is
all done on one layer, but, you know, for
the sake of these, I'm trying to show you the
easiest way to do it, really, it doesn't matter
if you do one or two unless you want
those colors to blend. And under here, these are
going to be different, right? It's a separate layer. It's a white snowman
and a black hat. It's harder, like, to, you know, you just end up smudging it together if
you're not careful. We're going to come back,
and we're going to paint the snowman body in
the next chapter, and then we'll work on the
scarf and then the hands and the background and next
chapters of the after those.
3. Painting the face and the body: Alright, let's take a look
here at our next layer, which is just gonna
be our base snowman. Now, again, our
sketch is on the top. We've made a new layer that
we're gonna paint with. I'm going to lock my hat layer, so I can't paint on top of that. We've got our new layer
underneath the hat, so we don't need to
worry about that. We don't need to
worry about covering up the eyes or anything
else like that. We can just come right
in here and grab one of these darker
colors there, grab our brush, you know,
get a decent size on. And again, we're doing the
same thing with our hat. But now, because
our hat is overtop, we don't have to worry about
that smudging underneath, which just makes it
a life a lot easier. Um, Again, if we do the scarf on a separate layer and the
nose and the eyes and the mouth and everything on a
separate layer, same thing. We don't have to
worry about that. I'm just going to basically
brushing these in. I'm basically brushing
these in very loosely, and I've got a darker
color just to put right underneath the
rim of that hat there. Okay, now we can
come along here. We can grab a
lighter color there, make our brush a
little bit bigger, n some of that in together. When you're making a
traditional oil painting, you generally will have what
is called an underpainting, and it helps you with your
values and everything else. And you're starting from, like I mentioned before,
dark to light. So now we've got a darker
color under anything, and that's not the right color,
but trust me, it will be. Now I'm using a little
bit lighter color there. Okay. Mm, I think my original one I had more of a shadow over here, so we'll
put that back in. And I think we got some
darker areas over here. But the car brush a little
bit smaller from that. Whoops. There we go. Okay, now let's get in some even lighter areas here and just gonna move this over
a bit closer to the white. We're gonna make our
brush nice and big. We can lower our
opacity here if we want to just so we don't
make it too crazy. Okay. Alright. So now let's
grab our blending brush. We're gonna blend some
of this together. Why are we? We too
small, I think. Yeah. Six. I need to remember to put some music
in so that I don't have I had more of a
underlay here, I think. Yeah, I did. That's better. Just a
little bit more depth. I was saying I need
to add some music in because of the tap, tap tap. I must drive some people batty. I know it does to me sometimes. Okay. Now you'll notice
our snowman here. This is a white background here, and our snowman's face is not actually totally white,
but that's okay. We can always make it
brighter or whiter, but in reality,
you know, we don't want paper white
everywhere. Okay. Basically, now, we're
gonna do the same thing. I'll speed this up,
but we're gonna do the same basic thing down here. We're gonna put an underpainting
on the whole body. Then we will come
back in and we will paint the lighter
colors over top. So I'll speed this part up now. Okay. So I've gone around and I've painted
in the body there. We've got some nice
brush strokes. We are starting to look
pretty good, I think. We got some darker areas there. We'll probably put more shadow in on this layer after
we do the scarf, but for now, we're gonna
leave it like that. We're gonna come back and we're
going to paint the scarf.
4. Painting the scarf: Okay, now we're going
to do the scarf. To do the scarf, I'm just going to show
you a neat little trick. You might know this already
if you've been painting in procreate for a while,
or maybe you don't. I don't know, but I'm going
to show you just in case. In full disclosure, this is
how I normally paint when I'm doing something
like this and how I painted the original snowman. So what you want to
do is I'm going to grab a hard round brush, which is basically it comes
included with procreate, straight up. This
is the base brush. This is the starter brush
of all the brushes. And it's just a
round hard brush. Get your brush the right size, and we're just going to outline this scarf sketch
here around like, so and one thing that we want to make sure we do is make sure
that it connects. If it doesn't connect,
this won't work. I'll show you what
I mean in a second. Okay? Now, all I did
was grab put my pencil on here and grab and drag
that color like that. If I make a circle like
this and it is closed, that's what I mean
by it's connected, okay? That will fill in. If I leave a space, I don't connect the line
together, watch what happens. It doesn't recognize.
Basically, it just says, Okay, you want to fill the
whole layer in with that red, which we
don't want to do. Two fingers to undo. Okay. Now, so why
did we do that? Well, basically, we didn't have to do all that
underpainting. We just kind of fill that
in. And don't worry. We're gonna get our
brush strokes in because we've got all
these shadow areas and highlight areas and
everything else there that are really cool and neat, and we're gonna use
our regular go back to our regular paint brush
there, our oil brushes here. We got to recent because these are the recent
brushes that we used. Grab that soft
blend again brush. Get it to be the right size, and we can choose our darker color and start
painting in the shadows. Now, just like the
other brushes, my brushes are made to work like real oil
painting brushes, which means that they will drag some of the underlying
color that you have there. So we're just basically
coming in and painting. Wherever that scarf overlaps
or there's a little thing, you know, like, whatever. Wherever the light
won't be there, we're going to just paint
some shadow area on, okay? And the opposite is where the ripples or whatever
come together, you'll see that there is
a highlight area there. And what is important
to remember Whoops, I accidentally hit
the eraser button. What is important
to remember is, as long as the colors are the same value or
the same hue, right? This is a bit off this orange, but if they were the
same hue or value, so let's just I'll show you what I mean. I'm going
to grab this red. I'm gonna come over here and I can lighten it this way
by moving the slider, or I can move the
slider up and down. And what that's
basically doing saying, that's the hue, and this
is the value of that hue. This one here is the saturation, so less saturation,
which is like none, and then more saturation. So if I had maximum, brightness and saturation, it would be way up there
at the corner, okay? So let's bring that over here, and we're gonna go up because we're gonna show you what I
mean by using the same hue. Okay? So you're gonna get that And we can bring in
our saturation there. Now you're getting that
highlight there, okay? I just chose to use a warmer one just because
I like the warmth of it, but that just explains
to you, like, sort of how the colors work
and how the highlights work, like what you're seeing
when they're reflected. And Procreates a
pretty cool tool for learning your
colors that way. Let's see what else
we got going on. I don't remember what I did. Okay. Got some different colors in there. Basically, all we did. And this is essentially
what oil painting is, like, traditional oil
painting is we made our shadow area,
some dark areas. We had our under painting in this case, which
was just like, one of the reds or
the base red value of it there, and we put that on. Then we put on some shadows, and then we put on
some highlight areas. So we've got our underpainting, our shadow, and our highlight. Now, and again, this is a traditional oil
painting technique. We blend them. And
them together, so they look how we
want them to look. And quite often,
one of the mistakes people make when they're
learning oil painting is they over blind. Like, you know, you keep
pulling this color down, right? And it keeps coming
and coming and coming. Where do you stop,
right? A lot of times, it's just one simple, little, like, you know, like, a little simple streak. Of course, here in procreative, we've got other
factors involved, like our opacity of
our brush and whatnot. We can bring this down to make it look like there's little bits of feathery bits or
whatever you call it, you know, when the strings hang out at the end kind of thing. There we go. Which I don't
have that on my original one, but you get the idea. And you'll see here when we did the when I did
my original one, you got more of that undertone showing through
because basically I circled the whole snowman and filled it in
with that undertone. So feel free to do that. This
one here is a little bit less dramatic in
the shadow areas, but we can paint those on later. Alright, our scarf came out, fantastic, very happy with that. We'll come back and do
some of the other details. We'll do the nose,
the mouth, the eyes, and I think we'll add in
some more shadows there. Feel free to get your scarf
exactly how you like it. You know, move those
highlights and shadows around, run them in together,
get them just perfect. And when you're happy,
move on to the next step.
5. Painting the nose buttons and eyes: Alright, let's look
here. Zoomed in on here. We're gonna go to
our snow layer. We're gonna click
the plus button. Whenever you make a new layer, it puts it on top of
whatever layer you're on. So we want this to be
on top of the snowman because well, that's
where they are. Their buttons go on
top of the Snowman. So we're just honestly, I'm just scribbling this in. There's no technique to this. You could use a regular brush, like that hard round
brush if you wanted, but you won't get the same
streaky oil painting kind of look that I like. But if that's your
fancy, feel free. You can make your snowman
however you like. Aren't they not. You can make your buttons any
color you like, too. They don't have to
be black buttons. You can put in the little
holes that are in buttons, if you like, or
you can just make them black dots like I have. Whatever you prefer. These
are gonna be very simple. I could make my brush
a little bit bigger, I guess, for this. Speed this up. Um, There we go. If you want, you can
grab some white, make your brush a
little bit smaller and add in some of the
little highlights, make the button shiny. Just try to make them all in the same spot is
basically what you're showing light
refracting off of them. Spinning a little semicircle
over top there. There we go. Now we've got some
shine to our buttons. Okay. Same thing with the nose. Grab a darker orange. Make your brush a
little bit bigger. You know, it does
seem like a tedious, thing when you're having to keep changing the
size of your brush. But if you ever painted
traditionally an oil paint, it's a lot easier than changing and cleaning your
brush, that's for sure. Alright, now we're
gonna make it smaller. And just that highlight
goes on the top there and a little
shadow underneath. Some lines. And you can leave it like that, or you can blend it a bit. For example, if you want to just take in this a little
bit on the end there. Feel free to put in a little
bit on the top, maybe. There we go. Alright. No buttons, I done.
6. Painting the arms and adding details: Okay, so now we can come over here and we can do the arms. So what should we
do with the arms? Well, they need to
be above a snowman, but I think we want them to
be underneath the scarf. So again, we'll come down
here to the snowman, make another layer,
and they'll zoom out. Oops. If the layer
thing is open, it will not let you zoom out. Okay, and we got basically here, we can do the same thing. So let's do that. Let's go
here to our recent brushes. B and brushes hard round
and make it nice and small. Come on. Got our brown there, and we're just going to trace
over top of our sketch. Feel for you to
change the shape. You're a snowman.
Okay, grab the color. Oops, so it's not gonna work
because Tata, I forgot. I need to close it.
Try that again. Tata, there we go. Okay. Let's come over here. We'll do the same
thing on this side. N, m. Close it off. Okay. Alright, so now what do we got? We've got our underlayer. But on top, we're going to
have some more colors there. So let's grab that brown.
Let's go back here, res and brushes, soft blend. Noah daa get up the
right size that we want. So essentially with
this, we're gonna pick inside where our shadow is. Our shadow's gonna be
down here at the bottom. Then we're gonna come up
here and it's going to get lighter on the
opposite side of that. So it'll always be like
a light coming this way. Okay, so we're just going to
take our next dark color. Put it on. Like, so I might be hard to
see, but it will get better. Grab another lighter color, say that one, and we'll put
this one right on the top. That'll make it easier and make my brush a
little bit smaller. See how this is happening here. You probably won't need
to do any blending. Just feel free to add in some
highlight areas elsewhere. On these, you won't need to the brush it does do
some blending already. But look at how that gives it. Look at that shape
just coming along. All we did was make a dark layer underneath and then put on
some lighter colors, really. Simple, super, super,
super, super simple. And add in one more
layer of, like, a medium in between. S. When you look at
a branch, you know, you'll see there's lots
of different layers and, you know, things to it. They're not perfectly
round. That is a bit dark. This one here is a bit
lighter, so, you know, if you prefer the
lighter version, make it lighter, make your
brush a little bit bigger. Here we go. There we go. See the shape that makes? If you want to add,
like, even brighter, you can just come over here and slide this up a little bit, just add some highlight areas there might make
it pop a bit more. Highlights always
make things pop. Just keep the shadows in
the right spot there. Von, look at that
beautiful branch. Okay, let's do the
same thing over here. One thing you want to
make sure, though, make sure the light is kind of, you know, we're gonna say
it's coming from the top. It'll make it easier
to interpolate here, and we'll just keep that
same highlight layer we've got on over here. Uh, it gets tricky sometimes, like, where the light
is coming from. But since we're making
our snowman up, we can make it however we want. I have another brown there. You can always come
over here, too, to the recent colors. I might be easier. Oops. Made a boo boo. Two fingers, undo. Okay, I'm not gonna
get too long that. I can tell it looks
like a branch to me. What I want to see
now is I want to see more shadow underneath
the scarf and whatnot. I don't have enough depth there. So let's come over here and make sure we're on
the right layer, which is gonna be our snowman.
Grab our brush again. The blend brush, make
it a little bit larger, just gonna come in
here and grab some of these darker values there. That'll do that one.
And just gonna paint under add a bit more roundness
there, too, I think. Maybe even darker.
Isn't that crazy? Grays eyed. Some under the chin. You want enough contrast
to make it interesting. Mmm. Is there some blending now? Lower the opacity of
that blending brush. There we go. Nice big brush. Now, because this layer
is underneath the scarf, we're not having
to worry about it. It's just naturally does
what it's supposed to do. Beautiful. I like that. Alright. Now on the mine, we've got
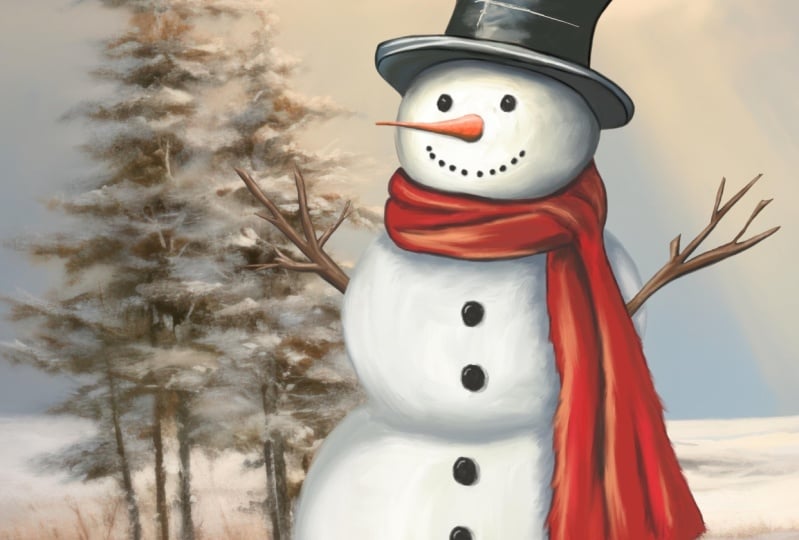
a background on there. So, we're not done yet. We're gonna come back and we're gonna paint in that background. What we can do, though, in the meantime is we can get
rid of that sketch layer. Okay. You'll see on mine, there is a darkness underneath there and around
it, and that, again, is because I filled
in this I made the snowman the same way I made the arms by
drawing it all in. So if you want to do that,
feel free to do that. You'll get this look here, this more liny kind of look. It's up to you. You can
also if you wanted to, just grab a dark darker
color, small brush. And come along and
add in some of those more line edges.
It's up to you. Okay, I'm not gonna play
around it too much. Now, if you wanted to
move your snowman, let's say, you know, 'cause mine, if we
look at this here, we've got more on you. The, we got more background, a little bit more,
not much more. But if you wanted to say make this more of an environment, you could come over
here and you can grab all of these layers
now that they're done. Whoops. I don't know
why I did that. Oops. Okay, we grab all these layers here
now that they're done, like I said, and just
squish them together. Oh, something was locked. What was locked? Oh,
the hat was locked. We probably should have had
them all locked, but okay. The reason I did that
now is I can now say I'm gonna come over here to grab my little selection tool, and I can make my
snowman smaller, if I want and make it
more or the opposite, I can make it larger, I can move them around
if I want to. I just want to make a bit more room for
my background there. Okay, speaking of background. Let's now do the background. And so I'm going to
make a new layer. I got to put that
underneath my snowman. I'm gonna come over
here and I'm going to grab my linseed oil brush. You could use, say, rough brush if you want. You can
use whatever one. I said Linseed oil. Now
I've got the rough one, and we're just going to paint
in some of that background. Make this nice and big. I'm
just scribbling this on. No rhyme or reason
to what I'm doing. I'm just getting
some color in there and different values
that I want to use. Oops. What happened
there? Where did I go? Hmm. I somehow erased my
half my background. I'll let's put that back on. Okay, so anyways,
as I was saying, Come back over here,
grab my history brush, and my brush is gone,
too. That's weird. Okay, whatever.
We'll put it back. And again, because
I'm behind snowman, I don't have to worry about what's there
or what's not there. Okay, smearing things around, doing whatever. That
doesn't really matter. Bit have been shadow down here, if I want from my snowman
underneath. Okay. Grab some of this color
down here just so that we're not stark whitening. Okay. Now we can come over here and grab
our blending brush, make it nice and big again, just smoothing out some
of those areas there. Upset. I don't like
what that did. I leave my shadow there. I like that shadow. Okay. Now we can take a pure white
white as can be there. Use small flat, no, let's go to the uh
well, paint brushes. We can use a small flat one. That's a pretty solid brush. Basically for this,
we just want to have a small brush that's gonna
paint solid as well, and we'll make a new layer
over top of our background. And now we can come along
and put in our little Oops. We need this layer
actually to be on top of everything to see
the snowflakes. So I moved my layer
up to the top there, and I'm just painting in my
little snowflakes there. Use to different
brushes when it's not working that well.
What have we got here? L scrap. Splin brush again. It's your classic
brush. There we go. I think in my original one, my background's a bit darker. So we could take
this, for example, come over here to the
little adjustments, if you like, if you will, click on the curves button. You can darken all
that background. All I did was put my
pencil in the middle. Okay, grab this little
line here and pull down as you see it gets darker and darker and
darker and darker. You can do the opposite and make it brighter and
brighter and brighter. You go one side, it's can do the shadows
more and the other side, it's can do the highlights more. But Fis're just gonna make a
slight little tweak to that. There we go. Click on
that again, to escape. And now our snowflakes
will show up. Better. No on. Where did you go? You want to be up
here, not down there. Oh, I was painting
on the wrong layer. That's why 'cause we had chosen the other
layer to adjust it. Alright, put our snowflakes in. And we are done. I hope you enjoyed this class. Just remember, too,
if you wanted to do the Snowman body
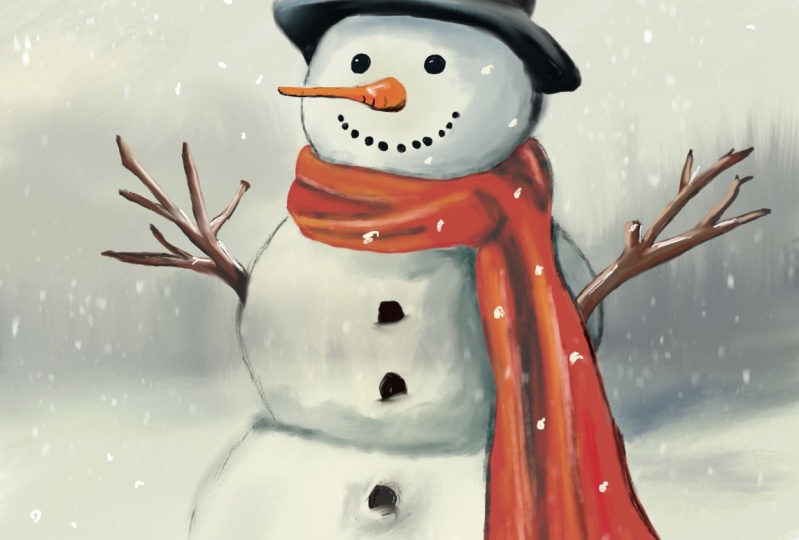
differently, okay? You can I had done it before where
I just painted over top of the
underneath a sketch. On this one here, I had
made it a big solid. That's why you're seeing
some different lines there. Either one, I like
how they both look. This one's a bit
more impressionist. But I think they
both look great. I hope you enjoyed the class. Let me know what you think
in the comment section. Please make sure that you post your snowman in the projects and resources section
for other people
7. Painting the Background: If you wanted to move
your snowman, let's say, you know, 'cause mine,
if we look at this here, we've got more come on you. Yeah, we got more background, a little bit more,
not much more. But if you wanted to say make this more of an environment, you could come over
here and you can grab all of these layers
now that they're done. Whoops. I don't know
why I did that. Oops. Okay, we grab all these layers here
now that they're done, like I said, and just
squish them together. Ooh, something was locked. What was locked? Oh,
the hat was locked. Probably should have had
them all locked, but okay. The reason I did that now is I can now say I'm
gonna come over here, I'm going to grab my
little selection tool, and I can make my
snowman smaller, if I want and make it
more or the opposite, I can make it larger, and I can move them
around if I want to. I just want to make a bit more room for
my background there. Okay, speaking of background, let's now do the background. And so I'm going to
make a new layer. I got to put that
underneath my snowman. I'm gonna come over
here and I'm going to grab my Linseed oil brush. You could use, say,
rough brush if you want. You can use whatever
one. I said Linseed oil. Now I've got the rough one.
And we're just going to paint in some of
that background. Make this nice and big. I'm
just scribbling this on. No rhyme or reason
to what I'm doing. I'm just getting
some color in there and different values
that I want to use. Oops. What happened
there? Where did it go? Hmm. Somehow erased my
half my background. I'll let's put that back on. Okay, so anyways,
as I was saying, M over here, grab
my history brush, and my brush is gone, too. That's weird. Okay,
whatever. I'll put it back. And again, because
I'm behind Snowman, I don't have to worry about what's there
or what's not there. Okay, smearing things
around, doing whatever. Alright. That doesn't
really matter. Bd have been a shadow down here, if I want from my
snowman underneath. Okay. Grab some of this color down here
just so that we're not stark whitening. Okay. Now I can come over here and
grab our blending brush, make it nice and big again, just smoothing out some
of those areas there. Opse I don't like what that did. I leave my shadow there. I like that shadow. Okay. Now we can take a pure white
white as can be there. Use small flat, no, let's go to the uh um
well, paint brushes. We can use a small flat one. That's a pretty solid brush. Basically for this,
we just want to have a small brush that's going
to paint solid as well, and we'll make a new layer
over top of our background. And now we can come along
and put in our little Oops. We need this layer
actually to be on top of everything to see
the snowflakes. So I moved my layer
up to the top there, and I'm just painting in my
little snowflakes there. Mm, use a different
brushes when's not. Working that well.
What have we got here? L grab sopping brush again. It's your classic
brush. There we go. I think in my original one, my background's a bit darker. So we could take
this, for example, come over here to the
little adjustments, if you like, if you will, click on the curves button. You can darken all
that background. All I did was put my
pencil in the middle. Okay, grab this little
line here and pull down as you see it gets darker and darker and
darker and darker. You can do the opposite and make it brighter and
brighter and brighter. You go, one side, it's
going do the shadows more, on the other side, it's going
to do the highlights more. But is, we're just gonna make a slight little tweak to that. There we go. Click on
that again, do escape. And now our snowflakes
will show up. Better. No. Where did you go? You want to be up
here, not down there. Oh, I was painting
on the wrong layer. That's why 'cause we had chosen the other
layer to adjust it. Alright, put our snowflakes in. And we are done. I hope you enjoyed this class. Just remember, too,
if you wanted to do the Snowman body
differently, okay? You can I had done it before where
I just painted over top of the
underneath a sketch. On this one here, I had
made it a big solid. That's why you're seeing
some different lines there. Either one, I like
how they both look. This one's a bit
more impressionist. But I think they
both look great. I hope you enjoyed the class. Let me know what you think
in the comment section. Please make sure that you post your Snowman in the projects and resources section
for other people to see.
 Paul Cheney, Teaching watercolour and digital painting