Transcripts
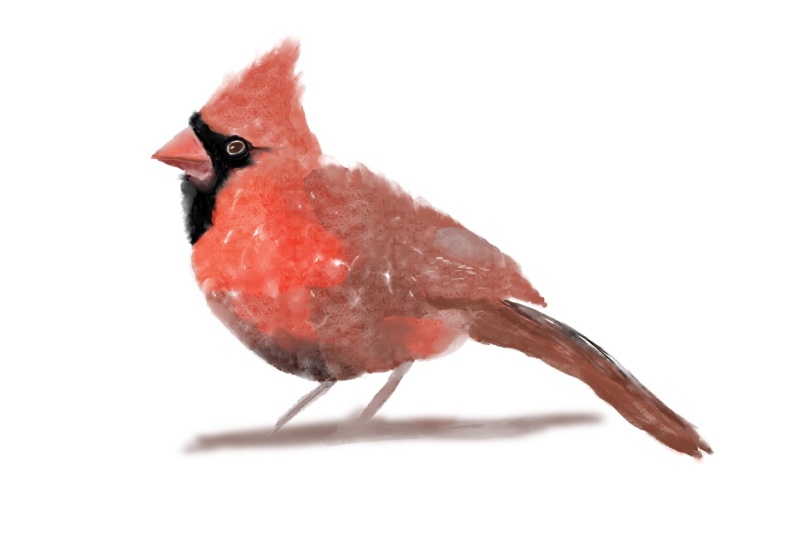
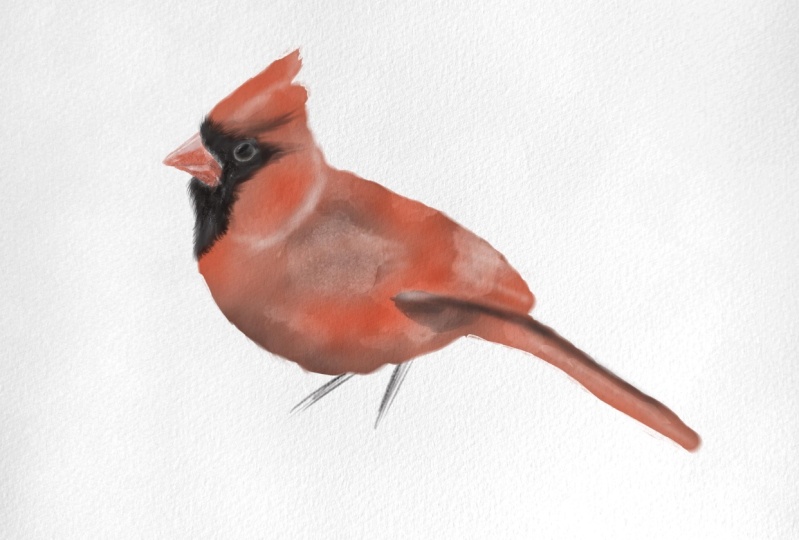
1. Introduction: Hello, everyone, and welcome. Today, I'm going to teach you
how to paint this cardinal, a digital watercolor
painting in Procreate, using an Apple iPad and pencil with free brushes
that I provide for you. If you've not painted digital watercolor painting on an iPad, using an Apple
pencil, I have made an introductory class
that I suggest you watch. It is my digital
watercolor mushroom class, which was made to teach you the techniques that
we'll be using today. That being said, if you have experience painting
at all on an iPad, you should be fined
to dive right in. As with all my classes, you do not need to
know how to draw. I provided a sketch for you and an outline as well
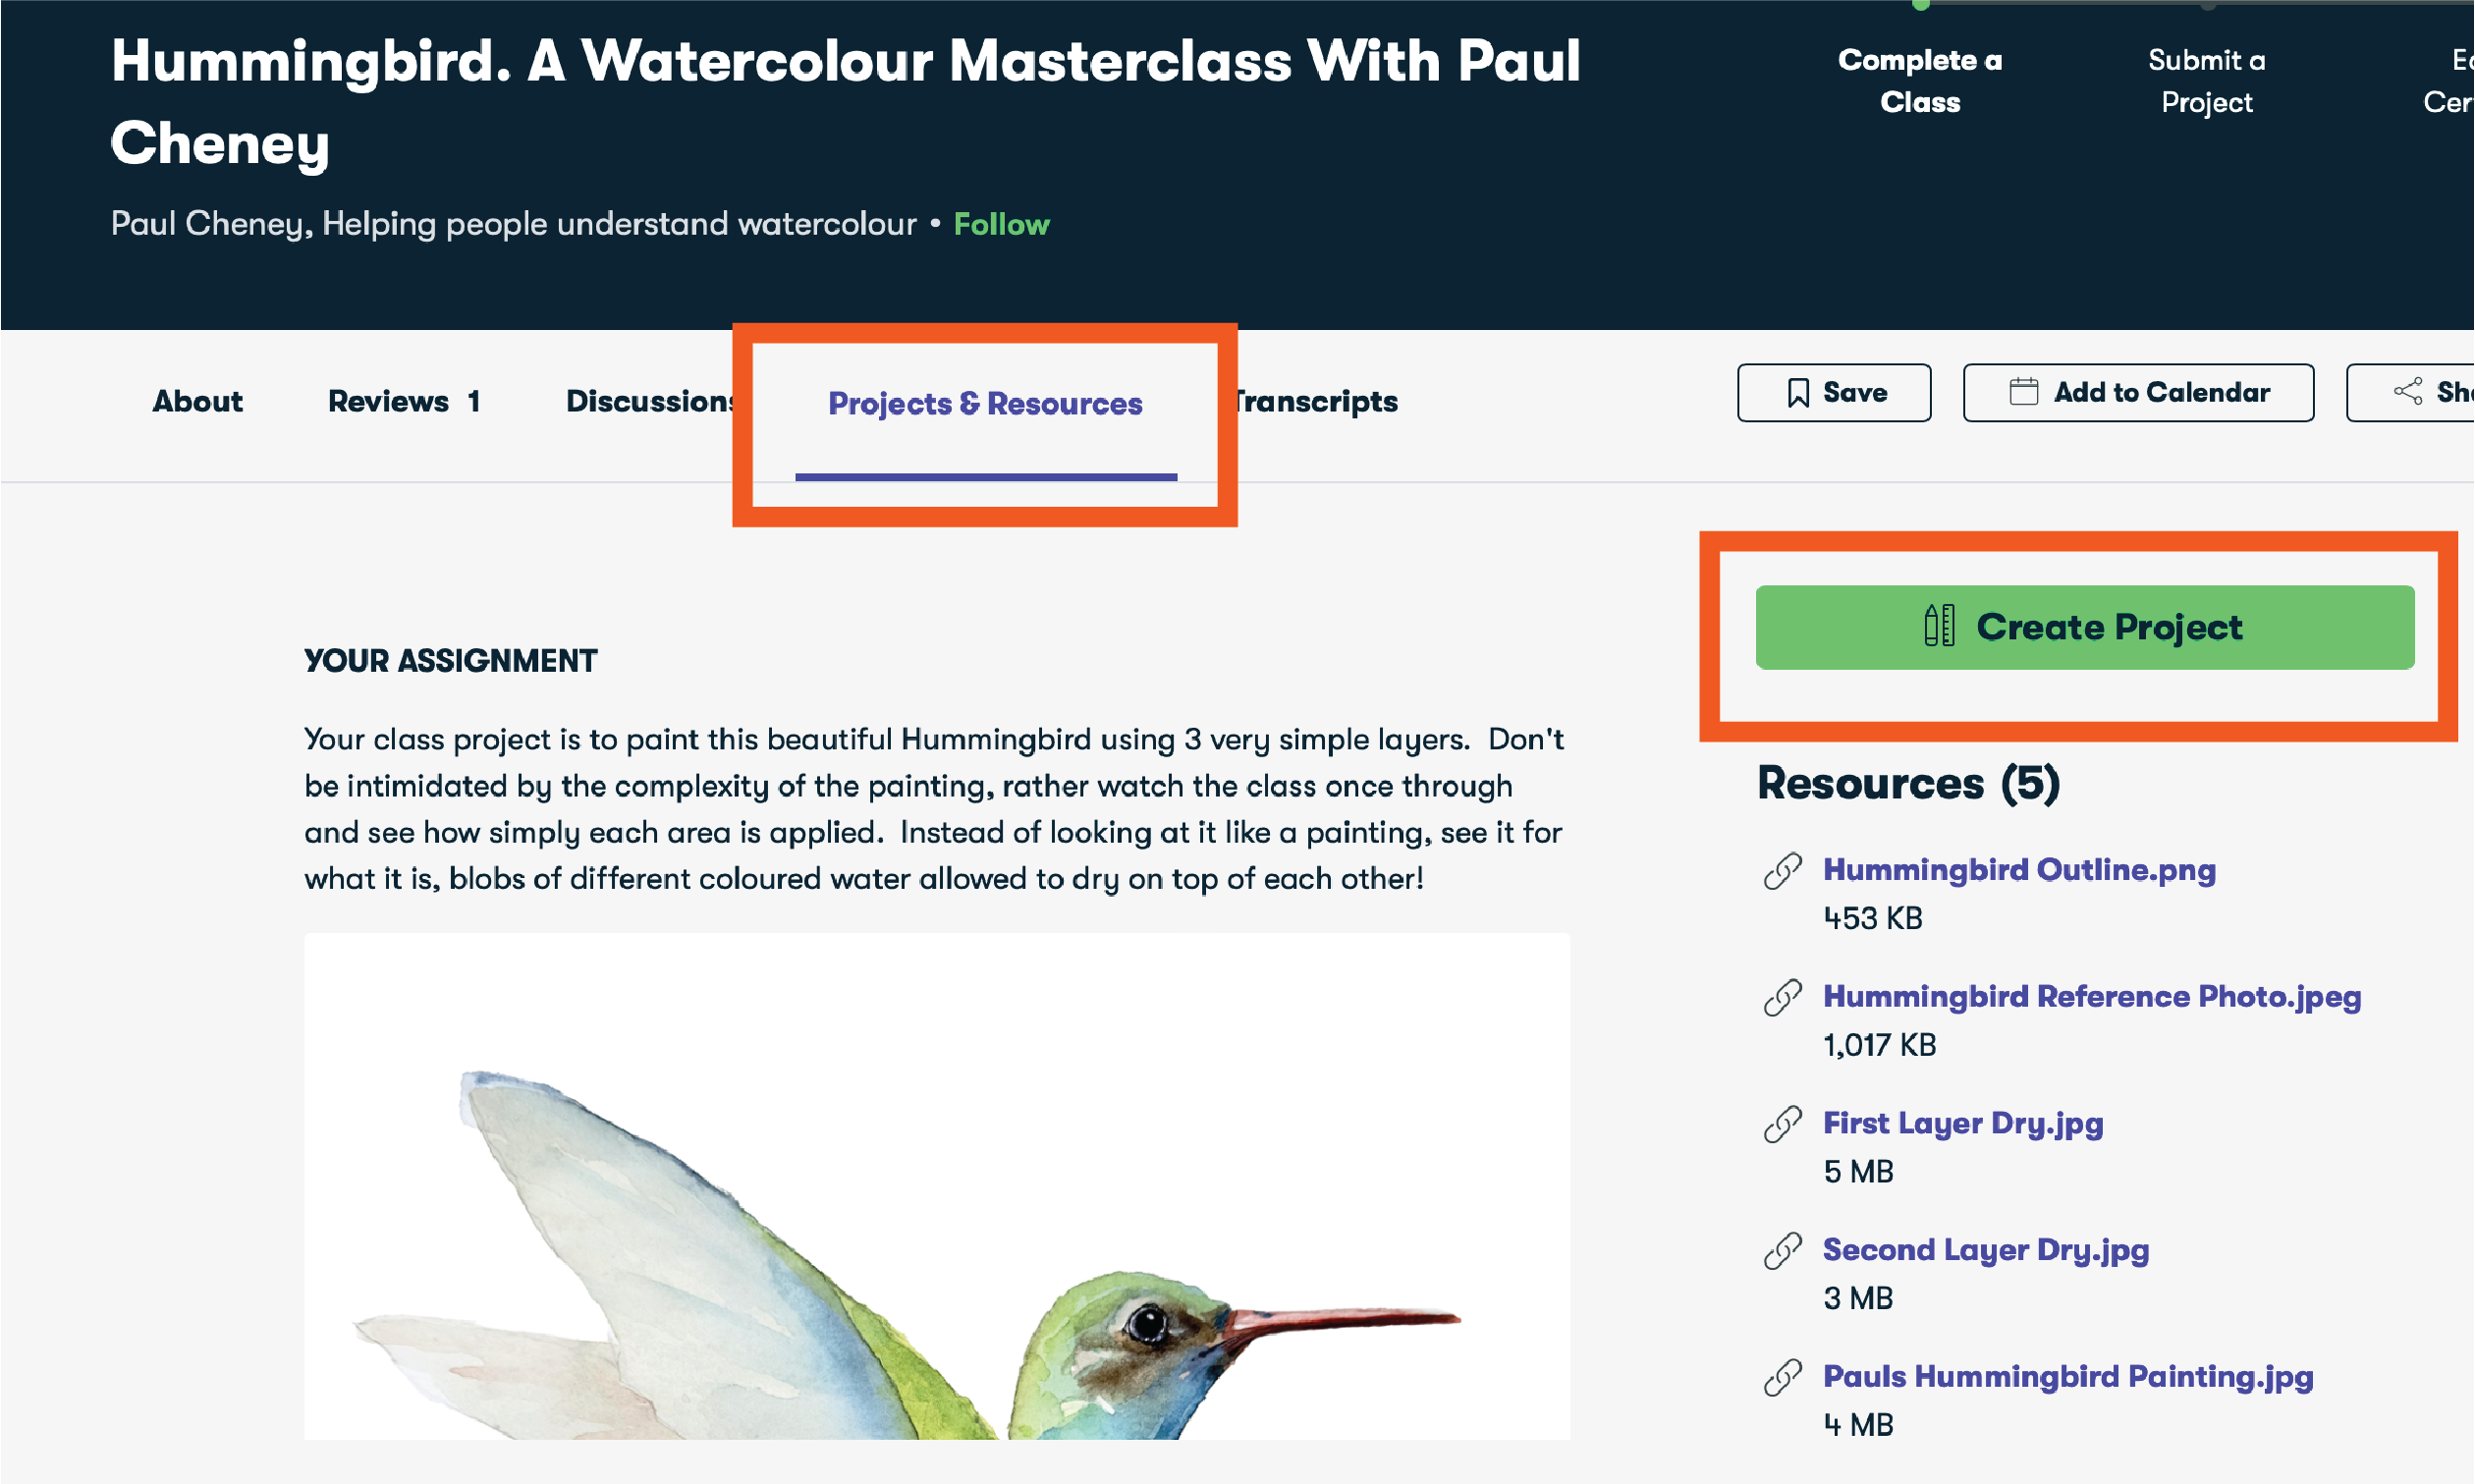
as reference photos. Everything you need
is provided for you in the Projects and
Resources section. We start off by importing
our artwork into procreate. We then slowly build up the
details by starting with a base layer of a base color
that we add details to. We then move on to the
finer things such as the beak and the eye and
other details like that. This is a super easy class
to follow along with. I think it's suitable
for all levels. However, you might want
to start again with the simple mushroom
first just to get a feel for the techniques
that we're going to be using. I hope you enjoy the class. Let me know what you think,
and please be sure to post your finished artwork
in the projects and resources section so that
I can give you feedback.
2. Setting Up The Painting: Welcome back,
everyone. So today, we are going to paint the
cardinal that I promised in the last digital
watercolor painting class that we would paint.
And here we are. You'll have to
forgive the delay. I've redone this
several times for reasons that are just
comical, really. Anyhow, let's move forward, and let's take a look at what
we're going to do today. So, for those of you that have done the digital
mushroom class, this is going to be
a bit of a recap. I don't want other
people to sort of feel lost and whatnot
that haven't done that. So just a little recap on
setting up the Canvas here. We have on our Canvas, we have our watercolor
paper background. All these files are
included for you in the projects and
resources section in the download section. And you can put these into
your photos on your iPad. And so your photos, like, which is da da da da, looks like this
right here, button. And then you can
import them, okay? So we've got our watercolor
paper on here, so do that. We go over here,
and we go to add, and we can either
insert a photo, or if you were clever and put it into your files, you
can insert a file. If you insert a photo, it will default to the
photos section on your iPad. So then, anyways, we're going to put in our
watercolor paper. We'll put that at the very top, and we want to make
sure that I'm going to unlock mine so that
I can show you here. We want to make sure
that it is scaled. Come on. Okay, sorry about that. We want to make sure that
the watercolor paper is scaled to cover
the whole canvas. We want it overlapping. We don't want it to be
floating somewhere. We want the watercolor paper
to cover the whole canvas. Now, you do not have
to have this on here. So I'm going to show you what this painting looks like
with and without it. So let's zoom in
here a little bit. What it does is it
gives the texture of the watercolor paper
painting behind it. Okay. So this is the
painting. It still looks. You can still see all the watercolor marks
and everything else. And this is it with the
texture on the background. So that is totally your choice. You don't have to have that. The second file that you're
going to add in the same way, is the sketch drawing here. I'll turn off the cardinal, and that is the
drawing on there. If you wish to draw your
own cardinal, feel free. You do not have to use this. It's there for
convenience for you. And again, just like the
watercolor paper layer, we're going to lock these only so that we do not paint
over top of them. Lastly, here, I have the
original painting on here, which you do not need to
put into your files here, but I do recommend
you put it over here into your
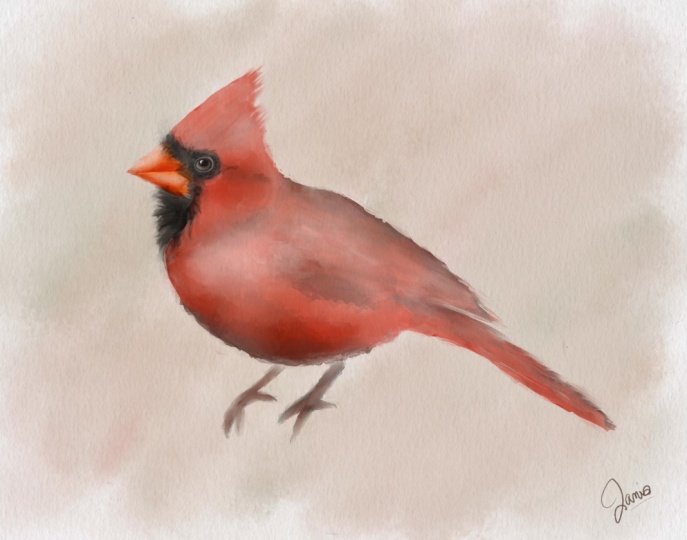
reference picture. Will also include the
high resolution image of the actual cardinal that
I originally painted from, and you're more than
welcome to use that for selecting your colors or as
a reference to draw from. You don't have to have this
reference window here. You can either just make
your colors as you go, which I quite often do because I find this little
window gets in the way, and I'm pretty good
at selecting colors and figuring out what colors,
what and adjusting them. If you're there and you're that advanced, then that's fine. But however, if you want to make sure that you're getting the right colors and
everything else. The best way is to put in the actual painting or the reference picture that
you're painting from. You can put it in this
little window here. And if you notice over here, look up here into
this little circle, you'll see the red
color, but now if I come over here and hold my
finger down on the black, that will change
that to the black. So whatever color, I move this around to that
little high light window, we select that color. Okay. And that is it for
setting up our canvas. My canvas here is 14 " wide by 11 " high at
300 pixels per inch, and I am painting
on an iPad pro. The 12.9 or whatever
size in here. So I have the ability to
put in several layers because it's a much larger iPad. The larger you make your file, the least number of layers
you will be allowed to make, only because the iPad can only handle so
much in procreate. It's scale proportionately to
whatever iPad you're using. Okay. So that's it for
setting up the canvas. We'll come back and dive
right into the painting.
3. Creating the Base Layer: Alright, so we're ready
to start painting now. The first thing we need to do is establish our base layer. I'm going to show you a couple
of brushes really quick. That you can choose either one. I'm going to give you
one to recommend. Let me give you one if
you want to experiment and get creative with, okay? So I'm going to turn off
this layer here because, well, we don't need it anymore. I'm gonna lock it just so I
don't paint over top of it. And I've made a new
layer here, Layer five. Feel free to name it
whatever you like. If you want to
experiment with brushes, perhaps you would name
it after the brush. For example, the brush
that I'm going to paint the base layer with
is Paul primary two. However, you might
want to try this one here if you want to get
really crazy and creative. First thing you
need to do is come over here, pick your red color. It's going to show up as
a little bit diluted. So I always like to
pump up the saturation. Saturation is this way, desaturation is that way. You can see the
color gets lighter, and this is how dark
it is or the value. Okay? So we're going
to put the value sort of up here
and the saturation pretty close right
over to the right. Don't go all the way over
because it gets blown out. That's just an unrealistic
color at that point. Alright, so Paul primary one.
What does that brush do? Well, it's a cool
brush because one, it has a lot of texture in it. It's actually got
watercolor grain in it from watercolor
pigments that I made. And a couple of things
that are neat about it. It blends better. Like
it's easy to blend. So imagine now it's
like you know, the brushs got a
lot of water on it, and the underlayer hasn't
dried yet, kind of. Now, the lighter I press, the smaller the brush gets, the harder I press, the
larger the brush gets. But it does have a
lighter texture. So you're going to have
a hard time getting these deep rich colors in
here. It's not impossible. You can double the layer,
duplicate the layer, or you can adjust it over here in the color balance or curves, for example, I can
now take that layer, and I can make it lighter
or darker, like that. Okay. But to keep
things simple for now, I just showed you that in
case you want to play around. But even to keep
things simple for now, and we're going to use the
Paul primary two brush. So this one does
not allow you to it doesn't change the
size of the brush as it goes. But it's simple. It's got a softer edge to it. It's not overly crazy. It's got some texture in it, but not too much, but it
does give us a darker value. One thing to keep in
mind with this brush is the harder you
press with this, this brush is designed to have as though you're
adding more water. So I'm pressing down, and
the more I go over it, you can see this is actually getting lighter in the middle. I'm actually putting water in
and pushing those pigments out just like I would with traditional
watercolor painting. Pretty cool brush. Okay,
so let's get started. First thing, get your brush
to a comfortable size. Okay. If you put your brush
as big as it can go, it's going to be a awkward. If you don't need to worry about getting the little
feathery bits in right now. Like, just get it so that it's a size that, you
know, it's a nice, happy medium, and you can go around without
lifting up the brush. If you lift up the brush
and you go over top of it, you're going to get some marks. You can remove those. We
can blend those later. But for now, just do your best, so just put it all in one layer. Don't stress about it,
just do your best. I'm going to speed
this up now and fill it in so you don't
have to listen to me talk while I do it. All right. So we've got our base layer on a couple of things.
You'll notice. I did leave some white
gap areas in there. You'll see those also in
the original painting. Those are natural to have in traditional
watercolor paintings, so I intentionally leave
them in when I'm doing this. Everything you can do to keep the characteristics
of watercolor painting, and make it look more like
a low watercolor painting. The other thing that you'll notice that I have
here is I have some lighter areas that I
have in my painting here. And so I went over
those several times. Remember I showed you at this
brush. You can paint it on. And then the more
you go over it, The lighter it gets, the more water you're adding
into the brush, okay? And I did that
because in my Whoops. I took away my whole painting. I did that because I've got
some lighter areas in there. Why not? Skip a step. If you if you want to just
make yours all one color, we can add in some light
areas later, not a big deal. You'll notice there,
what I just did is I hit the two finger tap. I those of you haven't
done my class before or are not familiar with
painting in Procreate, two fingers undoes
your last move, three fingers redoes
your last move. Okay? Two fingers undo,
three fingers redo. Okay? So I just
tapped. All right. We're going to come back and
we will add some texture.
4. Adding the First Textures: Adding texture. Alright, adding texture. So what do I mean by adding texture? I mean, some of these
details in here. Right now we've got a blob, a red blob that is somewhat
in the shape of a cardinal. We've got some lighter
areas, some darker areas. We've got some little
white bits that were left where the paint didn't
touch the paper. But we have lots of things going on here in our
cardinal painting. We'll try to make
this larger here. To give it that watercolor look like what is going on here? So let's look at some
of these down here. We've got these actual
paint textures. So can we put those on
with the paint brush? Yes, we can. But the trick is, how do you get it
right to the edge? Right? So let's say I
take my black brush here, and I'm just going to
use Let's go back up. Let's use this and I
come to the edge here. Okay? I've got a new layer, and I can paint over top. Okay. But you'll see You
know, it goes over. Now, you would have
the same problem in traditional watercolor painting,
right? Yes, you would. However, we can cheat in this. So let's cheat. I'm
all about cheating. So I made a new layer. I'm gonna make a new
layer above this one. I'm gonna click on it, and I'm gonna make it a clipping
mask. Okay okay? Those of you that did
my previous class, you'll know all about
the clipping mask. The whole point of that class was to learn these techniques. The clipping mask, what
it does is it only allows the paint to go where
there's paint underneath it. So I've got my brush here, and you'll notice
nothing's happening. The minute I go over
top, wh, look at that. Okay? So we can either put this on with our brush
like it is there, and I can paint on, some
of these areas here, which you know, we'll do some
like this because why not? Now, look at that
over that white area there, nothing happened, right? And the lighter that
my paint is, right? The lighter the
area is underneath, the lighter the overtop
layer is there, okay. So I'm not copying this exactly, trying to say, Okay, where's
that little bit there? Where's that little bit? I literally just took
my brush and one, blah, blah, blah, blah,
blah, blah, blah, right? You don't have to
say, blah, blah, blah, blah, blah, but
you can if it helps. Now, let's say, a, I don't quite like
how that looks. Then let's grab
our eraser brush. We can use the Pall base
watercolor brush here. It's a nice feather,
easy to use brush. It allows us to
adjust the opacity. And we can say, you know what? I don't want this up
in here. I'm just going to take that
little section out, and I'm going to lighten up
some of these areas here. We're getting that hard and
those lost and found edges that we love so much in
watercolor painting, right? Now, we can do the same
thing with a lighter color. Okay. We can paint on a
lighter color in here, I can select some
of this and make it's going to move
this over a bit just to get so you can see
what I'm doing here. And I can paint in some
of these areas here. Okay. Now, this is the brush that has
lots of texture in it. This is the PC primary
11 brush, okay? And I put that on the
same clipping path. Yes, I did. Okay. Same
clipping path layer there. And again, I can add
this in if I want, and then I can erase it later. The problem with putting it
on the same clipping path is then whatever
I erase, I erase. So I erase both
of those sections there, which I
want to keep that. So the easiest way to get around that is to make another layer. I can either repeat the whole process of making a new layer, slick on clipping on, clicking on clipping
mask, or undo, undo. If I click on the base
layer underneath, and I click the plus button, it will automatically make that layer clipping mask because it's in between this one and the last clipping
mass that we made. Therefore, it has to
be a clipping mask. Sorry if that's too complicated, it's just an easier step
and it's just how I do it, and I don't want you to be confused if I'm
doing it that way. We've got another
new layer here. We can paint on our
whops or we can erase. We can paint on our
clipping mask layer and add in some
light areas there. If you didn't do this,
you can do that now. We can come back,
we can erase some, make them nice and faint there. Let's say I want to
get a nice big chunk of something like this, like a brush stroke there. Okay? Well, let's make
another clipping mask here. Let's select this dark color. Again. Come back over
here to our brushes, and we can use these stamps. Stamps are a bit
different than brushes. A stamp will give
us some texture, but it also it allows us
to let's take this one, for example, actually, let's see which one
did I use there? That one is probably, let's
just say it's that one. We'll try this one.
And so what the stamp does is it's
essentially a stamp. So it's a watercolor stain that I've made on
watercolor paper, cut it all out, put
it into a brush, made it into a procreate brush, and now provided to you. Because that's just
how swell I am. What's going on here? Well, look at these crazy edges there. We've put that on our
clipping mass layer. It's all by itself on our layer. Now if I select
my selection tool here, I can move that around. Look at that. Isn't that cool? Now, I want this to take this little green
stick at the top, we'll call it a stick, and we can grab the bottom of it here and move that
up a little bit. And we grab this down here. Now, I have this on Free Form. If I click on Uniform, it will scale everything
proportionately. I usually leave it on free form because it gives
me more control, and I don't really care, like if it's proportionate or not. It doesn't really
make a difference. Okay. So we're
trying to line this up kind of similar to where
it is on the other one, and I'm pretty sure this
is the brush that I used, and we'll move that
up there like that. And now I'm going to click this blue arrow again,
and now that comes off. Okay? Now, I want to keep my edge there on the
wing, this part here. I'm going to erase that, my brush is massive, so I'm going to shrink that down to have a
bit more control, and I'm going to
erase that there. And now, I'm just doing
it gradually, like, you know, I've got
my opacity sort of midway there because I
want it to be like gradual. I don't want it
to be like, okay, it's like, like hard
edge there, okay? Now, what else do we
got going on here? We've got on our this wing here. It's like, we'll
take some of this off actually there. Okay. So now we're kind of
similar to there. Don't try to make it
exactly the same. You're going to drive
yourself mad trying to duplicate every
single brush stroke. It's just not going to happen. And I'm going to just tweak
this a little bit there. Bring that down. A little
bit larger. There. You're never going to get
that. Like, it's never going to come out to be
exactly the same. And all you're going to do
is drive yourself crazy. So look at it more like adding the value in on here. So
what do we have here? Now we've got this
darker wing here, this section right here
is quite a bit darker. So let's make another
clipping mask path here. And we'll come down here. We'll click on our
cardinal layer, and we'll click on that. I think we've got
an empty one there. Oh, well, doesn't matter. We'll squish them
all together later. Okay. And for this, you know, feel free
to experiment, right? Try some of these
so each of them has different
textures you can see, like what they look like is
what you're going to get. Right? There's no right
or wrong way to do this. Feel free to make them
lighter or darker. You can adjust the color
if you want to black, for example, you can
move this over more. And just feel free
to experiment. What you're trying to do
is not copy this exactly. You're trying to
get the values in the right places to show to make it look
three dimensional. That's it. Same as you're doing with traditional
watercolor painting, but you're using
different techniques. Now we've got this guy on here, like that, I quite like that. Let's move him down here so
I can see what's going on. Oh, that's pretty funky.
I think I did it twice. Yes, I must have. Let's start
over there. There we go. Yes, There was two of
those whys or two again. Probably because I had
the other one up there. I'm going to just
delete that together. I'm going to come
on this layer here, and now I'm going to
try that one more time. Touch once. There we go. There. Now we've
got just the one. Okay. What's going to work best for that
section up there? You know, I don't want
actually, I don't mind that. It's a bit dark There play
around with this a little bit. I'll stretch this out here. There we go. I quite like that. There we go. That's I like this little bit
at the back there. Now, on our head up here, it's actually lighter, so
I'm going to erase that. I selected my eraser, and I'm going to keep
that there, like that. I'll take a little
bit out of there. No, actually I'm going
to put that back. Because the one thing I do want to make sure
I get correct here is the lighter area because there is a highlight there, and I think
that's important. I think our bird
likes that there. Okay. And I also want some separation from
these two areas here. So where this wing comes, this is like a wing here, but I can put that in later and still use this
little bit there. I hope that makes sense, and
I'm not just rambling on. Okay, let's put in
one more up here. Let's try another
brush here just to drive this theory home here. And I'm going to pluck
that guy on there. I'm going to grab the move tool. I'm going to rotate it around.
I'm going to bring it up. I'm going to put it on
there, and I really like these hard edges there.
Those are really nice. So I'm going to leave
that just like that. I don't need to do anything. It did not show up here because
there's no paint there. So it's stopped right underneath
where the black area is. Okay, where else do
we have some detail? We've got another section here, we've got our whole
back of the bird here. We've got some shadows going on. So let's do one more.
We're going to grab another clipping mass layer.
We're gonna grab that layer. We're going to grab a brush.
Let's take this brush here. It's nice and long, and
it's got a dark edge on it. I know that because I made it. You'll know it because you're going to experiment with it. We're going to plop it on there, and we're going to take it, and we're going to rotate it around. I'm going to scale this
down so I can see. We're going to rotate
it around like that. And what we want is we
want this section up here, this dark section up here. And we're going to use
that here to bleed down. I hope that makes sense. Probably won't get
it all perfect because there's no
such thing as perfect. So there we go. Just like that. Now, there is some
lighter areas there, like in here, I want to
make sure I get those. Like basically what
this is is a shadow where that little lip
is formed there, okay? So now I'm just taking
my eraser brush and just kind of taking out
a little bit of that. Nice and small. Put in
some nice lines there. There we go. Okay. Looking good. Looking good. All right, we do have some
other lines, and here, we're going to come back
and we're going to paint in more details like those at the end when we get into some of the finer
details, we'll do those. But for now, we've
got a good start, like a great start on
some of our details, and we will now move on to
putting in the mask next.
5. Painting the Black Mask: Okay, we're ready to paint
our little mask area here. And before we do that, let's take a look at
what we've got so far. We've got a lot of
layers going on here because of all
those clipping masks. I know for myself, I'm happy to compress all
those onto one layer. If you're not sure and
you think maybe you want to go back and make
some adjustments layer, you can leave them, but it might get a bit
overwhelming and confusing. So to shrink them together, you basically take
your two fingers. I'm using my thumb
and my finger. I'm going to start at the
bottom here, Layer five, and they're both
called layer five, and the top layer five here, and I'm just going to take
them and squish them together. Squish, squish, squish. Okay. So again, I'll undo that. You can see and then redo it. I just put them all together. Now they're all on one layer. We zoom in here and
we look at our mask. We can see our
mask. Where is it? It goes over top. The feathers come out
over top of our bird. So what are we going
to put that layer? Well, you guessed it over
top. We'll come here. We've got our layer on top now. We need to select
our dark color. We call it black
for the fun of it. And let's just grab the Paul primary watercolor to brush again. Nice and easy. Make sure your brushes.
You don't get to the right size there,
a little bit too big. Come down. It's bigger
because I'm zoomed in. And again, just now
try not to get, you know, to go over
this too many times. Because you remember this
brush, the more you go over it, the lighter it will get, and we don't necessarily want
it to get lighter. We want this to be kind of
feathery and and loose. You'll notice in my red, I went a bit over top
of of the eyeball. Don't worry about it.
We can fix it later. And again, remember trying not to go over this
too much because it will lighten it the more
you do with that brush. If you decided, oh, I
made a mistake here, like I went up a bit high there, I'm just going to come back. I'm going to make my eraser
brush nice and small, and I can just erase
that that's too small, and I can just erase that. Okay. I can come around here
and zoom right in, and I can see, let's
hide this layer here. So I can see where my
eyeball is there. Okay? Get rid of that. Let's come
back here to our brush, make it much smaller
because we're zoomed in. I'm going to erase some of this. I want to see that
eyeball there. It's just going to make
it easier later on. So this line around here, there's kind of a double layer. I'm going to leave
that so that I can see it later and I don't
have to hide things, and now I'm just going to
come in and I'm just like, you know, think
of this as like a cran or a colored pencil. I'm just scribbling away. Okay. And I'm just going
around it. All right. So a bit too far there. Grab my eraser, double back. Okay. Is a bit more up here. Now you're saying, Hey, Paul, but you're making
layers on the paint. Yeah, I don't care
because it's black, and you won't see it later. Uh huh. Okay. And it's just saving myself. I've done this painting
several times now for lots of reasons once because I filmed the entire thing
completely out of focus, which is a funny story. Be more, you know, if I zoom in and I move
my hand like this, the camera on auto focus
will focus on my hand. And it will take away
from the painting, and it kind of zooms
in and out and it gets annoying to watch
or bugs me anyways. However, I didn't
focus it correctly. Even though on my screen, there are like these bright red lines. I'd say, like,
focus, not in focus. Anyways, I'm rambling. So there, we've got our mask done. Don't worry if it's
kind of patchwork, because as you can see, it's
blended in quite a bit. There's some soft edges there and different
things going on. This is the area around here. So basically what this black in here is this black up here. I kind of went around the
area there where I've got, you know, that white linish. We're going to fill
that in later. I just want to have
it so that it's nice and easy right now. Okay. So just keep it simple.
Don't stress about it. Just basically paint
the black mask. You'll understand later
why we do it that way. Okay. And that's that.
6. Painting the Beak: Alright, let's move
on to the beak now. Getting all these,
like, base layers down. And the beak looks very simple when we look
at it as a whole. But what's going
on with the beak? Let's take a look here and see. So the beak is sort of
a shiny object, right? It's got You know, you can see there's a
reflection right there. There's a lighter
area right here. There's a shadow underneath. It kind of curves in
where the mouth is. There's a line there.
There's some shadow here. So there is a fair bit
going on with the beak. I think I did my mask a little bit differently. I
came in a bit on the beak. I'm gonna leave it for now. I
can always change it later, but I'm just going
to leave it for now. And so I've selected this lighter color here for the beak, and I'm going to stick to the Pall primary brush for
now just because I've got it, and it's easy to use, and I'm basically going
to put on one base layer, cover the whole beak there. Don't worry if your color
isn't exactly the same. Now, I'm underneath
the black mask over top of the red base layer. It doesn't matter if
you're over top of the red base layer
because they don't touch, but I am so you know. And basically, I've
painted a triangle here. Well, pretty impressive, right? Okay. Now, let's say we want to now add,
which we do want to add. We want to add. We're
going to go here to you can use a hard edge wash, you can use a variable wash. Variable wash makes it light
and dark a little bit. So you can use either one here. I'm just going to show
you the difference. Let's select this red color, and I'm going to put
it over top here. What to opacity. Not enough opacity. There we go. I just want to
be able to control this. So what's going on
with this brush here? Well, as you can see, again, it's very similar to that one where the more we go over it, the more water we get, okay? And it gives us that hard edge, that water color edge, right? Okay. What we might
want to do is you might want to
make a clipping mask. However, because we started
with a light color, it's going to be very
difficult and you're going to end up making
lots of layers. So just get the right
color that you want to have and painted
on. Nice and easy. Don't stress about
it too much exactly. Try to keep it, remember,
you're trying to make a watercolor type painting here. I think I'm going to add in some more because I want more layers, so I'm going over top of this. And it's darker here. The more I go over this, you can see how it's getting darker now, quite unlike the
other ones there. I think I want a bit more
saturation in my color there. Look at that, I can
go over top of that. Again, the lighter I
press on this brush, the lighter it shows up there. I'm basically what I'm doing is I'm painting
in and around, leaving that
highlight area there, and I'm just adding
in my brush layer. Now, this layer in here, the little white line here, where that highlight is
is going to be tricky. I'm just erasing
that a little bit. There we go. Come
back to my brush. There's also this
triangle in here, where the beak shadow is. I'm going to make this a
little bit darker now. When you're zoomed
in like this too, a lot of times it
might not look. You might think, that doesn't look. What's going on there? Not enough opacity. I'm just going to fill in some of that area that I erased. But as you start to go over
it more and more, you'll say, Hey, look, I'm starting to get
those colors in there that I had, right? Okay. Again, pressing on
this, you'll see it's basically pushing
up the water line, it's as if you've got lots
of water on your brush. Each time you lift your brush, it's going to get a little
bit darker. Overdid it there. If you find you get
those weird little marks that you just saw there, don't worry, you can
just go over it again. Made it a bit darker now. Again, because I'm
underneath the black mask, it looks like I'm
painting over top of it, but because of the layers, it's just underneath there
and it's not showing. Bit darker even now. I want to get that
triangle in there. I also want to see some
gradation between. I wanted to blend a
little bit between the mask and the beak because of this, see
how that is there. It's very subtle. It's
not an actual hard line. I'm right at the edge, I'm
right on top underneath, basically I'm underneath
the black layer and just moving my brush in. You can see now it's just
pushing those colors up. Be patient with this
brush because it I adds it in as you go. See there, it highlights
and pushes the water out. Then you keep going and
then it'll fill it in. It's just the way the
brush is designed. Which might seem weird, but
it actually works well. I think this in here is a bit. I like this brighter part there. I'm going to try and put some
of that in. There we go. There we go. See that's spreading that water
mark around like that. Okay. How's that look? Pretty good. This mine came
out quite a bit darker than the original,
but I'm okay with it. You can try and lighten it up if you like
by moving this over. We'll come in here,
see if we can lighten that there we go
a little bit lighter now. Just play around
where they get it, how you like. I kind
of like the darker. I like the mood feel of
the darkness myself, but if you want it to be
more like the original, then by all means, change
it up, paint over top. Let's make that even
lighter, there we go. Put in that. Streak there. You can just This
is a nice brush that you can basically it's very forgiving because you can
keep working as you go. You can see like I made mine. I made a mistake, not mistake, but I don't like how see this
highlight goes that way. I want it to go along
the beaks line there. So I'm going to fill that in. By painting over top. Like I just said, if you
make a mistake or whatever, you can I don't want
it white white, but I do want it fairly light. Make this nice and small now, and I'm just going to
now I can paint it in. See that. Here we go. Again, this brush is the
new hard edge wash brush. Brought to you by me. Let's add a bit more shadow down here. Blend that in a bit more. Okay. Now, I'm turning two
fingers, I'm turning, and I'm going to
turn my pencil layer off so that I can see.
I need to see whoops. You see roughly
where that line is. But I will turn it
back on in a second. I'm going to make black here, and make my brush small, and I turned it because I have a hard time drawing a
straight line this way. It's much easier for me to
draw a straight line this way. I turned my canvas. Just in case you're wondering. Wops, about the opacity
all the way up. And get that line in there. There's a line, it's
a bit off from where the pencil line was, I think, yeah, too much off. So I'm going to
move it down a bit. That should be better.
Let's see what it looks like now without the
pencil line. That's better. Now, look in here, why is mine so much more
strong than that is because I went over after with
my brush and just s. Bring it up a little
bit, lower the opacity, and it's just blending it in a bit more. That makes sense. I need more brightness, I think there. Is too big. It a bit tricky. W Come on. I I hit on do a
bunch of times. There we go. Sometimes I will do things like this repeatedly over and
over again to get it right. These little finicky bits here. I'm just closing in
some of that line, making it more subtle by painting in the red
that's underneath it. Hope that makes sense. I
don't want to erase it. I just don't want it to be so strong, I'll put some on top. I want to see it. There we go. I like that. Okay. So, mine does look quite a bit different than the
original. So will yours? Don't worry about it, and make
your mine a bit brighter. I probably I spent a fair bit of time on these
kind of details when I'm painting because I think they're really important
and they make or break your painting there. So I just grabbed
a brighter color. Now I'm going to
lighten that up a bit. Maybe see how that looks. And I'm going to call
that Big done for now. We can change it
later. Nice thing is. Remember, we can always
come back in here. I'm going to grab the curves, and I'll show you
how this works. I've showed you this
in the mushroom class, but I'll show you
this here again. I put this as the
midpoint in there. I want to lighten
up that midpoint, so I put a little dot there, and I can slide that
up and down, right? See if I go way up
or way down, right? I'm making that nice and light. If I want just the highlights, I can move it up this way, if I want the shadows,
move it this way. Play around with it. It's very easy to understand
once you do it. But it's also works really well. You can also adjust
the saturation. Make it a bit brighter, and all of a sudden now we're
starting to look a bit more like the
original one there. And now I just adjusted
the brightness, and let's call that Beak De. I'm happy with it. Okay. Beak is done.
7. Painting the Eye: Okay. Now we're going to
move on to the eyeball. I zoomed in here on my reference picture so
that I can see the eyeball. I had my pencil layer
turned off the last time. And let's first fix the area there where
we painted over a bit. Let's go to grab my eraser
brush, get the size right. I don't want to go
too crazy with it, but I just want to
get rid of that red. We're going to paint over it. So it doesn't really matter, but I want to be able
to see the lines at where everything is. That white area, that white
line is not this thick, okay, like as I have it there, but it's just easier to fill it in than it
is to do later. Oop, sorry, I bumped my camera. Okay. To the brush. We'll use the hard edge
wash brush again because it allows us to build up
gradually as we go, which is what we
definitely want to do here. Where do we want to be? Let's put ourselves
underneath the mass, but above everything else. Actually, we'll
go above the mask for now because it's easier, and we can always move it later. Alright, so let's start with
the lighter color in here, which is this brown
color in there. And we're going to
take our brush, get our capacity set right. I had it lowered the last time. Get the size right. It's
a bit too big, Paul. Okay, that's good for now, and we're just going
to color that in. Try to keep it as even
as you possibly can. Again, remember, we can go over top layer if we need
to with this brush. And we're zoomed in
quite a bit here. So don't stress about
how this looks. Basically just get
the light areas where the light areas go
and the dark areas where the dark areas
go. All right. I kind of got that. Mine
came out a little bit gray, I think because I
selected the color there, so I'm going to undo that, and I'm going to move my slider over here to
the orange section. And because I want a
bit of a brown color. Essentially, that's like the eyeball color in most animals, birds, whatever
this part is brown. It's not actually looks
kind of purple in there. And so brown is essentially
just a dark value of orange. So when you're trying
to make brown, move the slider over
to the orange and then adjust the value to look darker. Okay. Same thing in watercolor, traditional watercolor painting. It's just a darker version of orange and any
painting, actually. That's just what brown is. Okay, so we've got a nice
brown outer eyeball. We'll call this. I don't really know all
the technical names for the eyeball bits, but we're going to call
it the outer eyeball. And now let's grab the dark
in there or the black, and we're going to fill
in the inner eyeball. You might want to go
over this a couple times because you can make
it a little larger, because it starts off light, it's diluted. It's watercolor. If you can hear my
brush is lifting, I'm lifting up my brush
to make sure that I'm getting going over top so
that it comes on darker. As I put it on. All right. There we go, right?
We're all done. No, no, no, we're not. There's lots more going on
here and don't overthink it. Keep it simple to what
you're looking at. We've got dark areas and
we've got light areas. Get your brush to a size
that is manageable now, and we're going to
come in and we're going to basically
go around here. We can see you've got a darker
area all the way around. So now we're just
going to paint in a darker area all the way around like that.
Nice and simple. Now, this white area here is quite a bit different than this
white area is here. It's easier to paint in the dark area than it is
to paint in a light area. So we are going to now grab our bruh grab that
gray color there, and we will fill in this area here with that
because it's not pure white, and we don't want this
big bright white. If we leave it white,
it's going to be far too overpowering in the end when
we zoom out, you'll see. I filled that in that gray area. Now I'm going to come back, I'm going to select my whoops. I hit on D by accident. I'm going to select my black. My brush to a good size there. Now I'm going to lower
my capacity a bit. I want this to be subtle. I don't want it to be too strong because I'm
basically making shadows, a shadow is like a
subtle gradation. This wide area, think of
it like it's like a curve. It's got a highlight
in the middle part, and then it gets darker
in the shadow part. It is darker. Now I'm to
make a little bit larger. And I'm making my shadow
underneath the eye there. I'm not worrying so much about You might pull this
brush, we'll pull a bit. If you're going back
and forth like this, you're going to pull some of
the brown into the black, so just go back over top of the black if you do
end up doing that. Take your time. You might want to take a few
tries at this, but don't overthink it. That's the part that I think messes most
people up with this. There's a trick to
painting eyes and other realistic things
in animals and whatnot. And that is looking at what
you've got and saying, Okay, what, here's what mine is. And a lot of times people would stop and they'd finish
like that and they'd say, Okay, mine doesn't look
anything like Pulse, right? What's going on? Well,
what is going on, right? So what is
happening here? So, right now, okay, look, I've got this light brown area there, which I do have in here, it just shows up in
very subtle areas. So I need to then
painted over top of it. I need to make that
darker, right? So I need to go over top
of it very gradually, and I'm just got my
lower capacity, brushes, nice and large, things nice
and soft, easy, peasy. You could use also, if you
want to make it even easier. You could probably use one of these base watercolor brushes because they're
very subtle, right? Almost like an
airbrush, really. Okay? And they have a
little bit less pull. Play around with them,
see which one you like the best for doing
the job that you're doing. And you're just subtly
going over and saying, Okay, you know what
colors are there? Does mine look too
light, too dark, right? Don't worry about the
white spot there yet. Leave that alone for now
because that'll just mess you up. We will
get to that later. I'm going to speed up a bit here and what I'm going
to do is I'm going to go around and I'm going to
bring in my area in here. I'm going to close this gap in here. I'm going to do that. I have to make my
opacity darker, and I'm going to close
that gap in there. I'm just going to speed
up the camera now and let you see what's going on. All right. So I've got my area
kind of done in there now, and I've got some lighter
brown areas in there. If I went too far, I could always come back
and pick up that brown, take my brush nice and s. Maybe that's too big of a brush. Yes, it is way too
big of a brush. And I can come in and
I can add those in by I'm keeping my pay
and low, but there. Okay. So I went back
in and I kind of put in a little bit more and
there. Go back and forth. You're not going
to get this like, you're not going to get it bang on exactly how you want it. You're going to have
to do some undoing. I do this countless times. And, you know, it
might look like, Oh, wow, yeah, but
you just bang it off. Yeah, but I've
painted this painting probably ten times before starting this class
to make sure that, hey, I know what I'm doing, and I know how I'm
going to do it. So don't worry about it. If it looks like,
Oh, it's really easy for me, trust me, it's not. You know, it's just as hard
for me as it is for you. So don't worry about
that. Just, you know, do the best that you can
and learn from this, right? Go over it a few
times if you need to Whoa, too much there. Okay. Now, let's grab
some white, okay? Make our brush nice and small, put our capacity nice and high. And so what you want to do with this highlight area
is you want to put it on small, Zoom out and say, how is that? That's not bad. I think
it's a bit too far forward. I'm going to try
moving it back a bit, undo, I'm going to bring it
back a little bit further. Much better. Kind of gives you the direction that
the bird is looking. I'm going to make it a
little bit larger, I think. There we go. All right. So I hope that made sense. Do it a couple of times, right? If you want to add in,
like, lower your pacity, a little bit, one that
you can do is you can add in some kind
of glassy bits. Remember the eyeball
is kind of glassy. You know it's got a
shiny texture to it. So I can put in you know, some shiny bits there like that. Make this a little bit larger. Which I do have underneath
here on the original one. You can also put it like
say over here, right? Keeping it three dimensional, It gives it that kind of
where the light is shining and making that
curved surface there. We'll put some down
here. We'll try it down here. There we go. All right. However you think
play around with this. Okay? I don't like that
because it takes away from the direction that
my bird is looking. Put something there. Yeah. I'll leave it off. I
like the way it looks. Okay. We're going to
come back after this, and we're going to make
some more details.
8. Starting the Fine Details: So let's look at a
few things here. Let's get our shapes
like our values and things like that we get our
three dimensional shapes properly. So there's
a few things. Let's look at our
original painting. We've got some more shadow areas in here that kind of come down
in this part of the head. There's a shadow area in here. We've got a different
texture up here. We've got a separation here like these cheeks around
the head, around here. We've got some darker values
under there and a bit brighter up here. And
where else do we have? We have in the wings. We've got some feather kind of lines
back here that we can put in. We need to separate
this wing a bit more, make it a bit more we need some shadow under there
to show that wing. We need to put the
feet on. We need to add some more
details down here. These are all small
tiny adjustments. So let's just go through
them one at a time. Alright? So first of all, let's take a look at the mask, and let's make that mask blend
in more with our cardinal. So to do that, I'm going to use a bit of painting
and a bit of stamps. Same stuff that we've been doing all along, just a
bit more of it. It doesn't matter
what stamp you use, you know, really, as long as you kind of,
you know, basically, I want a line that
goes along here and some that goes along here, and I just wanted to feather
out a bit more on there. So I'll show you
what I mean by that. I'm going to plop that
whoops before I do that. I better make sure. I don't want to do that on
my eyeball layer. I want to do that on. What layer, do I
want to do that on? Let's do that on, Let's
do it on a new layer. Just a plain layer. We don't need to put anything
on it in particular. We're just going to
put it on a new layer there just so that we can move it around, scale it around. And all I'm trying to
do is I'm trying to add some texture that's in between this layer here and
my cardinal layer there. I probably picked
the wrong brush the wrong stamp for
that, but that's okay. I'll let's put another
one on after over top. I like how that looks. I'll bring that down
there a little bit. Okay. Click Okay. And let's see what
else we got here. Let's grab one that has
a bit more value in it. Actually we'll grab this one
up here. We'll plop that on. Actually, I don't
want to put that on its own layer because blend that down because I want to
be able to move it around. If I don't put it on its own
layer, then I can't move it. Select the move tool, and It's got its own
natural feather here. There, like feathering by that. I mean, it feathers
off of the image. And I'm going to
squeeze that in. I don't want to going over
top of other bits there, so I'm string it right down, and I'm going to stretch
it out a little bit. Keep it off of the eyeball. There we go. You can see
what's happening there now. Stop it. Just by moving that in and keeping
it off the eyeball there. You see what I'm doing here, I'm adding this on above that, and I'm just adding a little
bit of feathering there. Okay. All right. Let's put another
one of those on. As I'm doing each one of
these and I'm happy with it. I'm just compressing them on.
You don't need to do that. You can leave them on
your layers if you like. I know that little
mark is there. Okay, and I'm going to
use the same brush there, and I'm going to
put that over here. I want that shadow
on the eye there. I sure I got it right. I want to have to zoom
out and see where my getting the angle
right is important. I think that looks
good. Stop, doing that. Okay. One. I don't
want. There we go. Some of the things
can be a the tools, they try to make
them so intuitive, but sometimes they can be
a little bit frustrating. We've got that line
there, and we've got, if we look at our
drawing lines there, we can see where some of
these shadow areas are there. So I'll make another new layer. I'm going to plop that,
another one of those on there. Scale it down. Scale it down and get that
in the right area there. I'll turn it around
this way. There we go. Okay. And that's underneath
the cheek there. Some of that, I'm
just going to erase off of this at the end there. So it doesn't ruin my already existing stuff that I
got going on there, I'll lighten this
one up a little bit. Oh, no, I can't light
that on the wrong layer. All right. And who?
That looks good. Let's make one more though. Shall we for up top here. And again, we can use the
same brush, doesn't matter. If you want to try a
different one, that's fine. This one is just a nice, simple, easy brush stroke. And we've got this right
above our e there. I think I might turn it
around. And see, yeah. I do, I'm going to turn
it around. There we go. Okay. How's that looking? Do I want to erase any of that? M. Maybe, maybe not. You get the idea.
There we go. Okay. So what have we done there?
Look, what have we done? We've added in some of
these shadow areas there. Another thing you can do is
let's say, you know what? I put that on really strong. If I click on this
little n here, underneath, you'll see opacity, and I can adjust that opacity so that it's
not overbearing, right? I'll do that again
on this one here. See where that opacity is there, lower that down a little
bit, make it more subtle. And this one here in the
middle or by the eye. This one here, I'm just going to erase some of the
edge of that there, just to make it a little bit more soft and feather
it in a bit. Okay. All right. Now I
got a whole bunch of these and I'm going
to get really confused. I'm just going to
shrink those up a bit. Now on this layer here, I can stay on this layer
because I'm above the red. I want to add in
some subtle shading. So for that, I'm going to use one brush that I can
control the opacity with. It's one of these base
water color ones here, and I'm just going to
the right brush side, bring my opacity
right down there, and I just want to be able
to blend some of that in. So that it's not like this hard fall like fall off, right? It's not like a hard edge
there, right? Whoops. Sometimes there's one
hand thing that you do hand gesture that you do and it accident and
it turns on the eraser. I've never been able to
figure out what it is, but I hit it like every time I make a painting at least once. But generally several times. So right along this
edge here, this line, I'm just smoothing that out, making that more gradual. Don't worry so much. And I also want to just fill in some of those
lighter areas there. Okay. So in traditional
watercolor painting, this would be using
a fairly dry brush. Okay. Good stuff. Alright, I'm going to erase a little bit of this because I think I a bit overboard there. But generally, I like
what's going on there. I like how that's
coming together. I'm going to go to
my blending brush here and I'm going to think
I'm going to use this one. I'm not sure. I can never
remember, which You know what? I think it is the
hearted wash, I think. Yes. I think. And just to get some of these
little feathery bits here, and I'm blending those in. Yeah. You can see them
how they come up here. I'll do it so you can
see there. All right. Just your opacity, your
brush size, get different. You don't want a
whole bunch of lines just like that. Because
basically what it is. It's a tuff of feathers
that comes out and they're more grouped
together at the base, and then they single out a
bit more as you go on there. Whoops. Let's see
what I did there. I pulled the red over by mistake. I don't
want to do that. Lower my opacity down here, and I'm just going to
bring some of this in just to meet up with
some of that beak there. And I'm going to
pull some of this in here for the triangle. Basically, I'm just
smearing my paint around. You would do this in traditional watercolor painting by using a wet brush and going over and grabbing some of
your paint there. You can do the same by pulling some of the
red down like here. I'm going to pull down over top to make it
look more natural. Bring some of these up here. And this is these little bits here doing this kind of stuff. So you might think,
Okay, you know what? That's not really like
watercolor painting, Paul. That's more like
traditional painting. And yeah, you know what?
You could be right. But it's up to you. You don't have to
do these parts. I like doing little subtle
things that add in. I add in a bit more dark
here to blend this out. I like doing things
that add in, you know, just kind of so that it's not like too abstract
that it looks funny. But I want emotion,
I want feeling in my bird and whatever my
subject is that I'm painting. I want to get some of
those, like effects. And so doing little things like this really bring
that home, right? They really bring that home. So I'm going back and forth. I'm pulling some of
the red towards, and I'm pulling
some of the black off onto the red by doing this. So the reason I'm
doing that is, again, I want a subtle
gradual blend between. I want, like a soft
curve there. Okay? All right. I'm going to come down
here onto my red layer, and we're all I've
got this brush here. Go to bring some
of that up here. I'm going to show you
another brush that's great for blending if
you want to play around. I use this quite a bit in my
um oil painting ones here, where it gives a I'll show you
a large what it does here. See that? How if you wanted a wet edge, so you wouldn't obviously
do that on this painting. But to get that wet edge that
you'll see there, kind of, it's basically
grabbing the paint like with a lot of water, and it's smearing that out. So you can do that two ways. You can bring the
color even though there's no white
in there, right? Imagine you had a
big blob of water on your brush, right? Okay. Just a neat effect,
and that's the big, beautiful blends brush
brought to you by me. All right. Where were we
hard edge wash, there we go. Bring up some of that opacity, get some of these
little feathery bits. Just to get you know, I
said we'd fix that later. Well, this is us fixing
that later. Right? We're getting some of
those feathery bits. We can do that again
down here on the end. Bring up the size. There we go. Well, we got the cardinal
rotated this way. Let's take a look here and
grab some of these grays here. And put some of those lines on, and then we can grab some white, and we can put in the
highlighters in between. Bring up my opacity,
lower my brush size. See how my brush curved there. That's because I have
such a hard time drawing those straight lines. That's why again, I
rotated the brush. I don't know why. It's just
a dexterity thing for me. Please don't mock me. Okay. So we got some
lines on there. We got some feathers on there. All right. We're going
to stop it here. This is the video
is not too long, and we'll have trouble
uploading, and then I'll come back and we're going to
do some more details.
9. Continuing the Fine Details: Okay, good stuff. So let's take a look here what
we got going on. We've got some
lighter colors here. So let's grab one of those. Let's make a clipping mask
above our red layer here. And clipping mask. This is probably too dark. I'll make it a bit lighter. We're going to grab
one of our stamps, whichever one you like, and we're going to put it on here. Rotate it around, move it around until you get the
look that you like. Basically, what I want to
be able to have a few of those little highlight areas
there that you can see, kind of the edge, you know, like our top of our bird. There we go. That looks good. Now, we also have some of our
highlight areas on there. Let's grab our new
hard edge wash brush, and we can paint a couple, not on the clipping
mass. We'll close. I'm going to close
clipping mass. Again, you can leave
it open if you want. I'm going to paint
right on top of my red layer. I'm
crazy that way. If you're not comfortable,
make a new layer. You know, if you're worried
about making a mistake. In traditional
watercolor painting, you don't have this option, so it's not like
you get to choose. You either make a
mistake and you live with it or you
start over again. So it's a good practice to kind of play along the
same way, I guess. We need some more
texture down here, and I think we've
got some red in here that I like, that's a bit. My painting is a bit to
what do you call it? Light there? That's the word
I'm looking for too light. So I'm just going to paint in, again, new hard edge wash brush. Come on. And if you wanted
to go real crazy and get, you know, in let you try
this muddy race brush here. And this will plop on, like, you know, let's take a look up here what it's doing, right? It kind of plops on the harder I press, the
lighter it gets, right? It's putting on a big
watercolor stain, right? Okay? If I started out like
that, nothing happens, but the harder I press,
and the more I go over it, I get a big watercolor
staying there. Okay? So let's see if we can make that work in here a little bit. I'm going to make
this a bit smaller. No. 'cause it's got red on underneath it already.
But that's okay. It's still giving us
the look that we want. We'll try it up here
with this dark color. I'm going to put a
new layer over top, and I'm gonna come in here, and I want to get some
of this stay there. I'm gonna put a bit
more Don't overdo it, like I just did.
You will regret it. Lower that down a bit and make
this a little bit larger, a lot larger. That's too much. It's very easy to get
carried away with these and the gimmicky. They become too gimmicky. We need some more dark
along this ridge here, where our bird is, our
bird's tail is here. I make that ale bit larger. O. Almost got it there. So what this is doing
is it's putting on the dark and the
light area there. You'll see in a
second. There we go. Okay. So now I can grab my
new hard edge wash brush, grab some red, make
it nice and small. Come on. Is going over above it. Trying to be above it
anyways. There we go. And well, look at that. We've got our feather with
the shadow underneath. Now, let's fix up the shadow a bit and make it more
defined underneath there. And I'm going to show you
that again because that was pretty tricky,
pretty sneaky of me. The way I did that. And I want you to be able to see that. So I'm coming underneath here. This is the new hard
edge wash brush now. And yes, there's a
big hard line there. Don't worry about that for now. We just want to see that shadow. Alright, let's grab our
smudge brush there. And we're just
smudging up some of that shadow with what's
underneath it there. And now let's zoom out
and take a look, Walla. Look at that. Big tail feather. Okay, so, what did we do there? With this brush here, this is a newer brush
that I've made, Paul Water smudgy race. It's got all kinds
of names on it. What I did is I
went over the top above above the feather, because what I wanted to
do is I wanted to have that little highlight
area there. This one's red on
top. I could put some dark up there, but
I like how it looks. And if I press down hard, you can see what it's
doing there, right? It's putting on, there's light underneath there and
there's dark over top. It basically just painted that on and one brush stroke as opposed to using a whole bunch of different ones. Feel free to do it in
easier way I feel like, but I think that
works pretty well. S. What layer, am I on here? That's why I'm nothing's
moving. I'm on the wrong layer. I'm just going to
feather that out and make this a little
bit more pointy. And we can call
that section done. I think my I'm not sure
if I put this on up here. Can I? No. This up here, I think is too dark right there. Let's grab that new edge. Let's use this one
again just to show you. And let's just wow,
too big. There we go. Just using that to push some. You're pushing like water color and some paint around there. Covering up some of
that shadow area. Alright, making some
watercolor stains. You can do this
like subtly, like, we're going to take
some darker colors now. Make this a little bit larger. And I'm going to
put this actually on I think this will work
with a clipping mass. You'll have to
forgive me because sometimes I get so voles. What I don't want
to do is I don't want to lose that
white under there. Yeah, there we go. Okay. Let me make this even a
little bit larger. And I want to have some more
texture underneath here. So I'm holding my brush down
and I'm moving this along. It doesn't matter
how fast you go. And you see what that
did, I just put in that nice watercolor
texture there, okay? Again, this is a
newer brush for me. But it does add in this, like, different layer, so you've got dark,
light, dark, right? So that may or may not work, depending on what it is, what
area you're trying to use. They're all different
brushes, and they're all different techniques to
do all different things. You know, there's no right
or wrong way to do it, so don't stress
about it too much. We need some more
gray down here. Oh, let's try this brush
since we've got it now. Will that work? Yes, it
will. Perfect. Might be a bit too much. No, it's okay. Too
much yet it is. I lower the opacity. Down. Ump. Come on. Put that back. And maybe
make this a bit more red. Try that. Good. Okay. Let's get our new
hard ed wash bush. We went over our white line
there. I want that back. If you want, you
can come in here and add it in a bit
more like on top, whoops, a clip mas. Here. Let's push these together. Woops. Try to push
too many together and there. All right. Okay. Our feathers need
to be here at the back. We need to bring these
out a little bit. And I think we need a
bit more red in there, but for now, it's okay. Now, up here, I made a bit of mistake with my white lines, so I'll fix that
up a little bit. And I think I will put
in a bit more red. So what brush would
we use for that? Let's say we're going to use. I want to stick to the same one. Okay, M it a little bit bigger. I just want to get some
brighter red in there. Oops, I lowered the opacity and not the size. There we go. Just a few more tones in there, so it's not just a big
solid blob of gray. And whoops, I think that
was a bit too much. You can zoom in here
to see a bit better. I'm going back and forth until
I get exactly how I want. Smudging is your
friend. All right. We are really close
now, I think. We need a bit more
shadow up here, so let's just grab that color. Let's lower their rapacity
down, make our brush larger, and we'll just a little
bit less pacity, I think. A bit bigger rush. That new button is so handy. You know how many times
I find myself trying to use that in real
watercolor painting? Okay. It never works. And let's bring some of this in here I'm just adding in
some more tones. We're getting
really close there. I like I think I
need some more Okay. I'm just putting in
another shadow area there. And now I'm going to try
blend that in a bit. So now I'm going to pull
these down over top there. All Sudden now it's
no longer a big line. And we've got another layer, another feather layer there. Perfect. All right. I think
we're good on the details. Let's come back and we'll add
in some very simple feet.
10. The Feet and Final Details: All right. Before we
start on the feet, O area that I think I
need to address here, and that is there isn't enough shadow here
underneath this wing, right? It's kind of blended and
we left that part out. So really quickly, again, drive this home clipping
mask above the red layer. Let's grab a dark color, and let's just grab one
of the stamps here. Which one do we got
here? Let's try that one, so that does. Perfect. Good. Okay, and we'll bring that down, we'll turn it around till
we get what we want. You could also paint
this on if you like. I'm just doing this because I don't think we did
enough stamping. I'm sure we did, but just in case people
want to see more, and now what we're going
to do is because we want to keep Tab
doesn't look at that. We want this. And here, make my brush a little bigger, and I'm going to erase the
parts that I don't want. Just slightly going
over very softly. There we go. Nice shadow there. Now, if I want, I'm
going to go back to my new hard edge wash brush
and make the brush small. I'll just get in
the dark part there and actually cover up some
of that white line even. I'm just scribble it along here. Not too fancy. See
how that looks. Beautiful. Almost a bit too
separate, but I like it. Let's see what
layer we got there. Yeah, we could probably smudge some of this
down a little bit. So it's not all consistent
and hard there. Perfect. Okay. Now, feet. I originally, as you can see, I
drew these feet on, and then just it kind of took away from where the
painting was at, and I still think it does. So I'm going to keep it
the way that I did it. And basically, all
I did is I knew hard edge wash brush and put the feet underneath
your red layer there because we want
underneath the body. Okay? And I just very
simply just gave a hint of, yes, there this bird does have. Feet. I just didn't
want to paint them. Because sometimes
those details will take away from your painting. Make it darker underneath the body because that's
where the shadow area is, and feel free to add in a
little highlight area there. I don't think I did much
on mine, but, you know, just to give some
three dimensionality. See, there's my
not being able to draw a straight line unless it's pointing the right way
again. There we go. Down here, we have um, What am I trying to say, Paul? Where's the brush
I'm looking for? Big. Wet and granular. Yes. And we've got some
little round bits under there that I think we should add in where the feet come in. It's not just, you know, they'll just stick out underneath there. So this big wet and granular
brush basically puts big wet and granular marks on your paper, your
canvas, whatever. Let make a bit of red in there. So of blends. There we go. Maybe too much. And I don't
like this blob there. I don't know what
that is all about. You get rid of some of these.
Whoa. To big. Too much. And just smoothen some of
those out a bit. There we go. And I'm going to say we are. Let's turn off our
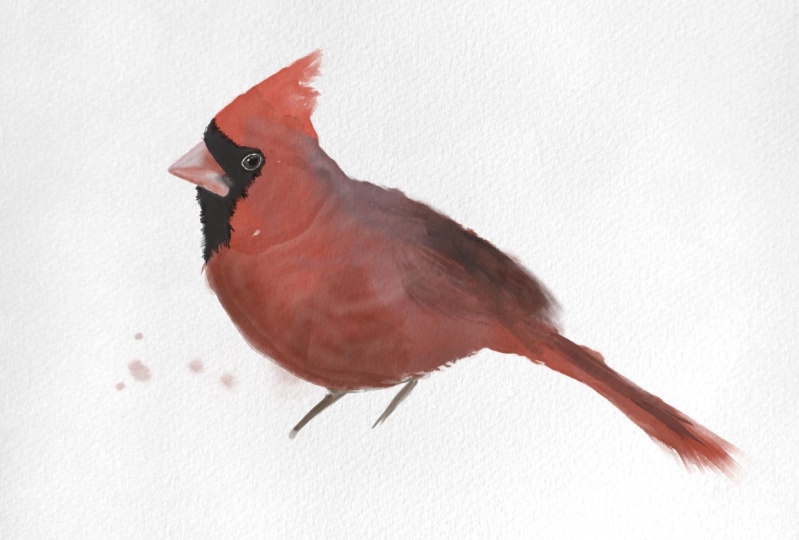
drawing layer, pencil layer. We are done. Oh, wait, no, we're
not. What do we forget? We forgot the paint blobs, the accidental paint blobs. We got to put on
the paint blobs. Okay. So let's make a new layer at the very bottom because
they're underneath. Make them nice and bright
so we can see them. And this is a fun brush
I'm including for you. Special today. And PC
watercolor splatter. It's essentially
exactly what it says. It's watercolor paint that
I splattered on a paper. And I think it needs a
bit a bit darker, maybe. So let's adjust some hue and saturation and
brightness there. Let's get some more saturation, darken it down a bit. There we go. The brightness is a little bit off,
but that's okay. The color, I mean, that's
okay for now. Alright. We got our paint blobs on. We got our feet,
we got our legs. We got our details,
eyeball, everything else. You can go to town
and you can add in more and more and more
details. If you like. I'm going to stop it here
because I think this is already getting to the point
where it might be overwhelming for some people. It's more about learning the principles and
about how to do these things and
practicing them so that you can do it
more on your own. I will make more classes
like this as time goes on. Thank you for watching.
I hope you enjoyed.
 Paul Cheney, Teaching watercolour and digital painting