Transcripts
1. Introduction: And Hi, I'm Ashley, and I'm an art teacher who loves painting loose
expressive florals. In this class, I'm going
to show you how to create a monochromatic floral
bouquet using just one color. We're also going to play
with our paintbrush and see all the fun
things you can do with just water and one color. We're also going to
focus on water control. So having value will
help you create soft light areas and with deeper and more
defined details. We're going to do that
in one of the lessons, we'll decide how much water we need to create light
to dark value. We're also going to go
step by step together, starting with simple layers and simple shapes and just
keep building upon those to create the flowers that
we're going to use in the final project and the leaves so you can be
comfortable and confident. By the end of the class, you'll have a finished
floral painting and a better understanding of how to use value to bring your work to life. So
let's get started.
2. Materials/Supplies: Mm In this lesson, I'm going to show
you the materials that you'll see me using throughout all the practices and through the final project. I'm going to first
start with the paper. The paper of all the things
I'm showing you, the paper, I think is the most important to get a certain type of paper. Now, the one I'm using
is the artisa brand, watercolor pad, nine by
12 cold press paper. It's 140 pounds, 300 grams. That just tells you that
you can paint on it. It doesn't have to be Artisa. It also could say mixed media and it could be in a sketchbook. It doesn't have to
be a watercolor pad. I like to rip them
out, especially when I'm doing practice paintings. So, that's why I have
these. This is from here. I just cut them down, so
I can have these ready. I usually cut a couple
pieces because even though, I only plan to do two or three, this way I have extra
just in case if I run out of room and I'm getting creative and I want
to just keep practicing. So it's good to
have that at hand. I have three different
sized brushes. I have and they're all round. I have a large medium and small. These are it's really nice to
have three different sizes, but you do not have to have
three different sizes. How you hold your brush can affect the line that you create, whether it's skinny,
skinny line, a thick line. But I do prefer to have
three different sizes. Again, you don't have to. I do have some stylus
embossing stylus pens. These are all different sizes. At the end of each pen here, you do not have to have these. I use these to create really interesting lines in my artwork. You don't
have to use that. When I go to use these, you can use the back end of your paint brush to create those dents so the
watercolor can flow inside. The color I'm going
to use today, this is the brand I like to use the doctor PH Martin's radiant
concentrated watercolors. So this is the brand I use when I'm using
liquid watercolor. Mahogany is such a
beautiful color. That's what I'm going
to use in this lesson. You do not need this color. You do not need anything fancy. You don't need these
little containers. If you have
watercolors in a tube, if you have acrylic ink, if you have any
type of watercolor, you can use whatever you want. It doesn't have to
be the same as me. It doesn't have to
be the same color. I also will have a bowl of water next to me
on top of paper toweling. Now, there are artists that
will have two jars of water, one for your dirty brush, and then the clean water. So you do the dirty
water and then do the clean water so you keep the colors separate and
they don't mix together. We just we're just
using one color. So you can just have one bowl, but if you want to
have two, you can. I typically usually
only use one bowl, but there are a lot of
artists that use two. I will also use extra
paper toweling. This is for my paint brushes. These extra on the
side are for, like, if I want to lighten something
or take something away, I like to have this at hand. And then also to clean my paint palette if
I need two and like, it's all dirty and I need room, I'll use these extra ones. Those are everything. Those are all the
materials that I'm using throughout these lessons. The next video, the next lesson, we'll start practicing and
getting to know our materials.
3. Getting Comfortable With Your Supplies: Alright, this lesson is just getting to
know our materials. It's really important to feel comfortable and confident
with what you're using. So if we just jump right
into our painting, we're not going to feel
very comfortable and confident with our materials, so it will show in our artwork. This is always my
favorite when I am deciding what
colors I want to use, what paint brushes
I want to use, how much water I want to
use for light and dark. That is just one of my
favorite things to do, and I hope it becomes
one of your favorite. So I'm going to start
with my big brush, my big round brush. First things first. I
like to shake this up. Sometimes watercolor will all the pigment
will sit at the bottom. And then when you go to do this, it just sometimes
comes out chunky. So I make sure I shake it up, even if I used it yesterday. It's always a good
habit to get into. Put this on my paint palette. If you do not have
a paint palette, you don't have to have a
ceramic one like I do, but you could use
like a paper plate. It doesn't have to be a
ceramic one like this. Alright. I'm going to start with
just making a puddle. So first, I wash my brush. It's always good to do that. You never know if maybe it wasn't washed.
Well, last time. I do want to mention a couple of things about your paint brush. If you ever watch art
videos of people painting, sometimes if you're on
Instagram or Facebook, you'll just have these little
clips of people painting. If you pay attention to
their brush strokes, if it's a lot of
loose brush strokes, you'll notice that their hand is further up on
their paintbrush. I tell my students, this is
the no touch zone and that we should hold it over here
or anywhere on the handle. So from here to the
end is the handle. There's nothing wrong with
holding it down here, but if you want
loose brush strokes, I highly recommend holding it after the no touch tone
or even further back. So this practice is, like, getting used
to doing that. You may not be used
to holding it here. It's definitely something that might feel awkward at first, but it is a good
habit to get into just so your brush strokes
are a little bit looser. So I'll paint the bottom
of my water cup or my bowl just to help clean it a little bit, wipe a little bit off. And I'm going to
just paint a circle. And that's just water. I don't know if you
can see that just a little circle here. And then I'm going to
wipe it off, dip it in. It is important to
get that extra water off, so make sure you do that. I dip this paint brush
into my mahogany, and I'm just going
to touch the center. And watch it grow. This so satisfying. So this part is definitely a good way not only to get to know
your materials, but just a way to
help relax your body. Whenever you're doing something
new, it can be stressful. So if this is something
that you're worried about or just want to play with your paints
a different day, too, this is something
you can just do. You don't have to make something every time you
get your paint brushes out. It can just be for fun to relax. This is just one of
my favorite things. I do this all the
time, and I still feel like mesmerized when I'm watching it because
you don't really know what it's going
to do every time. It's going to look different. So I'm going to do
it again this time. So I have that circle. You can see that. Dry
off that extra water. This time, I'm going
to do a spiral. So I'm going to put
once I put it in here, I'm going to just notice
where I'm holding my brush. I'm going to just do a spiral. Now, I'm going to
do the same thing because it didn't grow as much. So now let's see what happens
if I have more water. So this is more of a puddle
before it was just wet. So now I can if
I'm moving around, I can see that there's a puddle. I kind of have to hold
my head to the side to really see it, wipe it off. I always tell my
students to wipe it off, because if you're going
to tap it like this, it's going to spray and
get all over your stuff. So I take all that
extra water off. Now let's see what happens when it's a
little bit more water. This is why it's so important to practice because look
at the difference. We did the same thing. And
the only with our paintbrush, the only thing that was different was there
was more water. So I'll do another puddle. Extra water off. This time, I'm going to paint into it. My puddle is right here, it's probably easier
to see now because my water is turning
a different color. That's why people have
two different bowls, but we're just using one color. It's interesting
to paint right to it and see it go that way. I'm just going to do
a line this time. I kind of want a bigger puddle. So this is a line down here, and I just added extra water dried off before I
put it into the ink. And then I'm going
to paint up to it. I notice I touched it in some
areas and not every area. Just to see what
happens. There's really nothing that we're making here. It's just to see
what if I do this? What if I do that? What ifs? I just keep painting until I get closer, see what happens. Maybe use the back
end of my paintbrush. What's it going to
do when I do this? That's when you could use
those stylus embossing stylus. Just playing. This
is where it gets handy to have these
extra pieces here. Okay? So if you
want to keep going, trying different things,
that is up to you. It's very relaxing. This is also a good time to
test out different colors. So before we move
to the next lesson, I do want to just show you. So I'm going to do
another one of these. It is nice just to see what
a different color can do. This is sepia. Oh, that's a pretty cool color. I lied. One more. One more. It gets really relaxing and really just I just
get really into this, and I feel like I always
tell myself that. One more. No, wait, one more. Now, I thought
of something else. Go with that, too, you know? Like, yeah, I still
have a painting to do, but go with what makes
you feel excited. And you can just practice,
practice, practice, and maybe that's all you get
done that day. That's okay. I'm just gonna drop it in. That is pretty cool. That's also a good opportunity
to see what happens here. So you can see those dents. It's pretty interesting. You can kind of tie everything
into there. All the different
things we just did, paint up to it, maybe
tap this a little bit, drop a little water in there. Maybe a little dry brush. Why it's really nice to
have that watercolor paper because you can do
all these things. So I'm just using a dry brush. All these things happening
in this one spot. So if you have more ideas, the what ifs, given to the What if What if I do
this? What if I do that? Try different colors, try
different paintbrushes. Remember, we have the
other two paintbrushes, if you got all three
just have fun.
4. Practice Water Control: In this lesson, we are going to concentrate on water control. So having a light medium
and dark value is really important to practice because this is a monochromatic
painting, and you will be using
all three values. You need to know how
much water or how little water you need water really controls
everything in this piece. I'm going to continue using mahogany, the
concentrated watercolor. If you have something
else, that's okay. That's what this
practice is for is to figure out how am I going
to get my light value, how am I going to
get my medium value, and how am I going to
get my dark value? So we are going
to practice doing all these different values and really see how dark or
how light this can go. First things first
with my clean brush, and I already got
the water off of it. This is from my
practice. I'm going to just see how dark
this color can go. So this is just right
from the bottle here, and I didn't add any water. Off to the side, I'm
going to have some water, and I'm going to add
some of this mahogany. I'm going to see how
light I can get this. I'm going to put
that on the bottom. Now, this is our practice. There's no expectations except for trying to
experiment with water, see how much water you need. That, with that being said, I'm going to see if I
can get even lighter. I put this all the
way at the bottom. That's not a big deal. I'm going to see if I can go even lighter. I'm going to keep
it at the bottom. I can absolutely get it lighter. So when I get this
kind of value, I'm going to look at
my paint palette, and I'm going to kind of
make a mental note on how it's going to look on my paint palette
to get this value. That is going to help later. So I'm going to dry this off. Put a little bit more in here, right into that mixture. Definitely made a difference. I'm just keep repeating that. I do like to wash my brush
so I can start over. I don't really want to add a whole bunch of water to this. I want to take this
into my water. So that's why you
see me washing, wiping and drying each time, so I don't add too much water because I want to be
able to get that. So that is as dark as it'll
go, which is pretty dark. I'm not adding a lot
of pigment each time. I'm just putting the very
end of my brush in here. And this is just going to
help me in the long run. So this is definitely got more there's more in between
these to more value. So I'm just going to keep
going and experiment, come back and add more water. What if I have this?
This is quite dark. How can I lighten that up? Notice I am holding my brush
after the no touch zone two, that not only helps with
loose brush strokes, but it helps me see
what I'm doing. I feel like my hand is lower, I can't really see
what's on the paper. And then also, it helps me
just not worry too much. If I have these
looser brush strokes, I worry less about how
it's going to look because I purposely am not holding it right to the bottom, and it gives you a
little less control. I like to see how that happens. So really, there's
not a lot going on, practicing, just the
different values. So this is nice to have off
to the side when we're doing our final one or final piece. And I also will have
an extra just in case, because if I run out of room, this is kind of
like my test paper. If I don't feel comfortable with doing different values
right on the paper, I can test it out just to see how it looks before
putting it on my final, and then I have a
spare just in case. Don't just keep working on this. Don't feel like you have to
move to the next lesson. If you're not comfortable
and confident with value, continue practicing and then I'll see you in the next lesson.
5. Practice Flowers: In this lesson, I do have a bigger piece of paper because we're going
to practice flowers. And this way, I can just
kind of keep it all on one, and then you can compare each
flower, which one you like. And that just helps you grow as an artist to be able to compare
it all on one paper. So I did not change my water
because this is just still practice and I want to see
where these puddles are. The first things first, I'm going to start with
a light value. I'm just going to have a circle and it doesn't have
to be this perfect circle. I just go in a circular
motion and I like it loose, it's okay if it's not exactly the way you would
want a circle to be. So I'm going to take I
still use my big brush. I'm going to do the spiral
like we did on our practice. This just helps get
something out there. Now, I put that circle. My spiral started in the center. So I'm going to do
a quick oval or a quick circle and then I'm going to maybe
put it off to the side. Sometimes I like to go back and just soften that
with just water. We really want to suggest
these flower details. We don't really want to
outline it completely. The eye kind of does the work. Let the water do the work too. You're really just moving
the paintbrush around. This comes with practice. You can see how they
change direction. So I'm going to put a little bit more softer side
on the opposite, not in front, but like on the opposite of the
spiral where it started. And I did this all
while it was wet. I'm also going to
do a medium value, which I have some on here. But if I want to practice, I have a lot of
practice sheets here, so I can see what
kind of value I have. Well, this is drying. I'm going
to do almost kind of like a gum drop make it a little
darker at the bottom. So while it's still wet,
I'm adding a little bit of darker value to the bottom. And very loose.
I've just scooted my hand up naturally
on the handle. So that just tells me that should show you that I'm
just trying to keep it loos. So I'm going to keep my paint
brush here, pull this out, and then I'm going to
push down and pull out. So kind of with the tip of
the brush, go like this. And it just think
of it this way. You're just pulling
that paint out. So I'm going if you think of
this as like a ballerina, ballerina stays on
the tippy toes and then push down and lift
back up on the tippy toes. I'm going to do just
another one here. And then if you don't
like how the end looks, I like to sometimes just kind
of like these wispy lines. When I say wispy, that means I'm just trying to
barely touch the paper. So it kind of gives in a way, we're kind of outlining here, but I just want to
don't want it to look so perfectly
round at the end. I wanted to have a little
bit of light and dark. So these little spaces
here where it's starting to just kind of skip my paintbrush kind
of skipped a little bit. I'm not filling that
in. I really like having that loose
line, and again, let the water do the work, and then the viewers'
eyes will also kind of close that in or see
it as a light value. So I'm going it again. This
is practice after all. To start with that medium. This is pretty dark,
and that's okay. This is a little bit
bigger, totally fine. Get a clean brush with the baller on her tiputes
and I push down, lift up. Now, I could tell my paint
brush was pretty dry, so not a big deal. This is all about practicing. We are still practicing
with that water control, how much you need,
how little you need. If you get where there's,
like, a big puddle, you can just be
patient, let it dry, or you can move it around. You can lift it up
a little bit with your paper toweling if you
lift it up a little bit. So I don't always lift
it up because I do like, as you can see, as
it starts to dry, I love how it does
its own thing. So it's just really
different once it dries. But if you want to
experiment with that and see what happens
if I use paper towel, I would use a small
piece of paper toweling, and just set it
down and lift up. So if you're like, Oh,
man, this is too dark. I want to have some light
areas, you can do that. It is staining your paper, so you're not going to
lift it off completely, but it definitely lightens it. I do suggest to just kind
of see what happens. Now, if you go to
do the next step, I do like to have the next
step a little bit more dry. You can use the
back of your hand to touch this if you think it's dry and you go like this
at the back of your hand, you don't want the oils
from your hands on here. So that's why I'm using
the back of my hand. If it feels cold to the touch, it is still wet.
It is deceiving. I don't want the next layer to spread into my first layer, so I am going to let it dry. I also will have hair dryer, and I'll use that to blow dry my paper to let it
dry a little bit faster. It's up to you what
you want to do. You can keep doing these while
you wait for this to dry, or you can get a hair dryer. Okay, and now I'm going
to do the medium value. So I'm doing the medium brush. Each layer you're
adding details, you're going to do a little
less detail each layer. So I'm going to do
a medium value. Oh, that's pretty dark. Let's add a little
bit more water to it. Kind of going off to
the side a little bit. I love how this dries and
has, like, this blue color, and then you add water, and then it gives that
pinkish color. Little things. There we go. So I have a medium value. And I'm once again holding
it past the no touch zone, which is what I'm calling this metal part. Let's
start with this one. So I'm going to do kind of like a test line here because I may think that's
exactly what I need. But then when I get on here, I'm like, Oh, I can't see it. So I'm gonna do keeping the ballerina on or
tippy toes. It's okay. If it's little dark, I'm
gonna move it around. And then I'm going
to just kind of keep making these C marks. And then every once in a while I touch my paintbrush
down a little bit more. I don't want it to
be just like this. You're going to go
like this and lift up, even that little
bit of dry brush, so I got a little dry a
little bit right here. That is really unique and it
makes it more interesting. So as I'm doing these sees, I'm putting my
paintbrush up and down. I might make a line a
little bit skinnier. So I'm just trying to create a variety of lines
to make it more interesting. And I'm paying attention
to these big areas. So I like to add when I
get in that big area, add a little bit of
water, water to that. I don't want to put too much detail So notice I have some space in
between to keep it loose. So I might add a little
bit of water here. I usually do it on
the ends because I figure towards the
inside, it gets dark. But when I have
these bigger areas, I like to have it get a little lighter there because
I figure that is the flower part petal is kind of up a little
bit more, right? So it's going to have a little bit more light touching that. And the further into
the center you go, the darker it's going to be. So I can see my lines here. This is exactly what
I want going on. If you need to practice
doing Cs like this, maybe starting there
would be best. Don't get stressed.
This is practice. There's no expectations for
a masterpiece to happen. You can't really have that until you are practicing, right? That's what practice
is for to figure out, Ooh, I don't like that, so I'm not going
to do that again. Ooh, I do like this, okay? So that's what practice is for. Now, this flower is facing a different way because I
had started my spiral here. So I'm going to do my little
Cs here, little se lines. And then as I get further out, that's when I'm going to
start adding some thick ones. Kind of visualize what this
flower is looking like. So when I see that
big space here, I kind of want this to be like a big petal that came out
off to the side there. So that's why I wanted
to quickly do that. You can change the direction
of your paintbrush, too, if you notice I did that
skinny line and I'm like, Ooh, I want something larger. So I put another line like
that right next to it. So going skinny and then
thick pushing down, if that's not working for
you, try something else. This is what works for me, and this is what I'm teaching you. But if you find something that works best
for you, do that. I always tell my students
try the way I'm doing it first and then experiment. So this way, you have
a starting point. So I'm going to let that dry. I do want to bring
that out a little bit. So we're not trying
with loose flowers, it's definitely a good
thing to practice, like, trying to do less. If I feel like I need to
start doing more details, I'm going to stop because
I'm probably doing too much. Okay, so now I'm taking right from the mahogany that I
didn't add any water to. And I'm just going to
kind of do dots here. Just at the bottom. Sometimes I'll do a
couple at the top. And then a clean brush again, with my medium brush. I'm just going to pull some
of that keeping the baller in on her tippy
toes just to give some value because it's
going to be a little darker where the flower
meets the center. I'm having a lot
of lines that are similar in size on those two, so I want to make sure I
have a variety of lines. Ms sus hearing me say
variety all the time, but it does make things
more interesting. So medium size
brush, clean brush. And then trying to keep I'm also holding it
straight up and down, resting my hand arm on the table so I have more control and
a little bit more steady. When you're doing this,
if you get outside your lines, it's remember, we're doing this loosely, so it's kind of to be
expected for that to happen sometimes. No worries. I'm going to let it
dry. I'm may use my blow dryer again,
my hair dryer again. I used my hair dryer to get
this a little bit more dry. I did need more of my
watercolor on there, so I got some more of that,
and now we're going to add just the final details
with our smaller brush. I still have the same water because I'm going
with a darker value. I'm gonna go straight
from the color itself. So I want to my goal
for these is just to kind of create that back to that C curves that we have in the center and then just do a couple lines on the outside. So I'm going to stick with,
if I look at this petal, I'm going to stick
with the darker inside of it and then lighten
it a little bit. But as I get further out, I want less of that extra detail here that we're doing right
now. I don't want as much. So holding it
straight up and down. So just kind of
go with your gut, what you think it
should look like. And then I'll add just a couple lines and then I'll get it
wet and I'll add. Just a little to create
variety of detail, have a little bit of water in some of the line,
not all of it. Go. You add just a tiny bit. There. Could feel that I want
to add keep adding. It's so easy just
to keep adding. And that's when I
know I need to stop. You can kind of
get lost in doing too much of the small details. So do just more lines closer together at the bottom or the inside of the flower. And I try not to think too much and just kind of have
my paintbrush skip around. It's when I start to
overthink is when I don't really care
for how it turns out. That's why we practice. I want to do a little extra here and that drive quite fast. So it feels like
it blends nicer. So that's what I'm just doing
with a couple of these. I'm getting that color back on there, and it's nice and dark, so it's okay. Just
layer that up. Here we go. And then for this one, I do kind of outline
in a little bit. So I want it to be a little
different than this flower. So they're very similar
in color, different, but they have different shapes, and I want to use this last
detail a little different. So I'll do a couple of these. I don't blend them
as much on this one. I do a little bit of
the dots at the bottom. Don't overdo it. And then I'm going to try to kind of very loosely outline a little bit. I try not to worry about
getting it complete. I like having that space. I felt like these were starting
to get more solid lines, so I try not to on that one. Variety is key. Maybe I'll have a couple of
lines going that way. Just trying, see what happens, see what
feels comfortable. Did scoop my hand
up a little bit. I don't know if you
notice. That means I definitely want it a
little bit more loose. So I'm going to do that
with the other one. If you feel like, Oh, man, this isn't turning out, and then you just feel
like you're kind of stuck in doing too much detail, that is a good time or
good a perfect chance. Sorry, perfect
chance to be like, Oh, I think I'm
going to start over. This is my practice,
get a new piece of paper because sometimes
you kind of get stuck, and you can keep
doing the same thing. That's when comparing
is really not helping. It's just kind of keeping
doing the same thing. So if you feel like
that's happening to you, just start over, get a different piece of
paper, and try it again. In the next lesson, I'm
just going to go quickly over how to practice doing
different types of leaves, and we're getting really
close to the final.
6. Practice Leaves: Now we're going to practice
doing our leaves in fillers. That's important to practice
because that is what helps fill the space and helps keep the composition balanced. But don't overthink them. We're gonna do a very simple. You can try any kind of leaves. I have this room leftover. That's what I'm going
to do, and I'm going to try different size brushes. I'm not cleaning anything yet. This is all my practice, and that is, that's okay. If you want to clean it,
you can do that, too. So I'm going to start
with pure mahogany. And I'm keeping my paint
brushry up and down, still holding it
past and no touch zone, ballerina or tiptoes. And I'm going to just
try to do a thin line. Okay. Then with a clean brush, I'm going to see how
fast this will drive. I'm able to do this first. So I'm doing that method where I put it down and then lift it up. If you notice, I did
two different ways. You can go right from
the stem and out. So grab a little bit of that, push down, pull up. Sometimes it's too long. Sometimes it's too short. However you want to do that. So maybe I go right
away instead of getting which works, but
I don't like the variety. I like the light and dark here. You can always add
more to the leaves. Sometimes I'll just outline. Sometimes I'll just have
some out like this. This is practice, remember? This is just deciding
if you like it or not. So now I'm going to do the
what if I use a small brush. And I can I get a
nice thin line? So I can practice doing that. Too much water. What
if I have that water? If I do this to it? This is all just practice. They use my big brush. What kind of leaves
can I get there? Maybe add a little
bit of water to this. See I'm getting pretty good
at all the different value, so I can give nice
skinny line there. Pull it out a little bit. What if I just add
kind of what we did here or skinnier
have a skinnier end, like a point or a round end. What I do? Just really big. You do this. Notice I'm
saying, What if? What if this? What if that? That's the point, right, practice,
practice, practice. So I did some big leaves,
some medium leaves, some skinny leaves, all
different size brushes. You can go and look at different
things in your backyard, different leaves in your
backyard, go on the Internet. You could Google some. You can look at pictures. You could look at magazines. However, you want to experiment and practice and be inspired, that is up to you. So just keep practicing
all the different kinds. I'll probably do
these bigger leaves and some skinny leaves. I do like to go back in and add some dark and light values
to during my practice. Just experiment. What happens if I have
some that are drawn, painted, and some
that are not painted? Try not to think too
much, just paint. And if you have that
expectation of it has to be a masterpiece during your
fine or during your practice, you are going to stress
out. So don't do that. I am going to show
you how these look. I really like the
light and dark leaves, especially when it doesn't
look like outlined completely. Like, I like having that, too, but I like this leave
so much because it has just an unusual pattern and nothing nothing
on here is exact. Like, I don't have
half dark, half light. It's just there's little
splotch of light, a little bit of dark
with these lines, and then mediums
kind of got it all. And I like the variety. I like that it's
kind of unplanned. So this is what it
looks like to use this how all that dark color
kind of seeps into there and creates
a darker value. So just keep practicing. We run out of our room, get
another piece of paper.
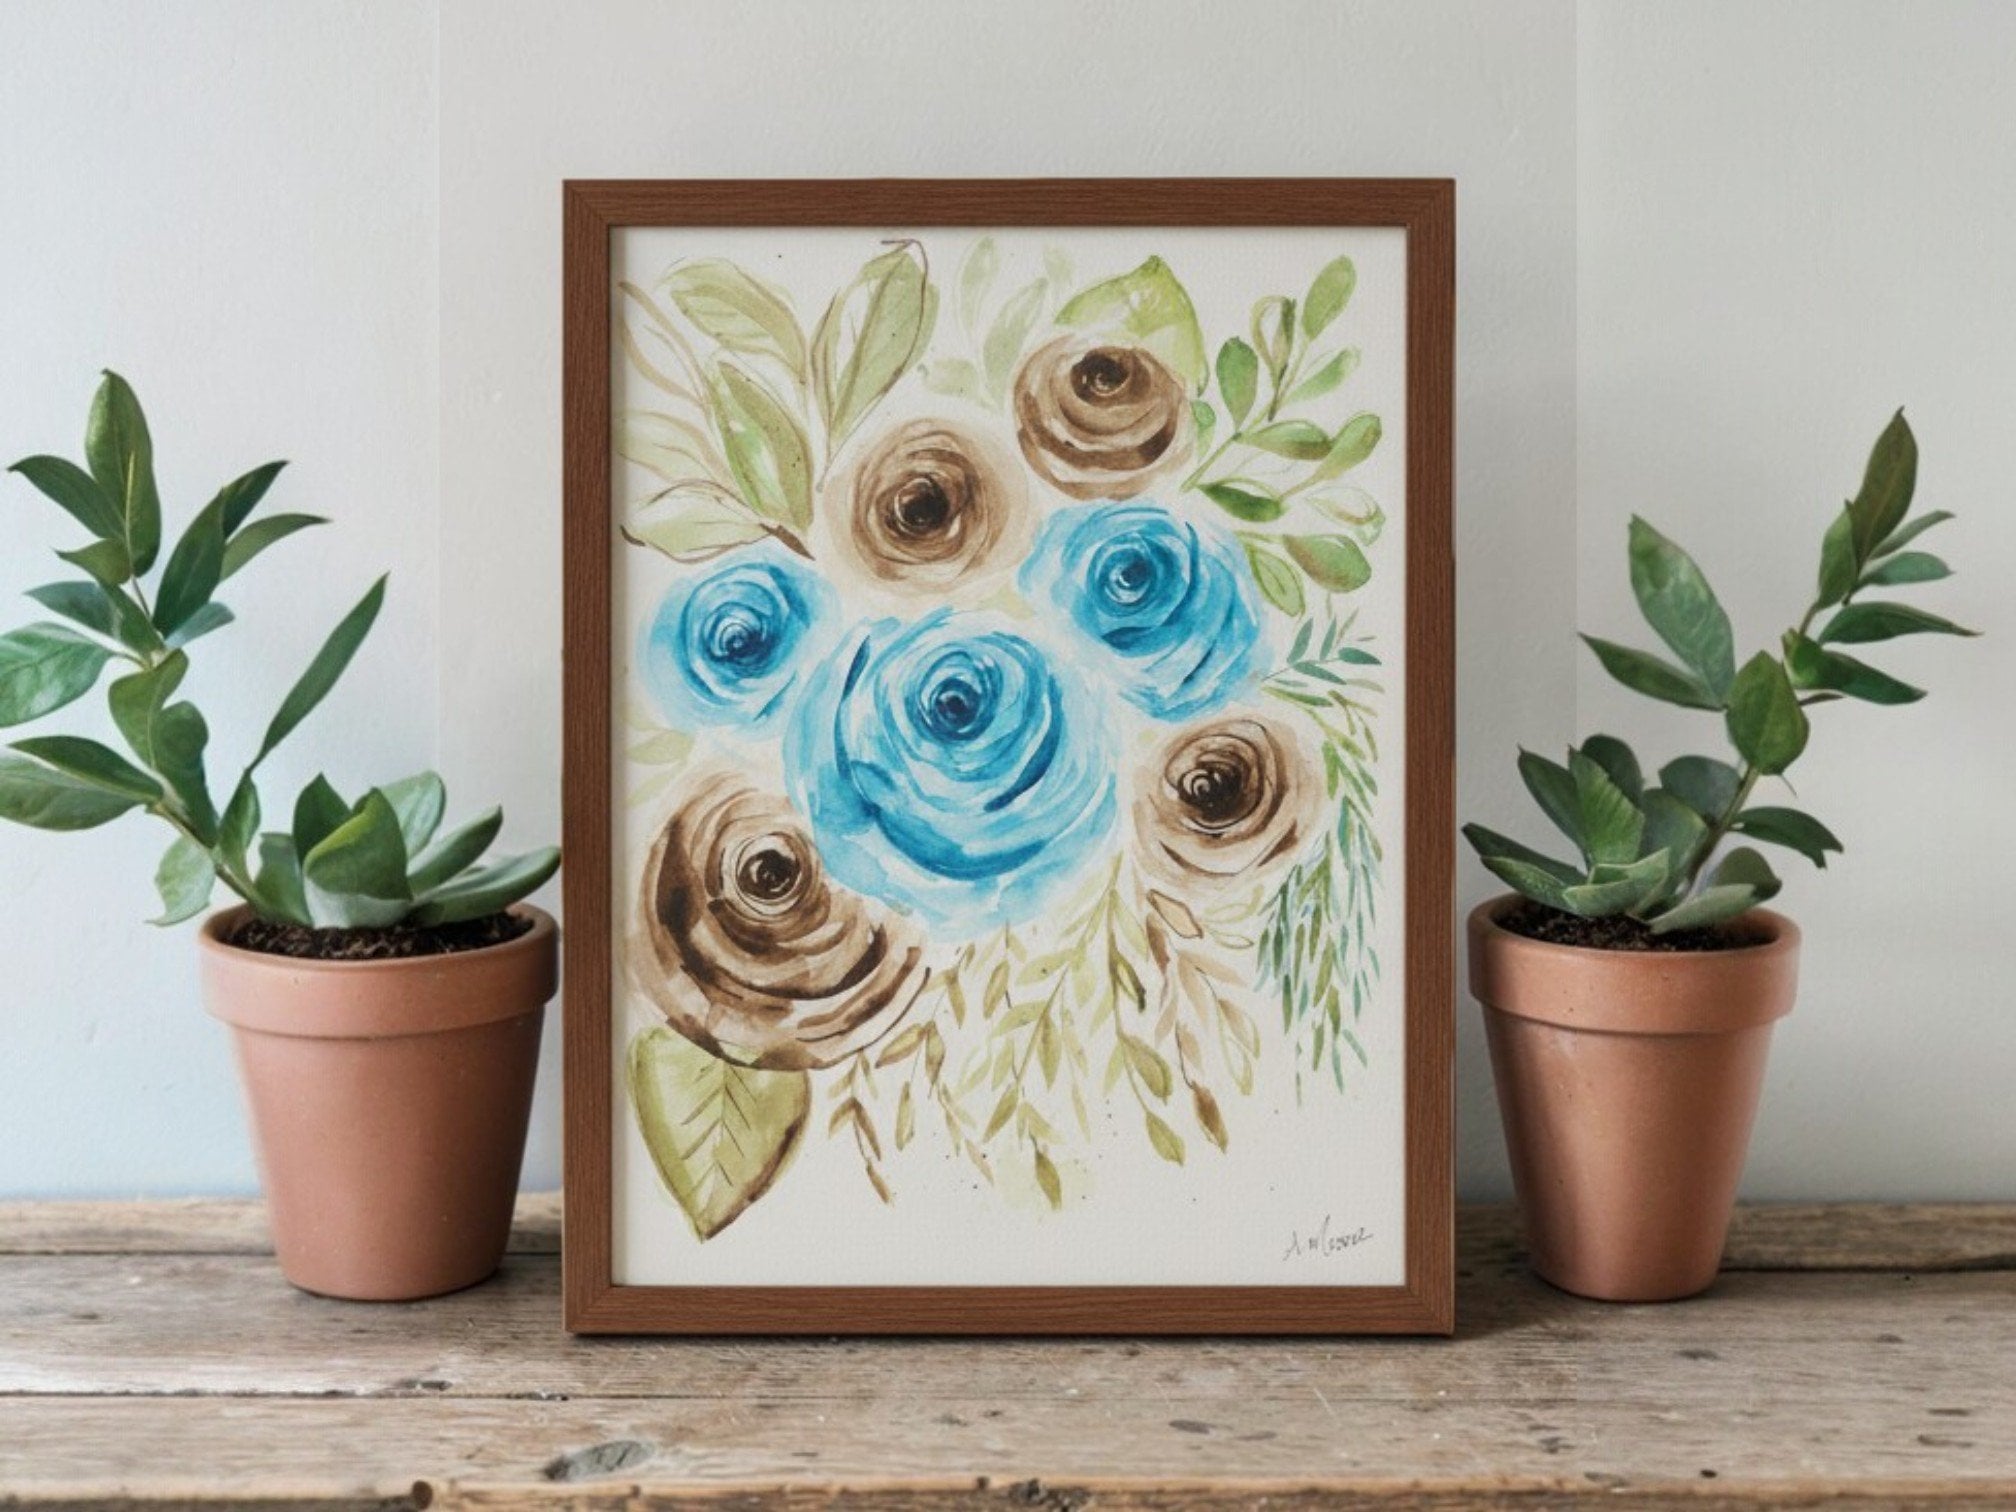
7. Final Project: It is now time for
our final project. If you want to have all
of your practices out, because we're putting
it all together. So having all these and
want to plan it out, I do suggest to maybe make a little map
for it. I did that here. I did a couple of circles where maybe I could
have some roses. If I don't like the composition, this is a time where
I can erase it. I do suggest though, to try to erase it a little bit, so you can kind of see it, but not so much that it's going to show
through the watercolors. It is up to you if you
want to plan it out. I like to do this lesson
of just see where it goes. If I don't like it at the
end, I can do another one, and it's more about the process and just kind of being
relaxed and experimenting. But if you want to plan out ahead, this is
what I suggest to you. Just kind of pencil it
out where you want it, where you want the vase, and
where you want the flowers. So I'm going to flip mine over, and this is going to be
where I put my final one. I have a new water cup,
new paper toweling, and I did wash off
my paint palette, so this way, we can start
brand new and fresh. I do have this off to the side, and I have my spare off to
the side just in case I want to test out my paint and make sure it's
at the right value. Light medium and dark is
what we're going for. So getting fresh mahogany on
there. Now I'm good to go. Now, I'm going to have the top half where
my main flowers are, and then so I can have the
vase towards the bottom. I don't want to do the vase till the end because I'm going to have those leaves
hanging off the bottom. Here we go. I want one of my main flowers to kind
of be off to the side, but a little bigger. So I have some of my water. Just remember,
we're just kind of doing a not so perfect circle. Then I can take this
a little drier. Then I'm going a
little bit of here, drop it in the
center, do my spiral. This is kind of a
good starting point. Then once I see it a little
bit better, I might be like, that isn't as big
as I wanted it, and maybe I'm going to do another one or what
I was thinking. So I'll do a little bit
bigger, maybe off of that. Try it a little bit,
have it going up. I have to have my
head to the side. You notice I don't
have that there. There we go. Oh, yeah. Try not to overthink
this area or this layer a we're
just keeping it loose. So I'm trying to just loosen
up a little bit too on the opposite side of the flower, the
center of the flower. Now, that these
are really close, I'm gonna have one
that's kind of up here and a
little bit smaller. It's important to have
your head to the side. If I didn't do that
with that one, I had that dry area
that I didn't notice. And I didn't want
a big dry area. These small dry areas
are really nice to have because it feels
more loose and relaxed. But I don't want a big area. Take a little bit off of that. Yeah, I like that
up and over here. And I don't know if
I want more roses. Every time I do this, I have
a different amount of roses. So maybe I will put a little bit of my
other flower in there. Just kind of going
off of how I feel, like I said, every
time I do this, it's just a little different. But if I'm keeping it light and just kind of
stepping back from it, it will This first layer is kind of important
for mapping it out. And if I don't like something, I can balance it
out with a filler. So I try not to stress too much because I can
always add more. Try not to add too
much details at once. So I'm also visualizing
where the vase is, and I want that a little
bit more centered. Keeping it light. I really like having
a variety of flowers, so I don't want to I
love making roses. So I try not to do too many of one flower,
which can be hard. Doesn't mean you don't have to. If you don't want
to do any other type of flower and you just want to do your roses or whatever flower you
like, then do that. This is your time to
just relax and have fun. So I'm trying to think
I like having three. Kind of like I like
when there's, like, just like the little
bit of roses. So I'm going to take
the water down one. There I go. I'm trying to think of what I want in that area. Probably have a little bit
of just fill in that space, maybe there is a
leaf in this area. You can see it
between the flowers. I'm draw a line like this. Just a hint of a
petal going in there. It's kind of growing, right? Me a little bit bigger. I'm putting my head
back each time too to feel where
it needs to be. Some other detail
needs to be added. I do feel like having this, I'm going to have another leaf somewhere else just
so it makes sense. I did what we did in
experiments in the practice, just kind of feel
my way through and have some water there and
add a little bit on there. I kind of discover new things
too on final paintings. Every time I paint, there's something that I'm
like, Oh, I like that. I'm trying to think of where I want to put another
one of these. I kind of want to
have it further back, so it's behind having
that layering, having things behind other
flowers over other stems, it helps create depth. And then it feels like a whole bouquet rather than
everything just kind of standing side by side.
Yeah, I like that there. I really can tell I need
something over here, but I don't have a lot
of fillers in there. A lot of leaves. So that's what I'm doing here. In your composition, you might feel like you
need it somewhere else. So this is where I don't
want to do too many flowers. I want this kind of
this kind of turned into my focal point here. So I want to make
sure that I have it nice and balanced around it without being super symmetrical. I'm going to keep this over here because I want to
start using that next. My thought was to have
some smaller ones. But because I only did
one with this brush, I do want to do another one, so it feels like it wasn't like it wasn't
supposed to be there. Like, it's good to have
more than one and repeat that element somewhere
else with the same brush. Like how this is kind of these are kind of working
with each other, and I kind of think, do I want to put a leaf over here, too? I do like having some
hang down off the vase. So I don't want it
super symmetrical. So just to kind of balance it, I'm going to keep that
as a single leaf. And I want to do this
just a little different. I'm starting from the
end and going in. Some shorter ones,
different sizes help, it's similar but also different. I don't want to crowd
this right here. I'm glad I put that other brush there because I get into it, and then I forget about
the other size brushes because you just
get in the zone. Trying to keep this one
a little bit more loose. I don't have my arm
resting on the table. This helps me create a little
bit more of a looser leaf. I want a little
wider at the end. And then don't forget. It's
like there's a petal here, so I want to make sure I
pay attention to that. So these leaves are starting
a little darker up here. So this is essentially
its lightest value. We're doing the lightest
value for each one, to create that interesting look, you want to have a
variety of values, so we want to have some
darker leaves too. Makes it more interesting. So these are a little bit more
around. This is behind it. Maybe this comes whatever feels right for the
angle of the brush too, because sometimes I like this,
sometimes I'm straight up, And feel free to, like, stop what you're
doing and practice on a different piece of paper. So I'm just mapping things out right now and
kind of looking back. I really like how it's going, and I'm kind of getting in the zone of putting
flowers out there, and I'm like, want
to keep going. But I think it looks
great just like this. So I'm going to get this
next value really light. I want to get this vase right. And if I make any
mistakes, it's okay. So I kind of just outline it. I want just a
rectangle, simple vase. I'm outlining it in the air
cause I'm trying to decide, if this is the center
of my bouquet, try that loose line. I want that to hang over. I have this showing up there. I'm not resting my hand on the table because
I want it loose. I do a smile curve down
here. Try to do a couple. Feels a little bit more
weighted than at the bottom. Feels like it's hanging off, and then like this flower
is really here, then maybe that vase goes up here. So I have
that line up there. I'm not too worried about
how the vase looks yet. But what I am doing is just bringing in this
really light value, seeing that I have
it on my brush, using water and going against the lines that are there and just gently going up and down. Doesn't have to get
filled in right now. Just wanted to feel like it's going together
before it dries too much. I'm going to let it
dry a little bit. It is nice just to keep moving. So let that dry. Let these parts dry. So now I can go to the first flowers
that I have on there. Now, if you remember, I used
the big brush for that one. So now I want that medium value. Okay, got that medium value
on there to pay attention to, like, what size flowers
are you doing right now? So that determines how many curve lines you
should have in the center. So I'll have more curve
lines in the bigger brush. I mean, I'm sorry, in
the bigger flower. I really like how some areas, how it gets really dark, I mean, really light
and really large. So because this is a flower, it's really dark and kind
of larger areas down here, but as it goes out, it has large areas. Like I'm trying to
visualize this as a big petal here,
like this area. So I'm trying not to do too much dark there towards the outside, trying to keep it
towards the inside. So I won't go too far off to the end figure these smaller
ones, they're tighter. I kind of just leave some to the imagination
of the viewer, there's some areas where it's
just kind of light and they kind of have to fill that in
with their own imagination. Now, this is really
dark on the inside, so I'm going to have a little bit more curves
here than we did at the practice for
the size of flower. I have a little bit more here actually than I did here
because like I said before, this is a smaller flower. I'm going to get some water on there to break up those petals. Remember, this is just water. I don't want to
overdo it either. Bring it up a little bit. I'm just trying to
lightly touch the paper. All mistakes are fixable. So if you have any
thing that you're like, Oh, that's not what I wanted, what can you do to make it look like you did it on purpose? That's usually when
I make mistakes, it's usually the
times where I'm like, have to get extra creative or just it's a
learning opportunity, and it'll help maybe
with your next one. So mistakes are really actually a good opportunity to
get more creative. I like that. I was just going to go
ahead and do that again, but I'm glad I kind
of put my head back to see where we're at here. And this is a tiny one. I almost want to use
a smaller brush. But I want to stick with
this a little bit of water. This is more just intuition. The more you go to do this, more you'll be like, Oh,
I'm gonna do it this way. I'm not going to do the
same way she did it. I'm going to do this or that. But just try out what you think. I'm going to use
that same value, maybe a little darker. See what that looks
like on here. Yeah. Actually, that's kind
of where I was started at. I just deluded that as I
continued on with these. So let's work in here. I'm going to do
my flowers first. That dotted line. Little dotted bunch at the
bottom, leave some at the top, so you don't get rid
of your highlight. I'm going to do
some smaller ones. This actually turned
out pretty good. It's just there's so much
that is white up there that it's bringing it's making
it too dark right away. And I want to save that dark
value for the next step. So you just got to
go to go with it. Always paying attention
to what you're doing. And I'm not moving too fast, that if I do something, I can just change it up. And if there's one, that's one petal
that's a little darker remember variety is really
interesting, so it's okay. So pooling that. And this does look darker
on different petals because of how light
it ended up being. I can tell I'm
diluting it again. So I just had a little bit more. I could tell with
that one. And this one's kind of
hidden behind here, so I'm going to do more of that dotted line or
the dots at the top, because it is hidden over here. And then I can't really see that petal as much
because it's further away. And then I'm going to
look at the fillers while the other part's drying. Just keep working this.
I have these petals. That's just one value and you want to add
a little bit more. It's a little darker than
I wanted. There we go. You know, maybe I'll darken part that's closer and
kind of like our practice, where it had that area was the light show that was shining on it
a little bit more. So I'm going to keep
that there because that's When I looked at it, that was the lightest, so I didn't want to
get rid of that. And this is hidden, so I
won't have that in here. I might still try that a little bit, get
some lines there. It helped having those
dents on the leaves because it's going to make
that darker right away. I did this because I feel like
that kind of lifts it up, just a tiny bit in that area, and I'll probably
put a little bit more dark value there later. And I want to keep some of
these leaves really light. So these are practically done, but I'm going to take just
a little bit more detail, kind of, like, in the stem area. Because you don't want
if you overwork this, then what will happen
is they'll all be the same value and you won't
have a variety of values. So you can sometimes,
like I said, I will add an outline to it. Maybe, not all of them.
You bent a little bit. Some areas are just blending in. Then I'll do the
same thing before I get more hoops before I get more on my paint palette. There you go. Always try stepping back too or putting your
head further back. That helps out a lot. Now, I'm going to
go back in with my smaller brush with these, but I want them to be a little
darker as you look at this and helps go to the next place is that it might bring it up to these
other flowers. Draw your eye into there. These I like to just
kind of wispy lines, I call them just barely
touching the paper, try not to think too much on it. Maybe I'll have a couple
that are not even filled in, can give it that
variety. I like that. Not really having a plan here. I get these nice loose lines. Now, I'm going to look back at anything that
maybe I've missed. This I feel like this gets lost back here
because it's further away, so I'm going to just make
it a little interesting. I don't want to make it
too interesting then, either, because then it
pulls away from the flowers. So I feel like this flower still has quite a
bit in the center. I want to keep moving.
So I'm going to continue using my small
brush and move to a different flower. I can't
move back to that one. Yet I could stop
and blow dry that, too, but with my hair dryer, but I have other
places I can go. So now we're kind
of at the end here. Adding these finishing touches is what really pulls
it all together. You want to have light
medium and dark. So this is straight from
the color, the mahogany. I have it a little bit
further down on here, the center, so I didn't put
as many dark lines here. With this one, I just want to add do a couple of
lines like that. I just want to add a
little bit of water to it, and then sometimes I'll just go back and make sure
it's nice and dark. The same thing with this, do
your see lines, see curves. I'm just looking for
the bottom of these. I'm not doing all of the bottom, all of the inside
lines of each petal. Just some a couple curve lines
like this to give it that really bent the petals
are bending look. So after blending some of it, I had some of that
left on my paintbrush, so I put it up
there just a little bit. This is important. You probably see me
keep doing this. I don't forget to do that. I keep doing that
to dry my brush. So I get pure mahogany here. Try and do little lines.
This is my little flour. Did grow a little bit more
each time, and that's okay. I did a little bit of that on my paintbrush. Just
here and there. Sometimes I do feel
like I'm like, I overworked these flowers, and then I step back and
I'm like, Wait a minute. Actually, I really like that. So don't judge it right away. Don't judge at all. But
wait till it dries. It does make a difference. So this is still a little wet. I could go in it because
it's pretty dark, but I'm going to just let
it dry a little longer. And I'm going to
do some of these this one had a little
bit more than I did my practice of just the peer stuff,
the pure mahogany. Try not to do too
many of these lines. Short, long variety. You feel like you
could see the stem, could even add a little leaf coming off of that.
Makes sense, right? So this one I'm trying to think of where
the dark would be, so it'd probably be
maybe this is casting in a little bit of shadow,
so I'm going to add that. Then you can see
all three values, the light medium and dark. Not as much light because
it is hidden a little bit. Just a couple lines there or do a little couple lines
on the edge there. G. I do find that sometimes these need a little bit
darker in the inside. Maybe it starts to get diluted a little bit from washing it. I'm trying not to wash it
too much on this layer. Remember the eyes will fill
in the small details too. It's a little bit more
interactive than it feels like there's always something for
people to look at. Try to decide, do I want this
to be really dark in value? Do I want it to be see through? Like, you can see the stems. I think I'm going
to do the stems. I don't want them to be
they're in water, right? And I want to just kind of a
little bit of water to it. Outlining what I think
it would be like. I have a couple of those there. I feel like I get some shadow on here from the flower. Just adding a little bit of
water to kind of separate that so you can tell it's
different than the flour. When you do monochromatic, you kind of got it's important to play
with the values here. So now I'm adding that darker
value to create shadow. I want to blend some of
it, but not all of it. With having those
lines there, too, I kind of have an idea
of where I want it to go for the stems. This is I decided that
this is way too close, so adding this darker value will make those pop more and
seeing that it's still wet. It does that really
cool. Like, it spreads. And then it will make my
leaves that are really light look lighter
and stand out more. I really like how
this is turning out. We want this to be loose. I'm just trying to
add some lines here. I don't want it to be
this perfect little vase. I would like having
that imperfections. Adding a couple of lines, so it's not too
blended together. You have a little bit
of this left on here, if you have a
little bit of color or just this colored water to give a little bit
of shadow to it, where you can kind of
see it kind of not. Now, the last detail that I
want to really stand out, I feel like these
flowers are done. I feel like these need just
that center to be extra dark. So if you practice
with other colors, you could do that on
these little details. But for the final, I'm
doing just mahogany. So I dried off my brush, and I'm getting pure mahogany, and I'm just going
in the center. I'm just trying to outline some of them that I already did. Try not to create new lines. You can always add
one or two just so it comes out a little
bit more natural. That habit of washing it
and drying it right away, I'm drawing it extra just because I don't want
to dilute this. This one is pretty dark, but we had that like it's
closer together in the inside. I still am going to do that for unity to make sure I do the
same thing to all of them. With this being big,
I'm just going to do a couple lines here. So just feels a little different because
it's just so big. There we go. In a little
something there. Good. This I feel like I keep going, I'm going to overwork it. So I really like how there's some areas we kind
of blend together, and I like some
areas that are super dark and right in the middle. And then when you're all done, you can sign your artwork. I always tell my
students sign it when you're done, show
that you're proud of it. You can do that
with a paintbrush, pencil, a fine liner, a pen. I have a pencil. The final the final lesson, we'll just kind of wrap
everything up and review, and I hope you
enjoyed this project.
8. Conclusion: Now that we finished
our painting, you can see how everything
came together step by step. We started by experimenting
with our supplies. That's really important to be comfortable with
your paint brush, with your paint,
with your water, and just to have
fun and loosen up. This is such an important part. We then experimented
with how much water we need to pigment to
create the light to medium, and then dark values, which really showed up well in our paintings because
of our practice. We then practice
layering from light, medium and dark using different type of techniques
to create our flowers. Yours might look a
little different because maybe you try different
types of flowers and leaves. Whatever you did, it really helps when you come to
this final project. I hope you're super proud
of what you've created. And when you're all finished, please upload your painting
to the project gallery. It really is inspiring for me and other artists to
see what you've done. And it's so interesting how they all turn
out differently, but using all the same approach. Thank you so much for
taking this class with me. I can't wait to see
what you've created.
 Ashley- Water Bloom Studio, Art Teacher