Transcripts
1. Introduction: Hi, I'm Ashley and I am a
classroom art teacher with over 17 years of
experience helping kids find confidence in
themselves through art. I'm also the artist that is
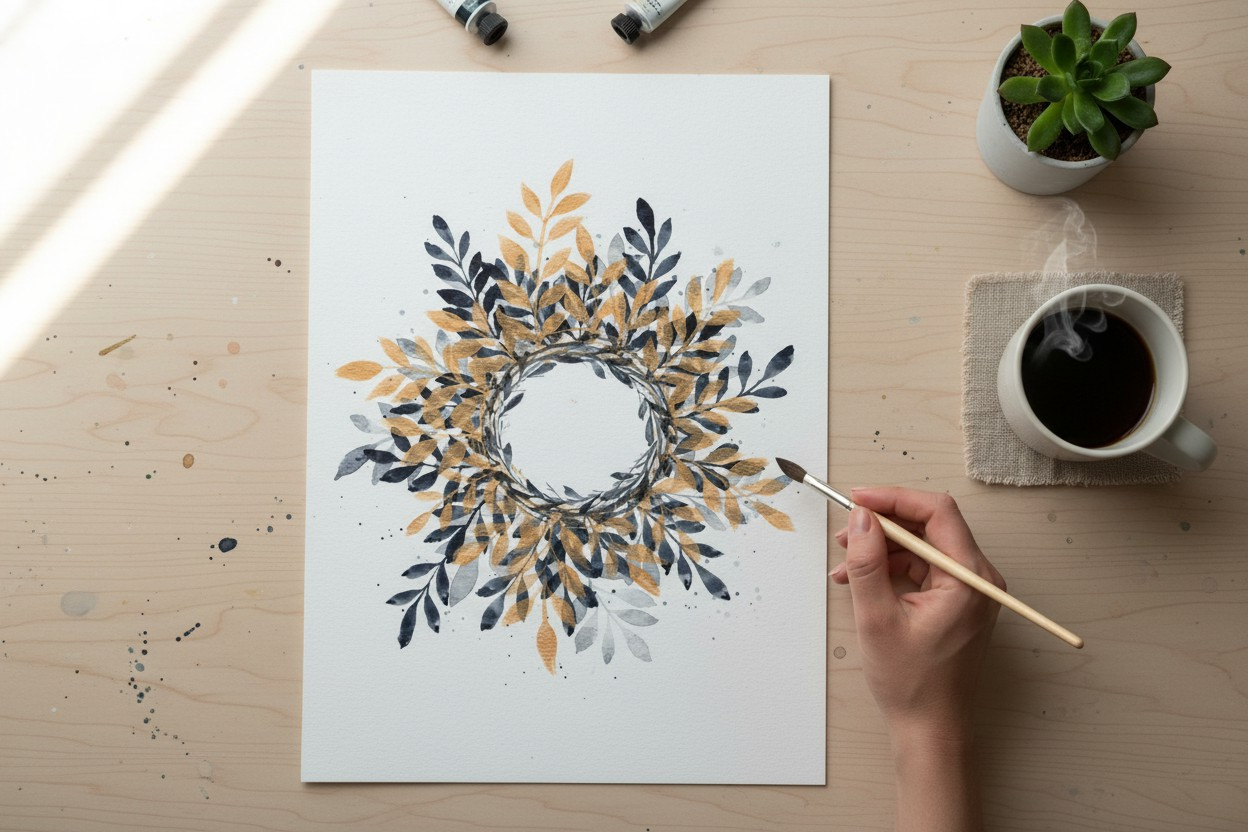
behind Water Bloom Studio. In this class, we're
going to paint a loose watercolor
leaf wreath using simple brush strokes and relaxing techniques that
are perfect for beginners. I'll guide you step by step
as we practice brush control. Explore how water
affects your paint, and learn how to make
simple leaf shapes. We'll also experiment
with color and add gold gouache accents to give your wreath a finished
polished look. I'll also be showing you two
different wreath examples. One with the shorter stems and more structured look and another with a
looser composition. I'll be demonstrating
the looser style in this class so you can see how to create a more relaxed
flowing design. This class is designed
especially for beginners, so no prior watercolor
experience is needed. By the end of the class, you'll have a
completed leaf wreath that you can even frame
as a piece of artwork. So gather your supplies, find a comfortable space,
and let's get started.
2. MaterialsSupplies: Hi, everyone. Let's
take a quick look at the supplies you'll be
using for this class. First, you will need
watercolor paper. I recommend using
watercolor paper that is at least 140 pound. This is my favorite brand paper, Artisa, it is cold press paper. You do not have to
have this brand, but watercolor paper does handle water much better
than regular paper. Next, you will need
watercolor paints. I'm going to use
for this lesson, Daniel Smith Payne's Gray. You can use whatever color, whatever brand you want, but
this one is my favorite. I also recommend
Windsor and Newton. These are both Payne's Gray, but for this project, I am
doing the Daniel Smith. For the gold accent
color on the last layer, I'm going to use Artisa brand, the gouache colors, and
it's going to be gold. Liquitex is also something
I've used for this project. But for the one I'm
doing with you, I am going to use Artisa. But again, both
really work well. Next, you will need
round paintbrushes. I do have four different sizes. That's what's going
to come in handy when we go to the
practice lesson. But for the final project, I will be using a small brush, and I'll be using
a medium brush. But we will test them out at the practice lesson so you can decide what
works best for you. Artists use two jars of water. So my bowl here,
I'm just using one. But if you do decide to use two, artists will wash their
paintbrush in what we call the dirty water
because it's right away and then in
the clean water. This way, you don't get any of the dirty water in
any of your colors. But because we are
using only two colors, I'm just going to use one
bowl and then rinse it between the Payne's
Gray and the gold. It is up to you what
works best for you. Next, I do have paper toweling. I usually have a big paper
toweling underneath my water. Then I will use small
ones off to the side just in case I have a spill or paint gets somewhere I
don't want it to get. And last of the things you will need will be a paint palette. You do not need a giant
paint palette like I have. This one has been used by
me for a very long time, and as you can see, this is what was left over
from my last painting. But if you don't have
a paint palette, a ceramic one like I do, you could just use
a paper plate, and that would be just fine. If I don't have my paint palette with me or don't want
something so big, I use paper plate, and it works. Something that you could use, but you don't have to. I do have a jar off to the side if you want
to use this for coming up with your circle size in the center of your wreath, you don't have to have a jar. It could be anything
that's circular or you can free hand it
because as you can see, we have a lot of
different lines here, so it doesn't have to be the
exact kind of circle that we want that's up here because we'll kind of
mix it up a little bit. That is up to you. I've done this painting with a circle that I stamp on there with a
pencil, free hand it. Whatever you feel
is comfortable. We will go over that in
the practice lesson, too, so you can practice and
decide what's best for you. Once you have all
your supplies ready, we'll start with some
simple brush strokes, practice in our sketchbooks
before painting the loose watercolor wreath.
See you in the next lesson.
3. Getting Comfortable With Your Paintbrush: Hi, everyone. In this lesson, we're just going to start
something very important, which is getting comfortable
with your paint brush. That is something that
will help you throughout the whole painting process and other paintings that you might want to
do in the future. I do have all four
paint brushes, but again, this is just about getting comfortable
with your paint brush. So any size will do. I'm going to choose
this size brush, which is a size eight. And it's a round brush. So there's a couple
of things I do to get my paint a little
bit more awake. I always say, you got
to wake up your paint. In here, it's really nice
with watercolor that it can harden and you can re wet
it to make it work again. And like I said, I
call, let's wake it up. If you are starting for
the very first time, yours is going to be
kind of gooey and wet. So I'm going to do both of them. All right. So first things first is holding
your paint brush. If you hold it way down here, it can make it really hard to get nice loose brush strokes. I always tell my students, this is the no touch tone. So I try to teach
anyone that I am painting with to hold it first,
like you would a pencil. And second, hold it
past the no touch zone. This way, you can see
what you're doing. And again, you have a little
bit more loose strokes. If you notice as I'm painting, I will go further up on my paint brush because this
way I get a looser paint. Brush stroke. If I'm
holding it way up here, that's not really gonna
work because then I don't have any control
over my brush, and it just kind of wiggles around and does
whatever it wants. I'm going to take this,
add a little water. There was some
water on my brush. So when I'm holding
my paintbrush again, holding it past
the no touch zone, and I'm going to just try different angles to get
a thin brush stroke. So I like to have
this part where my wrist is where
it meets my hand. I like to have that
resting on my paper so I can have control
over my paintbrush. I like to always
touch the paper. So if I'm holding it straight up and down and not
touching the paper, it's not going to be what I want it to be or go
where I wanted to go. So I will put my wrist down, hold my paintbrush
straight up and down. And then I'm just going
to practice lightly and gentle I'm going to just do
a couple of brush strokes. If this doesn't feel
comfortable for you, then hold it a different way. If you notice, I also
have my paint brush right in the middle knuckle
of my pointer finger. So that is what's helping me hold it straight up and down. If you are like this and you're trying to
hold it up, again, you're up in the air, and this
is not touching the paper. So I hold it up. Just like
this. And then I practice. So sometimes, when you first start doing your
paint brush strokes, you might notice your paintbrush is falling down a little bit. I tell my students, keep your ballerina on
her tippy toes. So when you have really
skinny brush strokes, you want to keep her
on her tippy toes. And as you can see, my hand is comfortable and I'm
doing these brush strokes. All of them are at a diagonal. If you want to
switch directions, you might have to
move your elbow out and be able to switch
directions just like this. I still have my
wrist on the paper, and I'm just moving my fingers, and it's going to move
these brush strokes, and I'm being really gentle. If that's not
comfortable for you, I could move the direction
of my paper when it gets some of the hard dried
up watercolor right now, just to practice that, too. Same thing. Water
was on my brush. I woke it up earlier
with that spray bottle. You don't need a spray
bottle to wake it up. You can just get it wet
with your paint brush. To know if you are ready to
move on to the next step, you will know because you feel comfortable
with your brush. So if it feels awkward, still holding it like this or you're struggling
to get thin lines, I would just keep practicing. Practice is so important, and there's no rules like you have to do it
this way or that way. You're just getting
comfortable with your brush. So if you want to
do other things besides these skinny lines, and you want to do just
different types of lines, or you want to draw something
on here and paint it in, like if I had a pencil
and I drew a circle, and I want to hold my brush
at a different angle, I could just practice. You will know that it
starts to get comfortable, and then that's how
you know you are done practicing and you can
move to the next step. So continue on, take
as long as you want, and move on to the
next lesson when you feel comfortable and
confident with your paintbrush.
4. Practice Leaves: I Hello, everyone. So once you have moved
on to the next step, again, like I said,
in the last lesson, once you're comfortable
and confident, you might have like ten
of these pieces of paper. That's okay. I once you are comfortable
and confident to move on to the next step, we're going to do
thin and thick lines. This is going to help us when we are going to paint our leaves. So I am going to use
still my Payne's Gray. If you have other
colors, use those. If you want to use Payne's Gray because that's going to be in our final painting, go ahead. So in our last lesson, we did the thin lines. Now I want you to practice letting your ballerina
fall a little bit, and then go back
on her tippy toes. So keeping your ballerina
on her tippy toes, which is the tip
of the paintbrush, I make a thin line, and then I go down, and then
I'm going to go back up. I like to experiment
in these stages, too by adding some color to it. This is my practice. Am I going to do
this am I final? No, but as practice, it is fun to find new
techniques that work for you. So again, I'm going
to lightly do a thin line and then thick
line and then lift it back up. So what I'm doing is I'm making
that line really gentle, push down, and then
slowly pull it back up. This is where the concentration
will come in because you've been just mostly
doing lines like this and not paying attention to two different ways
to use your brush. So this is step one, and this is step two with
two different techniques, the thin and then push
down, and then the thick. If you want, this is practice. Let's just do some
different things to help us feel
comfortable and confident. Having these little extra
water lines on here. There's a little pool there, so I pulled it down here
to see what it does, and it kind of slides over. I like doing that when I'm
doing the wreath, too. So if you have water
left over like that, I just keep it there
because when it dries, it does really cool things, feels more like nature, a little bit more
realistic and unexpected, which can be really
interesting and not so boring. So doing this, play around, maybe add a little bit
more water, less water, see what happens because then when you get
to your final one, you'll have all these ideas
that you came up with on your own just by
practicing and having fun. If you're not having fun,
if you're not relaxed, always go back to the basics. Always go back, take a
break, go back to this. It is something that you want to enjoy and
not feel like work. So practice can
just be relaxing. Artists do that all the time. If I don't know what
I'm going to paint, I'll just do these, and I come up with some really cool ideas. Now, I know that using gouache
so my gouache the gold, I know that I need
a different type of water to paint ratio. So because of that, I am going to practice these
leaf lines with my gouache. I don't let that sit out, so it is going to be
gooey like this one. I add a little bit of water, thin it out just a little bit. I do a lot of times
like to twirl my brush at the end to get a nice
point for my ballerina toe. And if this is not
a good consistency, so you see how it slides. That's how I know it's
a good consistency. If I'm doing this and it
doesn't slide and glide, then you definitely need
a little bit more water. So I'm going to do that and show you what it looks like
if I didn't have enough. So I go like this. And there's definitely a big difference. It did slide a little bit,
but it didn't really glide. So that nice creamy consistency, if you have too much water, you'll know as well because
it'd be super transparent. But I wouldn't worry too
much about the transparency. You can always add
another layer. And also, I find that
the gold when it dries, it's a little bit more opaque
than I expected it to be. So slide and glide. So here's one with a little
bit more transparency. So now, because
it's my practice, I'm going to add
a little bit more not going over this because I
want to see the difference. So add a little bit more of the gouache to that puddle
I have on my palate. And then I do that. So it's
a little bit more opaque. And then I'm going to
add a little bit more. So it's basically just
that natural instinct. You won't have that
natural instinct if you don't practice. So we can all be artists. We just have to put
the practice time in. I would continue working on this until we get
to our next lesson, which will be to add the stem and then have
leaves coming off of it. But don't move on
to the next lesson if you don't feel
comfortable and confident with this first.
See you in the next lesson.
5. Practice Leaves on Stems: Hello, everyone.
Now that we have practiced this and feel comfortable and
confident in leaves, we are going to move on
to stems and leaves. This is the second to last
practice before the final. So after we're done with
this, we will work on how you want to do the
circle part of the wreath, and then you'll be good to
move on to the final project. So let's put this to the side. And on this one, I do suggest if you were
practicing with other colors, I do suggest to practice with what we're going to do
for our final project. So I am going to I have been doing Payne's Gray and
gold the whole time. So if you decided
to try other ones, this lesson is going
to be about trying different size
brushes while we do those stems and leaves. You might want to have a thinner brush to be a
little bit more delicate. Maybe you want
really big leaves. You don't really know
until you practice. One thing is I do have
different brands of brushes. So a lot of times I just
show the size brushes. They're all round, and
they are different. I have small to, like, a medium large, and
these two are medium. Now, these two are very similar. I'd say this is thinner
and that's thicker. They are both size eight. This is a size four, and then this is a size 12. We have been working
with the thinner size I have in the practice. I have been working
with the size eight that's a
little bit thinner. You don't have to have
the same brushes, but I do recommend having these soft round brushes
for your painting. So I'm going to start
with my watercolor. I get a nice consistency. The more you practice mixing
your paint with water, the easier it will
be when you know, Oh, I need to add more water. Oh, I don't have
enough pigment in it. You will get the hang
of it. I'll become a natural instinct when
you practice more. So I'm going to do
a longer thin line keeping my ballerina
on her tippy toes. And then I usually start
at the end of the stem, and I practice my leaves there. Next, I like to stick
to one side too. I will do just a thin line
coming out of the stem and then go up just like we
were practicing before. I do notice there's a little bit more water than
I want on my paintbrush, so I can get a little bit
of it off using this. I can dab it at a little
bit on my paper toweling. And then I'm just
going to keep going. I do also like to have them
going into each other, sometimes too, changing
angles. This is nature. It can be all
different directions, feels like when you have a variety of
different directions, it makes it more
interesting to look at, and it feels more natural. I'm moving my paper.
This is not as easy because this back
is a little sticky. It holds my paper well, so it doesn't slide a lot. So if you are practicing
on a slippery surface, like if this was a table, you might want to
hold it still while you do. You're painting. So I'm switching directions, so I'm making sure I'm
not going in my paint. Here's one problem
you could have if you are starting from top to
bottom, is as you can see, my hand is going right
over the leaves before, and it could smear and smudge. If that happens, we can just add more leaves after it dries, but
it has to be dry. Now, I'm going to show
you what it looks like if I do it the other way. So I start this way. Do the leaves just like
we practice on this side. I am going from top to bottom, going in different directions. You can then on the other side, start from the bottom of your
stem and work your way up. So I do both ways. This way, I feel a little bit better that I won't
smudge and sneer it, but that comes with practice. So keep doing those until you feel comfortable
and confident. And then I want you to try
it with your gold as well, because as we know, the gouache will do something a
little different. I find when I teach
this lesson in person, a lot of people struggle
with moving to the guash. So it's really important that
you are practicing both. The consistency should be kind of like like melted
ice cream, maybe. So you want it thick, but
you don't want it too thick, and you also don't
want it too runny. So that's why I feel like
it's a little bit creamier. And you will be able to
tell as you do this, it won't slide and glide as easy if you don't
have enough water. It's pretty opaque,
so I'm impressed with the combination
of water and pigment, and I will continue to keep that consistency on
my paint palette. So keep practicing your
gouache and your water color. See as it dries, too, I want you to pay attention
to how your paint dries. It just looks so interesting
when it pools at the end. If you don't like
that, I would just dry it up with a
dry paint brush. So I will show you that. So after you're done practicing. So if I have too much, I'm running a little
bit too much. So if I have too much water, I will dry my paintbrush. And then with this
dry paint brush, I'll just soak it up. And if I don't want
that at the end, I can do that, but
I would have to do that right away before it dries. Now, when you are
comfortable and confident with these
brush strokes, that is the time to do
different size brushes. So I'm going to go to my size 12 round brush to show
you the difference. Don't get caught up in the size because I feel
like when people do, then they forget to hold it
after the no touch zone. They forget to hold
it straight up to keep the ballerina
on or tippy toes. So don't forget
those instructions. Because that will
help you practice in the same way to decide
what you like best. Now I can tell I didn't have enough water. This
is a bigger brush. I'm gonna need more
water. So that is going to be a big difference. Now, do I have too much water? So those are the things
you have to think about and decide I'm going
to wipe a little bit off. So I can tell I didn't round my brush and kind of twist it at the end because it just didn't
do what I wanted it to do. It's one of my favorite things. I don't know if you
could see that, but when you add it to another one, it'll slide into there
because it's still wet. If you don't want
that to happen, you do have to let this dry. If I do want this to dry a little quicker, I
don't have a lot of time. I might use a hair
dryer and dry that, but be careful because
these ends that are still pretty wet might go in the direction
you don't want it to. So you just got to
be really gentle and maybe hold it up a little higher if you're
using a blow dryer to dry it a little quicker. So you can get those
nice thin lines. This is pretty close to that. That is because we're keeping the ballerina
on our tippy toes. If you feel like when you
switch to a new brush, this is I'm not feeling comfortable and confident
doing these brush strokes. You can go back to doing
this page or this page. You can go back to this with the different size and
then move back to here. That is up to you. Now, once you feel like you have enough idea of what it looks
like with a size 12, then you can move to the smaller brush and then maybe move to the size eight brush
that's a little thicker or whatever brushes you have available
that are around. Once you are done, then you
can move to the next lesson.
6. Practice Final details: Alright. In this lesson, we are going to do two of the last things that
we haven't gone over, which is making this circle part and then doing the splatter. This is all just
practice, again, so don't be hard on yourself
if you don't like it. It is something
that we are going to work towards,
so you do like it. I'm going to have a
bigger piece of paper. I'm going to first practice different ways to
make my circle. This circle doesn't have
to be super perfect because we are going to add these lines because it
is a wreath after all. We do just want kind of some
kind of circle to go off of for our leaves so we know
where we're going from. A couple of different things.
One of my favorite ways is to get a jar or a glass bowl, whatever you have,
and just paint on it. It's really just turning
into a little stamp. So I'll just take
my water colors, and I'll paint the
top of the jar. Doesn't have to be
a solid line just to give us an idea of where
we need to go for our leaves. So I will just set that down, lift straight up, and
I have a nice circle. I could also use the lid of the jar and do the same
thing by painting it. I also could very lightly,
just like our paintbrush. Notice I'm holding
on the very end. That means when I have a pencil and I'm
holding it on the end, I'm going to make a
really nice light line that's going to be hard
to see hopefully later. If you push really hard, I would just erase
that line so you can see it but not
see it very good. So really there's no mistakes. We can make it work. Mistakes make it
more interesting. You could make a bigger circle. So maybe that's too
small and you have a masking tape roll.
You could just do this. Again, if it's too dark, just erase it, and you should
still see a faint line. I call it a ghost line
where you erase race, eras, and you can still see it because you
pushed way too hard. That would work for this
because we will be adding some paint on top of it so
you won't even notice it. It is hard to mess this up. I'm going to use my skinniest brush,
which is a size four. I know it's kind of hard to see. And I'm just going to practice. I'm holding my brush
up a little higher. We talked about that before. When I was doing the leaves, I want a little bit
more in control, so it's close to
the no touch zone. This time, I want to have
a little less control, more loose, and I'm just going to practice doing these
small little curve lines. So as I'm going around,
I'm just doing this. So I could even make my
circle this way if I wanted. It's a little bit more loose. You want to have more water than you did with the
leaves than pigment. In practice covering
up that pencil line. Like I said, I don't
when I paint this, I don't want it to be super clean of a circle
'cause it is a wreath. It's like this is a nice,
clean circle. Don't want that. And I will do these
little lines to make it a little
bit more realistic for a leaf or for a wreath. I'm trying to keep
it up straight up. And because I don't
have my wrist hanging I have my wrist hanging up in the air
and not resting here, I have to do that cause
my hand is up higher, so it means I have less control, and that is why we're
holding it up there. We don't want as much control
because this is nature, and it's going to do
what it wants to do. Now, once you practice the
different types of circles, and you are satisfied with it, we are going to
add more details. So if you still see
a little bit of that pencil in, in the end, when I add the leaves
and stuff like that, you won't even notice it, but do what works best for you. Now, the final touch is
one of my favorites. I love having some
splatter marks. I'm going to just do a
couple splatter marks. It is up to you if you want to practice it on a new piece
of paper or on this one. I'm going to practice
it on this one. I like using the bigger brush. I make sure I have
a lot more water. You can always add more pigment. But variety is more interesting. So you can see how
some has more water. Some of the splatters
have more water. That's because it's so light, and then some have more pigment
and I have darker spots. Variety makes it
more interesting. So when I have my
paint brush like this, it's loaded up with
that water color. I'll take the handle of another brush or
you can take, like, a pencil and you just tap it, and then you can tell, oh, is that enough or
is that not enough? So, too much water
or not enough water. Hold it up higher, down lower. So if I just stay in one spot, kind of let the
water go to the end. It gets a little thicker as
I go up a little higher. You just get all different
types of splatters. If I go a little harder or just a little
lighter in my taps, if I want to try
different size brushes, this is the perfect
time to do that. Oh, I like that one better. Do you notice how
there's more splatters? Thankfully, we are practicing, so we can get that idea. So let me show you
again. And then once you are done practicing and comfortable and confident, we'll move to the final lesson. So see how that
comes out like that. Very nice. That's a size eight. And now when I do this, see how it's a little
bit thicker dots. So that's also another really
good reason to practice different size brushes and also different amounts of
water to pigment ratio. They make this beautiful mess
all over. And that's okay. That's part of painting. I will see you on the final
lesson for the final project, and we'll make this beautiful
7. Final Project: Hello, everyone. Welcome
to the final lesson. Just a reminder that this
is what we're painting, I am going to start with
the center circle just so I know where each one is going to come off or
each stem will come off. You practice this already, so if you're deciding to do the center circle
different than me, this is the time that
you will do that. So I'm just going to get some
watercolors started here. And then I'm going to just paint on here. I don't need a lot. I don't need all the lines for the circle to
be done right away. That is the finishing touch. So I just need to know
where my circle is. I'm going to kind of hover
where I think the center is. I set it down, and I lift it up. That way, I know exactly where I want
my leaves to come up, and then I can have
that empty space in the center either leave it empty or put something
inside of it like a word or a name,
whatever you want. That I'm going to use the
small one that is size four, holding it up really high further away from
the no touch zone, and just kind of make
a sweeping motion. So I just do a little
bit of sweeping, as you can see that my color
is pretty transparent. So I had quite a bit of water
involved in this go around, but at the end, I do add darker. We have to start
doing our leaves. I want you to think of a couple of things while
you're doing this. I want you to have this
be your lightest color. It looks more interesting
when you have a big contrast between
the Paine's gray. So this is pretty light, which means I have more
water than pigment. And then when I get
to the next layer of the Paine's gray,
it is quite dark. So this skipping that
medium in Paine's gray allows for this medium value
of the gold to really shine. And then you can just see
all the different layers. So you definitely want
a big difference. I'm going to take one
of my practice sheets before I do the final with
my medium size eight brush. And I'm going to just practice. If I need more water,
if I need more pigment, this will help me see before putting it on
my final painting. Oh. I like that. So now as I do this, I say this all the time in
my classroom with my kids. Variety makes things more interesting. So I'm
going to remember that. I have the most detail on my first layer because it
is filling up this space. So I'm thinking tall, short, medium, and length. This way, it creates variety. And it's going to feel like any mistake you make
in this first layer, it's going to feel
like that really stands out, but it won't. We're going to add more layers, and no mistakes will stand out. So if I start here, holding it closer
to the no touch zone straight up and down, ballerina or tippites
I'm going to carefully put a skinny line. I like going at an angle. I practiced that in the
practice sheet earlier. And then I could start
adding my leaves. I do like to create
this tiny little line first and then create that leaf. And remember, in our practice, I did say having them going
in different directions actually makes it
more interesting because of the variety. I swear my kiddos probably
hear that in their sleep, they're probably thinking about variety because I
say it so much, but it is really
important, and it does make things look
more interesting. Now on the second side, I am going to start
at the bottom, and I'm going to
be careful I don't put my hand in the
freshly wet paint. I do still do that, and really I'm kind of reminding
myself, as I remind you. And if you do make any mistakes, remember this is
the first layer, and you can cover it up
with a different layer. But this layer has
to be dry first. Otherwise, it mix all together. So I'm going to continue to do this thinking long,
short, medium. I'm also going to try
not to get in a pattern. So instinctively,
I want to do tall, short, medium, tall,
short, medium. Once I start getting
in that pattern, I try to mix it up so it
doesn't become a pattern. So if I do tall,
medium, short, short, medium, tall, I don't
want to overthink it, but I also do not want
to have that pattern. I want it to be very loose. So I feel like if
I have a pattern, it will look too planned out. So if you notice I did
start on that side, and I liked how that
worked out better. I do something different
every time I paint this. So constantly learning,
and that's okay. I'm going to do a
really long one. Different curves and
different directions also helps create that variety. So I am going to speed
this process up. This is the longest layer because it has all
this space to fill in. Each layer is a shorter
amount of time. So I'm going to speed it up. All right. I hope you enjoyed
doing that first layer. Now, it's okay if it feels
off balance when you're looking at it and
you kind of put your head a little bit
further away from it. And you can kind of
see that maybe it feels heavier over here because there's more going on and just so much white negative
space over here. This second layer is where
you fill in those gaps. You definitely do not need
to do as many as here, but think of that
next darker layer as something that's going
to correct the balance. So again, when I
look at balance, I look at the positive space, which is all the painted areas and then
the negative space. So when I see a big open
area of negative space more on this side than I do this side or more at
the top and the bottom, that's when I can correct it
is with that second color. If it is still wet. So mine dried pretty fast. I don't always have
that dry paper. I would suggest to go and use a blow dryer to
gently dry any paint, or if you don't
have a blow dryer, you can or like a hair dryer, you can just let it sit. It shouldn't take too long because we kept it pretty light, and if you're using
watercolor paper, it soaks in really nice. I am going to practice the
darker color because remember, we do want that really dark, deep color of Payne's gray. So it's definitely less
water and more pigment. But if you don't
have enough water and what we talked
about in practice, it will not slide and glide. You can see in here on the
paint palette, the difference. You want a huge difference. So I'm just going
to mix that up. And then here are
my practice ones. Oh, yeah, that is nice and dark. So I might put just a tiny bit more because it's
still pretty loose, and that's okay. Yeah,
I really like that. If you think that your two
values look pretty close, then you need to make
sure you can tell a big difference between
the dark and the light. So keep adding by putting
your paintbrush on your color and then mixing it in that water to make it a little bit richer, a little bit darker. If it feels really sticky, then you have too much
pigment and not enough water. So it's kind of a fine balance. So stickiness is
not what we want. We want it creamy
and we want it dark. So I will fast forward
this and remember, we're filling in any spaces we need to be that needs
to be filled in, and this will not require as many stems with leaves
as the first layer. Now that you're done with
the first two layers, it's really important that this is super dry before moving
to the guash because it is definitely lighter in value than the dark paints
gray that we just did. So I suggest to go and blow dry this with
your hair dryer or just let it air dry but I also highly suggest that you practice doing this and
getting that creamy, like, melted ice cream type
consistency for your guash, because I have had a lot of students that take this
class and do this lesson, and they forget because
you get on a roll. We did a lot of
these, and it really slides and glides
easy and forget how hard it can be to get the right consistency because it is not the same
as watercolor. So right now, if you could just make sure this
is completely dry. Maybe practice a couple more
of these with your guash, and then we will continue on. So this would be a good
time to pause the video. Now, the next step is to add
our last layer of leaves. I did get fresh water, too. So while I was blow drying it, I realized, Oh, my gosh,
I got to get fresh water. So that's what I did. And now I have that nice creamy consistency for the guash. And I'm going to twist
my paper brush so I get a nice point at the end to have my ballerina
stay on our tippy toes. I will also kind
of look at where I still feel like I
need to fill in. This layer shouldn't have
as much as the other ones, but I do want to make
sure I get all the way around and it looks pretty
cool once it dries. I feel like it
doesn't get shimmery like this until it
completely is dry. So don't worry if yours doesn't
look shimmery at the end. You just got to
wait for it to dry. So as I do this, I'm noticing that I didn't
have the consistency that I really liked to
have skinnier leaves. So that's why I kept
going back into my paint. And once I get that
right consistency, because of the practice, I will better understand what it should feel
like when I'm painting. So I'm going to speed
this one up again. We're just repeating
the process, but with our gouache
gold. Have fun. All right. This is one of my favorite
parts is putting these fun little details at the end. Don't overthink how it looks when you're still
in your painting zone. So sometimes people get to
this point and they're like, should I add more
or shouldn't I? So if you take this and you
hold it at arm's length away, then you can see if it's balanced or if
you need more or not. I am going to switch
to my thinner brush now after I've made sure it's well balanced,
which I do think it is. Again, don't overthink it. I already have my lines, my little wispy lines
that are light in value. Now I want to add
with my small brush. I want to add some
darker wispy lines, holding it further away
from the no touch zone, and just kind of
sweeping back and forth. Be really gentle,
barely touch the paper. It's okay if it kind
of skips around because we don't
want a solid circle. This can be challenging
for people that like to have that clear circle. We want it to be broken up, so it looks like all these different leaves are
tied together to make a wreath. I'm going to also Do that with my gold. I'm going to get
a little thicker because we just did the dark. To, I don't want to
do a whole bunch, but with my gold, because it's not so dark, I do like to go a little
bit on the ends of the stems more than I did
with the other colors, and then just put a couple
wisp lines in the center. Also with my skinny brush, I like to add just a couple of leaves with gold
and the dark value. This one has a little bit
more dark than light, and that's okay. You
choose what you want. You can do all three values. I tend to do a little
bit more dark values. So I'm looking for
these wispy ends. So here's an end. So just kind of like
the end of a stem. I'm just going to put a
couple. I'm not going to put a whole bunch like
I did on the big ones. Then I'll put a couple
on the other side trying to do a full
stem with leaves. I'm just going to add a
couple here and there, and I do like to keep going
in the same direction with this being a
little bit more of a mess organized mess, right? I do like to have some
kind of organization, so it doesn't look like I just dropped my paint
brush and I just did what it wanted,
which you could do. But this is kind of
my organized mess. So just put a couple. Keep going around so you can keep going in
the same direction. It is your choice if you
want to do light and dark, but I just choose to
do dark and gold. So I see a couple here. Remember, the guash
is a little trickier. It doesn't slide
and glide as much. I could tell I had
too much paint on a paintbrush. Not a big deal. This is where it's
easy to overthink it. Right when I start
to think, like, I'm adding too much to one area, I move my paper because
it needs to look loose. And when you do too
many small details, it looks less loose
and more thought out. We want it to look
more natural. Okay. And then I'm going to
do some of the splatter paint that we talked
about before. Sometimes I will
put something in the center like maybe
the top of this, that metal cover
that's in the center. I'll stick that on
there if I want to add something later
because sometimes I'll scan this in and maybe write thank you on
there or you know, like, turn it into a card, or maybe I want to put a little saying in there
and then print it, or I want it on the original. It's really endless on
the things you can do. I really enjoyed this
versus the big one, but that is your choice, too, because we practice with both. And I do just do the paints
gray for this ladder, but if you want to do the gold, too, absolutely could do
it. It is your painting. Oops. Now, if there's any
area where I'm like, Oh, I don't want it there,
that's what that extra paper tilling
off to the side is. Also, if I have too many dark, I feel like I have
too many dark values. So just lifting it a little bit will help
create some lighter values. I do take it off the gold. I like it being a
little bit lighter on the gold for the most part. She has a lot of dark. So I got some lighter. I got it on my hand, too, which is part of the painting process. Okay. I do feel like I
need a little bit more. This is where I have
to remind myself. Ashley, do not get carried away with the splatter because
I just love it so much. So I just wanted a little clump
because I don't have any, like, close up splatters. I'm doing three areas. That odd number is just a
little bit more natural. So if you're dabbing
it, don't wipe it. You just go on it
and lift it up. On it, lift it up. Do not forget to sign your
name in the bottom corner. Sometimes I will do
it with a marker. Sometimes I'll do
it with a pencil. Sometimes I'll do it
with my paintbrush. It's up to you, but I
always tell my students. We sign it at the end to
show that we're proud of it. I like to do that in
the bottom corner. Here's just a pen that
I use all the time. There. And we are done.
8. Conclusion: Congratulations on
finishing the class. I hope you enjoyed the process
of learning and practicing watercolor techniques
while creating your beautiful leaf wreath. In this class, we did focus on several important skills to help you build your confidence
with watercolor. You practice getting comfortable
with your paint brush, learning how to control your brush movements. In
here, that's what we did. We practiced doing skinny
lines and thick lines. We also were understanding
a little bit more how water affects your paint when we practice the techniques
of making the leaves. You also explored creating
leaves along a stem and experience how watercolor and gouache do different things
when you are painting. So I'm really glad
that we practice this before doing our final. All of these small
practice steps do lead up to your
final project. Your watercolor leaf wreath, I'm sure, looks beautiful. But remember, every painting is part of the learning process, and each time you practice, you will continue to
improve your skills, and then you get to
develop your own style. I feel like every time I paint
this, I do the same thing. I would love to see
what you created, so please share your finished wreath in the project gallery. It's always inspiring to see the different watercolor choices and creative approaches
everyone takes. If you enjoy this class, please consider
leaving a review. This way, your feedback will
help other students discover the class and help me continue
creating new lessons. You can also follow me here to be notified when I
release future classes. Thank you so much for
painting with me, and I you continue
enjoying watercolor. Bye.
 Ashley- Water Bloom Studio, Art Teacher