Transcripts
1. Introduction : Hello dear friends. Good afternoon. Such a beautiful,
beautiful afternoon. My name is hygiene. I am a teacher. And this time, this time of
the year is holiday season. And in class we do a lot of
paper decoration and Origami. And because I teach
young children, elementary school age children, I tried to engage them by
using some very easy to understand terms to
explain my origami today, I would like to show you a very simple step for
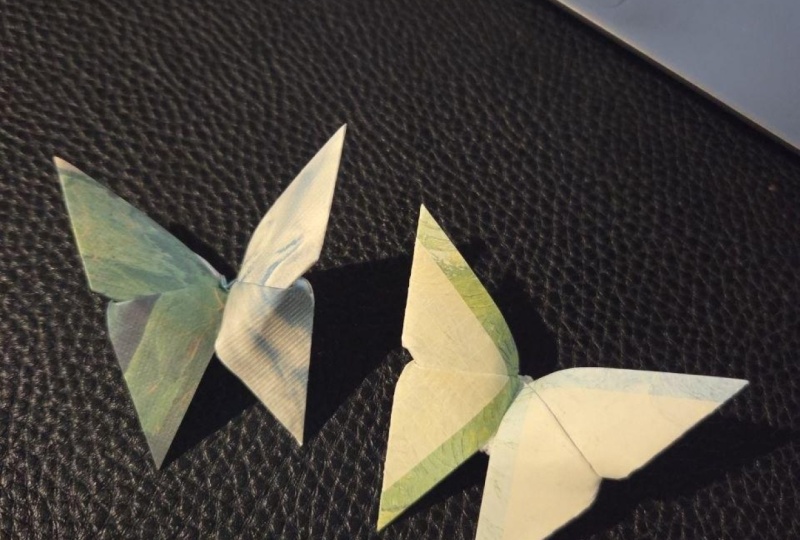
making a origami butterfly. Look at it. You can choose a different
color and different size. So in class, I will
show them you do a tab. Cole recalled these taco
and we call these hot dog. So it's fun and lighthearted
and also very productive. So let's enjoy it.
2. Origami butterfly: Okay, hello dear friends. Here are the butterflies. Now I want to make
a yellow butterfly. This side is white. I want to make it yellow. So I make a yellow tacos open. Now. Yellow tacos, it's
always symmetry, right? Symmetric. Turn it around. White hot dog. Remember, white hot dog? Open up another wide hot dog. Now, I make it like a like a
diamond and yellow diamond. And they've can push, push, push, push, push. Now I make a pyramid,
yellow pyramid. One leg lifting on,
another leg lifting. Now I screw it up. Here we have like a funnel
and lift the bottom up and twist it over and
turn it over to not press. Do not press. You wanted more lively, right? So you press U, turn it over. Not below it, Not too
much about it. Above it. About a third, a
quarter above it. And press it down. And you use your hand to pinch, pinch, start to
pinch very strongly. At the same time, your finger put
into the butterfly, the wings to make
it more relaxed, make it a more soft
and, or rounded shape. Now we get a butterfly dressed
alike that the small one. Maybe we should get a
teeny tiny little while. Let's do it again. This one is even smaller. Blue butterfly, blue tacos. Blue tacos. Everyday scene to two times. White hot dog. White hot dog, blue, pyramid. One leg, other leg. Scoop it up. Bend over a quarter
or assert over. Pinch. Put your 0. This time I need to use my
baby finger. Small finger. Press, press, press, press, pinch, pinch, pinch, pinch. A small butterfly. Thank you.
3. Origami tulip: Okay, hello dear friends. Here are some tulips. I want to make
these tulip flower. How we do it? This one, I got it wrong side. It becomes a little,
little zones. Chinese dumplings. Chinese a sweet rice dumplings. Anyway, these, when you
make it right or wrong, you actually discover and
develop some new designs. Let's do it, right. This time. I have a piece of paper. Seeing it clearly. That's good. So this is the paper
one side has designed. The other side is
the backing paper. We will call these wrong side. And we call this design side. Nothing wrong with
this red, red side. We just call it design
set and wrong side. Okay? So I want to, I want a flower has said
the design outside. You will make a design parkour. Open up. Design parkour. Open up. Turn around. Wrong hot dog. Open up, wrong hotdog. We all know how to press it
to write a diamond shape. Rise. You get a pyramid. Design. One leg or another leg. Or read one side,
turn it around. The other side. One leg. Another leg. We are almost there. Okay. So we have a teeny
tiny small square. This time. We need to flip one, only one of the tip, only one of the tip to the side. And on the bottom flip this
tip to the other side. So there's no opening. There's no opening. Here. We have opening none,
none, none, none. We want to have a smooth phase. Flip. Lead. Toby, it this is
a nod to the top, not exactly to the top. I think it's a it's
a personal choice. How much you want to open it up? I will open up trust, a quarter of it of
fifths it and press it. The same thing I will do. On the other side. It does not have to be
perfect for this particular, for this particular design. Then we tuck this one in. Hello Google. It's not easy to tuck it in. Tuck it in. Oh, that's good. That's good. We have tucked in. Press it. Press it. Now we need to do the backside. This time we do the backside, we already have
something to follow. A round. Hello Google,
That's my cat. Okay. This side, press
it and then tuck it in. You can talk from this side, you can tag from the other side. This is not not there is not a rule
which one you can tack. Sometimes I use a toothpick
to open up, tuck it in. We are good. This time. We can
press a little bit. And here is a whole
we need to blow it and open it up. I will do it. You can put your
hand on this side too to make sure it
does not blow away. I'm good. This time. I am good. Very impressed by myself. So this is roughly the shape. But on the top you want to
turn it a little bit, the tip. Turn it a little bit. I turned trust a little bit. Very nicely. Very softly, tenderly. Ok. Turn it. Oh, not so
easy because you can loosen up a little bit
before you turn it. Okay. Now let's come back. You can use your hand, press a little bit to
make the shape better. Now I will show you
that one is to sin. The toothpicks
seems, seems to sin. And you can use a pencil or something just
to the right size. For this size, I think this
pen refill will be good. And a little bit in, in, in TikTok movie,
in TikTok video, or someone does it very quick. It seems magical. But the truth is that it
does take time and effort. Okay, this is not the right. You can always go back to
add just a little bit. Oh, okay. Now, it's a little bit better. Now. It looks so much better. Next time, you're curious. Stopped recording. Let's continue. My families are having big
fun with the cat. Okay. So that's okay. That's about the right size. You can adjust a little bit. Make it to open more or open
lead to much more, right? And my personal idea, I think the same uniform
color will be better, e.g. pink, orange, yellow, red. This kind of more
looks like a flower. But yesterday, I pass
by my neighborhood. There was one family had black, truly not origami black. It looks so mysterious. It's Halloween season. Maybe we can make some
black truly enjoy.
4. Origami plum flower: Okay, So I will use blue
and the green color. And so that six pedals, one blue, one green, one blue, one green. And alternating will
be more interesting. So first, you get a blue
taco, put everything aside. Now you can see
clearly blue cold. Press it strong. And one of the leg tilted. Another leg tilted up
to make a new square. We are good. Open it up. You saw what? Original taco. And this one. We will forward the
last half, right? Patching our square
folding line. This one also touching
the square folding line. Open it up. This side. We will want to press it. There is a line, the paper already have memory. So follow the memory. This side. Also. The paper already have a memory. This memory, this memory
is just the opposite, but we press it, it will be, remember. The other memory. You can trust, folded back, keen, make it a straight line. There are people doing it, folding this one inside. We do not need to make
it so complicated. We just folded back in. We will show some
of the white miss. When we folded back in your
seat for this one back in, for this one back in. So we become another square. Make sure your squares
relatively group. And this time what we do, we fold the dean and
this is one pad. Okay? Now I will use a glue stick. John, when a piece of piece of sketch
paper or scratch paper. Now, I press one side. Okay. How do I make sure it holds up? I will use I will use a little clip
because I'm a teacher, I have tons of it. Okay. And now we do another one. Parkour. Tilted on one screen. Perfect. Good. Bring it down. Forward. Bring the down, fall down, touching the square line. Use the memory. Use. Mm-hm. Here is the map. I am I the most clumsy origami
paper folder in that one. Okay. I made six of them. I glue side-by-side. Blue green, blue
green, blue green. You know what? I want you to be strong. I want it to be strong, so I hold it for some
time and then put this one role to this side
and stack them together. It will take a couple
of minutes, okay, we want the glue
to dry down, okay? Now, we will put
the mass to one. Stack together. Will not be so easy. Use my hand to hold
it a little bit, and at the same time, I do some. Just seems okay. Now you to use the
glue will dry. Become transparent. Thesis a screw, purple glue. You can always
just the last one. I put that last glue it here. Becomes good, alerted dry. Need. I can add dressed. A little. News. Always. Just took it
to make it wrong. Yeah. Not too bad. I think. Good night.
5. Modular origami lotus: Okay, hello dear friends. Good evening. Such a beautiful,
beautiful eventing. So this is the finished
low juice of flour. And I do not have a
key light for now. When I have, I will put it in. So let's see how it is made. Step. Okay, so now
we make the flower, flower petal like this. See, I got confused one time. And it's better to have
one made good one sample. So first, you do a white hot
dog and then open it up. Open it up a white
piece of paper. You're folding in
the four columns. The four corners, 123. Origami is symmetrical. I am not doing very, very good. Try to make as good as you can. Oh, this one not very good. You can always fix
it a little bit and then make it
into this shape. I suddenly forgot the
name of the step Shane. I'm holding. You do not see any
white in this. It is close up. You do not see any white. White is on this side. So we will do all
of these pedals, which is, which is one to
12th pedals, 12th handles. Let's do it. So why? Hot dog? One more time? A couple of more times. We will be good. And it becomes
systemic, systematic. And you'll only
see the columnar. These color for this one is to try to make it
as good as you can. Because when you do it
here for your flowers on this side, complete
white, complete colors. Okay, I will keep YOU. Okay, Now we do the leaves. For the green leaf.
What do we do? We do green, dark green Honda. And then folding the corner
exactly as the pink, paddle. Green, Connor. Connor. Ring corner. Fold. Right to the middle. Fold. Right to the middle. That's it. That's
the leaf. Okay. We will do one more time. Leave ring. Ring, ring. Connor. Connor. Connor.
Followed the edge right to the center. Fold the edge right
to the center. For now we have, okay, so here we
have the pedals. 1234. I am not putting in
the right order. It's better to put, make sure everything
goes in the right order. First to layer, Second
layer, layer, leaf. You'll make your own
assortment of color, but always make the same. So you see the pink is, the light, pink is outside. The calories, gradually
moving to darker. So we have the flower
pedal and leaves ready, open up one by one,
stack together. And this time, what do we do? We want to add
just a little bit. Make sure they are
the same lens inside, the same lens outside, I think are pretty good. And then use rubber, sorry, rubber band to bend it. You do not have to be an
art teacher to have it. Grocery shopping, you always
get some rubber band. Now, we will do the paddles. So go to this side, pink first. And what do I do? I hold my hand, press it so that it
will not be broken. My hand is always a
supporting one layer, two layers, the green, I will not take
care of the green. For now. Only. The pink does not look
good at this moment. It does not matter because
it's not done yet. Make sure it's not broken. Here is I'm seeing not need patients. You need not in the rush to it. One at a time. It is not comfortable
the paper not a problem. This is not the
final settlement. Still need some further works. Sum where we sum, you know, you can do it. My first grade student, boy, can do it. My first degree student. There is one borough can use your hand to
support a new utopia. You can use your hand to. How do we do it? This is the last one. Already. Use your hand. It's quite a clumsy
at this time. I always use my hand
to support here. Otherwise, it will be
still He's broken. It happens. Not very, very, very much. We can do. The last one. Do not cut your fingernail
when doing Oregon. Okay. So that's about it. This one is a little
bit too long. We can add just a little bit. It's kinda fun to, just, to make it even a bit, to make it overlapping in the best possible way. You have to do it. Not really, but does
it hurts to do it? Not at all. Okay. The center is roughly like and you feel put a t light
will be very pretty. And for this class, I actually bought
some tea aligned. Now we do the leaf. You want to make it wider. That's the Lilypad. This pink is a
little bit too long. Too short. Okay. Let me just stop here. That's the Lilia. Okay. Now, I want to make
it a loop to get you. I have seen some students put flour inside e.g. like this. That looks pretty cool, right? Hold these in a little bit. That is very cool. Try this one. Little bit strange, right? Try this one till bit strange. Yeah, it's better to use
uniform color. That's it. Put a t light. I do not have that here light
for now because I lost it. Paul Napa t to 0. That's a good idea. Actually we can do this
kind of combination. Nice idea always
comes by trying. Love it. So this yz piece of glue. Bye, bye friends. Let's see. This one I made origami
and I forgot to. I did it the wrong size, so it becomes like
Awesome, Good. All right. So if I draw some load to see, That's good. For now. I think it's better this way.
7. Triangular bipyramid of 3 units: Okay.
8. Cube of 6 units: [No Speech]
9. Modular 12 piece origami spiky ball: [No Speech]
10. Cumulated icosahedron of 30 units: D. Oh, my God.
11. Origami butterfly in Chinese language: Tongue function,
function function. She tongue tongue can. Shaabaash sana, sana, Dak you into an Pengcheng fungus. Lars. Oh chichi A. Shah Piano Trio. Yeah. A, A. Accents cheap. Your shirt, you're
doing cheaply. Cheap. We're trod.
 Haiying Yang, Artist, Educator