Transcripts
1. Organize Content in Notion: Hi, I'm Alina raster. And in this course, you are going to learn how
to create a content planner in Notion to be able to organize all of
your content ideas. This is the exact planner we are going to be creating
in this course. And you can follow along step-by-step for how to
create this planner. Just to give you an idea
of what you can do is you can come over and
create content ideas. So I can come over and I have
a YouTube content ideas. I have different buckets here. So I can create a
content idea like how to organize your YouTube ideas. So this has already set
it as a YouTube video. And then what I can
do is come here. And I'm actually going
to be able to go to my schedule YouTube
videos and you can see how to organize your
YouTube ideas appears here. And I can just drag it onto the calendar wherever
I want to publish it. So I can come back to
my content calendar. You can see that
it appears here. And I have several
different ways that I can examine the status. This is by the published date. And if I go to the
creation date, you can actually
see it's already appearing on the creation date, even though I have not
created it in this course, I'm going to show you
how to automatically create your creation dates or you're filming dates based off of your
published date. And then you can also see it down here in your
different boards. So you can see by
media, by status, by platform, all your
different ideas and content. And then finally,
you can also look at your different content by the platform that
you're working on. So if you're just trying
to see what's coming up next in your
different platforms. There is another way
to view your YouTube, Instagram, and Twitter content. Alright, here, in this, I am teaching you the
skills to actually develop all of these
different things so that you, for your project can
create a content planner that works exactly how you
need it to work for you. I'm really excited to
share this with you guys. So let's go ahead and
dive into this course.
2. What is Notion?: So to get started, I first want to explain
what notion is. A notion is basically
a mix between a database and a document
like a Google doc. So this is just a blank
page and Notion and generally you'll give
your blank page a title. So I'm just going to
say what is notion. And then from there, you can basically start with an empty page and you can just press Enter and then you
have this empty page. If I backspace out of this, you have all these
things you can add in just from the very beginning, but I'm going to start
with an empty page to show you what this is. So the very first thing
you can do is you can just use this as a
document so I can write. Hi, welcome to Notion for
content organization. This is the first video. I can always highlight
over this and be able to turn it into different
types of texts. So I can turn a text
into a heading. All these different things
that you can do with almost any other
document type system. And you can do things like bold, italicize, underscore any
of these things, right? So that's the basics of
just notion as a document. But this notion has the
capability to include databases. And that is really where the
power of notion comes from. So all I have to do to include
a database is type slash, and this is gonna give me
all the different commands. So from here I can add
in all these things I can do just like a
normal document. But then I can also
add in databases here. And so basically what each one
of these lines is a block. A block can either be text, it can be a leak, or it
can be an actual database. So I'm going to
re-brand up this list. If we scroll down, we see the databases block. I can add in basically any of these databases and you can see a database as inline
or a full-page. If you do it as a full-page, it's going to create
a whole new page. If you do it in line,
it's just gonna be in line within this document. And I'm just going to add
in a table view right now what is notion
as a new database. So this is now my table database and I can add in
whatever I want. And the rest of this course, I'm going to be
showing you how to actually organize your
content within here. But this is just
an example one for now and then I can give tags, and these tags are
basically a select option. So what this allows you to do is to be able to filter, sort, and show all of the information in this database in different
ways within Notion. So that's just a very basic
overview of what notion is. And then the rest of this,
we're going to be building out a content planner for you to be able to organize your
content within notion.
3. Creating a Database: So picking up from
where we left off, I'm going to start by
creating a new notion page. I'm gonna come
over to my private and I'm just going to
click this plus here. And this gives me
a new notion page. So I'm going to call
this my content planner. The very first thing
that I'm going to do is create a database. So I'm gonna go ahead
and press Enter and start with a new page. And then I'm going to
create my database. I'm going to scroll down
to the database section. I'm just going to start
with a table view. And this is where I'm
going to go ahead and create the actual database. So I'm going to create a
database as content planner. So I named this content
planner and then course just because I have multiple
of these so that I will know which one
was made for this. And so now I have the very
basic database that I want. So this is going to be my, just where I'm going to
put all of my content in. So I'm going to have the
name and I can change this to the title or the content. And then I can have tags in here so I can tag
them by content. And then what we can
do in the next lesson, I'm going to show you how
we're going to start adding in properties to this.
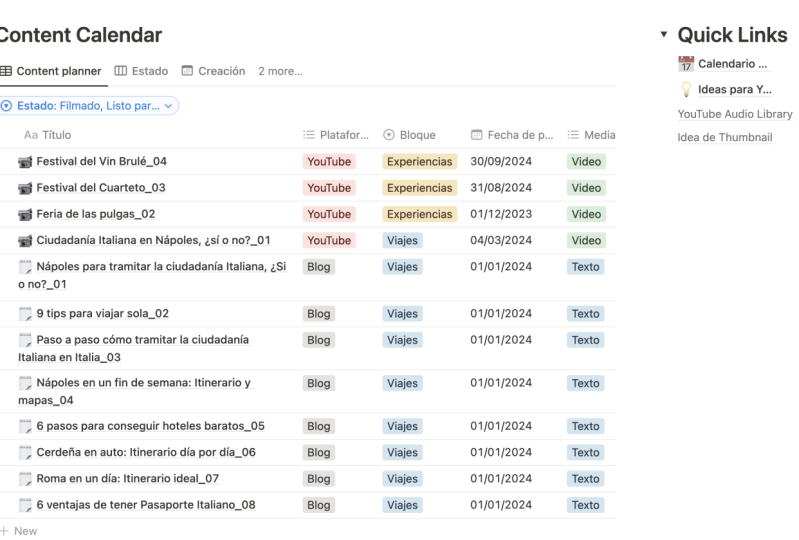
4. Adding Properties: So now that we
have our database, Let's start adding in our
actual different properties. Are properties are
things that are going to help us to be able to control how we see this content, control how we search for it, filter it, all of these
different things. So we have a title and our tags. Now a few other things
we might want to have is the platform. I'm going to add in,
platform in here. And then once we do this, once we add in a property, we want to select its type. And so we're always wanting
to think about our future, how we're going
to use this data, what text is searchable, but you can't really do
any filtering by it or showing it in a different
view or anything like that. And so what we wanna
do is if we want to be able to select
for it in the future, we really want it to be a
select or a multi-select. So I'm going to place
this as a multi-select because you may have be
re-purposing your content. So you may have one piece of content that you're
going to show on Instagram and YouTube shorts. So I want you to
be able to select all of those as an option. I'm going to click
Add options and I'm going to click YouTube, Instagram, TikTok, facebook,
and I'll add in Twitter. These are cutscene of
some of the big ones, but you can add in as
many as you'd like here. And so now we haven't
added anything in here, but we do have our
platform there. Then in addition to platform, we can have content bucket. And this is basically like if you're talking about Notion, there's several different things you can talk about within notion and being able to have those as different
content buckets. And then for this, I'm going
to just have it as a select, which means you can
only select one, you can't select multiple. And I can be done
editing that property. Then we can add in other things we might
want is published date. We can do that and
we would want to select this as a date property. And then I might even
add like creation date. And this would also
be a date property. Then we can even add
like tight or medium. I'm going to add in
media and I'm going to make this a multi-select and
I'm going to add an options, like it's just text, it's a video, or it's an image. That way if you're
trying to like, decide on what you're
doing on a different day, like Instagram content, you
may want to mix these up. And that would give
you the ability to be able to see that
visually as well. We have media and then
the one other thing I'm going to add in is just type. And so I know like some
people will do like a Tuesdays tips or
Wednesday something else. Or even if you have like tutorials and talking head
videos and things like that, I'm going to allow
you to have a type. So this is just kind
of basic properties of every single piece of content that we are going to try
and organize in here. So in the next lesson,
we're going to fill in some data in here and then we're going to start
playing with how we want our ultimate
dashboard to look.
5. Adding Content : Now let's start filling
out some of this data real quick just to give us ourselves like some
ability to see it. And then we can start
filling in some tags. So let's say this is
like about YouTube, and let's say this
is maybe about like the script As a software. Let's say title
number two is about YouTube studio and tidal number three is going to be about, I'll just make it about
Notion organization. Then let's throw these on
some different platforms. So we'll say this is
going on YouTube. This one's gonna
go on Instagram, and this one is going
to be on Instagram, TikTok and YouTube shorts. So now we have all of these. Then we can have put in
different content bucket. So I'm going to say
that this is YouTube. This one's also about YouTube, and this one's about Notion. Then let's just go with, this is going to be a video. This is gonna be an image
because it's on Instagram. And then this one's
gonna be like a real video type thing. And I'm going to leave
my type blank for now. So now we have at some
basic data just in here. And so now what we're
going to be able to do is create different
views off of this. That's when it's
going to make it a little bit clearer how this is going to help you
organize it so much better.
6. Views: This lesson is going to be an introduction
into Notion views. And then in the next lesson, we're actually going to create a dashboard with a lot of different views for
the same information. So right now this table right
here is known as a view. And what you can do is
you can add in new views. So if we just click here, it's going to say New View
and we're going to name it. So there's a few
different options for the views you can have. You can have a
table which is what we've been working
with thus far, or you can have a board. So I'm going to do this by, by platform is
gonna be the name. And then what I can do
down here is where it says Group By what I would
want to do is click on that. And I want to change
the group by column to the platform so that it now shows the
different platforms. And then from here I can
actually organize this. So I could say maybe
I want to see all my YouTube's first and
organize it that way. Then Instagram, then
Facebook, twitter. And then I can actually choose to hide any of these as well. So I might hide those that have no platform or I can hide one
of the platforms on here. So you can see that my
different titles fallen here in different places because they are associated with
different ones. So my title one is YouTube. My title three is
all three of these, YouTube, Instagram and TikTok. And my title too
is just Instagram. So this gives me a way
to just kind of organize things and see them all
by a specific group. The other thing we can always
do here is also subgroups. So if we come up to
these three dots, you can see that we have lots of different options
for what we can do. And one of those things
is click a subgroup so we can subgroup
by content bucket. And what you can see
that is doing is now showing you the
content bucket, everything within that, within the greater grid
of the platform. And so that's an option you can do and you
can always click and hide any of these as well
to show the hidden groups. So that's a little bit
more of an advanced thing. But the other thing
you can do with any of these is come
into properties. So if we look at the
different properties, you can see right now it's
only showing the title. And you can come in and
add any of these to it. So since we're already showing
the content bucket here, That's probably not
a good one to show, but you could show the media. So you could see very quickly
with the colors here of what is actually being included with that
piece of content. So the two other common views that we're going to discuss
is a calendar view. And so whenever you do this, you're going to have, you can choose to toggle on
or off the database title. But you're going to have
show calendar by and so in this you can only
show it by a date. And so we can just have
our published date. And then we can just say this is our calendar and click Done. Now, since none of our things
have a published date, they're not showing up here, but once we set that, they are going to show up here, you can see that we can
access our views just by being able to click and
go back and forth here. So it's here and
then you can come back to the calendar view here. So that's another one. And again, you have the
same ability to control the properties and filter and sort which we're going to
cover a little bit later. The final view that I
want to show you is I'm just going to add
another view and I'm going to click a list view. So in this, I'm
just going to put YouTube videos and I'm
going to have it be a list. I'm going to click Done. And so what I'm going to
specifically do here is actually add a
filter by platform. And my platform should
only be YouTube. And so that allows
me to just show my different titles just
really quickly as a list. And then I can control whatever properties
are over here as well. The next several
lessons are going to be on actually creating our
dashboard within notion. So we can easily access
the same information multiple different
ways to make it really easy to organize our content.
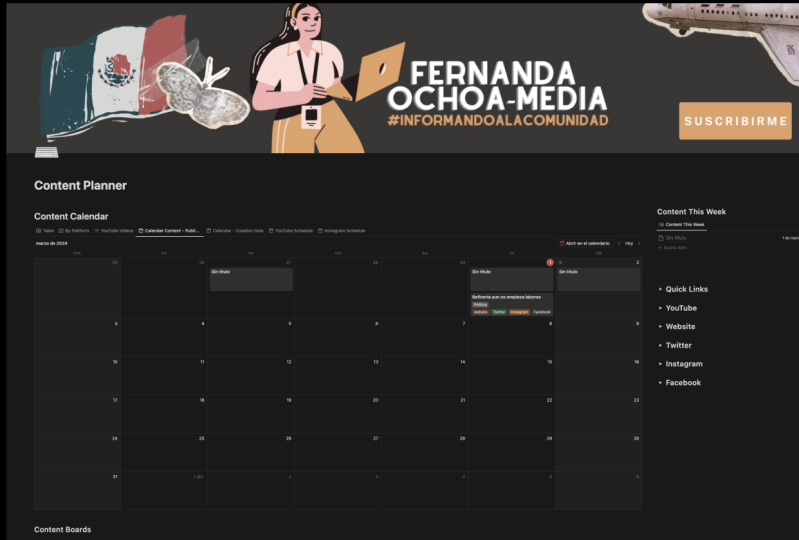
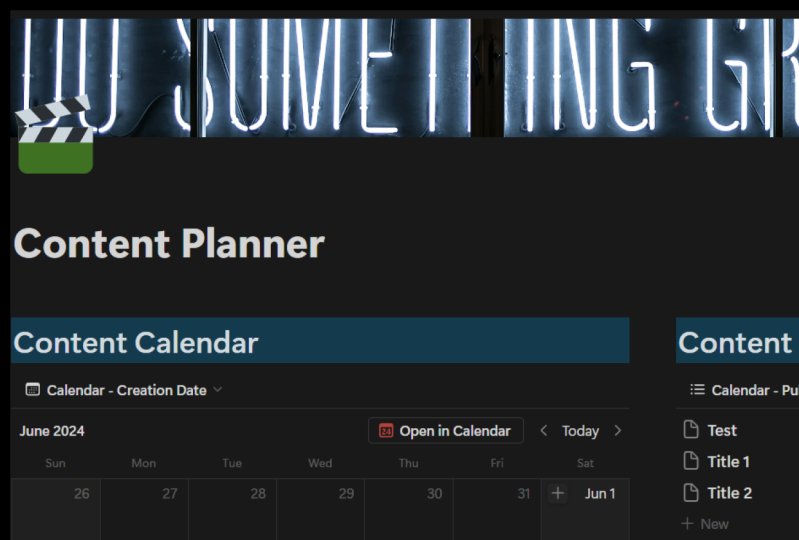
7. Structuring Your Dashboard: We just created a bunch of
views and now what I'm gonna do is start working on
creating a dashboard. The first thing I'm
gonna do is set my structure for my dashboard. So one of the first
things I'm going to do is come click these
three dots up here. And I'm going to move
it to full width. So now we have the full
width to work with. So what I'm gonna do
is click down here and I'm going to just
type a little texts. And what am I going
to do is move it up above my calendar. And then I'm just going to type some text again and pull it to the end till I see this vertical line and
then I'm going to drop it. And what this is going to
do is create a column. And so now I can move or adjust
the width of this column. If you come just to the
outside of your plus sign, you can actually adjust
the width of this column. So what this allows me to do is now take this and
put it over here so that my database is only on the main portion of this and is not all the way
over here as well. What I'm gonna do is
actually create this as a calendar so I can delete
out these other views. So I'll have to do is come right-click and I'm just
going to click Delete. And now all of my data is
still within this database. I'm just deleting
the different views. So the only one
I'm going to keep right now is this calendar, and I'm gonna go ahead
and also hide that title. So if I come into
layout where it says Show database title,
I'm going to hide it. Then I'm just going to call
this my content calendar, highlight it, and change
it to heading one. And then over here, I'm going to call
this my content. I will show you what
we're gonna do under here in a few lessons. So that's kind of
the basics there. I'm going to press Enter
and then I like to have a quick link section. And so what this is
gonna be is one, if you'd just like to have maybe certain things that
you're working on. Websites you regularly visit
that can be under here. But it can also be
where we're going to add in certain
pages that gives us functionality like
coming up with content ideas or scheduling
out our video ideas. And so I'm going to hover over this quick links and instead of turning it to a heading one, I'm going to turn it to
a toggle heading one. This means that
whatever's inside here, wherever I put my links, I can just easily
toggle it up into it, then toggle it back down. So then whenever I press Enter, you'll see that I am shifted
under this quick links, which means that this will actually be included
in Quick Links. So I'm gonna do is press
Enter again and backspace. And that's going to move
me outside of quick links, which means that it is
now it's old block. So I'm going to put in
my different content. So let's say YouTube, but that's going to be
my YouTube content. And these are all going
to be toggle headings. I'm gonna do my Instagram
content and I'll do my Twitter. I'm not gonna do it for all
of my different platforms. I just want to show
you what's going. So we're going to do
that and I'm going to hi to all of these so we don't have to
worry about the empty. This is the general
layout for my dashboard. And then I can have
additional space down here. I'm going to put my
content boards down here. I'm just gonna make
this heading one. And I am going to fill
out all of these within the next few lessons and really show you what I'm doing
with all of these things.
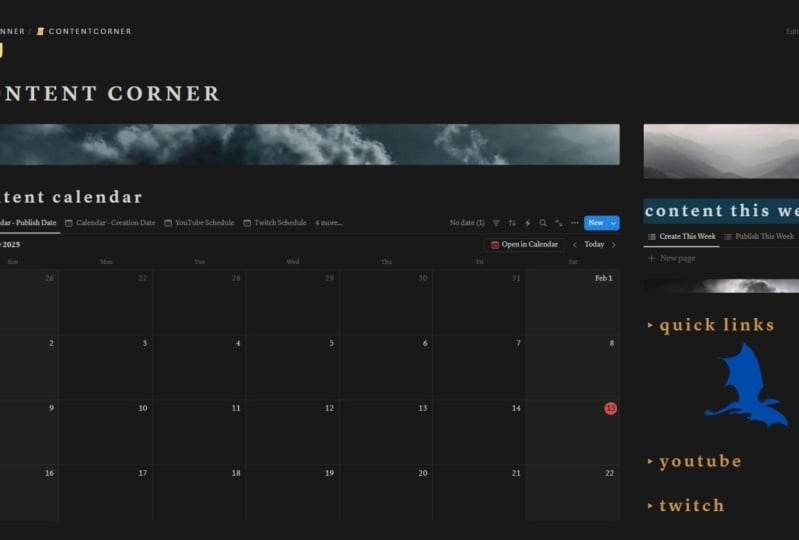
8. Calendar Views: So we're going to have
a different lesson for each of these sections here. The first thing I'm
going to work on is my content calendar. So right now I have
just my calendar. So what this is going to show right now if
I come in here, I'm gonna go to my layout. And this is going to show
calendar by published date. And so the only thing
that's going to appear on here is
the published date. So my titles will appear
on the published date. So real quick, I'm going
to come into no date. I'm just going to drop these
onto my calendar real quick. So now they're all added
in and I'm just going to move them along
to different places. So now these three have dates. This has now set,
they're published eight. And the other thing
we want to do, so I'm going to change this
and I'm going to rename it. And I'm gonna say calendar,
Published, published date. But the other thing you
may want is to be able to see a calendar by
creation dates. We're going to add a new view. We're going to click Calendar. And then instead of
by published date, we're going to say
by creation date. And then I can drop these
back in to my calendar. I'm going to move these
just along so that they're not they're published date and creation date
aren't the same. So now I can rename this
and we're going to say this is calendar ation. So now we have a calendar by published date in the
calendar by creation date. So if we come back to
calendar by published date, I'm going to come
in here and one of the properties I want to
show you is platform. So you can see right now, it's really nice whenever you create your
database this way because you can have one calendar for all your
different platforms. But maybe you just want
to see and look at your YouTube videos and different things separate
from each other. So I'm going to
create a new view. This is also going
to be a calendar, and I'm just going to have
it by published date, and this is going to be
my YouTube schedule. I'm gonna do that so you can
see they still show up here. But when we come to filter, I'm going to filter by platform. And this is only
going to be YouTube. Now, only my YouTube
videos will show up here and I'm going to hide that
database title real quick. Now, this is my YouTube
schedule and I can do the same thing for
my other ones. I'm gonna do my
Instagram schedule, ran a hide that
database title click. Okay. Then I'm just
going to hit my filter. Platform is going
to be my Instagram. So this allows you to be able to just quickly
with a glance, go over to the platform
you're thinking about at that moment and look at your schedule for
that platform alone. But then also be able to
just come over and look at what is your publishing
schedule for the future. So in the next lesson,
we're going to walk through how to create a specific list so
that you can see your videos that you need to be working on or publishing this.
9. Content This Week List: So now we want to work on
our content this week. And so what we're gonna do
here is we're going to add in another view of this calendar
but in a different spot. So I'm going to type
the forward slash combat down to my databases
and click List View. I'm going to connect it to
the content calendar planner. And I'm gonna say
new empty view. And this view is just going
to be content this week. And I do want it to be a list, but I don't need to
see the title and I'm going to click Okay,
and come out here. Right now this is just
showing everything, right? It doesn't know that
I only want things that are going to be
happening this week. So what we're gonna do
is we're gonna come up here and we're going
to click Filter. And we want to filter either our creation date is this week or are published
date is this week. You could eventually develop this out into two
different lists, creation and publishing, but
we're gonna do it for both. So what we have
is in our filter, we have creation date is and we can select a specific date here. Or we can change our is. So we can say is before, is after on or before
on or after within, empty or not empty. We're going to say within. And then if we come over here, this gives us different
options for what we can do. So we can say this week
and now it's going to automatically come from
Sunday to Saturday. And whenever you
start the next week, it'll automatically
dynamically change. That allows us to do that. Well, we also want
is for anything that's getting published
to also be in here. Maybe you create a couple of weeks out from
actually publishing. So you want to know both
what do you need to create this week and what is
getting published this week. So we can have in a filter for our published date
and we're gonna do the exact same thing we
did before is within. And then we're going
to click over here and say this week. Now you can see that
we only have one. We have tidal tube, but if we come over
to our creation date, we should still see
title to an Title three. So there's a slight
issue with this. I'm just going to
expand this out for a second so we can see. So what I'm gonna do is come in here and say Add
to advance filter. And then I'm gonna come in here and say Add
to advance filter. And so what this did is it now included these in
an advanced filter. And you can see it says
Where this and this. And that is why it's
only showing one. It's basically a
Venn diagram and it's only showing whatever
is in the middle. And we want this to say, or if it matches at least one of these
filters, it will show up. Once we do that, we
see we get title to an tidal three
that show up here. And if we throw, because this is the same, if we throw, this is here. It's now going to show up here. And then if we put
it back down here, it's going to show up later. That is overall how you
create out this section. I'm going to move it back over. Now what I wanna
do is also include the properties to be the
platform that it's going on. And I'm going to include
the creation date in there. So you can see that this
is going on Instagram and its creation date is January 19. And this one has a
lot more so you may not be able to see it all. So I might just include the platform or nothing at all if you just want to
be able to see it like that, but you can always alter your
properties just like this. So in this lesson, we covered how to
create basically a list that will show you the
content that is either going live or you
need to create. This week. In the next lesson, we're actually going to
jump down here and show you how to create
specific list for your different content based off the platform it is
going on down here.
10. Platform Lists: Now we're going to create specific list based
off of the platform. So I'm going to drop down my youtube and I'm
going to click in here. And what I'm going to do again
is add in a database view. And this is also going
to be a list view. And we're going to connect it to that same database
content planner Course. And then I'm going to
have a new empty view. It's going to be a list view. I don't need to show it. And I'm going to say the videos, list and click Done. So now what we
wanna do is filter by platform only
including YouTube videos. Now, this is going to get
really, really long, right? If you have all of
your YouTube videos, this is never self clearing. It's going to start
getting really long. So what I want to do real
quick is I'm actually going to come in here to my properties
and add a new property. And this is going
to be published. I'm just gonna put it
published as a question mark. I'm going to click to Add. And then the type I'm
going to make is actually a checkmark checkbox right here. Now whenever you publish it, you can hit your checkbox
and it's going to be okay, that is actually
published complete, which means you
don't really need it in these lists anymore. So what we're gonna do is
create another filter. And because I do want
this to be an end, it needs to be on YouTube and it needs to
be not published. It's fine to just
add it in here, unlike previously where we had to manipulate that further. So what I'm going to do
is have this published. And I'm going to say
published is unchecked. If it's unchecked, it
stays on here and you can see that removed
title to off. So if I come into Title, Title three, there are
moved Title three off. So if I come into
here and uncheck it, it's now going to
show up on here. This just gives
me an easy way to be able to see what's
coming up next. So I don't always have to
scroll through here or go to the YouTube schedule and then scroll to be
able to see it. So we're just going to get a little bit more
practice and do the exact same thing
for all of these. We're going to
scroll down, add in a list view created
off the same one, new empty view list. We're not going to show it and then we're just going to say it, Instagram content list. Then we're going to
add in our filters of platform is Instagram. And the other filter I'm not
going to do published it. That would be another
way to do it. Instead of having a checkmark, you could always do the
published date has passed. I'm not gonna do that just
because you may like, I might forget to move it and it's not
actually published. So I'm going to click
published is unchecked. And so that one is
all ready to go. I can hide that one and
I'm just gonna make one more for Twitter. So come in, ListView. Same one, new empty. We're going to call it tweet. Just not going to
show the database. And then that's done. And then we're just going
to add our platform. Twitter. And the other filter
is published, is unchecked. So right now we don't have
anything that meets those. The other thing I
want to show you real quick is to actually
sort these so that the ones at the top are something specific versus
the ones at the bottom. We're going to do is come
in here and click Sort. And I'm going to sort
this by published date. And we're going
to do us endings. So this should be the soonest
is earlier in the list. And we'll come and do the
same thing here as well. So sort by published
date ascending. And so you can see this is
Title two is before Title II. So you're going to see
them in order here, and I'm just going to
add it to this one to publish date. There we go. We've now filled
out these sections. The last thing we
wanna do is they come down here to
content boards, and then we're going
to come back up to the Quick Links, specifically.
11. Content Boards: Now we're going to come in
and add in some boards. So I'm just going to
click a forward slash and we're going to come into
down to our databases. We're going to add
in a board view. This is kind of an
iterative process, but we're going to add
in that same database and then we're gonna
say new empty view. This is already grouping
by content bucket, so that can be the first one
we have by content bucket. So that is fine. And then I like
whenever I'm in here, I always like to hide
those database titles. So I'm going to hide that. And then we can also
have a new view. And I delete our table view. We're going to add in
a new board views. So we're going to keep that. We're going to do
a new empty view. We're gonna do a board view. And in this one, I'm going to group BY, we've already done
content bucket. So we're going to
group by media. So if we kinda decide what
we want going on there, I'm going to hide no media. We're gonna go back. I'm gonna go to Layout and
hide that database title. And in here I'm actually
going to add in my properties and add
in my content buckets. So now we can see these here. So let's change this title out real quick so we can know
what we're working with. So this is by medium. So what's nice about this is
that if we wanted to change this specific content
from an image to a text instead of going into
it and doing that change, all we need to do is drag it. And that's going to
automatically update this. Or we can drag it back to image. You can add in new ones here. Or you can even say, oh, I want something to
specifically to be an image. I'm just going to add it
under that specific thing. I'm going to delete this. So whenever you're adding under, you're automatically giving it the properties of that column. So here's a couple ones and so the third one I'm going
to do is by status. And so we're gonna do
this same one here. Empty view. We're gonna say by status, this is gonna be a board view. And right now we have no
way to dictate status. So what I need to do first
is add in a property. I'm going to add in
a property here and there's actually I'm going to call it status, new
property status. So there's actually a
property called status. We have not started and
that's gonna be our default. Everything is going to
become not started. So instead of in progress, I'm gonna delete
that as an option. And my in-progress
options are going to be outlined, created. That also could
mean like filmed, edited, approved,
and then scheduled. And then I'm going
to outline these. I'm just going to re-edit these to be a little bit
more in order. So Scheduled would
come at the end. There we go. Then my done, I'm gonna say
is actually called published. There we go. So now I have this
property in here. That's good to go. So now what I'm going
to do is come back here and I'm actually
going to come in here, go to layout and go groupby. Instead of content buckets, this is now going to be status. We can move our content through
these different statuses. So we can say that's outlined, that's created and filmed
and that is edited. So this allows us easy
ways to be able to look at our different content
ideas by bucket, by media, by status. And you can add in
a third one here. By platform. We're connecting there. We're gonna do a new
empty view by platform. This is gonna be a board and
we're going to do the group BY is set of content
bucket is platform. There we go. Now we have all of our different
buckets down here that are our boards down
here that we can look at as we're trying
to analyze our content. So next, we're going to come up and do some quick
links to create some pages that
you can easily be able to organize your content
further come up with ideas, schedule your content,
everything like that.
12. Scheduling Page: So we're gonna come
up under Quick Links. And the first thing
we're gonna do in this lesson is
create a scheduler. So we're going to just say schedule and I'm gonna
make this specific type. So we're gonna say schedule
YouTube videos into a page. And now I can click on
this page and I'm now crew come to a completely
empty page here. So what I'm gonna
do is just type some text so I can
create two columns. I'm going to come all
the way to the left. Where is it? There it is. This one's a little bit closer. We're going to come in here. And I'm gonna come
up here and make this into a full-width page. And now what I want to
do is this is going to be on schedule videos, and this is going to be my
YouTube content calendar. I'm going to make
my calendar bigger and I'm going to set
both of these two. This one, I'm actually going
to make a toggle heading and I'm actually going to say that's my YouTube content calendar. Right below it. I'm going to say my
YouTube creation calendar. So I'm going to have this
again as a toggle one heading. And this, I'm just going to
make a heading one tier. We want a list again. I'm just going to
type in a list view. We want to connect
it to that same one. This is going to
be an empty view. It's going to be a list. I'm not going to show
the title name there. And now we want this to have
two different filters on it. The first filter we want is the platform because this is
only going to be YouTube. And the second filter we
want is the published date. And we want the publishing
date to be empty. So this basically
means that these are the video ideas that we
have an even scheduled. Then over here I'm
going to drop this down and create a calendar view. Click that, click over here. And then I'm just gonna do
my calendar published date. Then you can see all of
your things going on here. So what happens is if I come in here and I say my
published date, I'm just going to clear it. You can see it's now
showing up in this list. It is currently an
unscheduled video. And what this allows me to do
is just to be able to look at all my unscheduled
videos and just drag and drop them
on the calendar for when I want to do it. And I can always pull them over here if I just want
to clear that again so I can clear all my
dates just by pulling them here and then just drag
and drop as I want. So then the other thing
I'm gonna do is just create a calendar view. And I'm gonna do this and I'm going to create that
creation date there. So now we have, if I want this one to
be set on assert it. So let's say I know it's
going live on the 25th here. And let's say I want to
create it two weeks before. So it's getting
created on the 11th. So now I can drag
and drop between these two calendars as well. So that is an easy way to
create scheduling pages. I'm not going to create them
for every single platform, but you get the idea of
what is going on here. And I'm just going to
recreate this onto here. So the next thing I want
to do is show you how to create an easy way to add
in content ideas as well.
13. Content Ideas Page: Now that we have our
scheduler, let's add in. We're just gonna go
ahead and add in a page. And this is going to be
our YouTube content ideas. And what we're gonna
do here is we're going to do a board view. We connected it to
that same database. We're gonna do a new empty view and we're gonna make
it a board view. And this is going to be
just our content ideas. And I'm not gonna
show the database. So we have all of this in here. And now what I want it group
BY is our content bucket. So that's awesome. And I'm gonna go ahead and make this full width just so we
get more width in here. So now what I wanna do
is add a filter in here. So my filter is going to be the platform which is
only going to be YouTube. Now, what this allows
you to do is add in all of your content
buckets up top. And then when you
need to come in and create content ideas,
you just go, okay, what are my different
ideas for Notion, I'm going to add in
organizing content. And that's now a new guy. I can come in and add in how to build a dashboard in Notion. So all of these are just ways to easily be able
to come in here and develop out your ideas just based off your
content buckets. Now if we come back out here, we can go into schedule
YouTube videos and you see that they now
easily appear up here. And if I drop them onto here, and let's say I drop
this into here. So we're just kind of building
out how you would do this. And now you see that that
now shows up on my content for this week and on
this dashboard here. So that now you're
probably starting to see how this is all
coming together. And it's also going to be on my youtube list down
here as the top one. What I need to build
out this week. The next couple of things
we're actually going to walk through is a couple more of the advanced features of notion that just allows
you to go over the top and really be
able to allow this to automatically
organize things for you.
14. Relations and Rollups: So the next thing that's really helpful whenever
you are trying to organize content is being able to link multiple
databases together. So I wanted to show you how
to do this with hashtags. So I'm gonna do is
under my Quick Links, I'm going to click Add and I'm going to add in a new page. This is going to be my hashtags. And what I'm going to create
in here is just a table, and this can just be a table. So basically what just
happened is this converted the page into just a table. I'm going to click
a new database. And my new database is
just called hashtags. So my name is going to be
the name of the hashtag. And then I can have a tag
so I can have this leg, a topic if I wanted to. Or I could even add in a
number so I could have like number of hits
on it for that. So this just allows me to
have just a hashtag database. So I can click in here and
I can say like hashtag, youtube, hashtag
notion, hashtag, content creator,
something like that. Now that I have this, I want to now link it
to my content table. So what I'm gonna do
is I'm going to come. So what I can do is I'm going to add in a new property here. And I'm going to add in what's called a relation down here. So if I click Add in relation, it's going to ask me, what database do you want
this relation between? And I want it between
the content planner. I'm going to click that gun. And it's going to say
related to content planner, you can have a limit, so you can only allow
it to choose one. I'm going to allow
it to choose all. So basically, hashtags can have many post and post can
have multiple hashtags. And then I'm going to show it on the content creator or
the content planner side. So I'm going to just
show it as hashtags, like it said there. You can see it's
basically leaking back-and-forth hashtags
and content planner. So I can add this relation in. And so now what I'm gonna do, I'm gonna change this name here. So I'm gonna say this is just basically content that
is using that hashtag. So now if I come back to my content planner and
let's say I come in here. You can see that hashtags
now show up here. And so instead of having to
rewrite your hashtags every time or have it as
a, like a select. You can now have it in
relation to that database. So I think click empty
and it's going to start populating my
hashtags in here. So I could click YouTube
and it's gonna click, I can see it here and
then I can just add it. And now that hashtag, youtube is now linked to this, how to build a
dashboard of notions. So I probably should have
chosen the notion one for this. So I can add another one in here and add in that
notion one as well. Now these are LinkedIn here. The other thing I
can do is in here, I want to let me go
ahead and hashtag. I'm going to put
in number of hits. I'm going to say
this gets 10,000, this gets 20,000 or 200,000, and this gets 500,000. Now we have some
numbers in there. So what if I wanted
to really easily see what number of hits, the variety I have
on my hashtags. So I'm just going
to come in here. What I can do is I'm
gonna come in here and I'm going to
add in a property. And this property is
going to be a roll. A roll-up is basically going
to take any parameter or any property of a
different database and display it for what's
been connected. In that roll up,
I'm going to say my relation is to hashtags, because that's the only
relation I have here. And then I can choose
the properties. So the property is going
to be the number of hits. And I'm just going to
say Show original, but you can say shall unique
values show original, sum, average, medium
range, all of that. So what I can see is I've
now chosen to hashtags, and I can see that one of
those has the YouTube has 10,000 and the
roll-up has 200,000. Whatever I'm
developing this out, I might add in a bunch of different hashtags and I
can easily see those here. You can use this in
any way that best makes sense for you as well. You can even do a relation
to the same database. So if you want to link
an Instagram photo is promoting a YouTube video, you can actually link
that together as well. But that is how to do
a relation in notion.
15. Formulas: I want to introduce
you to formulas. And specifically
I want to create a formula that allows us
to set a creation date. So we can click on
any one of these. It will affect the
entire database. And what we're going to
do is add a property. And what we're going
to add is a formula. So when we click
that, we can name it. So this is going to, I'm going to recreate
creation date and I'm just going to
set this to auto. And so what we can do is we are in event
edit our formula. And what we wanna do is subtract a certain number of dates from our published date. So to do that, we
would enter date, subtract and then date subtract. If you click here, you
can see that it takes in three different arguments. It takes in the date that
we want to subtract from, the number we're going
to subtract from. And then what are units is, and all of these are lowercase. So we're gonna take
our published date, subtract so many days, let's call it 14 days. So you're going to create two
weeks before you publish. And then you're going
to say days here. Do this. We can just look on this side
and look for the property. We want to we want to use
the property published date. We're going to subtract 14
days from the published date. And then we can click Done. Now what that's
going to do since the published date
is January 19, it's subtracted 14 days. So it is now January 5
would be our creation date. Now because in the same database we have things like Instagram, YouTube, all of these
different things. One thing you might
wanna do is have a certain number of days based
off of the platform then. So you can create
a new property. Let's add a property in here, and we are going to
label this properties days between creating
and publishing. And this property is
going to be a number. Make it a number, cool. So now we have that as a number. And then if we come back into
our creation date, well, we can do is instead
of having 14 in here, we can make this dynamic by choosing this property
that we just created. So now we have it as that. Right now it's
going to be empty. But as soon as we fill
in this property, so if we make that 14, It's automatically going
to update to here. But now you have to manually put it in every
single time, right? So if it's a YouTube
video of demand, manually put in 14, or
if it's something else. So let's take this one step
further and we're actually going to make this
a formula as well. So if I click on this, I'm going to click Edit
property and I'm going to, sorry, the type is going
to now become a formula. And we're going to
edit this formula. So what we're gonna do
is use the if command. And so what this
is going to take in is what's called a boolean. Basically it's just a true or false value and
we're going to actually create this true
or false with other logic. So it's going to take in
a Boolean and then you give the value if it is true, then the value if it is false. So will you have to
start out first, is what operator you want. So we want equal. We're going to do equal. And then we're going
to come back and click platform and then comma and
what we wanted equal to. And so let's say we
want it equal to YouTube and then close this. So this is our first argument is whether the platform
is equal to YouTube. So if it is equal to YouTube, this would say true. So we want to give it
the value if it's true. So maybe you film your
YouTube videos 14 days out, and then you can do the
value if it is false. Well, we have multiple
platforms here. So instead of just putting two days or something like that, we're actually going to
redo another if statement. So we're gonna do if
and then equal again. And then we're going to
take that same platform and say if the platform
is equal to TikTok, remember to keep any like
strings like this at, in your quotations there, then we're going to
close that parenthesis. So this is saying if the
platform equals TikTok, we're gonna say that
that gets a five here. And then if it does it, so all your other
ones, Instagram, facebook, Twitter gets up. Let's just say that so
that we don't have to go through as many
iterations of this. Way you can see is that it's
not letting me press Done. If you get this, that means something's
wrong with your formula. And it's telling you
it's at character 81. So it's telling me I
have a parentheses. So basically I have
missed a parenthesis. So I have my equal,
that is good. I have my five and my two
and my parentheses here, which is the closing
of this if statement. So I don't have
one for this one. So all I need to do is add another parentheses
and click Done. So now this is YouTube. It's setting this to
14 and January 5th. Now if I change this to TikTok, even see that creation
date auto changed. So now I only have two days to create before it goes published. And so that auto date creation is automatically changing
to only two days. Now before that,
There's a lot of different really cool ways
that you can use formulas. I just wanted to show
you a few here to get you excited about the
different possibilities. So there is a building out the functionality of how
we would organize things. I finally want to
show you how to build out the
aesthetics and here, because as you can see, this is not the
aesthetic notion board. So that's going to be
in the next lesson.
16. Aesthetics: Finally, we're
going to make this look more aesthetically
pleasing. So we can come up here
and the first thing we can do is add
in a cover photo. And it's just going to put in
a random cover photo here. And we can change this. So you can choose
from the gallery. You can upload your own photo. I'm just gonna go to
Unsplash and I'll do like content creation. And let's just click a photo. There we go. So now we have what looks like is some transmitter receivers. You can reposition it. So I can drag it to
be more down with the lens and the mic there
and just click safe position. So now we have this and then the other thing we can
do is add an icon. And so you can see over here you have all of your icons here. And this is one thing you can do to make it more
aesthetically pleasing. For this, let's add in an icon and you can also create custom icon so you
can upload a file. Let's see, do they have
a YouTube icon note? So let's create a video icon. Let's just do that and then
you can choose the color. I like going kind
of a gray there. So that's one of the
ways this is starting to become a little bit more
aesthetically pleasing. The other thing we can do, we can actually give any of
these things actual color. So you can come to
texts color and you can choose a gray background or a different
colored background. Or if you click here, you can see here this background is only
covering the words. If you want it to fill
the whole length. You can come over
here and click Color. And then if you click
gray background, it's filling in this whole
width of the column here. So let's do this
for all of these, pick some different colors here. Youtube will be read. Instagram be maybe brown, and then let's make Twitter. Blue will make our Quick
Links like purple. Alright, so now we
have it like this, and then we can change our
icons for these as well. So this one, I'm gonna
make this a calendar. Stick with the gray theme here. Let's make this like a
light bulb for ideas. And we have a hash. Yes, there we go. You can also do things here like underlining
this and Bolding it. Since it's already a heading, It's already going to be bold. Or you can even
change the color. So we can change
this to a gray color just to kind of give it
some visual interest here. So overall, that's a few
things that you can do to be able to just make it
more aesthetically pleasing. And so now you have
a base template here where you can
start adding in an organizing all of
your different ideas for your content when you're
going to publish them. And even have some
automated fields for the different content
you want to create.
 Alana Rister, Content Creator and Data Scientist