Transcripts
1. Introduction: Hi, everyone, and welcome
to One Paper Wonders, painting and folding
a unique art book. In this class, we'll take a single piece of watercolor paper and transform it into a custom
sketchbook or art book. I'm Denise Love, an artist
and creative educator, and I'm excited to
bring you this fun and creative dive into
handmade art journals. You'll learn how to layer
watercolor and mixed media, add mark making for texture, and use simple
folding and cutting techniques to create a
functional and artistic book. This is a great way to
explore your creativity while making something truly
unique. So let's get started. William
2. Class Project: Your class project,
you will create a unique sketchbook or art book using a single piece
of watercolor paper. Start by painting
your large sheet with any supplies you feel
inspired to use. Once your paper is complete, use one of the folding
and cutting methods demonstrated in the class to turn it into a
functional book. Share the photos of
your painted paper in the final book to showcase your process and
finish project with the class.
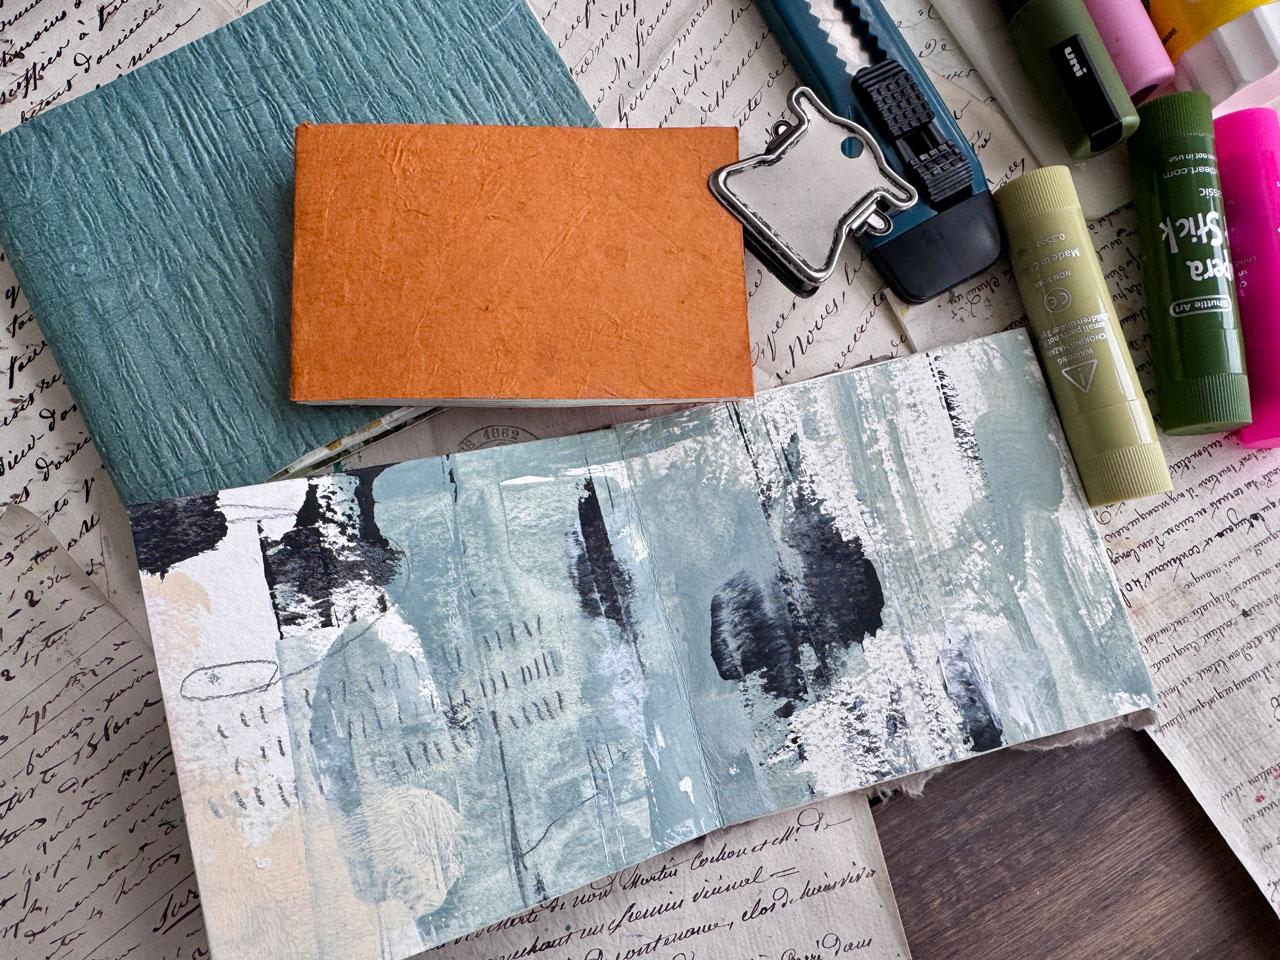
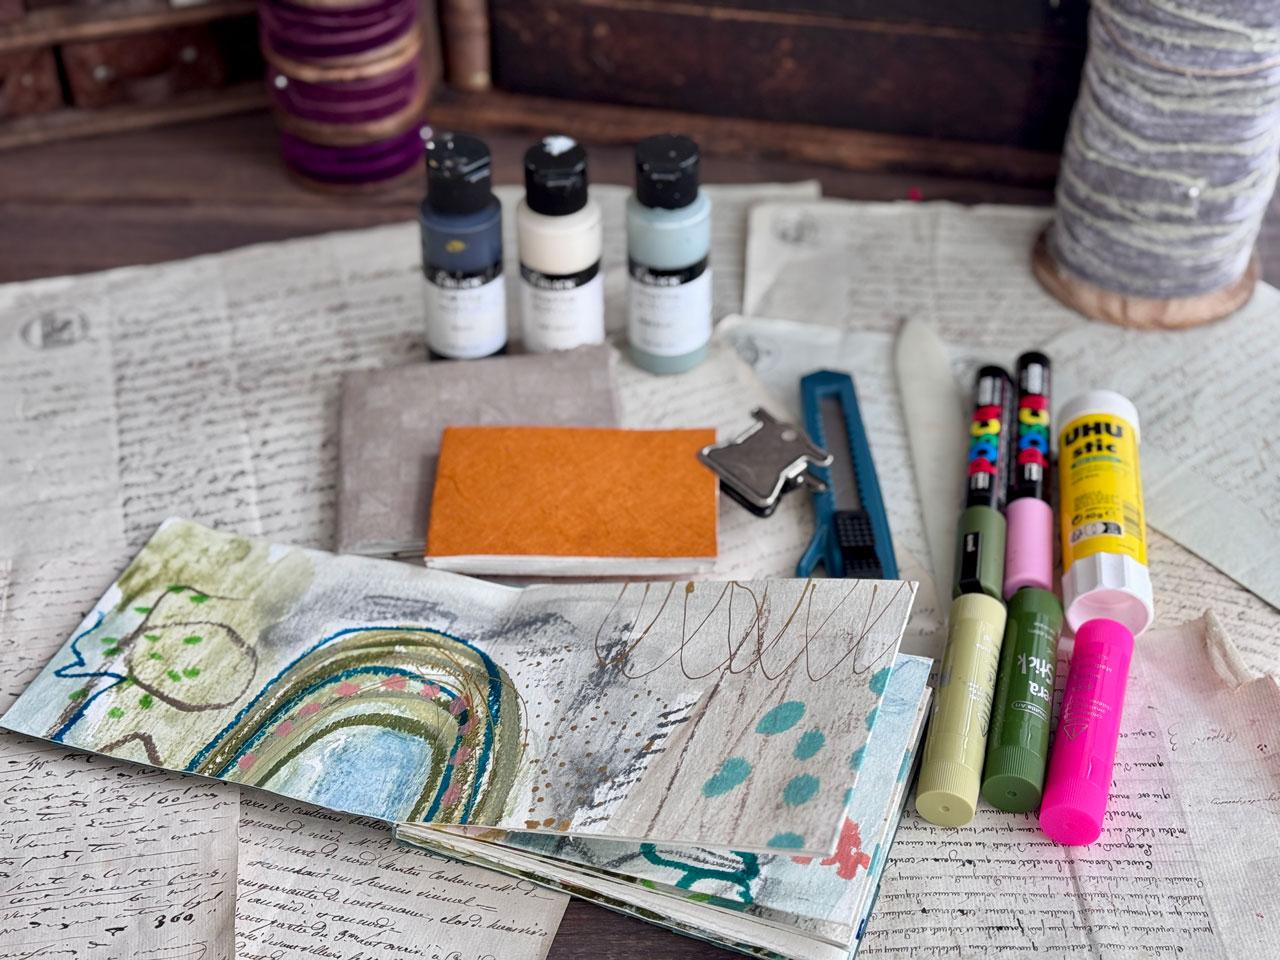
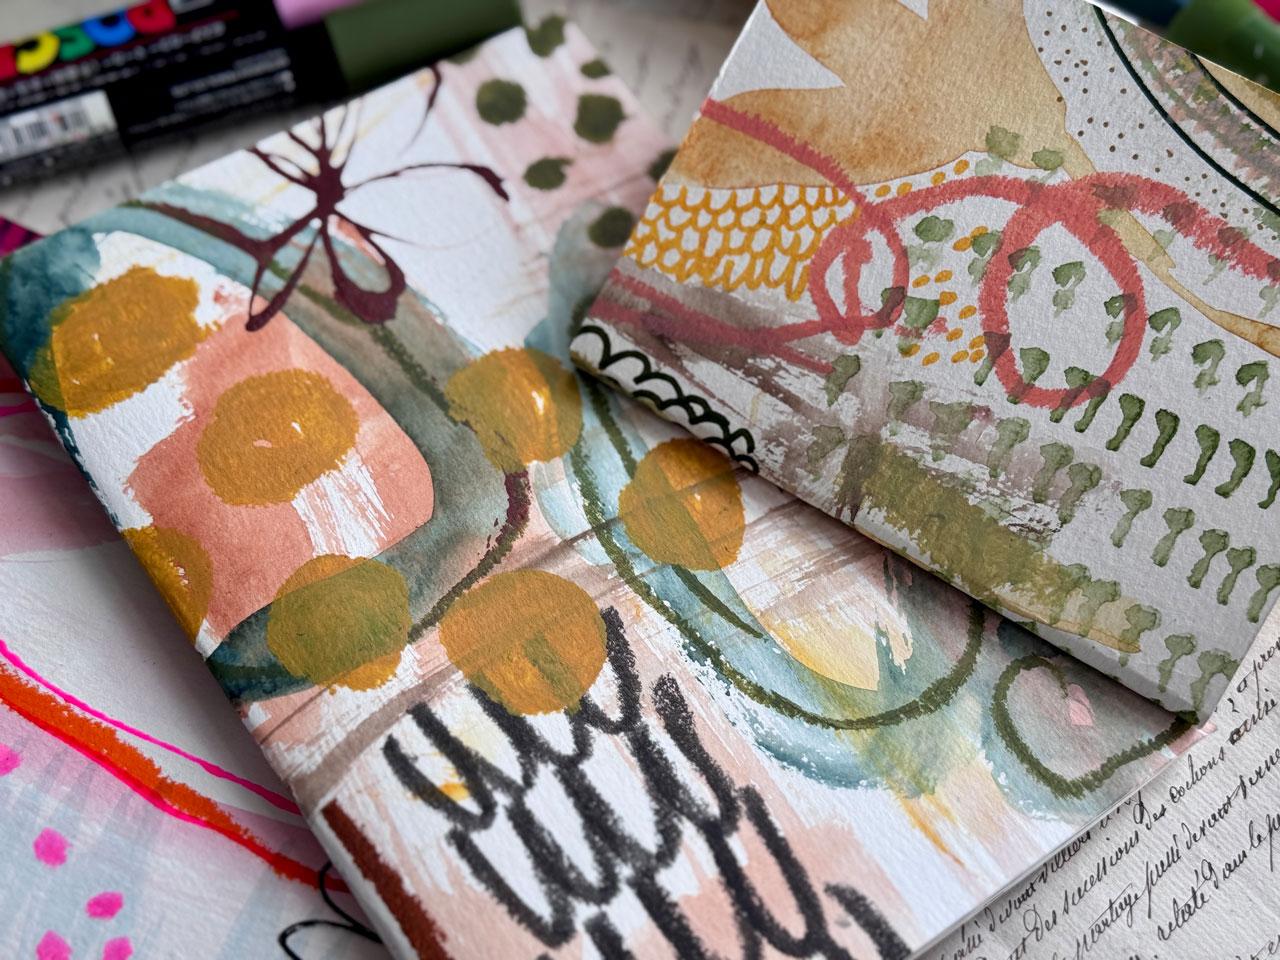
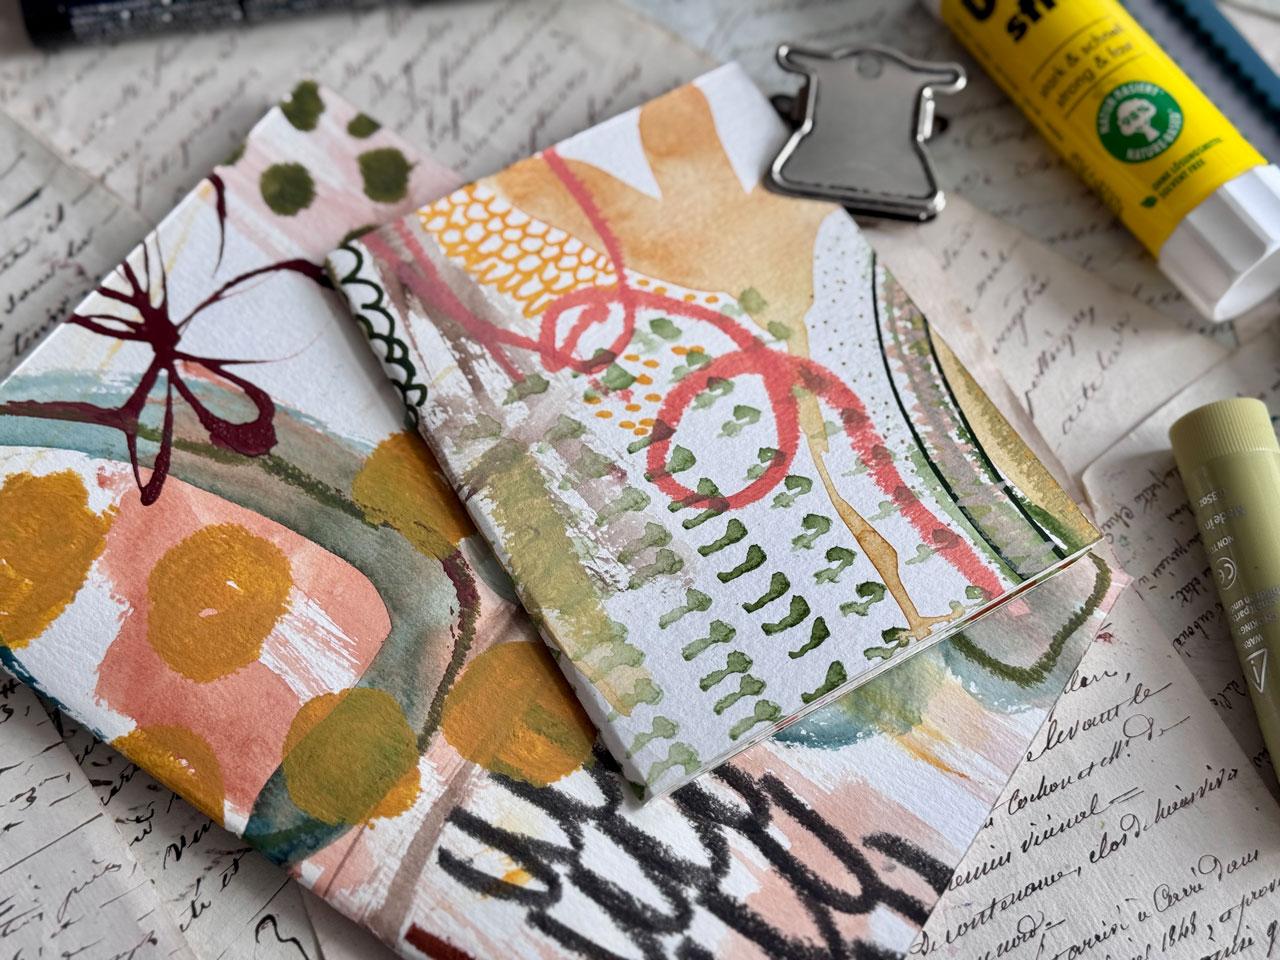
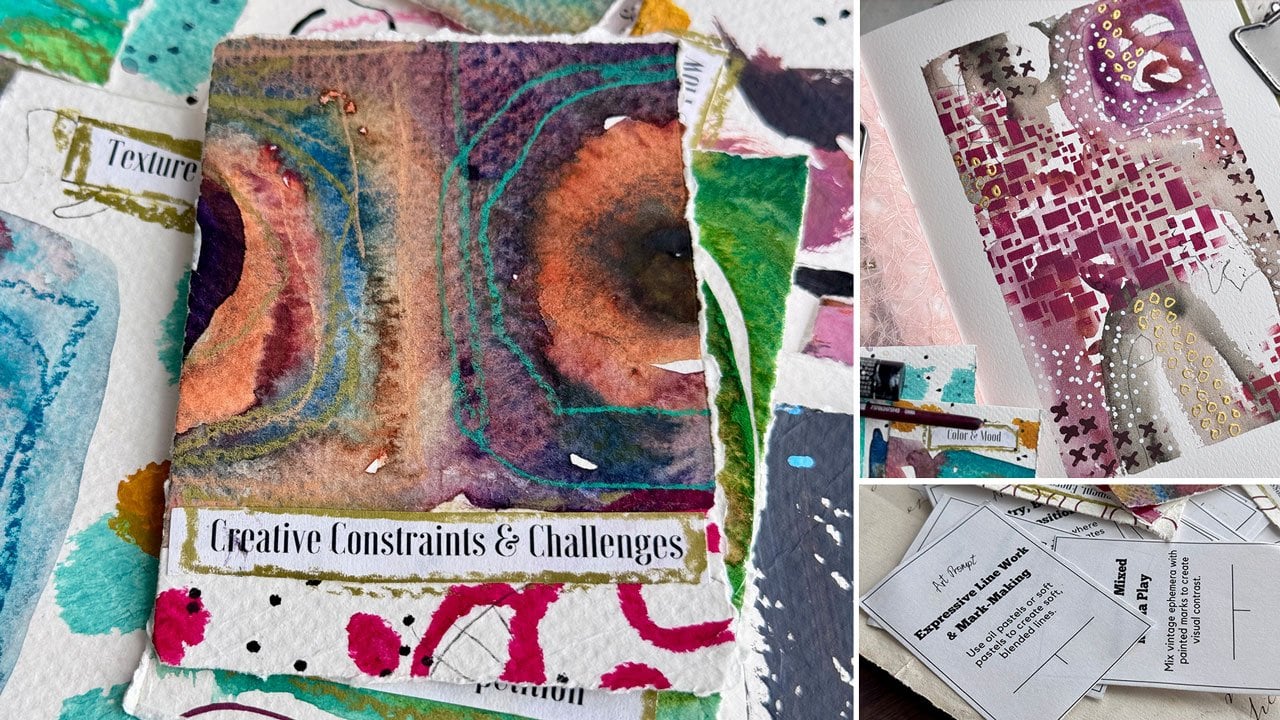
3. Supplies: Let's take a look at our
supplies in this video. You've got some very basic
supplies that you need, and then any art materials
that you own are up for grabs. I like having a ruler,
good sized ruler, so I can use this to cut straight edges and
my utility knife. I've got a ruler and
a utility knife. You'll need a pair of
scissors, possibly. I like having a bowl and folder. If you don't have a bone folder, you could use the
back of a spoon so go get a big spoon and
you can use a spoon to basically hit your corners and your edges of your
paper to fold them, and then I'm using a glue stick. You're welcome to use whatever
glue you have on hand. I just think this is fast
and easy and convenient. I've got the oh glue stick, and I'm using a large
piece of watercolor paper, and depending on what
size book you make, you can get these
any size you want. I've done several with the really big size
watercolor paper, 18 by 24. But because the paper is too big to really show you
what I'm folding in class, I'm going to work
on the one size smaller for a few in class. This is the 12 by 18, I'm just working on the
Canson watercolor paper because those are some pads
of big paper that I have. If you've got a
favorite paper that you like to work on
and you're willing to create some of these on your favorite paper,
then go for that. You just need something big. And we'll take a look at how to fold two different
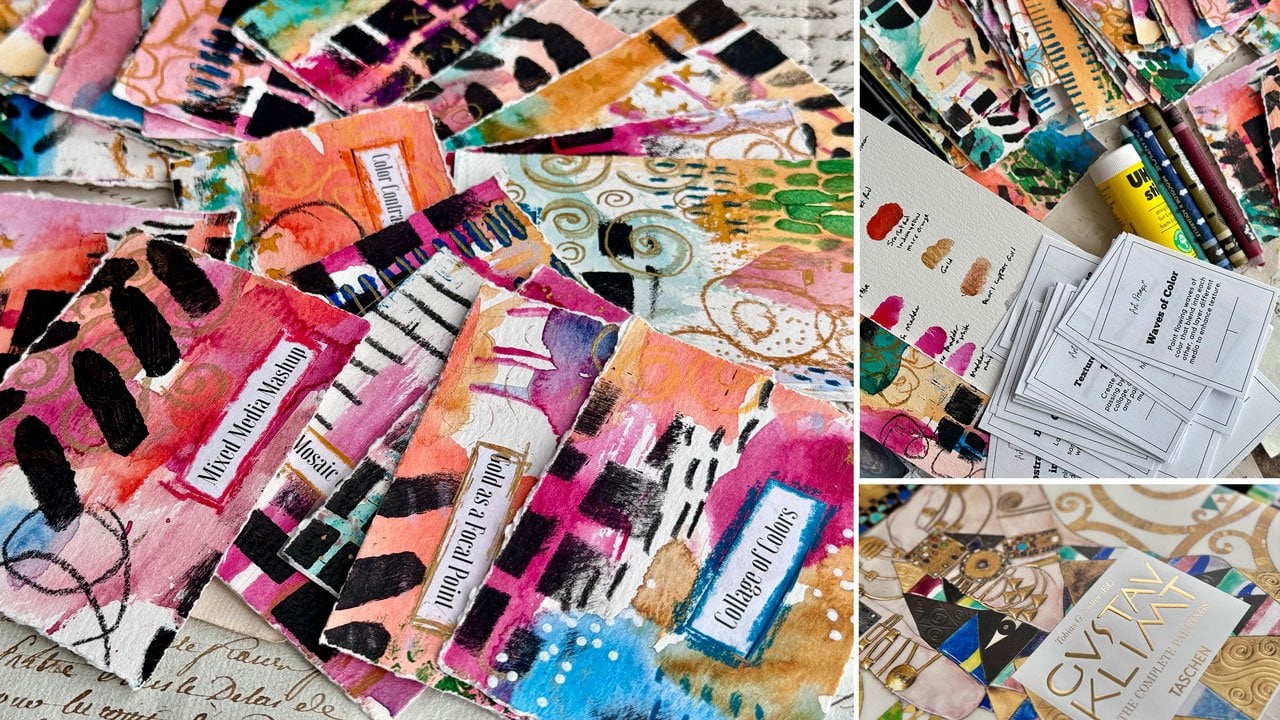
types of books. So I'm going to create more
than one painted sheet. So I want you to
experiment and play, take as long as you want
on each piece of paper, go as fast as you want. Slow as you want.
We're going to end up. This is the big
piece I've prepared to fold another book because I was playing in
different color palettes. So this is an excellent way
to play with color palettes, and this is the great big sheet. You see how it does all
the way, fit on there. But basically, you're going
to paint and play and smear things and mark
make until you're like, oh, I think I'm ready
to fold a book. That's the goal. It
doesn't have to be beautiful because
when we get our book folded and the reason
why I like to make these is because we end up with
some very interesting, cool compositions and things that we wouldn't have created. Once we've got our book made, then we can go back in and do any additional mark making or collaging or
anything like that. But you end up with
some really cool, interesting,
surprising bits that you just never expected. So this is going to
be fun. I cannot wait to start painting with you and just give you
that little look at these. The second one I've
put a cover on. That cover could be a
piece of handmade paper. It could be a piece
of art that you painted just to loop around it. We're going to make at
least two books in class, this one, and this one. So I want you to paint
a bunch of paper. I want you just to
have fun and play with color palettes and marks and just see what
you can create. You're looking to create
a great big just mess. Basically, it's not anything
to get stressed about, and then once you've got
it painted and dried, we'll be ready to fold,
let's go on to the painting.
4. Painting First Layer On Your Paper: This video, let's start
painting our sheets of paper and I start off with a layer of whatever paint
I want to begin with. In my case, it's going
to be watercolor paper. You're welcome to
paint your layers with any supplies
you have on hand, whether that be a watercolor
or an acrylic paint, I might do one with
acrylic paint just to do something different. But the first one
I'm going to do is going to be with watercolor. I've picked out the Kurataki
paints because I love them. I've got the art nouveau
and the 48 piece set, and I pulled these colors
out of both of these. I've just picked some random
colors, which I know, right? I love picking a color palette, but let's just pick
some random colors. Then you might see why
I pick a color palette. Four oh two Mrs yellow,
54 olive green, 44 yellow ochre, 17 coral pink, and 47 raw umber. They were earthy. I
thought, that might be fun. I'm going to paint
the whole thing. I'm wanting things that will dry fairly quickly so
that I have to set these to the side while
they're drying later and use different brushes,
make different marks. Let me move my cutting
pad out of the way here. The goal is to fill the page in whatever way you
are inspired to do. It doesn't have to be
anything specific. It can be different shapes, which I'm filling shapes. For some reason, I'm loving the little rainbow
shape recently, so I might put some
rainbows on mine. It's your time to experiment with your brushes and see
if you can get them to make fun marks and different things depending on how wet or dry the brush is. If you like botanical work, throw some flowers in there. Um so I could actually do that now
that I've said that just to play it up and be a little different than anything
that I've done recently. Because once you fold these up, you're not going to really end up with anything identifiable, it's okay if you're
like, what was that? We'll pretend those
are the yellow flower Jonquils day lilies. Going to go ahead and just play. That's the goal,
play and create. Your goal is to cover the entire page edge edge
because we're folding this. We're not throwing out any of the pieces that
we're doing here. We'll be using all of
these pieces in our book. I've done some where I've
just painted everything, but I'm feeling like,
let's just do something a little different
on this. This one. Once you do one or two of these, then you start getting brave
and you start thinking, what else could I create
and see where you can go. The goal here is
to work fast and not get hung up on
what you've put down and then we'll mark
make in addition to this. And you can use
any of your tools that you've got on
hand that you're like, try this or I want to try that. Use them. See what they
do. See if you can smudge some things around
and get some marks going. See, I might do another one
just using watercolor in my bowl scraper to just make it kind of crazy
and move stuff around. Once you get to the point
where you're like, I think I got
enough paint there. Let that dry, whatever
layer that is. Then I'm going to use some stuff on this one
that dries super fast. I'm going to use
temper paints because they dry super fast and I can keep on layering
on top of this. The first layer is all paint, and I'll see you back
here for the next layer.
5. Mark Making on First Painted Sheet: Miss Lear, let's do some
mark making and some play. It doesn't matter if yours looks just terrible
because at this point, it's going to look funky. I might pull some paint pens and I'm going to definitely
pull some temper sticks. Now it's time to start
mark making and playing. Whatever your heart
desires here. I got a tiny bit of wet paint, but I'm going to
go for it anyway. But now I'm going to start just making some favorite
marks or experimenting, making some pattern, playing. This can be in an art style
that you always create. It can be something crazy and fun and playful like
I've chosen to do. But don't get stuck in here. It's a time to experiment with all of your paint supplies, which is why I like
doing stuff like this. It's low commitment,
it's low pressure. You know, 'cause this is not something that, you know,
it's something for you. It's a fun personal thing to do. But then when you have all
these books to flip through, Oh, I can't tell you
how happy they make me. Let's draw some lines here in our little rainbows I like them. I like them when they go bigger. I should make a bigger one. Oh, that might be the next one. So let's just keep
on playing here. For some reason, I like
this pretty don color here in these temper sticks. What I really love
love about them is they basically dry
almost immediately, and then you can keep
layering on top of them. And they're big and chunky, so you can make big
areas of color. I mean, these are so fun
that I can see myself just sinking into these for a while
and making a ton of them. I get so obsessed with the fun books that when I find
one that I just love love, I make 20 of them. This is so much fun
just to sit and play and randomly layer and play with color and mark
making and not really being super attached to
what you're creating. So if you have a hard
time letting go, these would probably be a good practice
play thing for you because you're not
so invested in the outcome of creating a masterpiece or some amazing piece of
art that you're like, Oh, no, I messed it
up or what have you. These are more like
craziness is the point. Let's just play and see what crazy thing we
can come up with. It's part of what makes this so fun and it frees you up from that perfectionism and
getting stuck in what you created and being upset when something did not work out the
way you thought it should. This is a good project for that, getting unstuck and just saying, Okay, let's just play
and see what I get because you're not making
a masterpiece with these. Maybe you are, but I'm not. I'm not working
on a masterpiece. I'm playing. I'm having fun. I'm just trying to see
where can we end up? It's free knowing that this is not the
finished piece of art. The book that we make is
the finished piece of art. You just don't have
to get hung up on whether this is the ugly stage because it's going to
be the ugly stage. And take some joy in that. I love it. I love
it. I'm loving this. Time to play with
some color pallets, your supplies, get out something easy that's not going to smear like a temper stick. Paint pins. 'Cause you're gonna be touching and
folding and creasing and so anything
that's going to smear might not be the best choice. So I don't have out
the oil pastels today. Oh, see, now, the more you
add, the funner these get. Now I just kind
of these actually make me very happy
when I look at them. They're crazy, and they're fun. What else do I want to add? Let's see. I got some fun
paint pins over here. And I could you could
stop at some point, too and say, I don't
know what else it needs, and you could make your book. And then finish each page with
mark making that you think certain pages need it doesn't have to be the whole thing have to be finished
at this point. At this point, we're painting
and covering most of it, but we can add final touches
and marks after we've got the book put together and you can evaluate each page and say, what does this page need or
what does that page need? I'm so thrilled usually with
the book after I put it together that a lot of times I don't continue
adding to it, but it's your own
personal preference and whatever goal you
have for the book. Something like this
would be a cool addition to a collection that
you've got in a gallery, for instance, and you
could have had this in the same color palette as your
collection that you made. Then these could
have been some fun, crazy wild sketch things that go with art books that go
with that collection. Can you imagine
that? That would be super fun. I like that. Good choice. Oh, no,
I don't think blue. These are the little
Artyx markers that I'm kind of grabbing for because I got so many colors and I
like them. So let's see. Is there anything else
that is calling my name? Maybe the funky orange 'cause it kind of matches that little flower that we've got there. Hey. Oh, let's get some gold in here. Thing about the gold is
this takes a while to dry, so that might be that pin
might not be the best choice. Maybe y'all 'cause
the fine line stuff, depending on how thick
I put that gold, well, I kind of want some like some little de Lllies in here though. Wow. And then maybe I'll
do some gold dots with you do it
with your dip pen. I'm going to use this zig marker that I haven't pulled
out in a while and add some more gold. I tend to like these
when they're crazy, but I'm going to paint another
one with acrylic paint, I think that's going to be
more abstract and not I mean, this is abstract,
but it's going to be don't put your
fingers on the gold. But I mean, more
minimalist abstract. Let's do that. Let's
call this one good for now and I'm going to paint one that's more with acrylic paint and just see some
differences there. I'll see you in the next video.
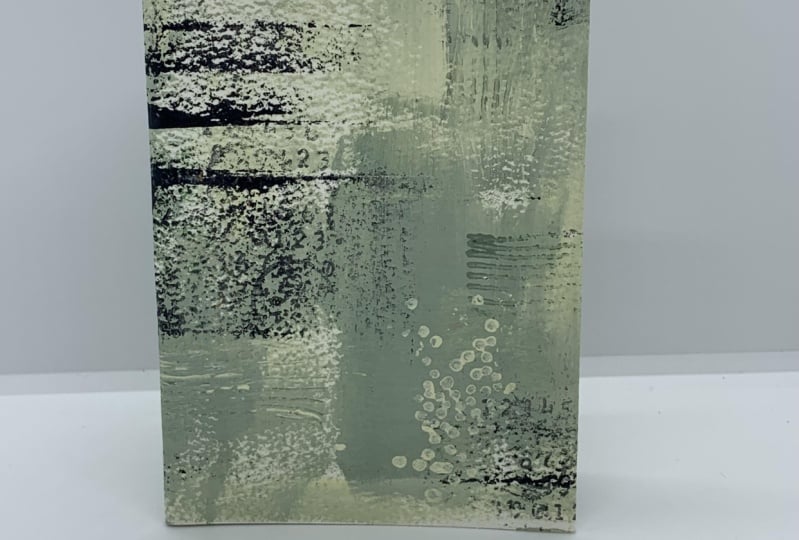
6. Painting Second Sheet Of Paper: Okay, we're gonna set
this to the side to dry while we paint
another background, and I just want to paint it
with some different materials than I've been
using because I had another idea in my mind for the way I want one of
these books to maybe look. So I've got black. I've got
off white in the Mattacrylic, I like these because they
dry matte and the sage blue. So wanting that color
palette neutrally. I'm going to take my mat. This is the Matt Blackwing. I'm going to go ahead and go back old school with some mark making
and stuff that I experimented with
quite a while back and do some more of it. This is a little
more in my mind, we may get somewhere different, which is what usually happens
with what I'm creating. But in my mind, I'm looking for a little more
minimalist maybe. I'm going to say that
with a grain of salt. Who knows where we're
actually going to end up. But we'll just get some
fun mark making in here. All right. Then I'm thinking, I've got my cheap paint
brush here and I'm going to smush color around and then
maybe a lot of times too, I mix my color with esos and allow me to
layer stuff on top. But because we're using this
matte paint or at least I am I I have not put gesso
in these, but I could. I normally do. It makes
it spread easier. Well, maybe I will go
ahead with a little bit. I like the weight gesso. I've got clear gesso
up there also. But I just like the way
it makes everything spread and move around. And if you're using
regular acrylic paint, it'll allow you to
layer stuff on top. I don't generally have too
much trouble layering stuff with the matte paint, but you definitely will
with other paints. And then I also like the
look that the white adds into the blue and the
different I don't know, I just like it
better than water. I'm just going to move these
around with my spreader. I'm already. Maybe I just
should go with the blue. I'm already excited
where this is going. And I put a brr over here, so I thought it might
be fun to try to brayer some stuff and just see, how would that look
compared to a paint brush? So get out all your little
tools that you're like, What does this do or
what does that do? Use this moment to
experiment with those. I do want to go to the edge of the paper on these the whole
page is part of the book. So don't go to the edge and
stop short on everything, or look weird. A. Don't worry about the backside. The backside. Not really gonna be seeing that
the way I make these. Alright. Then I've
got a little bit of black. Do I want the black? Maybe I'll pick
the black up with my spreader and work it in that way instead
of brushing it on. What. Look at that. Good choice. 'Cause I don't
want it to be all black, but I do want the
contrast in there. You see you can still see the
marks that I put down too. So you're going to see some of those sometimes
and sometimes you won't and just don't even
worry if you do or you don't. It's a good way to
start the page and not get stuck on white page
paralysis, basically. That's fun. You got to make sure every page
has something on it. Don't get like, Oh, this
is done on the big sheet and forget that we're folding
this into little pages. So all the stuff that we leave
kind of in here, not done. It's going to be not done
on maybe a whole page. That might be a whole page. So don't forget. That we need to cover the
majority of this. Like, it looks done now if we kept it as a
whole big piece, which that's pretty cool too. If you're painting and
you're like, Whoa, like the piece I created big, you don't have to make
a book out of it. Go paint another piece
of paper and save that. You might end up with
some really happy, cool surprises if you
just let your mind free from the stress and worry of creating
something amazing. Then I usually create something
amazing and I'm like, Oh, my goodness, I made that. That's where I find the joy in the process. This is so cool. I want a little bit of
black on every page, so I'm going to spread
that out just a little bit just to see in the end
what I ended up with, but I do want there to be a even spread of that so that we get a little of
that on each of the pages. Then when we fold the book, we can then go, what else does it need?
What did I forget? Where did it not have anything? Because you'll be surprised at how cool some of these
compositions are. Good choice, good
choice, good choice. I think for this one, I said minimalist,
so I'm going to resist adding a whole
bunch more stuff to it. I'm going to let this
one dry and then we'll be ready to
fold up some books. I want you to paint
a plethora of these. Paint several. Paint
enough that you've made three or four books when we're done that look really cool because I can't
wait to see them. I'm going to let this dry and then we'll be ready to fold.
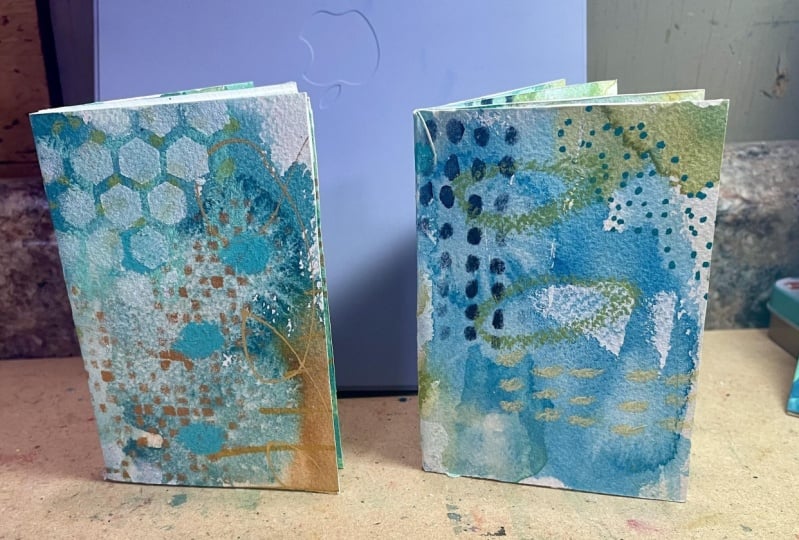
7. Simple Folded Slit Book: Alright, so we are
going to create the second type of book now
with one piece of paper. And we don't need
to cover anything because itself covers itself. And I love these, and I have the other
big one that I already had painted that I showed you
at the beginning of class, I'm going to fold this
one and that one, and we'll have two
books here finished. And basically, what we need
to do is we need to start off folding our art
this way in half. Well, let's fold it
this way in half first. We got one fold going this way. And then we'll have three
folds on the other side. So fold the long side first. That's the only
fold that we need here on this side of the paper, and I'm just trying to be real careful and line
those up real good. And if you've got anything
on here that would smear, then you might grab, you know, a piece of wax paper or something like that
because you need to go ahead and flatten
that real good with your hand or with a spoon
or with the bone folder. We're going to
really get that in. And this will protect
the art itself from you smearing stuff all over it accidentally from
whatever you're doing. So now we've got one fold. Now we're going to fold this
direction right in half, again, just like we just did. Again, prot that piece of art
with a piece of wax paper. I just got a whole big box of this wax paper that I use in
my art room all the time. So I've got plenty of
these little sheets handy. There we go. Now
we've got this one, and in the end, we're
going to be making a dou. So on this one, we're
going to fold it up so that we're right in half. And then I'm on the back side, so it doesn't really
matter about the backside. So I'm going to
fold both of these up until I'm right there in the center
and hopefully I get them nice and even. This is the harder side to fold. Then when you're all done, you've basically folded
yourself like a D. Then what we're going to do, you're folding all of
that on the top side. And we're gonna cut
this right here. That one line that we did
right down the middle of that. We're going to cut that
right in half on that line. And I'm doing it with
a pair of scissors. Just do the best job
that you can we can straighten this up in the end
after we get it together. So cut that right there
till that first fold. Then we are ready to do this. Oh. Look how magic that was, and this is going
to be our book. Look. Flow on the front of my book. Okay,
that was perfect. Then we can see each of
the pages as we flip. And then this would be the
back side of the book. So you can decide which of those are going to be
the front or the back. But what I'm going to do
first is we're going to glue these together.
Open that back up. That's basically
our goal though. Open that back up and
we're going to put some glue on all of these, so I could glue those
basically together and you only see
the front side and the pages are just
nice and thick. A little bit of glue on these, and you can use whatever
glue you have on hand. Again, I'm just
using the Uh stick. Is what I keep on hand, and just a little bit
of glue out there. Then you got to be
careful. You got to open it back up
the way we just did with that little for
some doing its thing. So don't just fold it over and glue it. That's not
going to be right. Fold it over, but then
fold it this way at the same time so that you can get the right
pages glued together. Because you're going
to pull these this way and get those
glued together. And then we've got
four different pages. And I'm just going
to get some tissue and get any glue off of here
that we've got coming out. And then what was our front? This was going to be our front. So I'm gonna go ahead
and fold that this away and get my bone folder. These are just super handy. And if you've got anything
that'll smear, again, bone fold on a piece of
wax paper if you need to. I'm just gonna force that in. Look at that. Oh, my goodness. And then, you know, now this
end, it's mostly straight. I don't know. They're not straight
they're not straight. But here's what you do
if that bothers you, is you now can take your book and I like having
something on here that gives me a line I can visually kind of line up with so I can see that I'm
getting them straight. And here I'm lining up
with a row of dots. And basically, after
they're glued together, you can take your knife and very carefully score right
down through the layers. Don't try to do all the
layers at the same time, a nice firm grip and keep it lined up with the
ruler, there we go. We've tightened our edge up. You can do that with all
the sides if you need to. Let's just do it as
a practice here. And again, I'm just
visually lining that up, trying to keep those
as straight as I can. I like this ruler. I got it at the dicklck because
it's got a lip here and it protects your finger from the knife slipping because
it's a nice thick edge. I really like it. Look at our
book and now look at that. Now all our pages are
even, everything is glued. We've got the front
and byte cover, and then we can flip and look at each page inside and just be amazed and awed at the compositions that
we magically end up with. It's the coolest thing
every single time. I love, love what we get. And then, too, at this
point, we can decide, do any of the pages need
any additional mark making, anything that would pull this together better for you if
something's not working. But, man, I love these. So that's the size one. And I thought what we would do because I did paint
a great big one, thought what we would do is go ahead and make one more out of this big one
that I already had painted. So again, on this one, we're folding it in half
and then we're folding it with the four on this side. So we're folding it
in half of this away. And it's a whole lot larger. And so it's a little
trickier to work with, but we're folding it
inside to inside here. So your piece of art
is on the outside. And then just do
the best you can. And you've seen that we can very easily straighten these out, and then can take our
bone folder again and get that nice get a nice edge on there
without smearing it across our art and whatever
we've got on our page. So if you're using
things like charcoal and pastels and
things like that, instead of what I've used, which is tempera
paint and stuff, you'll need to protect that. So now we've folded it that way. Now, let's fold it this away. And again, don't get hung up on perfect you can cut those
at the end to be perfect. So fold it in half one
way and then fold it in half this away on the short end, and on the short side
here we're gonna be going now on the inside. If you fold it backwards, then you realize you
fold it backwards. It's not a big deal.
When you're done, you can just flip that
fold the other direction. It's not like it's going to
ruin it or you did it wrong. You can just flip
it the other way. So don't get hung up if you
flip them the wrong way. It's not a big deal. It's not a deal breaker. Okay, there we go. Now
we've got all that. Now we've got fold, fold, fold, and one along the edge.
So what we're going to do And there we go. I
folded it backwards. We want an M. So as I was
saying that, I did it for you. Well, look, I kind of like doing stuff like that on
camera when I'm talking, I just start going
other directions. But when I do it
on camera for you, you can see how easy
it is to fix and you don't get hung up on,
Oh, no, I did it wrong. So in the end, there we go. H we're looking
for basically a W. And what we're going to
do is hold the W and cut that one center line that
we had created when we folded it in half the
other way. So there we go. That's funny. I always take
a detour accidentally. I had a friend right after I got out of college and
we went on a road trip, and she's like, we
should go on a detour while we're out
here on this trip. I'm like, I'm driving. So we may be detouring
whether we wanted to or not. And we laughed and giggled,
and then we're driving home. And we get to one point, we're like, Where are we? And so we get the map out of
the trunk because this is before GPSs we're
like, looking at it, and we pulled over at this
little gas station that had a Sashquach zoo sign
off to the side of it. So I'm like, I mean, how
much more fun could that be? And we're looking at the map, and we get the guy inside
to tell us where are we? And we realized that we
missed a turn 40 miles back, and I'm like, Hey,
here's your detour. We got so cracked up. Okay, so now we've got
chole cut in the center, and that's how we're gonna
pull these four together. So there we go. Let's
see what we got. Let's see what we want to be to cover. I mean,
that's pretty cool. Oh, Mom. That's kind of cool.
Oh, that one's cool. Okay, I feel like that should be my cover. That's
gonna be the back. And we've got some stuff on the inside. We've randomly got. Okay, that's pretty cool. Don't want it to be that way, though, with part
of the rainbow. Oh, my gosh.
Decisions, decisions. Okay, but before we even really make the final
decision there, let's go ahead and
open it back up. And we're gonna
tape these pages. And I apologize. If we
go in and out of focus, the camera doesn't
like white paper, so I'm hoping it'll stay
focused on my hand. Alright. Once we got a little
bit of glue everywhere, now we are ready. We want the edges to glue,
but not the centers. We want the centers to come
out and glue like this. So don't just fold it
over and stick them down. I want you to fold them, but then make sure
that your center parts are getting folded, too. Okay. Oh, I kind
of like that, too. That could be the
cover. Let's see. Alright, so I'm looking
at each of these. Oh, okay. Actually,
you know what? This is the cover. Okay. I love it. Now I'm just gonna put this
on here. Look at that. Oh. Oh, my gosh, every single one of
these, I'm like, This is my favorite.
But you know what? Every time I do this,
each one is my favorite. Okay, songs, just
picking these down. Really good. And then
so here's our book. Look how cool that
is. Oh, my gosh. So now I'm gonna go
ahead and one more time, I'm gonna go ahead
and slice these for us. Sharp knife. If you start slicing and your
knife doesn't want to cut, you need a sharp blade,
so change your blade out. Sometimes I'm definitely working with the same blade
for too long. So once that blade quits cutting, is
that pretty straight? Well, nope. Once that
blade quits cutting, you need to go ahead
and change the blade. I'm just lining that up there. There we go. Look at
that. Oh, my goodness. Look at that. This
one is amazing. And it was just lots
of scribble and play. And now you've got these
lovely books for inspiration. Here's the smaller
one that we made. Look how amazing those turn out and how much inspiration
that you can get from that. I hope you enjoy making these. I mean, I just want to
paint big sheets of paper all day and then turn them into a little artbok because my goal is to have lots of
finished little art books. And this it don't get
any easier than making a little artbok in one play
session at your table. So those are super fun and I can't wait to see what
you do with this project, and I'll see you back in class. Elia. Elia.
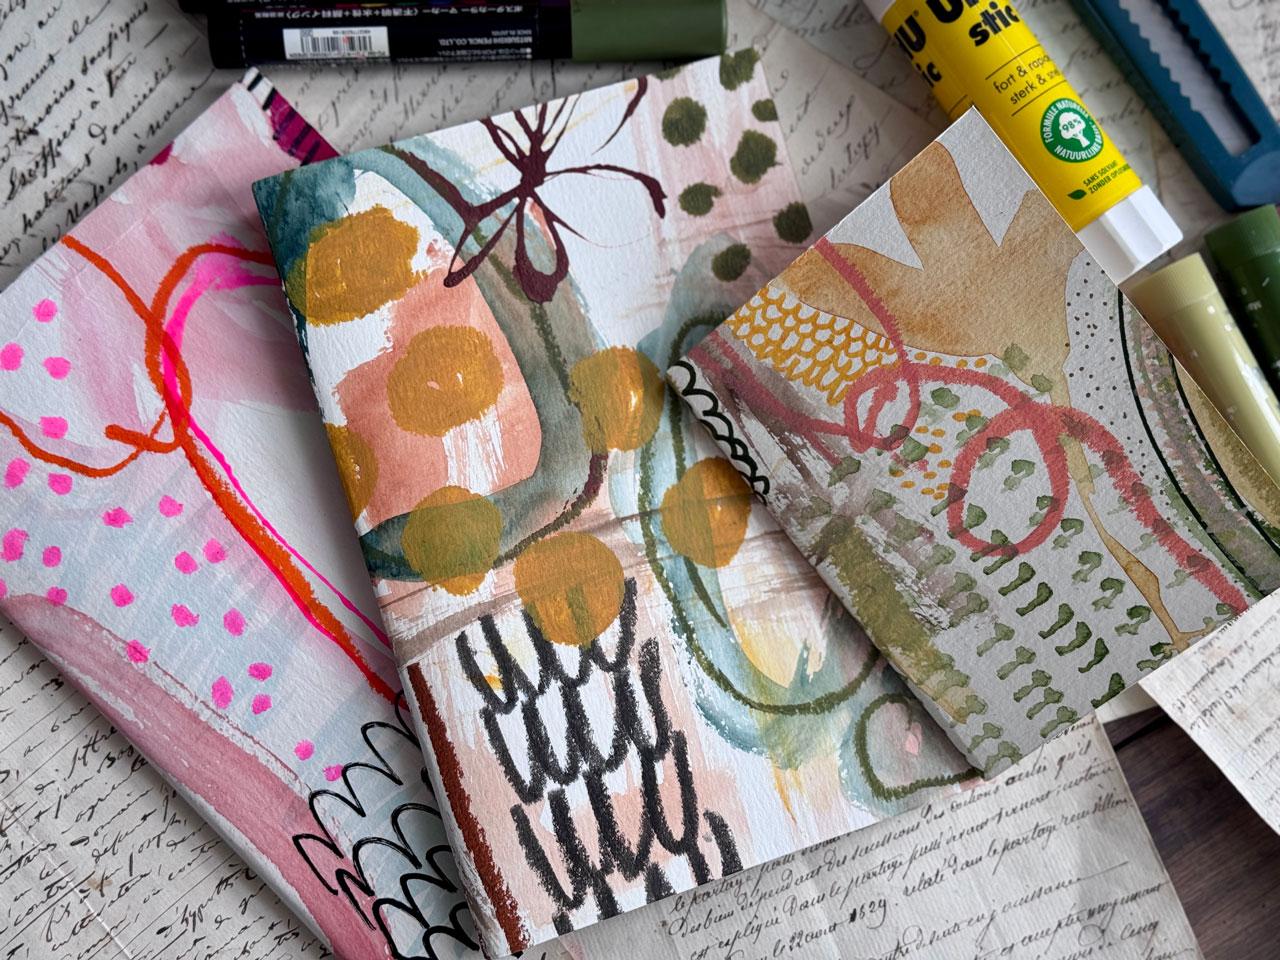
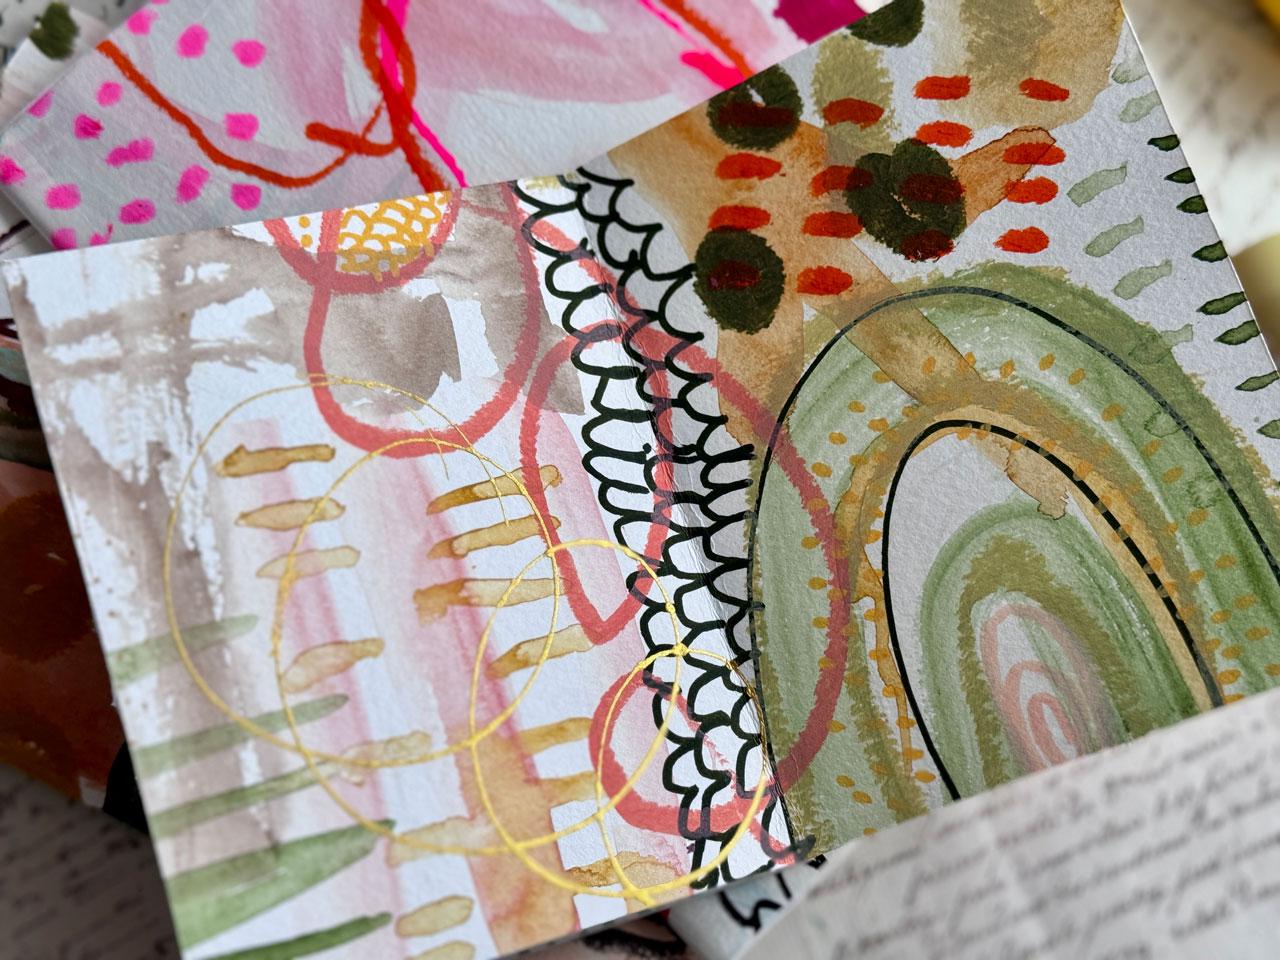
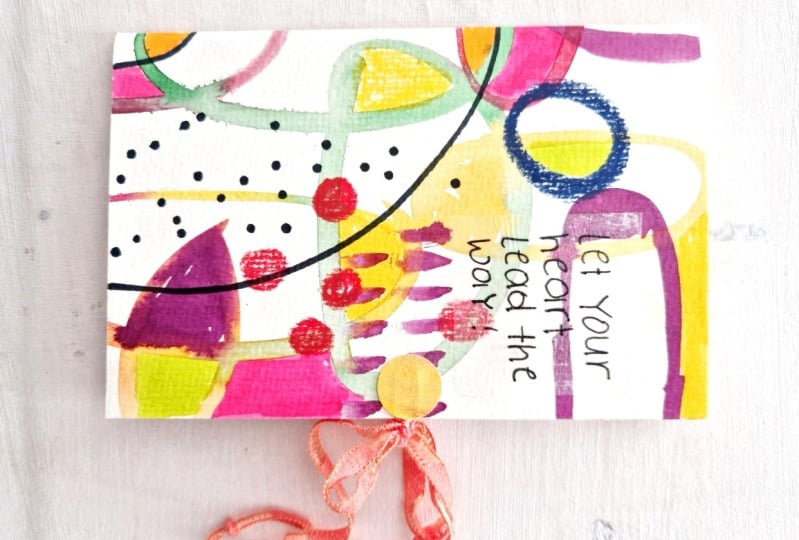
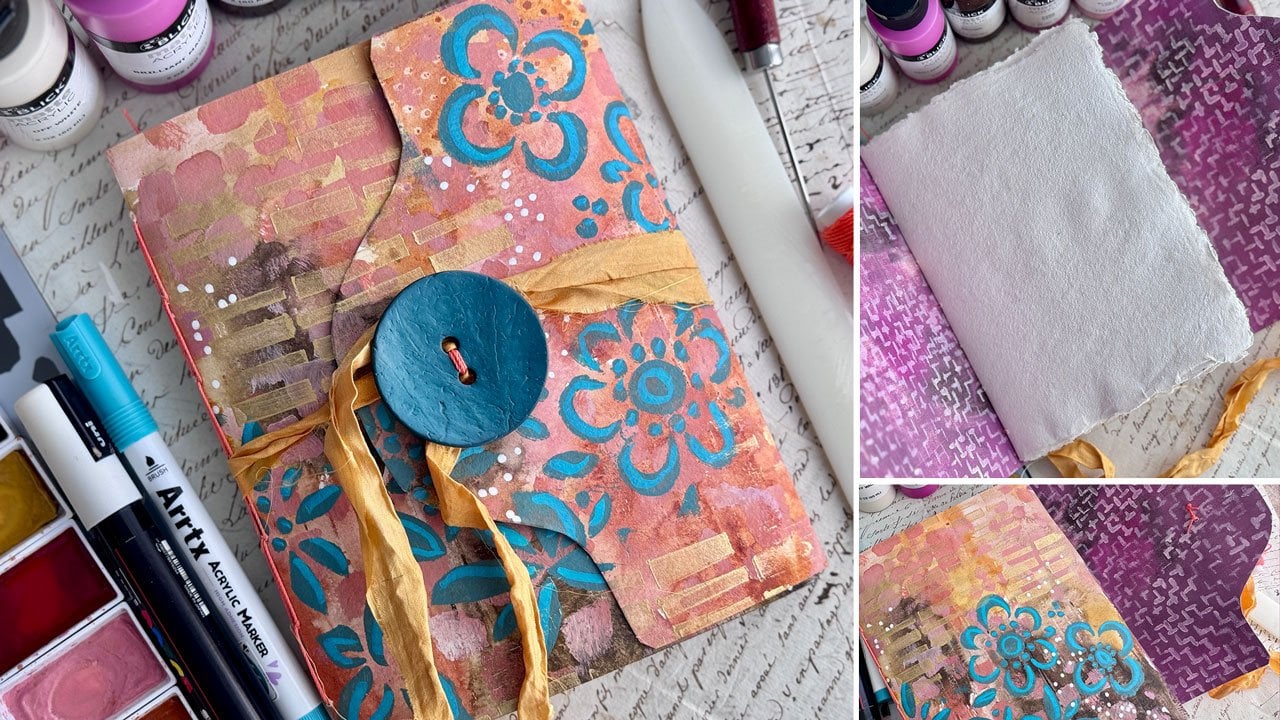
8. Zig Zag Folding Book: Alright. This second piece
that I painted is dry. And what I'm going to
make out of this one is a book that looks
a bit like this. It's got a little bit
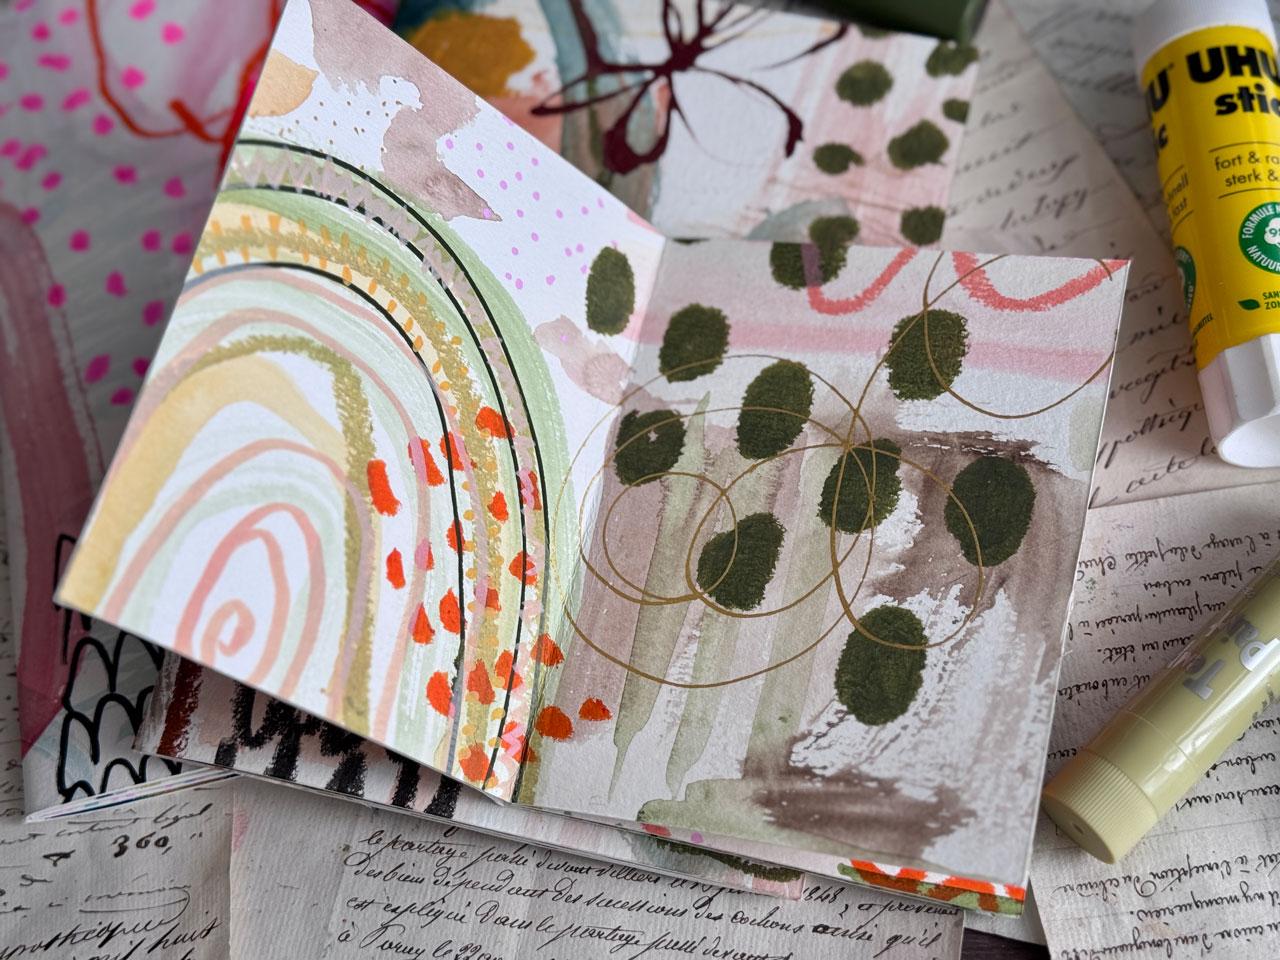
of a cover on it. And then as we open the
pages and flip through them, we can see different
parts that we've painted in our larger book. And I've put a cover on it because I glued all
the pages together. So you can see all the pages
are double thickness there, and they're a little wonky, so I'll show you on
one of the books, how you can make
them less wonky, just because I was cutting with scissors and I wasn't
being too exact. These are more for fun ideas, looking at where the
compositions ended up, deciding on whether any of the pages need more
work or what have you, but they're more for
me just I enjoy making the pages and then seeing what the book looks
like when it's done. These are super fun
and I'm going to put just a handmade paper as my cover because I
like the handmade papers. You can paint another piece of watercolor paper and then use that piece you
painted as the cover. But this is really easy to make. This one, I divided the
paper into fours this way, folding it, and fours this way, and then I folded everything up. But this one, I'm going to
divide it up into fours on the long way and threes on the short way since I don't have as much paper to work with. Basically, all
we're going to do, it really doesn't matter
which way you do this. If you think it'll be easier to work paint side to paint
side, you can do that. And we're going to start
with this long side, and I'm going to
fold it in half, try to make sure that
my edges here line up. There we go. And then I'm going
to come back down here and flatten that out. Then this is where our bone
folder comes in handy. We can give that a nice crease. And now I'm gonna fold
this part into the fold. So half the paper right
into the fold here. Which this paper,
that's the side. That's the paper has short
grain and long grain fibers, and one direction is much easier to fold than
the other direction. And you're usually looking for that direction when you make books so that all your
pages fold correctly. But when you're working
with a book like this, we're folding both directions. It just is what it is. Do the best we can. That we're working with
kind of a cheap paper, so that's not giving us
any help there either. All right. So once we've done
that, now we've got our folds going that way
so you can see there. Now I'm going to fold
it in to a third. I'm going to measure
the paper so that I actually get that fold
at the right spot. So let's do this.
So we've got 12 ". And so I'm going to mark this
at the four and the eight. Then I can do that further
down so I can line those up. And now I'm just folding
that in this away, just trying to get
as close as I can, and hopefully straight
on that line, I just painted painted droop. You can see I got it
right there on it. And just go ahead and
squish that down. And then we're
looking on this side. This side might be a little
easier now we can just come up to what we just created. Making sure my papers straight
as I can get it there. Again, just taking
that bone folder and getting a good edge. Or your spoon. If you've got a spoon, you
can do that with a spoon. Now you can see that we have created a whole bunch of
squares in doing that. What I'm going to do
is on the long side, I'm going to cut three
squares right here. I'm going to cut these
three right here. And then this one, we're
going to leave it there. And so we're going to
come around the corner, and then here, I'm going to cut. I'm going to
leave this one. I've left this one, so
I'm going to come from this direction and
cut three squares. I'm looking to cut three squares here and coming from the other direction,
three squares there. I might do this with my
knife to see if I can get a little bit better line that I got on the
other one that I made. But the goal is to leave the boxes there on the corner
with not cutting those. And so we're going to take
her knife, line that up, and we're going to
cut Three of those, and I got a tiny bit
crooked at the end. That's okay. And then
we're gonna turn it around and do the same thing
on that line that I drew. You can do it with scissors.
I did the other ones with scissors. And there we go. Now we're ready to fold. And so what I want to do, one of these will be the front, one of these will be the back. And I want the
front to be blank. So I'm gonna fold that
first one down so that it's going paint
side to paint side. Then I'm going to zigzag and
go back and forward so that all the unpainted sides
are sticking together and all the painted sides are making the inside of my book. So down because that's
the unpainted side, and then zigzag goes
back and forth. And when I get here, I'm
going to go down so that all the unpainted sides
are on this side. So you can see
everything unpainted and all the painted sides
you're on this side. Then Oh, my gosh, you guys. This is going to be my most
favorite book I ever made. That's a fun technique if you want to just play
with a little bit of acrylic paint and give yourself a beautiful
little abstract book. What I'm going to do is I want this side to
all be attached. I don't want it to
stay like this. I'm going to take my
glue stick and I'm going to glue the backsides
of each of these pages. This page sticks here, so I'm going to glue
these pages together. This page sticks here, so I'm going to glue
those pages together. I'm going to glue
these pages together. I'm just going to
work it as I go. And just glue it down.
Then this one is the next page and just glue that down and then
this one's the next page. You see it's just real easy
to work your way through. This one is the next page. It's real easy just
to flip and work your way through on
these. That goes down. This is the next page, and then I should
just be left with the back cover and the front
cover without the glue. What you can do at this point, stick these down real good. You might take your
bone folder and really squish those
edges and everything. If anything is
super duper wonky, and you think, what the heck? You could at this point. So out some glue out there. You could at this point
straighten your edges by simply taking your
ruler right here and your knife and cutting
that several times as you cut all the way
through the layers until you get to the bottom, and that will give you a
straight edge on all your sides. I'm not super picky on this. I do do it on the
next one though, so I'm not going to
do it on this one. But I am going to do it. I got glue coming out
of my edges here, so I'm just cleaning those up. I'm not going to do
that on this one, but I am going to do it on the other style that we create. Then once you've got
these glued down. Now we're ready for the cover, and I'm going to put a fun cover of the handmade paper on it because I like the handmade
paper and I'm just going to go ahead and glue
it down and then trim it up. I'm just going to put glue
on this side right here. And I'm going to stick it down. If the edges aren't straight
on your handmade paper, you might need to allow
extra room there. But I'm pretty good
right there, I think. I'm glued on the wrong side. All right. We're going to
have this side as our cover. I'm a nut. I'm a nut. That's okay. That's okay. Don't let the small
things get to you. It's still pretty on both sides. If not, you could
have pulled that off, flipped it over, and just sacrificed this
little piece here, but I'm good with that. Except for the name. I got these papers
at the **** Blick. If you're wondering
where you can get lovely handmade papers. And so now that one is set. And I'm gonna try. Let's cut some of this off. I'm gonna try to give me a hem. I'm gonna leave enough
paper to actually tear, 'cause I'm kind of
wondering if I can get a nice torn edge
instead of a cut edge. And if you're better at figuring
out as you're going, um, how to do some of these
instead of waiting and doing it at the point that I'm doing it, you're
welcome to do that. There we go. Yes.
That's what I wanted. Alright, let's do
this right here. And it just gives me
kind of the same edge there on each side. And I'm just lining it up with the edge of the book
so that I'm lining up with what we've already
got going on here. Again, it doesn't
have to be perfect. Perfect is overrated. Look how cool that logs. Oh, my gosh. Then just
give it some time to dry and this book
is basically done. Now look at this. Look
at that Oh, my gosh. Look how pretty that
cover is on there, even if it is on the back side. I almost matches better on the
back side because you just have a pattern there
that leads into this. Then these are like many
little masterpieces. Somehow that just always
works out that way. It's amazing to me. And now you could use
these as inspiration and jumping off points for
ideas for bigger abstracts. This is an excellent way to get everything your
thoughts together on creating some big
abstract pieces. Then at this point, you could evaluate and say, do any of these pages need any extra mark making or any extra color or
any extra lines? Maybe at this
point, you're like, maybe some mark
making on top of this would make it finished
for me or what have you. You can come back
on the top and do some extra marks and lines and maybe some extra dashes
or whatever it is that your favorite marks are
now is the time to come back and evaluate
each page and decide, does it need anymore? Is it finished? Can I help the composition to
a complete space? Then you've got this
amazing piece of art. You can see where I was saying that these would be
an excellent addition to a whole series if you
created abstracts in these color ways or
if this was your jumping off point
for some abstracts, how these would be beautiful compliments to those paintings. There's our first book.
Now I'm going to grab some papers and we
do the second book, so I'll see you back
in the next video.
9. Alternative Zig Zag Option: Show you one more fold here on the zig zag one because
on the book that we made, we did three sections
and four sections. And so I'm going to
do four sections and four sections just to show you what that looks like and how much smaller that
gives you for a book. And so I thought what
we would do real quick is maybe just do a little bit of painting on this and then we'll fold this one up. Um, so more than anything, too, you could make these blank
papers ready to paint on. But I want to go ahead and give myself at least a little bit
of mark making, and then, so you don't have to have a fully painted
page to begin with, but I want to give myself a visual here for what's the right side
and the wrong side. Then once you fold your book up and you glue it and
put a cover if you want, now you can come back
and paint these later, paint them whenever you
want to paint them. You don't have to paint
everything today. Now, we're basically going
to fold this in half, just like we did
before and you can do a piece of the wax paper if you want to
protect your pages. Hmm. But I'm just going quickly here to
give you an idea on how you would do the
extra set of folding. And this is the direction of the paper that it
doesn't want to fold, so it's a little harder. There's one direction
that it wants to fold and one direction that
it doesn't want to fold, and that's the one that
doesn't want to fold. So now we've got three
folds on that side, and then I'm gonna
come back and fold this side. It's easier. You definitely tell which
way the paper wants to go. And now I did it in half
rather than a third, third, and a third, like
I did on the other. So now we're going to come
right into the center fold, and that's our next fold. And we're also coming right
in on this center fold. And again, I could have done
all these on the inside with paper on the inside.
It really doesn't matter. And now I've got one, two, three, and one, two, three, and we're all in quarters. Basically, what
we're doing here is we're still cutting
three sections, but now I'm cutting three
sections right here. And over here, I'm
cutting three sections, not cutting this section, but I'm cutting three sections
all the way down to here. And then over here, I'm cutting three sections right here. You can see I've left this
one and I've left this one, and I've left this one intact. And we'll just take our scissors and if you have a big
enough piece of paper, I mean, you could
do even more than the three folds and the
four folds like I did. You could depending on your paper size and
what your goal was, you could make it
even bigger bigger. So right up to
that. Then seeing, see, I'm cutting a
zig zag, basically, coming back to this side. And there we go. Now we've made one big zig zag, so we've got an extra one
than we had on the other one. Again, I want this
to be the outside. So that's going to be my first
fold is arch side to side. And then we just start folding art side to
arch side always, and then white to white
backside to backside. So again, backside to back side, arch side to side. And so all the art will be on one side and all the
whites will be the back. Then we've got a
cover and a cover, and then we've got our
art pieces on the front. Now you can simply
just like we did on the other one is glue all the
backsides to the backsides. Don't glue the front sides. But now you can go
ahead and create this out gluing all the backsides together to keep keep the
book together like that. And then we can get our
bone folder and a piece of the paper we want and really just
squish that down better. Now you're ready to put a cover on it just like we
did our original piece. But you can see
we've got the cover. All of these sides
would stick together, so I need to let that dry. And then you could
just like we did that bigger one because I got so sloppy with my
folding and stuff, you could cut these just
like we did these books. You could cut that and have
a good edge if you wanted to trim these down and you do
it basically the same way. You would line that up
and then get all of the layers where you were going to get them all straight and get
them all in there, and then definitely
going to take a few more trims because
it's a lot thicker. But we can get them
all lined up just like that and we can cut the
edges to be the same. And you might get those all trimmed before you
put the cover on it, and then put the cover on last. But this is how you would
fix these also so that everything lined up
and was straight and pretty if the wonky
edges drive you insane. Which the wonky edges
sometimes drive you insane, but sometimes it adds to the
charm of the handmade book. Alright, now all the edges are good except for
this back edge. But the back edge
doesn't even matter, so let me go grab
a piece of paper. Gonna use this
pretty orange paper. And that would be
about the right sizesh so I'm gonna just cut
myself a size here. Then we can just glue this down. It's not really
straight anywhere, so I'm just going
to glue it down. And then I'll put a little
glue right there where the spine would be even though it's not
completely straight. I'm not even worried
about making it exact. If you get any glue
on the front side, you can just go ahead
and tissue that off. That just barely
made it, didn't it? That just barely
was the right size. Then we can trim that
cover to the right size. We can either do
that with our knife because we've got enough of the book as our guide
there and the papers so thin that I can just use
the book edge as the guide. And there we go. Now we have nice even edges if the edges
being wonky would bug you. Got a nice cover
covering all of that. Now you've got pages in
here that are ready for you to continue decorating and painting and doing
whatever you'd like. If you'd like it to be a
true sketchbook paint book, now you're ready to continue
adding to your book. I personally like to paint
the paper first and then just see what serendipitously. I've got glue on my finger. What just
serendipitously ends up. But I don't know,
that's pretty cool to be able to fill them
in after the fact, too. You got choices
there. All right. I'll see you back in class. Y.
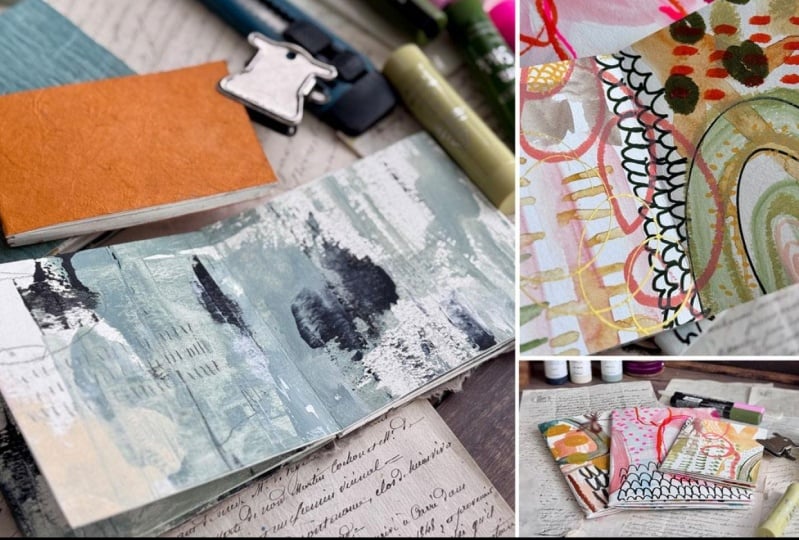
10. Books We Made Recap: Let's just take
one last look here at the books that
we created in class and just admire how amazing
these really come out. These are my very favorite. Get the biggest piece
of paper you can. I was working on
the gigantic 18 by 24 papers with the Canson to
make these big sized ones. These are a good size
to make as a gift. This could be the coolest
card that you make for somebody where maybe you put some lovely ceniments
and stuff on the inside. Uh, for them, you
could really get creative with this as a card. But I love these art books, and I'm going to have
a whole bunch of them and just add that to my stash of art books that I have that I'm making with
the other art journals. But these are a fun
addition to that, and they're like a one day
one paint session kind of project that you
could then end up with things like this that make
me ridiculously happy. For reals, look at this. Now, this would be a very
jolly happy happy birthday and then all the fun times
that we had in our life, little sentiments in
there or something or just a book that
you want to give to somebody that is beautiful that they can enjoy
and look through. I'd love these. Then
the other fold, where we put our own
little cover on it, if you work with the 18
by 24 piece of paper, this is the size
book you'll get. If you work with, and that was the same number of folds
as I did on this one. If you work with
this size paper, 12 by 18, this is the
size book you get. Now, if you work
with the 12 by 18 and you add the extra
line of folding in there, like I did on this book, this is the size
you end up with. Um, so it's quite a
bit of difference versus where you started
to where you end up. This is basically a 16th
of the size of this paper, and this one's basically a 12th, one, two, three, four,
five, six, seven, eight, nine, ten, 11, 12, basically there versus this
one being one, two, three, four, five, six,
seven, eight, nine, ten, 11, 12, 13, 14, 15, 16. So these two are made
out of the same paper. This was made out of
the larger paper. Which was this one. This
was one, two, three, four, five, six, seven,
eight, nine, ten, I think this is the 16th, one, two, three, four. This was the 16th, one, two, three, four. I did the four fold on this one. If we did the three
fold on this one, we would have ended up
with a book that was quite a bit larger because we
would have had one, two, three, and it would
have been this much larger than it did
and it would have been this much larger. It would have been a whole
lot bigger if we did the three folds on one side versus the four
folds on one side. That's another thing
to play with is how many of those rows
that you fold. This is folding four, the long way, three, the short way, is this
one versus four and four. Play with the number
of folds that you do on these zig zag books, you end up with different sizes, which is really
cool how that works out. And then I love that. You can put a little cover on
this. That can be your art. Any kind of cover
you want to make. That's just a little
handmade paper on mine. Then again, you've got a full sketchbook
inside artbok that you created and you can
continue to add to and re evaluate the pages and
decide, is this finished? Does it need more and wherever
you want to go with that. This one may be one of my
very favorites because I already buy and collect
this type of abstract. This is the abstract I
would hang on my walls. And this is right
up my alley for the most beautiful book
that I could have made. I need to paint some bigger
pieces in this style, which is completely different
in the bright colorful, how many marks can I make style? It's interesting. Whatever
your style of art is, you can do that and
make the book to be really personal to
what you love and enjoy. I hope you enjoy creating some of these books
with me in class today. I can't wait to see what
you end up creating. So definitely come back and share those in the
project gallery. Rely makes my day when I log in and see
projects in there. I can't wait to see yours, so I'll see you next time. Lo
11. Final Thoughts: We wrap up this class, I hope you feel inspired
by the possibilities of creating art books from
just a single piece of paper. This project is a great way to experiment with
your materials, embrace the joy of mark making, and discover how
simple techniques can transform your artwork
into something functional. Remember, the beauty
of this process lies in the unique results
each piece brings. I encourage you to explore
different color palettes, mediums, and designs
in future projects. Thank you for joining me, and I can't wait to see what
books you create. I
 DENISE LOVE, Artist & Creative Educator