Transcripts
1. Introduction: When I first think of oil paint, I think about the
possibilities and the limits that can
help me be creative. I think oil paint can
capture the essence of your subjects like
no other medium. Hey, I'm Corey and
I'm an artist, a mirrorless, and an educator. Today's class is
about how to paint an eye using various oil
painting techniques. I'm excited about
this class because I love painting the
portrait and the figure, and I also level
oil paint, a lot. This class is important
because in this class we will break down how to paint
an eye in a fun way. Also, make oil painting
less intimidating. I believe last time when
we think about oil paint, the first thing we think
about is chemicals. We're going to break
that down and make it much more simple process and have fun while doing it. I want to break
things down from it, gathering your
materials, how I set up, how to draw an eye,
how to paint the eye, and lastly, adding
in a background. Painting the eye can be tough. You got sclera, the iris, the pupil, the tear duct. Don't worry. I'm going to
cover all that in this class. I got you. With
your porch artists. You paint landscapes,
still life, or abstracts. This class want
to help you learn new techniques and also a different approach
to your paintings. I know for me, when I first use oil paint and I use
plenty other mediums, coat paint, watercolor,
pastels, charcoal. When I came to oil paint, I was thinking to myself, what was I doing? Where was I at? At least that's
me on oil paints. Why wait any longer? Let's get started.
2. The Project: Welcome to the project. [MUSIC] In this project, what I'll be looking for
is a loose eye painting. We're going for more of
a Alla Prima approach. If you're not familiar
with Alla Prima, Alla Prima basically came
from back in the day when they would have live
models in front of them. They only had a limited time
slot to paint those models, maybe 3-4 hours per session. They would have to paint
it in a quick way. With this painting, what
we're going to do is we're almost going to
keep that mindset in as we're painting to help get that Alla
Prima approach going. I chose this project
because it's a fun way to practice oil painting
facial features, especially if you
paint portraits. Painting eyes can be tough, maybe you're not a
portrait painter and you focus on landscapes
or you focus on still-life, this will help you take a step outside of the
subjects for a second, and then once you
go back to those, you can apply these techniques. What I enjoy about painting
portraits and figure is that it allows me to connect with
people on a personal level. They say that eyes are
the windows of the soul. What better way to
capture that essence than to paint the eyes? The reflection of the
light off in the eye, the color of the eye, the iris. There are so many different
aspects to the eye, that's what, I believe,
it makes it so unique. When you're finished
with your project, I want you to go ahead and upload your project
in the Project Gallery. How to do that is
you'll go ahead and click the project and resources
tab within the class. Click "Create Projects", follow the prompts
relevant to your project, and then lastly, publish. The steps that you
would need to take to complete this class is getting your materials ready, setting up a space to paint, and following along
for each lesson. First things first,
grab your materials and head over with me
to materials lesson.
3. Gathering Materials: Welcome to the next lesson, where we're going to
go ahead and jump in on gathering our materials. First up, we have our brushes. As you can see, these
brushes are a bit messy. They've been
definitely used here. We want to go through
the main brushes that I use and also maybe some
brushes that I don't use that you may
be interested in. These, not those are the main brushes that
I mostly used right here. I mainly use the brushes. I use the thicker ones
for the background. If I'm doing a smaller
canvas, or panel, such as an 8 by 10,
I'll use this for the background or a larger brush for larger paintings. This right here is a Number 8, Rosemarie company,
ivory long flat brush. For oil paintings, I
mostly use flat brushes. As we see there, I
accidentally left some paint on this as
well as a plane that. Let's pretend like this is a clean brush that we're
using the example of. For my next brush, I mainly also use a
number of six flat brush. Again, this is a
long brush as well. This is just a tad bit
smaller than the eight size. We got a number two
for finer details. So for smaller details, these are definitely
help on the eyelid and things of that sort. Then for it just a tad
bit smaller details, I will use this is a
Number 1 flat-tip brush. Then next I got a
zero right here. You can see that boom. Flat tip brush as well for those smaller details and much smaller details definitely helps with getting in the pupil and the iris as well. Then for those highlights, when I wanted to do
the eyelashes and hairs in the
highlight of the eye, I'll use this tiny brush
right here with a tiny tip. You can definitely use shorter brushes such as these. This compared to this, I prefer to use a long
brush because it helps me get a nice reach
when I'm painting. It helps me have a extra
step back so I can see my painting from a
distance and see what's going on from that
further distance as well. I'm probably only going to use about three to four
of these brushes. Next up, we got paint. Let's keep it simple. We're not going to use
every single color that we have at our disposal. These are our main
colors that I used. Right here, we have French
ultramarine blue laser, Winsor, and Newton oil colors. Next up, we get the
permanent Alizarin Crimson. You can tell that I haven't said that name too many times. Next, I got a yellow ocher. My approach is what
I do is I like to use a limited color palette. This helps me to learn how to mix colors much better. Next, we have burnt umber. You can almost see that
it's covered with paint, but you can almost see,
you get the point. We also have Rossi and I
like to use the raw sienna when I'm doing my underpainting and laying that down. Then a large tube
titanium white. I use a lot of this. This is why this too
is much bigger than the others and that
cap was loose. Let me go ahead and
tighten that up. Next up, we've got surfaces. Now you can either use a bunch of different surfaces. I like to use either canvas, that right there, or wood panel. Now, what panel is a much more smoother surface when you're using what panel? Now, with canvas, you
can definitely get more of that texture
going on there. Let me see if you can
never get more texture. You get more of that
smooth surface to it. These are both oil
paintings right here. These are both made an oil. Next up, we have paint thinner. Now this is terpenoids odorless. I currently use this one. Now, I believe I have
used gamsol as well. That cost just a little more but I believe it is better. I am currently using this
one right here and a lot of times when it comes
to oil painting, people are afraid, especially at how I was afraid of chemicals. Make sure you always
keep a ventilator when using something such as this. It is mainly this is what makes oil painting dangerous, is these chemicals right
here, the paint thinner. So keep that in mind when
you're using paint thinner. Along with that, we have
safflower oil paint medium. I just got these
two and I'm just realizing that this is actually water mixed
with oil color. I have those, but we're not going to be using those. But if you have one
mixable oil color, you can try this out and let me know how it works. I mainly use this. This medium right here is
covered in paint as well. What this does is it get the paint a nice
smooth flow with it. Also, you want to
thin the paint out just a little bit and expand it just a little more
as well so you can cover more area with less, add this bad boy up. Next step, we got
your pallet knife. Now, it's good to have I
think multiple of these. I currently only have one and it's covered in
paint right now as well. What I like to do is I'm
currently learning more. I'm using this for
the background. Not only can you mix colors
on your pallet knife, which you use the
paint with as well. Next there, we have
our glass pallet. Now, as you can see, this looks like your
average glass pallet. It's actually a frame. It is an 11 by 14 glass frame. What I do to help me
with this is which the next material is. You can use a razor blade
or a window scraper. Use a window scraper, which is much more
safe than this. If you do use this, you wrap something around the end of it when
you're pushing it. Watch out how I was pushing it and this edge right here, cut my finger open. Make sure you are being safe with that as you
push this along. What helps me is sometimes
I'll spray Windex. Once I see that there's
a bunch of panel, I spray Windex on it. That will help me scrape off the excess paint as well. Real quick, Matereo, you forgot to mention these
three essential items. A glass jar to hold
your paint thinner, gesso to prep your surface, and brush cleaner to
clean your brushes. Matereo, that's a
query, back to you. Lastly, what we will be
using is paper towels. You can't go wrong paper towels or if you don't want
to use paper towels, you can also use a cloth, maybe an old t-shirt that
you don't want to use. That was Oliver materials. Let's go ahead and jump into the next lesson where I
will show you my setup.
4. The Set Up: [NOISE] The set up. [MUSIC] In this lesson, we're
going to talk about how to make a simple setup
to help with efficiency. You want to make sure
that you're comfortable. Let's start with the
cart right here. I've got a top layer right here. The top rack, it holds
my glass palette, and then it also holds
my brushes as well. This makes it so simple
because I'm right handed. What I do is it
makes it so simple that I can easily
just access this and mix paints quickly
here to my right side. Next, I got my second layer. Now this rack, it
holds my oil paints, my also painting mediums, a jar here as well. We have our paint thinner and we also have
some gesso as well, and then a few other
random things. Then lastly, the third rack, I'm not getting all
the way down there, but we have different mediums
to play with as well. Sometimes I want to experiment. I got some acrylic
paint down here, some pastels as well, some paper towels and
other things as well. Next, I have my easel.
I love this thing. It's an A-Frame easel
and it's pretty nice. I really enjoy it. Let me
show you what it does. Let me show you a little bit. Wait. There we go. Lower it. Say if I'm sitting down, I'm used to sitting
down while I'm painting or if I want to get more
active while I'm painting, I just raise it and
standing paint. Also, another cool thing
about this easel is is that it can raise,
it can come forward. It can go forward
just like that. If I want the painting to
be straight up and down and not angled. This is a nice A-Frame easel
that I recently just got. Into is my left, I
have some drawer thing and I also have books
on top of that. These are books that
I'm learning from. These drawers right here
hold a bunch of my tools, my canvas hanging materials,
packaging materials, sketchbooks, and then also
broken action figures. On top of that, my
easel right here. What I will do is if I'm
studying a certain book, I will take that book and
place it on this easel, and I can easily just
look back and forth between my easel and
the book I'm studying. Also with these books is, I have my laptop
sitting on top of them. It's easy for me to look at
my reference left or right, right next to my canvas as well. The main thing when it comes
to set up your space is to make sure that it's
comfortable, comfortable for you. A way that someone else
may set up their studio, you don't have to set
up that same exact way. Make sure it's efficient
and effective for you. Get ready to join me
in my next lesson, we will learn how to
draw an eye. [LAUGHTER]
5. Drawing The Eyes: How to draw an eye. So in this lesson,
we're going to learn how to draw the basic
constructions of an eye. All right, so what
we're gonna do here is start off with the
basic shape of the eye. Nice sphere shape. Don't worry if your
sphere is not perfect. You can continue to
practice again and again. Mine isn't perfect,
either. That's right. Draw a line going straight
down the middle vertical line, the same thing with a horizontal line going
straight to the middle as well. Also, what helps me is if
you're thinking of how can you place where can you place
the iris in the people, go ahead and draw
a parallel line along with that vertical and
horizontal line as well. It's right about there. Now, go ahead and draw a circle within the
middle of that box. And then right in the middle is where your pupil
is going to land. That is how you draw the quick
shape of the eye as well, the scala, the iris
and the pupil. Next, let's go ahead and
draw that at an angle. Let's get the sphere
going right here. Let's say it's going
in this direction. Look at that as a
sphere and go around, draw the middle line
going around that sphere. Go right around that sphere. And then do the parallel line, doing the same exact thing. You can eye it a
little bit as well. And so the iris and people are going
to be right over here. And the cool thing
about the eye is, let's do that again, a little bit in this
direction right here. The iris and the pupil, the iris actually goes off. It raises up from the scala
and away from the pupil. So the pupil will be
right here. You have the iris going like, so then you have the sclera going straight
through there like that, and then you have
the iris raised up just above the eye as well. If you're looking at the eye from the side, it's not flat. It's not flat like this. It's not flat like so,
it's more so raise up right above that and
then you have the iris, knee of the pupil
laying right in there. No let's go ahead and get
the function of the eyelids. A good way to think
about the eyelids is to think of it lifts to the mouth. That helps me think of it and sclere will be the
teeth in a way. Let's go ahead and throw
in the iris would be, and then the eyelids
going around the scalara. They go around it. One
main important part about the eyelids is what
helps really bring it to life. Let's throw in those main lines real quick. Dark thosee up. See those? Is the top lid always goes over the bottom one. And then I like to call these
the lips of the eyelids. Throwing in the lip of the eyelids to show
that they're not flat. This goes underneath there. You got your I. You got your people right there. Let's go ahead and give that
just a little more form. Now let's go ahead and
put that into action. Now, when we're drawing the eye, let's go ahead and get a
front view of this eye. Keep in mind the scala and how it is place and the sockets
of the skull as well. And to look at the eyelids
in a way as planes. So go ahead and throw
in those eyelids first. We have a tear duct right here. Basic shapes, basic shapes. What I like to do
is keep in mind, there are three
planes at the top, the top eyelid, one, two, three, and there are
two planes at the bottom. 12. Let's go ahead and throw in the iris and the
people right here. Top eyelids always usually
covering the top of that iris, it's usually just
above right there. So go ahead and throw in
the construction of those. We got our planes. How it's
going to be above that, to make sure I get in
the lips of the eyelids. And notice how the eyelids, they protrude outward, and this is showing the form of that scala that's
underneath there. 66 planes one, two, and three, one, two. Go ahead and get that tear
duct in there as well. I'm going to lay that
**** right here. This is what a lot of
artists call the life of the eye when it has that little highlight
in there as well. And then the top of the scala, and then the top of the iris is usually shaded more
than the bottom. Let's go there and there. Then I like to throw in where some of these shadows will be Bridge the nose will begin. And then over here
between the eyebrow usually and the eye lid. Then lastly, you want to
throw in those eye lashes. Also, you're going to
see more so of the lip of the bottom eyelid
than the top usually because the top is hanging over whereas a lip is more
so hanging down. Let's cut ahead and
throw in those lashes. And note I'm doing
this right here, I'm going down and curling up. Do is you can clump
those together a little bit down
here. Not too much. And that is the
construction of the eye. So the key takeaway is
that you want to use basic shapes when
it comes to forming the eye and also other
features of face. This can also help with values. So now what I
encourage you to do is practice drawing the eye
from different angles. This can help you get
a bitter perspective, pun intended on how they work. And join me in the next
lesson where we will jump into the
underpainting. Let's go.
6. Underpainting: [MUSIC] The underpainting.
In this lesson, we are going to do
the underpainting. Make sure you can see my
hand. You see my hand there? It's me. We are going to do
the underpainting right here. I also, going back to
the lesson we were talking about
efficiency when you set up and finding what's
more comfortable for you. I discovered this. A more efficient way that
allows you to see me mixing my paint while I'm painting and of course it
needs cleaned up a little. Let's go ahead and do that. For my underpainting,
I want to first start off with some raw
sienna mixture. You can see that? There we go. I start off with some
raw sienna right there. Then what you also want to do is when you're using
the paint thinner, makes sure you're in
a ventilated area. I'm right next to a window
and I have two kids, so I have to ensure that
my area is ventilated. What I'll do now is I'll
get some paint thinner, mix it in with this, and then go ahead and begin
to apply that on my canvas. You can also use a bigger brush for this if you want to as well. It's cute applying this paint thinner and get that all
over the canvas here. Another way to apply
this underpainting is, you also just put some of the raw sienna on
here and then just smear it around with paper
towel and you don't even have to exactly use raw sienna. You can use a different color. You can even use
burnt umber. Now once that's looking pretty
good and covered, we're going to move
on to the next step. I also have my
reference to my left. You have pan over there
and see that, boom. Now for this part,
I'm going to grab my burnt umber to get those darker lines
in there as well. Instead of using a pencil
to draw our layout, what I'm going to do is, I'm
going to draw with a brush. This also helps to get more of a loose painting as
drawing with the brush. I also forgot to
mention that I've provided different
references that you can use in the project and the resources section below.
Go ahead and check that out. I got many different
references that you can use and choose from. For this part I'm going to
use this brush right here. My number 0 brush. I'm also using paint thinner
to help me use this as well. Only the eyelids in the center. Starting off with
the eyelids here. [MUSIC] One way to help you
paint your piece and get that loose look to it is
give yourself a time limit. Maybe 45 minutes per session
or an hour per session, just so you can quickly
do it and quickly get that painting in there, giving it that loose aloe prima
look and this area over here. [MUSIC] The side of the face over here. [MUSIC] Now that I've got a
basic feel for the eye what I'm going to do next is, I'm going to go ahead and use
less paint there inside of this burnt umber and get
in those darker areas. The pupil right here. Make sure I keep those
highlights in mind. Another thing that helps me is squinting my eyes at
the painting as well. This helps me break down
those shapes and then also it helps me
visualize the values. [MUSIC] I'm going to paint the eyebrow in
just so we know where it's at. We're not going to add the
eyelashes in because you want those to go over the lids. Place them just a little bit just so we know
where they're at. Down here, let me go ahead
and darken this area. For this part, I'm actually
going to go ahead and grab and go ahead
and clean this off, get my paper towel, wipe it
off in there, set that down. Then for this part,
I'm going to go ahead and grab my CRFs. Go ahead and grab Number 2.
We're going to do Number 2. Right there. Darken this area. [MUSIC] Side of the face right
here is dark as well. This is where the
nose is going to be. [MUSIC] I just want to fix this part
just a little bit. Let's go ahead and
clean my brush off. I want to use this
paper towel right here. Get some paint that are on that. [NOISE] There we go. Since
this is a wet on wet canvas, I'm going go ahead
and use that towards my advantage and
then what you can do is take your paper towel that has the paint
there on it and go ahead and apply it to areas that have
those highlights. Using the main base we used
back here as the meter. [MUSIC] If you feel the need
to as well go ahead and go back in and
darken some areas or highlight some areas that
you feel you would like to. Whenever you feel comfortable
enough with that, let's go ahead and jump
on to the next lesson, where we are going to go
ahead and mix some colors.
7. Mixing Colors: Now we're going to be mixing some colors and let's
keep it simple. We're just going to
use yellow ocher, french ultramarine blue,
permanent alizarin crimson, and then also titanium white. Let's go ahead and put
these down on there. Sometimes I like to have two
piles of titanium white, one where I'm mixing colors and other one I'm
using as highlights, if it's a pure white color. I'm go ahead and
plot these next. Don't be afraid to
use that paint. You definitely want more, especially when we add
thicker layers on there. You want to see that texture. We got blue right here,
ocher right here. Now, what I'd like to do is there's two ways that
I can mix my black. I can either use, I'll go ahead
and find it. There we go. I can use a burnt umber and
then mix that with the blue. That's a quick way to
get a black color. That's the way to
get a darker black. You don't want to use
a straight black, because to me, it
makes it look flat. It almost can suck the
life out of your painting because it's noticeable and there's a
difference you can see. What you want to do is you
want to mix your own black, what you can do is you can
also lean that towards either more of a
cool or warm side. That's the cool thing about
mixing your own black. For this, I got to
have my palette knife. Let me go ahead and show
you the two different ways that you can mix the black. I'm sure there are
more ways out there to mix black as well, I just do it this way. I either use some of this
right here, then some blue. That is a quick way to
get that black color. If you're looking to lean
more towards a cool color, you got to add more blue to it or you can add more
of that burnt umber. Another way you can do it is
you go ahead and get blue, of course, a red, blue and
yellow, mix those together. Or if you have purple,
we'll do that example. Let's make a purple. Let's make a nice
purple color here. Then go ahead and put
some yellow in that. Put too much yellow, so let's bring that back
just a tad bit here. I'm really excited about
this new way I just found to place my palette. I will be using this setup
from now on, possibly. Add a little more blue. One way to be able
to tell which color your black is leaning more
towards is I'll scrape it, you can see the
color underneath. It's almost like
a reddish orange you can see underneath as well, so it's leaning more
towards the warm side. Now I use leaning more
towards the warm side when it comes to making black because my subjects
usually have darker skin, usually brown skin. You can see the difference. This is much darker than
this one right here. I usually use this one. This is just a quick
way of making it. Now these aren't the only two
ways to make a black color. I'm sure there are other
ways that make it. These are the two that
I usually choose from. Now there are two
ways that you can do when you're mixing your
colors for your painting. One, you can premix them. We're mainly going to focus on three different main colors,
three different values. Especially when doing portraits, you want to help
break those down. I'd keep in mind breaking down three different main
colors in your reference. You can either
premix these colors or you could paint
them as you go. Me, myself sometimes when I
mix them together beforehand, I find out later on
as I'm mixing colors and I'm looking at the
colors I want to paint, I end up seeing a
totally different color. I now sometimes just
mix them as I go, [LAUGHTER] but you could
choose either one. For this lesson, we're actually going to mix
those colors, premix them, get an idea of those
main colors we see here. I'm just going to add
more paint to my palette. When I'm mixing my colors, I like to start from
my darkest color other than the main
colors I have right here, the darkest colors
I have right here. Let me go ahead and do that. Let's start off with an orange, and usually when I'm
doing brown skin, I usually mix a lot of
different oranges and browns. Let me get that. I got that color. Let's
add some blue in there. Sparking that up. Or again, going to
use burnt umber. Like to add some
of that in there. Just make sure my makeshift
palette holder is stable. Get some of that black in there. Little more in that. Like an hour dance. More red, a little more
blue to darken that up, and move on to my
next color here. My next tone I see, which is a nice oranges
brown color right in there. Red is really strong, you might want to
use less of it. That was a lot of red to use. Might not look like it,
but that's a lot of red. It's a very dominant color. I don't know about this
makeshift palette holder guys. There we go. Let me add a little
white to that. To help desaturate your colors, you can add a darker color
to it or a lighter color. This will help desaturate them
to get that nice skin tone. A little bit of white to that to help desaturate that color. Add a little blue in there, help tone that down,
white as well. I think that is
looking pretty good. Then as I go, I'm going to
work from this color as well. Then move on to a lighter color. What I can do is I can start off with just a tad bit of
that previous color. You don't want to
make a habit of working from the
same color a lot because there are so
many different colors usually in the face or the skin. I'm working from this and it's going to be
a lighter tone here. As you go lighter,
which you want to do is add that whites and
then add yellow. If you hear noises out, my
son's sign in the background. In certain areas of the
face such as the cheeks, you can see a little
bit of pink in there, a little blush area, in a way. Let me actually add
more white to this. If it goes in shadow
just a tad bit, add a little bit of blue
to help get that going on. I think that's pretty good. Now again, these are the main skin tone colors I'm
going to work from. These are going to help
me out as I paint. I'm not going to stick
exactly to these. What I want to do is
I'm going to use these as more of a starting point and then branch off with the
different colors that I see as I go through all my painting. Now, join me for the next lesson where we're going to go ahead and jump into the thin layer.
8. Thin Layer: [MUSIC] In this lesson, we're going to work on
the thin layer here. I'm going go ahead
and add some of this. This is safflower
painting medium. We're going to add
that down here. Add just a little bit of that. That's going to help
thin that paint out and also get more use of it. Right now, I'm using
my zero flat brush. I'm going to go ahead
into the blacks here. This is that thin layer. I'm keeping in mind where those
highlights are going to be so I'm not painting
completely over them. Now, for the eyebrow, I'm going
to darken that up in there because it's going to
be skin underneath it so we want to see that. With the eyelashes, I want to add more
of those hairs in. Just getting the
placement of that. Now what I'm going to
do is I'm going to go ahead over to my
next color here. Some painting medium on that. Get the next darkest color so
it's a little lighter here. These are my two flat tip brush. Then adding in all the areas where this color
looks appropriate. [MUSIC] I'm seeing a tiny
difference here in the color. With the colors, I want
to adjust that as I go. I'm actually going to go ahead and get more of a purplish
color underneath the eye. That looks better. One way to help to
get that to match those colors the best way
you can, just test them out. Mix the color and then
test it out as you go. Definitely around
the eyelid here, we have more of
that purplish tint. Don't worry about accidentally painting over certain highlights because you can always
paint over the dark areas and just fix as you go. Then for this next part, I'm going to go ahead and
use my four tip brush here and go ahead and dab
in that lighter color, so a lighter brown color. Squint your eyes as you go. It's going to help you see the certain areas
of your subject to where that paint
will match best. We're having fun, right? Make sure we're
having fun, guys. I'm noticing light
tints of the flesh underneath the skin here. I'm noticing light tints of paint underneath
the skin here. I'm going to go ahead and get some of that
paint in there going, just a little
lighter. Here we go. Use a shade with that
brush to your advantage, helps me out a ton. Now, let's go ahead and move
on to that lighter color. We were just in this
color right here. I'm going to go ahead and
move over to this one which is a tad bit lighter. Definitely going to use the size of the brush
to my advantage. Squinting my eyes help me see
those colors much better. Add in some of that paint there and some of those skin
tones in the eyebrow area. Just so we add in those
eyelashes, we can paint over it. I'm going to add some
more white in there. Add a bit more white. Now a little bit of red, I'm
pulling it here as well. Let's go ahead and
give that a go. I'm liking the way that looks. That's looking great. I'm sure all yours is
looking great as well. Switching brushes here, I'm going to clean
this brush off. Getting those smaller details. Actual highlight
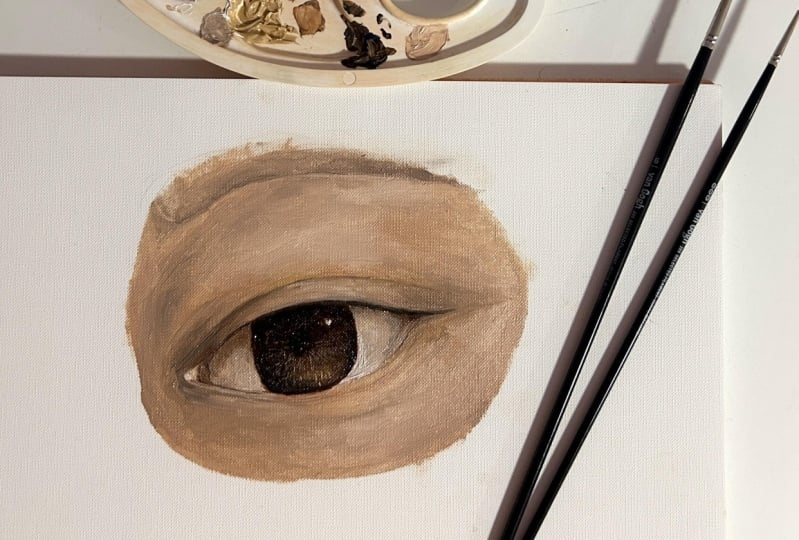
get going on here. This looks pretty good. That's how I left the eye here, the main part of the eye, blank. We wouldn't do much
with it yet. [LAUGHTER] I like to add that part at last. Let's go ahead and get
those main highlights in. You don't want to
use the pure white. Unless something is actually
exactly that color, whether it be close or
something of that sort. I always make a little tense to the highlights [MUSIC]
when I'm painting them. I got to test that out there. It's looking good. Let's highlight under the eye. This thin layer basically
just helps us map out where to put certain
colors and certain values. Now, in the next lesson, we're going to lay
down thick layer.
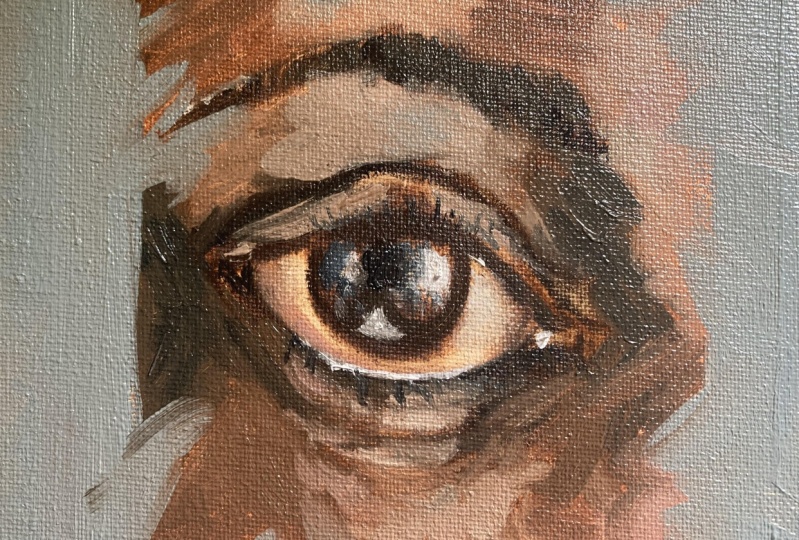
9. Thick Layer: Now in this lesson,
we're going to go ahead, jump right in and get that
thick layer going on. We had our same colors here, and I want to go back in and
start off with my darks. Make sure I got the
right brush here. Nice thin brush and don't worry about
glob and a paint on. This time we want
to see that paint. I'm going to show you a
technique that's going to really help you make those highlights stand out [MUSIC]. Use a thicker brush. Shadows always cast down
that crease and for this part I'm actually not
using my painting medium, I use before, that help make it smoother because I really want those thick colors in there until you see
that texture going on. [MUSIC] Had a nice purple light colored gone over
here in the eyelid. [NOISE] I don't like
it. Let's try this out. It's a little darker.
It's a little better. I can add much more. [MUSIC] Keep out my reference. [MUSIC] Jumping into those lighter tones adding a little more pink
in there. There we go. Add more white to that.
Squinting your eyes, getting those colors in there. Don't be afraid to lay
down the paint here. Getting a smaller brush for those smaller details and back
to what I was saying about the technique that
helps you really make those details pop is putting more paint down
in a textured way. What do I mean by that is, [LAUGHTER] let me explain that. Putting more paint
down in there. It almost practically raises
up from your surface. In that way it makes us highlight stand
out, I tab it more. It really brings those out. We working in those highlights. I like down here, going back in and adding
in some extra areas. My camera battery died, but we're going to
jump right back into it and pick up
where we left off. As you can see, it's lines out those days out
before you start some colors is there
on these right here, and this smaller
details in [MUSIC] see more of a tan color here. Make it a little
yellow in there. Let's go ahead and
mix that over here. I got some whites and
some blue in there. Let me add a little bit of
black in there as well. Let's add a bit more blue. Not too much stand out also should tab it
now I see how that looks. I think that's
looking pretty good. Quick we add that in there. It's more dark
over in this area, so let me go ahead and [MUSIC] have a yellow on that. That's actually too
much yellow, have a yellow and blue in there. Now what we're going
to do here is one of most important parts, the lip of the eye, and I want to line it
up just to tab it. It's still dark but just
enough that she could see it. Now the tear duct has
some highlights in it as well but and add those in there. Going back over here
and adding this in, let me touch it, tab it darker, as soon as highlights
in the eye there as well add some blue in there. Getting those highlights in, this is blue, oh my goodness. I did not mean do that
because I didn't see that. I was not looking and totally painted [NOISE] pretty
wild right there. Sorry, it's an easy fix. Some of these highlights jump. Now since I paint them here
just little bit too much, I'm going to go ahead
and use that tiny brush. The tiny brush is
called and it want to be used in this lessons. Here it is we go. Try this nice little highlight at the bottom of the eye here, where the lid meets the eye and nice little bit of
that in there as well. My tone uses lovely
brush for the lashes, add those in and sometimes it can be difficult to
add darks over lights. Keep that in mind when
you're painting as well. I have above here. [MUSIC] I've seen this one guy, he was painting hair, what he did to paint the
hair, the thin lines, he would actually take an actual hair and
dip in a paint, move around paint,
get some paint on it, put down on the
Canvas and pull it off and it'll create a
nice thin hair piece. It's pretty cool. One direction of this eyebrows, between the eyelashes as well.
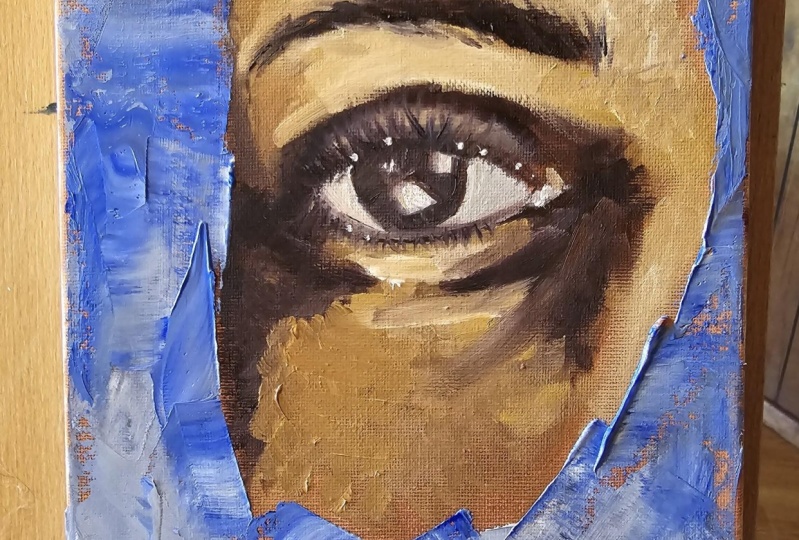
10. The Background: Welcome back. In this lesson, we're going to go ahead
and do the background. We're going to lay
in the background with our palette knife
rather than a brush, a different technique. Let's go ahead and do that. With your background, you
want to have a color, that's my complements,
your main focal point. What I can do is, I
like to keep in mind to do a background either
that's not so saturated, simply because I want
the main focal point to standout more with
all the vibrant colors. Sometimes I'll tone
down the background just to make the
focal point pop more. Now I want to go for a
nice toned down blue. A little bit of our
pre-made black in there to tone that down. Add a little bit of the yellow, almost get a teal
color going on. That looks pretty good. Don't be afraid
to lay that paint down on the surface there. This makes it fun, textures. Don't be too concerned if
you miss little spots, it's okay to not cover the
full entire background and some of that under
painting is showing through. After, I think that makes
it gave it a cooler look. This reminds me of when people put the
icing on the cake. They have that
palette knife thing and they're smearing
the icing on there. Then once you feel
good about that, another fun part to do is, I will take a small brush, get some of that
blue paint in there, wipe it out, just dab it. Now go on certain areas and wherever that
background color, the tone that background
color matches, I'll fur that in the skin tones. I'm looking for similar
values for my third in there. I'm just lightly brushing it in. This almost helps your
focal point, your subjects, look as though it's a
part of the background, not randomly sitting there. There on the eye, just
a little bit there. Now the background is important because it can help
competent your subjects, create an atmosphere,
and also tell a story. So don't be afraid
to use more paint, use texture to your advantage, and lastly, let's get
some glamour shots.
11. Final Thoughts: [MUSIC] Congratulations,
thank you for taking and completing this class. Give yourself [NOISE]
a round of applause. Some of the main takeaways
we learned in this class was how to keep your
materials simple, being comfortable and
effective with your setup, how to construct the eye, how to paint with less colors, how to create depth, and how to use a background
to compliment your subject. Out of all of that,
if there's one thing I would like for you
to take away is that in order to break the rules, you must first learn them. Make a painting yours and
do not marry any formula. Lastly, don't forget
to post your project in the project gallery. I would love to see them. Also follow me on social media and leave your
review down below. Thank you again for
taking this class, and I'll see you
next time. [MUSIC]
 Korey Edmonson, Artist