Transcripts
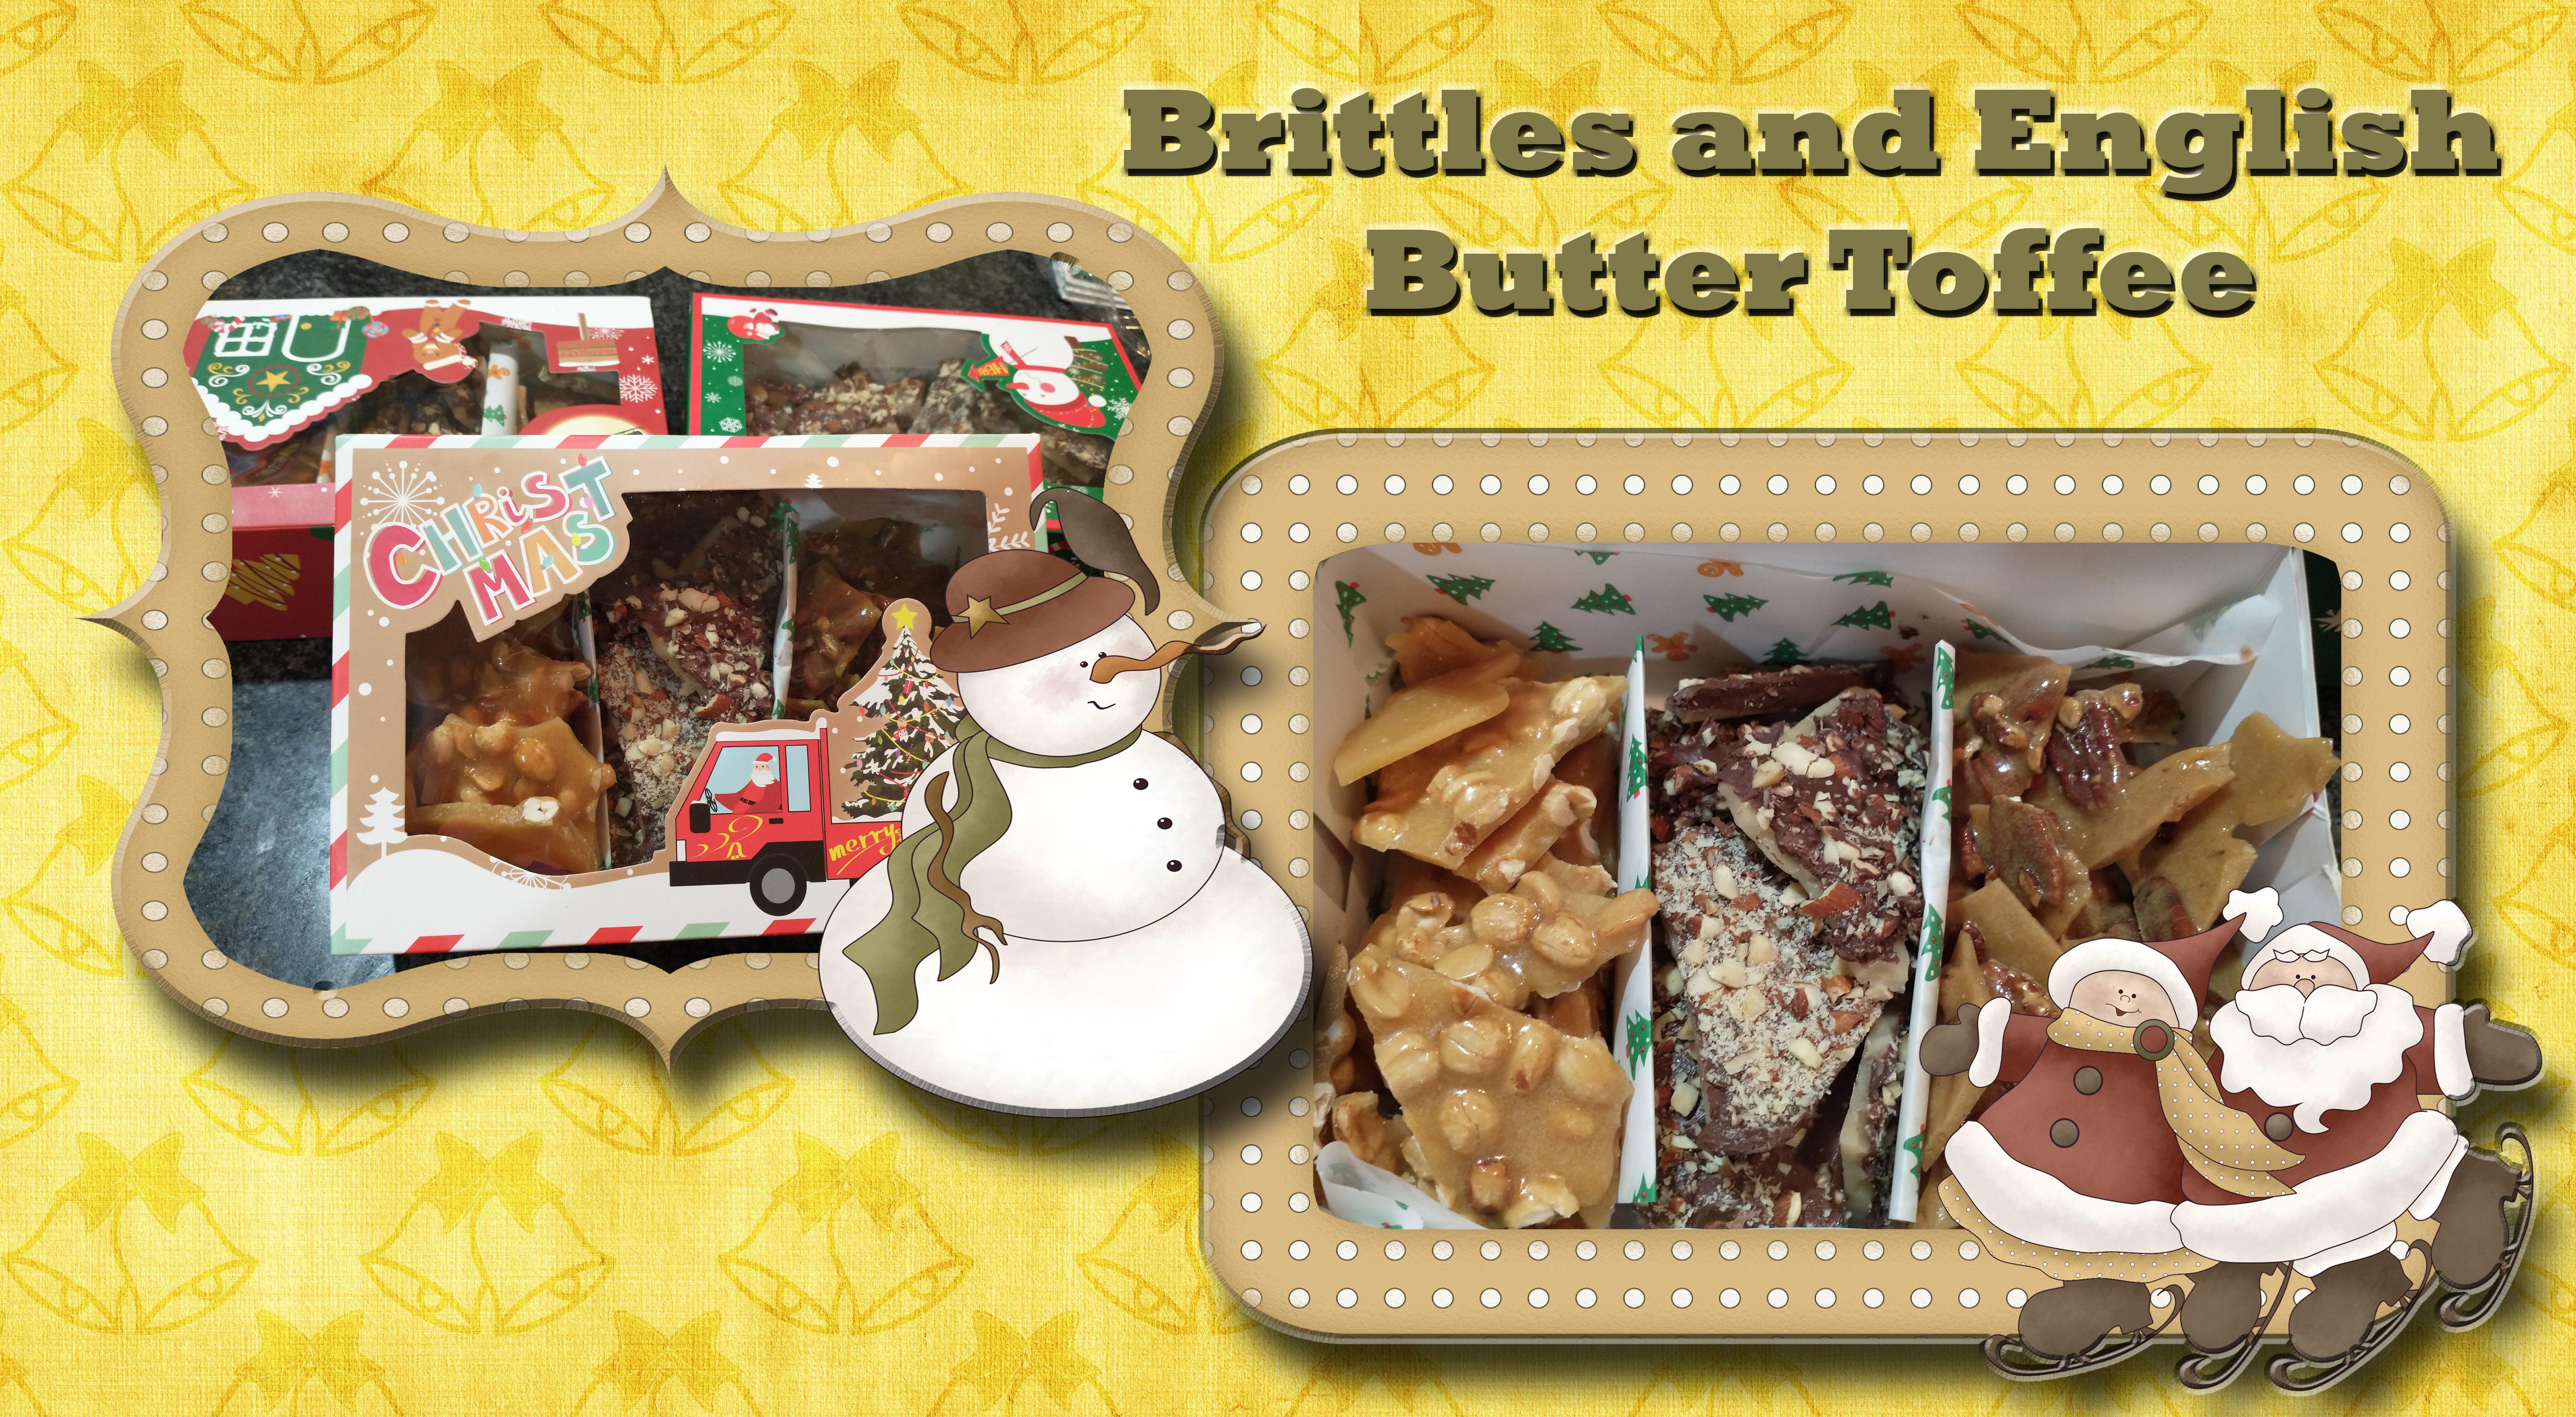
1. 01 Introduction: Thank you for taking this class. We had fun making are three types of
brittle or hard candies. In this class, I will teach you how to make these
three different types of these candies
are great treats for home or great gifts to
give to friends and neighbors. First, I will teach you how
to make them become brittle. I don't teach you how to
make the peanut brittle. Then I will teach you how to make the English
better toughy. Finally, I will show you
how to package the candy for storage and
gift-giving itself, taught Baker and cake decorator. Many years ago, I
decided I wanted to make cakes for other people
for special occasions. So I took some classes, watch videos that a lot of
books and of course a lot. Until I felt like my
decorates skills with the level that I could decorate
cakes for other people. I then opened up
my own home bakery and I had this business
for several years. One of the things I
did of this bakery, if I went to
different festivals, like at Christmas time, where I made these gravels
to sell at the festivals. I had this business
for several years and tell my husband got a job
offer in New York City. We felt like this was
a good move for us. And so I close down my business and we moved across the
country to New York City. Now here in New York City, I do not want to go through the steps to open up
another whole business, but I still up baking cookies. I have decided to share my
skills with you on Skillshare. This class is aimed
at the Baker and cookie would like to learn
how to make some delicious, not the thinking for themselves
or give away as gifts. I am excited to teach you
the skills in this class. Let's move on to
lesson number one. Become brittle.
2. 02 Pecan Brittle: We're ready to start
making comparable. The first thing we need to
do is get the pans ready. Because once the bread
is totally than kicking, we don't have time to
prepare the pounds. I have my two pounds here. I have silicon mats in there
to help it does not stick. But even with that, I
still want to spray this mess down with the spray
with those spread down. I'm now ready to go to this
toe and start my blue. I'm going to start by
using other to butter up the sides of my. This is going to help make it
so that the sugar does not stick to the sides of
the pounds crystallize. We're going to put the
butter in the pan. And to that, we're going to
add sugars, the brown sugar, and the granulated sugar, corn syrup, and the water. I'm now going to turn the heat to medium
heat and work in a Cook's doing this until
it's completely dissolved. The butter and all the sugars. That'll take a few minutes
to get all this dissolved. When I stood, I do want to
make sure that I am constantly scraping along the bottom so that everything
gets mixed thoroughly. I'm also going to make sure this butter is
touching the bottom. So the heat on the bottom of
the pan will help it melts. As you can see, the butter is almost
completely melted. So I'm gonna stop stirring
for a second so that I can pick this candy
thermometer in the panel. And I want to make sure
it is down in the stuff, but not touching the bottom. And you notice because it has been cooking for a few minutes, it's already gone
up to about 100. Actually getting close to 150. But we want to cook
it and stir it like this until it reaches 275, which is the soft crack stage. And that should
take about 30 min, not from here, but from
when we started heating it. I'm gonna keep Stern,
I think cooking. You keep stirring
yours and cooking. And when we get to 275 will be back here to
show you what we do next. You'll notice that it's starting
to boil along the edges. Getting up to 275, it's gonna be boiling
all along the top. We're gonna be getting a
nice boy going on here. So you're just going
to keep stirring it. So none of a firm's until
it gets to that to 75. Make sure that the
thermometer stays in the PAM and notice it's
boiling up quite a bit now. We have to keep stirring it so it does not boil over the top. Because again, our goal
is to get it to 75. Right now, it's about 02:25. So we have about
50 more degrees to go until we're ready
for the next step. It is getting close to 275. It's not flight there, that it's really close. You can see it's
boiling quite nicely. When we do dump, it becomes n, which is the
next thing we're going to do. This will go down
because the cons, we'll take it down. Then we'll have to
bring the heat back up. And I have been Stern it constantly while
it gets up to 275. History age to 75. So now we're going to do
is dump our pecans them, and then stir them in. Totally coated. And we're gonna
continue cooking this. So I can see it till it
reaches nine to five. So almost 300 degrees or
the hard crack stage. And it did go down
about ten degrees. So we do need to bring it back up and then all the
way to nine to five, Start constantly now, but we
do need to stir frequently. Now as we start
because of those nuts, we have to be more careful in Stern it because
we don't want to knock the candy
thermometer around too much. So what we're going to keep
stirring up frequently, lead the rest until it
reaches that to 95. It's almost gotten
back up to the 275, which is what it was at before. We put the nuts and now
we just need it to go the extra 20 degrees
till it gets to 295. And then we'll be back. It is almost two
to nine to five, it's about to 90. Scott, five more degrees to go. So again, I've just been
stern up frequently, but letting it also sit
unstirred for times. And it's really helped
the temperature go up fast if you're not
constantly staring, right? It has reached to 95. So I'm going to
turn the heat off. I'm going to remove
the candy thermometer. And I want to sprinkle the baking soda over
the top and stir it in. We now want to
bring this over to the baking sheets
and pour it out. So I want it about half
on this 1.5 from you. Once I have them dumped, I want to spread
this thin as I can. The recipe says to pull
it apart with the fork. But I find, as long as I'm doing this and spreading it out, I really don't need
a fourt to pull it. Spread between two
baking sheets, going back and forth between
the two to spread it out. So there's my 01:00
P.M. yes, my other pan. I am now going to let these completely cool in
the baking sheets. If I were to touch them
with my hands right now, I would burn my hands. But by letting them cool, I'll be able to then break
them apart without a problem.
3. 03 Peanut Brittle: We're ready to bake
peanut brittle. The first thing we
want to do is spread two pounds stem cell are going
to be pouring the units. We're now ready to go over to the stove and make
the peanut butter. We're going to start by taking our butter heading powder
all along the side. This helps make it so that the sugar does
not crystallize. Spread the butter
along the sides. I'm going to just dump it in and turn it to a medium temperature. This, I'm going to add my sugar, my corn syrup, and my y. And then I want us to all
of this to get combined. And I want the butter to melts. And I need to be stern
up constantly so that nothing firms better
is almost melts it. We are waiting for this
mixture to come to a boil. Once it comes to a boil, we will clip on the
candy to monitor. And we will turn me heat down from a medium-high
to a medium low. You can see the butter's melted. Now we're just waiting
for it to come to a boil. When I stop staring, I can see it's not quite to
that Boyle in the middle. It's getting close
because you're getting bubbles along the side of it. But we want it to
be a complete boil. Now I'm going to turn the
heat down to a medium low. And I'm going to stick
my candy thermometer m, so that it's in this stuff. But it's not touching the
bottom because I don't want to measure the heat of
the bottom of the pan. Measure the heat, the
temperature of the liquid. And we're going to
start this until it reaches 275 degrees, which is a soft crack stage. The recipe says this
could take about 30 min. It didn't take that long yesterday with the
become brittle. So I doubt this
will, but we'll see. The important thing
is to get it to that 275 degrees stirring constantly. We're actually
only going to stir this occasion we don't need. You'll notice acids getting
a higher temperature. It's becoming a heavier serve. And it's going down in the pan and it's not as high
up in the past. We are to, to 60, so we only have 15
more degrees to go before we add the two. There is almost at 275 to 70 would just have that
lasts five degrees to go. So we're watching it
a lot closer now, waiting for it to get up to 275, what it does reach to 75. We're going to dump our
Rob peanuts into this. We're ready to dump
or peanuts him. Just dump it in
and we stir it in. So we're going to
stuck constantly. So we have this totally
started getting all of the peanuts coated
with this spirit. We have the peanuts
totally sturdy. Then we're gonna go to
gesturing frequently. So more often than when
we were getting with up to 75, not constantly. We're going to cook this
till it now gives to 95. And when we dumped the
peanuts and this did drop about ten degrees because
the peanuts were cold. So we actually need to
bring it back up to 75 and then continue on to 95. It's still dropping. It's almost gone back down
to two if not applied. But we still need to cook
it until it gets to 95. As the peanuts warm up
and they start kicking. This will start rising again. And this part should
take about 15 to 20 min. She noticed that
sonata this point, because we've got all
these solid peanuts, but we do want to make
sure that they don't burn and that's why we
store it frequently. It has started rising backup, but we're still below that
to 75 that we started. We've now reached that to 75, so we're back up to the temperature we were
before we added the nuts. Now we just need to continue
to cook it stern up frequently until it
reaches that to 95. It has reached to 95. So we're turning the
heat off and we're taking the candy
thermometer out. And we're going to sprinkle
the baking soda on top. Once we have it sprinkle, want to stir it in. You'll notice it's firm enough. Let's put it, we want it to do. Now we're going to take
it over it important. So I want to pour about half and half of it in my other PAM. Once I have it in the pan, I want to spread it as
thin as I can get it. So it can cool and be this one. And I'm gonna do it to this one. I obviously put a lot more than the other parent,
but that's okay. It's both PAM so
big enough that it can hold more than half. Just wanted to keep
spreading this out until I have it
as thin as I wanted. Without like this. I'm gonna go ahead and
let this totally cool. I do not want to touch it
right now because if I did, I would give myself very bad.
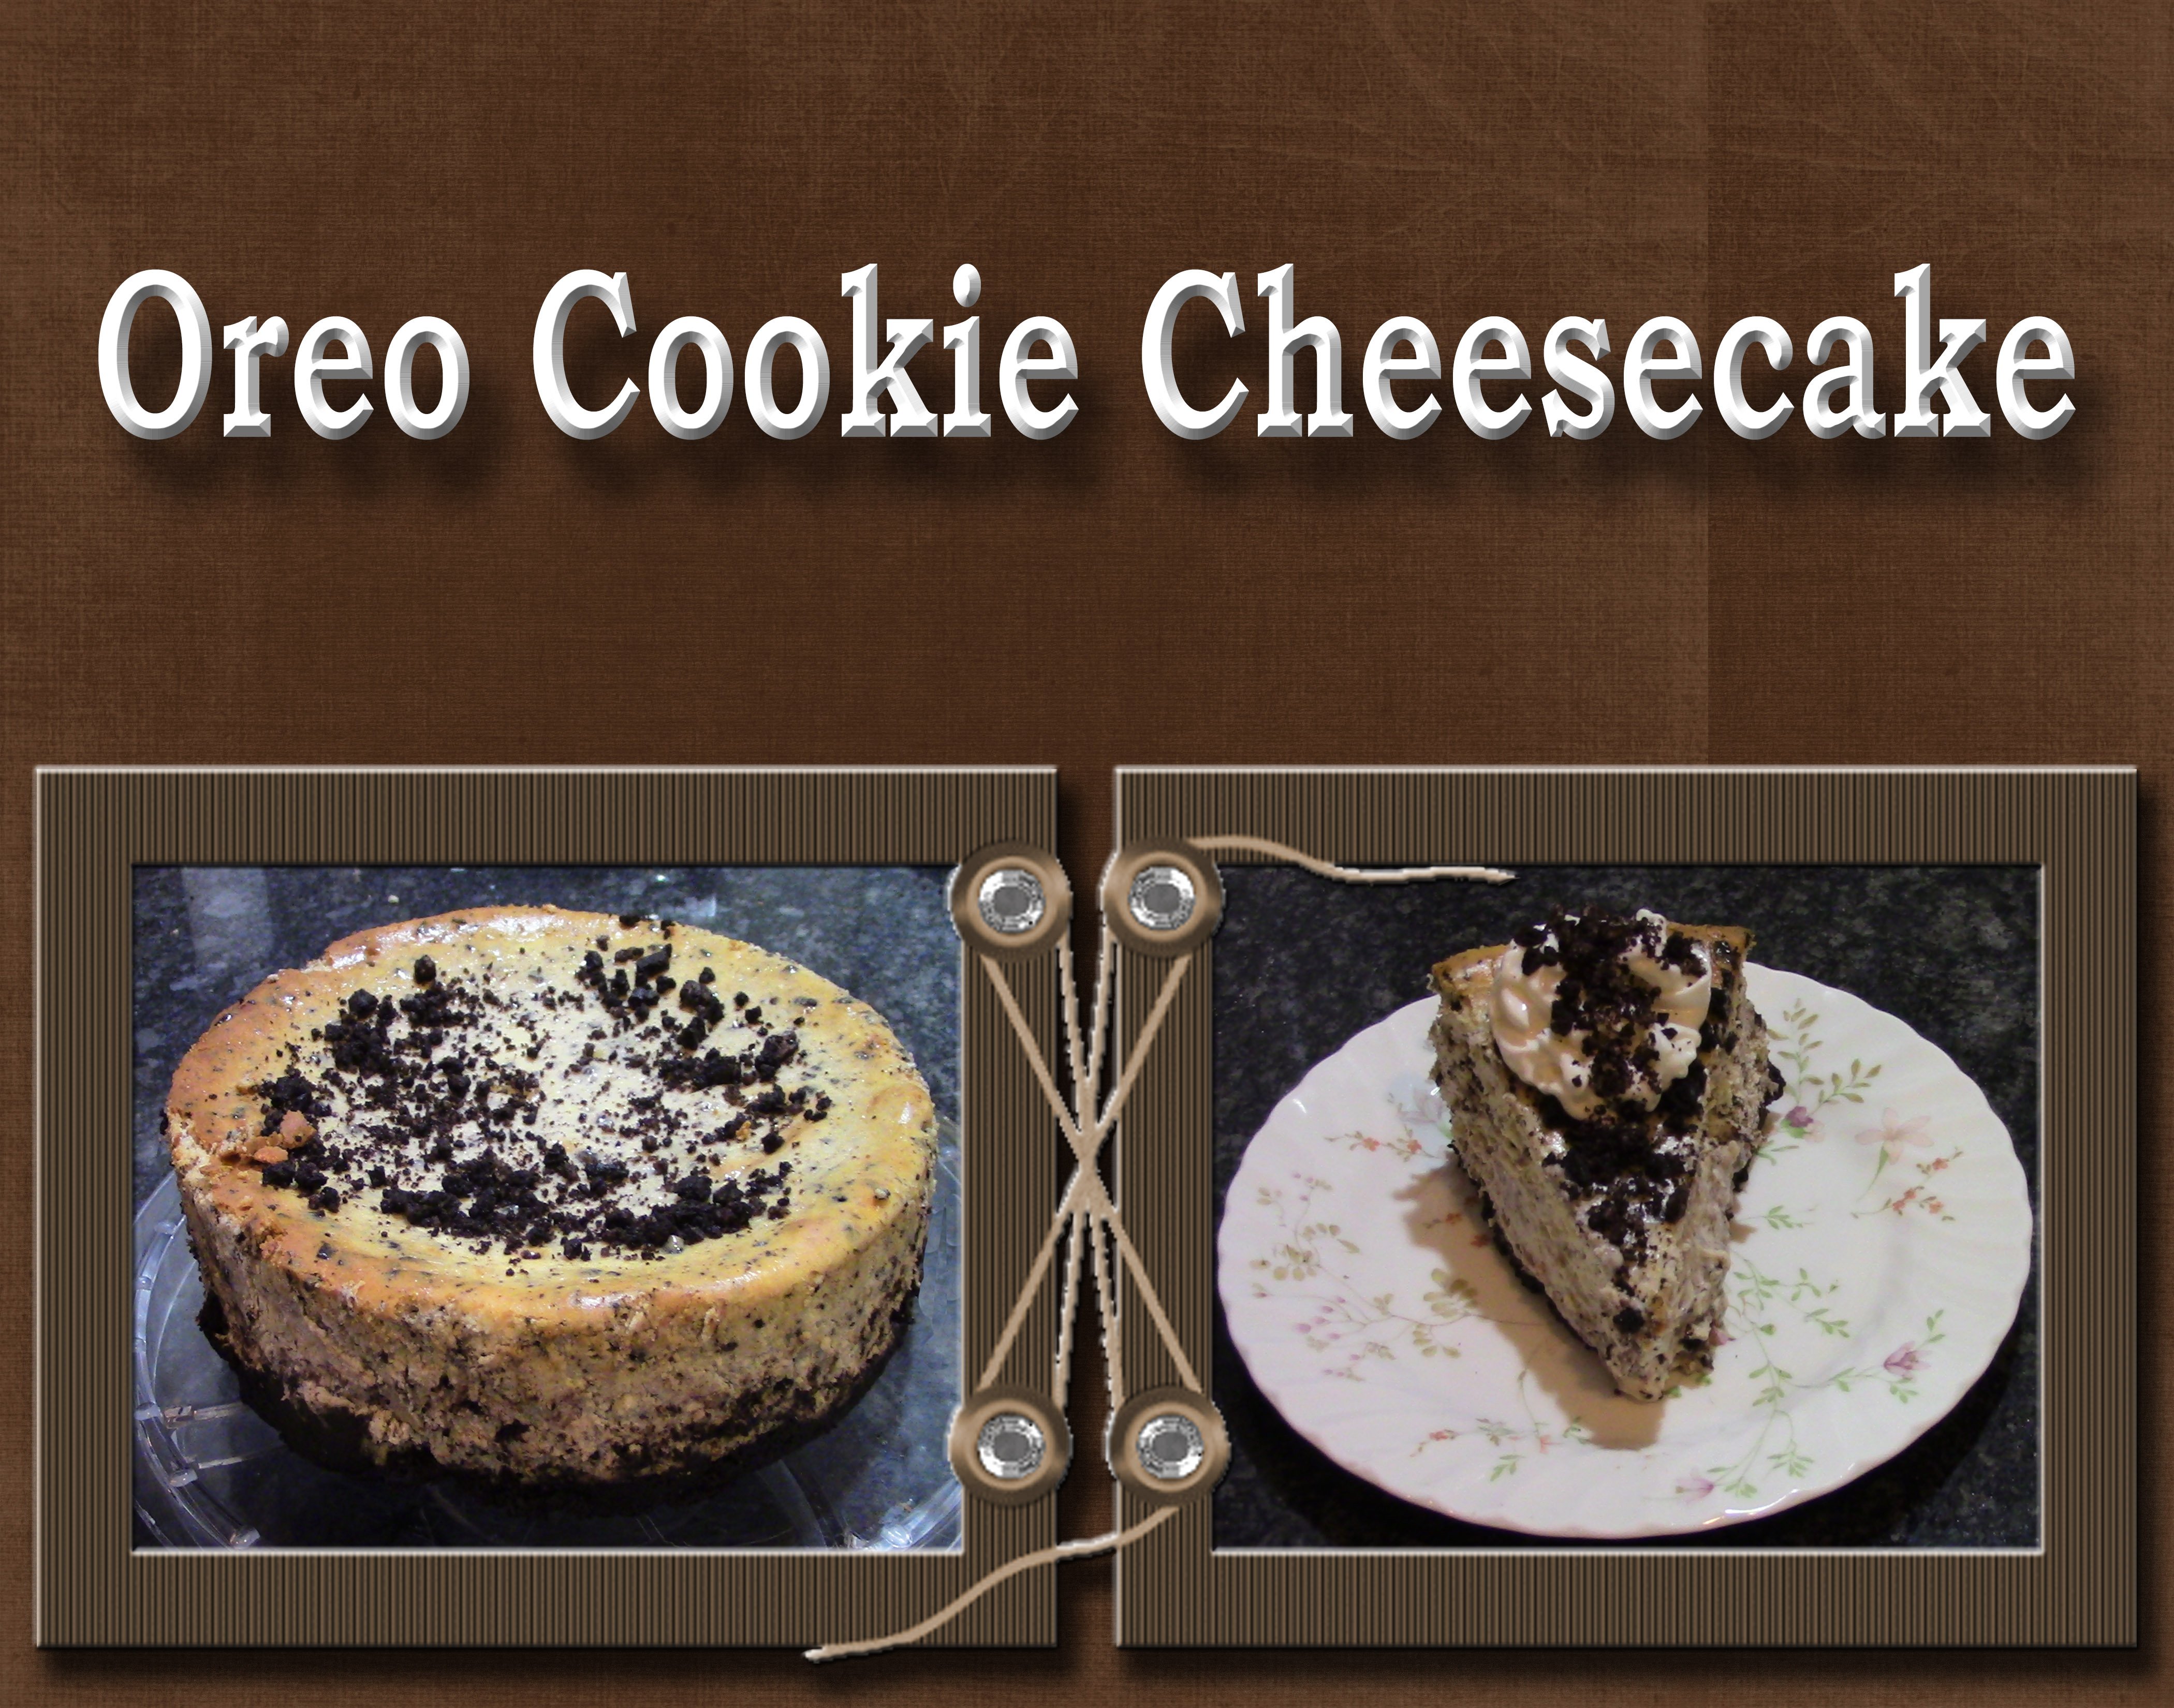
4. 04 English Butter Toffee: To start making the
English pattern, the first thing we
need to do is to grind the almonds into smaller pieces. I have my nut grinder here, and I have my elements. I need one cup, which I have that mark you in
right here on my grinders. So I'm just going to grind, tell the nuts get up to there. And because it's candy
and sprinkled on top, it doesn't have to
be totally accept, but I want to get it as close
to one cup doesn't count. So I just fill that up. And then I turn
this to gradients. You can use a food processor. Brian did a lot finer. Or you could even use a
knife and just chop them up. I like using my nuts, right? I have basically one cup ground. It's teeny bit more
in the center, not quite there at the edge. So it probably is about one cup. We now want to spread them down so that when we're
done cooking the candy, we can put it right in the path. We're now ready to go over to
the stove and start making eye candy in our large
heavy sauce pan. We're going to combine
the two cuts up other and I want to
turn the medium. Then we're going
to add the sugar and the one for
teaspoon of salt. We now want to stir this. Tell the button is melted and the sugar is dissolved
into the butter. And the steroid in the beginning
is not going to be a lot because we still have these
huge cubes of butter. But I asked the butter melts will be able to do a
better job of storing. As you can see, the batter is starting to melt. We still have some chunks, so we're still going
to keep stirring up until the butter
completely melts. We're not doing a
real vigorous stir, which is doing a nice soft, gentle stir which keeps the butter and all
the stuff moving. Butter is almost melted. The next step that
we're looking for is we want this to come to a boil. We want the better
to finish melting. And then we want this to come
to a boil. When I stopped. You can see there are bubbles
forming on the sides. But right now we're trying
to get that butter melted. That's why we're stirring it to keep the hotspots altogether. The butter melts faster. My betters now melted. You can see it's starting
to come to a boil. I'm going to stick my
candy thermometer in. And we're going to cook
this stern occasionally. Not constantly,
but occasionally. Well, it boils, which you can see it's starting to
get to that boiling, tell it reaches 285 degrees. Now you can see it
pretty much has a nice foil that's
covering most of it. And I'm just going
to start down. Occasionally. We'll be back when this gets
close to that 285 degrees. This is almost a 285 to 80. So we just need it to come
up five more degrees. You'll notice it's
starting to turn a little bit more ground
as the butter has brown, it is reached to a file. So I'm going to turn the heat up and we're gonna go dump this. Well first let's remove
the candidates monitor. And we're gonna go
dump to our Pam. We just want to dump
this out on the pen. Helps products, so
it gets to all of the gifts spread out evenly because we don't
want a very thick. Once we get that
spread out evenly, I want to sprinkle the
chocolate chips on it. And then let this sit
for a minute or two. While it melts and softens. This is softened. So now we just want to
spread that chocolate all the way out to the
edge of eye candy. You notice the canvas. As it moves. Spreading up chocolate all
the way up to the edge. Keeps spreading it to have
it all into the edges. And we can see that all of
the chocolate has melted. I don't want to see any chocolate chips,
chocolate chunks. I also don't want to see any of the toffee that's underneath. I want it all to be covered. Wherever you see a thicker, you want to move it to
where it's thinner. Now we're going to take our almonds and just
sprinkle it on top. Once I've totally covered it, I can look and see
where it's lacking. Go back to those spots. With that done, I'm just
going to come back with my spatula to press that down. We're now going to
take this and put it in the fridge so that
chocolate completely set up. After it's set up, we'll be ready to
break it apart.
5. 05 Packaging And Storage Of Candy: Our become brittle
has totally cool. We're now ready to pack
it up for storage. I have a container to put it in. I'm just going to take like
become brittle and break it up into sizes I
want for serving. And I'm gonna do this
with both pounds. And there we have
the second panel. We just want to
cover this so I can stay fresh till we're ready
to make our gift box. This can be stored
at room temperature, and I have the other
two candies made. And we pack it in. Our gift bags box or peanut
brittle has totally cool. So we're now ready to
put it in a container to store it until we're ready to put together the gift boxes. We're just going to
check the pedal and break it apart into our bite-size pieces and
put it in our container. So we just keep
breaking it apart. We have all of it and
I'll look for continuous. We want, as you can see, one recipe of this next slide. I just want to cover this up so we can stay until we're
ready to make our boxes. We let this sit in
the fridge and now we're ready to break it apart. So I want it kind
of I put a spatula under it so that I
could break them off. And then I'm just going
to break these into nice bite-size pieces and
put them in my container. I just keep breaking it up
until I have it all done. Here. We have the end
of breaking it apart. We can then put the lid
on up to containers. These are ready to be gift box. I've made all of the candies, and now we're going
to do a gift box. I went ahead and made this gift products that
has the three together. And yet to do after
you get them in there, close it up and this
is ready to give. Let me show you how I did that. First of all, I thought
these small cookie boxes and I bought
this Christmas. I'm going to buy a piece
of paper in the bottom. And I want it to go up to five, just a little bit on both sides. Then equal amounts on
the front and the back. So this does not go up above. So that gives her the coating
it needs for the bottom. I need to make the dividers. And I did that with two
more uses of the table. And the first thing I did
is I cut this in half. I've put it in there and I was one third is about right here. So unlike in about one-third. And then I'm taking
this paper and I'm holding it at
that one third point. And then this is going
to go straight up. And then I need to decide, I want this scope out this high from looking at
how high I want it. And I wanted about that high. And I'm going to fold it again. And then I want this
last piece folded. And then this is
one-half of my thought. For now I'm gonna
do the same thing. Instead of making
them with the box, I'm just going to
use this piece of paper and use it as a template. And do that again, I'm going to focus in half. And then I just
lay that on there. And because it doesn't
have to be exact, that's where I'm going
to fold it again. Hold it right there. And then I'm going to
put this back on there. Got down, making sure these align that to the side because that's
what makes it square. And then I want to fill that. And then I should
have my second piece. I just wanted to stick this. And then I just
stick this in math. And it's kinda flimsy right
now, but that's okay. Then I've got to decide
which one do I want to put in the middle on this one? I picked the one
that was the most different or the English
better tough in the middle. And I can do that,
but this also, I just want to stick
this in and fill that center section
up with the English. Better, toughy. Once I get that. I feel one side with
the pivotal thing is, is when you're putting it in, if a piece is too big, just right. And the other side convert all. These really are
flexible because this is just that wax paper
and able to move it however much I want my candy. So now you saw how I did it. And then of course,
I would just take this, close the box. Now the other thing you
can do is you might decide that you just want a box
with the onetime in it. So to do that, you would
just take your paper. And then I just pick whichever one I want
to put in there. So let's say I want this one
to be English better toffee. I would just fill this whole box with the
English. Better, toughy. Now obviously, if
I were to do this, you're only gonna get a
couple of boxes out of each candy that you make, because it takes a lot
more to fill a box. So a lot's going to
depend on who you're giving it to, what they like. So then I just feel that
until I feel like it's full. And then of course
I would cover. You could do this
same thing with the K-map and the same
with the pre-comp. It's going to work anyway, you choose to do it. You could get a little baggies and put them in the battles. I don't have Christmas baggies. But you can also do
little gifts in the bag. So you can take one
of these papers them. Then you could just stick these little papers inside
the bag. That Christmas. It's at the back of the bag. You just stick some
candy in the back. And of course this
way we're going to be given a lot less cabinet
because these are just snap. I have some Janda in the
bag and I seal it up. You can also buy
Christmas bags so you don't need but I didn't
happen to have any, so I'm just doing it this way. Let's draw our English better. And then I'll do the
same with the grill. You have three little kids. That's the candy that
you could give away. You could fit them together. Just a ribbon to that. Work. You have the three
different people. You can have fun
deciding how you want to box up you can do to give
to your family and friends.
6. 06 Final Thoughts: Thank you for taking this class. We had fun making are three
kinds of nuts or brittle. We first learn how to
make our pecan girdle. Then we learned how
to make a peanut. The final candy that
we learned how to make was English, but a tough. We admit all three candies. I showed you how to box them up or package
them so that you could give them away as gifts or
you could just keep them in the original air-tight
containers that I showed you as I finished his cabbie to enjoy
as a family at home. I hope you're candies. Turned out the way that
you wanted them to. Your project for this
class is to make these three recipes and are
in our project section. Please upload a picture of your bristles and
tell us how it went. Which one? You like the best. I look
forward to hearing from you. From my kitchen to your kitchen.
 Nadine Thomas