Transcripts
1. What is this class about?: Have you ever wanted to
paint but feel blocked, maybe after a long
break or just because every painting feels
like it must be perfect. In this class, I will show you a simple way
to reconnect with your watercour practice through short and relaxing
sketching projects. Hi, I'm Maria Watercolor
artist, author, and instructor. Most of my work is quite
detailed and time consuming. And over the years, I noticed that somehow makes it harder
to start a new painting. So I know when the
time is limited, it's easier just to follow the perfectionist voice and postpone the
painting altogether. That's why I created
this low pressure imperfect sketch challenge. We'll work through
seven simple sketches using watercolor
and card pencils. You don't need
special materials, whatever you already
have will be enough. I will explain the idea
behind each project, and then you can either follow my example or adapt
it in your own way. You can follow the class
day by day during the week or jump in wherever it feels
most inviting for you. Even though the projects
are quick and playful, you'll still practice
some important skills such as working with
negative space, letting watercolor
flow naturally. Simplifying subjects
and building loose but confident
pencil lines. Of course, I will show you
how I use photo references, but I also encourage
you to explore different interpretations
because there's never just one right way
to sketch the subject. This class is about
enjoying the process, staying curious, and making some space for imperfect
but meaningful work. So, if that sounds
like something you need right now, I'd
love you to join me.
2. Before we begin: Hi, and welcome to the class. I want to start by saying that creating this class
was really fun and even free for me because this technique is not
something that I usually use. My work is normally much
more detailed and technical. So working in this
loose faster way, I had to constantly remind
myself to keep it simple. It reminded me that simple
shapes can be enough and also how beautiful watercolor effects can be if you let
them flow naturally. I also really enjoyed working on drawings with the bald and
imperfect pencil lines. Here each project takes about
ten to 15 minutes to make, and I really recommend a project as a small daily practice. I think you could try
to watch one video per day and do just one sketch. Its rhythm keeps
the pressure low and helps to build consistency. The project slightly
growing in complexity, but there's no strict order. So you can follow
them step by step or jump into the ones that
feel most interesting. Both ways are fine. And remember, this class is
not about perfect results. It's about experimenting, trusting the process,
and enjoying sketching. So take your time, be curious and most
important, have fun. So good luck, and
let's get started.
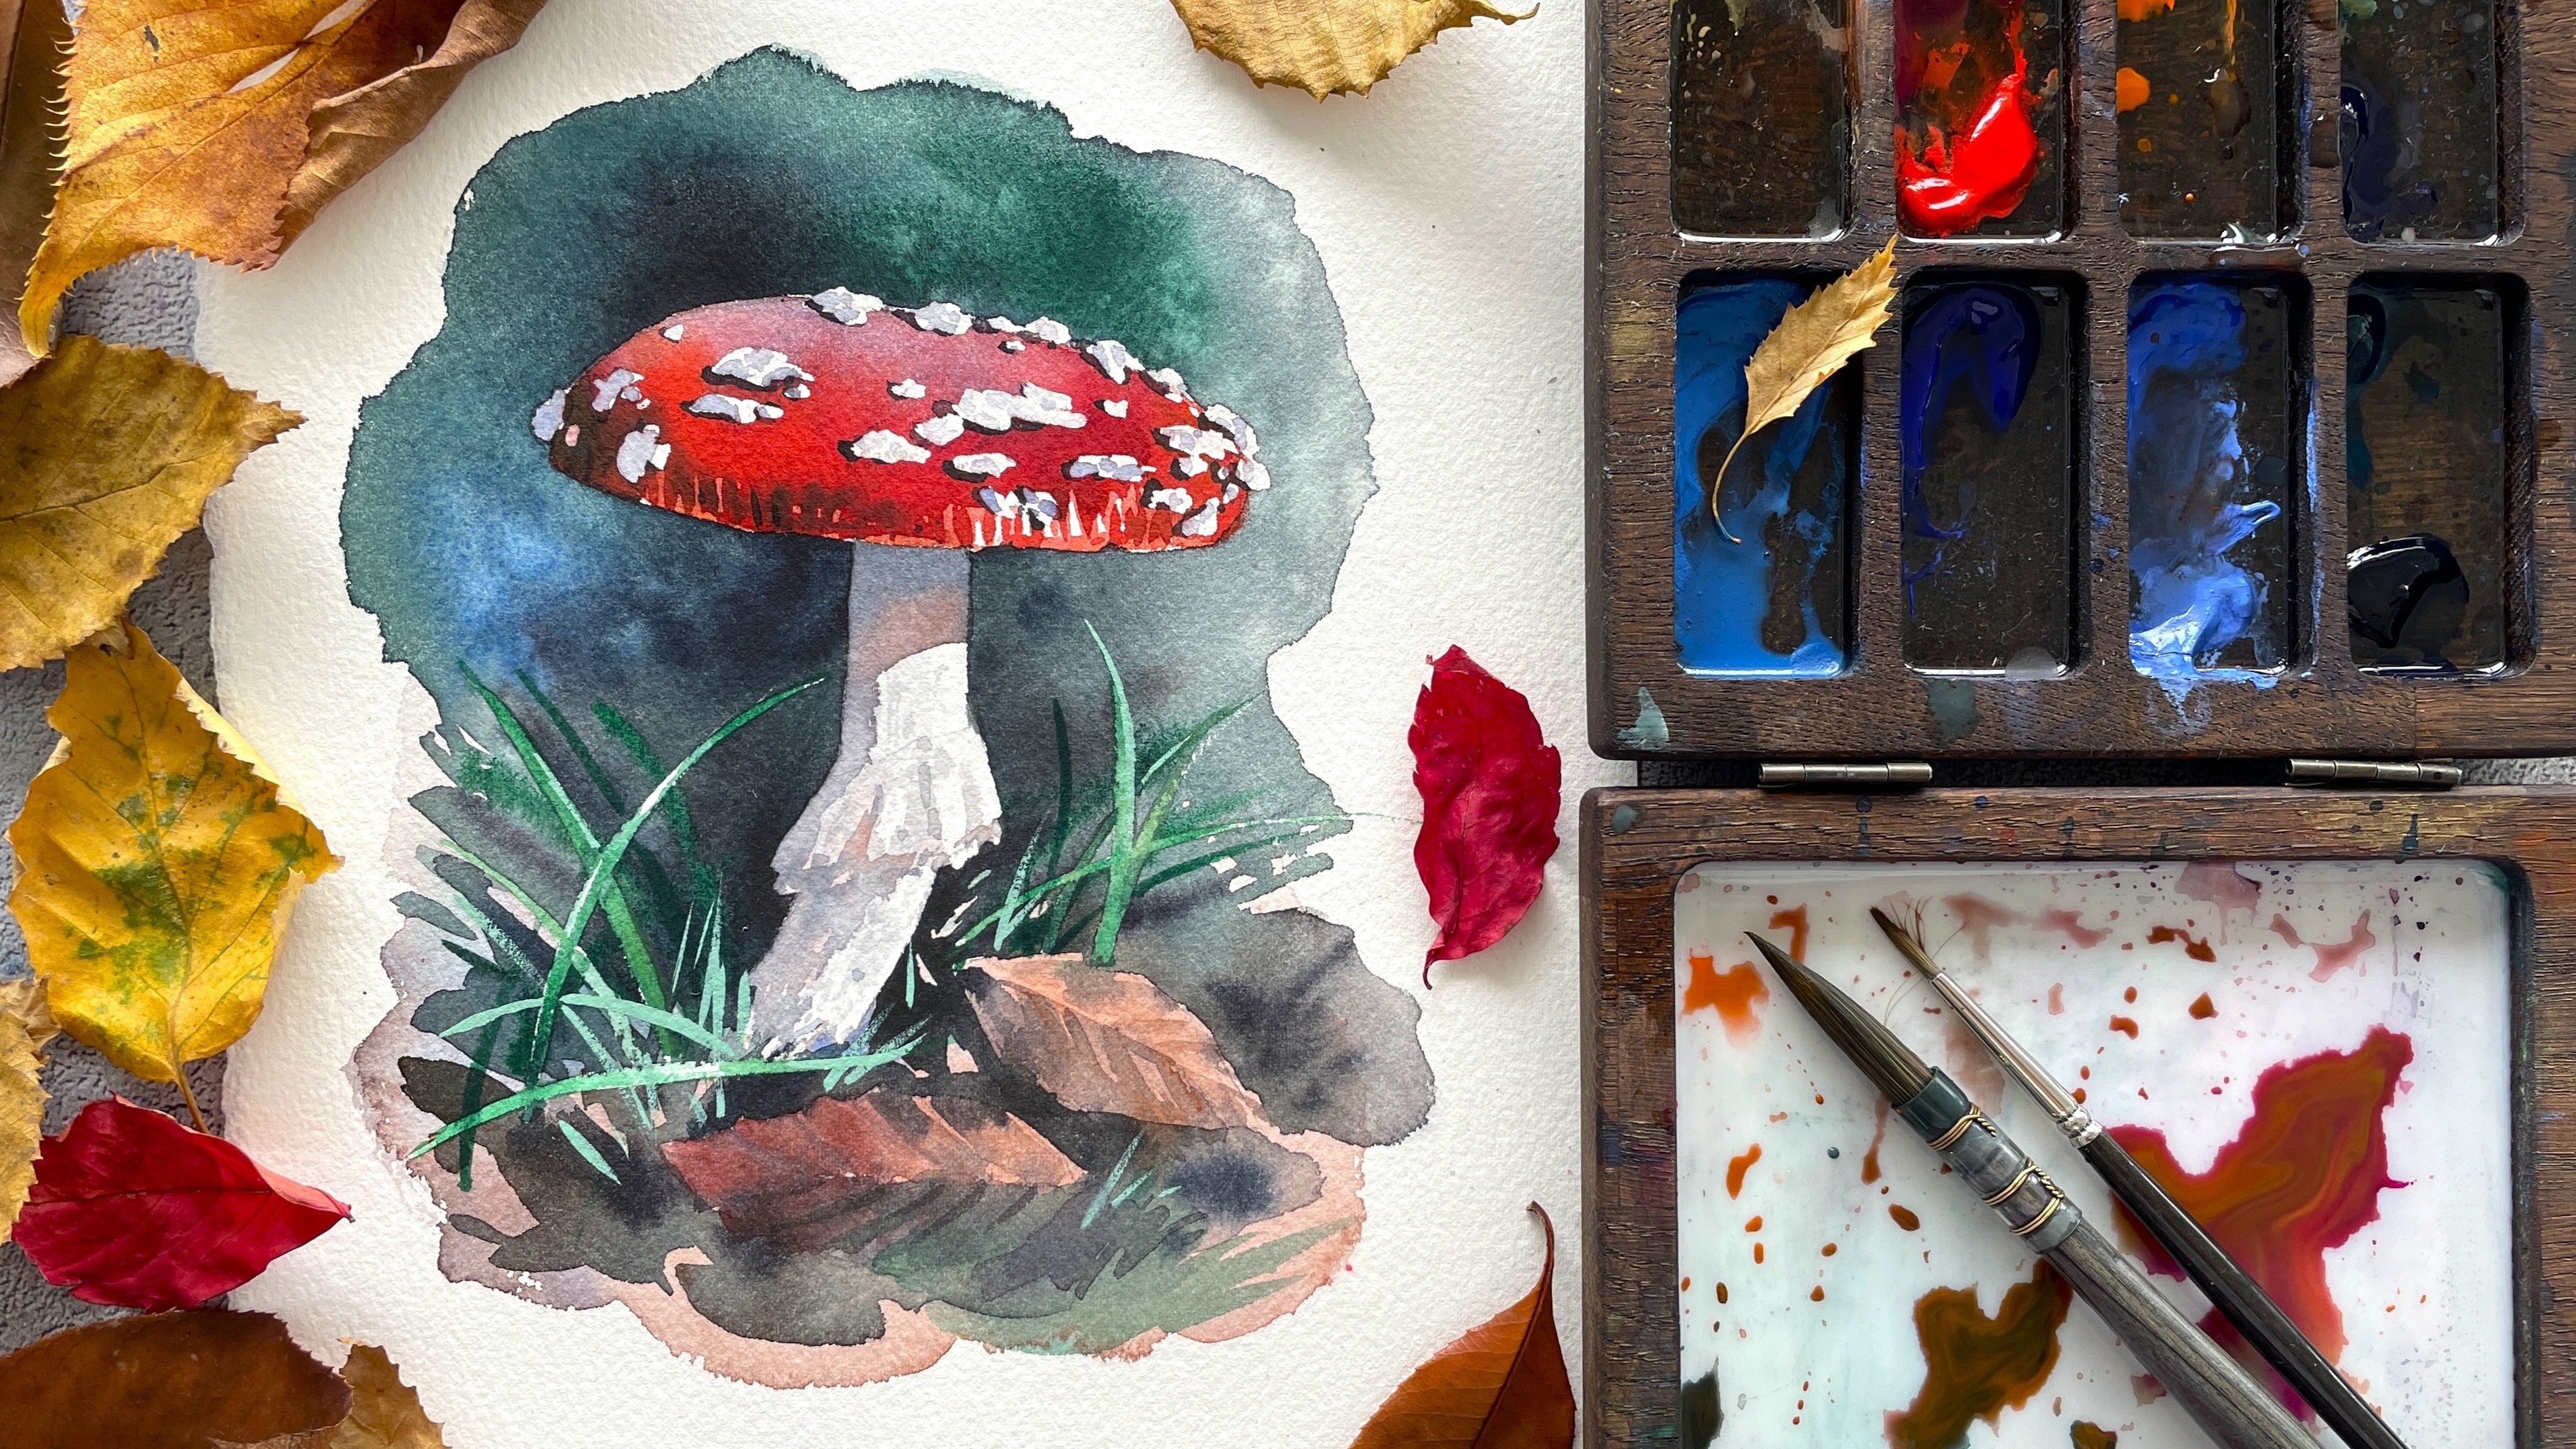
3. Materials: This class is designed to
be low friction so you can do the exercises with a
minimal set of materials. So basically, any watercolor
set will work for this task. I've listed the colors I use
at the start of each video, but you don't need to
match them exactly. Play with what you have.
Paper, though, is important. It really affects the results. And in this class, I'm using a very simple cell loss paper, watercolor sketchbook of
19 to 20 centimeter size. It's a 300 grams/square
meter density paper with fairly soft surface. If you paper smoother,
that's fine, too. Watercolor facts may appear even better on classic
smoother cell loss paper. You can work in a sketchbook
or on separate sheets. I'll be using the
synthetic brush that can hold a good
amount of paint. But still pretty easy to manage. I also have paper towels, water, and palette ready. And the last but not least
new material for me in my Skillshare classes
is colored pencils. I have two sets, regular
and watercolor pencils, but I'll use them dry on paper, so it doesn't really
matter which one you have. If you don't have pencils, you can do the same line work with watercolor
and a fine brush, markers, pens, or black
liner, if you want. Overall, just use what you have and let your materials
guide you creatively. Once everything is ready,
let's get started.
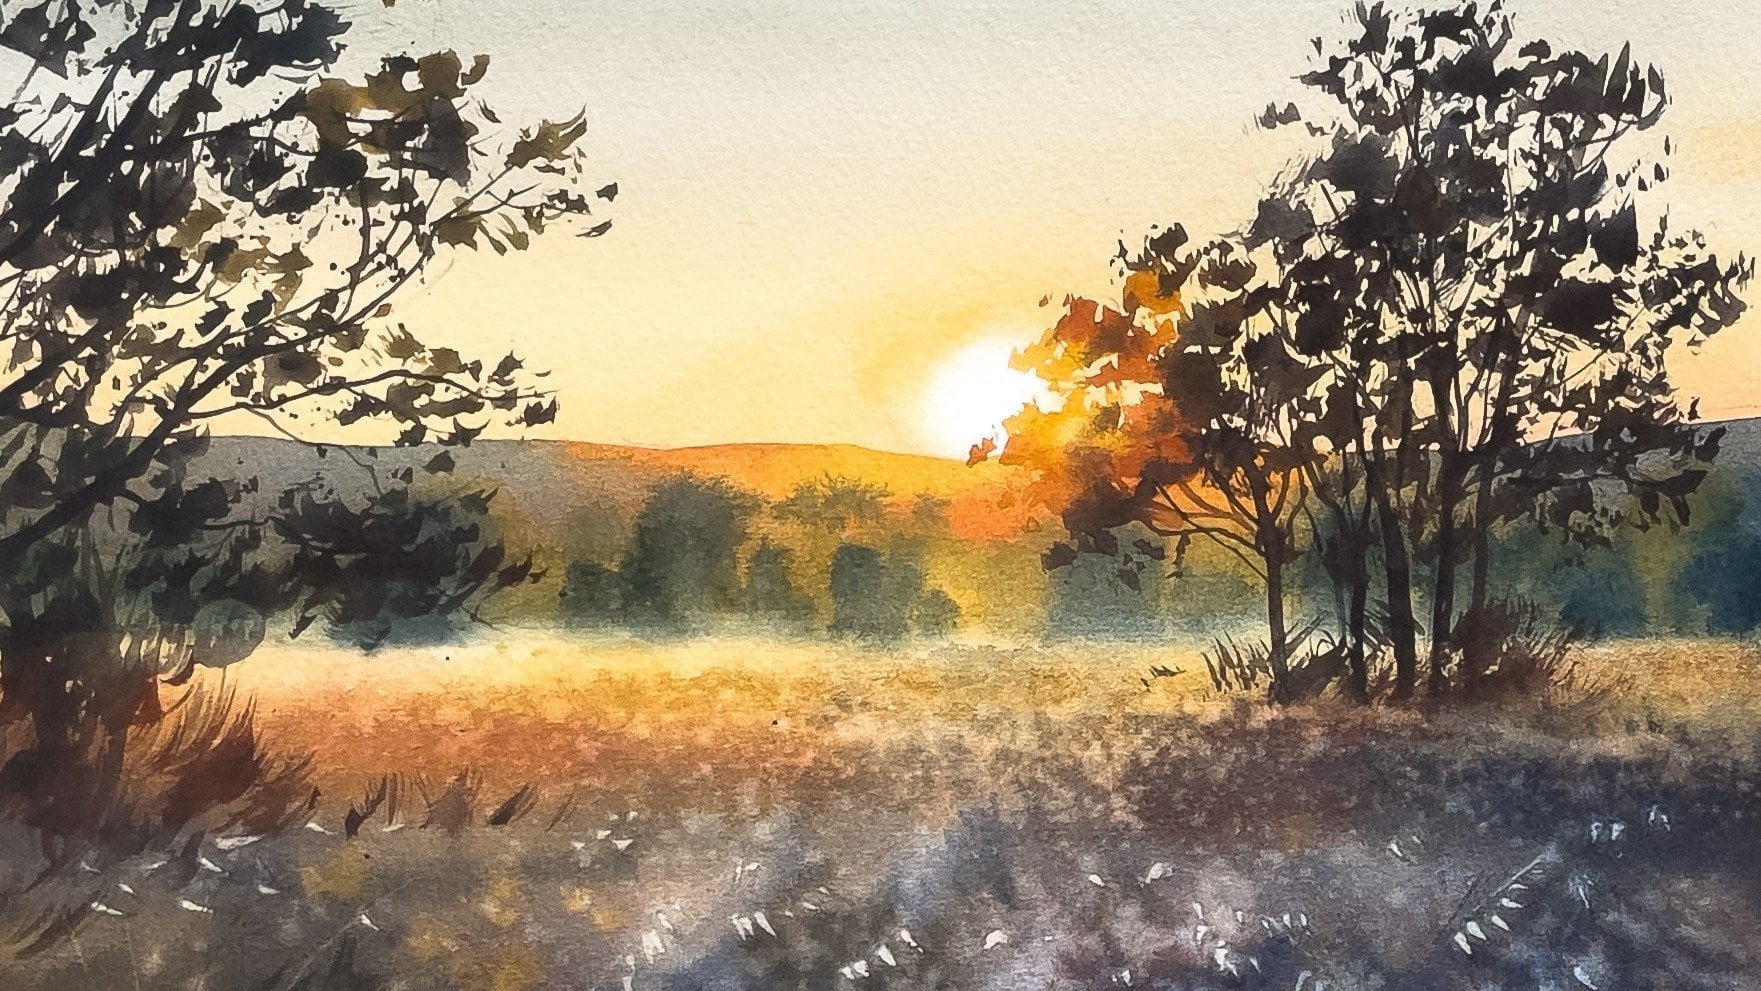
4. Tree: watercolor: Let's start our first class. In all the projects, I'll choose one or two
areas to paint with watercolor and I leave part
of the image as white paper. A subject like this
one feels to me suitable and simple
enough to begin with. To make the watercolor part more unpredictable and less perfect, I will work with
day liquid paint, allowing it to create
uneven textures and effects as it dries. If I think about it, it's the
thing that we actually very often try to avoid when
control the painting process. I will need a couple of
green shades for the tree. I'll start by mixing
my paints like this. Here, I can add a bit
of emerald green. I'm preparing
several green shades based on green
mixed with yellow. You saw the color
names on the screen, but that's not really important. Just use what you have. So this is the kind of paint
consistency we need. Of course, I'm using a
photo reference here, but it's more like
a visual support, so I don't have to invent
everything from scratch. I've already chosen the
color pencil I will use. It's a venetian red. And it's not very
sharp, by the way. And let's draw a simple
frame for our feature image. Of course, I'm not
going to use a ruler, and I'm not trying to
make straight lines. Imagine that you're 5-years-old. Sketches don't have
to be perfect. The only thing is that I
close the shape on all sides. So from this reference
image, I will take the tree, the hills and the background, and the grass in the
very simplified way. I will start with the
very general shape. I build a few blocks
of foliage and some small details,
like little dots. This is a basic
structure of the tree, large loose shapes, and then doing everything
with they liquid paint. Notice how the
paint keeps forming this drops and pools of water. It means that it
won't dry too fast. Now I will take a bit of
yellow and gently add it here because I can see that in the photo that some parts
of the foliage are lit. At the same time, it helps to
create the tree's outline. Because there are some small separate leaves here and there, and working with this yellow is really perfect
for adding them. And the shapes stay
very spontaneous, as you may see, and the
paint is still quite watery. There's also a small branch
that I almost forgot. You can add a few darker drops here and
there if you like. And now I just leave it. You can slightly tilt the
paper, let the paint move, maybe refine the edge so it
feels more like foliage. And that's basically it. Next for the background, I'll
take a cooler bluish color. This time, it will
be ultramarine blue, and I'm going to paint
the distant hills. Then I switch back to
the greenish tone. And I really want everything
to flow into each other. Here in the foreground, we have this grass, and
to paint its contours, I place the brush vertically and create these irregular
grassy edges. In this class, we will work
a lot with negative space, which means shaping objects by painting the
background around them. And in this case,
the green hells define the edge of the grass. And I won't paint the
grass area itself. It will stay just white paper, so I can stop here. Now I will let the
watercolor dry. I won't remove excess paint. I want it to stay liquid and
create effects as it dries. You can leave it
to dry naturally and have a cup of
coffee in the meantime, or you can use a hair dryer. As you may see, I'm
using a hair dryer. And notice that the direction
of the airflow matters. It affects how the paint moves and how it creates these
different effects and shapes. You can also tilt paper from
time to time while drying. Where the paper starts drying, I already get these
textured edges, and they look quite nice, almost like heels in this part. Alright, let's just
dry completely.
5. Tree: Pencil Drawing: So now you can see
the paint is dry. In the process, these kinds of blooms and textures can appear, and honestly, this is the
real charm of this technique. Now I can add a pencil line
on top of this landscape. As I mentioned before, I'll
be using Venetian red. These are watercolor pencils, but I'm not going to
activate them with water. I'll just use them as
regular colored pencils just because I simply love some of the colors in this set. And I'll start very simply with the main contours
of the landscape. I'm drawing almost without
lifting the pencil, pressing quite firmly, and
that's why I hold it this way, which is actually not
how I usually draw. Normally, I prefer
lighter lines. But for this exercise, we want to lose
slightly messy feeling. So this group works
really well for me. You might actually find
another way more comfortable and feel free to share in the discussion section
what works best for you. You can see that I
don't strictly follow the watercolor shapes underneath because this is not meant
to be a perfect sketch. For this part, you can choose
any pencil color you like. I went for this
warm, reddish brown tone because it's dark
enough for tree trunks and creates a strong contrast with the greens and
blues in the painting. But I'm so curious to see
what colors you choose. Now I will draw the tree trunk. I start with the
main larger trunk with this kind of shape. I also chose this color
because it's quite opaque, so you can see how nicely it
covers the blue background. I also tried the regular
red pencil for the subject, and it worked nicely, too. It's easier for me to start with the outline and then fill it in. You see that I simplify
the tree a lot, but it still stays believable. The branches get thinner as they go up and disappear
into the foliage. I try to keep that in mind. Maybe one branch goes
out here or here. We are not drawing
a perfect tree. I also use a
slightly dull pencil because it feels areas faster. Here is another
trunk or a branch. This one turned down
thicker than I planned, but that's totally fine. Oh, I'm really enjoying
this kind of sketching. And I also love this
color combination. This brick cred with color
bluish green works so well. And I had a few branches in
the gaps between the leaves. If your foliage area
is fully painted, you can always
draw some branches on top of the
paints if you want. And I think that's it. It's
a quick, imperfect sketch. F.
6. Clock: Watercolor: So it's time for
our second project. It has just two elements, a painted abstract background and a pencil drawing on top. Nice and easy. For
the background, I'll use a blue paint that granulates and separates
into two tones. You don't have to do the same. You could also get
a similar effect by mixing two colors from your
palette if you have them. For example, a
granulating torquise or cobbled blue with a transparent
pink, orange or red. The heavier blue particles will settle and create a
beautiful texture. But you are absolutely free to choose any background
color you like. And I'd really love to see your version in the
project section. And with this very watery
single color wash, I start painting the
shape of the street lamp. I'm not focusing
on drawing lines. I'm thinking about the background
shape behind the lamp. I start from the top and
slowly move downward. Here's the little
base of the lamp. It's not straight with
this imperfect shape. The contra stays very
wet with lots of water. Then I move on to the
round shape of the clock. I really don't worry too
much about proportions here. It's more about capturing the character of the
object if you want. So I slightly fill
this area with paint. Since the outline is still wet, everything will merge
into one larger shape. I'm taking a bit
more pure turquoise and add some color
here on the left. And softly fill
this area as well. You can do this or skip
it. It's really up to you. The goal is just to suggest
the shape of the clock with the background and ideally keep it a
little imperfect. I will add a small
drop of orange here, just a tiny accent. Since I plan to draw
with a red pencil later, I really want to have this hint of warm reddish
tone in the wash. I decided to leave
this area without any paint to give some breathing space and room
for pencil drawing later. And that's it. You can gently tilt
the paper if you like, and let the paint
move a little bit. Now, I'll just leave it to dry.
7. Clock: Pencil Drawing: So my imperfect background
is now completely dry, and it's time to add
the colored pencil. This time, I'm using a
regular colored pencil, not a watercolor one. The color is a deep scarlet red. Now I start edding the
lines on the street lamp, based on what I see
in the photo and also responding to the shape and contour created by
the background. And you see I can draw over the painted area or
stop before the edge. I really try to work
as freely as possible. The only thing I
really pay attention to is that my drawings
stay mostly neat. For this, I mean that I prefer one confident line instead
of bunch of small, fine, I call them hairy lines. Here I get this little
hamburger like top of the lamp. Of course, I'm not drawing every detail that
could be there. And there's absolutely no need to rush. You can take your time. Doing so, I'm thinking
that a marker with a fine but not too
thin tip could work really well for
this exercise, too. It gives a strong
color and wider line. And to get a similar line
with a colored pencil, I press quite firmly and you see that the
pencil is not very sharp. You can easily go outside the contour you created earlier, especially if at this stage, you feel like adjusting the shape a little bit.
No stress here at all. I will start drawing the
clock from the inner circle. You can see that
the outer circle goes beyond the
white shape here, and that's perfectly fine. And finally, I'll add a
small base at the bottom, this connection of the
clock. And that's it.
8. Landscape: Watercolor: Now it's time for the fastest project
in the whole series, and it's also a very fun one, especially for your
independent practice. We'll work from this photo
this time, and in this cage, I will paint the background with watercolor and do everything
else with pencil. I'll start with the blue color. I'm using leftover
ultramarine from my palette, mixed with some fallow
blue with a greenish tone. Now you can do the same as we did in the very first project and outline the shape with the pencil or like
I'm doing now, you can simply start with this vertical edge line on the side roughly in the
middle of your landscape. With very wet paint, I make a distant background. You can start by drawing
the contour or do straight into filling a larger area.
It's totally up to you. Because when you work
with very diluted paint, everything will
naturally merge into one large wet watercolor
shape anyway. I think this works really well, and the mountain part is done. Now I slightly change
the blue tone. I take more utromriin
and dilute it heavily with water to
get a very light value. I find now the upper edge of the landscape and paint
the pale blue sky. And along the lower
edge of the sky, I just soften the paint
with clean water to create this gentle
light gradient. And I don't connect this area
with the mountains because the mountain wash is still wet
and so they would not mix. And I want to keep a clear
edge for the mountain shape. And that's it. The
watercolor part is finished. Now it's time to let the
watercolor layer dry.
9. Landscape: Pencil Drawing: There's still a
small wet area here, but I think it's fine to
start with the pencil. As always, feel free to
experiment with pencil colors. For this sketch,
I'll again choose a complimentary color
to the blue background. This time, it will be
warm orange pencil. I will start with this line marking the edge of the field. Then this line where
the trees are standing. Another line here. And finally, the bottom edge
of our landscape. In this part of the field, you can see lines that
work as perspective lines, and you can try drawing them to emphasize the sense of space. So I begin with the central line and then move towards the sides. You see, I'm not trying to
make the lines very straight. They go beyond these lines, and that's completely fine. Then there are a few
trees in the distance. I start with the outline and
then fill it with color. In both cases, when drawing lines and when feeling shapes, I press quite firmly
on the pencil, so the lines stay wide and
the color looks dense. There are also a few
trees on this side. I will even go beyond the
contour here on purpose. If you're a perfectionist, this might be a bit
uncomfortable to watch. I understand that. But this
approach feels very freeing. I will draw the
trees starting with light short strokes
to suggest branches. These are really
small, quick gestures. While I'm drawing, I realize
this really reminds me of those intuitive doodles we made while talking on the
phone for a long time, and it feels very meditative. And you can hold your pencil however it feels
comfortable to you. And also, you can
absolutely stay inside the watercolor
shapes if you prefer. There's no need to go
outside the edges like I do. And the final step here
will be the tree trunks. They are wider and
stay along this line here. This is where they end. And here's our finish landscape.
10. Landscape: Your Project Inspirationct: I can imagine this
way of painting is a very nice approach
for your sketchbook. Imagine you have only a
few minutes and let's say, a blue marker and one colored
pencil in your pocket. And you actually can quickly capture almost any
landscape this way. So now it's your turn. Try finding a
similar landscape in your photo gallery or
use my photo reference. You saw that for this sketch, I chose to paint the
background with watercolor. But this landscape actually
has several layers, a background, a middle
ground, and a foreground. So for your project, feel free to use any of these layers to paint
with watercolor. This part of the class is
all about exploration. There is no single
right choice here. I can't wait to
see your projects, so don't forget to share them and then see you
in the next part.
11. Pot Plant: Watercolor: I think by now you've already warmed up from the
previous project, so we can move on to
something a bit more complex. By more complex, I mean that
the contour of this object is more intricate than
the earlier sketches. With Watercolor this time, we'll paint the shadow under the pot and the
background behind it. I'll start with the shadow. I'm using ultramarine blue, and I will also add
a bit of violet. Here will be the lower
edge of the pot. I'm starting with the
bottom part because this part feels more clear
for me how to paint it. And from there, I build this
more complex shadow shape. Using these small gestures
and little patches of color, I form the shadow, and the paint is very liquid. You can see this rounded
droplet sitting on the paper. Here is where the shadow
of the step begins, the one that the
pot is standing on. So there is a line here. This strip of color is
the shadow of the step, and here the pot
shadow continues. I'm adding a few drops of
this pinkish violet color. Now I'm mixing pink and violet to get a
warmer violet tone. This color will be
for the background. I want it to be different
from this shadow color. I will likely indicate
the edges of the pot, but for now, I'm not connecting these lines to the lower shadow. First, I loosely sketch
the feature contour of the plant with
these light movements. Because I'm working
with very wet paint, you know, this contra
won't dry very quickly. Now, I start filling
in the background. In this area, I can see this lighter edge of the step that the
plant is standing on. Then I can refine the contours of the leaves a little bit. At this stage, I can even connect the background
with the shadow, so these two areas
flow into each other. I continue feeling the
background in the same way. Some lines from the
background move inward, creating the contours
of the leaves. I'm not trying to copy
the photo exactly. I just think that this, like, more developed contour is fun and also will make the
pencil drawing easier later. I can slightly vary the
background color. Why not? I try to avoid repeating the
same leaf shapes too much, so everything feels
more spontaneous. If a lot of paint
gathers in one area, you can either
leave ****'s as of paint or just let it spread
naturally like this. I will add a drop of blue
here and also a drop of pink. You can also add just
clear water to lighten some areas or even
introduce other colors. It's totally up to you. And I almost forgot to paint this part of
background here. And I think that's enough.
What do you think? Is this sketching perfect enough or should I adjust something? The leaves here turn
out quite messy, and that's actually
exactly what I wanted. And I will probably
keep this area darker around the plant so
it creates more contrast. And now, as usual,
let's try the paint.
12. Pot Plant: Pencil Drawing: So the watercolors dry now. It's time to move
on to the pencil. This time, I will use
a bright green pencil. You can also choose
even lighter, more neon green like this one. I picked mine, so it's clearly
visible on the camera. In the background wash, you see, I ended up with these
watery textures, and I think they look
really beautiful. My paper is quite soft, and if you're working
on smoother paper, you might get even
more of these effects, hopefully, really
interesting ones. I'll start drawing
with the pencil by focusing on the leaves, especially the ones along the edges that are
easier to imagine. I'll partly refer to the photo, but mostly I just respond
to what I see on my paper. Notice how the drawing
becomes easier because the watercolor already
did most of the work. I try to keep the shapes
a little bit different. To fill the center, I begin with a few
clearly visible leaves and then add lines
in between them. I'm basically fitting the leaves into existing
watercolor counters. As I move along, I start thinking about what
to do with the pod, whether to leave it
white or add some color. I think I could work either way. I could even try a pencil in a different color and
see what happens. I really like how this playful
sketch is coming together. I do feel like adding some
color to the pot, though. Since it's in the shadow, leaving it completely white
feels a little bit odd to me, even though, of course, logic isn't really the point
of these sketches. I'll take a light orange
pencil for the pot. I will start with the contour
and see how it feels. Let's also add a bit of
contra here on the step. And now the question is, should I stop here
or add more orange? All right, let's do it. And now that's
definitely enough. And it's your turn now.
See you in the next part.
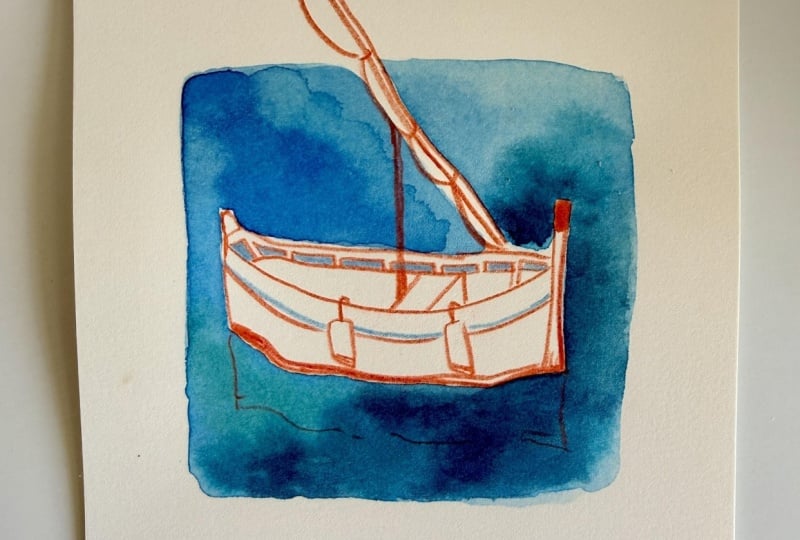
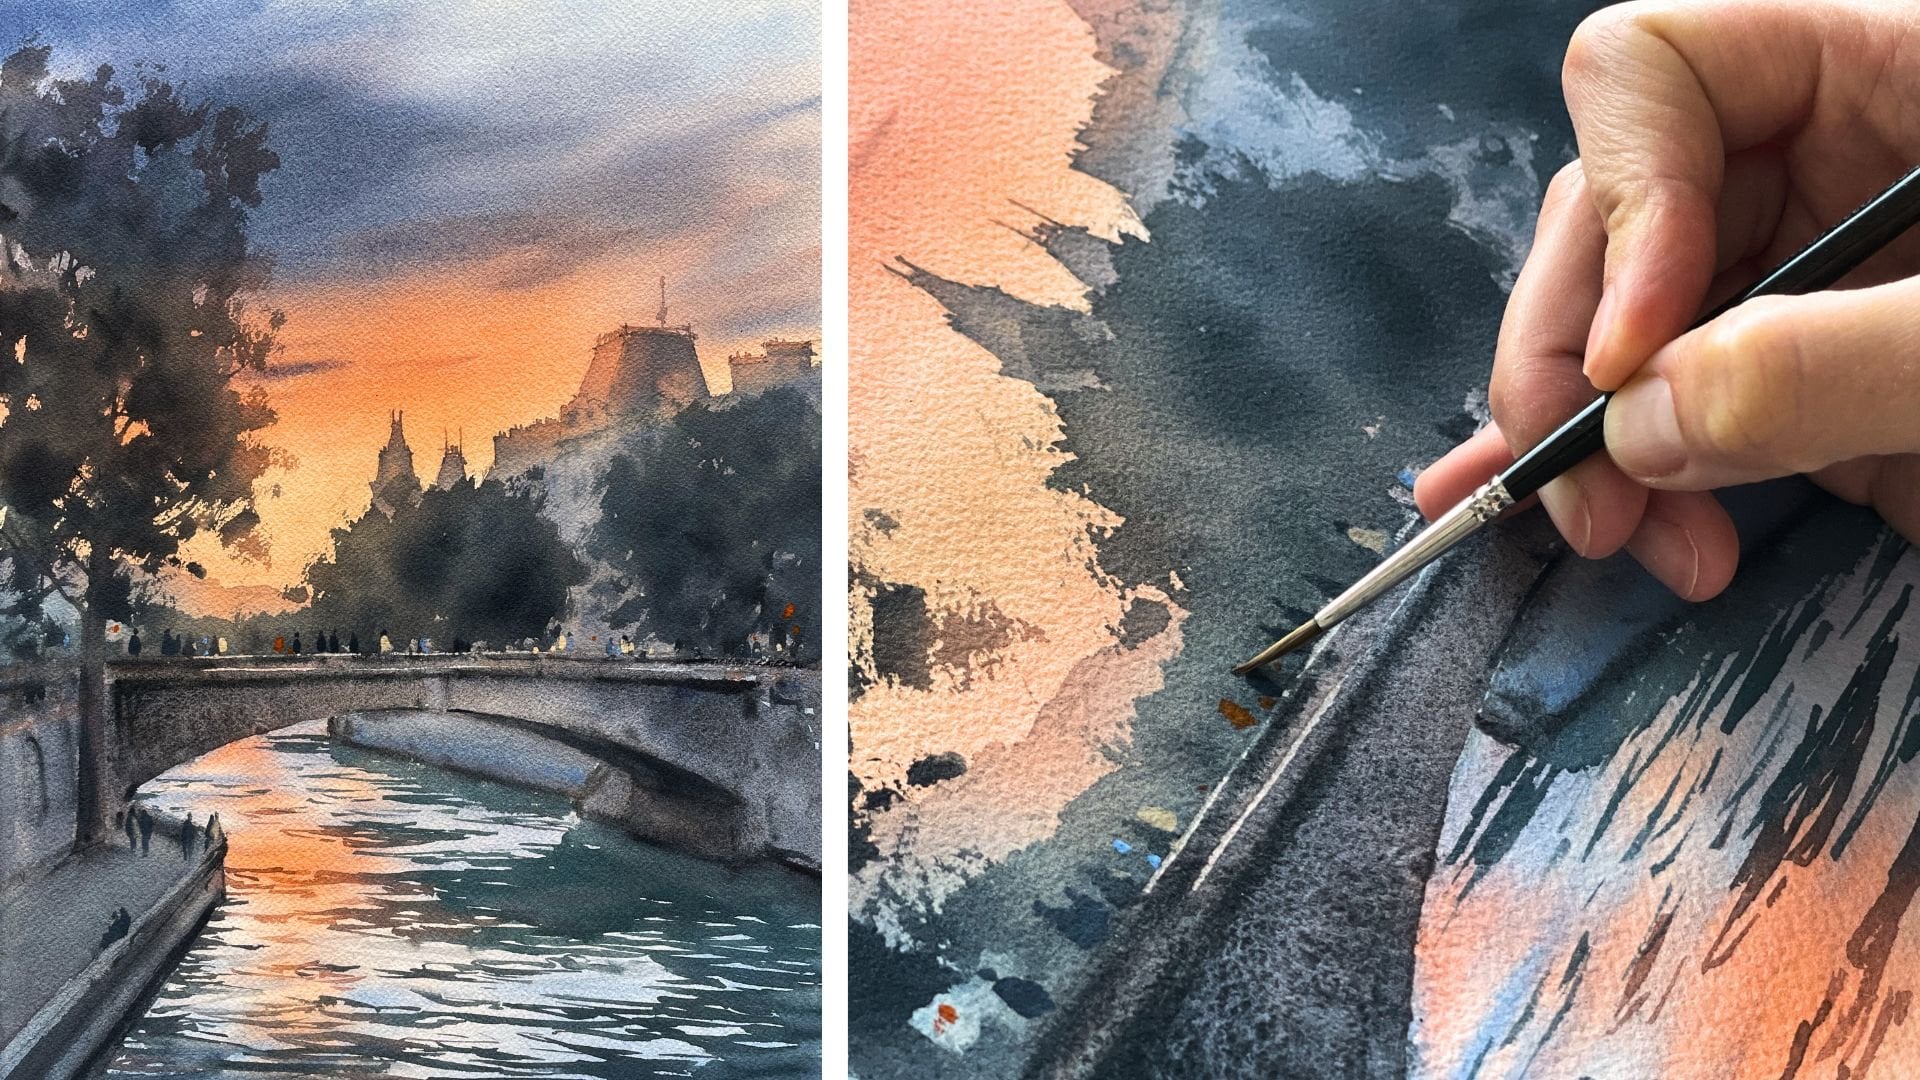
13. Boat: Watercolor: I still have some blue
paint left on my palette, so why not use it
for a water subject? Let's paint this
scene with a boat. Here we're going to
play with contrast, a loose watery background
and a very simple, confident pencil drawing on top. I want this water contour
to be a bit brighter, so I will add some greenish
fallow blue to the water. Without overthinking it, I'll just start
painting the water. First, I will roughly define
the boundaries of the image, and then I decide where the
lower edge of the boat is. And you see, I start with a fairly light blue tone so I can darken it later
in some areas. Notice that the boat is
placed at a slight angle. This gives a subtle
sense of perspective. I really like how the shape of the boat stands out
against the dark water. This is a folded sail here, and I'm making its
lower edge first. And there's also a small
element on the boat here. As usual, the paint
is very liquid, and I think you're already
used to that by now. On this side, I will also
paint the edge of the sail. Notice that I'm not drawing
the top part of it, because I want the sketch to feel a bit unfinished,
if you want. So the blue background will only sit behind
part of the boat, while the rest of the sail
will stay on the white paper, and I will draw it later. Now that the contour is done
and the paint is still wet, I can slightly adjust the color and add more intensity to it. For example, here at the bottom, I want the water to feel more
torquise than at the top. At this stage, you can
refine the shape a little. Although, as you know, having
a perfect bow shape is absolutely not required
here. That's up to you. I also have some greenish paints left from the tree sketch, so I can try using
it here as well. I will add a mix of thalo blue and dark green to create
a shadow under the boat. Adding a bit more contrast. And that's it for the watercolor
part. Let's let it dry. This time, I use
the hair dryer in a way that helps the
paint move quite a lot around the surface and dry unevenly creating
some natural contours. And I really like the effect, even though it was
completely unpredictable. And I'm very curious to
see what you'll get.
14. Boat: Pencil Drawing: Now it's time to add
the drawing here. By now, you already know
what's going to happen. I will once again use this
deep scarlet red pencil. If you remember, part
of the sketch with the clock was on the painted background and
part was on white paper. And I want to do the
same thing here. This white mask and the
sail will extend beyond the watercolor wash. As usual, I press quite firmly
with the pencil. I try to keep the lines closed, white and definitely
not straight. I draw the sail with very
simple movements like that. Here at the bow of the boat, we also see a bit of red, so I will fill this area. My paper has some
texture and it's soft, so the pencil line isn't
perfectly even everywhere, and that's actually the
fact we want, right? Now I will draw these white
elements on the sides. The one that I always
forget the name. I'll start with them, so I
don't forget to interrupt this line later because it
goes behind these parts. There's another line here, and it's much easier to leave gaps once these elements
are already in place. Now, all that's left to do
is the inside of the boat. This part may need a bit of attention so the elements
feel logically placed. I'll start with
the largest shapes and then move on to the details. On this side, it's easier for me to begin
with short lines and then connect them like this. So I'm connecting them now. I also want to add
more color here, so there isn't too
much white space between this red line
and green water. So for the final touch, I will add a second color, a light blue pencil like this. And I will fill in the small
gaps with this blue color. Of course, I'm not copying
the photo exactly. This is not at all a realistic
sketch, as you may see. But I do keep looking at
the reference all the time, so I don't have to invent
where the things go. There's also a little
blue line here. And actually forgot to draw the attachment for
the side elements. I already feel like
stopping here, but maybe it seems that the sale could have a bit more
support. What do you think? So let's add a small
mask here as well. I'm sure it has a
proper name, too. If you know it, tell
me in the comments, I'm really curious to
know, because for me, it's just a vertical element, drawn as a simple line, but I think it would be nice
to know what it's called. I think the sketch already
feels quite complete. But if you want to add more, you could include the
reflection of the boat. I would draw the
whole reflection just a few lines to suggest that the boat is
sitting in water. If you have an opaq
light marker like Posca type or other
white or light pen, you can try adding
light reflections, too. I also included a
few extra bot photos in the class materials, so you can use them as
photo references in case you don't have anything similar in your photo gallery. Feel free to use those for practice and see
you in Neecor size.
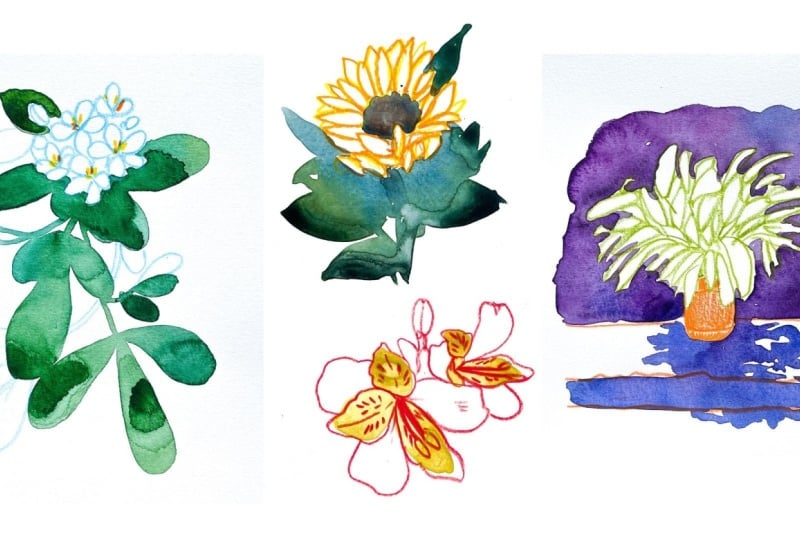
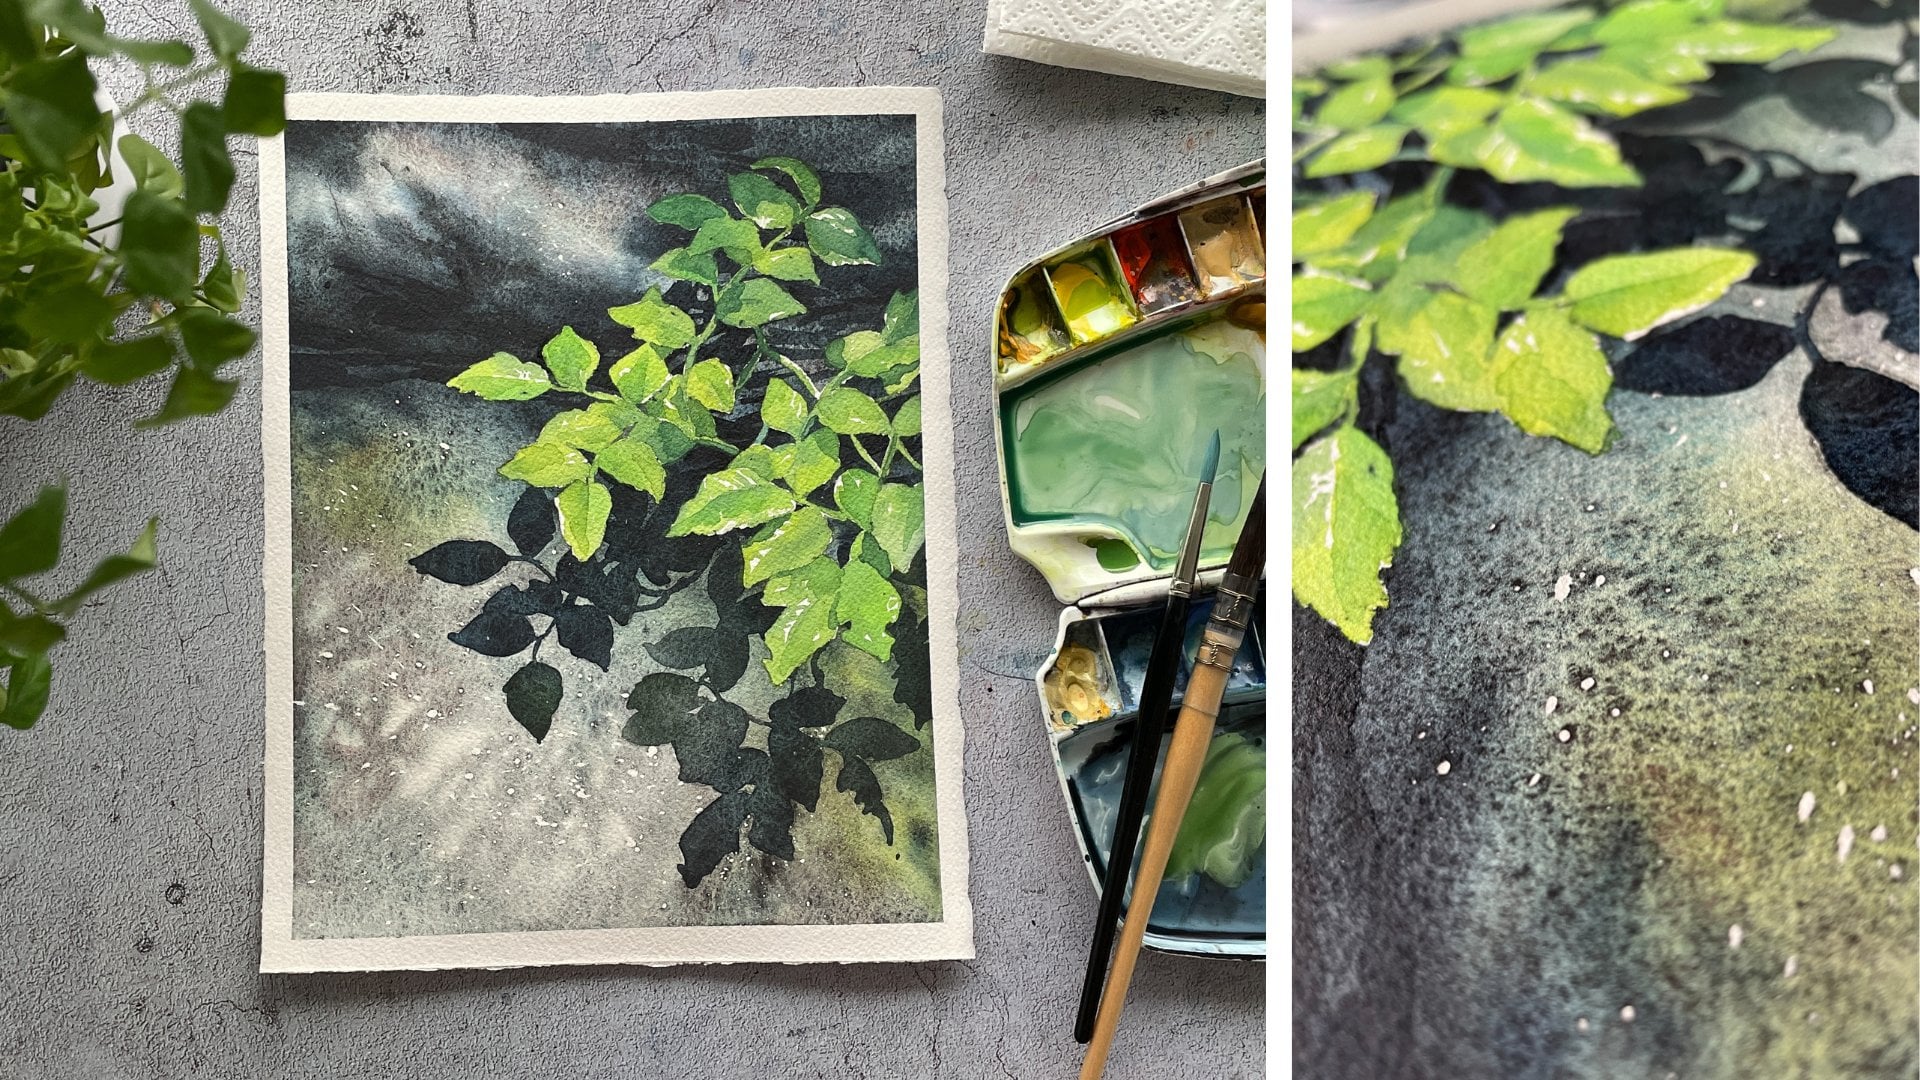
15. Flowers: Watercolor: To change the subject a little
bit for this final sketch, let's do a floral scene. For this, I'll prepare
some green paint. On my palette, I almost never have ready made vibrant greens. I rather mix them
myself usually based on yellows and blues
or yellows and greens. And with this color, I
start painting the foliage. In fact, only the leaves will be painted in watercolor
in this piece. The flowers here are white, so I will leave them unpainted and work around their
shapes with paint. Once again, we're working
with negative space. The background behind the
object defines its contours. On this side, there is a
noticeable green leaf, and above it, there is a flower. I will carefully outline its
shape using the green paint. And once the contour
is established, I will finish painting
the leaf on this side. I accidentally dropped
a little paint here, so I'll just lift it
away with a paper towel. As usual, I'm not following the proportions very strictly. I have a general idea of where the flowers will
be in the center. And on this side, we have another small leaf. See, I'm not brushing.
I'm taking my time. Down here, I will
have another flower. And why not connect these
two green leaves like this? Notice that now I'm picking up green paint from this blue
puddle on my palette, so the shade of green
naturally changes. In fact, the most difficult
part is already done. We've outlined the
flower shapes. From here on, we just need
to add a few more leaves. For some variety,
let's add something like a small branch
with flower buds here. Here's another leaf,
and you can see that even its shape isn't
exactly like in the photo. Even though I'm painting slowly and paying
some attention, I'm not trying to reproduce the reference photo
very precisely. Here's another leaf, a bit
more yellow this time. If needed, the shape can always be adjusted slightly like this. For me, this is a very
relaxing process, and I hope you're
enjoying it as well. I'm really curious to see how
it will look once it dries. Here I will add a
connecting branch. From which these
three leaves grow. I want to fill my
paper a bit more, so I'm adding more elements
toward the bottom. Here, it's easier for me to draw the conor first and
then fill it in. And everything merges into one large shape because
the paint is very watery. You already know how it works. If it feels more natural to you to fill the leaf
right away like this, that's also a great option. So do it in the way
that feels comfortable, relaxed and more
enjoyable for you. I'll add a couple of small
elements for variety. And I think this is
enough for the stage. We'll add the rest with pencil, so it's time to rinse the brush and let
the watercolor dry. When the paint is this wet, drying does take some time. I really like watching
it in time lapse. I think it looks very fun. I hope this process is
enjoyable for you, too. And now it's time to
add the pencil lines.
16. Flowers: Pencil Drawing: In this area, the paint
hasn't fully dried yet, but I don't think it will
stop me from drawing. This time, I will take a
light blue pencil again. When I'm not sure how to
approach the whole image, I always start with the elements that feel the most obvious. So I will begin with the
small element here and then gradually build the rest
of the flowers around it. Since I already outlined
these shapes with watercolor, it makes sense to draw
over this area right away. These flowers have five petals, so I'll try to keep it in mind, even though I can see
that in some flowers, not all five petals are visible. Let's do the next one. One, two, three, four, and the fifth one. In this flower, we also see one, two, three, four, and the
fifth one is not visible. Now, I will try to fill the
space with another flower. Here's a flower that we
see only from the side, so I will draw
just three petals. And here I plan to
add a couple of buds. If you're happy
with how it looks, you can stop at this stage, but I feel like adding a few more elements
among the leaves. I thought for a
while whether to use a light green pencil for this or to continue
with the blue one, and I think I'll just
stick with the blue. I will end these leaves that are hiding behind the ones
that I already drawn. If I have painted
them in watercolor, I think there would
have been too much green and the page
would feel too filled. And this way, I can suggest the full plant without
adding more color. So why not? Maybe a few more
additional leaves here. Honestly, I don't really have a strict plan for what to add, and I'm working
quite intuitively, sketching different
elements as I go. Looking at the image now, I feel like adding
the yellow sandras of the flowers to make everything
a bit more playful. So let's do that. First, I will add a few dots
using a lemon yellow pencil. And for the final touch, I will add a couple more dots in the centers with a
light orange pencil. And this is the imperfect
flower sketch I end up with. Remember, you can choose
any color instead of blue. I can easily imagine a bright
light pink or yellow here, and I'm very curious to see which color you're going to choose and what
result you will get. So don't forget to
share your work in the project section. H
17. Flowers: Bonus: O. In these videos, I often talk about using
your own photographs and trying this method on
your own photo references. So as an example, I'd like to show you
how the technique from the previous floral
sketch can be applied to a different
but similar subject. Here, the principle
is exactly the same. I start by working
with the green leaves, although this time I chose
a more yellow toned green. Almost all the leaves
connect with each other. These are leaves,
small branches, and the paint flows between
different elements. As usual, I dry everything with a hair dryer and then add the flowers using
colored pencils. The flowers in the
photo are pink, but I chose the red pencil
to create more contrast. This sketch is a
bit simpler because only a few petals were
outlined with watercolor. If you like, you can also add a few pencil details on
the branches or leaves. And this is the sketch
we end up with. I'm really looking forward
to seeing your own versions.
18. Lantern: Watercolor: Here, I'm going
intentionally change the mood of the reference
by changing the colors, turning my winter food reference into a more summary version. The goal here is to see how color alone can
shift the feeling. I prepare two puddles of paint, one green with a
slight emerald tone, and another one is pink. I start by outlining the lower left part
of the street lamp. So basically, I'm
creating the contour of my object with this
background, again. With these light touches
of a very wet brush, I add an impression of flowers. And now I do the same on the other side using
my greenish paint. For this sketch,
it works best to choose cool versions of red and green because when warm red
and warm green mix together, they usually create
a brown color, and that's something
I like to avoid here. I roughly imagine how high the street lamp will
go in the upper part, and at the same time, I try to balance
the composition at the bottom by adding
a bit more greenery. So I paint slightly
lower right now. And that's it. Time to dry it. Here, I'd love you to pay
attention to this moment. I deliberately dried
the central area first where the colors
could flow into each other. Now, they can't
really mix anymore, so one side stays more pink, and the other stays green. This way, they won't mix and
not neutralize each other. I already made a
similar sketch before, and I didn't really like
how the colors mixed. So this time, I'm
much happier with the result being this intentional
while drying the paper. You can absolutely
use this trick in your other sketches as well, and now it's time to
move on to the pencil.
19. Lantern: Pencil Drawing: Because I dried the
central part first, I get this clear effect, leaves on one side,
flowers on the other. For this cage, I'm choosing
an emerald green pencil. You may have noticed
that I usually pick either a complimentary color
to my watercolor or one that already exists in the wash.
And here I was choosing between pink and green and to green just to
change a little bit. I will start with the main
guiding lines on the lamp. The contro is already here, so I'm just placing the
structure inside it. Here's the top part,
this lamp cap. As you can see, I'm
simplifying the shapes a lot. Et's place it on some
kind of support. There's probably a wall here, but we don't need to draw it. At this point, it's
almost finished. I might just add
one small detail here and a bit more contrast. For example, filling this area to make the lamp
feel more solid. I also think in these
lines slightly, and I think now it's
done. Here is the result. And I also want to
show you something. In this short time lapse, there is another version. This time I took a red
pencil for the lamp. Feel free to tell me
which one you prefer. Or maybe you will find your own better colour
combo for this sketch. I'm very curious to see it.
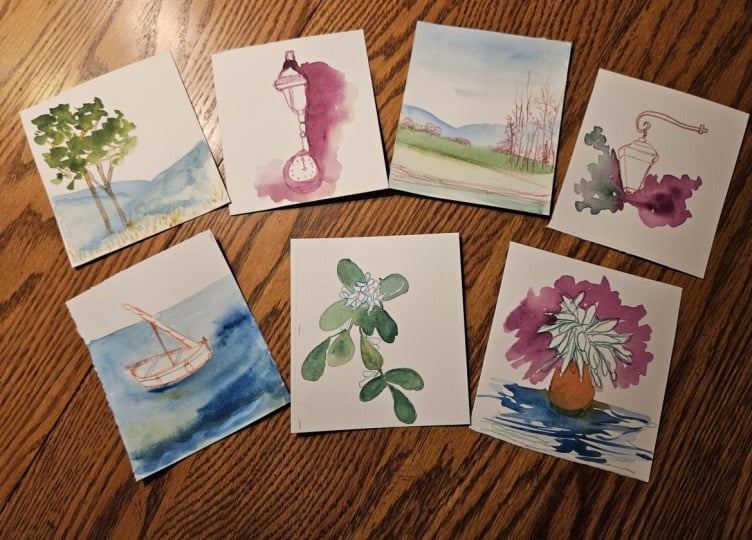
20. Conclusion: So you reached the
end of this class. I really hope the
sketching exercises help you unblock your
waterflour practice or maybe just give
you a chance to feel more free and relaxed
in your sketches. Now you can see that
you don't need to have perfect pot references, complex subjects
or lots of time. Even a few minutes,
one watercolor, one pencil sketch can
create something fun. Even if you did only one
sketch, it already counts. Also, I would love to hear what project
was your favourite. Personally, I really enjoyed
painting a clock project, and I also was especially
happy about my boat sketch. So this is why it's
on a class cover. Every sketch is a
little step forward. So keep experimenting, try different subjects
in different ways. Thank you so much for watching
and practicing with me. Keep sketching. Stay curious and see you in the next buzz. Bye bye.
 Maria Smirnova, Watercolor artist and author