Transcripts
1. What Is This Class About?: As autumn days become
grayer and rainier, it's the perfect time to brighten things up
with watercolor. Luckily, along with
the mushroom harvest, this season also gives
us a vibrant collection of reference photos to
inspire our paintings. And in this class, I'll
be using one of them. Hi, I'm Ria, a watercolor
artist and instructor. In this tutorial, I will
guide you through the step by step process of painting
this bright autumn mushroom. From reviewing materials
and creating the pencil sketch to editing final
details, we will cover it all. If you already have some
watercolor experience, this lesson is for you. You'll get a chance to practice a variety of
techniques like wet on wet painting and using negative space to
shape your subject. We will also discuss how
to work with masking fluid and layer colors with different levels
of transparency. These methods will not only help you complete your
mushroom project, but also enhance your skills for future watercolor paintings. Join the class and
enjoy watercolors.
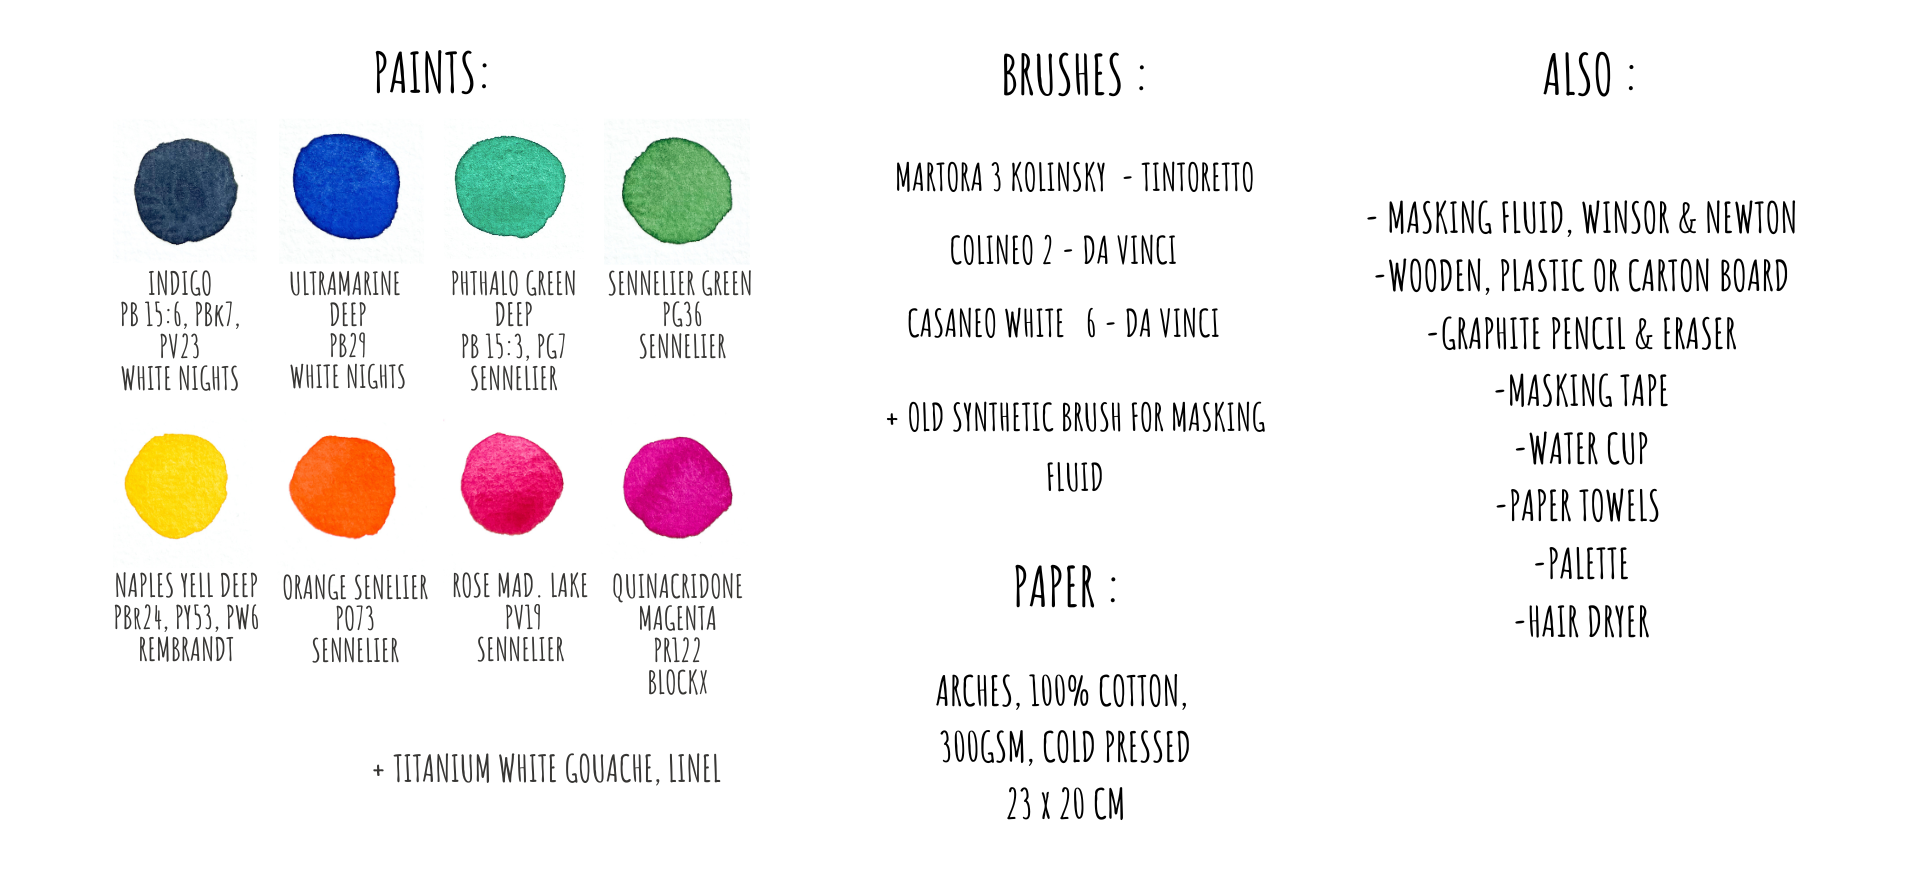
2. Materials Overview: To start, let's take a look at the materials we'll
need for this project. Remember, you don't have to
use the exact same brands, feel free to replace them
with your own favorites. I'll be using three flexible, quite responsive brushes of different sizes for
the background, main work, and detailing. For a Noton vibe, I've chosen a wooden
palette this time and squeezed out these
paints from tubes. And here is the list of
colors I'm going to use. You don't need to
use the same colors, pick up the paints from
what you already have. A key element in this
project is the vibrant red, orange color of the mushroom contrasted with a cool
green in the background. We also need masking fluid. And for applying it, I set aside an all synthetic
brush as well. As for paper, I'm
using arches paper, 100% cotton, it's cold pressed and 300 grams/square
meter density. I will also use a scrap
sheet for color testing. Don't forget a cardboard
or plastic board, masking tape to attach
the paper, a pencil, eraser, water, paper towels, and a hair dryer. Once everything's
ready, we can begin.
3. Sketching the Mushroom: Firstly, I've
secured the paper to this piece of cardboard
with a masking tape. You know how paper tends
to warp oil painting, but if you let it dry
in this fixed position, it will flatten out again. The board can be anything, and I'm just using
thick cardboard here. Of camera, I already
have my water. Now I'll begin with
a pencil sketch. I've chosen a B hardness pencil, just a regular graphic one. My goal is to quickly sketch
out our feature mushroom. I'll try to place
it in the center, considering its height and
the space for the background. This is how I like to hold my pencil when
drawing light lines. I will start with the cap as it sets the size of
the whole mushroom. Next comes the stem, which has this curved shape. Later, I will refine
the sketch and darken the lines to make
it clearer for you. The cap has an oval shape. And there was a
slight vertical edge that we can see here. The angle looks a little
bit too steep for me, so I'll adjust it a little. And, of course,
don't hesitate to use an eraser. It's
completely fine. And you don't need to strive
for perfect accuracy. It's okay if the mushroom
doesn't look exactly the same. And it's not a goal here. I just want to make
it roughly similar. I'll continue
sketching the stem, bending it slightly, and we
will add the ring around it. Here's a shadow
section and the ring, the skirt, it will sit
diagonally under it. And the ring actually
has two layers, so I sketch them this way. I will go over the lines and it'll be darker so now
you can see them better. There might be some leaves
or something around here. I will probably just draw
one leaf in this spot. Well, maybe one more
leaf in the foreground. We'll see later if we
really need it here. I'm just drawing simple
imaginary leaves, but you could also make a more precise drawing
using a photo reference. We'll also have a few
small plants growing here. Looking back at the
mushroom shapes, the cat turned out a bit
different than in the reference, but I don't think
it's a big deal. Overall, it looks close
enough for my taste. The proportions are not
that important for this. Okay, maybe I will darken
this leaf just a bit more. Because that way, when
we add the background, we'll still be able to
see the lines clearly. Alright, I think that's
enough for the sketch. The rest will be done with
paint and masking tote.
4. Applying Masking Fluid: Before starting
with watercolors, I will mask the areas I
want to keep untouched. So for this, I'm using masking
fluid from vendor Newton. I really like how it applies
smoothly on the paper and also how it is easy to
remove it once it dries. I will apply it with this
thin synthetic brush, which is easier to
clean afterward and allows for more
detailed work. Please be sure not to use natural hair brushes
or the ones that you paint with as masking
fluid can easily ruin them. Just use any old
brush that you have. I dip the brush into the fluid and carefully
begin applying it. I love the spots
on the mushroom. They're slightly raised compared to the background and will stand out vividly against
the dark background that we're going to paint here. I vary the size of
the spots making larger some smaller and sometimes clustering
them in certain areas. It's important to remember
that these spots lie on the surface of the
mushroom cap, which curves. So some will appear horizontal, while others will be nearly vertical because
they are facing us. So their shape will
shift a little bit. So here I just keep
going adding more spots. I don't need make them too tiny. I really want them
to be noticeable. I will add a few smaller
ones here and there. If we miss any spots, we can always add them
later with squash. I really like how this cluster
of white dots turned out. It's a really nice little group. Now I'm going to mask
this part as well. Since I'll be painting
a dark background, I don't really want
to worry about accidentally painting over
the white mushroom stem. So now I will mask
this section as well. My brush is quite flat, so it doesn't hold much liquid. So what I do, I pick up a drop and spread it across the
surface like this. I'm working carefully
around the edges. I'm applying it in a
quite thick layer, so it will be easier
to remove later. But it shouldn't be too thick either because in this case, it will dry for edges. Along this edge, I'm creating
a slightly broken line as if there are some blades of grass or something similar here. I will give the edge a bit
of a rough uneven look. And finally, I want to add a few small branches
or grass stems. I'll then a couple more
from this side as well. Letting the brush naturally
create their shape. And actually, you can sketch
them with a pencil first and then fill them with the
masking fluids if you like. I'm not going to add too many of these now
because if needed, I will just paint them later using light guash
over the background. So actually, masking
fluid isn't really essential for these
stems and grass plades. And I think I want to make this little stem longer
and thinner like this. Now, don't forget to wash
your brush right away. All that's left now is to wait for the masking
layer to dry.
5. Painting the Mushroom Cap: Now, the masking fluid
has fully dried. The layer has turned from a milky shade to a
yellowish, transparent one. I'm ready to start
painting the mushroom, beginning with the light areas
on the cap and underneath. I'll be using a mix
of orange and pink. And I have two pinks
on my palette, one warmer and one cooler, but you may only have one. It's totally okay. And by blending them
with the orange, I get this bright vibrant shade. I could also use this
red, French vermilion, which I have here, and it gives them almost the
same shade as you can see. The difference is
that with my mix, I can adjust the
hue and temperature plus these two colors
are transparent, whereas this red is more opaque. Let's start with
the lighter part, which is more of
an orange shade. I could actually pre
moisten the area inside the cap with
some clean water, but I think I will paint
directly on the dry vapor here. The light areas seem mostly orange to me with a
few small white spots. I'll pick up more paint here. Notice how wet my brush is. There's quite a bit of liquid, so the colors are
flowing freely. I will cover this area with
a more intense orange. It could be brighter, I think. This part will eventually be darker and I will come
back to it later. Now I will switch to a
slightly pinker shade. So that's all the light that
we see on the mushroom. The top part seems bluish, a bit cool, so I'm going to
use ultramarine blue now. I will ed it up here. It looks like the sky or
forest is reflecting on the wet surface and giving
it a bluish tone like this. Maybe I will add a bit
more pink here as well. I will also make these lines. And that's it for now. No need to spend too long
on this stage because there will be a second layer of
paint here later anyway. While the cap is still wet, I'll add some volume
to the front area. I always keep a paper towel in my head to manage the amount
of liquid on my brush. Now I will take some pink and
mix it in a bit of indigo. This will give me a dark violet. Maybe I will even add a
touch of orange to it. I will use this to draw
the shadow line here. And that's it for now. I will stop here and let it dry. And in the meantime, I
will work on this section.
6. Painting the Base Layer of the Leaves: I will let the cab
dry for now and later I will add a darker
second layer on it, and in the meantime, I will work on the light areas
at the bottom. I'm starting with an
orange base color. I will add a tiny bit of green, though you could
use turquoise or emerald green as well depending on your preference and mood. This will tone down the
intensity of the orange. So now I'm mixing a
very watery paint. Then I will apply it
to the lower part. You see that the paint
is quite diluted. I'm shaping it into a slight
semicircle at the bottom. You could even add a touch
of blue in this area. This is just the first layer of the lower section where
the autumn leaves will be. Above the background will
be cooler and darker. But I'm not painting
that part yet. I'm only softening the edges of the spot with a bit of water. You can make the colors of the leaves even more
vibrant if you like. Maybe I will add a little
emerald green some spots. For now, I guess I will
leave it as it is. I could paint the
upper part right away, but since the mushroom
cap is still wet, I'm holding off for now to
avoid unwanted blending. I've added just a bit of
color to the bottom here, and it will be just
the base layer. I think I should adjust the shape of the
edges here a little. You see the paint
is still very wet. Now we'll need to wait
for the paint to dry, and of course, you can speed up the process with a
hair dryer if needed. Oh
7. Adding the Second Layer to the Cap: Before moving on
to the next step, I check that the
paint has dried. The lower part of the paper still feels a bit
cold to the touch, meaning it retains
some moisture, but it's dry enough
to rest my wrist on. And the mushroom cap, however, is fully dry now. So I begin painting the
second layer on the cap. Then I will let it dry before moving on
to the background. The goal here is
to darken the cap, so I'm using the same
colors as before, just with more pigment. So I'm again mixing
pink and orange. And you see that the result is a vibrant, very saturated color. Now I will touch up the mushroom here where I feel it
needs more contrast. Even though I'm using
a lot of pigment, the paint is still fluid enough that it won't
dry immediately. You can start from whichever
edge is comfortable for you. I will begin applying
the second layer actually in the same
area as the first one. I outline the highlights
again and even add a bit more pink as I
see a very nice, rich pink hue in this
reference image. You can also leave
some gaps here. I really want this part to be darker to make the
cap stand out. And of course, it
will still lighten and lose some intensity
when it dries, so I'm not holding back
with the saturated paint. I might even add nearly
pure orange here. You will notice I adjust
the shades as I go. And I'm also drawing these lines carefully
along the edge. Then I rinse the brush and lightly soften
the edge with water here as I like how
this area looks. Otherwise, I could
add more color, but I'm happy with
it for now and just want to blend the
layers wet and wet. So I see how the pink is
naturally bleeding in and well, we will see how it evolves. The cap is still quite wet, and I want to take advantage
of that to add some shadow. Let's grab a smaller
brush for this. I'm preparing a dark mix using red and a tiny bit of indigo. I think it's a nice dark shade, really good for this section. And I will add it right here. If you don't manage
to do this while the paint is still wet,
it's not a big deal. You can always add
more layers later, just like we did with
the second layer now. You can also add details on
a dry surface if you want. Here, I want to merge
some spots together. Maybe I will add a
bit more pink too. Overall, I kind of like
how it's turning out. We'll see how it
looks when it dries. I think I can leave
it as is for now. And if needed, I can
always add details later. And there's still a lot to
work on in this section. But for now, my main goal
was to add more color, and I think I've
accomplished that. So now I will just
dry this layer.
8. Beginning the Background: I dried the paint
using a hair dryer. While the center here
is still slightly damp, the edges are completely dry, allowing me to proceed with
the more challenging part. The dark background. This step is tricky because
we need to carefully paint around the mushroom
and other details. The strategy here is to keep the background
very dark near the lighter parts
of the mushroom and slightly lighter where
the mushroom is darkest. This contrast will
help the mushroom pop out from the background. I want to maintain a
cool color palette for the background to create a contrast with the warm red tones
of the mushroom cap. So I will start by mixing
the leftover paint on my palette and adding
some turquoise and green. So here, I'm aiming for
a grayish green shade. And when mixed with the
orange on my palette, it creates a neutral
greenish hue. This will be my start point, and I will gradually add
more contrast into it. So here we need a lot
of paint for the step, so don't hesitate to prepare a really
generous amount of it. You can also adjust the shade by adding more vibrant green. Or even lean towards a more indigo blue tone,
which works well too. And I will be adding a touch
of indigo for darkness here. I might also add a little bit of utromarne
blue as we go as well. So let's try it out. You can pre moisten
the area if you like, but I'm choosing to
work on dry paper. I will only make sure to use enough water on the brush to
keep the paper wet longer. I'll start by adding more
water to this area right away. But I'm keeping the paint limited to a small
section for now, working carefully
around the contours. You can also consider adding darker paint here
right from the start. At this point, the
paint is quite watery, which is fine because I want it to flow and blend smoothly. Next, I will add a more
blue tone to this part. I'm still using
very fluid paint, aiming for it to merge into
a large, soft wet spot. Now I'll tone it down by
adding a muted shade here. As I said, if you prefer, you can really pre
moisten the area and then paint the background within
this moistened zone. And I'm skipping that step because I don't feel
that I really need it. In this section, I can paint freely because I've
masked it earlier. For now, I'll just
blend it smoothly. We'll come back to
this area later, focusing on the
upper part for now. I could even try highlighting some areas by adding drops of clear water moving forward. I'll experiment with
adding a bit more blue. Higher up, I might
introduce more green tones. In the reference image,
there's a lot of green, and I can use that as
inspiration for the background, adding more green here. Lower down, we transition to a more neutral tone as
we approach the leaves. We're going from this
called forested backdrop to the earthier brownish
tones on the ground. To emphasize the texture change, I also use more defined
brush strokes like this that's possibly hinting at details like leaves or
other small elements. As I till the paper,
the paint flows down and I want to quickly
add some dark axons here. I'm mixing indigo with a bit
of orange to mute this blue, creating a dark, kind
of purplish tone, and I will apply it here. Remember, I wanted the
dark background to contrast with the lighter
part of the mushroom, and that's what I'm doing now. However, the paint is still very fluid and
spreading too much, so I might wait a bit before
adding more dark details. So as I move downward, I will start introducing warmer, more like orange tones. I will outline a leaf here. Leaving small gaps to suggest other leaves or
elements or something, and we will add more color to this area in the next layer. For now, I'm just painting with water
to create soft edges. Further down, I will switch to more texture strokes
to suggest some grass. The paint becomes lighter and more transparent as I go down. I keep adjusting my brush angle to make the contras more
precise when needed. And it's really a
constant process of moving your wrist like this, imagining leaves or other
elements taking shape. To soften the edge of a leaf, I will put some
clean water here, letting the paint bleed like this gently for
a soft transition, and I think it looks
nice this way. I will adjust a bit
here because I want rounder shape and not
like straight lines, and everything is still very wet and it creates a
large fluid colour spot. Let me show you a closer look. Yeah, I see. It's still too wet to add fine details because the paint will
continue spreading. So I will wait for
it to absorb a bit before adding more
elements to this wet area.
9. Adding Details to the Background While Wet: There is no pose between
these two videos, and at this stage, the paint is still wet almost
as I've shown you. So I will continue
adding details while working on the
wet surface here. I will switch to a
smaller brush probably to avoid overloading
with too much liquid. And here I'm using indigo, but you can mix emerald
green with some pink, orange or blue depending
on your palette and this creates a rich dark mixture that I will begin applying
in certain areas. However, it turned out to be too watery causing the paint
to spread too much, so I will need to thicken it. Since I previously
added a lot of water, the paper is still very wet. I will start by adding
darker details, but I also observe
that some areas on the paper are beginning to dry and the pigment has settled. This is the perfect
time to add drops of clean water to create
subtile highlights. There is a lot of liquid here, especially where the paper bend, forming such a small puddle. So I'll try to
carefully remove some of the excess water to
avoid long drying times. As the paper dries
and turns mat. I will add a few
more water drops to create highlights here. Or, I like how the blue I added earlier has
brightened here. Next, I'll take a
vibrant green color from my palette
and blend it into the background in certain areas where I plan to add grass later. So this wet and wet
application of the green will help to make the soft base
for the future grass. Again, there's lots of liquid, so I use a tissue to
remove some excess water. You can also introduce
a bit of green here. It's optional, but
since I know that grass will be part of the scene, it doesn't hurt to add a touch
of it in the background. Even though it's faint mal, these strokes will complement the grass that I'll paint
in the foreground later. I continuously assess how
the background looks, adding small flesh and drops, and also focusing on increasing contrast
in certain areas. I'm mixing indigo with orange to create a deep dark
color for more details. The paint is drying slightly, so I will add some darker
spots here and there. I'm trying to make
the dark patch in the background look cohesive with its parts balancing on both sides of
the composition. If you have large empty
section of the background, you could add branches
or darker lines or dots. Though I won't, in this case, since I like how it looks, I might add a few transparent
water droplets here, which creates a lovely effect. It's important to note that the dark color
that you mix on the palette can appear much less intense when
applied to wet paper. I will add a few
final small details to enhance the depth
of the background. Ensuring both the
upper and lower parts of the painting have contrast. A touch of green here and
there should do the job. And for now, I think
this part is complete.
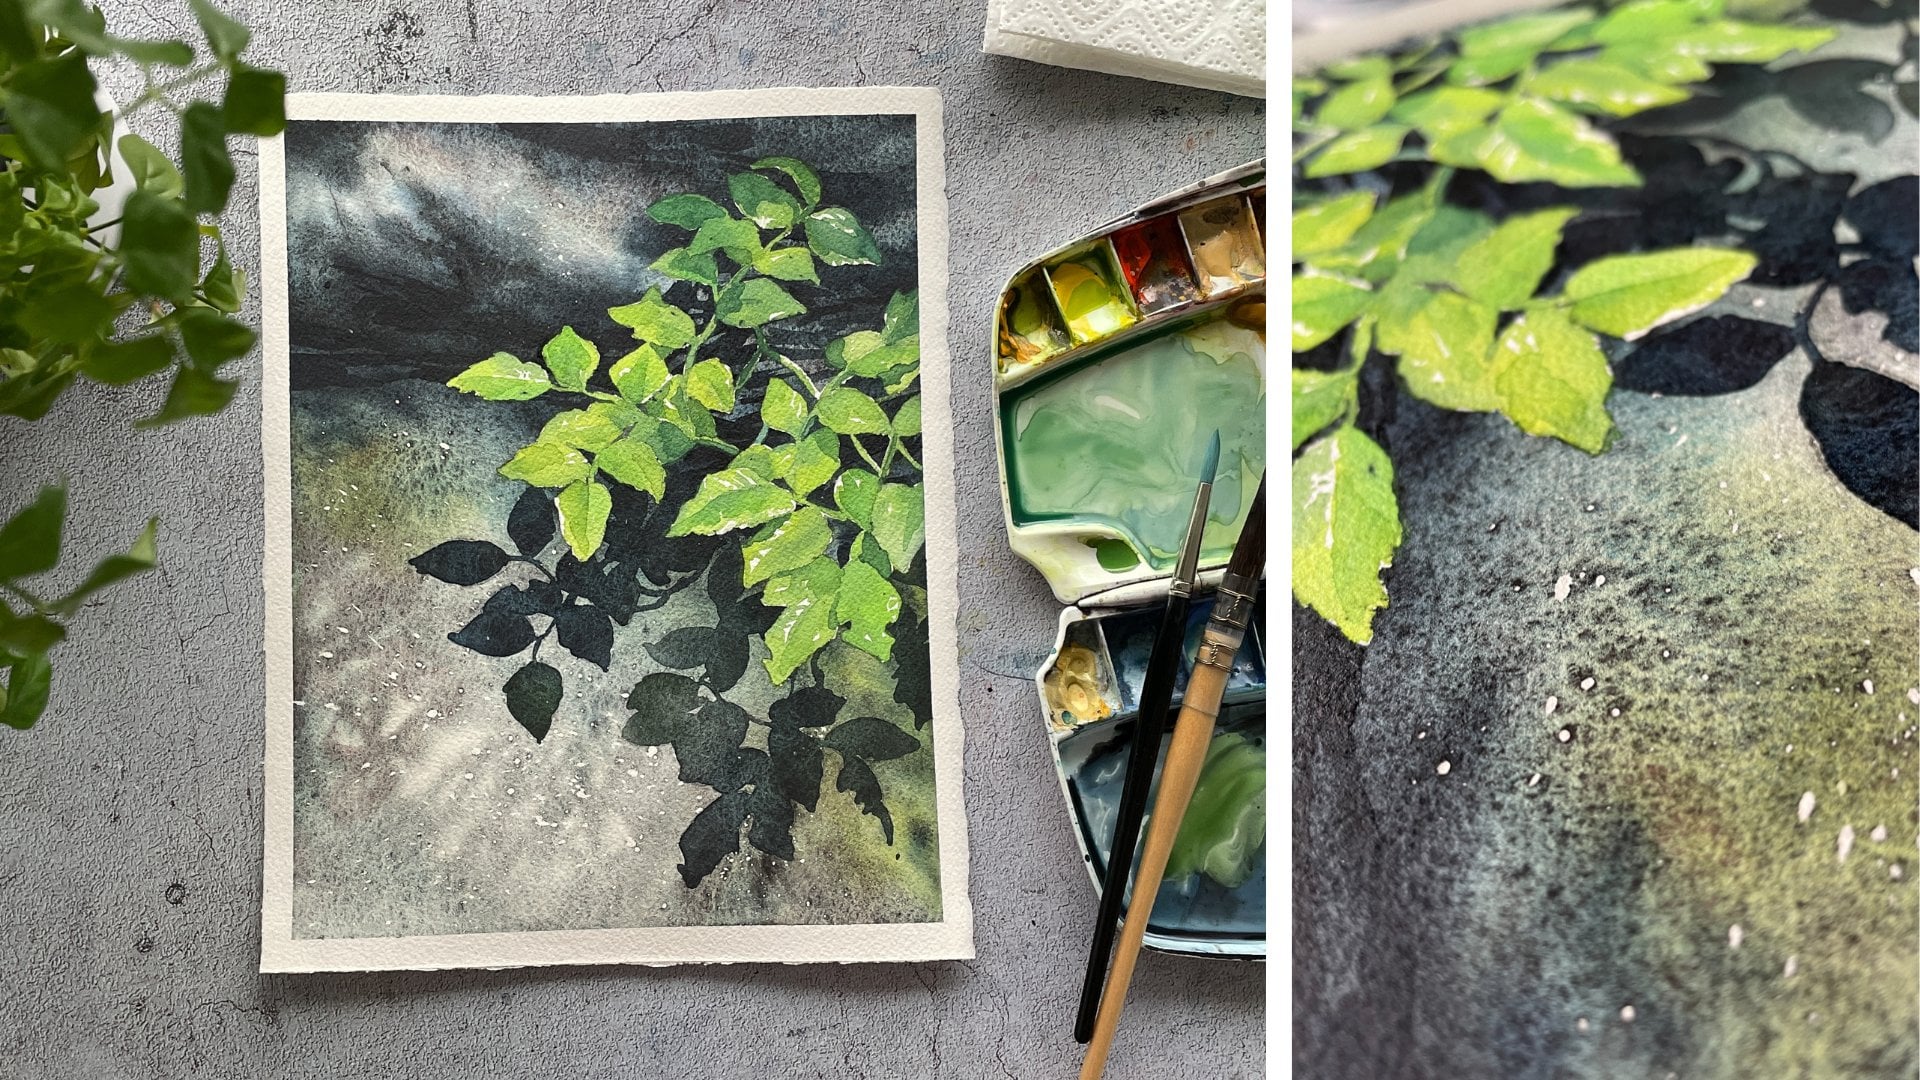
10. Adding Details to the Leaves: At this point, I will focus on leaves at the bottom
of the painting. Enhancing them with a bit of shading and fine
details like veins. I'm using a more
transparent paint for this, allowing the background to
blend into the wet areas. I want the leaves to be visible, but not to distract too
much from the mushroom. I will add a few light details to balance the composition. For the lower part, I will use a darker paint, creating depth. Don't worry, we will add more details to this
area once it's dry. Now it's time to
finally dry everything. There are still some
areas where I can add more details to break
up the uniform wash. You might want to look
at your background and decide if it needs any
last minute adjustments, such as drops of water
for texture, for example. The paint will
lighten as it dries, and you also may notice some unevenness or
blooming effects. Alright, once satisfied
with this layer, it's time to let everything dry.
11. Final Touches on the Cap: So I finally dried
the background, and as expected, it has
lightened considerably. Before removing
the masking fluid, there's still a chance to make some final adjustments
if needed. So now you can take a moment
to evaluate the background, and if you feel like
adding more contrast, do so with a second layer. Just soften the edges
with clean water to blend new areas into the existing
background seamlessly. I'll be focusing more on the lower part of
the painting later, especially since I feel like it could get a bit more green
to balance the orange tones. But for now, it's time
to finish our mushroom. At this stage, you could also apply third layer of paint if you'd like to add more shadows or fine details on
the mushroom cap. Because if you're using a
high quality cotton paper, it can handle several layers
of paint without any issue. So I noticed a few small
white gaps near the edges of the mushroom where
the background didn't fill in completely, so I will fix those. And also, I will add shadows
to the mushrooms cap. I've mixed a cool, slightly grayish color from the leftover paint
on my palette. Using a fine brush, I will apply these shadows
under the white spots on the mushroom to emphasize
their three D appearance. Since the light
comes from one side, the shadows will fall to
the left on each spot. The bit looks dark now, but it's quite diluted and
will lighten as it dries. Even though the reference photo doesn't show many shadows, I'm adding a bit more
to enhance the effect. And once the shadows are done, I will dry everything again before removing
the masking layer.
12. Revealing the Masked Details: The surface of the paper
has completely dry. This means it no longer shines and feels
warm to the touch. I can finally remove
the masking layer. I usually just lift it by
the edge with my fingernail. That's how I remove it. But I also like to use
an ordinary eraser, especially when I have a lot of fine or thin details masked. For the stem, you can
remove it by hand, like peeling off
a layer of film. I think it's easier that
way and I don't risk smudging the paint that's left on the mask
with the eraser. And it's also a very
satisfying process. Once everything is removed, I will brush off
the remains with a dry brush and we can
continue painting.
13. Refining the Mushroom Cap: Now I will refine the shape of our mushroom and add a
few shadows on its gap. For this, I take a very light, transparent color, adding a bit of shadow to these little spots. It's important to give them some shadows because without
they won't have any volume. These ones are completely
in the shadow, so I will cover them
entirely with this color. Here the shape ended up looking
too similar for my taste. All right. That's done. Let's move on to the next step.
14. Adding Texture and Volume to the Stem: Now I will start adding texture and volume to
the mushroom stem. I would like using
indigo for that, and I will mix it with what's
already on my palette. I will use this color to create the stem's shadow
to give it volume. Plus, it has a bit of texture
along the shadow's edge, which I want to
highlight as well. To achieve this, I lay
the brush on its side, creating a rough edge that takes advantage of
the paper's texture, giving it that texture
defect right away. Of course, you could also paint small dots along the edge, and that would work too. There is some texture
here as well, so I'll add it. Since this side is in shadow, I'll cover those white spots. I might also add a few details to the
little skirt on the stem. You could choose a clear shade for the base if you prefer. I also want to add a bit
of reddish orange hue, very diluted but still vibrant and place
it in a few areas. While the ban is still wet, it will blend nicely. It's almost like there is a warm reflection from
the leaves below with some light bouncing
of the white stem. Now, while this part dries, I'll move on to the leaves.
15. Adding the Grass: Now it's time to work
on the greenery. I will use the same green I used for the background
to paint the grass. I'm thinking about which blades of grass are on top and which are underneath and try to
add shadows accordingly. You can also add a
touch of yellow, if you like to adjust the color. Oh, it seems here, I didn't fully remove
the masking fluid, but well, no worries. We'll come back to
that spot later. I could actually
also extend some of the grasslines slightly
beyond the background. You can adjust the
green to make it more yellowish or neutral, depending on your taste. Once it dries, I will remove the masking fluid and
add a bit more paint. Since I'm working
with green right now, I'll also add a few
extra blades of grass. Maybe some darker ones
in the background. In the shadows here. And now let's move
on to the next step.
16. Shading the Mushroom Stem: While I was working
on the grass, the paint in this
area has dried. And for now, I will clean
the excess green from my palette and mix some indigo and orange to
create a shadow color. Let's draw that now. I'm using a fairly diluted
paint and you'll soon see why. The shadow here
has a curved shape because the mushroom
stem is cylindrical. You can also add a
hint of texture here, so I'm filling the space. And I could also make it
a little darker here. Next, I'll take a bit of orange
and add it to this area. Of course, there will
be a shadow here. And I'm adding a
few small details. These will also have a
slight touch of orange. It might look like the shadow
is too dark at the moment, but remember, it will lighten significantly when it dries. You can add a bit
more texture here. Depending on how
your paint looks, you can keep adding
small details. While this part dries, I think we can add a few
shadows to the grass as well. These are tiny details to help separate one
leaf from another. And then we'll just
need to finish up with a few more
final details.
17. Adding Final Color Details: Well, there's really
just a little left to do, as I mentioned, and I'd like to add a touch
of green here because the bottom feels a bit too
uniform in color for me. I will add a bit more over here. You can also add a few
details to the leaves. Using a darker shade of the same color
as the leaf itself. Don't hesitate to play
with different shades. Maybe you can darken
some areas as well. At this stage, you can also add a bit more color
if you'd like, perhaps some orange
here, yo, I not. Now I'm going to dry the
paint with a hair dryer and probably think
about it a bit more. I like how the leaves stand out. This one turned out really well. But here I feel like I
could adjust the color. Let's probably return to that interesting red color
that we used before. Maybe it makes sense to to
add just a little here. Yes, I know I just worked
on this area was green, but I've changed my mind and decided to go
with red, yeah. It's just because I think
the darker shade will add more contrast and will
probably look nicer here. You can also add more details
while the paint is still wet here and actually
at this stage, just do whatever
feels right to you. Now it looks a bit more natural
to me, a little prettier. You can also add a few
more details if you want. This will dry and
lighten up, of course. I can also add some
for the background. But remember, I'm always working with a fairly
diluted paint, so it becomes quite
transparent as it dries. The last thing we can do is
add a few more light details.
18. Final Touches and Highlights: We are down to the latest
few finishing touches. I'll take some white guash and mix it with a bit of color, maybe a little yellow
and some green. Then I will add a
few light details to the grass where it's needed. It's important for the
paint to be thick. Otherwise, it won't stay
as bright once it dries. You can also adjust the shape of the grass plades add some highlights for volume
or other small details. And I think that's
where we will stop. Once you've finished,
leave your painting attached to the board
until it's completely dry. This will help keep it flat compared to letting
it dry freely. Okay.
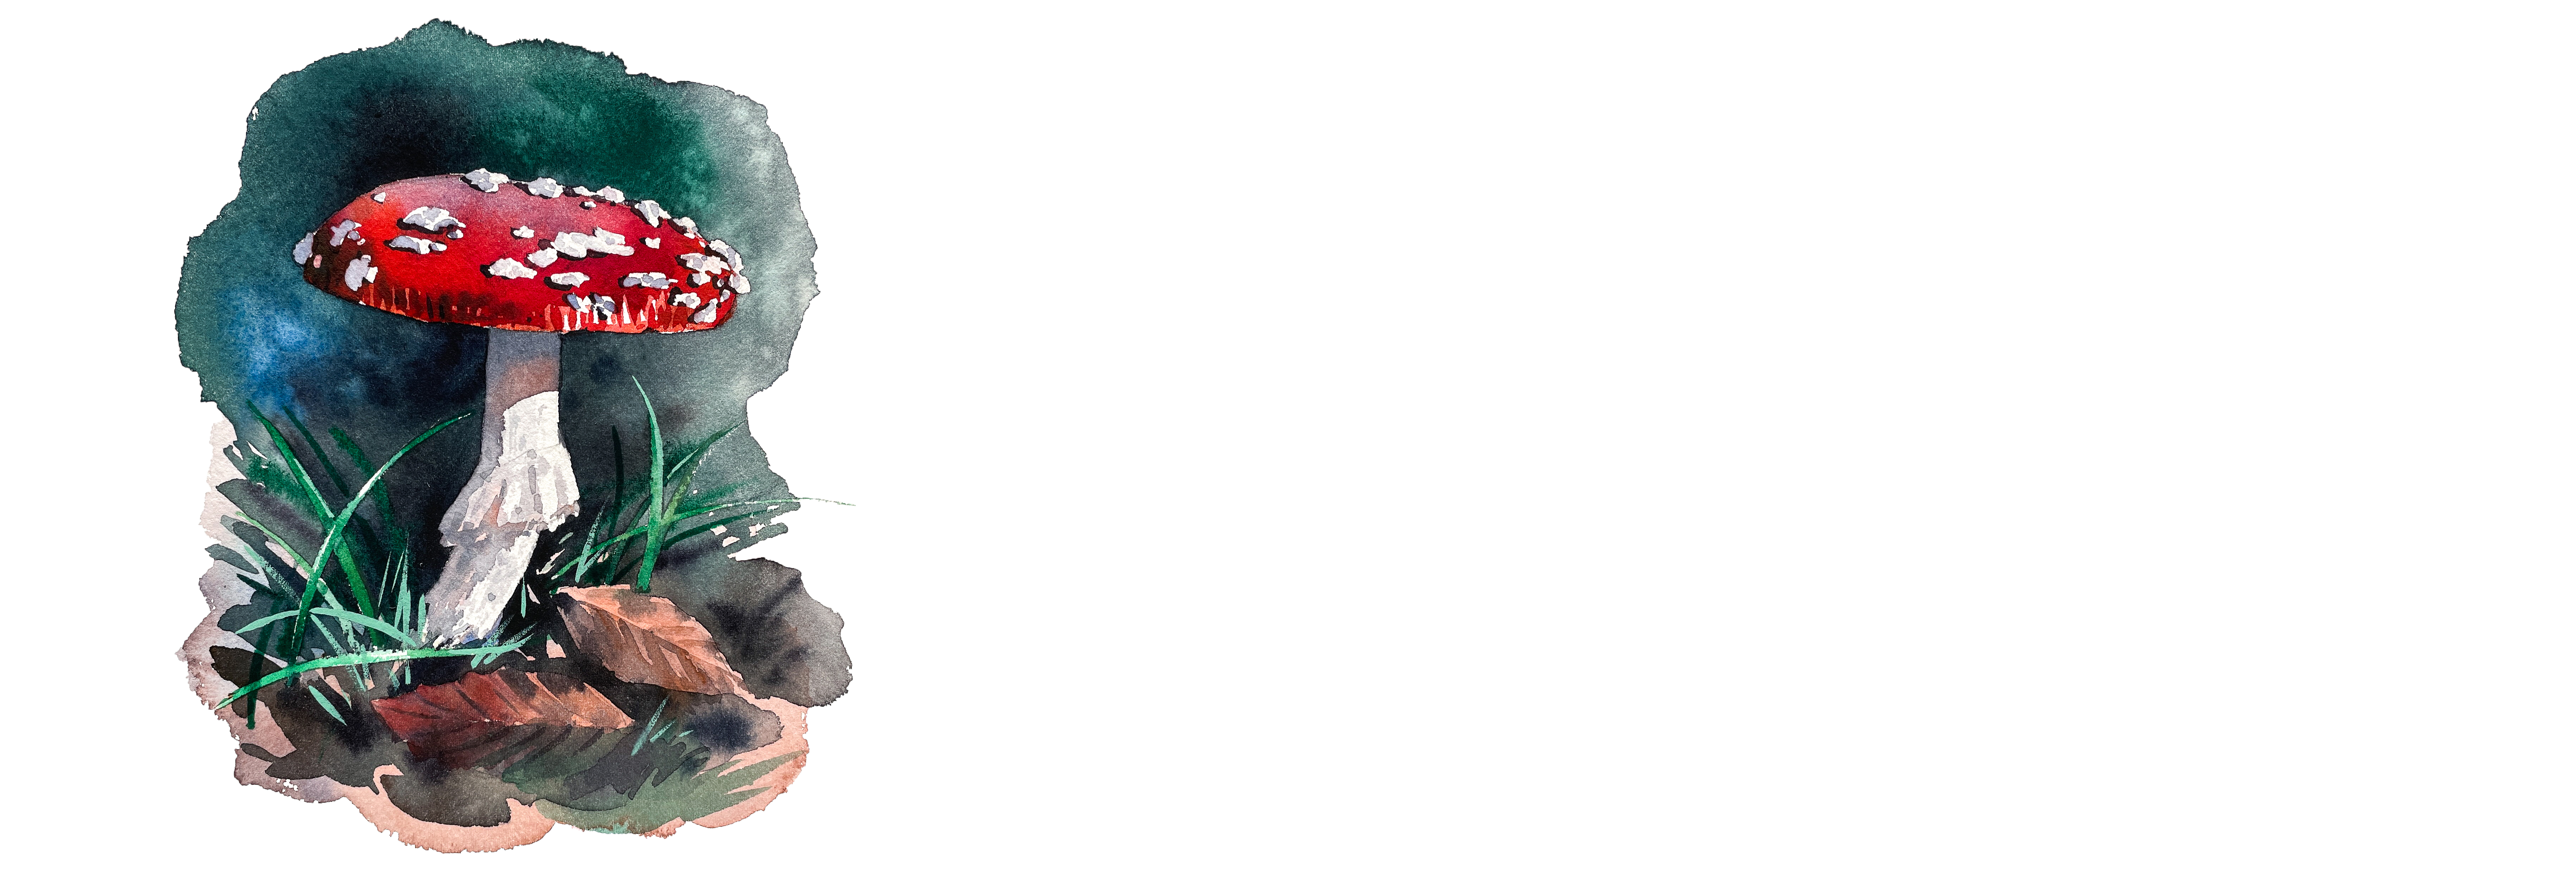
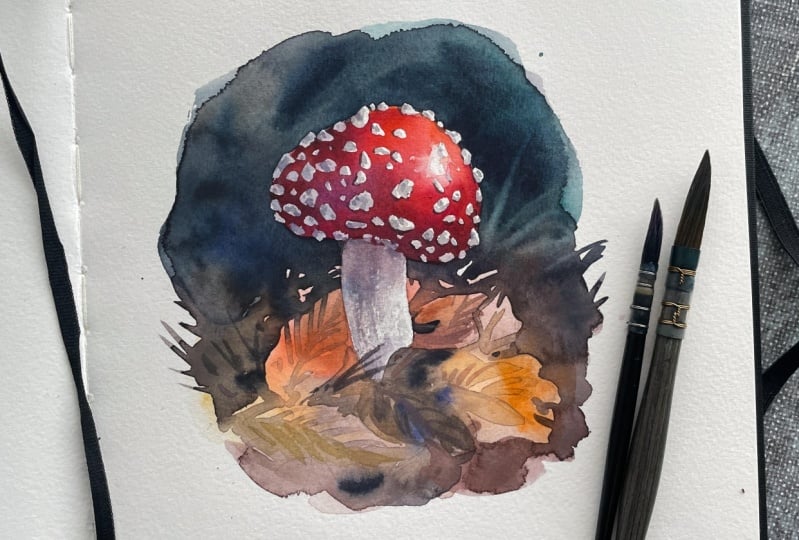
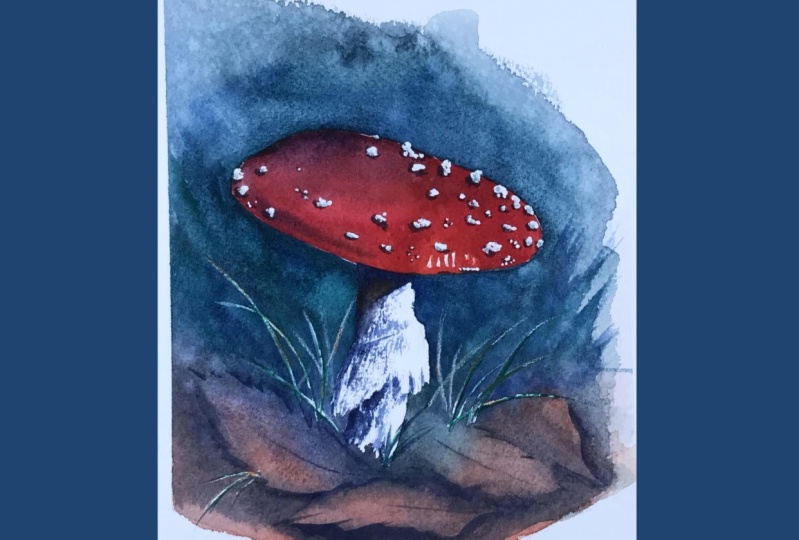
19. Conclusion: So here's the final result. I hope you enjoyed the
step by step process of painting a colorful
autumn scene. Feel free to share
in the comments what new things you
learned in this lesson. Don't hesitate to
ask any questions about the materials or
techniques we covered. I'm excited to see your
autumn mushroom paintings, so don't forget to
share them here. You will find a list
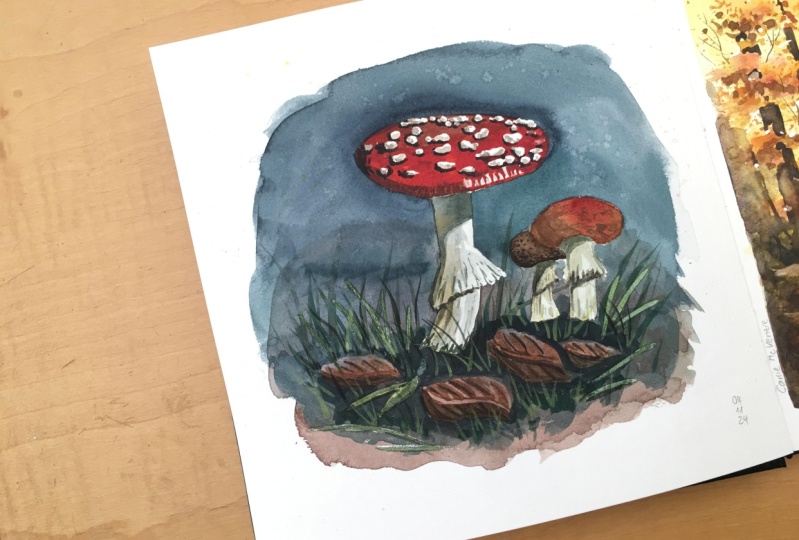
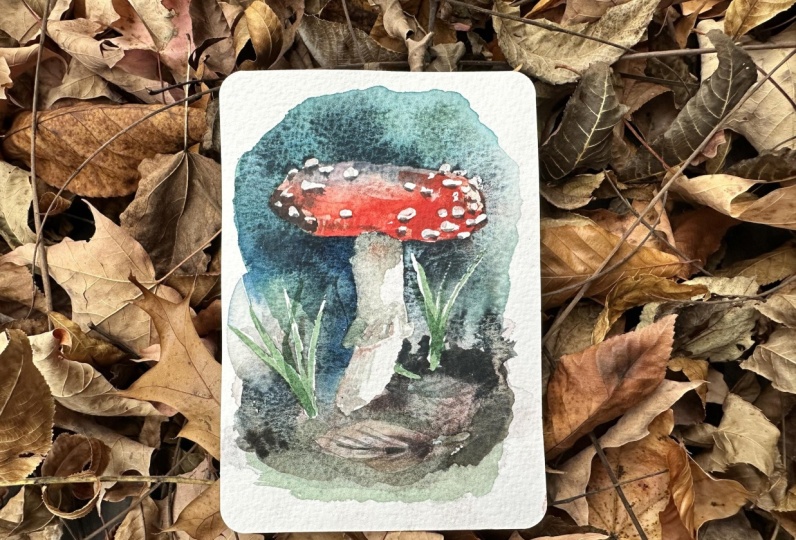
of materials and a few reference photos for practice in the
project section. And, of course, if you
post on Instagram, remember to use the hash tag so I can check out your work. Thank you for watching
this tutorial. See you in the
next one. Bye bye.
 Maria Smirnova, Watercolor artist and author