Transcripts
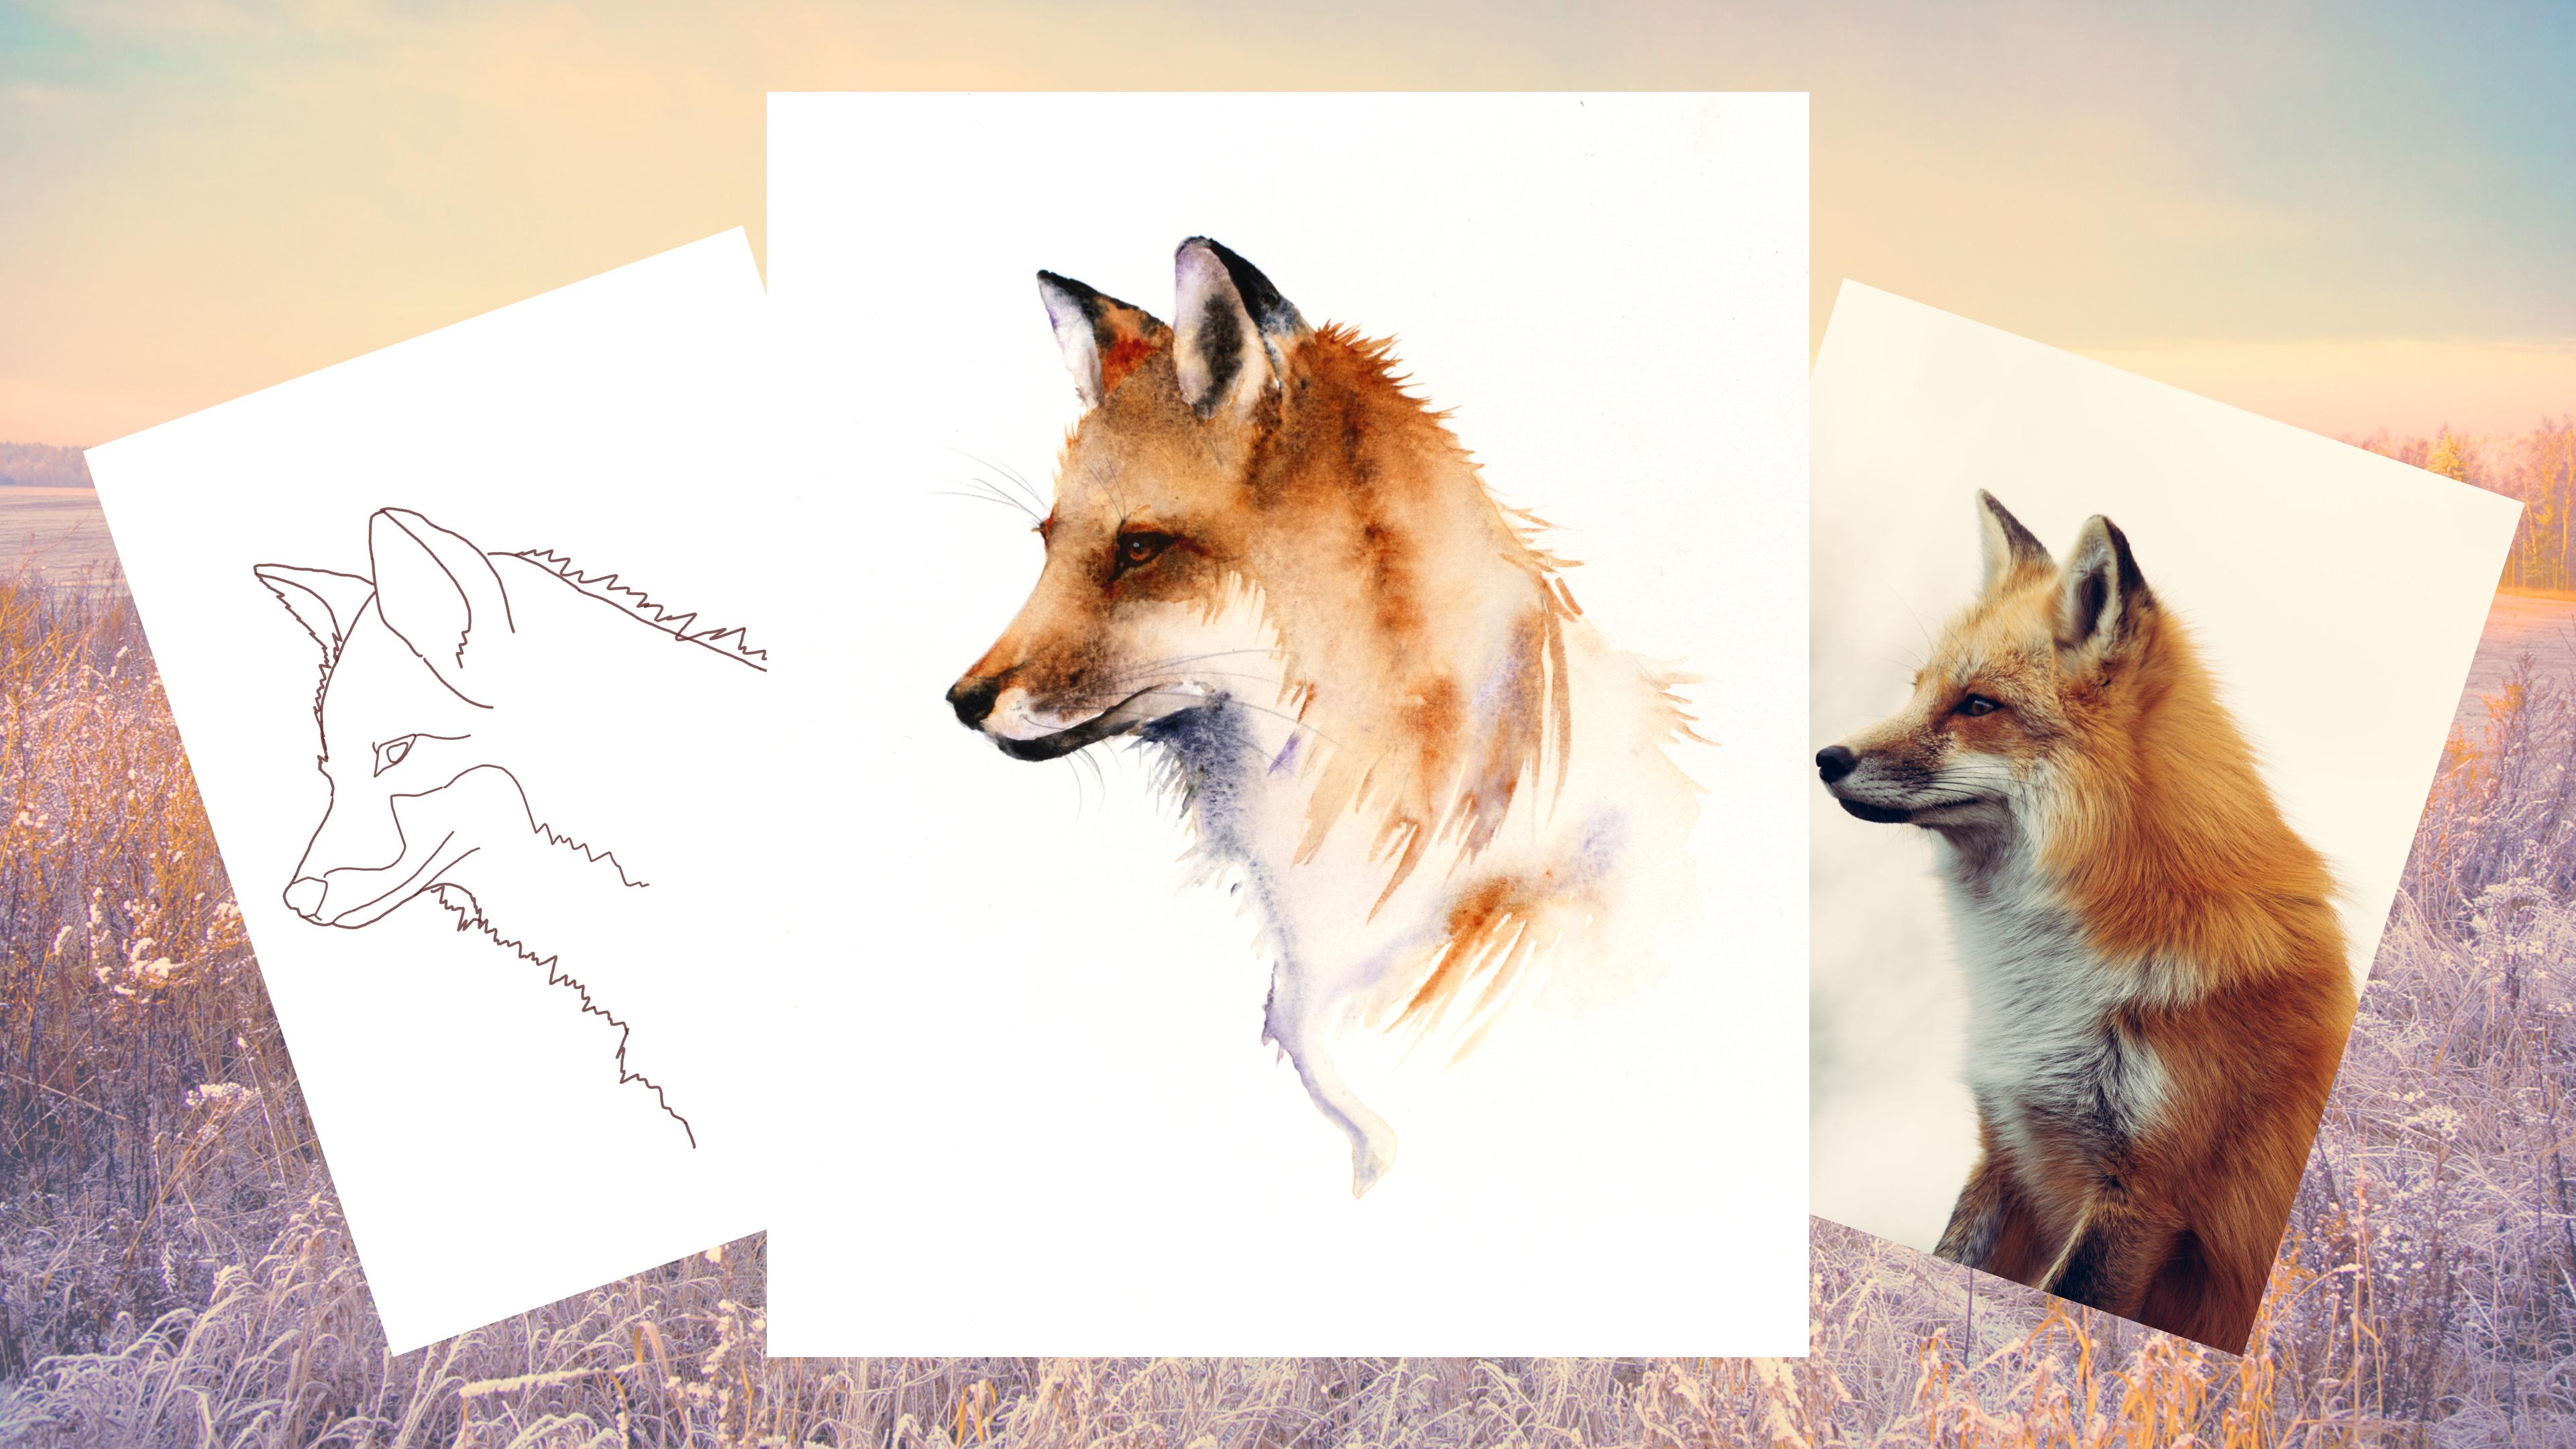
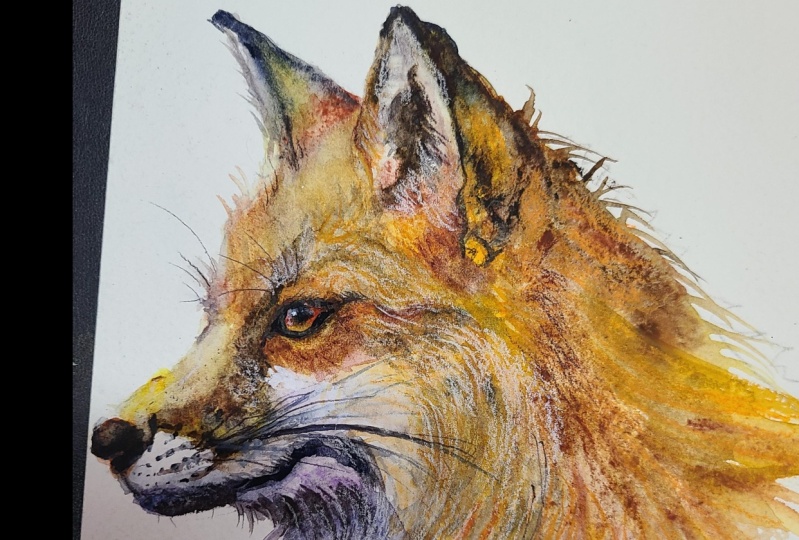
1. Introduction: Hello, and welcome to this
intermediate watercolor class. Today, we're going to be
painting the fabulous Mr. Fox. He is incredibly satisfying
to paint with easy to follow techniques that will
give you superb results. I'm Jane Davis. I live, paint, teach, and walk my lovely spaniels in the beautiful South Downs
National Park, England. Over the last 15 years, I've taught myself the free flow technique that
you see today. Not having been to art school, finding my own way has been
fun and sometimes daunting, but has allowed me to
develop my own style. This has led me to
teaching others, either on a one to one
basis or as part of a group in a wonderful studio in the heart of the South Downs. I also run a successful
commission based business, painting pet portraits and wildlife art in my
own home studio. In all my classes, you will follow
along in real time, where I can guide you
to keeping your work loose and fresh
without over fussing. I have over 20 classes
available on skill share now. If you're just starting out, my three beginner
classes will guide you. Then you'll find over
20 master classes, covering a wide range
of beautiful subjects. In each one, I'll share the techniques that I use in
my own professional work. We'll have a lot
of fun together, and you'll gain the
understanding and confidence to
incorporate everything you learn into your own work. Plus, I'll share a few of my tips and tricks
along the way too. As ever, I've provided you with a wonderful
reference photo, along with a downloadable
template for you to print out. The template will give you
a stress free drawing, so you can just
enjoy the painting. I'll be showing
you how to achieve that wonderful light and looseness using
two simple layers. I will also show
you how to paint that lovely inquisitive eye
that's so full of character. How to reserve the
white muzzle markings without those hard, ugly lines. Keeping your Mr. Fox
wonderfully soft and natural. There's a wealth of other
tips and tricks I'll be sharing with you as we work our way through
the class together. If you'd like to learn
more about me or my work, please pop over to my website
at Jane Davisw Colors UK. This can be found
on my profile page, along with links to my
Instagram and Facebook pages. I'm very active on my
social media pages, where I love sharing my art, especially on stories
with many ideas, works in progress, and
tales of studio life. I really hope you will share all your paintings on the
projects and resources pages. As I love seeing
your Master Petes. And don't forget,
I'm here to help if you get stuck or
have any questions. I want you to experience that buzz of painting
in this liberating, wet and wet, loose style.
So come and join me.
2. Materials: L et me run through
all the materials you need today to paint this
fabulous and Mr. Fox. Starting with my paints. So I have a lovely collection
of Daniel Smith paints. I love this brand. But obviously, I appreciate
you may not have them, or want them or like them. So find the colors
you're happy using. Obviously, a nice, bright, sort of vibrant orange is nice. I have tried this
with some browns, but it just got a little
duller if I'm on it. So a n n I've got nacrodome, deep gold, but a nice
orange color is lovely. Apart from that, it really
doesn't matter too much. So let me let me start and
I can sort of explain. So from the top, I've got a
burnt tiger's eye genuine. This is a lovely
granulating paint. So if you're not familiar
with granulation paints, it just gives a nice
sense of grainy. And then if you can
make it out here, that's the grain there
and the sodite genuine, which is another one
here, that you can see, gives a nice texture. So that's nice. I have CPA. CPA is, I probably use this
nearly on all my classes. It's a lovely, deep, rich color, which when you place
it on the paper, on the wet paper,
doesn't move very much, a really useful color. I don't tend to use it
for sort of, you know, too much of the main color, but it's very useful for sort of holding other
colors together. So light, genuine, a
real favorite of mine is that this lovely blue got
that nice granulation in it. Ultra moon violet, just
'cause I like the color. It's just a nice contrast
between the sort of orange. Quake deep gold is just again, almost what I've got. You know, you may have
a different orange, which you can use. It's just what I
had in my store. And a very, very tired
tube of white guash, which is just for that tiny
little white catch lights. Now, my paper has
been stretched on a perfect paper
stretche and there's a link in the projects and
resources pages to it. I again, if you're not familiar
with stretching paper, it's a really useful technique. It will allow you to paint
on a flat piece of paper. So when you add the water, it won't buckle into
those dips and divots and then you have puddles
and some dry bits. I know it takes away
the spontaneity of just picking up your
piece of paper and going. But if you want to do a really lovely piece and
potentially sort of frame it, you'll find it will give
you a nice flat surface, and it is easy to work on. I haven't got any videos
of stretching my paper. I do it in the bath, so it's not going
to be a very useful or very pretty video, but I would just
have a little look. On your search, engines, whoever you use, have a search, and there will be
I'm sure hundreds of demonstrations on how
best to stretch your paper, or invest in a perfect paper
stretch. They are fabulous. Right pot of water. I have this is a
inch high heart. It Doesn't need to be
a heart obviously, but anything you've got that's about an inch high that you
can tilt your board on. That's all it does.
It just gives us a little bit of tilt. I've got a little rubber. Doesn't matter what
rubber, just a rubber, kitchen towel or paper towel, a kitchen roll or paper towel. I have got three brushes. I have a number, bear
in mind, this pants. The sizing is a little,
I would say it's odd, but they're a 16 brushing, a lot of other manufacturers
would be quite a big brush. So I would say that somewhere
like a ten doesn't matter. You just want a brush
that's a little bit bigger where you can
get a lot of water down. Probably the only time I
use it is to add water. This is the number six pan art. I use this mainly to do
the adding of the color. And this little
tiny needle brush, which is a number naught, but again, that
would probably be a two properly and maybe
other manufacturers. Again, just for doing
very small details like the eye and these little tiny
flicks and bits and pieces. So a little small brush. Pencil doesn't
matter what pencil, any pencil will do you. And I have a hair dryer, which is off camera,
by no means essential, but it's just quite
nice if you're like me, you just want to
get on, and you can just finish the drawing
process off with it. There's obviously a lovely reference photo in
the projects and resources pages along with a template which you can use to make sure you get
a nice shape of that, but I'll tell you a little more about that on the
sketching out part. But I think that's all you
need for the materials, so let's go sketch out
the lovely Mr. Fox.
3. Sketching Out: So I know we all want to get to the fun bit and
start painting. But if you can take the
time and get your sketch, right, it will enhance the
painting bit, trust me, because if you do this in a hurry and you don't take
the time to kind of get all these nice sweeps and lines and the eye
in the right place, when you come to paint, you'll be struggling
because you'll be going, Oh, I'm not sure. Something's not right,
and it's quite often. It's just because you put
something just a tiny bit out. The eye can look a
little bit to one side, a little bit up, and it will
put the whole painting out. So really take your time. However, you find the best way to transfer this image
onto your paper. Obviously, there's a template in the projects and resources
pages, which will help. But yes, really take the
time to get the eye right, the nose right, and
the mouth line. Is are probably the
most important bits. These little and keep
your pencil marks really light before I forget to say
that because it's important. These are probably
heavier than I would do if I was just painting this
as a commission piece. But obviously, I want you to be able to see what I'm painting. Um These little lines here, these are going to be layers. It's worth just
putting these in, but ever so lightly, just so you can make them out, and this line coming over here because you can see on the reference
photo, this is light, and we've got this
quite dark here, so you want to get that little line in the
mouth line in and right. Again, just make sure
that's the right shape because you can make it look
ever so cartoony, very sad. So yes, this little line
is ever so important. U another really useful tip is when you look at
the reference photo, you can see all these
lovely flicks that go up. But if you draw the flix probably comes
somewhere like this, especially on the back and on the front of even
this is a dark area, you can see that sweeps
underneath his chin, but these are the lighter parts. So if you were to then
sketch it out to here, you've then got a fox
with a very big head, and then you then do the flick, so everything gets
out of proportion. So if when you're If you go on to do other pieces
of a very furry animal, it's worth bearing that in mind. If you can see the skull line, and you can almost
sit on the fox, but you have to make
it up a little bit, but try not to put your pencil marked
on the end of the fluff. I think that's a
really useful tip. Is there anything else on here? Again, I'll just
say, take your time. If I'm doing a commission
piece, I will sketch it out. I'll go away, make cup of tea, do whatever, just for
five or 10 minutes, come back and just look
at it again because you'll see quite often see little bits you
haven't got quite right. Yes, take your time and then
we can get onto the fun bit.
4. Ears and Chin: Okay, so it's on onto the lovely bit of
putting some paint down. So I'm going to break
you in ever so easily. We are going to section
some little bits off and add some bits of paint. So it's nothing to too
scary at the moment. I always like to start with
sort of ears just to kind of get yourself going
and put some paint down. So I have picked up
my number six brush. Just I don't want too big of a brush because we're not
doing some very large areas. It's the inside of the ear. The back of this one
and the little chin and so you don't
want it too chunky. So I'm going to
wake my brush up, and I'm just simply
going to wet this down. And what I will do. And this
is really just for you. You'll get used
to this if you go on or follow my classes. This is just so you can see
the areas are wet down, but you want yours lovely
and clean nice clean water. So it's that front
little portion of ear. And then it's the back. I'm sure if you can see any color there. I go, still no color. You can get the gist,
but be very careful, to, leave a little tiny dry
line because we don't want the color from these two ears running
into one another. If you leave a little dry line, they won't reach each other. So I think that's all covered. We want to just probably
hell up and down and make sure you've got that all on
wet there's no dry patches. So we're simply adding a little bit of under
color to start with, so I've picked up
my little violet, which I've already got on here, because obviously, I've put a little bit of
color down for you. Very gently, I'm just again, just pick up a tiny little bit of color and dropping it down. Very subtle. Go to pick up my orange and do the
same, very subtle. Say if you look at the inside the on
that reference photo, there's not a lot going
on, but just a little bit. I'm going to allow
that to dry tad a tad. We're going to be adding
that dark inside of the ear. And if you've followed me on from the three
beginner classes, it's going to be a little
like the butterfly body. We just want it to be
going off a little bit. So I'm going to go to
the back of the ear. Pick up a little bit of orange. Gonna tap a little bit of
orange in the bottom there. A more color. What's better. Allow it to move up.
Do whatever it wants. So. Be careful you don't
touch this frontier. Clean a brush. Pick up a bit of soda light genuine
and a little bit of CPA. And I'm going to
write at very top. I'm going to put a nice
amount really nice and strong and just allow that
to blend into the orange. Try your best not to fiddle
with it and just allow. That's where the magic
is just allowing. The more you fiddle, and
the more you try to, sort of manage it, I suppose, in some ways, the worse it gets, so just leave it. I know it's so
tempting, isn't it? Because you just want
to carry on and fiddle. Now, if your paper because we're all going to be drying at slightly
different rates, you may be in a wonderfully
hot country at the moment, and you find this little
area is starting to dry. Then just flip a
little bit further forward on the video and
do that inside the ear. But mind is still quite
wet and I'm going to go onto this chin
area. So I'm going to. Again, I'm just putting this
color on for you to see. I'm going to wet
underneath the chin. Quite a lot of
color. Need so much. Just running up to here. But be really careful
to stay within your lines cause like I said, in the sketching out,
it is very important. One of my practice pieces, I went at chin got a
little bit too big, and actually, I turned it
into a wolf very quickly. So the fox has a lovely
pointy muzzle. That's part. There'd be characters
and obviously shapes that make that
animal very distinctive. I think that pointy
nose is a fox. So a little about the
top of the ear color. I'm going to pick up my
so light genuine and CPA. I go heavier on the CPA just because
the CPA doesn't move. It's a nice sticky kind of pate. And I'm just going
to try and plate a color right at the front and allow it to
move to the back. Okay, just very gently, I'm just touching the paper. Keep an eye on that
reference photo. We will sharpen up
that mouth line, so don't worry too
much if that's not really crisp
further along here. I'm just going to swap
brushes that quick clean. Pick up my little
one, wake it up. To just make sure we get
that line a little bit. That is enough. You really
don't need too much. In my true style,
I then carry on. But you just want this nice
light and strong because we won't be doing another
layer over this chin. So make sure you've
got enough strength because that reference
photos quite dark. And again, just make
sure you've got those edges lovely and crisp.
Really take your time. I'm going to down my brushes. I'm going to have a little
look how we're doing up here with this here. I think I'm just about there. If it's still
sitting in a puddle, which you don't
ideally want anyway, you can just with a dryer brush. You can very gently, just touch the edge and
it will soak up. Okay, so I'm going again the spa and the
sod light genine, they're just nice dark colors, the spa kind of helps the slight genuine
from moving too much, but I like the granulation. So over time, you'll find your favorite paints
and you'll find their own characters because
they do have their own. Yeah, ways of moving. So, okay, I'm I'm going into where the center of
that dark area would be, and I'm just tapping,
and I'm allowing. If it's wheezing too much on you and it's covering
the paper too quick. Hold on in a middle minute. It's all about getting
that timing, right. We just want a fuzzy inside. I'm not if I'm honest, I'm not worried if it's
exactly the same shape, but I will put that just
a little kink in there. And we're just going to allow that because if you look
at the inside of the ear, on the reference photo, there's
a lot going on obvious. Color is in that dark back. Portion, which will we put
on a little bit later. So yes, resist the
urge to fiddle, put your brushes down,
put your paints down, and allow that to dry. And obviously, you
can pop a little hair dry over there once
it started to dry. I probably repeat this
a little too often, but you don't put a hair
dry over while the area is still quite wet
because you will just blend the
colors too quickly. The hair dry just
helps to finish the very last sort
stages of drying. So, don't be too
hassty with that.
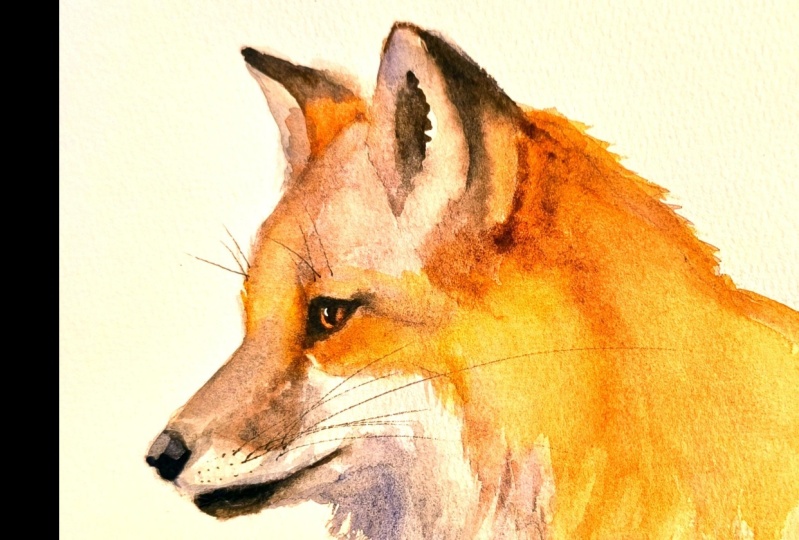
5. Head and Body First Layer: Right. Once these little
portions are thoroughly and dry, we're going to do
the next layer. I'm actually going to pick up my slightly bigger brush just because it covers the
area a little bit quicker. I'm going to pick up the violet. Again, this is just for use, so you can see where I've
wet down because it can get a little bit confusing. So I'm going to start
on top of the head. I generally go around
the outside, so I know. Again, if it helps, put a little bit of
color on your brush. Just so I know,
I've to see a hair. Saw a hair on the end of my brush,
that's not going to help. Just so I know I've
wet all the outside, you know, go right
up to my lines. It's so important. Make sure
you get those shapes right. Then I'm going to come down down to those pencil marks
you hopefully you've put in. But if you've done them quite lightly, I hope
you can see them. Now, we're going to
go around the eye, but we're going
to go around what I would call the eye ball. So you can see, and I call this The makeup. So there's obvious, when you look at that reference photo, this fox has got some
lovely dark areas around the eye and this lovely dark
sort of portion in front, but we're going
to wet that down, so we're going to keep the
eyeball nice and clear. We're not going to
wet the eyeball down. Now, you may like
painting eyes first. And if you do, then go ahead. I always doing them at the end. But if that's really
really making you feel weird and kind
of freaking you out, please by all
means, go ahead and paint the eye first and
just waz back again. But I always do them last for some bizarre
reason. Don't ask me. There's no technical reason
why I can't do the eye first, so I don't think that there
is any particular reason. It's just what I favor. Okay, we're going up to
the back of that ear. Again, just wet that down. And we're going down the neck. Again, be careful. You've pented out those nice lines and you haven't incorporated
the flick into it. And we're going to
come somewhere here. I see that because
what we want to do, we're going to flick
all these out. But again, a little
bit like the back of the coat back of the neck. If I come right
the way down here, then the flicks are going to
have to come further out. I hope that makes sense. So we're going to go
somewhere like that. Obviously, the paint, if you'll seal fairly
new toward color, the paint will only go
where the wet paper is. So that's where you
have some nice control. Obviously, this is nice and wet. It's not going to disappear onto this area here because
it's nice and dry. Okay. So make sure
it's lovely and wet. You have no dry patches because if you leave a
little area of dry paper, the paint will just go round it, and it'll be quite obvious. You don't really want
that. Okay, it's a very easy technique, and that's just to
duck your head up and down or as I bobble
your head up and down. Okay, that's nice nice and wet. I'm actually going to swap back to my it's
slightly smaller brush. I find a smaller brush gives
me a little more control. I feel a little bit
more in control. But you don't want
to go too diddly. Otherwise, it becomes
tight and fiddly. So my blessing, my
lovely dad always said, Go with a brush that's as big as you can
sort of cope with. I don't know if that's kind of contradicting some of
my earlier comment, but Yes, you know what
we'll feel comfortable. Okay, I'm going to pick up my nachdm gold and
the tiger's eye. Clean brush. Make sure
it's nice and it. Give this a little
squeeze to wake it up. You can use the two colors on your brush at the same time, and we're going to start right
at the end of that nose. And just again, just allow. Obviously, we'll paint the
nose in darker later on, but there's no reason
why we can't go over the nose in the
orange orange brown. If it's not moving, sometimes you just haven't got
your brush west enough, so give you brush a little dip in the water and see
if that helps it move. That's probably
enough. That top of that nose is quite light, and we do do another layer. So I would always
go on the air of lighter if you're doing more
than one layer cause again, you can just strengthen that up. That Sometimes just
paint works beautifully. Obviously, cause we've
got that eye cleared, the paint has whizzed
around that and given me some quite nice lines. But what I want to do is
strengthen round the eye, so I'm going to put
the tiger's eye down cause that
moves quite a lot, so I don't want to that
to happen so much. I go to pick up the sepia. So I've got the gold and CPA. And I'm just going to
dot around the eye. Again, if it's moving too much, Oh, my goodness, just
hold on a minute. Or you can move on to
another little bit, but if it's moving
a huge amount, you can control
it by just gently pulling it back. You
want it blending. But sometimes it
does get a little bit away from you,
doesn't it in your life. So you can always say,
always soak it up. So I just picked up it as tiger's I I just feel
that's right at the moment. Again, as you progress
with your confidence, you'll know which paints
to pick up on what will work for you and how
your paints all behave. And how your paints behave on
your certain paper as well, 'cause that obviously
has a huge effect paper. So I can only guide you with my paper and my
paint at the time. Okay, take I always say, take your brush away,
see what you think. Does that need a
little bit more color? A little bit more depth. Again, bear in mind, we will add more depth in on the next layer, so just go to just warm it up with a little
bit more orange so make sure that fox is nice
and rich orangey color. That's probably
enough, actually. Okay, you're gonna
clean my brush, and we're going to sort
of working my way round. I'm going to pick up the out
of all the pop up there. I'm going to pick up the sepia
and the so light genuine, we're going to do
the back of the ear. Quite quickly. Don't think about it too much.
Nice and strong. So if you're working with pans, it's always a little harder, but you're given a
really good rustle. You get a lovely amount
of paint because it's quite hard
otherwise if you don't. And you can just
with a little brush, while it's nice and wet. Just very carefully
flick around. It just has a just the
smallest amount of color. Goes around the top of
that ear, doesn't it? Put your brush down again, see what we think.
How's it looking? I think that's travel
down enough for me, so I'm going to pop down. I'm going to hang on
to so light genuine. The gold or the orange color
and the burnt tiger's eye. I'm going to have a little
tiger's eye and orange. Looking at my reference photo, there's a nice bit of color. Starting to creep up
the ear, isn't it? I let's just pop that in. That's lovely, and
that's moving. Actually, I'm going to just give this a little bit of tilt, so I've got my little heart
that's bad in each high. Just going to tilt the
ball just for a minute because that's going to
allow this paint to run. I just want to get a little bit of movement down the neck. So that will prevent me from will prevent me from fiddling too much,
trying to get the paper down. I'm just going to allow
gravity to work for me to nice strength of
color up the back there. And again, just
allow that to run. I'm just checking 'cause
this is starting to dry, and I'd like to do some flick, so I'm going to do
a little bit of multitasking here
because this area is just beginning to
dry a little bit, and I want the flick to
be wonderfully natural. So I picked up a litle brush. I'm going to leave
that for a second. It's fine, but keep an eye. If you've got that
on a tilt that you haven't got a
big puddle here. I actually soak mine up 'cause I can see it's
starting to gather. You can get distracted
in other parts, and all of a sudden it's
whizzed down your body. I no we start to fix a little way in rather
than right at the edge, and we're just going to, I can
see that has begun to dry. I'm just going to wet
my brush a little bit, still go a little dry, so add a little bit of
colors to my brush. That's better. Just a few. I've got a little chunky. That's just move Move the
coat down a little bit. Again, every fox will
be slightly different, so it doesn't really matter. You can upside brushes, make them look a little
bit different in size. I'm just going to leave it there cause we're going to do
these nice flicks here. I want to add a
little bit more color on that back at the moment. So back up to the
back of the neck. That's a nice strength of
if you squeak your eyes and see there's that nice line
of coat going down there. Bit. Okay, again, I know this is going to start
drying up the top here, so we need to get
some nice flicks in here we're not doing another
layer quite up here, and I think it's just better
to get these flicks in at this stage we
know they're there. Again, don't go all the way down in a very methodical line. Try to be random. Maybe
a thicker one somewhere. I just leave a gap. Come
down a little bit further. Yeah, that's looking nice. Pick up my medium brush again. I'm just gonna pop.
Let's have a little bit. Let's add a bit of violet
in there, as well. I can't help myself
with a bit of color. Pop a little bit
of violet there. A little bit of orange.
A little bit of orange. O. That's it. And I'm just going again
do some nice flicks. I'm going to use this little puddle of
color here that I've just got and we're going
to do some nice flicks. Again, e keep your
wrist if you're unsure. Try on a little bit
of scrap of paper before you start if
you've got a bit to hand, but it's just a nice
sweep of the brush. Everything nice and light. Going to go right along. You can add a little if
you have enough paint, you add a little bit, as long
as there's loving and wet, it won't matter. Just blend. Again, just take
your brush away. If you've got
something you like, even though I may be still continuing, but
you've got something nice. Stop. Don't continue just
because I'm continuing because It's having
the confidence that you'll trust your
own piece really. Right, I'm going
to leave it there. I've got a love this
lump of light here, and I know if I fiddle too
much, I'm going to lose it. Or when in that little area, I was going to do
some flicks in. I says probably dried, and yours is probably dried, but just in case yours hasn't or I can put a little bit
of paint on my brush. It's just a couple of
going into that ear. Just again, just a few Lovely. Right. We need to allow again,
just allow that to dry, and the hair dry exactly
same rules apply, just allow it to dry
most thoroughly, and then then pop a
hair dry over it. And before you I disappear, just make sure if you've pop
a little board on the tilt, just make sure you
allow it to dry on that same tilt as well
because if you lay it flat, you'll encourage some of this to start working back up again. So it's always best
if you've let say you've finished on some sort of tilt just to allow it
to dry on that tilt.
6. Eye Background: Right. Once it's thoroughly dry, we're gonna pop an eye in. Let's let's Stop b bringing
this lovely chap to life. So I'm just going to take my little art away that's just put a
board on a tilt or something was underneath
our board pencil. I don't know why it wasn't
laying flat and straight. Yes, we're gonna lay that flat, and we're going to do the eye. Now, the eye can get
a little confusing. This often used to catch me out when I first
started painting, 'cause what is the eye ball and what is the sort
of makeup round. So if I bring my eye pad in, I'm hoping you can see
this clear enough. I'm going to hopefully
demonstrate, we are going to be wetting. There's 00 the eye ball, and it all sort of
merges of them on is, what is the eye makeup and
what is the eye in shadowing? It's hard to distinguish. But we're going to be doing don't no point resting
my brushes, Silly. We're going to be doing
this portion here. We're not going to do that
little that lovely sort of a sort of lump of color. A lump sounds awful, doesn't it? But this little area here, that nice sort of
drag of dark that really makes that fox sort of whatever fox you like to me. But we're just going to
be doing the ins sort of the dark area around
the eye and the eyeball. I hope that makes sense.
And once we get painting, it probably will
become clearer, too, so I'm just going to put my
iPad back up and he Right. So lift definitely
a little brush. I've cleaned my water. It's always nice to
have clean water. Fresh piece of kitchen
roll paper towel, and we're going to very
carefully wet the inside. But you want to touch right up against that
sort of darker area. We put in. You want to touch the paint would be a
nice way to put it. Really take your time now. I always stand to paint, but if I do eyes, I like to sit, although how my setup is, I can't actually
sit at the moment, but it's a nice time so it
will be quiet and gentle. So quite simply, we are just
going to pick up the gold, and we're going to just drop can get some color on my brush. Just
drop some color. The lovely tip is
there's always, even if it doesn't necessarily show it in the reference photo, there's always sort of shadowing
underneath the eye lid. So that's a nice sort of thing
to sort of bear in mind. So always put your heavier
colors at the top, and we'll obviously add more
color at the top as well, but you want the bottom
to be fairly light. Now, boringly,
we're just going to need to allow that
to dry thoroughly. Again, you once it's
beginning to go off, you can put a hair
dryer over it. Shouldn't take too long, especially if you like me, you should have finished
the last little drying. Area by giving your
pizza hair dryer. So your paper is
probably quite warm, so it will encourage
it to dry quicker.
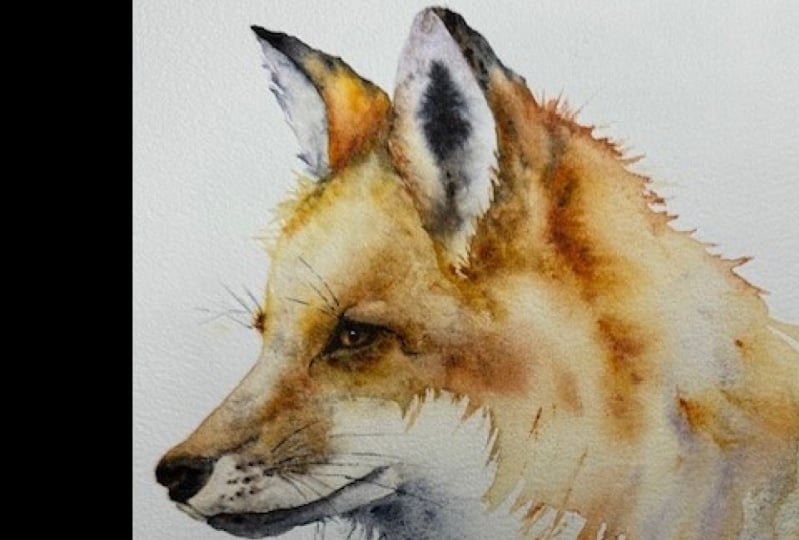
7. Eye Makeup: Right. Once it's lovely and dry, and we can add another layer. The layers are lovely, especially on eyes because
that gives them that depth. And we can then gently take one layer out and just give a little bit of
light to the eye. It just gives a nice depth. The eyes are so important. It's what we're
drawn to, isn't it? And it gives them
the character, so it's worth getting right and, adding some nice depth to them. Again, we're going to wet
down exactly the same area. Now, the nice thing
about doing the eye at this stage rather
than a little bit later, like I quite often would do is the next layer over the body will come right
up against the eye, so we can in len adjust the eye in the eye
makeup if need be. It gives us a little bit more wiggle room to get things right. Right, on with a sepia. Now, we need this to
dry just a little bit. We don't want it
sitting in a puddle. And quite often, because you're working on
quite a small area, and you pick up the
water and pop it down, you'll find you've
got a little bubble of water. So you
don't want that. You can either get very gently, just pop your paper towel up against the little bubble,
and let that suck up. Again, you can do that
with a clean your brush. Dry it off, and then you can do exactly the same
sort of theory. Pop your brush right up against that little
puddle of water. So you want it just going
off? We'll look at that. I'm going to go back
to the butterfly. We're just at that kind of sticky stage where it's
starting to go off, but it's not by no means dry. Again, if it dries on
you, suddenly out. Oh, my goodes it's gone dry. You can just again, just
reapply that water. Now we're just going to go
round, put the eye makeup on. That's that really dark. Look at that reference photo. It's that lovely darkness
that goes around the eye. Almost painting. Nice amount
of paint on your brush. Again, take the brush
away. Have a little look. Now, the eyeball smooth move my e. My eyeball is a little
bit long at the moment. So I'm just going to my
spa move that in a bit. It should just very gently give you a little soft like say, with the butterfly body, a little bit of a fuzziness. I might pick up a tiger's eye because that moves
a little bit more. Sep is a very sticky
sticky color. So the tiger's eye will give
me a little bit of softness. You can see how that That's
given me as moved it. It's just a more, We say a more move paint. It just moves more. The CP is quite sticky or stay in its
place where you put it. It eyes are just
about tinkering, taking your brush away, having a look, seeing what you think. And the minute you get
something you think looks good, bearing in mind, we haven't put the eye ball, the pupil in. That is a really nice stage
for me at the moment. Obviously, we haven't put that nice little front
portion of the eye in, which we won't do
until the next layer. So we're just
concentrating on really that dark makeup round the eye. And you've got the nice shape. Just make sure that's sort
of in the the top edge, it's pretty much if
you imagine a clock, that is 3:00, 9:00, so that you make sure you
get all those angles in because that gives obviously
a huge amount of character. Again, we just need
to allow that to dry, then we can re wet and
pop the scary pupil in.
8. Eye Pupil: Right then on with
the fine all layer. So back to the
little brush again, and we're going to again, just rewet that
exact same portion. Now, drip about to escape. Now, if you've gone
a little I can see this little bottom portion of my eye could just do
a bit of tidying, but the beauty of
doing another lays, we can then sculpt that
little bit more on the sort of the layer that will follow the
whole body layer. So we're just don't get
too worried if some of you out another bottle of water. He has got a little raggedy. They're just rewetting that. And you can see
how that's moved. That tiger's eye is has
really moved out of position. And just how it goes, I probably will need to reapply a little
bit of tiger's eye, a little bit of sepia and sort of reclaim that
darker area at the top. Sometimes it's when I was, again, sort of
still starting out, my my actual table
was on a slight tilt, so it was always allowing the paint to move
in one direction. So yeah, check you if you ever
have something like that, and the paint we seem to
end up in one direction, check your tables nice
and straight and flat. Flat more than
straight, I guess. So I'm just tapping
that two colors in taking my brush away. Just being ever so gentle. You can just the tiny
little things with eyes will alter the
whole appearance. Okay, I think I'm back to
roughly where it was before. And we're just going to
I won't dry that again. Probably I would
dry that again if I was If it was just me, but that alter that
was my alteration, not yours, so we will continue. So I've picked up
the slight genuine, and I will actually have the SPA in my hand
at the same time. Sole genuine are nice
for doing pupils. I just found it's a nice color. Now obviously, if
you look at the fox, it's thankfully quite merged, but it's not very obvious. It's not like painting
a cattle or something, but it's very, very distinctive. It does merge quite nicely
with the rest of the eye. So you just want
to start somewhere in the middle of where
you can see that pupil and start tapping
and gently working out. Oh, my goodes keep getting a bobble on
the end of my brush. Say, again, keep taking your hand away, see
how that's looking. Go very gently, take your time. You can always I add a
little bit of tiger's eye, keep that strength at the top, but it's a little bit
soft to strength. And then, again, I would say stress minute you have something
you like, then leave it. I actually quite
like that because I know I'm going to take some
little bit of color out, and that should
just make the eye to the pupil Pin a little bit. Let's just put those
down for a minute. Clean your little brush, take the excess and moisture off, and make sure
you're not going to add any more water at
this stage to this brush. And I sometimes even give it a little squeeze in my finger, just to make sure it's It just hasn't got too much
excess moisture on it. I'm just going to go right
underneath this eye. Onto the eyeball, just
take that color out. You can see that because
we've done some layers. I've just gone down
one layer probably and gone and gone into the
orange we initially put in, so that is a lovely way to
add a little bit of umph. I like that. I'm not sure if I want to fiddle much
more with that, because I know I can strengthen this y makeup on the
next layer. I like that. We'll put on a
little catch night because that always
makes a difference. And yeah, please with that. So get to the stage, so
kind of happy with it, but Try not to fiddle too much. If it gets a little
bit out of control, and you're like,
Oh, my goodness, it just gone, I've lost it. Step away for 10 minutes. Let it dry. You can
rewet these things. And again, just
very gently tinker, take your time trying
your best not to panic. I can see, actually,
just looking it. I probably need a little bit
more of a flick up here, but again, I say that can all
be done on the next layer. So it may look a little odd, so it might be worth
if you're generally happy with the color
inside, then then leave it. And we'll just allow
it to dry properly, and we'll put that
little catchlight on because that always helps.
9. Eye Catchlight: Right. Once thoroughly, let's put that magical
white catch light. Now I've got my Oh, my goodness a very tired, white guh, and I've actually got I've got
some I've got a new tube. I've treated myself coming
from the online store better. Yeah, it hasn't arrived yet, so I've still got my old tube. Right? So I'm going to have
to give this a little bit of a little bit of a rule. Wake it up. I must have had this for Oh, my goodness. Five, six years. I suppose it's
probably only ever does little white catch lights, and don't really use
it for anything else. Okay. Nice, Dicky. If you're not sure how much
you got on your brush, again, if you got a little
scrap of paper, it's worth maybe just
doing a little dot, but Yeah, I think I'm
fairly confident. Now, if you look at the
reference photo, there's a line. I'm not going to do a line. I'm just going to do a
dot towards the front. Be careful you don't put it on what would be
the actual eye lead. Obviously, some
of this dark area up here is the eye lead. So you want it on the eye ball, but towards the front and top, so I'm going to go somewhere. Let's be confident I've
got enough on my brush. Let's try in. The little do. Dad. I know the rest
of it isn't finished, but that really
helps, doesn't it? I've I've gone a
little in between. I haven't actually done the eye right at the end, so I've, I've treated myself to an eye a little further long than
I would normally do. Anyway, so that needs to
just allow that to make sure it's all lovely
and dry before you then we crack on
with the next layer.
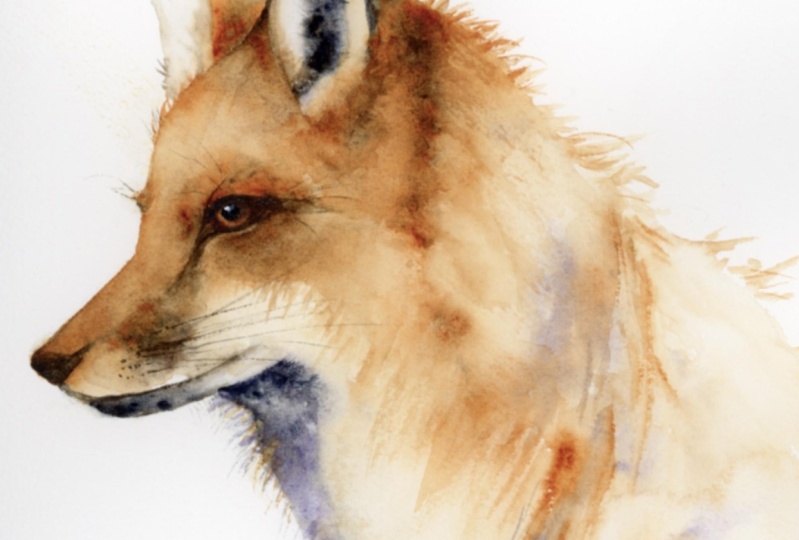
10. Head and Body Second Layer: Right. Then so before we
actually put any paint down, I'm going to rub
out very gently, any of these reference lines we put around the body inside. So don't rub the
air outside lines, as we'll lose where
our lovely foxes, but more concerned about these lines here
because I don't want to see them on the finish piece. But say, make sure
it's lovely and dry. So just those lines. Brush them a on. Mach.
A go pop that oil. Right. I'm going to pick
up my bigger brush again, and we're going to wet down. It's a little bit
harder for me to show you because
I can't actually put a color on my brush
to make much sense. But if I start at the top, we're going on top
of the forehead. Don't go into the back ear, so just the top of the forehead. We're going the inside
of the front ear. That makes sense
swinging it around. We're going a little way up
the back of the front ear. Going back down here. Now, because we've got
one layer already, and I've got some lovely light and nice sort
of patterning. I want to go as gently as I most possibly can
and add that water, especially on this
light area here. I love that, but we're going
a little bit further down. Again, we're going to do some
more, probably more flicks, so I don't want
to go as far down as we probably put some flicks. We're just going to go
somewhere like that, and we do have to let me put a little bit color on here and you can
actually see it. There. And then we're
coming back up. Underneath the chin.
So we're getting that lovely that really nice
sweep underneath the chin. Chin to run here, doesn't it? So that little area, then a nice sweep
that sits underneath. Don't say, don't go to
the very edge of his fur. You're just doing that sweep that darker sweep because we end up with a very thick
fox, otherwise. And then just gently
work your way back up. We're going on top
of the muzzle line. Let me put a little
bit of purple because I can violet, so. Hopefully you make
a little bit of sense. Little bit more. I bear in mind, this purple is just for you. You want it nice and clear. Don't add the
purple around here. Now, we're going very, very, very carefully round the eye. But I'm going to just going
to carry on working around the outside first before I go around closer
to the eye because I'm going to pick up my
little brush in a minute, make sure I get really
tight against that eye. I want all wet here. Say really gently. You want this all wet. Ever so gently and you
probably find you end up putting too much water
on, but that's fine. It's better to have too
much water than upset all that lovely first
layer we've put down. Again, make sure you've gone
right up against that ear. And if you've left a little
line where on our very, very first layer where we did the ears. You can just creep up. Let's pick up that bush. I'm going to go around
the eye in a minute. So you can just creep up
that little white gap. I left a very slim white gap, so you can't really see it, but you can just wet
that down as well. Now, we're going to
go around the eye. Now, you want to. Go right up against that makeup. And if you've made like me, that got a little bit chunky
down the bottom there. I can wet that down.
It will just soften so we want to touch the
edge of that makeup. So then the makeup gently blends and gives us a nice
amount of softness and blend. I know it's a little fiddly. Again, just duck your
head up and down, take your time at this
stage, it doesn't matter. We can always add a
little bit more water before we start painting, but it's worth taking the
time to get this area around the eye right because
it will be quite hard if we go into the eye or doing it or
leave a little gap, that is going to look quite odd. Can see I've lift the big
chunk of dry paper here. Just wet that down
slightly bigger bush. Okay right up against where
you've done that first layer. Be careful you don't get bot.
You see my drips of water. So be careful of those,
you don't put it over up to the forehead, and it drips into the eye. As you can imagine, I haven't
done that before at all. And if it does, you really
just need to let it dry again, and it can be a bit frustrating because you don't want the
eye wet at all at this stage. Okay, so if you've
taken your time I have to go round, duck
your head up and down, make sure this is dried
up here already on me, so I'm just going to
add a bit more water. It's lovely and wet. We can start adding a
little bit more color and depth. A little bit down here. Perfect. All right.
I'm going to hang onto this brush because
I quite like this one. Now, you've probably got some quite hard
lines here where we painted that muzzle going
around that muzzle line. So I'm going to pick
up the Tiger's eye and sew light genuine. C get over the
tiger's eye first. It's always worth
whatever when you start doing when you
first wet the layer down, look see what areas need the most blend,
if that makes sense? Obviously, the wetter the paper is the more your
paint will move, so you want to find the places where you need the
most paint movement. So that muzzle is probably it because I want you
to almost disguise that sharp paint line.
Swing around here. Again, if it moves
a bit too much, you don't want that
as much paint. Paint there. You can say very gently push
it back terribly light, it's like your plate you almost picking up codd
something very gentle. I think I described it in a probably a more recent
class I've done. Here if you're doing gold leaf, you're being very gentle,
so that's no pressure. Again, we can start then
working around the eye. I've lost a lot of that strength actually I put on
the first layer, so I'm going to pick up my gold. Got the light genuine, and we've got a tiger's
eye in there have an eye. I have a little tap,
see how that moves. Say, as we work our way through these classes,
everybody's painting differs. So I can I'm chatting
through my piece. But, you know, if
there's areas I'm working on that
don't apply to you. And, have a look
at your own piece. See. I'm looking
for the dark areas. I'm squinting, seeing
where I need more paint. The forehead quite
light at the moment, so I'm going to go up
to that in a minute. But just want to
make sure that's a lovely blend around the
eye, and that's nice. That's worked beautifully. I don't want to do
any more to that. So I'm going to go
up to that forehead. Pick up the violet, put that down, the orange down, put the light genere down. So I've got tiger
sy and the violet. Okay, just very gently. Tapping. A little
bit more tiger sye. Two violety up there. Okay. Take the brush away. If you need a little bit
more further down, say, it's just just ever so gentle. If it's sticking a
bit, then add it. Sometimes it's just
people don't have the brushes or you may not
have the brushes wet enough, so just make sure your
brushes of wet as well. Now, if you didn't get in
time to do those flicks, I could have done
them there as well. So, you know, you could flick up those sort of
flicks into the ear. Et's pick up. What I want to do
is add a little bit of strength around that ear. You can see if again, I'm only looking really
for the darker areas, because our paper is lovely and wet, the paint will blend. So by adding the dark, I'm leaving I'm
allowing the light to almost take care
of itself, really. So I've got Tiger's
eye and gold, I've squinted my eyes. I can see there's
some nice dark area around here right
underneath that ear. Socket. Comes up a bit. Again, you could strengthen
this if that line didn't work quite so well for you
there, or your flicks. Again, we could have done the flick at this stage as well. So you can go around and do a couple more
flicks if you want. I could have put a little
bit more depth up there, that would be really
nice and dark up there. It's a lovely contrast, isn't it between real depth and strength of color.
And then nothing. That's the beauty we can
achieve in watercolor. Again because I've got to
put a lot of paint up there. I'm just going to do
a couple more flicks. Okay, before things
start drawing, we need to do tonight
that nice sort of darkness underneath the chin. So I've got the violet
and the sight genuine. I'm going to actually give
my ball a little tilt again. So back up with a little heart, and I'm going to
have to be careful that this line of water cause we've added a lot
of water, probably. You can I that's really
sitting in a big puddle. Again, you can just either
do it with a brush. I'll just do it with
a brush. And then We're going to do kitchen rock. It's quite a lot sitting there. You don't really want it
whizzing off the page. You can. If you want those lines that
dribble lines that run off, this would be how you
would achieve them. But I personally
don't want them. Okay, so I got sewed like
genuine and the violet. I'm just putting that right
up underneath that chin area. So really close up and allow that to move
back to little brush because I just want to make
sure I get that nice curving. And if it's not moving,
add a little bit of water. Again, it's all going
back to the simple trees. This is the allowing the
light in the ground. And if you just watch
how that trickles down. Again, just be careful
of that bobble of water down there. We can Pick up my medium brush, and always just
dribble it down a bit? You can see how that just by adding more water further down, it's obviously just allowing
the paint and water to run. Yeah, that's looking nice. And before it does dry, we do want to do some flicks on the chest, back
to my little brush. I'm just going to pick up
some of that color that we've put on our na of chin. Just flick a few bits out. Again, don't get
too carried away. If it's not getting enough on your brush, there's
not enough there. Do we just put a little
bit on your brush? Quite sure what's happened?
A little bit further down. And if it looks a
little bit too wet, sometimes this maybe because
it's a little bit too wet, you can get some
really sp juice. Flick flicks agar to get it catching it again
at the right time, that nice sort of sticky
stage where it's wet, but not so stocking,
stopping wet. Making sure that
nice line right. Okay, that's looking all right. We need to just do a few sort of flicks down here and add a
little bit of color. So I'm going to pick up my gold. That's not clean my
brushes, isn't it? Is that slot you. S, genuine. Get rid of that. You probably haven't got the violet down here
'cause I've popped that down there so you can
see where I've painted. I've just got a bit of color in the top
of the tube there. Sometimes a problem of
working straight out a tubes. Okay, just going to pop
a little bit of color. We're just going
to just literally just a few more flicks. Pop on the back just to
give ale bit of sense of something going on
down further down. So a bit further down the neck. Out a little bit, allow some of's colors to
run again, step away. How is it looking? Fully as this dry can do to a couple of. They won't stand out too much, but you might get a little
bit of just a sense of a bit of a coat movement. I don't like doing too much. It can get all look a little
bit contrived and worked, so I won't do any more
than that, I don't think. I like how that's
gently moving down. I just just a nice little
kick of the chests there. So I just get a tiny
bit of color in there to make sure I
get that nice shape. Sometimes just looking for shapes, isn't it that pleasing. Give that a little. Lot
of water sitting there. Okay, I going to I'm just
going to allow this. So I'm going to allow this
to go flat again, I think. I'm just making sure
there's not a lot of water sitting on these edges because
it will run back up again. So lower that down again. Now, I can see this has dried. So I'm A this is wet. I can just see round
the eye has dried. So I'm just going to just add a little bit more water
there very gently. S as long as all the air you've already wet
down, it is nice. It's still sort of wet, or just. You can still moisture in it. You can add a little bit water. Allows you a little bit longer
to have a little fiddle. Okay, you want to. Hidden my d bar shaven
underneath here, it is. Alright, I just want we need to put that lovely sort of flick that's coming out and the reason I've left it a little
bit longer is, again, I want it at that
nice little tacky stage, but just be careful. You don't put your
wrist in there, so you might want to sort of
move your ball around, or I won't obviously
move mine because you don't want to see my
painting upside down, but I have to be careful. So we're just going to
try and get that nice Flick. That makes all the
difference, doesn't it? Again, to say if mine
looks a little small, so I can very gently add
a little bit more paint. Of course, I didn't quite get the nice little kick
up on the top of the eye. So I can gain this
is the beauty of doing the eye in the makeup now. Or, the eye on that layer because we can
sort of fiddle with the eye on this layer and sculpt almost. It's being very gentle. It's worth mentioning,
I have got quite a nice lot of light
here, but for any reason, this is still damp, and a lot of color has gone
into that cheek area, which we need to
keep nice and light. I can pick up my damp brush. I say our mines fine, but I can just while
the paper is still wet. It's quite a nice time
to lift color out. It won't if it's still damp, you're not going to be left
with sort of a hard line. If we did this we did
this when it was dry, were more likely to leave a sort of a hard line where you just taking
the color out. So You know, if you if you
lost some of the light there, there's quite nice time to do
that when it's still damp. Alright, I'm having
a little look. It's looking right. I tell you what I haven't
done, actually. And while this is still a
little bit damp up the top, to do some of those
flicks. Just a few. I don't want to do too many, but because they're
nice. I go to do a few. But a little bit
more brush 'cause I haven't got enough there. Take careful not to put my
fist in this. So the strong. That's it. Just a few. If you've got something a
little bit chunky like that, you say, it's got a little
bit too hard there. And Jane just very
gently soften it. I think it's all just
not panicking, really, just being really gently and sort of whatever a
kind of corny thing, but just a very mindful. Here, I think that's probably
enough because we've got this little tiny
little triangle shape, which is the other
eye just coming in. So I think I will do
that now, actually. Just while, it's just a tiny, little bit damp still the edge. So it just blended very gently. So so I picked up the orange. Now, if it's moving too much at the moment for
you, just hold on. You can do this when it's dry. It wouldn't matter too much. How's that look? Yeah, that's we'll do some
of those lovely flukes. But I'm going to do
that. I'm gonna cheat. I'm going to do that with
a pencil because it's really hard to do cause
it's not very big, this little painting,
it's quite hard to do with a brush and get
them looking right. So I have played with that, but some got a
little bit raggedy. That's enough. Just
a tiny little bit. If it's got a bit orangy, could be a touch orgy, maybe. Just go a tiny little bit
of tiger sy in there. Just to give a little
bit to call a tag. Just a tiny bit. So as the painting
sort of progresses, everything becomes
sort of quieter and more delicate to start with. You're yeah, allowing
lots of sort of, um Paint and water to flow,
we're being quite bold. But generally as the
painting sort of progresses, you sort of become a little bit quiet and a little
bit more sort of say, the corny word,
mindful about it. So I think I'm just about there, you do get to this rather
tricky stage where although I have already wet this little area down to
allow myself a bit more time, this is almost dry up here now. I can see if I duck my
head, that's almost dry. So this is where at this stage, things can get quite muddy because you get quite
involved with it, and you want to sort
of continue playing. But It's a dangerous time, I would say because you
quite easily muddle things, muddy things, put water marks in that then make a funny shape. So if there's something
you're going, Oh, my goodness,
this isn't right. I need more time. Allow
it to completely dry, and you can rewet it. I won't be doing that again
because this has worked out, but for you, it's
still not right. There's always that option
to ret and work on again, but it's better to do that
than to fiddle at this stage.
11. Finishing Off: So we have done the scary stuff. I I hope you're pleased
with him so far. We just need to
put some nose in, got the little front ear to do. Whiskers, and it's just
a little tinkering, taking any light out, and just sort of finishing off and making him lovely and crisp. I'm just going to put
this to one side. I've got myself a clean
piece of paper towel. If your water got very dirty, I'll suggest cleaning
that, but mind, okay. So I will try to be methodical, like I'd always try to be, and I'm going to start the top. So I'm going to got
my number six brush. Again, just wake it up, take the excess
and moisture off. Always do that because you don't want to add lots of water, especially at this stage. You just want a nice damp brush. With a little bit of water. You don't want it sopping. And we're just going to wet down this ear, front to the ear, and we're going to touch right up against that back of the ear, and in theory, you should get
a little bit of bleeding. If you don't, just give, give it a little bit of a rustle. Just touch that ear
back of the ear, to wake up some of that color. If you find some, there's nothing really
exciting about it. You need to add a
little bit more color. Off, you've got the option to
add a little bit of violet. If you like a little
bit of violet. You're right down on this
bottom sort of corner I boat. It's quite nice to get
a little bit of color. Just so you can see. Once we rab those
pencil marks out, there is a little bit of white. Here. Again, we can do
some tiny flicks, but be really careful because you don't want to
go too crazy on these. So I'm just going to do a
couple at the very bottom. Just make sure you
get that nice top of that ear's got a
nice sort of bend over. That's enough, take
your brush away. You want a nice light
ear, I would say. You don't want to
add too much color. We put a tiny a
little bit of violet. I just want something
on that edge. So once that pencil marks gone, and I can see there's there's
a sort edge to that ear. Game very gently. Don't need to do
anything drastic. Just a little bit
of tiny tinkling. Okay, I think that's enough. Now, around the eye, we need to I need
to do that again, another droplet of water. I want. There's a
nice little kink. It's where the eye
socket goes, I think, and the brow comes in. So we can pick up a little
bit of Tiger's eye, and we can right on the
edge of that flick. We just come up ale bit. You can see in the reference
vote if you sprint your eye, you can just see that
see what I mean. It doesn't have to be big. It's a tiny little
bit of movement. And also, I've personally, I've lost a little
bit of color up here. You may have a nice amount
on this. You don't again. I. But in trying to do multitasking
of painting and talking. You may have a nice
amount of color on here. And I was going
to say, all these finishing off bits can be very individual because we're all at different stages, I
should imagine at this point. But I will say, I'll go round my piece
and tinker and hope. It will help you. Some of them are bits
we haven't done. Some are more individual. And I can just soften
an edge just to stop that looking like we've just painted on, which we have. I can just stop and soften the top edge just to
keep that lies and soft. Again, it's the same with that little little
kin cupboards. There's also the tiger's eye. There's a nice This probably
could have been done again in that second layer. Probably just time
ran away with us. There's a nice little bit of color just up the
middle of the forehead. Again, it's very subtle, and I'm just using Tiger's eye because that's a
nice soft color. And I can again just tap with my finger because that just squiges paint rather
than actually taking it out, and it's quite a nice
way of softening things. Soften any of that. If you when you did your little
triangle with that eye, then with that go a little hard, then you can always soften
the edge of that a little. Tie the eye so soft, it's hard to get it on my brush. T t. I think that's
enough. All right. If I come down here,
working my way down, my flicks got a little bit. I could have done
with these being a little higher or yes, the flicks could have done with being a little bit higher. So I'm going to I'm
actually going to re this ear again and say this is probably
a individual thing, but it's nice to hopefully see how things can be sort
of tinkered and altered. Add this s. Wet all
that down again. I can just add a
little bit of gold. I'm going over those
flicks that I put in. Just add a little bit
of color up there. I'll be a tiger's eye.
I'll be more strength. So you're going to
take my brush away, see how that looks all right. I don't want to just because
I've wet an area down. I doesn't mean to have
to do anything else. I wet it all down so I
avoid any water marks. I can take a little bit
of color out again, just like I was mentioning
the cheek here. It's quite nice to take color
out while things are still a little bit damp it
stops, it being too hard. I take a bit out there. I think because I added
this violet in so you can see where I was wetting areas down, it's got a little. A little too much there. Okay. I like all this back,
and if I'm honest, it's a little hard at
this stage to sort of alter things because it's
been left lovely and loose, and we've just allowed
color to move. We've done some
lovely bold flicks to go back and then to sort of rewet little
areas like this, it would only it wouldn't
improve it sadly. So if you were to
try and go back over this very carefully
for any reason, You would find it looks very
choppy and very broken up. I really wouldn't help it. All right. Coming down here, say this
is all nice that you know, I might take a little
bit out there. I started to do the
flicks a bit too soon, so they had a little bit
too much water there, so I can always
just with a brush, just soak just sort of get rid of some of those
bit a kitchen roll, and just take any sort
of hard lines out. Now, this quiet little
hard line here, which is just where we
sectioned area is off. Again, we can just
with a damp brush. We can just give it a
little bit of a soften. For a little finger
then just soften it. If your little line if your mouth hasn't
come out very well, we can add that in again. We can again I've got CPA here. I can paint mines.
If I'm honest fine, I wouldn't add anymore, but
you can to add that in. If you paint it in, with
a clean your brush. And then just go,
clean your brush, just go underneath it and then just soften
that line cause you don't want a very
personally painted in line. It's going to look a bit
cartoon if you're not careful. So again, you can just alter that if you
if that needed altering. It's all about, it's
individual little bit, just looking at reference e and seeing where you need adjusting. Okay, let's do the nose because he's rather noseless
at the moment. So hopefully you can just about make your pencil
marks out underneath there. And you just need to wet. The nose, really carefully.
Don't go over those lines. Don't ruin it the last moment. I've got CPA and
so light genuine. Going to put the paint on
the brush at the same time, and I'm just going
to go underneath. Working round. There's
a lovely light. There's a lovely lump
of light on the top. So by working underneath,
I should just get that. But I can always
take it out as well. So don't ideally want too
much paint up on the top. That's worked out.
Yeah. Absolutely fine. So again, there's
a nice if I sce my eyes there's a
nice little line just comes out for
the tip of the nose. I just very gently wet my brush. Just pull
some of that out. The paint this paint here
from the bottom of the nose should just gently
run along that line. But again, you can just give it a little screech of it,
looking a little harsh. Gonna go right around that tip. If you look at the
reference hote, it's got a nice little kick. They have quite a little um. Little button nose. They're very quite an
individual foxy nose. We can very gently just run that little line
down, so it joins up. Again, I'm using the paint that's at the bottom
of that nose. Bit like the If we go
back to the trees, it'll like using the
trunks when we did those. I'm just allowing the
paint to run down from the nose and we're just
join it up to the mouth. Again, if this is, and when you painted that mouth seemed a long time
ago, doesn't it now? If that's gone a lumpy
or it's a little uneven. Quite right shape,
but be careful, don't go too far down
because I made that mistake and turned my lovely
fox into a wolf, so make sure it stays nice
and it's not very big. So Don't don't make it too thick at the bottom
and say turn you into a wolf. Again, always take the brush
away, see what you think. Even if it's a tiny
little movement, it can make all the
difference at this stage. So it's worth rather than sort
of blindly painting away, keep taking your brush away, keep analyzing what
it looks like. Right. How am I doing? I think this is
looking all right. So at this stage, I can now take any light out that
I want, if need be. If I'm personally,
I'm happy with the amount of light
I've got in my fox. But if your top of your muzzle, that was often a place where too much paint
can send up sitting, Big brush is just damp. I can very gently
just take some away. Now, a little bit will depend
on how your paper reacts, what paints you've selected
to how well these lift out. So go careful because if
you take too much out, it's incredibly hard
to put back in. Without it looking really
odd, so be careful. Again, the forehead is quite often a place where
it's quite nice. I've managed to achieve quite
a nice amount of light, so that's worked out okay. You know, you can
start getting a little bit picky
and start taking little bits of light out
here at the top of the eye, which will probably be the
eye brow coming in there. H, that's quite nice. We kind have tackle
the ear, didn't we? But again, if you didn't have to wet your ear down
again like I did, you can take a little bit of
light out around the ear. Take a little bit out of
the front of this ear. Got quite purply
again because I added the so a bit violet, because I added the
violet for you can see that got a little
violety for me, but that's just have enough. Now, a really nice little
bit of light to take out, and you need probably a small brush is right
underneath that eye. There is, if you look at
that reference photo. Again, it's the light where
the socket falls really, there's a nice light just there. And again, you can sort of
reshape your eye a little bit. If your eye got a bit chunky, maybe a little bit too
much sp on the bottom, you could just gently take
a little color again, really gently because
like top of the nose, it depends what paints
you've used and paper, how well your paints lend lift. But sometimes it's just again, the tiny little movement and
the tiniest amount of paint. It doesn't look like you're taking much off, but actually, when you lift your brush away, like, no, that's enough. You don't want to go right
back to the white paper, which this paper is lovely
and very forgiving, and will do that for me. Okay, I'm personally really pleased
with that at the moment. There's nothing more I want
to actually fiddle with. Obviously, like I said, it's all it becomes a little
personalized at this stage. But the only thing we haven't
put in is any whiskers. So I need to bring back my
pencil. I'm gonna cheat. I'm gonna put pencil
marks because if for any reason they don't work
out, I can rub them out. But be really mindful, everything is nice and dry. So actually I'm gonna
be very cautious. I'm going to give
this a quick air dry, so I know it's completely dry. So if the pencil
marks don't work out, I can then rub
them out and be in the safe knowledge that I'm not going to rub any paint around. And actually, before I put those whiskers on and
potentially rub any lines out, let us rub any pencil marks
that are now existing. I haven't got nothing very obvious despite being
quite heavy lines. Let's co down here
on the back here. Go careful and gentle, say? Really make sure everything is. I think we hopefully
got all those pencil marks out there earlier on, so that's kind of it. Sure my hand clean.
Brush that away. And hopefully, if you bub
spitted out the chests. I think we think that's
quite nice because then suddenly you
get those lovely s kind of lost and found edges because you've taken
that pencil mark away. Okay, T the whiskers now. Let me find a little
scrap of paper. Okay, little scrap of paper. Just to practice those
whiskers, really. So they are, Pitzel. There's just a nice sweep. So they're worth practicing because although we
can rub them out, it's quit nice to get them
right before we start. So it's Yeah, it's just getting that nice
sweep of your wrist. So let's go for it. So I'm starting here. Now I
haven't put the whiskers. I'm always a bit
strange about putting these little marks in, but you can, if you
like putting those in, you can do that little brush. Let me do those for you
so you can kind of see. It's just something I never
put on, but I don't know why. Again, you can lay your brush. Flat and kind of do some
little marks along there. If you get of me.
It's not too wet. I'm going to sort of start
there and just move out. Also, if you're
feeling really brave, you can do that with
a little brush, and they will give
you a better look because they've
been a lot darker. Or a little fine marker pen
is often quite nice as well. So a couple up there. And is a nice I tell you what, there's a nice little we really zoom in on
that reference photo, and we've probably got a
little enough dark paint in already on the
edge as the eyelash. You see? He just pull that out. That's quite nice
to get in there. We than actually
doing the pencil. Getting just a little darker. Oh, I was going to
a little array, probably. I get the right angle. It's tilting your paper at
the right right position. Just a couple under under
the chins quite nice. Yeah, I think that's
probably enough again. It's one of those things
you can get carried away with and give him
1,000 whiskers. We're all pretty much done. The only thing I
want to look at is that light on top of the nose. So if you didn't, if your black paint or your darker colors have gone all right the
top of the nose, you can just gently take color out there on
top of the nose. I'm not going to
worry about there's obviously a nostril in there, but you can't really sit
on the reference photos. So you can at this stage, you can carry on fiddling and
doing tiny minute details, and that's sort of
a personal thing. If you like things to
look very detailed, then you can obviously go
on and sort of tinker. That's enough detail for me. I've got the sort of
crispes of the eyes. A the eye for me is the most important bit
I want to get right. So So, yes, again, you know, I may step away from
this in a couple of and come back and look at
it, and I always say this. It is amazing what you see
with a fresh pair of eyes. So, you know, I
may feel I needed to strength of
something a little bit. You know, I wonder
whether I needed a little bit more flick here. Again, I can do that, but this stage, I would
leave it, come back. And have a look at it with
a fresh pair of eyes, which I do repeat. Probably too many times, but it's definitely worth doing. I think we've obviously been
painting a little while now, and you can get tired, and you almost don't see
what you're painting. And it's at this stage where you can ruin
things because you're still carrying on
because you want to get it finished and done and go, y, I've finished
my lovely Mr. Fox, but it's worth always
stepping away. Coming back, you may find
it's absolutely perfect, and you don't need to do any
more little tiny bits to it. So so, yes. Right. I think we are done
with our lovely Mr. Fox, and I hope you enjoy this class. Fox is are lovely, aren't they? There's something
yummy about them. So as ever, please do share these in the projects
and resources pages, again, I always say
there's any questions, something I haven't explained very well or something
you're sort of struggling with pop in
the discussions page. And I will endeavor
to get back to you within a couple of
days. I'll do my best. So as ever, thank you
very much for joining me, and it's been a pleasure.
12. Final Thoughts: So I hope you enjoyed the class. Wasn't the fabulous Mr.
Fox amazing to paint? How did the two layers go? Remember you're looking
for the dark areas and leaving the light
to take care of itself? Did you nail the eye? Remember, don't panic. If it all seems to be getting
a little out of control, allow it to dry and go
back and gently tinker? I hope you found the two layers useful in reserving
the white areas. It's such a useful technique. As I always say, it's worth stepping away and
coming back and looking at your painting with a fresh pair of eyes and
tweak, if necessary. So we look forward to seeing
you in the next pass.
 Jane Davies, Professional Artist and Teacher