Transcripts
1. 1 Class Introduction: Ready to make after
effects feel smarter, faster, and a lot more powerful. Welcome to Motion
Code Met simple After effect expressions
for beginners. Another exciting class
in my Skillshare after effect series. Hi, I'm Eli. And in this class, I will
introduce you to one of the most useful features in
after effects, expressions. Don't worry. Expressions may
sound technical at first, but you're going to break
them down in a simple, practical beginner friendly way. You don't need to
be a programmer. You just need to
understand how expressions can help you automt animation, link properties together,
create smarter controls, and build motion graphics
that are easier to edit. In this class, you learn how to get smarter with expressions, how to use expression tools, how to explore the expresion
language reference, and how expression controls can help you create flexible
learning missions. We will also look at
five most new after effects expressions that every beginner
should understand. These expressions will
help you create movement, control values, loop missions, and make your project
feel more dynamic. And to bring
everything together, we'll create a practical
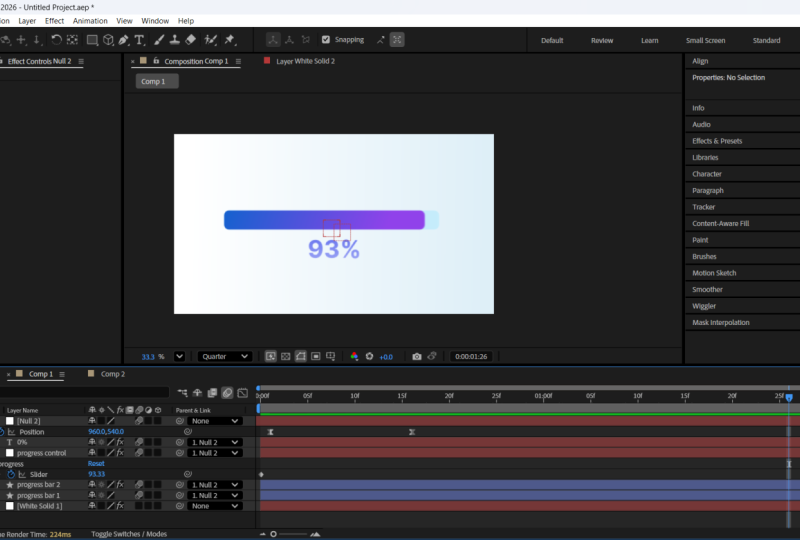
class project, a progress bar linked to percentage text
using expressions. This is a clean, useful motion graphic setup you can
use in infographics, UI animations, presentations,
explaner videos, and real client projects. This class is part of a bigger after effects learning journey. So every skill you learn here connects to the larger goal, hoping you become
more confident, creative, and efficient
inside after effects. So get after effect open, get comfortable, and let's start making motion code simple.
2. 2 Class Project: In this class, we have
one main class project. For this project, you
create a progress bar and percentage text admission
with expressions. This project is covered
in video ED and it brings together many of the ideas we'll explore throughout the class. You will build a progress
bar that fills up over time while a percentage number
updates automatically under it. Instead of admitting the bar
and the text separately, you will connect
the boot of them to one simple control
using expressions. This is a very useful
project because it teaches you how expressions can
make your works matter. You'll practice using
a slider control, linking properties, controlling skill and creating percentage text that
updates automatically. By the end of the
project, you'll have a clean practical
motion graphics mission that can be used
for data visuals, loading screens, UI designs, planer videos, and
presentation graphics. Once you complete your project, I encourage you to upload
it to the project section. You can keep it
simple, or you can customize it with
your own colors, phones, layouts,
and design style. The goal is not just
to copy what I do, but to understand how
expressions can help you build missions that
are more flexible, more professional, and
easier to control. So when you're ready, jump
into the project lesson. Follow along step by step and create your own
admitedPgress bar.
3. 3 Getting started with expressions: Hey, there in this video, we're going to talk about expressions, and we're going to have our
introduction to expressions. So what are expressions?
What are expressions? Expressions are basically
little pieces of code, which we can add to our
project in after effects in order to simplify
rather complex tasks. So there are tasks
which require a lot of complexities and a lot
of keyframes, okay? So it's easier to
perform these asks, some of these complex tasks
with expressions rather than having to keyframe
every single little detail. Okay? Key framing can
be frustrating at times and expressions can
come to our rescue. Expressions open a whole
new world of possibilities. So if you master expressions, working in after effects will become extremely
less frustrating. So instead of talking,
let's go ahead and see how we can
add expressions. So here am I with
my new composition. Go ahead and create
a new composition. I'll just create an ellipse
here, very small ellipse. Yep, and I have my ellipse aligned to the middle
of my composition. Yeah. So how do we
add expressions? And what can we add
expressions to? Expressions can be
added basically to any property in after effects
that is key flamable. So any property that has a
stopwatch icon beside it, just like the ankle property, the position, the scale, the rotation, okay, all of these can be added expressions. Yeah. And it also
applies to effect. So let's say we add
an effect here. Any effect, we can see that we also have key
frameable properties, so it means we can add
expressions to these. So how do we go ahead
and add expressions? The first thing we need
to do is, of course, expose the specific property which we want to add
expressions too, so we can use the rotation
in this case, for example, and then all you need
to do next is hold down Alt or option at the mark and then click on the
stopwatch icon, and we immediately, you see
that the value turn red, and we have some tools here, and we have this text field. Okay, we have this text field, which you can now write expressions and now we
have a default expression, which is transformed
dot rotation, and this expression
basically references itself, so it won't really do anything. So this is just a
default expression, and we have our
expression field. This expression field will
work just like any text field. Okay, we can write. Our expression,
remember their code, so we can write our code. We can delete, we can
copy, we can paste, we can do all sorts of things, just like a normal text field. And we can come here, just click here and make
this text field even bigger or in case we want to write a longer line
of code, you get. So we can increase the
size of our space. We can make this smaller. So that's the text
field for you. And these are the
expression tools, which we won't be looking
at in much detail for now. But yeah, that's the
expression for you. And then how do we
remove an expression? So we can remove an expression
by doing the same thing. Okay, that's coming back to the property who need an alt or option in
the mark and then clicking back and you can
see that we've removed our expression and our
values are packed to blue. And that's not the only
way to add an expression. We can also add
expressions by selecting the value and then come to animations and then
add expression. You can see that it has a
little short call here, which is all shift equals. So you can use that as well
to add your expression. I just added the expression
using the animation option. So you can see that the same
thing, we have our text, our default text, we have
our expression tools, and here we have our expression. So I'm just going to remove the expression so that we now look at some actual example. So for this example, I'm
going to first of all, turn my layer into a three
D layer by clicking here. And then that's because
I want to create or I want to add my
expression on my Z rotation, and I want to next move the ankle point for my layer or for my ellipse
rather, just here. Here just a bit to the left hand or to
the right hand side. So I did that by, of course, using my pan behind tool and
just moving it like this. Yeah, next, I want to take
my selection tool and align my ellipse or the ankle point
back to the middle yeah. So next I want to create
an expression or I want to add an expression
to my zero rotation so that we have this
sort of rotation, okay, so that our
ellipse will move or rotate around our anchor
point, which is this point. So all I need to
do now, of course, is select my zero rotation, either go to Admission
and then add expression or do option
or alt and click. So the next thing is
now add our expression. Now, I just want to type time
times 180 and click out. Now, my expression
has been added, and if I play now, we're going
to see something happen. I didn't see that our
ellipse is rotating, in the Z axis along the Z axis. And how is this
rotation structured? So when I get back and start to move my time
gradually or slowly, we're going to see that
from here to 1 second. Is 180 degrees. So my expression is telling
after effect to rotate my ellipse by 180 degrees in every second or
after every second. So that's basically what my
expression is telling me. Now, instead of just
creating key films, we can see that all
we needed to do was write in a very
simple expression, and we have our animision done. And this gets even
more interesting because we can easily increase
or decrease our speed. So let's say we want to increase our speed and just click here. And instead of 180, we can
type 360. And click out. And when we play, we see
that our expression or our rotation is down
faster, down faster. We can make this even crazier. We can make it as
fast as possible. Things we normally
can do with keyframe. So we can see that I'm
making it rotate by 360,000 degrees in 1 second. Now this is something that's almost impossible with keyframe. So you can see how expressions
can really save us. So if I play this,
we can see that it's extremely fast, right? So in every second, it
does 360,000 degrees. Of rotation. Yeah, so
that's expressions for you. That's how incredible
expressions can be. And it's even possible
to copy expressions. So let's say we have
multiple layers. So let's do control the
Control D, Control D, to have a lot of them and
we have seven layers, and I'm just going to select
this guy to this guy hit R, and I'll just go
ahead and remove the expressions on
each of these ones, each of the duplicates, so that we have no
expressions on them. So of course, I'm
doing or option and click and that to
remove the expression, I'll just close this, and now we have expressions
only on this guy. Let's say we want to now
copy our expression. All we need to do
is select the guy, right click and then
copy expression only. And now we can select
as many layers as we want and just hit Control V
to paste our expressions. So when I open now
or when I hit R, can now see that our expression
has been pasted right on our Z rotation property
of each of these layers. So each of them now is rotating because we copied our
expressions from this guy. And we can even go
further to paste our expressions on
specific properties. It mustn't be the Z rotation. So let me just delete some of them so that you
see what I'm seeing. Now we can select, for example, our X rotation and do Control V, and you're going to add the
expression to our X rotation. So now we see that we are not only getting the
rotation on the Z, we're also getting
it on the X axis. So you see what we get because of our rotation on the X axis. Same also with our
Y axis, Control V, and now we'll get more interesting or more
complex animation, right? And all of them are moving
by 360,000 degrees. So that's how crazy
expressions can go. And of course, these are
just really simple examples. These are just scratching the
surface on expressions that are very complex stuff that we can achieve
with expression, things that we can't even look
at in this course because expressions open
a whole new world of possibilities
in after effects. So that's it for this video on Introduction to Expressions. Hope you learned something
new and interesting. Yeah, and that's
it for this one. See you in the next
video. Bye bye.
4. 4 Expression tools: Hey, there. Welcome
back. In this video, we're going to learn how to use the expression tools
in after effect. These are simply the
tools we get access to whenever we add
an expression. In order to start, I'm
going to create my ellipse, a very simple ellipse and align my ellipse to the
middle of my composition. In order to see our
expression tools, of course, we need to
add some expressions. Of course, you can come to
our skill, for example, and hold on Alt or Command on
the M or option on the MAC rather and click on scale and now we've added
scale expression, a default expression,
which references itself. And now we have our
expression tools here. We have the first
guy, the second guy, the third guy, and
the fourth guy. So there are four
expresion tools. Now the first one is the
enable expression button, and this enables
our expressions. So unfortunately, we are
not seeing anything. We can't see how it
works now because we don't have any animion. So what I'll do is just take out our expression and create
a little animation. So I'll come to my scale
and create a keyframe and come to 1 second
and make this 200. Okay? So we have our scale animating 0-200 within a second. Now, select everything here, right click and easy
ease, my keyframes. Okay. Now I'll just go ahead and add my expression
now to my scale. So create my hold
on Alt rather and click to add my expression
and now click away. And we have our
animission, right? And in order to actually
see this thing at work, we actually need to
have an expression which modifies our
current animation, right? So we can click here and
write a simple expressions, which is a value times two. And when I click away,
we immediately see that our ellipse gets multiplied, or the skill of our ellipse
gets multiplied by two. And with that, I'm very sure you already understand
what our expression does. So our exclusion basically
takes the value of our skill and multiplies
it by times two. So it means each
value of our skill. From this keyframe to this keyframe is
multiplied by two. Okay? So now this is our expressions, and we can enable
our expression by making sure we have
this bottom turned on. And if we have it
turned on, it's going to be looking blue
just like this. So we have our expression, and we can click and turn it off to disable our expression without removing our expression. So our expression is still there only that it's been disabled. Yeah, so that's the enable
expressions button for you. The next guy is the
pushed expression graph, and this is just
like a graph editor. So you actually need the graph editor to see
how this guy works. So I'm just going to
select our keyframes here and enable
our graph editor. So here is our graph editor. Of course, you're familiar
with the graph editor. Now, when I enable my
pushed expression graph, you're going to
see that something has been added to our graph. Okay? So it's the graph editor just like you know it only
that we have this new line. So what's this saying
it's basically saying that this is our original line. Okay? The new line is
actually our original line. That's our original keyframe
without the expression. Okay? It's our original keyframe
without the expression. And this FICA line, the one that goes above, it's the modified line. Okay? It's the modified graph. So it basically shows us our modified graph or our
expressed value over time, just like our graph editor does. Okay? So that's basically the post expression graph for
you. That's what it does. It shows us our express value versus our original
value side by side. Yeah, that's the expression
or the push expression graph. The next guy we have
is the expression PiwpT is just like a perentinPi weep just
like you know it. And just like we use our
perentinPi weep to basically parent one layer to another
or one object to another. We can use this
pick whip to kind of reference certain attributes, okay, in our expressions. So for example, we can click it to reference see
the anchor point, and we can now see
that the anchlepoint has been referenced here. And in order to
use the Phip tool, you actually have to have that attribute which you
want to reference exposed. So even if it's
on another layer, say, it's on another
layer, let's see, we have some two layers, and we want to reference the
attribute on this layer. We actually have
to open artribute. So you can solo the
attribute, for example, by selecting the attribute
and then just hit S two times to solo
the attribute, so that you can
see that attribute in cases where you
have plenty layers. Okay? So now with this, we can go ahead and select our P whip our expressions P Whip, select it, and then
reference that attribute. On a different layer. And this can also work
when we have effect. So let's say we want to
reference an effect. This can also with effect. So I'm just going to do that
and delete this duplicate. And this tool actually
has a limitation. The limitation of this
tool is that you can only reference things
you can see, right? So it means the things
you are able to reference will have to be
in the same composition. So you can reference stuff
in a different composition. Okay, so let's say we have
a new composition and we have this guy here, Control C, Control V, and we want to reference
an attribute here. So we can actually parent
from here to here. But there's actually
a way we can do that, and that's by just copying it. So you have to select
your attribute, which has the expression
on it to select it, and then come to edit and then copy with relative
properties links. So click and now you can go
to your next composition, and let's just delete or remove the expressions from
this scale here. So I'm just going to hold on and click to remove the expressions. So you can see that we have
new expressions, right? So what I'll do now
is select my layer and go to edit. And piste. And now we can see that we have basically pasted our expression. And this is not just a piste.
We're not just pasting. We're actually
linking this to this. So this is the parent and
this is the child, okay? And I'm going to prove
that to you right now. Now, I'll just played
this so you see? So you see, it's the same thing that's happening here, right? It's the same thing
that's happening here. So all I'm going
to do right now is basically make this bigger. 400 now, I'm just going to
make this bigger, right? I'll just go back here, and now we can see that
this guy is bigger now. It follows the parient. So that's a proof that
we've been able to parent this attribute to
this attribute right here. So basically, that's how to parent expressions across
multiple compositions. Yeah, and the next two we have here is the Expressions
Language menu. Now, the Expressions Language
menu basically contains categories of common
expressions with their syntax. Okay? So we have different categories
of common expressions. We have lots and lots of them. Okay, we have the global, we have the vector mat, we
have the random numbers. And we're going to
look at some of them in this video and in
subsequent videos. And for example, let's
just take a look at one of them or some of them. So let's just delete
this expression we have here or create a new one. Now I'm just going to click
here and go to interpolation. And let's just add one
of these and click away. And we can see that we have
an arrow. This is an arrow. And that's because this is
actually a placeholder, which we can use to
write expressions. So we have values
like the T value, the T minimum, the T MAX, the value one, value two, and all of these are actual
values we need to impute. So we don't have them imputed. That's why we're
having this error. But let's go ahead and look
at another type so just click on the Expression
Language menu and go to Properties. And for properties
now, I'm just going to click on LoopOut. Okay? Now, we are not going
to have any error here. Now, let's play this
and see what we've got. So as you can see, what it does is it modifies
our current admission. It loops our current
admission out. Okay? So we are just going to
have our current admission repeating as our
video keeps playing. So that's also one of the very simple
expressions you can add using the Expressions
Language menu. So that's the
Expressions language menu for you in a nutshell. It contains lots of expressions
and expression templates, which can help us build
more complex expressions. Okay? Yeah, and that's basically it for the Expression tools, and that's it for this video. See you in the next
video. Bye bye.
5. 5 The Expression language reference: Here, welcome back. So the
Expression Language reference is a piece of documentation
here on Adobe's website. So you can just go
ahead and search the expression language
reference in after effects, just on your search
bar that's on your browser and going to
bring you to this place. And of course, it's on
the Adobe's website. So this piece of documentation
teaches you how to use the Expressions language menu this Expressions language
menu here in After effect. So of course, we have all of these categories
Okay, of expressions, we have the global
the vector mats, the random numbers,
interpolation, and so on and so forth. Now, when you come to the
expressions language reference, it's going to teach you
how to use all of this. Okay? So there's lots and
lots of things here to learn, lots and lots of things
here to learn. Okay? But you have to, of
course, go through them and read
through them, okay? Teaches you what
the expressions are and the values you need to impute and even
gives you examples. There are lots and
lots of things here, so we won't go through them all. But we also have the
expressions examples. If you click here, you're going to see expressions examples. So we have the wiggle random, and then we have the control
wiggle with slider control, so even slider controls, which we're going
to look at next, we have examples of
that here as well. We also have videos.
You can play this to see for yourself. And there are lots
and lots of examples. You can really learn a lot
with this piece of document. So definitely check it out.
Definitely check it out. Yeah. And there is even more. So if you come up here,
you're going to see that this is an entire section
on expressions. Okay, this is an entire
section on expression. So we have expressions basics. So it means you can even start learning about expressions
right from here. So you can learn all
about expressions right from here. Okay? Understanding the
expression language, you have syntax differences
where syntax differences between the JavaScript and
legacy extended script, okay? And, yeah, basically lots and lots of things here.
Definitely check it out. But that's the Expressions
language reference for you. And that's definitely it for this very short video on
Expressions Language reference, and see you in the
next one. Bye bye.
6. 6 Expression controls: Hey, Day. Welcome back.
So in this video, we're going to talk about
expression controls, and expression controls are
a very easy way to link multiple properties
or multiple values to one source, okay? And this makes it very easy
to use, very easy to mit. And without further, let's just go ahead and see how they work. Okay, so I'm just
going to go ahead and create null object, and you can actually add
them to any type of layer, not necessarily null object. So you just come
to effect and come to expression controls,
and you can see them. We have a number of them here. In fact, let me just search
them here, controls. So that we can add
them all at once. Okay, I'm not seeing. Okay,
let me just close this and manually come
to the category. So these are the expression
controls. So you see them. I just selected all of them, and now I'm just going to
add them to my layer. So these are the
expression controls. And now the first one
is the slider control, and the slider control
is a simple slider. Okay, it's a simple slider, and it can be used to
control properties for very nice transition,
just like 0-100. Let's see opacity or 0-100
or let's say scale 0-100. So you can link all
those properties to a slider like this
using expressions. We have the point
control, and this one just acts like a point. Let me just hide my null object so that we didn't
see my null object. The point control
is just a point, which can be used to
control positions. As you can see, we have the vertical and
horizontal position. Okay? We also have this guy, which is the three
D point control. It can be used to control
both vertical and horizontal and as well
as the three D space. So it's just different
from the point control in the sense that it has a
third slider or third value, which is the three D value. So this is two D, and this is three D. They all
do the same thing. They control points
like positions. And then we have
the layer control, and the layer control
basically can be used to select the layer which one wants to reference
using expressions. So if we had multiple
layers here, we are going to see all
of them up here here. So let's say we
have this or layer. And select back our non object. And when we come to
the layers control, we're going to see that our new layer has
appeared here, right? So that's the layer
control for you, and it's not very commonly used, but it's one of the expression controls and it's important. We also have the drop down menu, which gives us a drop down menu, which we can then link
using expressions. We have the color control,
which controls the color. And we're going to see how
these things work actually. I'm just going
through them so that you see each of them
for what they are. Now, these are really
simple simple stuff. They just have one or two. Most of them just have
one or two options. So we see that the color control has just this color picker, which is used to
control the color of the linked properties, right? And we have the checker control, which acts like an
on and off button. So you can check this
two on the layer. You can check this
two of the layer. It basically returns either a positive or a negative value, either true or false. Okay? So the checker control
is very effective for creating on and off
animation effect. And then we have the last one, which is the angle control. This just serves as an angle. So it's good for
linking properties, which can be related with
using the angular slider. You get properties like the rotation,
properties like that, which can be related with using this 360 degrees angle slider. Yeah, so that's
basically what they are. Now, let's look at some
of them in detail. I'm just going to
delete all of these. And now you can add your layer
control to a null object. You can add it to
basically any layer. So I'm just going to
delete this new solid. I'm also going to delete
the null object to that. We just add it to our layer. Now, I'm just going to
create a new ellipse. So let's create our ellipse. We're always using our ellipse. Let's create our ellipse,
and let's just centralize our ellipse or align it to the
middle of our composition. Yeah. So align our ellipse, and now let's look
at the first guy, which is the slider
control in this case. So select your ellipse. You either go to effect
and then effect control, and then slider control. So add the slider control, and this is just the slider
control, like we said, it's used to generate values
0-100, just like this. So what we need to do now is go to the
property which we want to relate the slider control to or connect the
slider control to. So in this case, I'm going to
use my scale, for example. So just come to your scale and then Hulan Alt or option at the MAC and
create your expression. So you can see that we
have our new expression, and all we need to
do now is select the pick whip tool and drag it to our slider
control and release it. Now automatically, it creates
our expression for us, and when we click
out, you can see that our expression has been
added without any arrow. So it means it's
been collected now, and now you can
immediately see that the scale for our
ellipse turns to zero. So when we make this big, we can see that now we're taking the scale or we are
basically controlling the scale using our
slider control here. So you can just create a
keyframe on your slider control. Let's make this zero.
Yeah, it's zero now. So create a keyframe here, come to some frems, S eight frames, and
then make this 100. Hit you, select everything easy. Now, we've basically created this animation using
our slider control, so we can see how easy it is to connect to our
slider controls. So I'm just going to hold
them Alt and click, not this. Hold the Alt on the scale and
click to remove our effect. So we can see that now they
are no longer connected. I'm just going to delete this
and look at the next guy, which is our point control. So our point control, we can go to effect and
add our point control. Point control. And
for point control, all we need to do is go into
our properties and then go to say our position. So create a keyframe
for your position or hold down Alt and click to create an expression
and basically link your position to your slider
or to your point control. Okay? So with this now, it's been linked, and
we have no arrows, and with this now,
we can go ahead and start changing the direction. Or the position rather of our shape using
our slider control, and we can even use this to
specify specific positions. Yeah. So that's basically
it for the slider control, and the slider control will
work in the same fashion. Only that we're going to
have a third option here, which enables us to control the three D dimension of
our layer of our ship. So I'm just going to delete this expression
from our position to hold on Alton click to remove the expression and delete
our point control. Perfect. Now the next one we're going to look at
is the color control. Let's look at the color control. Let's see, the color control. So we have to first of all, go into the properties, that's ellipse and
then go into parts. Okay? Or instead of
going to the properties, let's just search for color because that's the property
we are targeting, right? So search for color enter
and now we have the color. We have the field color here. We also have the effect color. Of course, this is the color relating to the color control. So you don't want
to be linking this. You want to be linking the
field color of the layer. Okay? So hold on Alt or command on the mark and
click here to create your expression and
use your Phip to drag it here and click away. And right away, we
see that it now copies the color of our layer. So we can change the color and this is going
to work with multiple layers. This can work with
multiple layers later duplicate this and open the color property and delete or remove the Q frame
and basically create a new q frame or rather
create a new expression and then connect it to our
control, our color control. And let's just move
this so that we see that we are not changing the color of multiple layers. So let's Okay, sorry, we can see that as
we duplicated this, we actually are duplicating
our color control, right? So it means we have
different color controls for each of these layers. So we actually want to have only one layer selected.
So let's choose one layer. Let's choose Layer one, or we can just create a new null object and then add the color
control effect on the null object and
relate all of these to the color effect control
on the null object. Okay? So we can do that as well. Or we can just use
one of these layers. So let's use layer one. And
since we always want to have Our layer visible here. The effects on our
layer visible here. One thing we have to
do now is come here and click on this
Toggle viewer log. So this will lock our effect
control so that we only have the effect on layer
one showing we get. So we can open this and
go into our field column. Now, let's do this
all over again. So we can just click here
to remove it and then click that len click to add it
and take this and connect. Click away. So it's now been driven by our
color control. Yeah. So this is the first
guy now we can do this to others as well. So we can select this guy, pink up the color property. Remove the effect here or the expression here by holding
down Alt and clicking. Now we have our normal
color now we can do Alt and click and
take the pick whip and then relate it to our color control on
layer one. Click away. And now we can tear out
our layer two color is now driven by the color
control on layer one. So it means we can take
this and basically control the boot layers or key the
color on the boot layers. And with this, we can do the same thing to
multiple layers. So we can use one color control. To drive the colors
of multiple layers. We can do this for
the third one, Hulam and click to remove, then Hulu Alt and click to add the new expression and
do the same thing, click away, and now we can drive the colors
for all three layers. Just using one expression. Incredible. Now they just did it two and look at the next
expression control. I'm just going to unlock
the effect control panel, and let's look at and let's delete the color control
and look at the next guy. Now the next guy is the
checker box control, like I said before, it gives us two values, positive
or negative. So it's also very good
for on and off scenarios. So let's try to create an on and off scenario using
this expression control. So what do we do? We go to
our transform property. And then go to the
opacity, right? So we want to create
an on and off effect, so on and off using the opacity. So all we need to do, of course, is hold on t or
option on the mark, click her to create
our expression. Okay, and we want to
type in something now. We actually want to type in something because this is a bit more complex than the
ones we just looked at. So we want to type I and
then open parenthesis. And now we are inside
our parenthesis. So what we want to do inside our parenthesis is
just go ahead and pick our Pick Whip tool
and drag it and drop on the checkbox effect. And now we have it
referenced in our checkbox. Now the next thing we
have to do is go ahead and type greater than zero, and then come out
of our parentheses and create a curly bracket. Open curly bracket,
close Core bracket, and then inside our car bracket, we're going to write 100 and outside and then go
outside and then write else. And after else, we're
going to create another curly bracket
and close Core bracket, and then inside our curly
bracket, this time, we're going to write
zero, and then click out. So we can now see
that immediately, it turns our layer of it
turns our opacity of now, let me just click this
to enable our opacity. And let's see what
we route here. Now, this is what we
call IL statement. Okay? This is an IL expression. Now, what am I saying is, if our checker box is
greater than zero. If the value our checker box returns is
greater than zero, it should give us
100% on opacity, else, give us 0%
on opacity. Okay? So that's basically what
we are seeing here. So if our checker box returns a value of zero,
and, of course, you know, zero is off, right, and one is on
because it gives us either of two values,
zeros and ones. Okay? So zero means off and one means on or zero means false, and then one means true, right? So if our checkbox returns
a value greater than zero, it should make our
opacity 100 else, it should make our opacity zero. So that's basically
the expression here. And with this, we can drive the on and off effect or transition on our layer
using the checkbox control. So that's basically this very simple but
useful expression. I'm just going to delete this so that we look at the next guy. Now the next guy is
the angular control. Okay, so select your guy and
then add an angle control, go to effects, go to
expression controls, and then angle control. Now, like I said
before, this gives us the ability to create angular
manipulations, right? So go to your
transform property. And I'm just going to remove my expression here by holding
down Alt and clicking. So we have removed
our expression. And for this, we want to be using our rotation
to experiment. And I'm just going to turn
this into a treed layer. Okay. And now we
have a TD layer, and let's go ahead and drive our Y rotation. Y axis rotation. So you need to come to the
YX rotation hold on Alt or option on the
MAC and then click here and take your Pick
Whip too and drop it on the angular control
and just click away, and now you can drive your rotation using
your angle control. Yeah, so that's basically
it for your angle control, and that's basically it, guys for expression
controls and after effect. Hope you learn something new. And that's it for this video. See you in the
next one. Bye bye.
7. 7 5 must know after effect expressions: Hey, welcome back.
In this video, we're going to learn how to use five fairly simple yet incredible expressions
in after effect. So I have my new composition. Go ahead and create
a new composition. I will create my first shape, which is a rectangle and align my shape with the
middle of my composition. Perfect. And I'll just pick or open my position property and create
a keyframe for position. I want to bring my position to the left hand side
of my composition, create a keyframe here,
come to 1 second, and then bring it to the right hand side of my composition. Okay? So just this very simple animion is what we
want to create. Yeah, I select everything
and EZ Es my key frames. So I have this movement
from left to right. And what I want to
do is just come to 2 seconds and copy my
first key frame and piece. Yeah. So we have this very simple animation
for the position property. Now the first expression
I want you to learn is the loop in
and loopOut expression. So the loop out and
loop in expression. All you need to do
now is come here and learn all and click
to add your expression, and we just type Loop so we loop and
then out with a big O, loop out and we can see
the expression right here. So you just want to do open
and closed parenthesis and you really don't need
to type anything else. Just click away and
play your animation. So after our Q frames, we have it animating
down till the end. And we also have the
looping animation. Now, the looping
animation creates keyframes or creates the loop animation
before our Q frames. For this, we can just move our Q frames to the
middle just like this. And then instead
of loop out now, I'm just going to
type Loop in with I. Loop in, and click away. And when I play it, we're
going to see that it creates this loop in admission
before our keyframes. Now, after our Q frames,
we are not going to have any other animations. So we can see that our animation stops after our q frames. So basically, that's a loop in and loop out on
admission for you. Very simple but very
effective and very useful. It's one of the most
commonly used expressions. Now, you can also add this
expression by just coming to the expression language menu
and then go to properties. And now you see on
the properties, you're going to see
them, loop out loop in. So you want to be using
one of them so you can go with the loop out this
particular loop out, the loop out, this one. So you can go with
this and basically, it's going to do the same
thing we've done so far. And here, that's the loop
out animation for you. Now let's look at the next guy. I'm going to remove my
expression by hooding down all to a
command and clicking here to remove my expression. And I will just remove my keyframes and basically reset my property is incredible. Now, I want to bring my
uncle point to the middle, so I'm just going to hold
down Control Alt and home or command option home on the
MAC and then furthermore, align my shape to
my composition. Close this. Now the next guy
is the wiggle expression. So the wiggle expression is also very popular and very useful
expression in after effects, and it can do great
things. It can do magic. So for this example, I'm
going to use the position, so hold down Alt and click to add the expression
and then just type wiggle and then open and close parenthesis and
then for this example, I'm going to type seven
comma 45 and click away. And right away, we've
added the wiggle property. Now we can play it and see
what's happening, right? So the wiggle expression
basically wiggles our ship or our layer along or about a specified amount of pixels using a specified
amount of frequency. Now, these numbers we have here, seven command 45
are the frequency. So seven is the frequency
and 45 is the amplitude. Now, this means that
seven times in 1 second, the ship emits 45 pixels above
and below the start value. Okay, so the frequency is seven. It means seven times per second, the shape mites above and below 45 pixels from
the start value. Okay? So let's say we make
this instead of 40 5405. We go see that the distance
which it covers increases, because we've increased
the amplitude, we've increased the boundary
around which it wiggles. Okay, we can make this 70 to also increase the speed or the frequency
of our wiggling. So we see that it's wiggle
very frequent, very frequent. So that's basically the
wiggle expression for you. You can add it to
multiple properties, not just the position. So I'm just going to remove it here and look at the next guy. Now the next guy is
a time expression. So we looked at the
time expression before. I'm just going to
make this longer. So this is a rectangle now, and I'll just open my
transform and go to my rotation and hold down all and click and add
the time expression. So for the time expression,
all I need to do is type in time and asterisks and say 360. So time times 360. So if you play this,
we're going to see that object is rotating, right? So what it does is it rotates
360 degrees in 1 second. So we can start here and we're going to see that in 1 second, it covers the same
or it completes a 360 degrees rotation. So
this is what we've got. And one secret with this is
or maybe not the secret, we can go
counterclockwise by just putting a minus in front of 360. Okay? So we're going
counter clockwise. So it means we can just
do something like this, can duplicate this
guy hit Eu times. So E, E E to bring up the
expression for that layer, and let's turn this two plus. Or let's remove the
minus from this. So when we do this, we're
going to see that we're going to be having this
sort of animation. This one admitting clockwise, while this one animitting counter clockwise,
all with expressions. And we can increase
the speed basically by just making this a
bigger value, right? Let's make this 3,600 and see. Incredible. Yeah, so these
are some of the things we can achieve using expressions,
using the time expression. Now we can go even further by
adding the time expression to say an effect. So let's go ahead and add the turbulent displace
effect. To our layer. So turbulent displays,
this our effect. We can add the time expression
to say the evolution. So down all the click
and just do time times 360 or whatever value
is 720, click away. Right away, we can see
that, let me just remove. Let me just disable this guy, disable this one so that we see the effect we get only from
our turbulent displays. So we can see we are
driving the admission on our evolution just using
the time expression. Incredible. Now,
let me just delete this guy and look
at the next guy. The next guy, let's hit E times and remove the
expression, look at the next guy. Now the next guy is
the random expression. For the random
expression, I'm going to hit T to open the opacity, and I'm going to add the random
expression to my opacity. So I'm just going
to click Hold down O and click to add
the expression, and I'm going to type random. And then after random,
I'll do open and closed parenthesis and ten comma 100. Now, what I'm telling
after effect to do is randomize the value for
our opacity 10-100. So it's creating a
random animion of our opacity from value
ten to value 100. So you can keep
playing and it loops everything out
from start to end. We can as well change
the values here. We can even remove the ten completely if we want it to
actually start from zero. So you see that
starting from zero and just randomizing our
animation, our opacity. That's the random
expression for you. You can try it on other
properties as well, not just the opacity. Now the next and
final expression we're going to be
looking at in this video is what we call the matt round expression or
the match round expression. I'm just going to
take my text tool here and create a text. Let's make this zero. Okay, make the zero
and align the anchor points to the middle to control
Alt Hum ki or command lt, Hum key or command option
Hom key on the mark, rather, and then just
make this centralized. Okay. Incredible. Now,
next thing I want to do is select and then go to effect
and add a slider control. So come to expression controls
and then slider control. And what I want to
do is come here, open this up, go to my text
and go to my source text. Hold down all to command and click to create an
expression and just take my Pick Whip tool
and drag this to the slider control and
release and click away. Now, what happens is, if I open my slider control and move this from zero to
whatever value I want, we can see this animating
or basically moving 0-100. Right? Yeah, so this
is what we get. We are able to modify the
values of our source text. Yeah, so that's what
we get with this. And we can now see that we
have this in fractions. We have this in decimal places, and this can be a
little bit problematic. So we can use the march round expression to
actually solve this. So let's come here, for example, so that we see the
whole numbers or the fractions properly and
just come to our expression. And then under our expression, we're going to type in the
march round expression. So in front of your expression, that's your current expression, just type march round. So the has to be a big letter, captul letter, and
then mart dot round. So you do dot round
and then open parenthesis and then you don't need to close
the parenthesis. Just delete this
close parenthesis, but come here and close it. Come here and close
the parenthesis. Basically, that's it. We
have two parentheses here. Now you can click away and
now we see immediately that our number gets adjusted or gets rounded up
using our expression. Now we can of course, bring this aligns to the middle and see that
everything now works perfectly. Everything has been rounded
off now works perfectly. And we can use our
paragraph tool here to centralize our
text and furthermore, align it or the ankle
point to the middle and then centralize or align the entire text to
the composition. So we have everything
going perfectly. Now, we can create a keyframe
of course, come here, click and then
come to 4 seconds, and make this say 55. So we have it a meeting 0-55. Incredible. So let's say we
want to add, say, a symbol, something like maybe
$1 sign so that we have everything
going from $0 to $55. You can do that with
expressions as well. So all we need to do for this is come here
under expression, and let's go ahead and type the quotation mark to
open and close quotation. And then inside our
quotation mark, we have to put in our dollar
sign and then go out, and then between our quotation
mark and our MT round, we have to use the plus symbol. So we are doing the dollar sign, plus our MT round, and then our slider control, which gives us our value. So we now see that
the dollar sign appears in front of our text. Incredible. Yeah, so we can
as well select our text. And let's say we don't want
our dollar sign to be moving, we can just maybe just align to the left hand
side or justify it to the left and side and align everything the
middle of our composition. And now we see that the
dollar sign remains static while the other texts animates. That's basically it for these five little but
important expressions. Now, expressions can be a
really overwhelming topic, and there are lots
and lots of things to look at in expressions, okay? So if you are trying to create something in after
effects and you want to use expressions and you
don't know what to do, the easiest way to find a way around that kind of situation is just go ahead and Google it. Okay? It's very
easy to find help with expressions
online. It's very easy. I've used that method to
navigate through some problems as well because expressions can sometimes be overwhelming. And with this, we'll come
to the end of our video on these five fairly simple
yet important expressions. See you in the next video. Bye.
8. 8 Class Project Loading bar animation: Heyday, we comeback.
So in this exercise, we are going to create a simple very powerful motion graphic setup
in after effects, progress bar that is linked to percentage text
using expressions. This exact admission you can see on your
screen right now. This is what we're going to
be creating in this exercise. And this is the
kind of animion you can use in infographics,
explana videos, UI style animations,
presentations, loading animations, and deta diving motion
graphics, basically. And the best part
is that instead of animating the bar and
the text separately, we are going to be
connecting both of them to one control so that they
update together automatically. That makes the admission faster. It makes it cleaner and
much more easier to edit. Let's go on to see
how to do this. First things first, I'll create a new composition
by clicking here. Now nim do exercise. Make sure I am using
the 1920 by ten TP and 30 frames per
second. Just hit okay. Next, I'll create a new solid, right click New and
solid. Heat okay. The next thing I want
to do is actually give my solid a gradient ramp effect. And for this black color, I will just change it
to a very light blue, very light and
subtle, move it here. Maybe for this point,
I'll have it here. Just something that
looks like this. Good. Next thing I'll do
is actually lock my background layer and then
go on to select my ship, my rectangular ship layer, and create my rectangle. This rectangle will
be the Louden bar. I'll select my rectangle
and do Control Alt home to move the anchor point of my rectangle to the
middle of my rectangle. I'll do control home to move my rectangle to the
middle of my composition, or just go to the align panel and align my rectangle to the
middle of my composition. Next thing I'll do is open
up my rectangle shape, and then go on to
rectangle path one, open it up and just increase
my roundness to about 30 and give this a
field colour with a very neutral field colour that just turns out from
the background slightly. Perfect. I'll close this and we need to rename
this the progress bar. So progress bar one. I'll just duplicate
my progress bar to have the progress bar two, which would be the
main progress bar. And this one will
also have an effect. I'll give you the
gradient ram effect. And I'll make this darker blue and make this
a brighter blue. I just adjust their
points like this. And just slightly further
adjust my gradient. Yeah, maybe for this, I'll use this color. So this looks good. The next thing we're
going to do is actually create a null object. Create a null object,
and we're going to rename this null object,
progress control. So progress control. And
after our null object, we're going to create
our text layer, which will hold our
percentage text. I'm just going to write 0% here. Now do Control Alt home or
command thom to actually move my ankle point to the
middle and just come and align my text to the
middle of my composition. Now, bring my text down a bit. Select my text and
every other thing and just make sure we're having something that looks balanced composition
that looks balanced. Okay, this looks good.
Perfect. And for my text, I can also add a
gradient ramp to give you that bit of beauty. You can make this
whatever color you want. It could be gray,
it could be bluish, like what we had. Here looking perfect. And now we need the
control layer that will drive the whole animation. Now we have our null object, and we're going to be adding an effect to our null object. We're going to go to effect
and expressions control, and then slider control. I'm just going to renew
my slider control effect to progress. Perfect. Next, I want the fill bar to grow based
on the slider value. Easiest way to do that
is to actually connect the bar's scale to the slider,
so we can open this up. But before I do that,
I will actually have to move the anchor point for our fill bar right here so that it scales
from here and fills the bar. Okay? So let's make sure our
anchor point is right here. This looks perfect. Good.
Now we need to go on to open the skill value
of our bar and connect it to our slider
control, which is this. But again, our skill value has the width and height values. They are currently
linked, and I only want the width value to change and not the
height value, right? I want the width value
to change like this and not the height value because that will mean it's
changing like this, which is not what we want. So in order to achieve that, I'm actually going to
use an expression. This is what you
have to do, select the progress control
so that you see the slider control
effect and then come to the progress barrier
and use the PC whip, which is attached to the scale
property and drag it and drop on the slider control
effect, just like this. So this what we have now. We just need to hold
down and click here, alter option on
the mark and click here and then type in
our expression that instructs after effects to link only the width property and
not the height property. Now go on and type this
expression P space, equal space, and then put in this comp
or ident to select it, and then that layer Hidnt. Inside my bracket, I'm going to use the double quotation mark, and inside my double
quotation mark, I'm going to write
progress control. Okay, so we are referencing
our progress control layer. And then we want to
come out to the bracket and do that effect, hiddena and double
quotation mark. This time, I'm going
to write progress. So we're referencing
this effect, which we named progress, this effect, which is attached
to our node object, okay? Let's go back and continue
writing in our code. We can see that
because we deselected and stopped writing our code, we got a bit of error. Now you also need to do
open closed bracket. And inside your bracket,
you're going to do the double quotation mark and type slider and go out and do the semiclum Hid enter
to go to the next line, and we're going to do the
square bracket and P, comma space and then value And then open and close
Quare bracket one, and just click out to
complete your expression. Now, let's go on to explain what our expression actually says. Now in this line you
see go to this layer. Which is the progress control
layer, which is this layer, and then look for this effect, which is the slider
effect named progress, and then get the value
from the slider. When you get the value
from the slider, store the value under
the variable named P. So this is what we are literally telling
after effects to do. So if the slider is
currently at 40%, then the value of P will be 40%. Let's go to explain
the next line. The next line is saying
the skill value for the progress bar
should be the value of P on the X axis and
one on the Y axis. And one is usually the default
of value on the Y axis. So it means the X axis changes while the Y axis
remains constant. And of course, in this case, the X axis represents the width, while the Y axis
represents the height, since we are not
trying to change the height but only the width. Perfect. Now, all we
need to do is come and open our slider and
just adjust our slider. Now we're going to see
that our loading bar animate alongside our slider. Isn't that incredible?
That is incredible. Now let's go on to link our percentage text to
our slider control. So in order to do
this, we need to, of course, close all of this, select our text layer, open it up, go to text, and go to source text. Hold down all the ocean and click on your stop watch icon. And now we need to go on
to write this expression P space equals space
and this comp. And then dot layer,
closed bracket, and then we want to reference with double quotation mark,
the progress control. So here we have it.
You can click here. We're not done yet, and
go out of your brackets, hit dots and then
effect KdnalPgress And then go out of your bracket, then open enclosed bracket, open otition mark and slider, go out and semicolon. Hint to go to the next line, and I'm just going to do
the mat round expression. And we're going to do P,
go out one piece, plus, one piece and the
double quotation mark, and we want to put in
percentage here and click out. Incredible. Now what
did we just do? This expression is
basically similar with what we did previously. So this line, what
it basically does is it gets the value from the slider and stores it as P. So if the slider
is 2%, P will be 2%. If the slider is 72%, P will be 72%. And this line, what
it does is it turns the slider value into
readable percentage text. Sometimes the slider may
produce decimal numbers like 5.5 or 50.001 or
something like that. So, of course, what the Mt
dot round expression does is, it rounds that number
to a whole number and then adds the percentage
symbol after it. It's basically as
simple as that. So now when we come and select our progress control and push it to the
right hand side, we see that both
our progress bar and our text are being animated. Of course, we can further
centralize this so that it looks more centralized.
This looks perfect. So now the next thing we
need to do is actually select our progress
control, open this up, and click here to create
a qframe hit you to view our qframe we're just going
to animit this 0-100%. So this should be 100%, and this should be 0%. You go 0-100%.
Incredible. Of course, you can select these
and eases them. Incredible. And that's it for this exercise. See you in the
next one. Bye bye.
9. 9 Conclusion: Congratulations on
completing the class. You've taken an important
step into one of the most powerful as
of after effect. In this class, you learn
what expressions are, how to start working with them, how to use expression tools, how to explore the expression
language reference, and how expression controls can help you build
smarter animations. You also created a
practical class project, a progress bar linked to percentage text
using expressions. That project may look simple, but the idea behind
it is powerful. You learned how one control can drive multiple parts
of an admission, which is the foundation of more advanced motion graphic systems. Before you move
on, make sure you complete and upload
your class project. I'd love to see your
progress bar animation, especially if you customize it with your own design style. And because this
class is part of a wider after effect series, I encourage you to continue
with the next class so you can keep building
your skills step by step. If you miss any of
the previous classes, you can also go back
and take them so that the foundation
becomes even stronger. Thank you so much for
joining me in this class. Keep practicing, keep
experimenting and remember, expressions are not here to make after effects complicated. They're here to help
you work smarter and it faster and create
with more control.
 Ukpoewole Enupe, Become a Pro Designer Today!