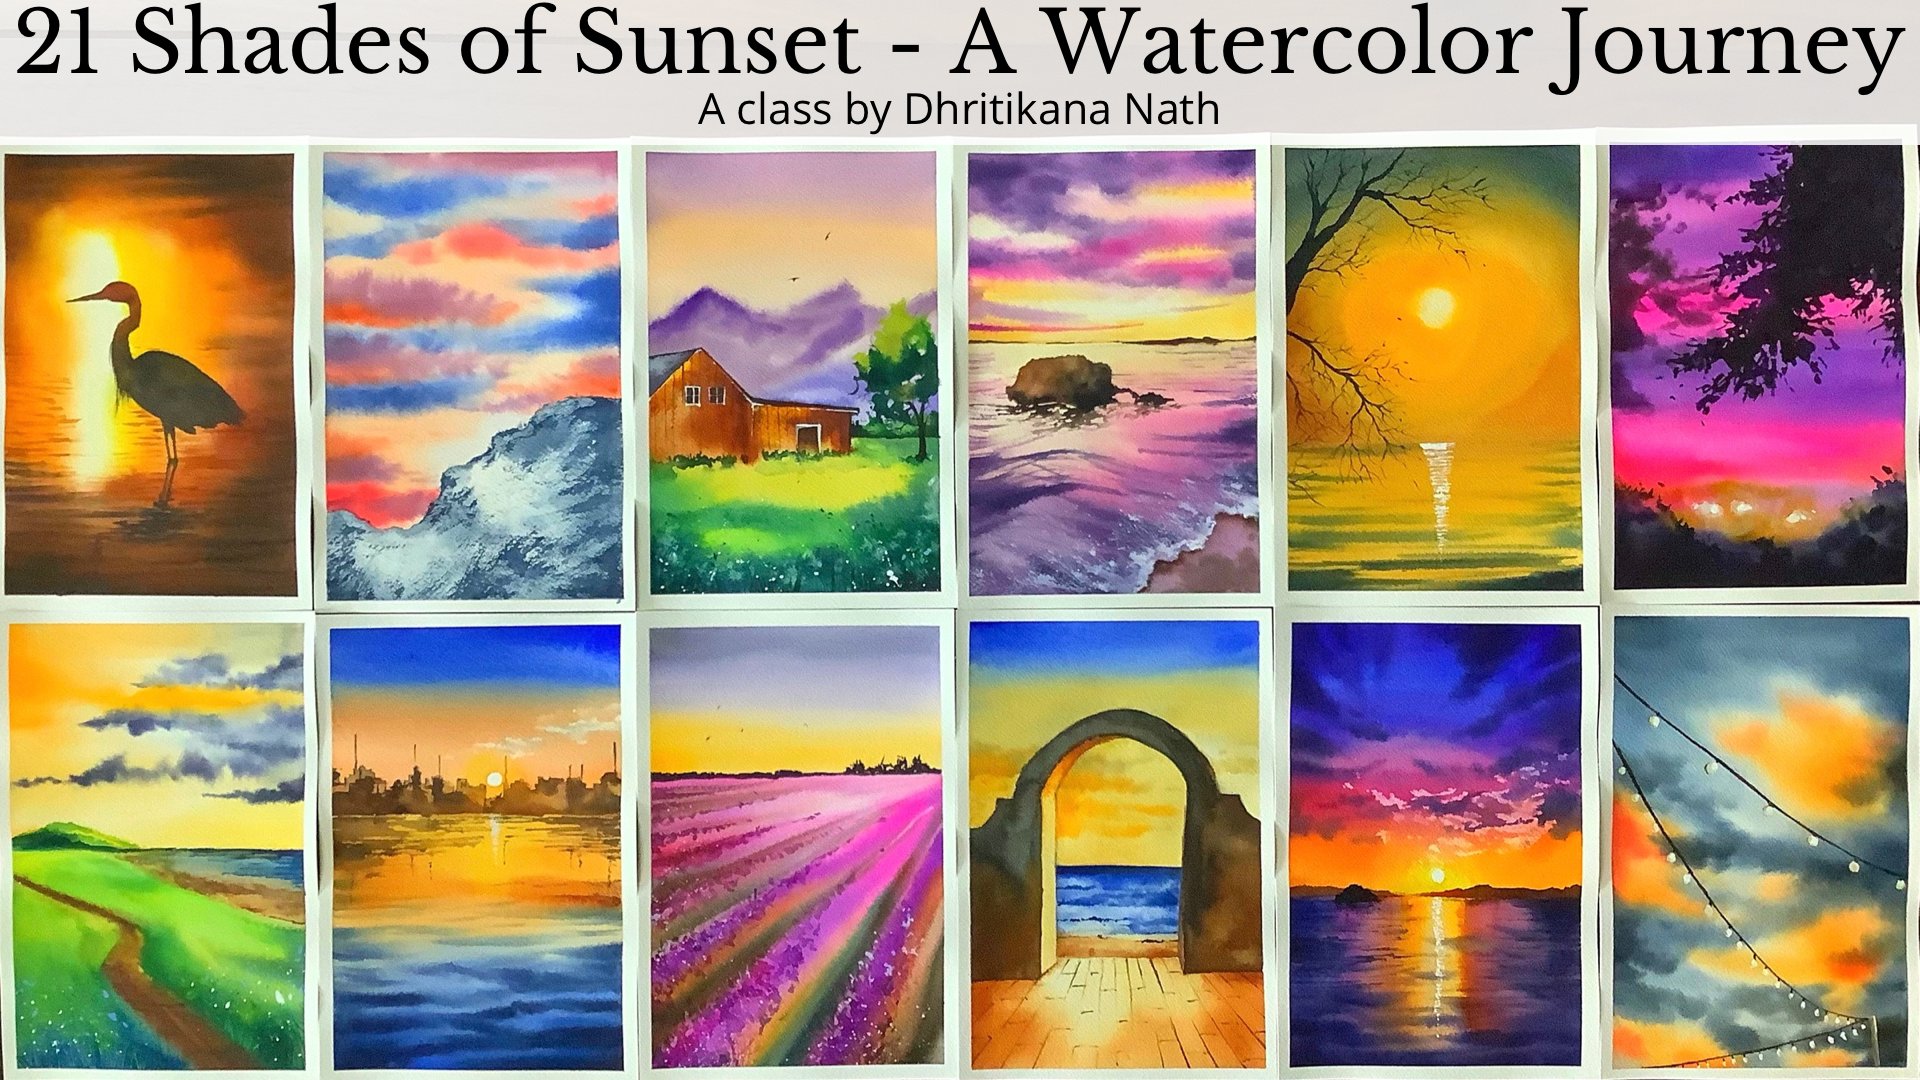
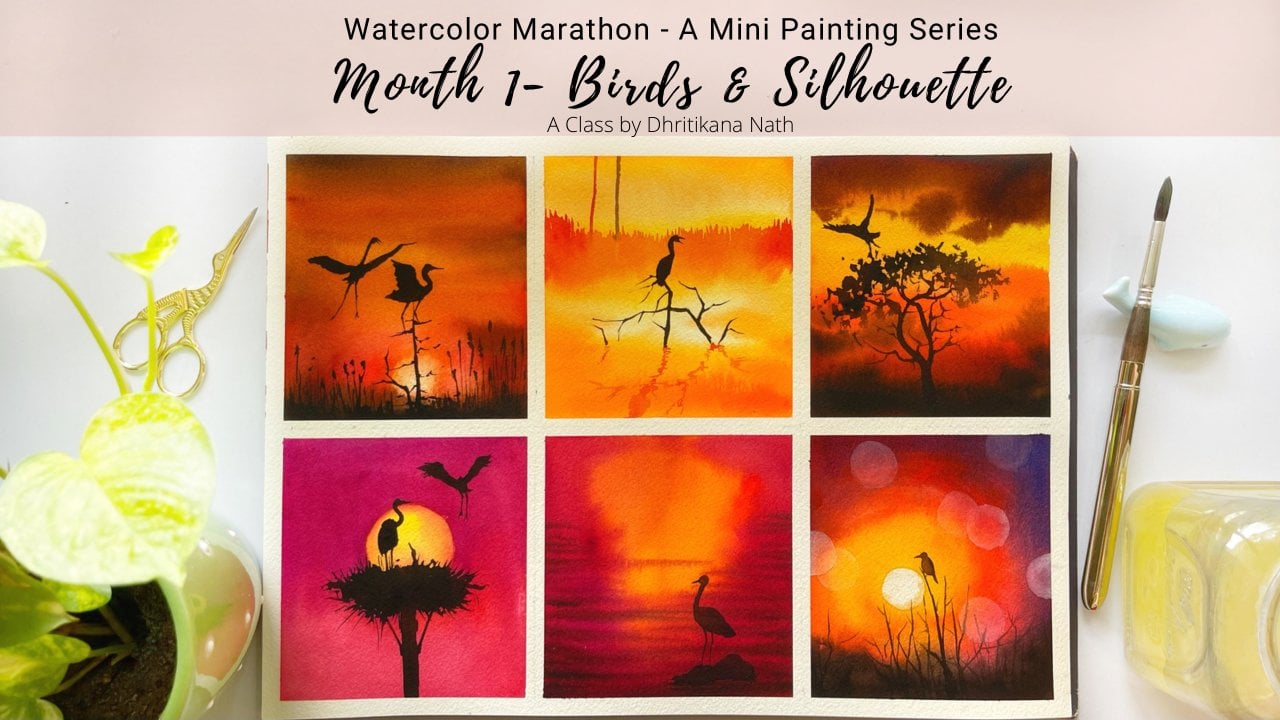
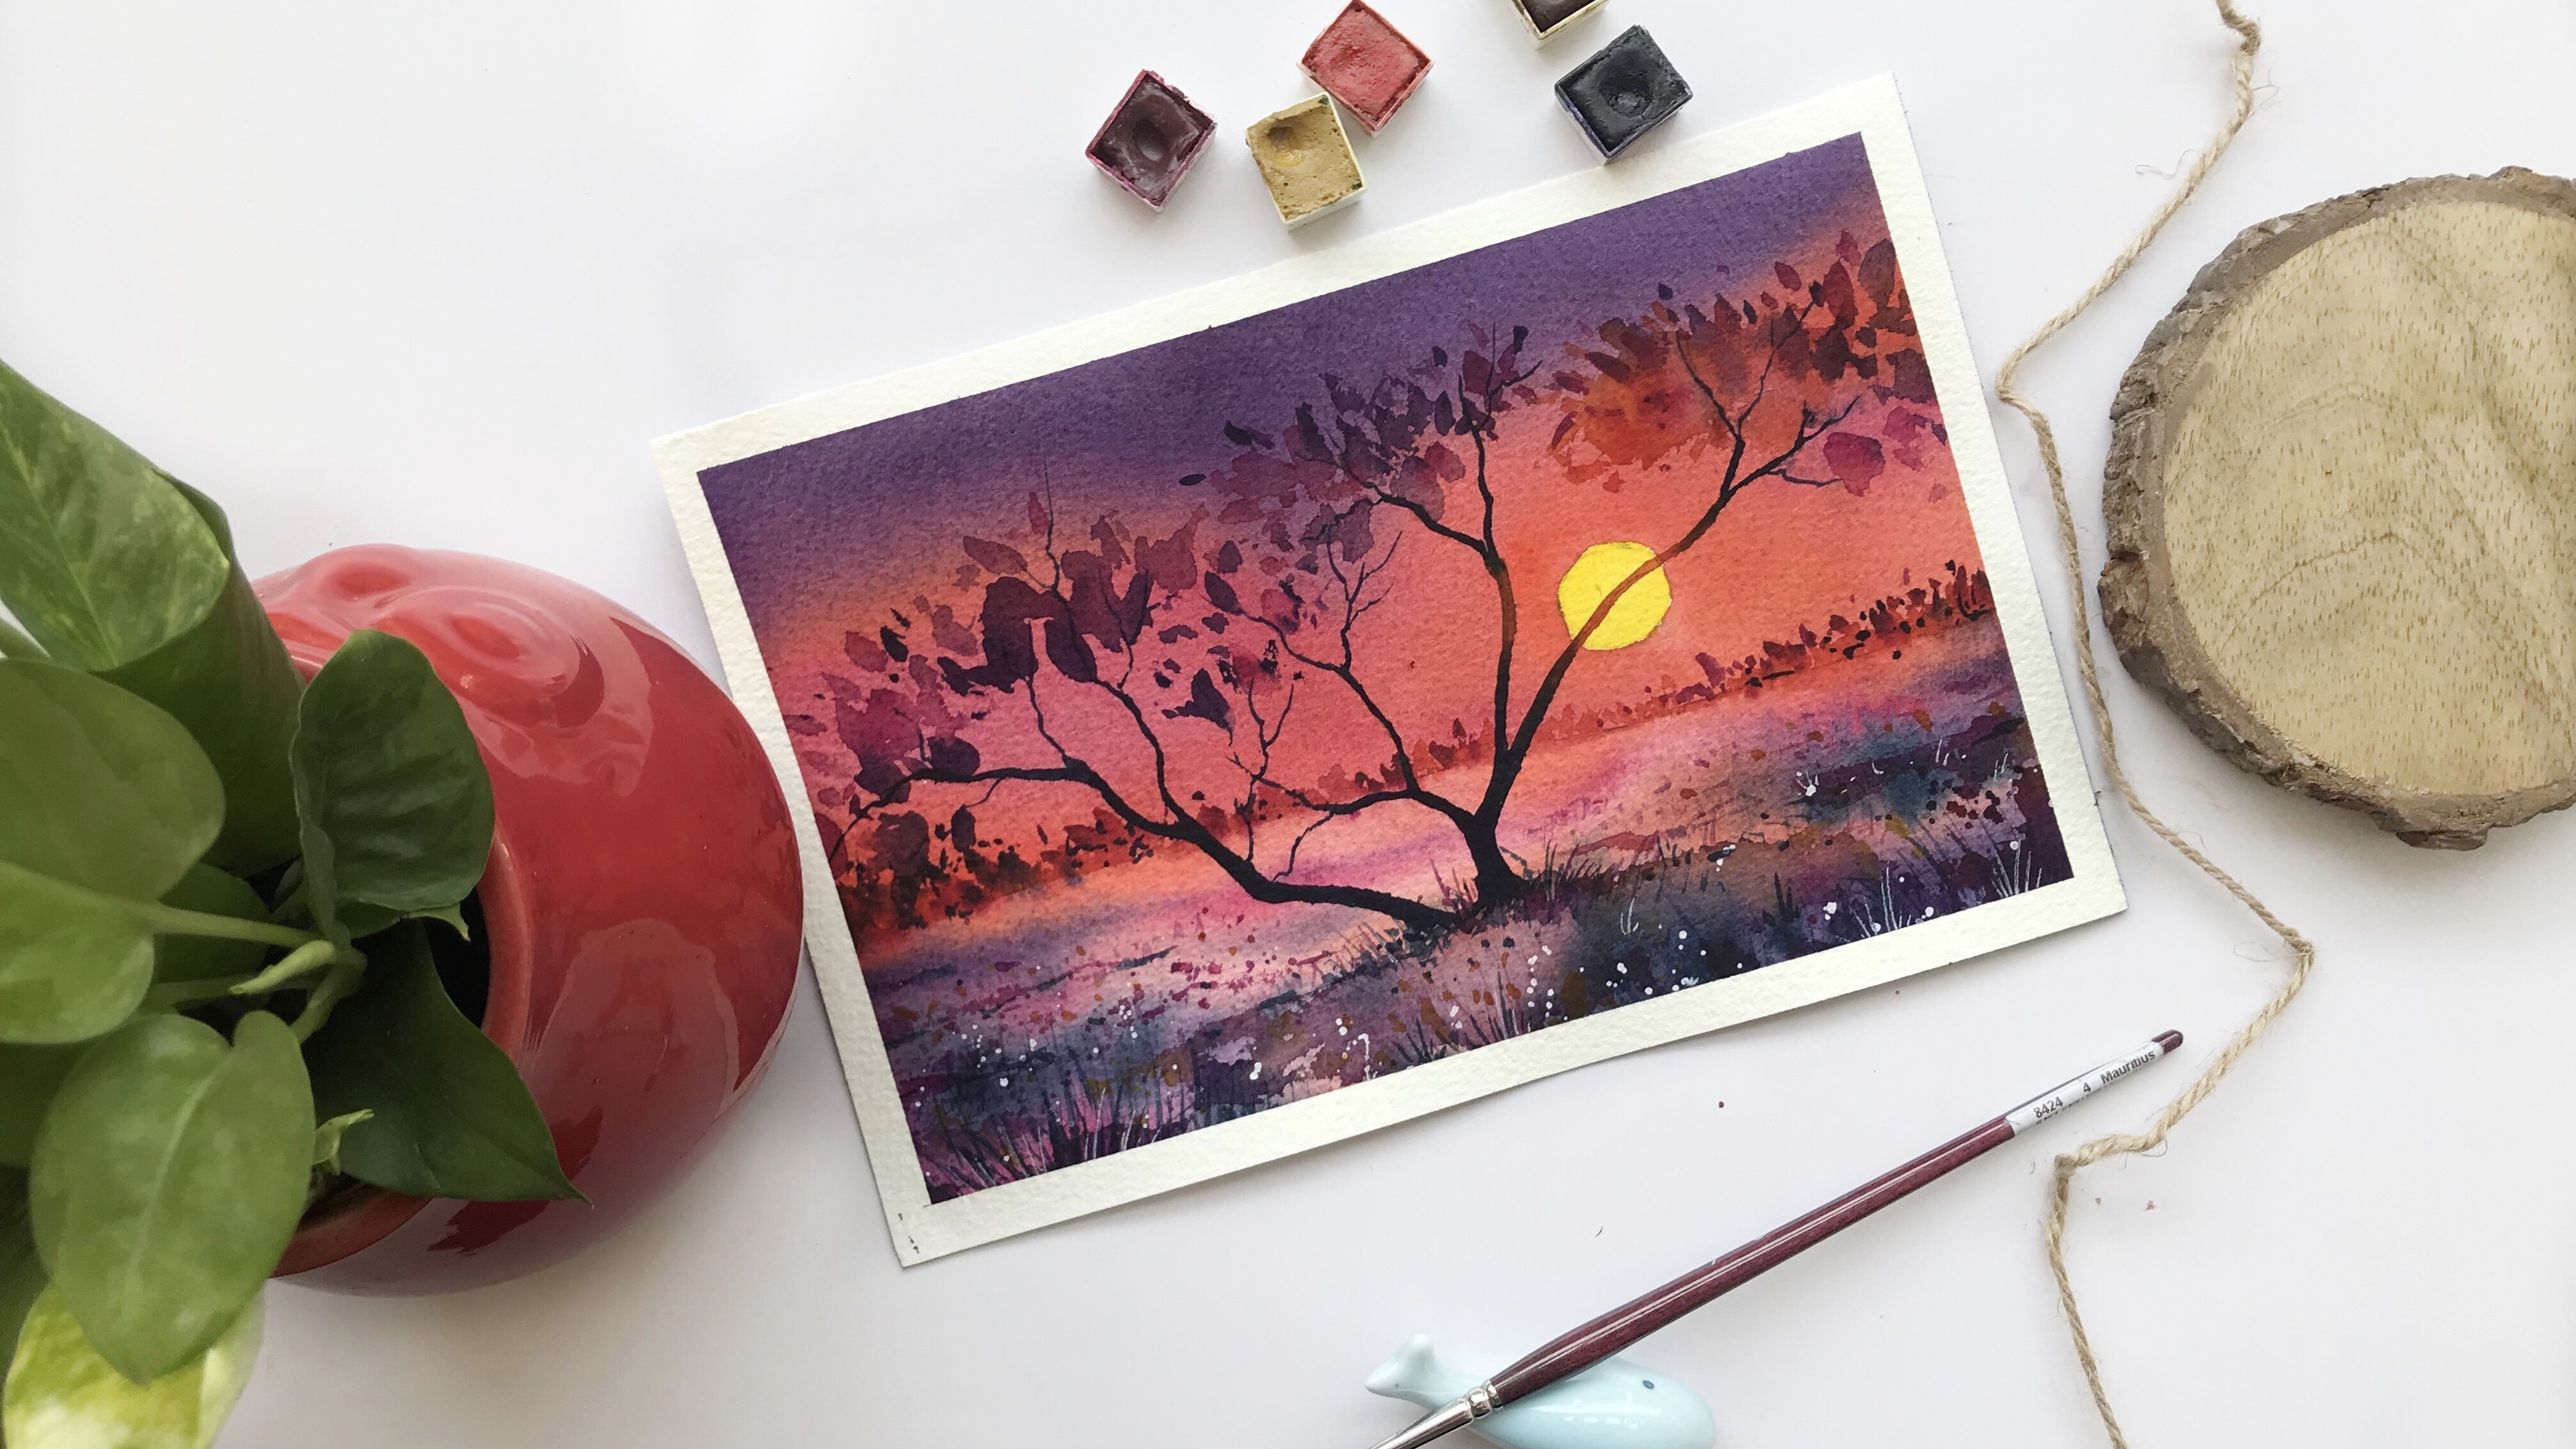
Transcripts
1. Introduction: It's time of monsoons in India. I love to watch surname along with giants. I'm also, according to me, there are four aspects of a monsoon season, though. First is the time to stop. Then next is the beautiful rain drops on the glass window. The torque is the rainbow, which we see once the vein is forward. And lastly, the small boats that mainly high, they could sue, kinda fought holds, which I'll quote with water. If you do associate with any of these, then this is the class for you. Hey guys, I am big on or not, then not just pinned, struck dope model and o bound educate dope form instead on Newton. Many of you might already know be handled the people who are joining me for the first time, I go by the name what? That follow not illustration, dot Lego on Instagram. Most off my artworks and displayed on with it. I do juggle between different roles of being an artist, pulp content creator, as well as calm model, willing me guys, I do not get more than 30 minutes in our day to paint. Therefore, this class is curated for everyone who wants to attempt a painting in less than 30 minutes. Each of these paintings are real-time radius. We start with the basics like going to all the materials, including the people, paints and brushes. I'm Dan, stepwise leveling up from easier painting to Udot, tougher ones. Each of these projects are independent of each other, which means that you can drop it at any point in time and pick it up whenever your time permits. Hence, without any further ado, let's jump on to our first lesson.
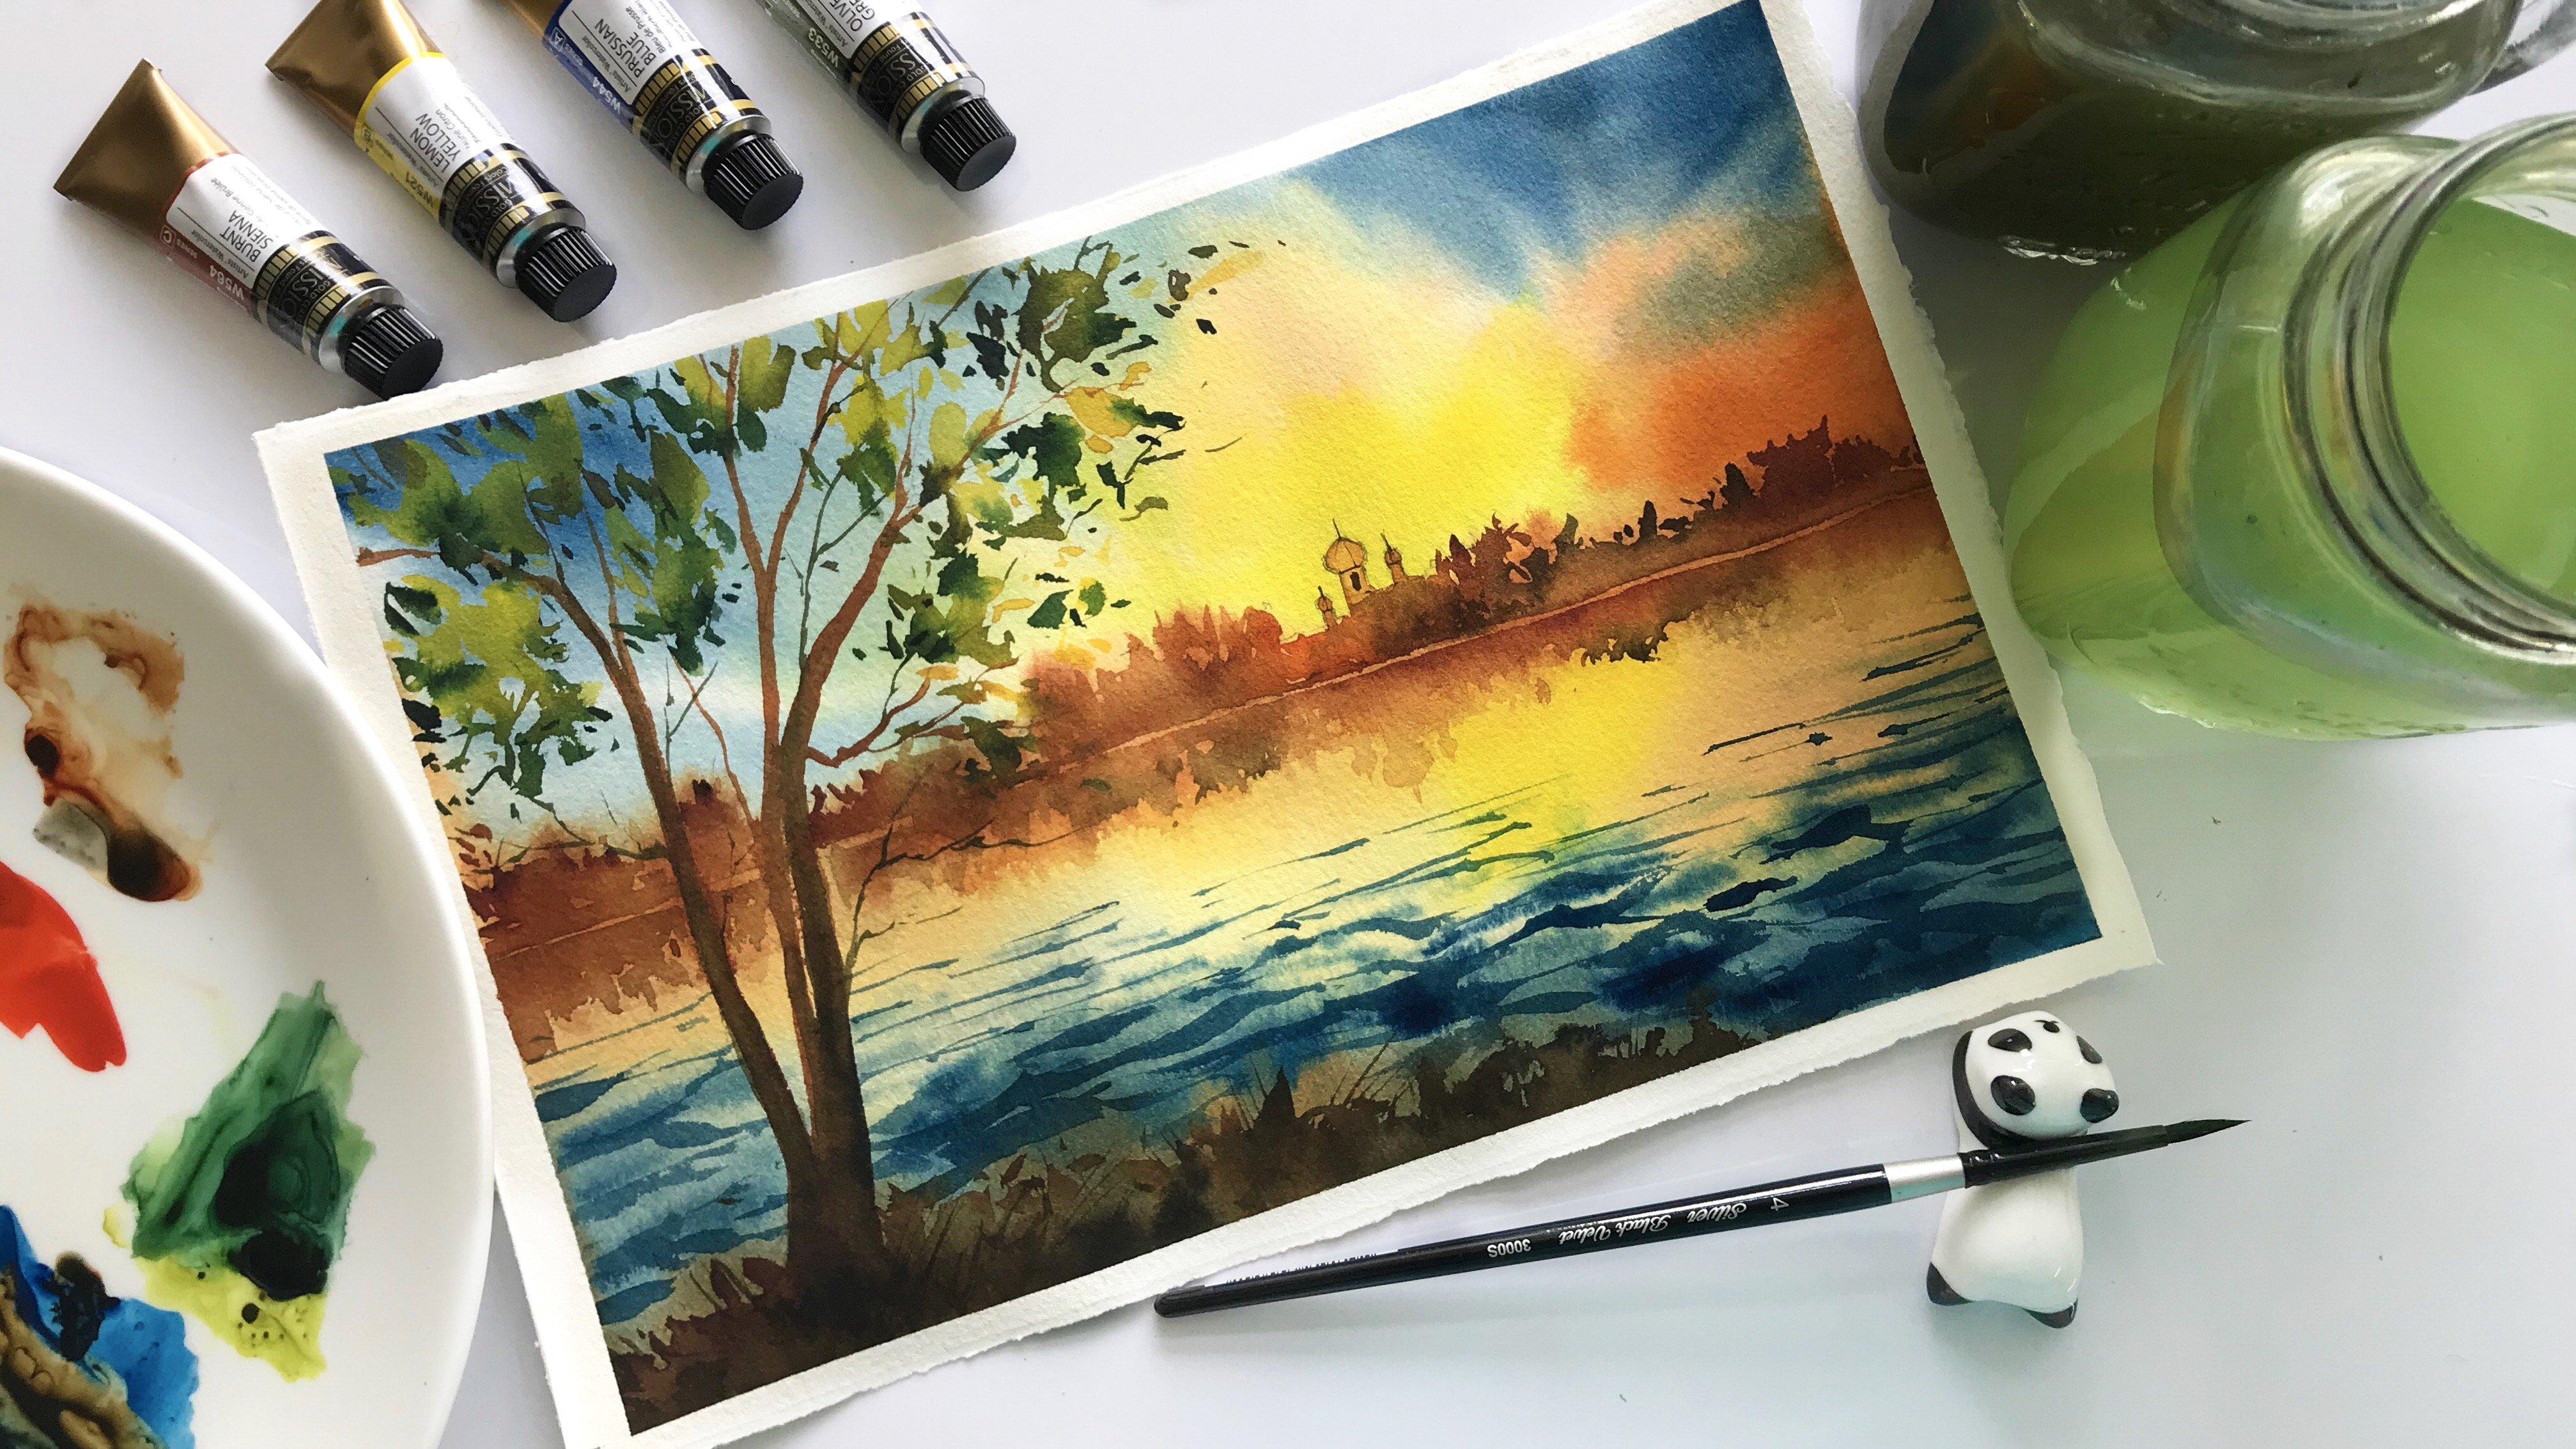
2. Materials Required: This course on the materials which you need for completing all these four paintings of the rainy season. We are starting with the masking fluid. This is a cilia masking fluid. You can go ahead with any masking fluid that is available with you. I would go ahead and use the paper which is Arches, 300 GSM gotten acid free people. Now, this is very important. The use of cotton paper that would enable you to go with multiple washes. If you are planning to go ahead with anything less than 300 GSM pie would say, which is not at all preferable. So go with any day Baraka choice, but it should be a 100 percent but no brushes. Now, I have a better idea of brushes on my palette. Do we need them on loan? So we need only a few brushes either. You can go ahead and use this 1.5 inch brush quality by 400 to crush any of them will solve the bulbus of applying for new wat. Don't want that before. You can go and use a Posca marker. This is a white pen. You can also use her Jelly Roll pen like anything is okay. Whatever you want to use as well. Okay. Then I would go ahead and discuss all the brushes. Brushes is size for as far as our brush, size six brush, you can go and use any one of your choice. You can keep a six, you can keep a poor data of immobile as well as for lab brushes. I have a variety of brushes with me as soon as you do not need to warn all of them, you can go use only one that is size four and a size six optimal brush, then there is, as far as I get more brush, this helps me to get those thin and nice lines which you'll need. So that would be the top brash and this is the silver black velvet size eight brush. I would be using Grab your fellows. I haven't said I'm new gun, then I have semi your annoyed by phone audit needed a valid for myself which I on Mac or these are the kind of colors in this palette. I put individually tell you before each projects, which is the color you need to use. The pencil I am using. Optimal. This is a monograph dentin, so I'm using a monograph pencil, then I have a scale. Scale by aside, It's not necessary, but whenever you need, it's easy to sketch. What she did. I have a better idea of what she did with B. We do not need all of them. I put forehead and the ask you to keep only a half an inch washi tape and a smaller one like six MMR, ADMM like these with you. I think that's it. From the materials perspective, we're lucky for two jars of water hanging with you who Joseph water is really, really important. One for washing your brushes sac now the one-up for keeping or fresh supplies whenever you need to apply, kidding kind of what that could be really helpful.
3. Project 1 Paper Boat: I would be using only one single color from this painting versus Spain's great, you can go with any color of your choice. There's no particular color that I have in mind. Buffering dark values like Prussian blue, our CPR, anything that you would like to paint with. Though, this might be the last thing that we do while we are into our monsoons. But we will take this as our first lesson, which is my paper boat. Why I would say this is one of the easiest lessons that I would be teaching. It's not that other lessons are going to be daft, but they're going to be a bit longer than the current one that we're doing. I will go step-by-step. We are first trying to draw a small paper bought into the water. Now water is a simple, these are the potholes which has got a lot of water. And I want to say simple people bought into it. I would be using only one single color, that is my Payne's gray to paint this paper, but you can choose any of your own favorite color to paint us. We are going absolutely monochrome in this. The first two paintings are going to be monochrome and then slowly and steadily rework, move up with our limited color palette. And then the next one would be called full-blown all colors together. So let's just draw a small boat, as I have told you earlier. And then stepwise, go ahead and start just adding the colors. How do you act of Carlos? Why I say colors? Because with ever be different values of one single column, you have to understand that if you are using different values, It's very, very important to know exactly what value you are using for differentiating between the objects or the different subjects that you are doing. I would love to master's work first. So you can either Masters board or even leave it. I'm using a synthetic brush and Sennelier masking fluid to mask this out. Why is a masking is easier because you can easily go head with painting the waves or water without even touching the sport. You can also go without masking because the area near the board will any ways be absolutely clear. So do not worry. Go ahead with whichever way you want to progress. There is no hard and fast rule. Hence, pick any synthetic brush that is available with you. As you see, I am taking a size two brush and I keep some of my brush clean up or you can save the soap off the brush. I put it on this particular brush and then I add my Sennelier masking fluid with the help offered that helps me to keep them fresh, clean as well as I can use it for longer period of time. Once your paper is completely dry, I would go ahead and start applying some clean water with the help of my flat brush, which is 1.5 inch, you can go for any flat brush that is available were killed. This is the Princeton flat brush that I'm using. You can have incentive brush or any other brush of your choice. There is no particular way of using this one single brush or you should not be investing on any kind of brushes still you'd have flapper hobby like painting or else you are actually in this particular creative work that would actually lead to investing. I would say you should always invest slowly and do your colors as well as into your brushes or all the supplies. I have also accumulated the supplies over the years. So there is no particular they are there is no one single way you should go ahead and do it right away. Start applying some darker values of your Payne's gray wide. You're going from the bottom towards the top. There is no one single way of applying it, as well as apply some more colors towards the top. This is a very light value that I have applied. Now, I am going ahead and adding some more darker values. I would leave some white spaces in between. Violate, apply these colors. Why I see colors? Because you see the difference in values while I move from bottom to the top. That usually happens because I'm using. Wet on wet. Now, if you are going ahead and using wet on dry, this might not happen. Hence, make sure that while you pose slowly towards the top, your colors should become lighter compared to while you are towards the bottom of the painting. I would clean a few areas and then go ahead with my size six or size four, brush whatever is available with you. This particular size of people allows me to warhead with size for a size 6. You can go ahead with any other brush size of your choice depending on the people size you are using. There is no one single way or there is no particular exact size of papers that you should use. Tense. I would refer to you that go with any size of paper of your choice. And accordingly, you can decide the brushes are the kind of supplies that you need to go ahead with. I'm applying some more darker values alternatively, on my Paypal. If you see I'm keeping a few areas absolutely clean and leaving some gaps while I apply these kind of leaves, It's very simple process, but it might take a bit off your time as you might need to practice it ones on simple people. And then it would come as muscle memory to you how you need to apply your brushes. Yet, at some places, while I start from the right and go towards the left, I apply a lot of pressure. While I go from the left towards the right. Again, I apply a lot of pressure, which practically means that I am making broader strokes towards the sides. While I move towards the middle, I make shorter or smaller strokes and they are way more tenable. Now, I am just taking some of my clean brush, which I did audio, and then picked up some of the colors from variable. I felt that it is not necessary to keep it so that my leaves look way more natural and nice. Hence. So go ahead and apply some more ductile values and whichever please you feel it is necessary, there will be some of the leaves which are interlocking with each other. If you see two off my reefs while I was painting earlier, they are interconnecting or interlocking. It's not that you have to do it for all the waves, but you'll have to do it for a few of them. I'm going now towards the top and then again leaving some space and applying these guys up, we ve like motions now, since might be both awake, what has happened? Notice that it has buckled a bit due to which the waves are pretty national. Or also what you could do is if your paper is completely straight to go with the few of the areas where you apply more pressure and fewer failures where you apply less pressure. I am now using my flat brush and picking up some of the colors, again, from few of the ideas as I have shown you earlier. If you haven't taken my waves, watercolor, ocean lives. So part 2, then this might be a bit challenging or a bit rough. To begin with. You can go ahead and pick that class that would actually help you to guide through this particular painting pretty easily because they don't have liquidity. Explain then we more detail how you can work with the waves. How you see our shoulder motion of the waves, how it actually works out completely. How the, how you can make the direction of the waves and everything else. You can also go ahead and refer to my first class, watercolor ocean lives, which might look a bit more complex to begin with. But then as you slowly and steady progress, you would understand more about that subject. I'm cleaning up a few more spaces now. Once I move ahead in this process, as I want to keep some of the areas just below my paper board cleaner, I want to show that the board has got clear reflection and it only happens when your water is come. So the area gesture below the board close to clean so that it looks like that there is nothing that is there in terms of motion. Hence, you get a clear reflection. I'm going ahead with my Payne's gray again to start off, and then I keep adding the colors. The way you absorbed right now on my Paypal gate is simple. Easy. Go with size four brush. I'm using my size four brush to add these colors. In view of the places I would be adding darker values on a few of the places, I would be adding lighter values. That's how I go about it. If you watch closely, I'm going ahead and washing my brush and then I'm moving some of the color attack I did or the applying onto the reflection of the board CALEA factors, how I changed the values of the color. They look absolutely fantastic once you see the final outcome on the paper, that is, once you finalize the painting and half will finally look at it. This one is simple, as I have told you. It is a real short and small one. It is one of my favorites from this monsoon season because I have done this kind of bored when I was small and I still love to do this. I just can associate with all of these painting individually as we have all seen it during this monsoon season. Each and every monsoon season has something special. And I feel this particular monsoon season starts, split the thunderstorm rain, then your rainbow coming up. Along with it go, you will observe the rain drops that are there on the window. I'm finally this board that we will sail King daughter. Far those of the water which we usually absorbed in the potholes. And once the paper is completely dry it off. Do make sure that your paper is completely dry. I have absolutely dry before you remove the masking fluid. And removing the masking fluid. Well, or when your paper is drying is very important. Some of you do complain that the masking fluid did not come out well from the people. For all those kind of problems, you need to always artist time that you have to first to check the masking fluid on the people that you aren't using for your final painting. If your people is not good in terms of having their tenacity to take the masking fluid, then you will not be in a position to have this beautiful outcome or the way you have already picked up the masking fluid, you will not be in a position to do that. If you can't do that, then it's always good to try it on the paper which we're using. Once you use it first, before you go with the final painting, you know that whether your paper will report or not, if your paper is not ripping off, then you know this is a good paper and you can use it for your final painting. I'm going with a very light value. And then I think egg towards the left of this board. I would go keep taking off the colors as I work for real light value to be added on the boat area, even on the left. Again, I'm going to add in one more shade, darker value for the right side of the boat. Once that is done, I would make sure that the sum of the parts are also lightweight and values this board needs to be likable compared to any of the other bots that we would be painting. Because this is the main subject of the painting, along with the small waves that you have done. Transparency of watercolor is always the key. The more transparent you can paint with your watercolors, the better would be your outcome. This one particular aspect of watercolor, if you can learn practically, you can nail any kind of painting that you would like to try out even in your future? I would let the paper dry off and then remove the tape at an angle. Once I remove the tape pattern, anger, I get these clean edges, which I'm really proud of once you see this painting. Oh my God, I can say that this is one of the most beautiful paintings that I have seen till now. And this is really the first one that you would be doing. There are so many more that is coming up. This is a small class. So I think you can even take it together. All the paintings are, you can give it a shot. K2 difference steps, or else individually go head with each of the painting that I would leave it up to you. Absolutely. I am removing this one-inch tape now and then I would like to write the monsoon now people bought along with it. Client would even like to date this particular painting. I have done this for another one, which you would be doing next. I'm using one of the simple fan that is from Sura. I would not only go ahead and delete this painting, I would even just sign it. Signing your painting part does make it to your own cans. Go ahead and sign it as well as the date on which you did paint this one.
4. Project 2 Thunderstorm: Let's just discuss all the colors which you need for completing the painting. It is a low blue, Payne's gray, red, violet French or from Maine and white goulash. You might have a separate set for all of this. You can go for alternate colors, whatever is available with you. Good to go. Do not stick to the colors that right now I am using. You can use Kenny off your shades high and create something which is similar to what you observe today as we proceed through the painting. Hey guys, We are onto our second painting for today is going to be very interesting. Again, we are going ahead with the Tango. Strong thunderstorms are meant to be a bit more easier compared to what we are going to add them next. But believe me, the sky is going to be absolutely dramatic. And you will feel that ADA standards Sean, which is striking the C along with it, I would be majorly using the two colors more on the Bhopal and the blue side rest, it would be a white quash that I would go ahead and add onto this painting. That's the color palette that we will keep in mind while we do this painting. I hope that you can actually go ahead and use other colors like yellow paints, gray, whatever you feel you are more comfortable with RL. So you can also use the color palette like your yellow ocher, then some Naples, yellow, Payne's gray. That can be also an adult palate, which you can use data, several palettes that you get, decide what you want to use for your paintings. I am right now mixing some amount of my art from marrying into the tail blue and then applying it towards the bottom of the people with the help of my 1.5 inch flat brush. Once I have done that, I will go to Woodstock crop and it would be more of a gradient wash where I go lighter in value while I go towards the top compared to when I am there towards the bottom or near the horizon line. And that's how I go about painting this one. More than anything. What do you need to keep in mind this start always with the darker value towards the bottom. As you go towards the top, it has to become lighter because we are going to apply some other shoot towards the top area and which would be again from the purple side that would be more afraid violet and simple two column. There is change there. I'm going to do this, got a valid, hence, we absolutely relaxed, Be gone, compose. This is going to be simple, easy under the guidance of me, you would be in a position to nail this painting. Go ahead and start adding some red violet. If you do not have this red violet, you can add some amount of your car mine onto your and create a color which is close to the one that I'm using right now. If you observe I'm mixing up these two colors, that is your red-violet and purple. And then again, I am doing a seamless wash, which means they're darker values to which set up. And while I'm going towards the bottom, I'm adding some lighter values of my purple towards the left hand, towards the right. In between and keeping it more of a blue shade. I have taken our damper silver black velvet brush. Doesn't have any kind of color in it. I did don't dab off the extra water onto my tissue. And then I have just started adding this white patch. I who would say, well, this white line kind of a thing on top of which would be painting my thunderstorm. I love to keep the area in and around the Tantalus Tom with more white. You will see that when you observe any kind of a photo or in real-time, if you have seen thunderstorms, usually in and around, disability, white as it is, lightning and no light has caught. A lot of flair is itself. Hence, I would like to keep it that way. I'm cleaning up some more edges from this part, particularly why I would say the first lightning strikes over onto this cloud and from tag cloud gets more intensified and dense strikes just above the ocean. That's how I have imagined it back. You can have your own imagination. You can always try out many different aspects of a thunderstorm. This is just one of the aspects which I will love to explore. And that's how I have just started adding these whitespaces. It's not much of a work, I would say it's pretty easy and simple, so go ahead and try it. Once you are done, just make sure you have this one layer of water. Once your paper is completely dry, just add this layer of water and then start adding your plots. This is a very, very light wash. I do not want my first Walsh to get wind. Hence, I go with the VA like-kind with my flat brush. Once done, we will start with the values of purple, red, violet. Those are the colors that I would love to apply for my tardiness from Nieto. Si, I would add more of blue tones. And towards the top, I would go ahead and add more of the darker values off of that. You can always mix a bit of blue with purple that would give you a very nice, beautiful Gallo which has got a light blue. Yet it is purple and it flows very nicely on go. Do people USE that? I did remove some parts round my cloud which I wanted to paint below. That's okay. Sometimes it happens that one I did imagine, well what I wanted to paint did not come out well. Hence, I pick up those colors and then again start painting over it. One thing, not that too, you can always keep in mind why you'll paint 0 with watercolors is stack. Watercolor will do its own magic. If you'll be better sweat, Watteau will help your pains to flow. That's one of the things which I have always realized down when you start working with watercolors more often, you would understand that incase, you are friendly with watercolors or in case you have just the optimum amount of moisture or humidity on your paper, your colors start flowing, which actually gives an edge while you paint. Controlling the water is always a very, very important aspect. And watercolors, if you can control your water, or I would say the humanity of the people, then you will get the perfect outcome that you need. There are times where we need more flow and I do apply more water. And there are times where I do not need a lot of flow, hence, I apply less amount of water. If you see right now when I'm applying the colors on my Cloud, might people has gone a bit dryer compared to what it was earlier. And there are times where I need to even add a bit of clean water. You'll see that on the right-hand corner. I have two jars of water. One where I'm washing my brush and Canada from where I am taking my clear supply of water. One of the reason I have always told you depot cleaning supply of water for yourself. Once this is done, we will start applying some taco values towards the left hand, towards the right, and the bottom area. And then that the color can be your paint scree or it can be a mix of your pins gray, and the purple that you have already applied. It all depends upon what you want to apply. R to be frank, I'm not really particular about the colors that you want to add because it's always a good habit to experiment with your colors. You might have a few shades, but you can mix and match and get something that is closer to the one that I'm using. That's always the reason I have told to Egypt had leased tool of mine or two each and every person who is taking my glasses that nipple. Think about the colors that you are using. Always think about the people that you should use. People is the most important aspect of watercolors. Right now, I am taking my wash brush and applying the darker values. See this kind of washes that I'm doing, Drupal three washes to get or doesn't go. Well, if you do not have a 100 percent cotton, people with the kind of humidity data have all the kind of peak that I have in the northern side of India. That's very difficult for any kind of paper to take compared to if I don't use arches. So arches is one of the people that I have been using for quite some time because this actually helps me to get a great outcome. Even if I am in parts of India where you get a lot of heat and it's difficult for any of the other papers to work well for you. Let's start applying some value. So with the help of the gland, violet color, if you particularly do not have the scholar, I will ask you to just go ahead and mix some carmine and her bubble and you would get a color that is similar to this one. Frankly, you do not mean dumb. All the colors you get even go ahead with the red, add some purple in it and get the scholar. Or even if you have red and blue, you can prepare a color that is close to this one. Hence, you can keep applying the colors and take towards the bottom. If you see I had just blew about in this guy hands. I would like to add some blue IV and not two words. Don't top horizon line. Now while I start painting the water, you just add this bark with our permitting or you can take any other blue like cobalt blue and EU cilia method or whatever you have used for this painting. I'm not particularly adamant about using a particular fluids. So go ahead, use any blue or fewer choice and then start applying TO white quash. Let the part of the water dry up Backed. And then we would go ahead and add the waves. Start adding the white quash with the help of your size six brush, it has got a very nice step, as I always say, it is my optimal branch from a SCADA. I have been using it for most of my paintings. You might be seeing me using it very often in many of my other painting still. Hence, start applying the colors. And then you would see this timeless DOM comes to life. Yang. Hi, I'm very excited at this point in time because most of my work, to be frank, which was what the background is done now are most probably need to work on the final details and finer details. Obviously a lot more time compared to the background that we need to paint. Do there are many paintings where we are going to do more with the background and let's put the foreground. That's absolutely fine. Whatever you decide, you can go ahead and do that. I'm extending whiter, small, small lines here and there. And then I would start painting just below the white cloud that I talked to add for my painting. Once you'll see these small, small lines. So do make sure that you do not be interred with a very thick brush or you do not have a lot of water in your brush while you start painting on this part of the tundra strong, you will get very many PICC lines and that will not look exactly like the Tonga strong. So just keep that in mind and I guess so you should be good to go. Let me start applying. Some are smaller lines and a few of the other areas where I feel it is necessary. You can just have a look at it. Though when this thunderstorm originates, kick-ass to beat really tick, and then it can branch out. Just like you paid any kind of trees and branches. In the similar way we will be painting this time the strong, you don't need to worry, whatever you can do, that's absolutely fine. You should know that this is what it is. There are times where things are not under our control. And to be frank, chromosome also shows that rate it has got a lot of thunder as well as you can say hi in dogs out the energy and hence we have to go with that, NOT let it flow as I always say. Let your NLG floor, let it show through your watercolors. You do not need to stop loss from painting. If there is any mistake that you have done, let it be. There are many happy mistakes that we do. There will be many paintings which you would spike. There are times I would show you that I've used both sides of the paper and none of the paintings came out well, so it's okay there it is obvious to your paper also, yes, bigness. We're always sought diode and we are like We cannot do this and we should not waste the people. We should not raise the colors and everything but seriously, in our learning goal, it's important to waste papers do with scholars to get to understand how your watercolor or the people that you're dealing with will let your work shine through. Okay, I guess this is more detailed part and you base might be a bit dull. Boyd could do the core by you keep painting this bag, believe me guys, this is the heart of the painting. The better you can paint your timeless Tom, the best outcome you would have. So I have taken my all of the time to paint this and this is completely real-time. Why I have kept it real time. I could have done a fast-forward and all, but I really wanted to show you how you can go about this painting. I'm, you can also completed within the timeline that I have done. And that's one of the important aspects of any painting that I hold true. Real-time videos are always the essence of any of the projects that I put together because I do not want you guys to be spending more than their time that I have spent behind this particular painting and finalizing it. Hence, I think I'm good to go right now. Let us paper dry and just check if your paper is dry towards the bottom media that is going to be the ocean. And then wash your brush, mix some fresh colors. I love to see the flow of colors. You know, whenever I mix the colors, I watch them, how they blend with each other, how the colors look together, and how it appears on the people. This is one of the fairy. Now, good aspects of watercolor like what makes your colors low, like anything under when it appears on the people, like wet on wet technique, then it's like the best that you can get in watercolors for me. Wet on wet is the most amazing and the most beautiful technique that I have a book come across. But you cannot always only work on wet-on-wet tensor. This is a wet-on-dry technique that we are doing. That's just on the techniques part. If you want to understand more about the technique, this particular class or this particular project doesn't have much about it. You can go ahead and check out my All right. Class. It has 21 different all right. So over 21 different days you can paint dirt or you can even paint to get all these small, small, 10, 10, 15 minutes project and they will help you to create the base while watercolors, on which you can always build up for your next level. That's how you go about this particular painting. So it's time to draw the reflection of the time the storm into the water area. This is one of the important aspects of watercolor that you need to paint. Pandas, Tom, or any kind of lightning. Exactly. Your water needs to reflect the Sky. Walker doesn't have any color of its own hands. You need to keep in mind that the water will always be the reflection of this guy hands go ahead and start adding these small, small reflections on to the water area, and then start applying these 1A2 small, small base which we did miss, or you want to add four door and splatters some of your colors, the same color stack you did apply for painting your water into the media itself to make sure that it doesn't get reflected on the sky area. I will just use my tissue to pick up the colors at whatever, please. I would like to pick it up because I do not want the colors to be moving around the places, at least not into the sky area, guys. That's one thing I need to keep in mind. I'm also using my blue color and adding some of my other supplied goes. I think I'm cool with how this painting has turned out. I'm very happy with their dye will just laugh to pick up the tape, take off the tape from the paper, and then have a final look at the painting. Make sure you just apply a light, wash out the beans onto the top of the water, just that I wanted it to look more organic and natural. That's why I'm doing it. You can even leave it at this point in time, it's fine. Sometimes what happens is we keep on working on any particular painting and then it leads to overworking. Painting. Lead your people are dry and then remove the div. Have a final look at your painting and I'm Fay, happy to tell you that this might be one of the most satisfying the things that you have done. So that's it for now. And let's just move on to the next one.
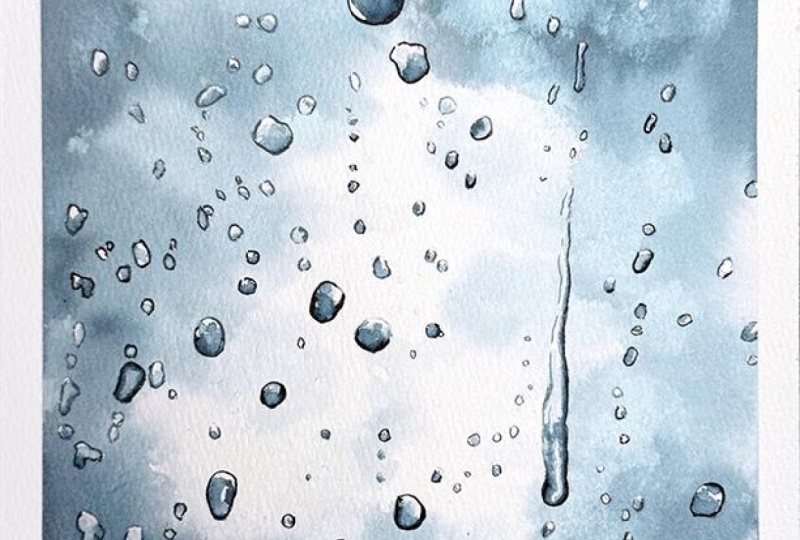
5. Project 3 RainDrops: We will only use one single color for this painting harm it is Payne's gray. You can choose one of your favorite colors to complete the painting. It can be pushing groupings gray, or anything that is available on your palette. Nothing in particular. That high half kingdom, so color choice. So this is our third painting and it's going to be really fun when we start by painting these water droplets. It's again going to be under 30 minutes. I can tell you most of my paintings that I have done for this particular class I have kept in mind that you all have opposition, you will, and you might not pick up so much of time during the day or cannot get so much of time during the day, but still have that urge to paint with watercolors because of which you are here. That's one of the reasons I have kept the class are short and simple. I'm going ahead and sketching of fuel droplets. If QC, you can go with any kind of size and shape. Few of them make it bigger, few of them make it smaller. It's on a glass window that you see these droplets. And then for the background, we will be having the clouds. Again. We are going to paint it with only one single color that has been scraped. There is no other color we would be using for this particular painting. Hence, you have all this thing to yourself that you can choose your color. You can go with the bubble. You can go with. Now cobalt blue, you can go with Prussian blue. You can go with any color of your choice. For this particular painting, I have this budding will now good paints gray. That's why I have been using this color so often in most of my paintings. And two of the paintings in this particular class have been done in monochrome itself. There is another class where I failing everything with monochrome. If you want to go ahead and check out that class, It's really awesome. Now we are going to burden step-by-step for that particular class and how you go about starting from all the instructions about the techniques that you are learning and slowly, steadily building upon it to get the final four paintings. So when Sam Marlins shell drawing these smart, smart droplets, I'm just adding some amount of larger droplets that viewpoint sand at some parts. I'm just starting this month. I'm going slow with the sketching part. I always make it a point that with the sketch, I am always slow compared to while I start painting, you might find my painting speedup bit more higher compared to the sketching part. Because catching is always the base of any kind of painting door. I might see that this is a lot less sketching that we're doing. But still, I would say that you have to concentrate lot more when you are sketching and it's important as an aspect of watercolor painting to sketch. Well, if you can sketch world practically any of your paintings can come to life. Though. I have taken many classes where I have not done any kind of sketching and we have done caught completely as a free flow. That is also an aspect. So either you can go with a sketch, either you can go without sketch. It's up to you. But if you want going with the sketch, It's always an outline or you can say it's always a framework that you can use to your advantage while you are on your final painting. I'm going ahead and masking these small, small droplets as I do not want to get into that effect of that, I have to take care of each and every droplet separately and then I have to again go and paint over it. That would be our real, real huge task where me and it would be very difficult for me to manage all of it. Hence, masking becomes pretty simple in this case, you can also use any kind of masking fluid. I'm using sending LEA masking fluid. It works absolutely well on an Arches paper. As I have told you, always, always go head and cry your masking fluid on any kind of paper where you feel like finishing off your final painting. That's again, an important aspect of any kind of painting when you are planning to do it. That way, go ahead and check it on their final paper and then only apply it. Because if you're masking fluid rips off your paper, then it's not a great thing to do work as you know that we have done so much affair thought creating the background and everything and then we tried to remove the masking fluid. You will get those ripped off edges of these smart, smart droplets. Usually how I add these masking fluid onto these small, small area. It does take a good amount of time to do this. So go at your own speed. I will be just speeding up the video a bit more as I do not want you guys to be spending a lot of time on this particular masking part. I know you can all do it well, and there is nothing exceptional that they are doing over here. It's just simple masking or going over the areas which we did already sketched earlier. I'm going with a synthetic brush and I did initially apply some amount of brush cleaner soap corporate and then hide it, pick a high masking fluid and go over each of these droplets. Once done, Lego masking fluid dry off? Absolutely. Before you start painting. If you start painting before your masking fluid dries off, then it becomes very, very difficult For has to work it out as it put Come on your brush and even rip-off your brush badly because these masking fluids have really sticky. And if they come over on your brush show, which are really expensive, then it might lead to real big problems for you. I'm going with a very light value of Payne's gray and I am going over the age of this particular painting part. And this is one layer of water that I've already applied onto the paper. And then I'm going over it with the help of my one single color that is Payne's gray, as you already know, I will be working from darker values to store lighter parts, not as taco value or the top half and lighter value towards the bottom. There is no fixed way that you can do this. It's just a way I want the clouds to appear in the background. That's how I am dealing with there. Style like to apply some lighter values and dense, fully extended to the darker values. As I do not want to come at any mistakes in water, Carlos, I always say you cannot get back to lighter values of you have already applied some calculus values. It becomes very, very tough to kickoff the color or else you can also lift up the color with the help of your brush, but all the papers do not support that kind of collecting. Hence, it's great to go ahead with lighter colors and then go with the darker values. And that's how we aren't these clouds in the background. You see there is no particular fixed way am going ahead with them going with very, very small strokes. And now I am taking a smaller brush, that is my escort apolar brush and applying some data, clouds and few of the areas we need to also apply the darkest clouds. I want to vary the values that I apply in the background, green, the values is very, very important. Then I can show the difference in the color. Colors are important. But if you can read the value of one single color, that's absolutely fine to finish off or painting. As I always say, you do not need a lot of colors to find laser painting. You can also go ahead with one single hello and just Neal a painting that's also absolutely great to do it. Go ahead and keep applying some more colors and a few of the areas where you think it is necessary to apply the darker sides and then let your paper dry. I do not want to overwork all the ideas. Wherever I feel that I have applied some darker values, I can go head and always use my flat brush to pick up the colors easy. This is an important aspect of watercolors. While you paint, you can always, always pick up the colors whenever your paper is wet. But do keep in mind if your paper is already dry enough, it becomes a bit tough. Paul, the papers support this kind of lifting. Hence, you might have to test your paper beforehand and then only lift up the colors. Those things. I think if you are good to go, then this is going to be awesome for you guys. Let's start now with picking up a few more videos and let your paper dry. After that, the magic will begin once you have paper dries completely because I know that we will start painting those droplets and that would bring this complete painting to life. Believe me guys, you will find the whole painting come to life immediately with the kind of droplets restart painting. And it will take a lot of time. If you see the majority of the time is going to be the foreground droplets are not going to actually fast enough any of the video over here, I want you guys to follow along with me and paint along with me. I will slowly blend it with the blending brush. I'm keeping two brushes or wash one brush and go over it with some clean water. And then you will see that these droplets show the bandgap out loud. That's how it appears in any kind of photo or any kind of. Time when you sit by a window and the water droplets are on your glass. So we'd know you could see all of this line with your eyes and seriously fall in love with it. From my childhood days, this has always been one of the major, major things that I've loved about the ray. At 1 in time. I always used to dance in the rain and now I love to sit by my window. Why Listerine have my cup of coffee? Or Chai had enjoyed the all seen. This hardness Tom rain than appearing of the rainbow and flowers blossoming as well as the whole of the greenery that comes after it. I think though, cool off the soccer or I would see the chronology of the nonce then your animals and everyone, even us, we all depend on water and water comes from rain. And even our reverse flow because of the glaciers as well as the rain that happens during the monsoon season. The ring doesn't come on time on any of them one soon season you can see this E field or difference. People are so frustrated you get that humid conditions or you might feel that heat so much and you will find so many living things dying. It is so much of sorrow associated with any kind of dropped when it happens. So hence, I think Green has got a lot to do even with the feeling of life are together. Since now this is going to be more of an iterative process. So from now on, I would go leave it up to you. How you go power, prayer time, doll, keep painting some of the areas you need to and white some of the years to have to make a darker. There is no particular painting, these droplets, It's all feel very, very simple. The more fighting the colors. On the smaller one side, just start a background that set and then the fit. It's simple, easy, yet very interesting to create these kinds of effects. I just love to create these effects. They bring so much of difference to your watercolor paint. Watercolors is not simple, and I will not say that you will get everything at the first school, but along with it, there's so much of great things associated with watercolors. You can discover so much more in terms of techniques. You can discover so much more in terms of pigments, how they actually behave. Some of them are highly granulating, some of them are non granulating. The colors that you can mix and match and get even something that is closer to the one that I'm using is always so great to go ahead with. I always say this that you do not need the same color palette that I'm using. You can go ahead with whatever is available on your palette. The intent is to paint. The intent is to learn. Learning is most important and it goes way beyond that. Only just understanding how you do what Carlos and guys fall once. Just not only go head and voice the video, but if you paint along with me, you will feel that energy, you will feel that love. You will feel that stretch and happiness. I would say everything is there in watercolors. You can find that therapeutic mode. You can find that patients, you can find that Communists in watercolors. And I always feel that with watercolors I have become more patient as a person. I have this technology to Wood's life. I have a blue hue. There are so many things which have happened to me past one year and slowly, steadily step-by-step. I have tried to heal myself. I'm watercolors has played a really, a huge role in this whole process. When I every sit and pain, there are so many days I just paint for myself that I just paint for my soul. I want to paint just to feel that energy, just to feel that strength that patients that love. All of it comes together. For me with watercolors. There is many ways you can, of course, the width, a lot of issues, but I have been grateful that I could find this medium to my help and. It goes way beyond that, only a single painting guys, believe me, once you start painting with it, you will feel all your fat together. Just paint and you would find so much of happiness slowly and stack the, I have been painting with this medium for many years now. And see you see I have not only found a creative person and myself, I, on my living through this, I have been working with many brands, et cetera. Everything has come to me with this particular medium itself. And I would love to tell you about this medium more and more as we progress. In many of our other classes, I partly produced a lot of classes. You can have a look at that. And every time I am so much more enthusiastic about getting you more about watercolor is how the papal behaves, how the color of the pigment behaves, and everything comes to life for me. The Eran Buddha last few minutes of the painting and non using our two off my brush has got a size four brush and it's called a size six brush. To paint these spots, you can also use any size brush. This is one of the most important, I would say droplets in the whole painting. This is pretty big and you have to keep some spaces MPI as white in case you occupied the complete area. Do not worry, use your tissue to pick up the colors and becomes really easy that way. Then, now keeping data once, I think you would also like to painting once you are done with it. It's very simple, just that we sometimes feel watercolors and B do not want to take that plunge into the watercolors. That's one of the reasons you might give it a bit long or something like that. But once you start painting, I can't guarantee on that. This is one of the paintings which I loved the most in the entire collection of this monsoon season. I will go ahead and just add some more colors in few of the other white spaces which are still there, and then have a final look at the painting tensor. Do remember that there is only one last painting that is left. It's not complex, but it's bit longer in terms of the total time that we're running. It's saying, but it's an involved that we will be painting. And the first part of the rainbow is longer as well as along with their toe, you would find that the bypass, all of that is painting the sky is also a bit more complex, as well as painting the hoops far away hills with all of it makes it a bit more complex than what we are doing right now. Before. Three paintings are more simpler in the version compared to the one that we will be doing next. But there is a step-wise process that I've explained the time. I think you would be in a position to pin that along with me. All these paintings or realtime, as I always say, I want you guys to be painting along with me. It's a good habit to always watch the glass at your own speed, which means that just watched the class once had to wait speed of possible. Just know what I'm doing and how I'm doing and then you can start painting along with me the next time you watch it. That's how I had been doing it. And I can kneel most of my paintings that way. So this is a good practice, so auto habit that you can always keep in mind for yourself. That's it. And then let's go ahead and go keeping things some of the other room droplets. There's something much to explain over here, that race, I would just leave it at this point in time and a lot of music to go along. I will again now picked up towards the Endo where we will be peeling off the tape and just writing that this is the monsoon rain drops. Those all things are important. I think resampling he happy with how the painting is turning up right now. I think you will be also happy with the way you're painting is going to turn up after this 10. So make sure that you continue on with this step-by-step and then we will see how it goes from here. Hi, 36. Finally, the most tedious process has come to an end. I know it has been really tedious on many of you that this fun project pens so long with only their droplets part in the background was so quick and easy. But that usually happens when you come to detailing part of many of the paintings analytic some good amount of time. Have a final look at your painting, but before that, do make sure that your painting is completely dried up. And then only you are going ahead and moving the tape at an angle. Once you remove the tape at an angle, then you can write just monsoon droplets towards the left and just take your painting. I love to date my paintings nowadays and sign it because that gives me the proof that guests I have done this. I have accomplished something today and it's a painting that is really close to my heart and soul to be frank, you can make those in many other multiple colors. So I have displayed it like these kind of different multiple colors in the other spaces. So you can go ahead and look at the projects because I will be uploading one of the project where I have done it with the multiple Clouds Scholar. You can also do it that way. This is just the beginning and there can be many ways, so it can be painted. You should experiment more with particles. Once you start experimenting more, you will understand it better. Have a final look that I loved, these curves fences. Okay, move on to the next painting where we would be doing the Rainbow's hands. Not the Ringo's. It is one single wrinkle along with it, the greenery and the beautiful style.
6. Project 4 Rainbow: Let's go through all the colors which you need for completing the painting. It is Taylor blue, ultramarine, French Charlemagne, then Payne's gray, yellow Sap Green, Prussian blue, pink, orange, carmine, red, violet and white quash. These are the colors would be majorly using, but do not stick to them. Whatever is available on your palette. Cool with that. As we are going to paint a rainbow. Rainbow will have all the colors, so whatever ballot is available with you, use it to your advantage. So onto our last painting for today. And again, this is going to be pretty simple and easy. We just take down the people. And once you have deep down the paper, apply one clean layer of water on top of your time, you're losing my 1.5 inch prints didn't brush along with it. You can see, I do have my Chai. I love to enjoy my Chai. Tea with paintings. So painting gives, gives me a lot of love and happiness along with it. If you get a beverage, it just makes it better. I would say, you're going ahead and adding some rainbow this time. How do I go about it? I start by applying a yellow color. I don't know why he is happening that risk spreading too much. Is there a lot of water on the people or is it just the cargo that is not reacting well, but it's okay. We can clean it up from the sides with the help of our flat brush or any of the other brushes that you can just have. A little bit of dampness center, and then remove the extra pins from the other parts. We will add some other colors on the top as well as the bottom. I'm not going to paint all the colors for Brainbow, as you know, there is no point doing that. And I will only go ahead and paint a few out of them. That would be more of the green ball. It would be some thing, then some orange and some other few sheets. I'm not going to take all of them. As I have told you earlier on, going ahead with some of the orange, we just need to show that it looks like rainbow. We do not need to always go head and had the same colors stacked up there in the rainbow. Whatever is available on your palette, just go ahead with those basic colors and tried to paint this rainbow sheets. I think that's what is more important than intent of painting. Well, is important compared to walk. How the colors or are, or what the colors are. So yeah, adding some green and blue together to go towards the write off the yellow color as you absorb it right now. And then I will just add some colors, but do make sure that you don't have a lot of water on your brush. Has I did have I think in the whole school while I was adding the yellow, make sure that you don't want do those kinds of mistakes. And I'm using my eyes caught up for lab brush to add the colors. So it has got a very nice tip for which you can use it to your advantage. That's one of the reasons of using this brush. Most often brushes from a SCADA really good. You can try out this brand TO whenever you want to accumulate some good brushes. I think this one brand can help you guys to work it out. And then now start earning some of your violet or purple. This is darker shade. I therefore go ahead with the shade towards the end so that I do not spoil my water much. Yes, while I do keep in mind that I should not smoke my water. I have two jars, one for the first supply and another for the normal supply. Still, it is important that whenever you are using one norms apply for your brush. That you just wash off an act or else it would be difficult for you to keep it up to that level. You have to continuously change your water, which we do not want our address. What you can do, you can always apply the lighter values and then go ahead with the darker values. Told, this painting might not be exactly how you should be working adult. According to me. Now you should just clean the edges towards the left and towards the right, as well as see that your people is so wet enough so that you can apply the blue color. I'm going to head with Kanye blue that is available on your palette. You can go ahead with yellow, blue. You can go ahead with the ultramarine. You can go ahead with Selenium. For me. I'm going ahead with some yellow, blue along with some cobalt. So I have three or four blues. So their hand it is pollution go by the law. All of it. I have two words that DOP AD. I'm mixing just to walk them and applying the colors. Whatever is available on your ballot has always, you should go ahead and use that. There is no point thinking that I will not use this or I will not use that. I will exactly match the color that the instructor is using. That should not be the case. I am applying my wash brush to apply this blue color because I have to actually take care of a lot of space over here. That's one of the reasons of the flying. With this brush. I do not want that the people will become dry in the meanwhile, I'm applying the colors. Hence, keeping these points in mind is very important. While you go ahead and clean up our, add some amount of pink so that you are a boy doesn't look very, very thin. That's very important to keep in mind that you have good color that is visible. And you can only make that happen when you are applying. And the colors one after another. Yeah, this kind of problem will happen while you apply the rainbow colors. Why I would say because you are blue Mike, come into the rainbow color. That's one of the reason I did apply the yellow or LEO and then went ahead with the other colors later on, I have cleaned up some of the spaces as I do feel that all the colors by mixing up. So you can always take a damp brush, clean the space, and then again, go ahead and apply the colors. That's one way of tackling with these kind of issues when it happens while you are painting. So it's not that I do not face any kind of issues by lapping part, I tried to always understand what's the issue and how it can be gathered in my own way. Always are damp brush or a tissue is helpful to pick up the colors. If you can't use a tissue user damp brush, it looks way more natural and it helps you to paint in a better way. While you use your tissue, that particular part might become completely white and patchy, which absolutely we do not want that. One of the reason I use the damp brush, as I've told you, you might use or any other way to do it, but these are the two most common ways to clean up any area whenever required. Go ahead and apply the blue color. Even towards the bottom, though you might be seeing that I'm struggling a bit with Ringo. Yes, it's not a very easy topic eyes That's one of the reasons I've kept it towards the last. When I struggled a bit, then it might be a possibility that you might also struggle a bit with the painting because we need everything to be seamless. It does Chi showed look absolutely seamless as if the rainbow has come and we are just absolving the sky like that. It doesn't come to you naturally. I do understand it. And you might need one set of practice before you go ahead and paint this fats, absolutely. Okay. Always practice and think. Practicing is very, very important while you pick, apply some more colors towards the right, you will continue. And in the blue collar, even on the right, applying the colors so with the flat brush would be an easier way, as I have told you already, I am mixing 23 colors like your Taylor Blue tenure, ultra many, and some amount of promotion or cobalt, whatever is available on your palette to get all lighter blue color like this, there is no particular color which I have in mind. While you see towards the left top corner, I have added some amount of our crumb anymore compared to the paler blue that I did apply volume kids. Okay. Just make sure that you don't have any patches or lines. It should look more seamless. That's what. And then now, once your paper is dry, bugles start adding some of the other colors. But before you go ahead and do that, make sure that the colors that are visible on your sky are more off your ultramarine, then they look at some of your city, Liam, if you do have seen him, Yeah, go ahead with Syria. Many people love to use cerium as one of the blues for the sky. You can also use it. It's a beautiful color. When you apply it, you would add a standard. Since my clients do it, I would go ahead and add some clouds into it. Adding the clouds would be a bit more. Yeah, if you are going to do a more complex painting guys, all my classes are step-wise taking you towards more complex painting compared to what you did towards the start of the class. You have many other basic classes which you can take from me, which are more like the others of bold write CDS. That's really simple than many of the clouds classes. Then your walker escapes if you want or have an interest in Word of those things can be also know, I have mixed some amount of my Prussian blue and adding with the help of my size for a size six, brush, depending on the size of the paper, you can always go ahead and change the brush size. Depending on the paper size, you will change the brush size. That's how it is proportional to each other. I am just making some brush strokes. At some point I am releasing. Or you can say I'm adding less pressure and releasing the whole of the pressure while in few of the places I'm adding more pressure. This is how I go about. I didn't colors or water clouds on the oldest guy gets a very, very simple exercise and a very simple process. And then I will take some tissue and pick up some of the colors. Just the way you absorbed right now on the people. I twist my tissue and then I am picking up the colors. That's how I grew up Arctic. It's a very, very simple procedure and believe me guys took large looks fantastic this way. As I did already see, that whenever you are picking up the colors with the help of your tissue, you will get more of whites. That's what we were trying to void while we were working initially. Now, I am photo earning some more darker values towards the right in the clouds. Once that is done, just add some more towards the left. I guess I'm pretty happy with how though whole lot this cloud looks right now. I will now focus on adding some mountain like shoes or hair-like structures. You can also say that it looks more like Plato. That's absolutely fine. And this needs to be famous soft. So what you can do is while your people is a big, dried or has less humidity, that your water is not flowing at that time. Go head and think Spark. You need to also use your flat brush to make it more software. While you go towards the bottom of the people, you will observe how I continue doing it. It's a very, very simple process though, but needs a bit of experience. Compared to what I can say, you can just go ahead and do it simply. So I would say that's the only thing you need to keep in mind. Do go ahead with a clean, flat brush this time I'm not using my brush that as the river, that's absolutely fine. You can go ahead with the 1.5 inch flat brush to I have to do with me. Therefore, I sometimes organically research. There is no hard and fast rule that you must use this particular blood pressure at that particular flat brush, whatever washed versions available with you, go ahead and use it. Make sure that your people is YC enough. Now, I would keep adding one small layer of hills, again below it. How I do it, it would be not very, very simple and a very subtle way you absorbed right now hi Mike, the darker value. And this is going to be so subtle that you will not absorb that, whereas you can still see it that this particular place has one more layer of hills. I'm teaming up some of the areas where I feel that it is necessary to clean it up. Once you're done, just make sure that your paper is wet while you apply this yellow color. If your preference not wait, go with the mixing of some yellow and green. That's also fine. There is no particular way you need to apply the colors. This is more of them, meadows that we are painting and the greenery that you see. Greens is always associated with rainfall. When it does rain, you will see more of greens and nice. So Kylo leaves. So all of that keeps happening in this kind of a case straight. Once done, apply some darker sap green color. You can go ahead with even olive green in case you do not have sap green, I have just applied, I think we more darker value which is either good Indian or you can go ahead with any dark green of your choice. I would leave it up to you, but sap green would be a better choice. You know, you can control the colors in a better way. But I again, feel that whatever is available on your palette, go ahead with that. No need to binding new set of colors. Because we're still trying to just build up a hobby or you have taken up professionally still. You are trying to understand the process of watercolors and a better way compared to if you are a proactive, then it would be easier for you to always had these colors available with you already. I think I'm pretty happy with the outcome right now. And just TO one thing you need to keep in mind that once this paper is dry, then only will start working on the second layer. We have already done most of the work on the clouds. We are now just going to work on the ground. I have just this perfection in my mind, which needs to be absolutely perfect weather. I'm painting a rainbow or bathing anything else. So I am just using my brush. Don't make it more seamless and the colors are just blending well, I need to just show that. That's the only thing you will observe me doing right now. Then again, wash my brush, again, landed well with the other colors. This is a kind of process which you can never ignore. Seriously speaking, if you are behind perfection, there is no perfect art. It is actually a fallacy. I always feel there are times where we can make something that looks good. But you cannot make something that is absolutely perfect. So do not run behind it. You have seen me doing it in this rainbow part. All and all and all once again, once again, once again. But it is almost at the same stage from there we started, right? Hence, if you worked more and more, it is not going to change much. Why? So run after something which is absolutely perfect, it cannot be perfect. It's painting after all, it has to be loose, it has to be simple, it has to be beautiful. Just let it law as I always see what the color has its own flow. Use it to your advantage. Never tried to beat it up any way. You would not have been a position to get the best if you'd beat it up. I have used my audio brush to add some more dots like clusters to get though they look like bushes. And then I'm using a very 10 brush to make some of my lines. This is basically a rigger brush or you can say any of the long bristle brush that you can use, those multiple lines, they would look like purchase. You can go for any other detailer brush also. There is no particular brush that you should own are even you can use a tape off any of your brushes that is available with you. That can also have. So go ahead, do it. Whatever is available with you, use it to your advantage and make it happen. I will keep on adding these kind of bushes one after another via lamb move from the left towards the right. This is a process and it would go become longer and longer to make sure that you are leaving some empty spaces. We are not going to cover up the entire area that we did paint in our first year, which is majorly the loose bushes. We are going over it to add some kind of details. The details need not be so much that your first year old news does not visit that. So make sure those things you keep in mind while you paint your detail or more off. You can see finer parts. When you are finalizing your painting. Hi. Michael, the domain for screen, I did apply some darker green include or blue dark was already dead on the ballot. I don't mix and match a lot of my colors. So you might feel that this doesn't look like exactly the one which I have. Always mix your colors and get to something. If you need a darker value, if you need a lighter value, whatever you want, just dumb, tried to mix and match and then you can get it. I'm going ahead with my brush and then I'm just adding a few stems and these just look like a loose plants which are having some stems and there are some loose leaves. Make it more from appealing, do the eyes of the spectator. That's how it is. Now I'm adding some white to small, small dots. You can also add these dots with the help of the white quash. I already had this squash on my palette. So I'm using it. You can always squeeze out some fresh wash and user that is no hard and fast rule of using wash. You can even go for your opaque white watercolor that is also helpful while meet these dots. Immediately though, titanium white, which is opaque in nature compared to the Chinese wide, which is more transparent. Though we have worked a lot with the transparency of watercolor, but wherever it is needed to show the flowers or you need to show small, small white, white highlights. It's great to use some Jelly Roll pen. Or you can even go for some posca marker. You can also use some of your other colors. So like go postal colors, they are also white or else you can also go ahead, go with markers or anything that is available with you. Make these small, small lines. And again, with the liner brush that you have, they are absolutely random in nature. These are just months one highlights which I love to add in case you do. These kind of highlights, go head and I did, I think we are practically done with the painting. If you overwork on this painting, you might not get the greatest of the deserts. Believe me, we have done whatever was required to complete the painting and it is pretty much gone. Good sized painting that we have done with them. 23 to 25 minutes. I think that's an achievement in itself. Making bigger paintings and smaller time is always so great. That doesn't usually happen. And when it doesn't happen, that's the Dang. You should understand that if you can make bigger paintings and lesser time, you are becoming more of an artist who has understood the whole game of watercolors. Well, that's my quick, but you might have a different opinion altogether. That's absolutely fine. Once done. Now have a final look at your painting and to move the tip at an angle. Before you remove the tape at an angle, make sure that your painting is completely dry. The paper should be absolutely crisp dry just a way when you started your painting. That's the most important aspect of any kind of painting that you'll do. Hence, so make sure that you do that part before you start out on this painting area. I'm also using a Jelly Roll pen as you observe. And adding one of those ones, wild grasses. It's just to add on to show you how you can work it out. Though I did most of the work with the white quash that was already available with me. Once you done? Yes. How final look, I am pretty sure that you would be really proud of what you did paint. This time. It is a bit tough, but believe me, it will not take a lot of time. It's easy, just the initial control of the rainbow is a bit difficult. Rest everything is simple, easy and you can get a hold of that hang of it pretty quickly. Just remove the deep band and have the final look. I think this looks quite perfect rate.
7. Conclusion: I hope you did enjoy all these for one's own paintings. I'd orderly to each one of them aren't putting spam. All my childhood memories along with it also helps me to meditate. In case you are on Instagram. Do dan has what Apollo dark illustration got later, as I would love to share, pack all your work on my stories. You dislike anything about this glass, then lead me of the impact as it does not only on grid, so self-motivation, but also helps this class to reach out to greet the audience of similar interests. Do not forget to upload the class projects in the project gallery. Happy painting dies and see you soon.
 Dhritikana Nath, Watercolor Artist and Instructor