Transcripts
1. Modular Crochet - Create a Colourful Scarf: For me, crochet is like
finger-painting with yarn. It's all about the senses, the feeling of the
textures and the colors. Hi. I'm Jane Snedden Peever and I'm a creative force
behind JSPCREATE. I learned to crochet
when I was young. My mom bought me a crochet
hook and a ball of yawn to keep me busy on a family
summer vacation and well, the rest is history. I followed my passion as an adult when I opened
up my own yarn shop, fresh out of school,
and through my shop, I met many wonderful people, honed my design
skills and even had the opportunity to
publish a few books. Me and my little helper
continue to enjoy exploring and sharing color
and textures in crochet, creating designs online
through my website and blog, tutorials on YouTube,
and of course, creating these classes
for you on Skillshare. In this class I focus
on modular crochet. What I mean by that is
making small pieces that you can put
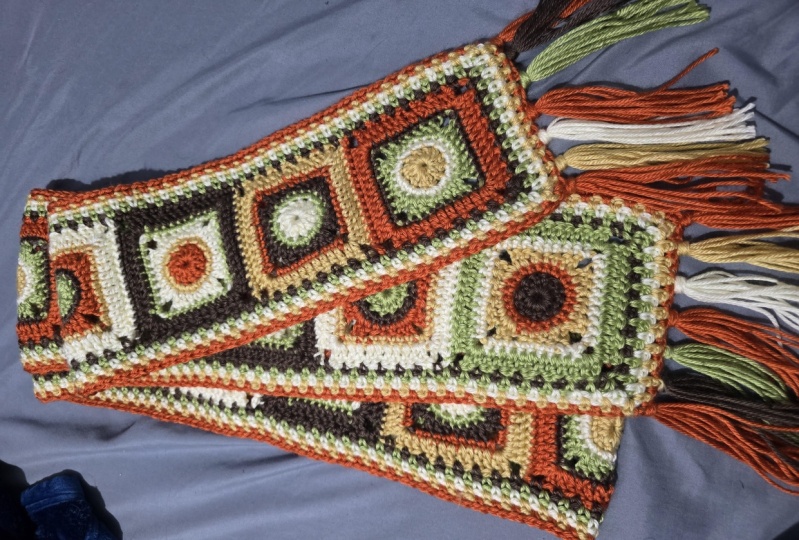
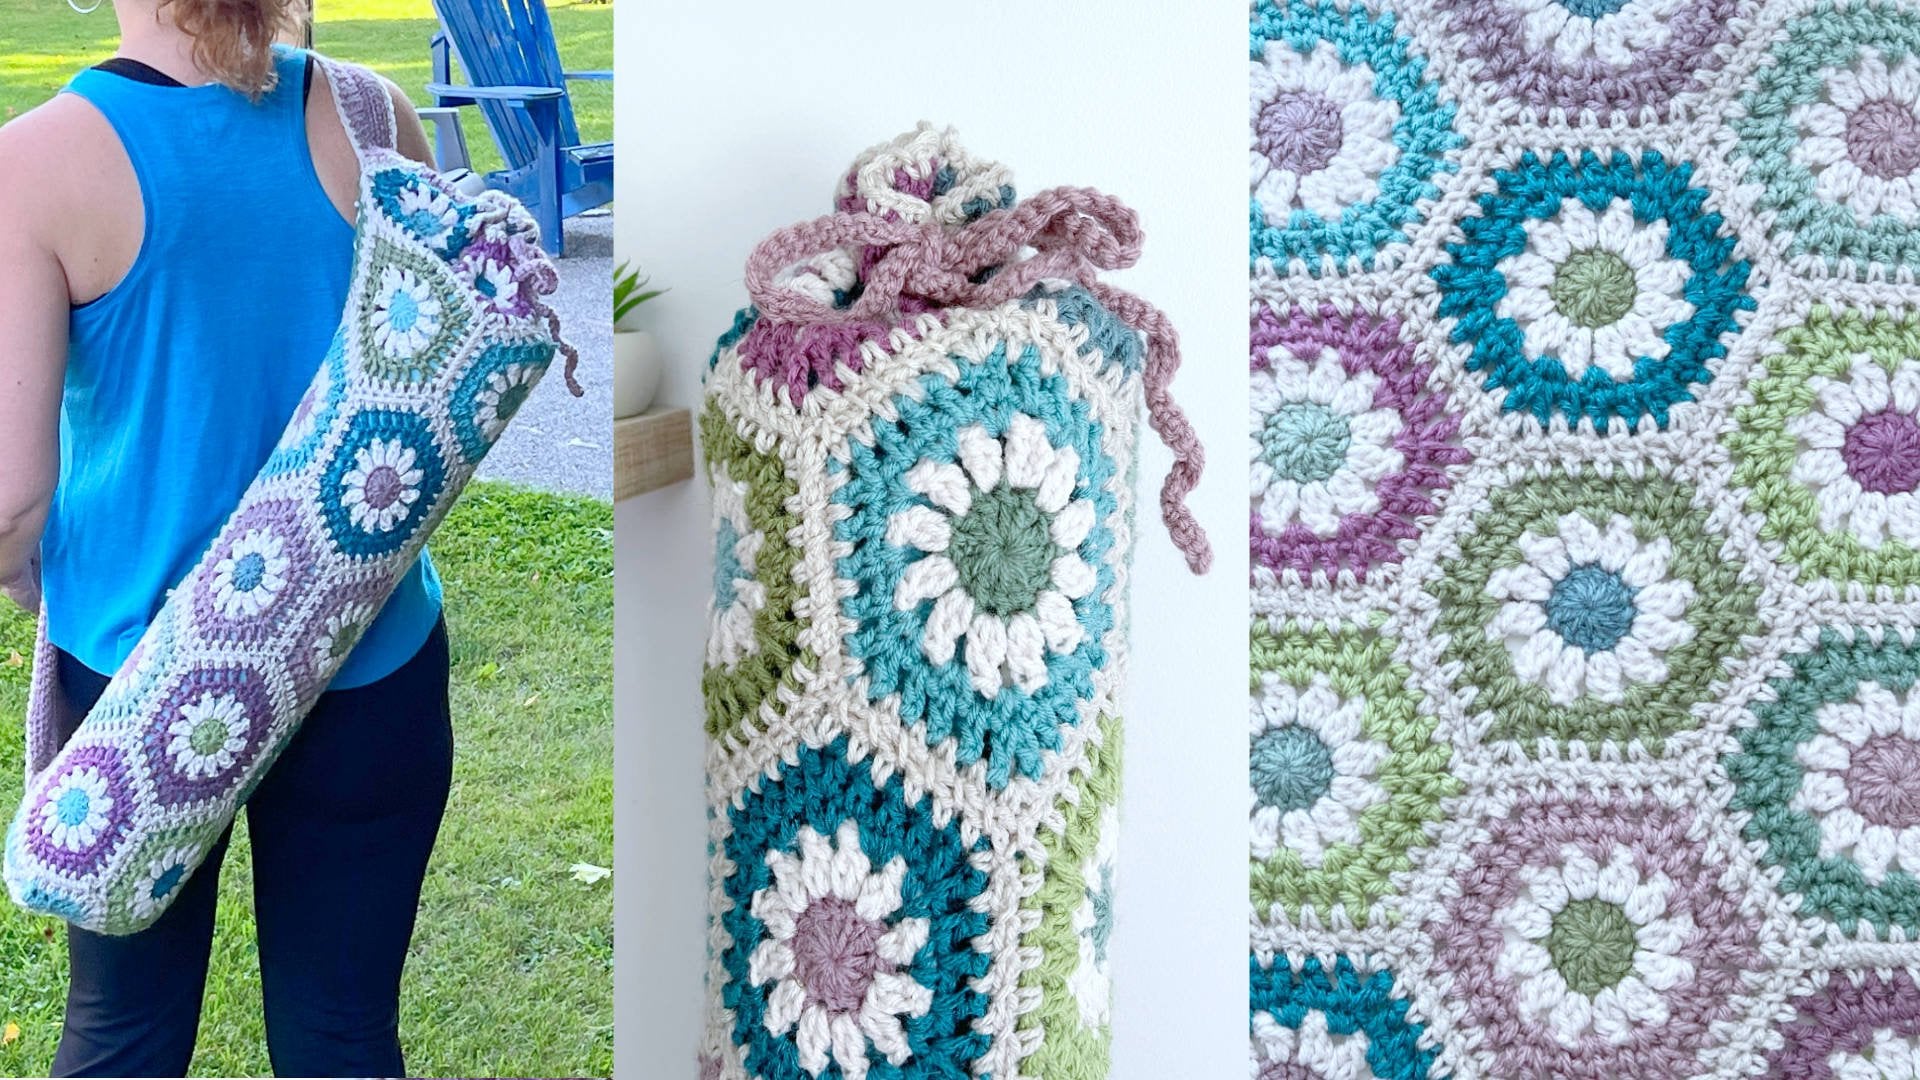
together and make into any project that you want. Today, we're going to focus
on making this scarf. I'm going to walk you
through the steps on how to create this beautiful, fashionable, colorful scarf, one square at a time. I've created this class with a beginner in mind as I want to inspire others to
try playing with color and texture
through crochet. I've also formatted
this class for both right-handed crotcheteers and left-handed crotcheteers. If you've always wanted
to learn how to crochet, this is the class for you. I'll start the class
by taking you through the basics of the online layout, as well as the materials we
use and the crochet language to help you read the pattern and follow along
with the lessons. I provide the written pattern
and will be showing you how to read it as we progress
through the project. What we're going to do
is I'm going to walk you through all the basics of learning how to crochet while making your first granny square. Before we jump into the project, I'll provide you with
a stitch primary lesson where I'll demonstrate all the basic stitches
we will be using in this class slowly and with
detailed explanation. Once we have our
square complete, we'll discuss color
combinations, taking care of your ends, and sewing our pieces together. We'll then move on to creating
our edging and finally, finish off with a
beautiful fringe. I'll finish up the class by explaining how to alter
the size of your project, as well as discuss different color combinations and other projects you can make
using the same square. When you complete this class, you'll have all the
crochet skills you need to create many more
beautiful crochet items. Join me as we make
this simple scarf to keep you or your loved
ones cozy and fashionable. It's a one of a kind handcrafted item that you
won't find anywhere else. Let's get crocheting. [MUSIC]
2. Supplies and Class Layout - Both Hands: First let's deal with what you're going to need
for this class. You will need the pattern. In the pattern, you will have all the supplies listed as well. The pattern is available for download under the
projects section. If you're on the browser, it is off to the
right and if you're in the app under the
project section, you will see a link that
will take you back to the browser where you can
download the PDF pattern. Throughout this class, we will be referring to the pattern and I want to show you how
to read a pattern as we go. Whether you want to
print it out or just have the digital version
in front of you as we go, we will be referencing the
pattern throughout the class. For this class, we'll be
using five colors of yarn. In the pattern I've listed the exact yarn brand and color numbers that I've
used for this project. But you can use any
colors and brands that is accessible to you and that
you enjoy working with. On the yarn label, you will be looking for
the weight of the air and in this case we want a number 4. You'll find that right here. This indicates
it's approximately a worsted weight or an
air and weight yarn. There's many different numbers, but we want number 4. I love this weight because
it's not too heavy, but it's still cozy. The yarn label also has a
lot of other info on it. It has the weight of the ball, which is different than
the yarn weight itself. This is the weight
of the ball itself. Here we have 127.5 grams. This is just this
particular brand. It also has the link, so it has it in
meters and in yards. This scarf uses approximately
300 grams of yarn total. One ball of each color
is more than enough. It's actually a great
project to use up scraps. You'll also find here
the suggested hook size, the gauge using that hook size and you'll also find
washing instructions here. Then if you keep looking
around the label, you'll find the color
number and a lot number, which specifies that
this particular lot, it's really good to
get the same lot if you're getting a
lot of one-color. Here's our color name, which is putty and then
if you continue around, you'll find in
very small letters on this one that
it's a 100% acrylic. You'll always find on here
somewhere what the yarn is made of and that helps you
with the washing instructions. I mix and match
my brands because I like to pick
certain colors and it doesn't matter to me as long
as they all fall within this number 4 and they
work well together. It's an experimental thing. Again, this is a
different label, but you still have a number 4, suggested hook, suggested gauge, and washing instructions. Here they have a
100% acrylic right beside all that information. They have the weight of the ball itself and
how many yards. The next thing the pattern
looks at is your hook size. What I use in this pattern is a 5.0 millimeter for
the main square. Then I go up to a 5.5
millimeter for the edging. Hook sizes are measured in three units depending on the
country that you live in. A 5.0 millimeter, which is the one we use
for the main square, is metric and it can
also be called a size H or a size 8 US. These days, all three sizes are usually listed on the
hooks themselves. It's easier for me to
just go with the metric, that's what I'm used to. The next thing on our
list is other supplies. This includes a darning
needle and here I have a metal one and I always
wanted to have a large eye. You can get the yarn through and a dull point
is my preference. It doesn't have to
have a dull point, but it's easier on the
fingers if you do. You also want a ruler to
measure your gauge or your square in this
case and we'll get into that more in the class. You'll also want a pair of
scissors small enough to get into tight spaces and sharp
enough to cut the yarn. Now let's talk about the
layout of this class. I'm a right-handed crocheter. The recording of
the class is done from a right-handed perspective. However, when I
taught in person, the best way to teach
a left-handed person, I found was to either
sit across from them or teach them while
looking in a mirror. I've included
left-hand versions of all the instructions by
mirroring the video. As you look through the lessons, you'll see each lesson is titled with either right
hand or left hand. Only follow the
lessons that apply to whichever hand you
are dominant with. This is why the
class looks so long, but really it's just
two classes in one. One for right hand and
one for left hand. I've given you a stitch
primer where I go over the basic stitches
moving very slowly. You can return to
this primer whenever you have trouble with
any of the stitches. As I move on through the class, you may find them getting
faster with a crochet. This is so the class is not any longer than it needs
to be and I'll focus only on things that are new to us at that
point in the pattern. As we move through the pattern, I'll be showing you where on
the written pattern we are, as well as the current line of instructions will be at
the top of the screen. If you're find I'm moving
too quickly on a section, you can slow the video
down or you can pause it. To the left of the
Skill Share screen, there is a number 1x. This is the speed. If you click on it,
you'll either get a selection of speeds
or the number itself, we'll just change
to the next speed. You can speed it up. But more importantly, you can slow it down by at least half. This may help you if you find
a certain spot giving you some difficulty and would
like to see it slower. There will be parts
of the instructions specifically with
the edging where I will tell you to go ahead and I'll meet you at
the end of the repeat. In this case, you can
go ahead and pause the video and then resume
when you reach that point. If you'd like captions
on your screen, this is available on
the bottom right. You can choose your
language and you can turn them on or
off here as well. Now let's move on and
learn a little bit of the crocheting language before we get going on our project. [MUSIC]
3. The Language of Crochet - Both Hands: Now let's learn a little bit about the language of crochet. Once you have downloaded your pattern and you
have it in front of you as a printed version
or a digital version, we can take a look at
some of the terminology. Patterns will give you
a gauge in some form. We are working small squares. Here we will find the
finished square measurement, which is five inches
by five inches. Sometimes they give you a stitch gauge where you have to work out
a pattern stitch. But in our case,
we're making squares, so we will give you the
finished square measurement. After you finish
your first square, use your ruler to measure it and see if this
works out for. Now, since we are
making a scarf, fit is not so important, but if you were making
a sweater or wanted a specific finish size for a cushion or even a
blanket, this is important. If your square is smaller, then you are a tight crochetier, and you can change your
hook size one size bigger. If your square is too big, which means you crochet loosely, just choose a hook that is one size smaller and try again. It is important to get used
to checking your gauge so your finished
project turns out as close to what the pattern
designer intended. After all the work you're
putting into this, you want to be pleased with it. Next, we have the finished
measurement for the scarf. I'll show you at the
end of this class other projects I've
done with this square. In this case, you can
change the finished links simply by adding or subtracting the number of squares
you'll be using. Next, we have the abbreviations. These are used across the
industry and are here to ensure your instructions
are not 50 pages long. This is the language of
crochet and you'll learn it quickly just by
following the pattern. Keep the sheet handy if you
want to refer back to see what stitch the abbreviation
is referring to. The other item you'll be
learning about is repeats. Each designer will have their own preferences on how
to mark these in a pattern. But in general,
it will either be a star or a multiple of stars, a pair of round brackets or
a pair of square brackets. Round brackets and
square brackets are sometimes used
interchangeably, but generally, it
goes as follows. A pair of round brackets contain the instructions
that need to be done all into the
next stitch as a group, or it can also mean the
instructions will be repeated a certain
number of times. Square brackets are usually used for a larger set of
instructions that will need to be repeated a set number
of times and are often used when the round brackets are already used within them. So it would be too confusing to use the round brackets again. A single star or multiple
stars are used to repeat a section from the first star until a set point
on the pattern. They're used if you're using different
sizes and don't know the exact number of
times it needs to be repeated because
sizes will differ. We'll be using all of
these in this pattern, and I will guide
you through what to look for and how to use them. You'll be a pro by the
end of this class. Find a look for any special
notes that might give you helpful suggestions in the
pattern and any diagrams. At the end of this pattern, I give you a diagram
as to how I lay out my squares to sew them up. Let's get going on our
project and learn as we go. Pick up your yarn
and hooks and let's practice making some stitches
using the stitch primer. [MUSIC]
4. Stitch Primer Right Hand: Before we get going on our
instructions for the square, I want to just set you up with a little bit of a stitch primer. This will just be something
you can come back to if you have any trouble going along
with each of the stitches. If you want to see them slower and a little more detailed, come back to this stitch primer. We're going to start with the slip knot and I'm going to go over this
very slowly for you. This is how I start
all my projects, whether they're in the
round or back and forth. You're going to take the cut end of the yarn and you are going to lay it over your
non-dominant hand. If you are a right-handed crocheter you're
going to lie it over your left hand and if you're a left-handed crocheter
or you're going to lay it over your right-hand. Line the yarn over your palm, you want the cut end towards you and the end that
comes from the ball, which is called the working end, your want that at the
top of your hand. You're going to hold
that in place with your thumb and then
you're going to flip your hand over and wrap the yarn around your first two fingers. Just your first two fingers. you're going to bring it
back across the bottom and you're going to cross
over towards your arm. You're going to lay it over your next three fingers and then hold it in place
with your baby finger. The first wrap is towards
the ends of your finger, and the second wrap comes across and it's further
down your hand. You're going to
take your hook in your crochet hand and
you're going to put it underneath the first strand and over top of
the second strand. You're going to pull through
a strand of yarn underneath. You're going to twist the hook away from
you so you can get this strand onto the hook and then roll it
back towards you. You've just twisted this
knot onto the hook. Then you're going to
slip you fingers out, holding on to the two
ends of the yarn, keeping the loop on the hook and then
you're going to pull it gently until it
creates this knot. Then you're going to
take the two strands and pull them away
from each other. That's the slip knot
part of this knot. You want it to go right up
to the hook but not tight. Just nice and gentle so there's still some space in there
for you to work with. That is your slip knot. The next thing we're going to
learn is the chain stitch. You want you cut end of the
yarn down towards the bottom, away where you're
not going to use it. You don't want to use
that end of the yarn. It's very easy to
pick that one up and start working and
then realize that you have no yarn left to work with and you have to rip
out what you just did. Make sure that yarn is a way. Sometimes I'll tuck it
under my thumb to start with along the hook. You want the working end of the yarn that comes
out of the ball. To get some tension, I usually wrap it once around my baby finger and then back over the top
of my three fingers. That's how I hold my yarn. Some people just literally
lie it across their hand. Some people have it wrapped
around a few fingers. It just creates a little bit of tension on the yarn as you work. You want your index finger
and your thumb to hold the knot of the slip knot so that you can work
through this loop. We're going to go ahead
and do the chain stitch. You take your hook and
you reach over and go underneath the yarn
and you grab the yarn. You're going to pull it
through the loop on the hook. Make sure that it
is hooked around that yarn and it's
coming with you, using your finger and thumb to hold this knot open
so that your can get it through the loop and
pull it through the loop. There's your chain stitch. You're going to do that again. Often when you start
a piece of work, it asks you to do a
certain number of chains to create
your foundation. Let's do another one. We're going to
move our thumb and our index finger up to
the base of the hook. That's where I keep
them so that they are always working with
the loop on the hook. You only ever have one loop on the hook when you've
completed a stitch, unless you get into some
complicated stitches, but we won't be doing that. One loop on the hook. That's part of the
reason I love crochet. I tend to rotate my hands as
I work towards each other, away from each other. Towards each other to wrap
the yarn around the hook from underneath and then you're pulling them away
from each other. This thumb and forefinger are
helping you pull this loop. you pull the loop through. That gives you two chains. Let's do one more. I move my finger and my thumb
up to the base of the hook, rotate my hands
towards each other, wrapping the yarn over the hook. The hook goes under the yarn, twisting it so that it
gets caught up with the hook and then
I pull the hands away from each other to
pull the chain through. I'm going to do a few more
of those so that we can move on to our single crochet. Next stitch is gonna
be our single crochet, and I'm working them
into a foundation chain. In this case I'm just
working them across. We're not doing
them in the round. We'll do that when we
get to the instructions. To work our first
single crochet, we always work into
the second loop on the hook, the second chain. We're going to insert our
hook into the chain loop. That strand of yarn is over your hook and it goes into
the center of the chain. Then you're going to
put you hook under the yarn and wrap
the yarn over top, just like we did for
the chain stitch, pulling the yarn through. See how our thumb
and our index are at the base of this stitch. Pull it through and now you
have two loops on the hook. We're in the middle
of creating a stitch. We now have two
loops on the hook. We want to do again. Wrap the yarn over the hook. Make sure that you have that
yarn so you're rotating the hook so that the
hook part has the yarn. You're going to pull it through
both loops on the hook. Through we go using
this thumb and finger. They are very key in letting
you pull this through. You pulled it
through two loops at the same time and that's
your single crochet. Once again, we will
go into the stitch, into the center of the chain. You're going to wrap
the yarn over the hook. The hook goes underneath, turns it, so that you
can pull it through. See where my thumb
and index finger are, at the base of the next stitch, and we're creating some space. You're pulling your hands away from each other to
create this space. you're going to pull that through and end up with
two loops on the hook. Then you're going to wrap again. You're going to pull
it through both at the same time so focus on one and then the second one. Your attention for
your stitches might seem a little wonky as
you're learning this, but it will get
better with time. It's all about practice. That's our first stitch; our single crochet stitch. Now we'll do the
half double crochet. The half double crochet is wrapping the yarn
over the hook first. We're going to wrap the
yarn over the hook. Then we're going to insert
into the next stitch. We're going to pull up a loop just like we did with
a single crochet. Then we have three
loops on the hook. We're going to pull through
all three at the same time. Yarn over and then
you're going to go through one, two, three. You just did three loops. That's a half double crochet. Again, we're going to do
yarn over the hook first. Then you're going to insert
the hook into the stitch. Then you're going
to pull the yarn, wrapping the yarn
over the hook again, you're going to pull
through one loop. You have three
loops on the hook. You're going to wrap the yarn
over and you're going to pull through all
three of those loops. Here, your thumb and your index finger are
key on pulling the yarn down so that you have
lots of space in there and you pull
through all three loops. That's a half double crochet. We're gonna move to
the double crochet. Again, you're going
to wrap the yarn over the hook and then you're going to insert the hook
into the next stitch. You're going to wrap the
yarn over the hook again and pull through one stitch. Three loops are
left on the hook. Again, we're doing
a double crochet. We're going to wrap the yarn around and we're only
going to pull through two. Use that thumb and index
finger to make space. We're going to pull it
through the first two loops and that is all. We have two loops
left on the hook. You're going to wrap the yarn over and you're going
to do the same thing. Moving my thumb and index
finger up a little more, we're going to make space and pull through the last
two loops on the hook. That's a full double crochet. Again, we'll do one more. Yarn over, insert your
hook into the stitch. Yarn over the hook
and pull up a loop, moving my thumb and
index so that I can see this better and
get a good grip on it. Yarn over. Pull through the
first two loops. We have two loops
left on the hook. Moving my thumb and index
finger up again, yarn over. Pull through the last two loops. you notice when I'm
pulling through the hook is facing down. It just works best for me, but when I'm wrapping I have
the hook up. There we go. We have our two double crochets. Let's see if you can see
this on this swatch, see how they keep
getting bigger. you can see here the single
crochets are the first two, the half double crochets are the next two and the full double crochets
is at the last two. The stitches get higher. Single crochets are the lowest, half double crochets
in the middle, and a full double
crochet is higher. That's the height
of your stitches. The last stitch I
want to show you is a slip stitch and that's usually how we join things like the ring for the foundation
or the end of a row. A slip stitch is pretty simple. you just take the hook into the stitch that it
asks your to go into. In this case, I'm slipping into the first chain of the round. I'm going to wrap my yarn over. You're going to
use your thumb and your index finger to hold
those stitches in place. Once you have that yarn wrapped, I'm going to bring
it through both stitches at the same time. you're not actually
creating a stitch, you're just joining things. That is a slip stitch. [MUSIC]
5. Foundation Right Hand: Let's get started on
our first square. We're going to start with
this color combination. Using our colors in order
from A which is the putty, B which is the blue, C which is the red, D which is the beige, and E which is the green. This will be our first square
that we follow along with. Then later on you can change
up the colors and make these different squares that will go into
completing our scarf. We're going to get
started now on following our directions and our pattern
to make our first square. We're going to use color A, which is this off-white or
putty as it's called here, and we're going to go ahead
and read the pattern. Under directions,
we see foundation. With color A, make a slip knot on the hook. Again, I'm using my
5.0 millimeter hook. We'll go over that again. It's in the primer if you
need to see it much slower, but we're going to
create a slip knot by lying the yarn
across our fingers, wrapping around our
first two fingers, bringing it up, and wrapping
it around the third. Again, follow the primer. It goes much slower if you're
having trouble with this. We go under our first strand, over our second strand, pull it through, twist
the hook towards us, and slip your fingers out. There's your slip knot and
slip it up to the hook. With color A, we have our
slip knot on our hook. Chain four and then join with a slip stitch in
first chain to form a loop. This is going to be
our beginning ring, our foundation ring, so we chain four. Holding our hook in our dominant hand and our
yarn in the opposite hand, we will wrap the yarn over the hook and using our
hands to pull apart, slip that hook through
the loop on the hook. That's your first chain. We need three more of those. Wrap your yarn, pull it through, and see how I'm working
my hands together. They rotate towards each other and then away
from each other. That's how we get this
yarn around the hook. Pull it through. There's our four chain. Let's count them, 1, 2, 3, and 4. Now, we want to join with a slip stitch in the first
chain to form a loop. We go back to this first chain, we slip our hook underneath. Now, we wrap the yarn around
the hook again bringing the hook up underneath
and hooking the yarn. Pull it through that loop
and the loop on the hook. Use your thumb of your
non-dominant hand to maneuver that hook
through those two loops. There we have our foundation ring that we will be working around one into.
6. Round 1 Right Hand: Moving on to round 1. It says in the pattern, continue with color A. We're going to
continue with this off-white color so we don't need to cut any ends
and worry about that. We're going to start
by chaining three, so again, from where we were, we go ahead and wrap the
yarn around our hook, pull it through, that's 1, 2, and 3, so that's chain 3. That counts as our
first double crochet. Moving on, we're now going to do the double crochet right
into the taller stitch. We work 11 more double crochets into the center of
the chain 4 loop. Working into this
center of the loop, see if you can see that there, you want to work 11
double crochet into that. By working in double
crochet again, we do yarn around the
hook to begin with. Then we insert the
hook into the ring. Then we bring it up
and wrap the yarn around again on the other side, pull it through the ring so you have three
loops on the hook. Wrap the yarn around again, pull through two loops, wrap the yarn around
one more time and pull through the last
two loops on the hook. That's your double
crochet stitch. We want to work 11 of
those into this ring, so that's the first one. Again, we wrap our yarn around. Give yourself a little bit of leeway here with your yarn so it doesn't create extra
tension on your hand. You want to keep this yarn
nice and loose coming onto your hands so the
tension stays nice and even. We have our yarn wrapped
around our hook. We insert it into the
middle of the ring, and I'm working over this end. You want the end to be lying over top of your hook as well. If you find that too confusing, you can leave it to the
back and darn it in later, but I like to work in my ends at every possible opportunity. You're going to wrap
the yarn around the hook now that's on the
other side of the ring. Pull through, you have
three loops on the hook. Wrap the yarn around,
and pull through two, wrap it around and pull
through the last two. We'll do this a little
smoother and faster this time. Yarn over, insert into the ring. Yarn over, pull through
three loops on the hook. Yarn over, pull through two, yarn over, pull through two, and that's how we do this. We want 11 of these. Again, I'm always
keeping this cut end of the yarn over
top of the hook. It's working into our
work at the back. We want 11 of these. Moving a little faster now. You just keep working your way through and you're
always pulling away from each other with your hands when you're
pulling the hook through. This hand will pull
in one direction and the hook hand will pull
in the other direction. That is how you keep your tension nice and
even and it also makes it easier to pull these pieces of earring through the
loops on the hook. We've done a couple here.
Let's go back and count. Counting stitches,
very important. You never want to be off on your count because
then your next round isn't going to work out and somewhere along the line you'll figure it out and then you'll
just have to rip back. That's not fun. We're
going to count the chain 3 as our first double crochet and then there's going to
be 11 more after that. This is our first one, so then 11 more. So 1, 2, 3, 4, 5, 6, 7, and 8. You can either count the
posts or you can go up here and count the actual
chain loop stitches. I need nine and 10. Maybe a little bit more yarn
here and one more for 11. Now it'll feel like
you're really packing them in there and that's okay. That creates a nice
solid center for us. Now that we have the
11 plus the chain 3, it gives us a total of 12. We want to slip stitch in third chain of starting chain 3. So 1, 2, and 3. You want to slip stitch into this third chain of
your starting chain 3. Just poke your hook through, wrap your yarn around, pull it through, and pull it through the one
on the hook as well. That is how you
slip stitch to join and then because we're working with a different
color each round, I will be cutting my
colors after each round. I cut about anywhere from 2-4 depending on
how comfortable you are. I work my ends in. Usually by working
them in as I go, I only need about two inches. But to be safe, you could go 3-4 because you can always
trim them off later. Then you're going to go
ahead and pull that yarn through the last loop there. There you have it fastened off. This center, you can see there's a hole in
it and that's okay, that can be part of your design. Often there's a hole when
we'd start with a chain ring. I've turned over
to the wrong side. This is the right side. Turning over the wrong side, you can see this yarn. If you put your
thumb over the hole and your index finger over the other side and just give this yarn a little tug while
holding that in place, it stitches up the center. You can continue to darn this around and stitch
it up even more. If you don't want that
hole in the center, that's a good way
to close it up. Now we're ready for round 2. [MUSIC]
7. Round 2 Right Hand: Moving on to round Number 2, we want color B, which in my case is this blue. Round 2 says join color
B with a slip stitch in any double crochet
of previous round. It doesn't matter
where you join, and that's another reason
why I like fastening off my colors at the end of
each round because I like to start my rounds in
a new place so that I'm not getting all these ends
going up in one line. If we take one of these squares, if I were to join in the
same place every time, I would have a bulky line of ends all in one of the corners. Every time I join a new color, I like to pick a different space on the square so
that when I'm done, my ends are dispersed
around the square. Seeing as I fastened off here, I'm just going to rotate
it maybe 45 degrees, and just start
into one of these. You want your hook
to go underneath the two loops of any one
of these double crochet. We're going to join
by pulling up a loop, so wrap the blue around your
hook and pull up a loop. That's how you join a new color. Following Round 2 instructions, we join col blue with
a slip stitch in any double crochet
of previous round, chain 1, so yarn over the
hook and pull it through, that's your chain 1. Now you want to do
two single crochet in same stitch as join. Not only learning
the single crochet, we're learning how
to do increasing, because as you
work in the round, you have to increase
your stitches so that your work lies flat
and doesn't pucker. We're going to start by two single crochet in
same stitch as join. You want to take that hook, keep the loop that's on it, nice and firm by holding your attention with
your opposite hand, and you want to
insert the hook under the same two strands and wrap the yarn around
and bring it through. Now you have two
loops on the hook. Wrap the yarn around and
pull through both loops. That's your single crochet. Then you want to do a
second single crochet in that same space. Again, we go back
into that space, draw up a loop, two loops on the hook, wrap the yarn over your hook, pull through both loops on hook. Now you have two
single crochet into the same stitch and that's
considered an increase. We go back to the instructions
and we see we did the two single crochet
and same stitches join increase made. Now we have the square bracket, and when you get the
square brackets again, it's about whatever's in
those square brackets, you're going to be doing a
set multiple number of times. We have two single
crochet in next stitch, and we're going to
do that 11 times. Our first one's already done. This one doesn't
count as the 11. This one was done
before the bracket. Then you want to do two
single crochet next stitch, a total of 11 times. We're going to go ahead
and start working these two single crochet
into your next stitch. Then move on two single
crochet into the next stitch. Move onto your next stitch, and you're going to
do this 11 times. Sometimes it's good to
have a little piece of paper beside you to tick off how many
times you've done it. A lot of people have
different kinds of row counters and
stitch counters. You can use them even on your devices like your
iPhone or your iPad. Some people are just really good at keeping it in their head. For me, I really just have to
keep counting my stitches. I've come up to
the point where I joined from the previous one. I'm going to show you
a different joint on this round that isn't
as bulky as this one, although this one
is a simple join. But you have to make sure you're going to go
into the right stitch. That's what I don't
like about this join, is that it can get confusing. We just worked into this stitch, and we have to see
where this one joined and it joined over here. That's the place you want
to work your next stitch. Don't get confused
by this right here. This is really just a chain. It almost has to go to the back. You want to go way over here and create another single
crochet, and then another. Even though that's a very common joint and a very
simple one to do, pulling it tight
from the back there, it does leave a little
bit of a bulky gap. I'm going to show you
a different way to join that doesn't
leave that gap. It's not so bad on
your first ring, it's really not going to show. We did our two
single crochet there and nowhere make sure you
work into the next one. Going under two, what we did back there is
worked into that third chain. It's a little confusing there. Then again, now I'm on my last one because
here is my last stitch. If you're not sure if you've
reached your last stitch, then you do have to
go back and count your stitches and make sure that you don't
end up with too many. But before we join this one
and finish off this round, I want to count the
stitches to make sure. You go back and you count all these little loops
that are on top. That's the easiest way
with single crochet. Round 2 says at the end
after we've fastened up, we should have 24 single
crochet. Let's count them. One, two, three, four, five, six, seven, eight, nine, 10, 11, 12, 13, 14, 15, 16, 17, 18, 19, 20, 21, 22, 23, and 24. We have the right number. Now we're going to join. In my instructions, I
always say slip stitch and first single crochet or
slip stitch fastened off. It is the most common
and it is the simplest. If you were working
on one color, you wouldn't even really notice. But when you're working
with multiple colors, I prefer the one I'm
going to show you now. Before I do any
fastening off here, I'm just going to go
ahead and cut my yarn. Now, we're going to cut the yarn about three to four inches. You'll be fine, and go ahead and pull it
through with your hook. We're going to take our
darning needle now. We're going to get that yarn
onto your darning needle. However, that works for you. This is how I fasten a color so that
you don't see the join. This is our first stitch here. We're going to go into the second stitch and imitate
this loop right here. We're going to go under the two strands of the
second single crochet. We're going to pull the
darning needle through and just lightly snug it, don't yank too hard, you're trying to
match the tension that you've already got there. Then you're going
to go back into the stitch that
yarn comes out of, as in the last
stitch you created. We're going to push our needle through and just a nice tug and you're
trying to match it, so see how this is
the stitch we just made and it matches
all the other ones. You can just let your yarn go at the back, and there you go. There is one of the best invisible
joins that you can get when you're
doing this crochet. You can see back
here with the white, this slip stitch join, which again I say it's
very common join, does leave a little
bit of a bump. That is fine where that one is. But going forward I'll mostly be using this
kind of a join, but you're welcome to use the
slip stitch joint as well. There are times when
the slip stitch join is better and we will be using that
going forward as well because when you end your
round with chain stitches, it's much easier to
use the slip stitch. You'll see when we get there. But for now, we have finished Round 2 and we're ready
to move on to Round 3.
8. Round 3 Right Hand: Onto round 3 we go and we
are now going to be using color C which in my
case is the red. Picking up our work, we're going to join color
C with a slip stitch in any single crochet
of our previous rounds. Again you can join it
anywhere you want, and I once again will rotate a little bit
further past where I fastened off just so my ends aren't all
hanging in the same spot. Here we go. We're going
to wrap the yarn around, joining by pulling the
yarn up into a loop. With a slip stitch it says join your color C in any single
crochet of previous round, then we will chain three which will count as our
first double crochet. Again, yarn over, pull through. That's one chain, two
chains, and three chains. Now we hit our square bracket which we know that when
we find a square bracket, it means there's a bunch
of stuff in there that's going to be done a
multiple number of times. We're going to go ahead and
it says double crochet. If it doesn't say
in same stitch, it's usually in the next
stitch because it would be very wordy to have to say
double crochet next stitch, half double crochet next stitch, you get tired of the
words in next stitch. So they're left out. The only time you will see it specified as if it has to
be in the same stitch, it will say that. Again, we're going
to double crochet. Again, I'm going to show you
how to work over this yarn. I try to do this as much as possible but I've been ignoring that because you have a lot of other information
going in right now, but you'll get the
hang of it after a while and you may not have
to to darn in any ends. Double crochet into next stitch. Wrap the yarn around
three loops on hook, pull through two, and pull through two, then we want to do
1/2 double crochet which we have not done yet. Half double crochet, yarn over, insert into next stitch keeping that cut end
over top of the hook. You're going to pull up a loop; three loops on hook, and remember 1/2
double crochet is yarn over and pull through
all three loops. Push up with your hook
hand against the hook, so it can pull through
all three and use the opposite hand to help
maneuver that hook through. There is your 1/2
double crochet. Then we're going to
do a single crochet, so simply putting it
into the next stitch, yarn over, pull up, yarn over, pull
through two loops. Moving on, 1/2 double crochet. Yarn over, insert
into next stitch, yarn over, pull up
three loops on hook, yarn over, pull
through all three. Then a double crochet, yarn over the hook first, insert in, yarn over
three loops on hook, and now double crochet
is pulled through two and pull through two. Now we're going to do a round
bracket which usually means everything in that
is going to be done within a certain place, so it says double
crochet chain three, double crochet into next stitch. We're going to go
ahead. Double crochet into that next stitch, chain three, and then double crochet again
into that same stitch. Now this is going to
create your corner. What we're doing is
squaring off this piece, so you can get this
flat. You can see it. We've been working
in the round but now we're going to
get the square part; so see here, same thing. We've worked across
this first slide and created this
corner over here, and now we're going to
continue to work around and square off that circle. We're going to go back
and read the end of our square bracket which means that's the grouping
that we'll be repeating and it
says three times. We did it once. It's going to be three times total including
the one we just did. We're going to go back and double crochet in
the next stitch. Remember if it doesn't say
anything it's the next stitch. Half double crochet,
single crochet. You're getting a good variety
of stitches on this round. Half double crochet,
double crochet. Make sure you give yourself enough extra yarn
there so you're not creating too much tension. If you're pulling really
tightly from the ball, if you're really
having to yark on it, it's going to affect the
tension of the square. Now we do the double
crochet chain 3, double crochet chain 3, double crochet, and
we've done it twice now, so you want to do one more time. Back to the beginning of the square bracket:
double crochet, 1/2 double crochet,
single crochet, 1/2 double crochet,
double crochet, and then double
crochet chain three; here we go, and double crochet. We've done it three times: 1, 2, and 3. Then we can move on, so then it says two
double crochet, 1/2 double crochet, so we're doing the same thing. Single crochet, 1/2
double crochet, double crochet, and double crochet into
same stitch is joined. See the stitch right
here is where we joined, we need to do a
double crochet back into that same stitch. Chain 3, and then it says slip stitch to third chain of starting chain: 1, 2, and 3. This is the case in which I do use a slip stitch to join, it just works better
when you're ending with chain stitches instead
of an actual stitch. Again, we're going to go into the third chain of our
beginning changes; push that through,
wrap the yarn around, pull it through, and pull it through the loop on the hook. We're going to snip this
about 2-3 inches [NOISE]; probably more like four inches there, and pull it through. We have finished [MUSIC] round 3 and we have squared
off our circle. [MUSIC]
9. Round 4 Right Hand: Now we're ready for round four. With round four, we're going to use
this nice beige color. This is color D, almost a brownie beige. We're going to just do simple single crochets
around our square. We need to join color D
with a slip stitch in any chain three corner
space of previous rounds. I'm not going to join it
in the same one that I fastened and opened because
I like to move around. Move one more corner over, insert your hook into
that chain three space. Draw up your yarn
with a slip stitch. Chain one, yarn over, pull yarn through chain one, single crochet in same chain
three space as joined. Let's do a single crochet in there as well and
I'm just hooking my cut end over top of
my hook to lock it in. Then we go square bracket, single crochet in each of
the next seven stitches. We're going to do a
single crochet in each of the next seven stitches. One, two, three. I'm working over top of that
into the stitch but keep the cut end over top and it works the cut end
right into your work. Losing track here, that's
where we started and then one, two, three, four, five, six, as you get closer to
it flies up at seven. There is the seven stitches. Then in round brackets we have
single crochet chain three, single crochet into
next chain three space. Again, our corner
is single crochet, chain three, and single crochet. Don't worry as we if you've been working in the ends and
they pop to the front, you can just pop them back to the back when we're
all done this. We have finished the
first square bracket and we need to do
it three times. That's our first time. Now we're going to go across seven single crochet
for our second time. That's four, five, myself, a little leeway
here, six and seven. Then I want to single
crochet chain, three. My yarn's creeping
back in there. I have all my balls in a yarn up there and they're wrapping
around each other so if you get one of those yarn holders that
you can just work with one ball at a time
that's always nice. One, two, three chains in a single crochet into
the corner space. We've done it twice now. You're going to go one more time single crochet seven across. I also don't like pulling
out too much yarn at once because it can actually
tangle in itself. There's different ways to keep your yarn loose and not tangled. But it's different for everyone, have to work it out
the way you like. If you're like me and
you have a cat and the horse chances are if
you pull it too much yarn, the cat will steal the
ball and run away with it which really makes
it hard to crochet. Our corners, single
crochet chain three , and single crochet. We now have done one, two, and three. What's next on our instructions? End of square bracket, then single crochet in
each of the next seven. Where we joined here, you're going to be working into that third chain just
like you joined it. Work it just like you joined it where you
go in the center of that third chain and that's
your first single crochet. Then continue on. The nice thing with crochet
is you can fudge a little. It's not like knitting
where you can see every stitch and if it
doesn't line up perfect, then you're in trouble
within reason. But you can fudge a
little bit with it because you only ever have
one stitch at a time. As long as you're
pretty consistently going into the fabric, you're not really
going to notice if you've missed a strand or went into the wrong place on a stitch for the most part. Then we have our seventh
one here and then we do single crochet chain three in
the same chain three space, so really it's the
single crochet in the same chain three
space then chain three. Then you're going to
slip stitch because I'm ending with chains
I am going to slip stitch again into that
first single crochet. Wrap the yarn around
pull it through the single crochet and pull it to the loop on the hook
and now you have joined. We're going to cut the yarn
again with four inches or so, pulling it through
to fasten off. There you have round four and we're ready to
complete our last round.
10. Round 5 Right Hand: We've made it to round number 5. Round number 5 we join color E. Color E for
me is this nice green. We're going to be working double crochets
this time around. Join color E with
a slip stitch in any chain 3 corner space
of previous rounds. Again, I don't want
to do it in the same one that I just did. I'm going to move
up to this one. We join by wrapping
the yarn around the hook and pulling up a loop. That's how slip stitch. We start with a chain 3, which counts as our double
crochet, so chain 3. Now square bracket, double crochet in each
of next nine stitches. We'll go ahead and do that. Wrapping the yarn around, away we go into the next line. If we can keep that end over top of our hook
just to lock it in place and maybe work it over. It's so much easier
to work your yarn in, especially when you've got consistent stitches
like single crochets or double crochet a
whole row of them, then you're not having
to hide it anywhere. It's a little harder if
you've got chain stitches and open work that end doesn't
necessarily hide very well. But in this case,
it's perfect for it. When this happens and your
hook slide out of everything, you can try to just put
it back in like this. Worst case, you just pull the stitch out until
you end up with one stitch and then you
go back from there. Always count your stitches so that it's so easy to
think that you did the right number when
you come up short or you actually got an extra
one in there somehow, and that really affects
when you're trying to make the square work with others squares and they're
not the same size. This should be nine. Now counting our chain 3, we have 1, 2, 3, 4, 5, 6,7,8,9, so nine stitches. Then we have our little
round bracket here, which is two double crochet, chain 3, two double crochet
into next chain 3 space, which is right here. You won't realize how many
little kitty hairs you have until you try to do
this on a white background. [LAUGHTER] We go
two double crochet, chain 3, two double crochet. That is our corner. You can see here that's
the first square bracket. We want to do this three times. I'm going to give myself
a little extra yarn here. Because these balls are
rolling all over my desk. Crocheting at a
desk isn't my norm. Crocheting on my lap just about anywhere is more normal for
me than crocheting at a desk. Since crochet is
supposed to be my relax, I don't do it at a desk, and if I do it at a desk, I'm usually doing it
in my lap as well. That is why I love crochet because it can be done anywhere. We're coming up on
the ninth one here. I like to double-check. Yes. It should work out to
the end but double-check just in case, 1,2,3,4,5,6,7,8,9. Now two double crochet, chain 3, two double crochet. Now we're ready to do
nine more double crochet, 1, 2, 3, 4, 5, 6, 7, 8, and 9. Then we need to do
another corner which is two double crochet, chain three, two double crochet. We've hit the end of
our square bracket. Then we want to double
crochet in each next nine. So really the same thing as we were doing, 1, 2, 3,
4, 5, 6, 7, 8, and 9. Now we want to
finish it off with two double crochet chain 3
and a single double crochet. Two double crochet, chain 1,2,3, and
a single crochet. My yarn is really
coming at me here. In the same chain 3
space as our join. You came up to it, you knew that was where you're
probably going to work. Again, I say here,
slip stitch into third chain as starting
chain 3 you could. But because I'm going now
from a regular stitch, not chain stitches, I'm going to do the
other type of join here. We're going to cut the yarn
about three to four inches, pull it through, and see how we have this gap here because we didn't do the slip stitch. And now I'm going to
show you how to do that invisible join again, put the yarn onto
your darning needle. See here we have
the three chain, you don't want to go
into that you want to go into the next one.. Go underneath the two
strands of the next stitch, pull the yarn
through just gently, then go back to where
you came out of. Insert it in, and just tag it lightly and see how it
imitates the stitches. You can't really tell
where the end is. That completes round number 5. You can see on the back here, the reason I started
in different places is because now I have
ends to darn in, in different sections
of the square. So they're not all in one line and create a bulk in one
section of my square. They are dispersed around. It'll balance out nice and even. There is your completed square. [MUSIC]
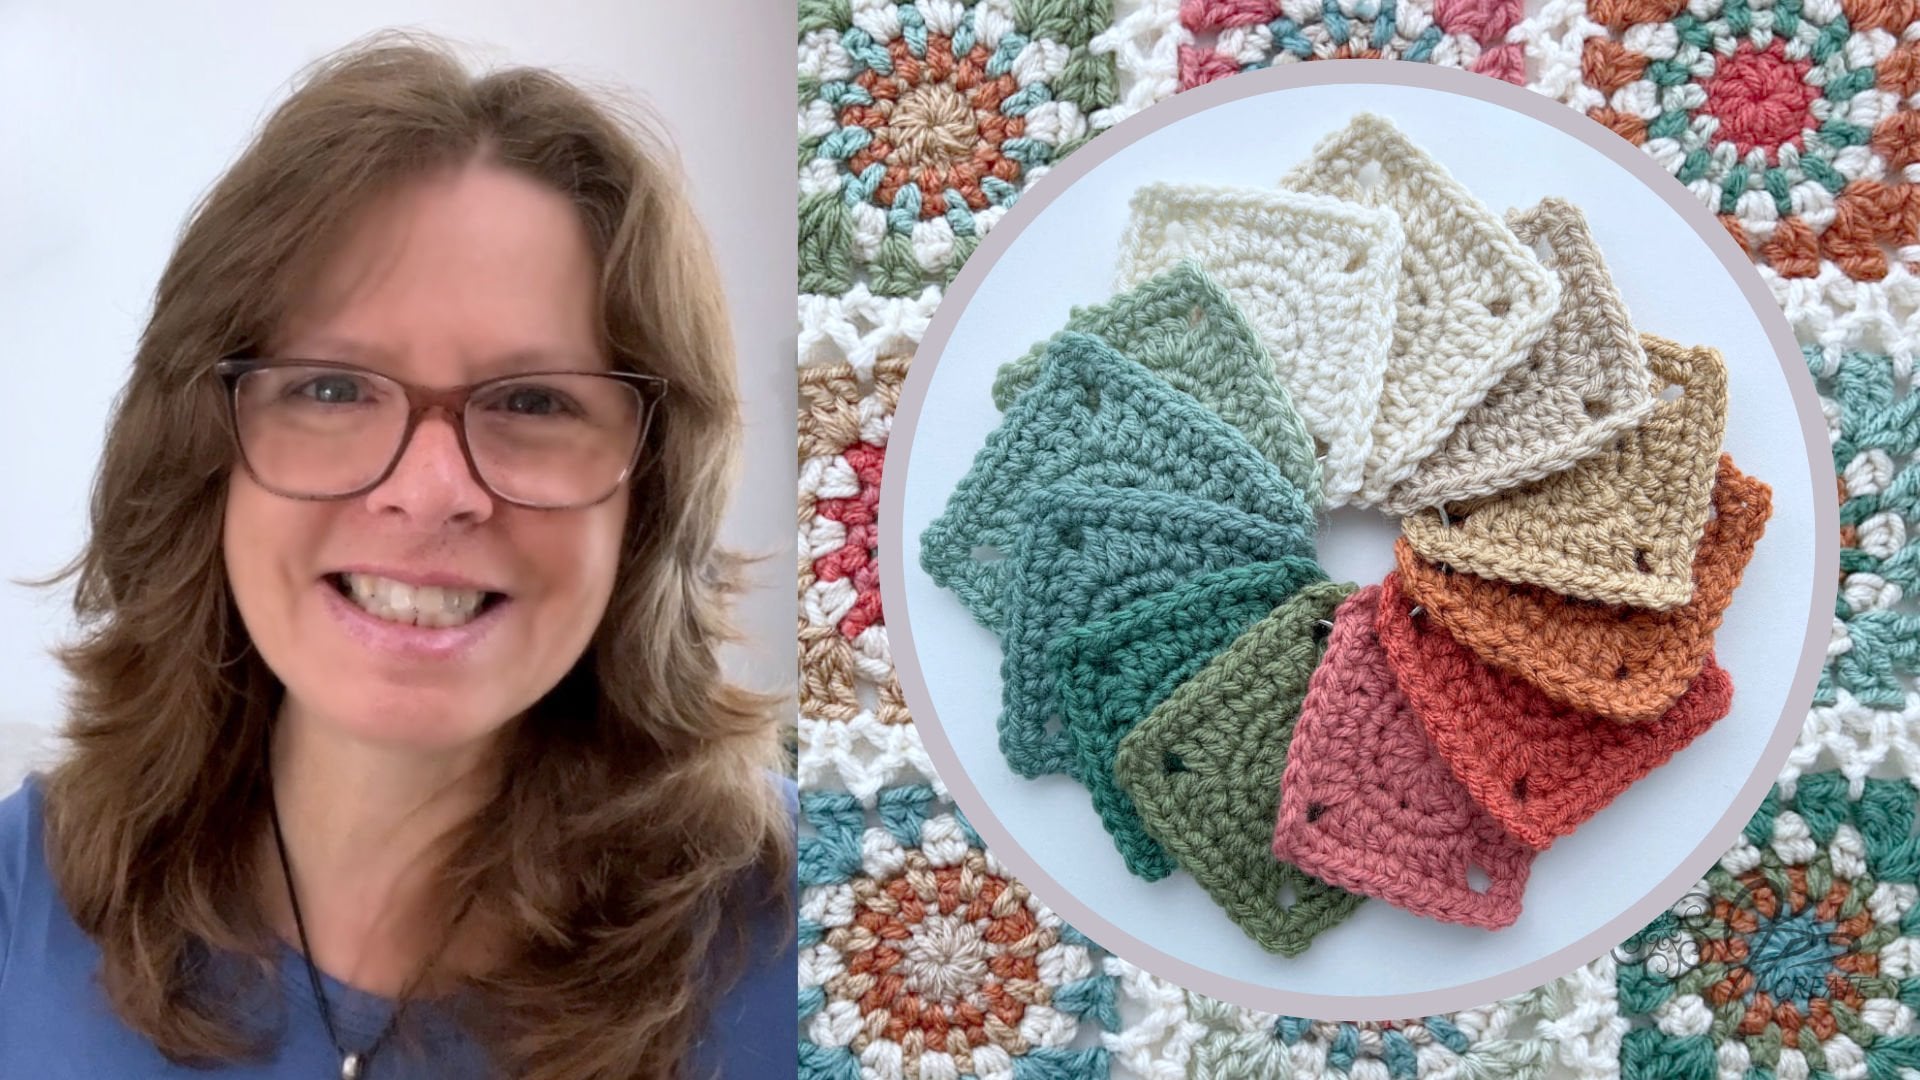
11. Colour Combos - Right Hand: Now we're ready to create more squares in different
color combinations. Now that you've completed
your first square, you are ready to make the rest of the
squares for the scarf. This one is square 1, and we're going to use the
exact same square pattern but we're going to
mix up the colors. I have five square
color combinations that make up this scarf and each
square is approximately, if I pull up my ruler there, it's approximate five
inches by five inches. I'll show you later when we're putting the
squares together how to figure out
how long you want your scarf to be and how
many squares to use. But for the scarf that I made, I did four of each square
for a total of 20 squares. Square 1, we've
already discussed the color combination
and each one keeps the colors
in the same order, it just changes up what
round they're being used in. Square 1, we've already done. Square number 2 is going
to have blue for round 1, red for round 2, beige for round 3, green for round 4, and the putty color
will be in round 5. That's square number 2. Square number 3 will
have red for round 1, beige for round 2, green for round 3, putty for round 4, and blue for round 5. That's square number three. Square number 4 is going to
have the beige for round 1, green for round 2, putty for round 3, blue for round 4, and the red for around 5. That's square number 4. Our fifth square will
have green for round 1, putty for round 2, blue for round 3, red for round 4, and the beige for round 5. That gives you five
different squares using the exact same square pattern but because you're
mixing up the colors, it gives your scarf a
nice multi-variety look. You're going to go ahead, you're going to make four
of each of these squares. I'll see you in the next lesson where we'll talk about
darning in ends. [MUSIC]
12. Darning The Ends - Right Hand: Now we're ready to
darn in our ends. Once you've completed
your square, you can darn in your
ends right away, or you can wait
till you completed all of your squares and then just sit down and do one big darning
in the ends best. Because I like to
work my ends in, I don't have as many and
I can even go as far as getting them all worked in
and not have to darn them in. But often I forget as I'm crocheting through and I'll
leave the ends hanging, so that's fine, it gives
me something to do after the completion
of the square. You can see here in
this particular square, I didn't work in
any of the ends, so there's two of each
color hanging, and again, I like to start in
different places, so they're dispersed
around the square. If I started in the
same place each time, they would all be lined up and darning them
in would create a little bit of bulk on the back of the square in that
particular spot. I like to move around, that's why I do that, so my ends are all dispersed. We need our darning
needle, and again, it's the one with
the big eye and I don't really like a
pointy end myself, but you can use one
with a pointy end. I tend to hit my fingers
and it can hurt. You can start anywhere, you can pick any of them. The only one that
I do a little bit different is this one
in the very center, so I'll actually
start with that one. We get our yarn onto our needle in whatever fashion that
works best for you. This one in the center, which is usually the only one, I can't darn it even though
I've worked over it, to do that foundation ring. What I want to do
here is continue around and then I can really
cinch up that square. You just go in underneath
these stitches, so you're going
into the middle of the stitches so that you can't
see it on the front side. You're going right into the
center of the stitches. I do a few stitches at a time and just give
it a little tug, not a tight tug, you don't want any puckering, and then just keep on going, and you can darn this in until you feel
confident with it. But I usually go like
a boat and into two, two is a lot, but at least
an inch in one direction. I've probably gone all the way around because I'm back to where the yarn started and stopped. Amazingly, it's much more
secure than you think it is because I have done
simple darn ends, cut them, and then decided
to change something and really had a hard time
pulling the stuff apart. But if you want to
be more secure, you can turn around and work in the opposite direction for another inch or an
inch is plenty really. But you don't want to tug
too tight because again, you don't want a
little clump there. So just didn't leave, the
trick with darning in ends is not to pull too
tight but to be secure. I think that is plenty, that end will not come out and then you trim it as close to
the fabric as you can get, but be very careful not to
cut any of your stitches. You just want to trim it, and it doesn't have
to be flat against it because if you leave just a little bit of a knob up there, [NOISE] and then you give
it a nice little tug, over time it will
work itself in. If you cut it flat
against the fabric, it might actually
work its way to the front and it does that sometimes that's okay,
you just tuck them in. The joy of handmade
items is you're going to see those ends flop out
every now and again, but as long as you've
darn them in securely, it's not going to be a problem. Again, we're going
to take the next one and in this case it's the beige, and what I do is I try to work in where it's
not going to show. Even though I'm going
under the green here, that's also the top
of the beige section, so it's going to blend in. You want your ends to blend in, and if I were to go up here and start
working at over here, you'd see it from
both back and front, and you really don't
want it to happen. Again, just a few
more stitches around, just gently tugging it in. I use my thumb to make
sure I'm not puckering, and then if it makes
you feel better, you can turn it around. Don't go right in
where you came out, it'll just undo
what you've done, go over one strand and then work your way
back a few stitches. Now you've reversed it, and reversing it, even just that small amount
secures it in place, and when I cut it, I don't cut it right flat
against the surface. You'll see that little end,
but it works its way in. There we have the
beige all darned in and then we can
work on the next. Now some people like to knot their ends and I do get
people asking that question. I don't like knotting my ends in general because if I were
to knot these two ends, it would create a knot
on the back of my work and often those knots will work their way to the
front of the work. If you knot it and
then cut it off short, if for any reason that
knot will come undarn, which it can, then
you have nothing to secure your darned in ends and your work will start
to fall apart. The only time I do knot my ends is if I really
don't have anywhere to darn them in or in a section
that's actually going to be folded over like edgings and
the knot will be hidden. But again, there are times
when you want to knot it, but even if I knotted it, I would use probably about an inch or more of
the yarn to darn it in as well because I wouldn't want that
knot to come undone. Again, let's go up to an
area that has a space. Here you can see
there's a nice big gap. We are on the wrong side. This is the right side, it is where you don't
really want things to show. Being a scarf, you really
are going to see both sides, so we just try to be as neat as possible because once you get the work finished and you're wrapping
it around your neck, you might not even notice what's right side and wrong side. But if you have a section
here that has a space, and let's say we're
going to go back in this direction, again, you don't go in where you came out or you'll undo the stitch, you go over this strand so
you're locking in place. We'll go up to the corner, we'll just give a little
pull but not too tight. Then I'm going to go around the corner and back
down the other side, so go under a few
stitches at a time. Then just allow that to
lie next to the same color and it really isn't
going to show or do anything that's
going to fall apart, and I'll go a few more stitches. Now when I'm working
over my ends, I only work them
in one direction, that's why when I
work over them, I work as far as I can with it and then you
could just cut it. I'm going to go a
little bit further. I'm not going to
reverse this one, because if you work the
end in long enough, so we started here, I worked it all the
way round corner here, so that's about three
inches I've worked in at least maybe four and
then just trim it. Now you don't want to trim it, see how he stopped a little
bit before the space. I wouldn't want to come
into the space and then trim it because it
definitely will show, so you want to do your
best to leave the ends in an area that's well
packed in with stitches, and it'll just hide
itself in there. Again, you can continue around and always try to darn your ends in to the same color that they are so that
you're camouflaging them. Remember, we never go back
in where the yarn comes out, you want to go over
at least one piece of yarn and then you
just go around. Again, like I said, two inches is good and
then you can reverse for few stitches or you can
go another three inches, whatever makes you
feel comfortable. But I have found in the past, I do overkill, and then when I
actually think that I'm going to rip that square
and do something different, I can't find the ends. That's how secure that they
actually get in there. [NOISE] You can
continue like that. I want to show you
one here that I did actually work some
of the ends in. See here. For the most part, this one I worked
all the ends in. You see how you have little
ends like this hanging, this is where the end
again I began to work in. They're all worked in, again here, and what I would do here is I would just
neaten that up on the back, just trimming off that
little frayed part because they do tend to fray because they've been stuck
out for a little while, while I've been
playing around with the square and cut
a little bit there. Then I darn the
rest of these in, and you'll see that one seems
like it doesn't really fit. I'm going to leave it
there because it will work its way into the fabric. Again, at this point, nothing has worked to the front, but I do have garments that will work
their way to the front, and you just take your
little darning needle and poke it back or your crochet hook and
you just pull it back, and if it really bothers you, you can tuck it in
somewhere else back there. [NOISE] But they're
going to show that's just the nature of a
hand-crafted item. There you go. You have darned in, you've got your
squares to darn in, and the next one we're
going to do is learn how to join all our squares, sewing them together. [MUSIC]
13. Sewing Together - Right Hand: Now we're ready to sew
our squares together. On the pattern, I do show you how I laid out the squares, but the best way to do it is to lay them out yourself
and see what you like next to each other and then follow that however you like it. Sewing the squares together, I always use one of the colors
of either of the squares. In this case, I
sewed it up using a white and then here I sewed up these two
using the green, so that you're sewing blends right in, you
can't even see it. But in this case, I'm going to use a
contrast color so that you can see
exactly what I'm doing. If I use the same color,
it would blend in, you couldn't probably be able to see where the
stitches are lying. Take two of your squares
that you want to join together and we're going to
align them side-by-side. Because we counted our stitches, every side is going to have
the equal number of stitches. Therefore, they will line up. So these two chain three spaces and these two chain
three spaces will line up and there'll
be the same number of stitches in-between each one. You can pin your squares
together if you want. When it's this obvious, I usually just stitch
them up by sight. If it was a more
complicated edging, I would probably pin
them to make sure that I wouldn't be off by the
time I get up to here, it'd be so frustrating and then you'd have to rip it
all back out again. But we're just
going to go slowly here and I'm going to
show you how I do this. I darn the yarn onto my darning needle and
I'm going to come up from the bottom through one of the squares corners in whichever direction
you prefer to sew, there is no right
or wrong here as to which direction you go. Right to left or left to right, whatever feels best for
you and pull it up. We'll leave a four inch tail. Then you're going to
go back and down into the opposite corner and then you're going
to come back up again where you just came up. We're going to pull that through and we're
not going to pull it too tight because we will
end up pulling our tail, so hold on to that tail and
we're going to pull this. The way I'm going to lock
it in place is I'm going to go underneath the
strand that comes between the two and
that's going to lock my yarn in place so that the tail doesn't keep
disappearing on me. Holding everything down
including the tail, give it a gentle tug, so it's almost like you're
tying a little knot there. But it's really
not going to show. But it keeps your tail,
because, as you saw, your tail just will keep coming out with you and
really frustrate you. That's how we secure our first stitch and we did
it in the chain three spaces. Next up we go to the next stitch on the opposite side
that we came up from. We go into this next stitch here and see how
it's a loopy stitch. Go under both strands
and then come across and go under
both strands of the other square
and then pull it through and I have a
nice long piece here. You're probably looking at, the way I gauge is you go three times minimum the length
that you want to sew, so I just cut myself in a
strand, I had one here. You're going to pull
gently and it's good to hold down the two pieces
and just pull gently. You want it to match the tension of the stitches
that are on the squares. Now you're going to up under
the next two loops and come across under the next two
loops of each of the sides, and again, pull it through. This is a whip stitch. Again, just gently tug it
so it matches the tension. You want it to be enough that's going to hold them together, but not so tight that you're going to pucker them
and it's going to be rigid. You have to remember that
this is a garment and you want it to remain soft and
supple when you're wearing it. If you end up pulling
your seams really tight, you're going to feel
that in the scarf. You're going to have this nice soft square and then
you're going to feel this ridge and that's
going to be where your seam is and you
don't want that. Again, we're going to
keep moving up under two strands and under
the next two strands, pull your yarn through. Just then gently tuck it up. So see how you can
see the stitches because I have a
contrasting yarn. You wouldn't see those if it
was in one of these colors. It's a beautiful stitch
that blends right in with the work that you have. Just keep on moving
up to more loops, into more loops and you're
going to work your way up to the top and see we're right on track because our
top is matching. If for any reason they don't, then you've gone off
with your stitches and you've missed one or
gone into one twice. That is very easy to do. Just keep working your way up. I always recommend doing the seeming in a color that
matches your work. Some people think this
is a beautiful contrast seem to work on. But what I would do
is do the seam in the same color as the square
and then embroider something like this after because it's
not always this even and it really enunciates how
uneven sometimes it can be. You would prefer to embroidered
the way you want it. I always work in
the same color yarn as one of my squares. We're almost to the top. Keep on working your way up. There we go, almost there. These are great to
work on your lap. I don't usually do
this on a desk. Nice small pieces you
can sew together. Keep going until
you hit that space. It looks to me like that's
probably the last stitch. The next one will be into the corner space
and then across to the other corner space then you always want
to end at the back, so go back down corner space. Then if you want
to lock this one into holding that yarn, so this doesn't
loop up too much, come back, just bring your needle back to the
front over the top. Go under that last stitch
and give it a poll and now you've got
a little bit of a knot there that
holds it in place. There's your whip stitch seam
that joins the two squares. Again, you're going
to use a yarn that matches and you will do that all along and you end up with something that looks
a little more like this. This is my completed
scarf and see how they're all whip
stitched together. You can't really see the scenes. When I'm sewing my
squares together what I usually do is I figure out the order that I'm going
to solve them together in, and then I literally pile
them backwards in order. Say, I wanted these three
to be done together, I would place this on the
bottom then this one, then this one and
as I pull them off, I stitched them to the
one that's in the pile. Then these two would be stitched together and I would
stitch into this one, and that way I
don't have to keep looking as to what
square is next. I already have them
piled in reverse. That's the easiest way to do it. Good luck with
sewing your squares together and I'll meet you back here to start
working on our ending. [MUSIC]
14. Edging Rnd 1.1 Right Hand: Moving on to the edging, we now have all of our
squares sewing together. Again, I have 20 squares. That's what I've written
the pattern for. But the nice thing about
these edging instructions is they will work with however
many squares you're using. If you find 20 squares to be
too long of a scarf for you, you can cut that back a little and the edging will still work. What we want to
do is with all of this scarf that's
all joined together, we want to pull out
one of the ends, it doesn't matter which end, and lie it in front of you. Now the edging I go up half a size or I guess it's
a full-size of hook really. For the main square I use
a five millimeter hook but for the edging because
I like my edgings to be soft and cuddly and airy, I go up a size in my hook. Now this stitch that I'm using actually does require
me to go up a size as well because otherwise
it would be very peccary and pulley on my scarf. Just so that you know, whatever size of
hook you ended up using for your scarf
if you felt that your squares weren't coming
out right and you change the hook size just
go a size of hook. Again, I use the five
millimeter to make the squares and I'm using a 5.5 Millimeter
which is also a US 9. I'm going up from a US 8
to a US 9 to do my edging. Again, my edging, you can get creative and use any of the colors
you want in the edging. But my first row I'm going
to start with my color A. That is my off-white color. The instructions say place
scarf right side facing, so this is your right side
and this is your wrong side. You want the right
side facing you, short edge at top and
long edges of the side. We're going to join color
A with a slip stitch in the top chain three
corner of the end square. For your right-handed
version you want the top right corner and for the left-hand version you want the top left handed corner. We're going to be working
across your short edge first. You want the corner
that you're going to be working across the shortage. We're going to take a color A and we're going to pull up a slip stitch
in that corner. Working across short end
of scarf, chain one, single crochet in same
chain three space as your joints so single
crochet then we hit a star. We haven't done any of
these star repeats yet. Stars are usually a
repetition that's going to be quite a bit of stuff
repeating to an endpoint. Ignore the star for the moment and we're
going in round brackets, we're going to chain
one, skip next stitch. Working into these edge stitches
here, skip this stitch, single crochet in next stitch and we want to do what's in the round bracket
six times total. That was our first one. Skipping the next stitch, single crochet, that's
our second one. Chain ones skip next stitch, single crochet and
next that's three. Going across until we've
done it six times total. That's five and
this will be six. Then we want to chain one, skip next stitch and then in round brackets
single crochet chain three single crochet into next chain three space
which is right here. Single crochet, chain,
three, single crochet. Now you want to turn your
scarves so you'll be working down the long edge.
15. Edging Rnd 1.2 Right Hand: Now you want to turn your scarf, so you'll be working
down the long edge. This is a really long edge. I'll get you started on it, and then I'll meet you
in the far corner. Let's get started
on this long edge. In round brackets chain 1, skip next stitch, single crochet next and we want to do
that a total of six times. We do that across the top
and here we are again. We're doing it a
total of six times. Hold your scarf, however, it's most comfortable for you because you've got a
lot of weight probably sitting in your lap as
you're working along this little part
of the long edge. You want six, this is my sixth one here
and let's just count them. We'll pass the corner here, chain 1, skip a stitch,
single crochet. So that's 1, 2,3, 4, 5, and 6. I'm just counting the
single crochets because that's part of what's in
those round brackets. We ended with a single crochet. So that's six times, chain 1, skip next stitch. Now here's a double star, but just ignore it for now. It's going to be
used later on as a reference point to
come back down like in coda if you do music, like repeat from coda, it's going to be that
kind of concept. Single crochet in next chain-3 space,
which is right here. Chain 1, single crochet
in next chain 3-space. Then we're going to continue on chain 1 and we're in
round brackets again, so chain 1, skip next
stitch, single crochet next. Anyone will do that, six times. Keep on moving across, sometimes it's good to have little marker following on your patterns so that you
know exactly where you are. When you get into these
hefty instructions it's easy to forget
where you are, so that should be six but
let's go back and count. Is with a chain-3 space. Then we did 1, 2, 3, 4, 5, 6. I get talking, I lose track. Now we want to chain 1, skip next stitch,
single crochet. Nope, see I've lost track. I did the six and then I
chain 1 and skip next stitch. Then repeat from double star. We're going to go back to
the double star and it says single crochet in
next chain-3 space. Chain 1, single crochet in next, chain-3 space and then you've
got your round brackets. Chain 1, skip next stitch, single crochet, is chain 1, skip next stitch,
single crochet. I'm going to show you what
happens when we finish this part so that you'll understand these
star or repeats. We want to do six of
these working our way down this long
side of our scarf. That's the sixth
one right there. Then we chain 1, skip next stitch, repeat
from double star. You're going to
continue to repeat from the double star down the long edge of your scarf to the last chain-3
space corner, which is at the far
end of your scarf. This is what we've done so
far and you're going to continue to do that
repeat all the way down. Each of the squares really
has the same repeat and I'll meet you at the far
corner of this long edge.
16. Edging Rnd 1.3 Right Hand: Now we've worked all the way
down our long edge and we are at the opposite chain
three-space corner. Here's a work down long edge of scarf to the last chain
three-space corner, which this one right here. Now there's a triple star there, again, ignore that
for the moment. We don't need it. We
will come back to that. You want a single
crochet, chain three, single crochet, in the
corner chain three-space. Single crochet, chain
three and single crochet. Turn the piece of work to work across the short
end of the scarf, which is what we're doing now. Repeat from single
star to triple star. You're going to go all
the way back and look for that first single star
and then you're going to work all the way
through it again until you hit the triple star. Then you'll come back to
this place in the pattern. Let's go back and start that up. Single star takes us back to
round brackets, chain one, skip next stitch,
single crochet, and next and we do
that six times. This is just like working across the short edge
at the very beginning. That's really exactly the same thing that
we're doing here. We will do six of these. This is our sixth one. Then we chain one, skip next stitch
and single crochet, chain three, single crochet
into that chain three-space. We do our single crochet. Then you're going to
turn the scarf so you're working down the
long edge again. We turn it and we see what we're doing here and we're going
to do the round bracket, chain one, skip next stitch, single crochet next six times. You're going to do that just as we did the first time around. Follow through the
pattern just like we did before until you end up at the three stars and I'll
meet you there. Here we are. We've worked down the
last second long edge, and we've ended up again at the final chain three-space
at the end of the scarf. Instructions had said to work from the single star
to the triple star, which would bring us down
to this last corner again. Then this is how we finish it
off, following the pattern. Then single crochet
in same stitch as beginning join, so
single crochet, chain three, 2, and 3, and slip stitch in the first
single crochet of the round. Slip stitch comes
through both the loop and the one on the
hook and fasten off. We're just going to cut
it three or four inches, pull it through and
it has fastened off and we have
finished Round 1.
17. Edging Rnd 2.1 Right Hand: Now, we're moving on to Round 2. Once you have Round 2 in place, that will be the
same as Round 3, 4, and 5 just
switching the colors. This Round 2. Round 1, set our edging in place. Round 2 will be easier and
I'm going to use my color B, which is my blue, and continuing on with
the 5.5-millimeter hook. You can see your edging, has a little bit of
area space to it and that'll be nice as
you keep adding the rows, you're going to get a nice
lighter feel to the edging, and a nice more solid coziness to the center of the scarf
where the squares are. In Round 2, it says to join color B, with a slip stitch in any of the chain 3-space
corners of the previous round. It doesn't matter which
one you join it in. I'm not going to join
it in the one that I finished off on because
that's the way I do things. I'm just going to
go with this one, and I'm going to
join it in this one, so it doesn't matter
which one you join in. We've put our hook into
the chain 3-space, we draw up a loop, so joining with a slip stitch. Again, we're using color B. Then you want to chain 1 and single crochet
in same space. Now we have the square brackets, and in the square brackets
we have also a star. Just take note of those, but we don't need them yet. Chain 1, single crochet
in next chain 1 space, which is right here, single crochet into
that chain 1 space. Repeat from star to
next chain 3-space, corner. Again, simple. You just chain 1, single crochet in
next chain 1 space, and you repeat that
chain 1 single crochet and next chain, 1 space, chain 1 single crochet and
next chain 1 space and so on, all the way down
your long edge until you get to your next
chain 3-space corner. I'm just going to
continue on there, and have you continue
along there, and I will meet you at the
next chain 3 space corner, which is at the opposite
end of your scarf.
18. Edging Rnd 2.2 Right Hand: Here we've reached the corner, the far end of our scarf, so we repeat from star to next Chain 3 space
corner, which we have done. Then we are going
to proceed to Chain 1 in round brackets,
single crochet, Chain 3, and single crochet
all into that Chain 3 space. Now we've hit the end of our
square bracket after all that and it says to do whatever is in the square bracket
three times total. Basically, you're working
up the three sides. We've done it the first time. I'll walk you through
the second time because it's a short one. We go back to the
square bracket and we Chain 1 single crochet
in next Chain 1 space. We repeat that to the
next Chain 3 corner so we Chain 1 single
crochet in next space. Chain 1 single crochet
next space and just keep repeating that across
this top short edge, which counts as one of
our square bracket times. There is our Chain 3 space. Make sure we're
doing this right. Chain 1 single crochet, next Chain 1 space repeat from star to next Chain 3 corner. Chain 1, single crochet, Chain 3 single crochet
into that corner. Single crochet again
into that corner. That's the second time through the square brackets and we have one more time through
the square brackets, which is going to
take us all the way down the next long side. Continue on on your last time through your square
brackets and I'll meet you at the Chain 3 space corner at the far end of the scarf.
19. Edging Rnd 2.3 Right Hand: Here we are finishing
up our square bracket. We repeated from the star to
next chain 3 space corner, chain 1 single crochet, chain 3 single crochet
into next chain 3 space, and that's the end of our
square bracket repeat. Now we're going move on, so double star chain 1 single crochet and next chain 1
space which is over here. Then we're going to repeat
from the double star to the next chain 3
space just over here. You can start this in
any one of the corners. You might be working
on your long side now, but the way that I started it, I'm actually finishing
up on my short side. Chain 1 single crochet and
we just keep repeating that until we get to the
next chain 3 corner, which won't take us long. Then we can finish
off this round. We're almost there
chain 1 single crochet, and we are at the next corner. Finish off that single crochet. Now we chain one single crochet in same chain 3 spaces joining. We're back to where we started, single crochet chain 3. Then we slip stitch in
the first single crochet of the round slipping
through both. We cut our yarn, and we pull it through
to fasten off. Now we have finished round 2. Round 1 was in color A, round 2 is in color B. Now we continue on to round 3, which is just repeating round 2, but using color C, which is my red. Round 4, we'll again be
repeating round 2 using color D, which is the beige. Then round 5 we'll be repeating round 2 using color A again, which is the off-white. That'll be the end
of the edging. Go ahead and work on that, and I'll meet you back here
at the end of round 5. We will finish off our scarf by adding some nice
fringe to the ends.
20. Fringe - Right Hand: We're ready now to
add on some fringe. Here we have our scarf done
with all of our rounds. Our round 1 of the edging
was in the off-white putty, then round 2 we did in blue, and then I left you
to do round 3, 4, and 5 on your own and this
is what you end up with. Again, you can mix up those colors to
whatever you prefer, but this is the result of
the one that I worked on. When you reach the
end of your edging, you can decide whether
you want to put on extra fringe or not. I like to add on
fringe to my scarves. It gives it that
extra little touch. I'll show you here
on this end I've already added the fringe on, and you can mix up the
colors the way you want. You can do them
all in one color. Here I've made sure that I
have every color in here, and then I've added in the off-white in multiple
places as an accent. Because of the width
of this scarf, what I've decided on is a six-strand fringe which
doubles over into 12 strands, and I've decided to do
it and spacing them out, so I end up with seven
fringe knots altogether. Now, I'll discuss this at
the end about blocking, but you'll see some of my
fringes a little bit kinky. It does that if I pull it
from the center of the ball. When I'm further along
it's a little straighter, but I can block that out. We'll talk about that
at the end of this. What I want to do is make three knots of off-white
and then one of each color. To make my fringe, [NOISE] I use piece
of cardboard. You can buy things
from a craft store that specifically are
made for making fringe. I just use a piece of
cardboard or notebook. Sometimes I'll use a notebook
about this size as well. Whatever I have in the
house is what I use. You can just use a cereal box. I've just used a plain
piece of cardboard. What I've done is I've cut
it six inches in depth, and then I've actually cut
it eight inches across in case I wanted to use it
this way for longer fringe. But for my scarves I
like to do six inch, and then what I'll do is I'll wrap them around
and I'll end up with a finished six inch fringe that I can trim off evenly. So I usually guarantee
myself a five-inch fringe. We're going to take
some yarn here. I'll use the blue
this time around, easier to see on the cardboard. I cut my cardboard
again six inches, and then I put a little slit up here so that it has
somewhere to hold the yarn. I just tuck my yarn in
there, [NOISE] like that. Now I'm going to wrap it
six times so it count six. A full wrap up to here is one. I take my yarn and I
wrap it once, twice, three times, four times, five times, and six times. [NOISE] Once I have it
wrapped the six times, I'll take my scissors, tuck it under your
strands, and cut it. [NOISE] It leaves this little piece
in here which is fine. You don't need that anymore. [NOISE] I take this ball away and I should have
six strands of yarn, approximately 12 inches long. I'm going to pull my little
ruler out and we're going to say that that is
approximately 12 inches long. Depending on how tight I
pull it when I wrap it, so try to wrap it very loosely, you'll end up with
the 12 inches. [NOISE]. You might want
to go ahead and make everything that you need
and join them at the end. But I'm just going
to do another one here in off-white so I
can show you two of them. Again, I tuck the white in and I wrap it loosely
six times around, so 1, 2, 3, 4, 5, and 6. Again, I'm going to
take my scissors and go underneath and cut it. [NOISE] I can let
the ball fall away, pull away my cardboard, and I should have
six strands which are usually lined up well. If they aren't, you just pull that one out and realign it up. Pull them all straight, and again I have 12 inches, and I'm ready to go
with my off-white ones. I start in the corner
with my off-white, so that's the one I
want to start with. You fold it in half
over your finger, so it's basically lined up at the bottom here. Take your hook. You want your piece right
side facing towards you, and you're going to
go underneath it to this corner chain space. Poke your crochet hook through, and then loop your
yarn over top of the crochet hook at
the halfway point. Now, you're going to want to keep a little bit of tension on it so your strands
all stay together. Then you're going to pull
it through to the back, and leave your strands
lying to the front. Now, pull up enough of a loop that you can
pull this through. You can either use your hook, or you can take your hook off and put your fingers through. I like to use my fingers, and grab the yarn and loosely pull it through
because you don't want to upset the knots at all. Now that it's through, grab all the strands together
and gently target tight. Not super tight but just
firm. There you go. There is your first fringe. Now, the next one I want
to put on is the blue. We're going to again go in and I'm going to skip
this chain space. Again, fringe is what you want. You can put one in
every chain space, I wouldn't do six strands
every chain space because it'll get very bunch up. I like to space mine out
but make them bigger. We're going to skip
over this chain space and go into this one. Make sure I've got the
right space there. Looping the yarn over my
finger at the halfway point, trade it off to the hook, and then hold it firm on the hook and pull it
through that chain space. Make sure you get
all the strands and pull it up a little bit, keeping it firm there
so it stays together. Slip your hook off
and slip your fingers in, grab the tail. Gently pull that through, and then make sure
you grab every one of the strands
because if you don't, someone's not going
to get pulled tight, and then gently tug
it until you have it right up to the scarf itself. There you have two
of your fringes. Once you have all of your fringes attached as I've
gone ahead and done here, you're going to want to trim
them up so they trim even. See how they're all
different lengths down here. If I were to go through here, flatten them out and look for the shortest piece because
that's what you do. It looks like it's about there. If I lie this ruler across, this helps me trim them. So we're going to
make sure this is straight and this is straight, then I can just
trim them across. I'm just going to show you
that they're going to end up being about four
inches in length, and that is why
sometimes I'll use the long edge of my tassel maker and
make them eight inches. Depending on how long you want your tassels
to be or your fringe, you should accommodate for about two inches off of that because part of
it is in the knot, and part of it
you're going to trim off from them knot being even. If you want your finished
fringe to be eight inches long, which is a good length, you would need to cut your
strands 10 inches times 2, so you'd need 20 inch strands because you're
folding them in half. You always want to
take the finished, add two inches to it,
and then double it. That's the length of each
strand that you want. You fold them in half, then once they're in the knot, that takes a good
solid inch off, and then when you trim them
so that they all are even, you're probably taking
another inch off. I'm going to end up
with four-inch strand , and that's okay. That's fine with me. I don't like them
to be super long. I find sometimes the
best way to trim them is just to somewhat eyeball it, but I like to use a ruler, so I'm straight here. Then you just go along and
trim them across [NOISE] slowly because you don't
want to mess anything up. We'll get through
this first one here. A little bit of an awkward
angle formula on this desk. You want them all
to be the same. Let's just go there.
I've started there, see how much more even they are. Sometimes a really nice
quick way to do this if you're also a quilter, I like to take a
quilting grid background and a roller cutter, and I push down on my ruler and I just
cut them right across. But this method
works just as well, and you're eyeballing them
and going across slowly so that you make sure
you don't miss any. Just keep doing that across. There you go. You've
got your fringe. It's nice and even, and try to make it
the same on both ends so when the scarf hangs down, your fringe matches. [MUSIC]
21. Stitch Primer Left Hand: Before we get going on our
instructions for the square, I want to just set you
up with a little bit of a Stitch Primer and this
will just be something you can come back to if you have any trouble going along
with each of the stitches, if you want to see them slower and a little more detailed, come back to this Stitch Primer. We're going to start with the slip knot and I'm going to go over this
very slowly for you. This is how I start
all my projects, whether they're in the
round or back and forth. You're going to take the cut end of the yarn and you are going to lay it over your
non-dominant hand. If you are right-handed
crocheter, you're going to lay it
over your left hand. If you're a left-handed
crocheter you're going to lay it over
your right hand. Line the yarn over your palm. You want the cut
end towards you, and the end that comes from the ball which is
called the working end, you want that at the
top of your hand. You're going to hold that
in place with your thumb, and then you're going to
flip your hand over and wrap the yarn around your
first two fingers, just your first two fingers. You're going to bring it
back across the bottom, and you're going to cross
over towards your arm, and you're going to lay it
over your next three fingers, and then hold it in place
with your baby finger. The first rap is towards
the ends of your finger. The second wrap comes across and is further
down your hand. Now you're going to take your
hook in your crochet hand, and you're going to put it
underneath the first strand, and over top of
the second strand, and you're going to pull through a strand of
yarn underneath. You're going to twist the hook away from
you so you can get this strand onto the hook and then roll it
back towards you, so you've just twisted
this knot onto the hook. Then you're going to
slip your fingers out, holding on to the two
ends of the yarn, keeping the loop on the hook, and then you're going to pull it gently until it
creates this knot. Then you're going to
take the two strands and pull them away
from each other. That's the slip knot
part of this knot. You want it to go right up
to the hook but not tight. Just nice and gentle so there's still some space in there
for you to work with. That is your slip knot. The next thing we're going to
learn is the chain stitch. You want your cut end of the yarn down
towards the bottom, away where you're
not going to use it. You don't want to use
that end of the yarn. It's very easy to pick that one up and start
working and then realize that you have no
yarn left to work with, and you have to rip
out what you just did. Make sure that
your yarn is away. Sometimes I'll tuck it
under my thumb to start with, along the hook. You want the working end of the yarn that comes
out of the ball. To get some tension, I usually wrap it once
around my baby finger, and then back over the
top of my three fingers. That's how I hold my yarn. Some people just literally
lay it across their hand. Some people have it wrapped
around a few fingers. It just creates a little bit of tension on the yarn as you work. You want your index finger
and your thumb to hold the knot of the slip knot so that you can work
through this loop. We're going to go ahead
and do the chain stitch. You take your hook and you reach over and go underneath the yarn. You grab the yarn
and you're going to pull it through the
loop on the hook. Make sure that it
is hooked around that yarn and it's
coming with you. Using your finger and thumb to hold this knot open
so that you can get it through the loop and
pull it through the loop. There's your chain stitch. Now you're going
to do that again. Often, when you start
a piece of work, it asks you to do a
certain number of chains to create
your foundation. Let's do another one. We're going to
move our thumb and our index finger up to
the base of the hook. That's where I keep
them so that they are always working with
a loop on the hook. You only ever have one loop on the hook when you've
completed a stitch, unless you get into some
complicated stitches, but we won't be doing that. One loop on the hook, that's part of the
reason I love crochet. Again, you're going
to go and I tend to rotate my hands as I
work towards each other, away from each other. Towards each other to wrap the yarn around the
hook from underneath, and then you're pulling
them away from each other, and this thumb and forefinger
are helping you pull this loop and you pull
the loop through. That gives you two chains. Let's do one more. I move my finger and my thumb
up to the base of the hook, rotate my hands
towards each other, wrapping the yarn over the hook. The hook goes under the yarn, twisting it so that it gets
caught up with the hook. Then I pull the
hands away from each other to pull the chain through. I'm going to do a few more
of those so that we can move on to our single crochet. Next stitch is going to be our single crochet and I'm working them into a
foundation chain. In this case, I'm just
working them across, we're not doing
them in the round. We'll do that when we
get to the instructions. To work a single crochet, to work our first
single crochet, we always work into
the second loop on the hook, the second chain. We're going to insert our
hook into the chain loop. That strand of yarn is over your hook and it goes into
the center of the chain. Then you're going to put
your hook under the yarn and wrap the yarn over top just like we did for
the chain stitch, pulling the yarn through, see how our thumb
and our index are at the base of this stitch. Pull it through and now you
have two loops on the hook. We're in the middle
of creating a stitch. We now have two
loops on the hook. We want to do again, wrap the yarn over the hook. Make sure that you have that
yarn so you'll be rotating the hook so that the
hook part has the yarn, and you're going to
pull it through both loops on the hook. Through we go using
this thumb and finger, they are very key in letting
you pull this through. You pull it through two
loops at the same time, and that's your single crochet. Once again, we will go into the stitch into
the center of the chain. You're going to wrap
the yarn over the hook. The hook goes underneath, turns it so that you
can pull it through. See where my thumb and index finger are at the
base of the next stitch. We're creating some
space so you're pulling your hands away from each
other to create this space. You're going to pull
that through and end up with two
loops on the hook, and then you're going to wrap again and you're
going to pull it through both at the same
time so focus on one, and then the second one. Your attention for
your stitches might seem a little wonky as
you're learning this, but it will get
better with time. It's all about practice. That's our first stitch, our single crochet stitch. Now we'll do the
half double crochet. The half double crochet is wrapping the yarn
over the hook first. We're going to wrap the
yarn over the hook, and then we're going to
insert into the next stitch. We're going to pull up our loop just like we did with
the single crochet. Then we have three
loops on the hook. We're going to pull through
all three at the same time, so yarn over, and now you're going
to go through, one, two, three. You just did three loops. That's a half double crochet. Again, we're going to do
yarn over the hook first, then you're going to insert
the hook into the stitch, then wrapping the yarn
over the hook again, you're going to pull
through one loop. Now you have three
loops on the hook. You're going to wrap the yarn
over and you're going to pull through all
three of those loops. Here, your thumb and
your index finger are key on pulling the yarn down so that you have
lots of space in there. Then you pull through
all three loops. That's a half double crochet. Now we're going to move
to the double crochet. Again, you're going to wrap
the yarn over the hook, and then you're going to insert the hook into
the next stitch. Now you're going to wrap
the yarn over the hook again and pull
through one stitch. Three loops are
left on the hook. Now again, we're doing
a double crochet, so we're going to wrap the yarn around and we're only
going to pull through two. Use that thumb and index
finger to make space. We're going to pull through
the first two loops , and that is all. Now we have two loops
left on the hook. Now you're going to
wrap the yarn over, and you're going to do
the same thing, moving my thumb and index
finger up a little more. We're going to make space and pull through the last
two loops on the hook. That's a full double crochet. Again, we'll do one
more, yarn over, insert your hook
into the stitch, yarn over the hook
and pull up a loop. Moving my thumb and
index so that I can see this better and
get a good grip on it. Yarn over. Pull through the
first two loops. We have two loops
left on the hook. Moving my thumb and index
finger up again, yarn over. Pull through the last two loops. You'll notice when
I'm pulling through, the hook is facing down. It just works best for me. But when I'm wrapping,
I have the hook up. There we go. We have our
two double crochets. Let's see if you can
see this on this swaps, see how they keep
getting bigger. You can see here, the single crochets
are the first two, the half double crochets
are the next two, and the full double
crochets are the last two, and the stitches get higher. Single crochets are the lowest, half double crochets
in the middle, and the full double
crochet is higher. That's the height
of your stitches. The last stitch I want to
show you is a slip stitch, and that's usually how
we join things like the ring for the foundation
or the end of a rope. A slip stitch is pretty simple. You just take the hook into the stitch that it
asks you to go into, so in this case
I'm slipping into the first chain of the round. I'm going to wrap my yarn over. You're going to
use your thumb and your index finger to hold
those stitches in place. Once you have that yarn wrapped, I'm going to bring
it through both stitches at the same time. You're not actually
creating a stitch, you're just joining things, [MUSIC] and that is a slip stitch [MUSIC].
22. Foundation Left Hand: Let's get started on
our first square. We're going to start with
this color combination, using our colors in order. From A which is the putty, B which is the blue, C which is the red, D which is the beige, and E which is the green. This will be our first square
that we follow along with. Then later on you can change
up the colors and make these different squares that will go into
completing our scarf. We're going to get
started now on following our directions in our pattern
to make our first square. We're going to use color A, which is this off-white or
putty as it's called here. We're going to go ahead
and read the pattern. Under directions, we see
foundation with color a, make a slipknot on the hook. I'm using my 5.0
millimeter hook. We'll go over that again. It's in the primer if you
need to see it much slower. But we're going to
create a slip knot by lying the yarn
across our fingers, wrapping around our
first two fingers, bringing it up and wrapping
it around the third. Follow the primer. It goes much slower if you're
having trouble with this. We go under our first strand, over our second strand, pull it through, twist
the hook towards us, and slip your fingers out. There's your slip knot and
slip it up to the hook. With color A, we have our
slip knot on our hook. Chain four and then join with a slip stitch in
first chain to form a loop. This is going to be
our beginning ring , our foundation ring. We chain four. Holding our hook in our dominant hand and our
yarn in the opposite hand, we will wrap the
yarn over the hook. Using our hands to pull apart, slip that hook through
the loop on the hook. That's your first chain. We need three more of those. Wrap your yarn, pull it through. See how I'm working
my hands together. They rotate towards each other and then away
from each other. That's how we get
this yarn around the hook, pull it through. There's our four chain. Let's count them, 1,2,3,4. Now, we want to join with a slip stitch in the first
chain to form a loop. We go back to this first chain, we slip our hook underneath, and then we wrap the yarn
around the hook again, bringing the hook up underneath
and hooking the yarn, pull it through that loop
in the loop on the hook. Use your thumb of your
non-dominant hand to maneuver that hook
through those two loops. There we have our foundation ring that we will be working
our round one into.
23. Round 1 Left Hand: Moving on to round 1. It says in the pattern, continue with color A, so we're going to
continue with this off-white color so we don't need to cut any ends
and worry about that. We're going to start by
chaining three, so again, right from where we were, we go ahead and wrap the yarn around our hook,
pull it through, that's 1, 2, and 3, so that's chain 3, and that counts as our
first double crochet. Moving on, we're now going to do the double crochet right
into the taller stitch. We work 11 more double crochets into the center of
the chain 4-loop. Working into this
center of the loop, see if you can see that there, you want to work 11
double crochet into that. By working in double
crochet again, we do yarn around the
hook to begin with, then we insert the
hook into the ring, and then we bring it up and wrap the yarn around again
on the other side, pull it through the ring so you have three
loops on the hook, wrap the yarn around again, pull through two loops, wrap the yarn around
one more time and pull through the last
two loops on the hook. That's your double
crochet stitch. We want to work 11 of
those into this ring, so that's the first one. Again, we wrap our yarn around, give yourself a little bit of leeway here with your yarn so it doesn't create extra
tension on your hand. You want to keep this here
and nice and loose coming onto your hands so the
tension stays nice and even. We have our yarn wrapped
around our hook, we insert it into the
middle of the ring, and I am working over this end. You want the end to be lying over top of your hook as well. If you find that too confusing, you can leave it to the
back and darn it in later, but I like to work in my ends at every possible opportunity. You're going to wrap the
end around the hook, now that's on the other
side of the ring, pull through, you have
three loops on the hook, wrap the yarn around
and pull through two, wrap it around and pull
through the last two, and we'll do this a little
smoother and faster this time. Yarn over, insert into the ring, yarn over pull through
three loops on the hook, yarn over pull through two, yarn over pull through two, and that's how we do this. We want 11 of these. Again, I'm always
keeping this cut end of the yarn over
top of the hook, so it's working into
our work at the back. We want 11 of these. Moving a little faster now, you just keep working your way through and you're
always pulling away from each other with your hands when you're
pulling the hook through. This hand will pull
in one direction and the hook hand will pull
in the other direction. That is how you keep your
tension nice and even, and it also makes
it easier to pull these pieces of yarn through
the loops on the hook. We've done a couple here,
let's go back and count, so counting stitches,
very important, you never want to be off on your count because then your next round isn't
going to work out, and somewhere along the
line you'll figure it out, and then you'll just
have to rip back. That's not fun.
We're going to count the chain 3 as our
first double crochet, and then there's going to
be 11 more after that. This is our first one, then 11 more, so 1, 2, 3, 4, 5, 6, 7, and 8. You can either count the
posts or you can go up here and count the actual
chain loops stitches. Eight, I need 9 and 10, and I need a little
bit more yarn here, and one more for 11th. Now it'll feel like
you're really packing them in there and that's okay. That creates a nice
solid center for us. Now that we have the
11 plus the chain 3, it gives us a total of 12, and we want to slip stitch in third chain of starting chain 3. 1, 2, and 3, you want to slip stitch into this third chain of
your starting chain 3, so just poke your hook through, wrap your yarn around, pull it through, and pull it through the one
on the hook as well. That is how you slip
stitch to join, and then because we're working with a different
color each round, I will be cutting my
colors after each round. I cut about anywhere from 2-4 depending on
how comfortable you are. I work my ends in, so usually by working
them in as I go, I only need about two inches. But to be safe, you could go 3-4 because you can always
trim them off later. Then you're going to go
ahead and pull that yarn through the last loop there, and there you have
it fastened off. This center, you can see there's a hole in
it and that's okay, that can be part of your design. Often there's a whole when
we'd start with a chain-ring, but the trick that I do is
because I've worked over this, so I've turned over
to the wrong side. This is the right side. Turning over the wrong side, you can see this yarn, and if you put your
thumb over the hole and your index finger over
the other side and just give this yarn a little
tug while holding that in place it
cinches up the center, and you can continue
to turn this around and cinch
it up even more. If you don't want that
hole in the center, that's a good way
to close it up. Now we're ready for round 2. [MUSIC]
24. Round 2 Left Hand: Moving on to round number 2, we want color B, which in my case is this blue. Round 2 says, join color
B with a slip stitch in any double crochet
of previous round. It doesn't matter
where you join, and that's another reason
why I like fastening off my colors at the end
of each round because I like to start my rounds
in a new place so that I'm not getting all these
ends going up one line. If we take one of these squares, if I were to join in the
same place every time, I would have a bulky line of ends all in one of the corners. Every time I join a new color, I like to pick a different space on the square so
that when I'm done, my ends are dispersed
around the square. Seeing as I fastened off here, I'm just going to
rotate it maybe 45 degrees and just
start into one of these. You want your hook to go underneath the two
loops of any one of these double crochet and we're going to join
by pulling up a loop. Wrap the blue around your
hook and pull up a loop. That's how you join a new color. Following round 2 instructions, we joined with a slip stitch in any double crochet
of previous round. Chain 1, you're in over the
hook and pull it through, that's your Chain 1. Now you want to do
two single crochet in same stitch as join. Not only learning
the single crochet, we're learning how
do increasing, because as you
work in the round, you have to increase
your stitches so that your work lies flat
and doesn't pucker. We're going to start by two single crochet in
same stitch as joined. You want to take that hook, keep that the loop
that's on it nice and firm by holding
your tension with your opposite hand and you want to insert the
hook under the same to our strands and wrap the yarn around
and bring it through. Now you have two
loops on the hook. Wrap the yarn around and
pull through both loops, that's your single crochet. Then you want to do a
second single crochet in that same space. Again, we go back
into that space, draw up a loop, two loops on the hook, wrap the yarn over your hook, pull through both loops on hook. Now you have two
single crochet into the same stitch and that's
considered an increase. We go back to the instructions
and we see we did the two single crochet
and same stitches join increase made, and now we have the
square bracket. When you get the
square brackets again, it's about whatever's in those square brackets
you're going to be doing a set multiple number of times. We have two single crochet in next stitch and we're
going to do that 11 times. Our first one's already done. This one doesn't
count as the 11. This one was done
before the bracket. Then you want to do
two single crochet next stitch a total of 11 times. We're going to go ahead in
and start working these two single crochet and
your next stitch and then move on to single
crochet into the next stitch. Move onto your next stitch, and you're going to
do this 11 times. Sometimes it's good to
have a little piece of paper beside you to tick off how many
times you've done it. A lot of people have
different kinds of row counters and
stitch counters, you can use them even on your devices like your
iPhone or your iPad, and some people are
just really good at keeping it in their head. For me, I really just have to
keep counting my stitches. I've come up to
the point where I joined from the previous one. I'm going to show you
a different joint on this round that isn't
as bulky as this one, although this one
is a simple join. But you have to make sure you're going to go
into the right stitch. That's what I don't
like about this join, is that it can get confusing. We just worked into
this stitch and we have to see where this one joined
and it joined over here. That's the place you want
to work your next stitch. Don't get confused
by this right here. This is really just a chain. It almost has to go to the back. You want to go way over here and create another single
crochet and then another. Even though that's a very common joint and a very
simple one to do, pulling it tight
from the back there, it does leave a little
bit of a bulky gap. I'm going to show you
a different way to join that doesn't
leave that gap. It's not so bad on
your first ring, it's really not going to show. We did our two single crochet
there and now here make sure you work into the
next one going under two. What we did back there is
worked into that third chain. It's a little confusing there. Then again, and now I'm on my last one because
here is my last stitch. If you're not sure if you've
reached your last stitch, then you do have to
go back and count your stitches and make sure that you don't
end up with too many. But before we join this one
and finish off this round, I want to count the
stitches to make sure. You go back and you count all these little loops
that are on top, that's the easiest way
with single crochet. Round 2 says at the end,
after we fasten off, we should have 24 single
crochet, so let's count them. 1, 2, 3, 4, 5, 6, 7, 8, 9, 10, 11, 12, 13, 14, 15, 16, 17, 18, 19, 20, 21 22, 23, and 24. We have the right number and
now we're going to join. In my instructions I always say, slip stitch and
fasten single crochet or slip stitch fasten off. It is the most common
and it is the simplest. If you were working one color, you wouldn't even really notice. But when you're working
with multiple colors, I prefer the one I'm
going to show you now. Before I do any
fastening off here, I'm just going to go
ahead and cut my yarn. Now, we're going to cut the yarn about three to four inches, you'll be fine, and go ahead and pull it
through with your hook. We're going to take our
darning needle now and we're going to get that yarn
onto your darning needle. However that works for you, and this is how I fasten a color so that
you don't see the join. This is our first stitch here, we're going to go into the second stitch and imitate
this loop right here. We're going to go under the two strands of the
second single crochet. We're going to pull the
darning needle through and just lightly snug it, don't yank too hard. You're trying to
match the tension that you've already got there. Then you're going
to go back into the stitch that that
yarn comes out of, as in the last
stitch you created. We're going to push our needle through and just a nice tug and you're
trying to match it. See how this is
the stitch we just made and it matches
all the other ones. You can just let your yarn go with the back and there you go. There is one of the best invisible
joins that you can get when you're
doing this crochet. You can see back
here with the white, this slip stitch join, which again I say it's
very common join, does leave a little
bit of a bump. That is fine where that
one is but going forward, I'll mostly be using
this kind of a join, but you're welcome to use the
slip stitch join as well. There are times when
the slip stitch join is better and we will be using that
going forward as well because when you end your
round with chain stitches, it's much easier to
use the slip stitch. You'll see when we get
there but for now, we have finished round 2 and we're ready to
move on to round 3. [MUSIC]
25. Round 3 Left Hand: Onto Round 3, we go and we
are now going to be using colors C which in
my case is the red. Picking up our work, we're going to join color
C with a slip stitch in any single crochet
of our previous round. Again, you can join
it anywhere you want. Once again, we'll
rotate a little bit further past
where I fastened off, just so my ends
aren't all hanging in the same spot. Here we go. We're going to wrap
the yarn around, joining by pulling the
yarn up into a loop. With a slip stitch, it says, join your color C in any single crochet
of previous round. Then we will chain three, which will count as our
first double crochet. Again, yarn over, pull through, that's one chain, two
chains, and three chains. Now we hit our square bracket, which we know that when
we find a square bracket, it means there's a bunch
of stuff in there that's going to be done a
multiple number of times. We're going to go ahead and
it says double crochet. If it doesn't say
in same stitch, it's usually in the next
stitch because it would be very wordy to have to say
double crochet next stitch, half double crochet next stitch, you get tired of the
words in next stitch. They're left out.
The only time you will see it specified as if it has to be in the same stitch, it will say that. Again, we're going
to double crochet. Again, I'm going to show you
how to work over this yarn. I tried to do this
as much as possible, but I've been ignoring
that because you have a lot of other information
going in right now. But you'll get the hang
of it after a while. You may not have to
darn in any ends. Double crochet into next stitch. Wrap the yarn around
three loops on hook, pull through two, and
pull through two. Then we want to do a
half double crochet, which we have not done yet. A half double crochet yarn over, insert into next stitch, keeping that cut end
over top of the hook. You're going to pull up a
loop, three loops on hook. Remember half double crochet is yarn over and pull
through all three loops. Push up with your hook
hand against the hook, so it can pull through
all three and use the opposite hand to help
maneuver that hook through. There is your
half-double crochet. Then we're going to
do a single crochet. Simply putting it
into the next stitch. Yarn over, pull up, yarn over, pull
through two loops, moving on half double crochet, so yarn over, insert
into the next stitch. Yarn over, pull up
three loops on hook, yarn over, pull
through all three. Then a double crochet
yarn over the hook first, insert in, yarn over
three loops on hook. Now double crochets pull through two and pull through two. Now we're going to
do a round bracket, which usually means everything
in that is going to be done within a certain place. It says double
crochet chain three, double crochet into next stitch. We're going to go
ahead, double crochet into that next
stitch, chain three. Then double crochet again
into that same stitch. Now this is going to
create your corner. What we're doing is
squaring off this piece. Let's see if I can get this
flat so you can see it. We've been working in the round, but now we're going to
get this square part, so C here. Same thing. We've worked across
this first slide and created this
corner over here. Now we're going to
continue to work around and square off that circle. We're going to go
back and read at the end of our square bracket, which means that's the
grouping that will be repeating and it
says three times. We did it once. It's going
to be three times total, including the one we just did. We're going to go back and double crochet in
the next stitch. Remember if it
doesn't say anything, it's the next stitch. Half double crochet. Single crochet. You're getting a good variety
of stitches on this round. Half double crochet. Double crochet. Make sure you give yourself enough extra yarn
there so you're not creating too much tension. If you're pulling really
tightly from the ball, if you're really
having to yank on it, it's going to affect the
tension of the square. Now we do the double crochet
chain three, double crochet. We've done it twice now. You want to do one more time. Back to the beginning
of the square bracket, double crochet, half
double crochet, single crochet, half
double crochet, double crochet, and then
double crochet chain three. Oops. There we go,
and double crochet. We've done it three
times 1, 2 and 3. Then we can move on. Then it says two double
crochet, half double crochet. We're doing the same thing. Single crochet, half
double crochet, double crochet, and double crochet into
same stitches joined. See the stitch right
here is where we joined. We need to do a
double crochet back into that same stitch. Chain three. Then it says slip stitch to third chain of starting
chain 1, 2, and 3. This is the case in which I
do use a slip stitch to join. It just works better
when you're ending with chain stitches instead
of an actual stitch. Again, we're going to go into the third chain of
our beginning chains. I'm just going to
push that through, wrap the yarn around, pull it through and pull it
through the loop on the hook. We're going to snip
this about, again, two to three inches, probably more like four inches there, and pull it through. We have finished round three and we have
squared off our circle.
26. Round 4 Left Hand: Now we're ready for round four. With round four, we're going to use
this nice beige color. This is color D, almost a brownie beige. We're going to just do simple single crochets
around our square. We need to join color D with a slip stitch in
any chain three, corner space of previous rounds. I'm not going to join it
in the same one that I fast and dolphin because
I like to move around, so move one more corner over, insert your hook into
that chain three space. Draw up your yarn
with a slip stitch. Now, chain one, so yarn over, pull
through chain one. Single crochet in same chain
three space as joined. Let's do a single crochet in there as well and
I'm just hooking my cut end over top of
my hook to lock it in. Then we go square bracket, single crochet in each of
the next seven stitches. We're going to single
crochet in each of the next seven
stitches, so 1, 2, 3, see how I'm
working over top of that into the stitch but keep the cut end over top and it works the cut end
right into your work. Losing track here, that's
where we started and then 1, 2, 3, 4, 5, 6, as you get closer to it
flies up at you, seven. There is the seven stitches. Then in round brackets we have
single crochet chain three, single crochet into
next chain three space. Again, our corner is single crochet. Chain
three, and single crochet. Now don't worry if you've been working in the ends and
they pop to the front, you can just pop them
back to the back. When we're all done this. We have finished the
first square bracket and we need to do
it three times, so that's our first time. Now we're going to go across seven single crochet
for our second time. That's 4, 5, let me leave myself a
little leeway here, 6, and 7. Then I want to single
crochet chain three, my hand is creeping
back in there. I have all my balls up there and they're wrapping
around each other, if you get one of
those yarn holders that you can just work
with one ball at a time, that's always nice, so 1, 2, 3 chains in a single crochet
into the corner space. We've done it twice now. Now you're going to
go one more time. Single crochet seven across. I also don't like pulling
out too much yarn at once because it can actually
tangle in itself. There's different ways to keep your yarn loose and not tangled. But it's different for everyone, kind of have to work it
out the way you like. If you're like me and
you have a cat in the house chances are if
you pull it too much yarn, the cat will steal the
ball and run away with it, which really makes
it hard to crochet. Our corners single crochet chain three, and single crochet. We now have done 1, 2, and 3. What's next on our instructions? End of square bracket, then single crochet in
each of the next seven, so where we joined here, you're going to be working into that third chain just
like you joined it. Work it just like you
joined it where you go in the center of
that third chain. That's your first
single crochet. Then continue on. The nice thing with crochet
is you can fudge a little. It's not like knitting
where you can see every stitch and if it
doesn't line up perfect, then you're in trouble
within reason. But you can fudge a
little bit with it because you only ever have
one stitch at a time. As long as you're
pretty consistently going into the fabric, you're not really
going to notice if you've missed a strand or went into the wrong place on a stitch, for the most part. Then we have our seventh
one here and then we do a single crochet chain three in the same
chain three space. Really it's the single crochet in the same chain three
space then chain three. Then you're going to slip stitch because I'm ending with chains, I'm going to slip stitch again into that first
single crochet, so rap the yarn around, pull it through
the single crochet and pull it through
the loop on the hook. Now you have joined. We're going to cut
the yarn again, four inches or so, pulling
it through to fasten off. There you have round four. We're ready to complete
our last round
27. Round 5 Left Hand: We've made it to round number 5. Round number 5, we join color E. Color E
for me is this nice green, and we're going to be working double crochets
this time around. Join Color E with
a slip stitch in any chain three corner
space of previous rounds. Again, I don't want to do it in the same one that I just did. I'm going to move
up to this one, and we join by wrapping
the iron around the hook and pulling up a loop. That's how you slip stitch. We start with a chain 3, which counts as our double
crochet, so chaining three. Now square bracket, double crochet in each
of next nine stitches. We'll go ahead and do that. Wrapping the iron around, away we go into the next nine. If we can keep that end over top of our hook
just to lock it in place and maybe work it over. It's so much easier to work yarn in especially when you've got consistent stitches like single crochets or
double crochets, a whole row of them than you're not having to
hide it anywhere. It's a little harder if
you've got chain stitches, an open work, and doesn't
necessarily hide very well. But in this case,
it's perfect for it. When this happens and your
hook slides at everything, you can try to just put
it back in like this. Worst case, you just pull the stitch out until
you end up with one stitch and then you
go back from there. Always count your stitches so that it's so easy to
think that you did the right number and
you come up short or you actually got an extra
one in there somehow, and that really affects
when you're trying to make the square work with others squares and they're
not the same size. This should be nine. Not counting our chain 3, we have 1, 2, 3, 4, 5, 6, 7, 8, 9, so nine stitches. Then we have our little
round bracket here, which is two double crochet, chain 3, two double crochet into next chain 3 space,
which is right here. You don't realize how many
little kitty hairs you have until you try to do
this on a white background. We go two double crochet, chain 3, two double crochet, and that is our corner. You can see here that's
the first square bracket. We want to do this three times. I'm going to give myself
a little extra yarn here because these balls are
rolling all over my desk. Crocheting at a
desk isn't my norm. Crocheting on my lap, just about anywhere, is more normal for me than
crocheting at a desk. Since crochet is
supposed to be my relax, I don't do it at a desk. If I do it at a desk, I'm usually doing it
in my lap as well. That is why I love crochet because it can be done anywhere. We're coming up on
the ninth one here. I like to double-check. Yes, it should work
out to the end, but double-check just in case. 1, 2, 3, 4, 5, 6, 7, 8, 9. Now, two double crochet, chain 3, two double crochet. Now we're ready to do nine
more double crochet, 1, 2, 3, 4, 5, 6, 7, 8, and 9. Then we need to do
another corner which is two double crochet, chain 3, two double crochet. We've hit the end of
our square bracket. Then we want to double
crochet in each of next nine. Really the same thing
as we were doing, 1, 2, 3, 4, 5, 6, 7, 8, and 9. Now, we want to finish it
off with two double crochet, chain 3, and a single
double crochet. Two double crochet, chain 1, 2, 3 and a single crochet. My yarn is really
coming at me here. In the same chain 3
space as our join. When you came up to it, you knew that was where you're
probably going to work. Again, I say here
slip stitch into third chain of starting
chain 3 you could. But because I'm going now
from a regular stitch, not chain stitches, I'm going to do the other type of join here. We're going to cut the
yarn about 3-4 inches, pull it through, and see how we have this gap here because we
didn't do the slip stitch. Now I'm going show you how to do that invisible join again. Put the yarn onto
your darning needle. See here we have
the three chain. You don't want to go into that. You want to go
into the next one. Go underneath the two
strands of the next stitch, pull the yarn
through just gently, then go back to where
you came out of, insert it in, and just tug it lightly and see how it
imitates the stitches. You can't really tell
where the end is. That completes round number 5. You can see on the back here, the reason I started in different
places is because now I have ends too darn in in different sections
of the square. They're not all in one line and create a bulk in one
section of my square. They are dispersed around, so it'll balance
out nice and even. There is your completed square. [MUSIC]
28. Colour Combos - Left Hand: Now we're ready to create more squares in different
color combinations. Now that you've completed
your first square you are ready to make the rest of the
squares for the scarf. This one is square one. We're going to use the
exact same square pattern but we're going to
mix up the colors. I have five square
color combinations that make up this scarf. Each square is approximately
five inches by five inches. I'll show you later when we're putting the
squares together how to figure out
how long you want your scarf to be and how
many squares to use. But for the scarf that
I made I did four of each square for a
total of 20 squares. Square one, we've
already discussed the color combination
and each one keeps the colors
in the same order. It just changes up what
round they're being used in. Square one we've already done. Square number two is going
to have blue for round one, red for round two, beige for round three, green for round four, and the putty color
will be in round five. That's square number two. Square number three will
have red for round one, beige for round two, green for round three, putty for around four, and blue for round five. That's square number three. Square number four is going to have the beige for round one, green for round two, putty for round three, blue for round four, and the red for around five. That's square number four. Our fifth square will
have green for round one, putty for round two, blue for round three, red for around four, and the beige for round five. That gives you five
different squares using the exact same
square pattern. But because you're mixing
up the colors, it gives your scarf a nice
multi-variety of look. You're going to go ahead, you're going to make four
of each of these squares. I'll see you in the next lesson where we'll talk about
darning in ends.
29. Darning Ends - Left Hand: Now we're ready to
darn in our ends. Once you've completed
your square, you can darn in your
ends right away, or you can wait till you
completed all of your squares. Then just sit down and do one big darning in
the ends first. Because I like to work my ends in I don't have
as many and I can even go as far as
getting them all worked in and not have to darn them in. But often I forget as I'm crocheting through and I'll
leave the ends hanging. That's fine. It gives
me something to do after the completion
of the square. You can see here in
this particular square, I didn't work in
any of the ends, so there's two of
each color hanging. Again, I like to start
in different places, so they're dispersed
around the square. If I started in the
same place each time, they would all be lined up and darning them
in would create a little bit of bulk on the back of the square in that
particular spot. I like to move around
that's why I do that. My ends are all dispersed. We need our darning needle. Again, it's the one
with the big eye and I don't really like a
pointy end myself, but you can use one
with a pointy end. I tend to hit my fingers
and it can hurt. You can start anywhere. You can pick any of them. The only one that
I do a little bit different is this one
in the very center. I'll actually start
with that one. We get our yarn onto our needle in whatever fashion that
works best for you. This one in the center, which is usually the only one, I can't darn it even though
I've worked over it, to do that foundation ring. What I want to do
here is continue around and then I can really
cinch up that square. You just go in underneath
these stitches. You're going into the middle of the stitches so that you can't
see it on the front side. You're going right into the
center of the stitches. I do a few stitches at a time and just give
it a little tug. Not a tight tug you don't
want any puckering, and then just keep on going
and you can darn this in until you feel
confident with it. But I usually go like
about an inch or two, two's a lot, but at least
an inch and one direction. There I've probably gone all the way around because I'm back to where the yarn
started and stopped. Amazingly, it's much more
secure than you think it is because I have done
simple darn ends, cut them, and then decided
to change something and really had a hard time
pulling the stuff apart. But if you want to
be more secure, you can turn around and work in the opposite direction for another inch or an
inch is plenty really. But you don't want to tug
too tight because again, you don't want a
little clump there. Just didn't leave the trick
with darning in ends is not to pull too tight
but to be secure. I think that is plenty. That end will not come out. Then you trim it as close to
the fabric as you can get. But be very careful not to
cut any of your stitches. You just want to trim it and it doesn't have to
be flat against it. Because if you leave just a
little bit of a nub there, then you give it a
nice little tug. Over time. It will
work itself in. If you cut it flat
against the fabric, it might actually work
its way to the front. It does that sometimes
that's okay. You just tuck them in.
The joy of handmade items is you're going
to see those ends flop out every now and again. But as long as you've
darn them insecurely, it's not going to be a problem. Again, we're going to
take the next one. In this case it's the beige. What I do is I try to work in where it's not going to show. Even though I'm going
under the green here, that's also where the beige has it's the top of
the beige section. It's going to blend in. You want your ends to blend in. If I were to go up here and start working it over
here you'd see it. You'd see it from both back and front and you really don't want to have that Again, just a few more stitches around, just gently tugging it in. I use my thumb to make
sure I'm not puckering. Then if it makes
you feel better, you can turn it around. Don't go right in
where you came out or it'll just undo
what you've done. Go over one strand and then work your way
back a few stitches. Now you've reversed
it and reversing it even just that small amount
secures it in place. When I cut it, I don't cut it right flat
against the surface. You'll see that little in,
but it works its way in. There we have the
beige all darned in. Then we can work on the next. Now some people like to knot their ends and I do get
people asking that question. I don't like knotting my ends in general because if I were
to not these two ends, it would create a knot
on the back of my work. Often those knots will work their way to the
front of the work. If you knot it and
then cut it off short. If for any reason that knot will come undone, which it can, then you have nothing
to secure your darned and ends in your work
will start to fall apart. The only time I do knot my ends is if I really
don't have anywhere to darn them in or it's in a section that's
actually going to be folded over like edgings. The knot will be hidden. But again, there are times
when you want to knot it. But even if I knotted it, I would use probably about an inch or more of
the yarn to darn it in as well because I wouldn't want that
knot to come undone. Again, let's go up to an
area that has a space. Here you can see
there's a nice big gap. We are on the wrong side, this is the right side. It is where you don't
really want things to show. Being a scarf, you really
are going to see both sides. We just tried to be
as neat as possible. Because once you get
the work finished and you're wrapping
it around your neck, you might not even notice what's the right side and wrong side. But if you have a
section here that has a space and let's say we're
going back in this direction. Again, you don't go in where you came out or you'll
undo the stitch. You go over this strand so
you're locking in place. We'll go up to the corner. We'll just give a little
pull but not too tight. Then I'm going around the corner and back
down the other side. Go under a few
stitches at a time. Then just allow that to lie
next to the same color. It really isn't
going to show or do anything that's going to fall apart and I'll go a
few more stitches. Now when I'm working
over my ends, I only work them
in one direction. That's why when I
work over them, I work as far as I can with it and then you can just cut it. I'm going to a
little bit further. I'm not going to
reverse this one because if you work the
end in long enough, so we started here. I worked it all the
way round corner here. That's about three
inches I've worked in at least maybe four.
Then just trim it. Now you don't want to trim it? See how I stopped a little
bit before the space. I wouldn't want to come
into the space and then trim it because it
definitely will show, so you want to do
your best to leave the ends in an area that's well packed in with stitches and it'll just
hide itself in there. Again. You can continue around and always try to darn your ends in to the same color that they are so that
you're camouflaging them. Remember we never go back in
where the yarn comes out. You want to go over at
least one piece of yarn. Then you just go around. Again, like I said,
two inches is good. Then you can reverse for few stitches where you can
go another three inches, whatever makes you
feel comfortable. But I have found in the
past, I do overkill. Then when I actually think that all I'm going to rip
that square and do something different I
can't find the ends. That's how secure that they
actually get in there. You can continue like that. I want to show you
one here that I did actually work some
of the ends in. See here for the most part, this one I worked
all the ends in. You see how you have little
ends like this hanging. This is where the end I
learn how to work in. They're all worked
in again here. What I would do here is I would just neaten that up on the back. Just trimming off that
little frayed part. Because they do tend to fray because they've been stuck
out for a little while, while I've been playing
around with the square. Cut a little bit there then
I darn the rest of these in, and you'll see that one seems
like it doesn't really fit. I'm going to leave it
there because it will work its way into the fabric. Again at this point, nothing has worked to the front, but I do have garments that they'll work
their way to the front and you just take your little
darning needle and poke it back or your crochet hook. You just pull it back. If it really bothers you, you can tuck it in
somewhere else back there. But they're going to show that's just the nature of a
hand-crafted item. There you go you have darned in, you've got your
squares the darn in. The next one we're
going to do is learn how to join all the squares, sewing them together [MUSIC].
30. Sewing Squares - Left Hand: Now we're ready to sew
our squares together. On the pattern, I do show you how I laid out the squares, but the best way to do it is to lay them out yourself
and see what you like next to each other and then follow that however you like it. Sewing the squares together, I always use one of the colors
of either of the squares. In this case, I
sewed it up using a white and then here I sewed up these two using
the green so that you're seeing blends right
in, you can't even see it. But in this case, I'm going to use a
contrast colors so that you can see
exactly what I'm doing. If I use the same color,
it would blend in. You couldn't probably be able to see where the
stitches are lying. Take two of your squares
that you want to join together and we're going
to lie them side-by-side. Because we counted our stitches, every side is going to have
the equal number of stitches. Therefore, they will line up. These two chain 3 spaces and these two chain 3
spaces where line up, and there'll be
the same number of stitches in-between each one. You can pin your squares
together if you want. When it's this obvious, I usually just stitch
them up by sight. If it was a more
complicated edging, I would probably pin them to make sure that I
wouldn't be off. By the time I get up to here, it'd be so frustrating and then you'd have to rip it
all back out again. But we're just
going to go slowly here and I'm going to
show you how I do this. I darned the yarn onto my darning needle and I'm
going to come up from the bottom through one of the square's corners
in whichever direction you prefer to sew. There is no right
or wrong here as to which direction you go. Right to left or left to right, whatever feels best for you and pull it up so there's about, I don't know, what
we've got here? Three to four inches? Four inch. We'll leave a four-inch tail. Then you're going
to go back down into the opposite corner, and then you're going
to come back up again where you just came up. We're going to pull that through and we're
not going to pull it too tight because we will
end up pulling our tail. Hold onto that tail and
we're going to pull this. The way I'm going to lock it
in place is I'm going to go underneath the strand that
comes between the two. That's going to lock
my yarn in place so that the tail doesn't
keep disappearing on me. Holding everything down, including the tail, give it a gentle tug. It's almost like you're
tying a little knot there, but it's really
not going to show. But it keeps your tail. Because as you sew,
your tail just will keep coming out and
really frustrate you. That's how we secure
our first stitch, and we did it in
the chain 3 spaces. Next up, we go to
the next stitch on the opposite side
that we came up from. We go into this next stitch here and see how
it's a loopy stitch, go under both strands, and then come
across and go under both strands of
the other square, and then pull it through and I have a nice
long piece here. You're probably looking
at the way I gauges you go three times minimum the
length that you want to sew. So I just cut myself a nice
strand I had one here. You're going to pull
gently and it's good to hold down the two pieces
and just pull gently. You want it to match the tension of the stitches
that are on the squares. Now you're going to go up under the next two loops and come across under the next two
loops of each of the sides. Again, pull it through. This is a whip stitch. Again, just gently tug it
so it matches the tension. You want it to be enough it's going to hold them together, but not so tight that you're going to pucker them
and it's going to be rigid. You have to remember
that this is a garment, and you want it to remain soft and supple when
you're wearing it. If you end up pulling
your seams really tight, you're going to feel
that in the scarf. You're going to have
this nice soft square and then you're going
to feel this ridge, and that's going to
be where your seam is and you don't want that. Again, we're going to
keep moving up under two strands and under
the next two strands. Pull your yarn through and
just gently tug it up. See how you can see the stitches because I have a
contrasting yarn? You wouldn't see those if it
was in one of these colors. It's a beautiful stitch
that blends right in with the work that you have. Just keep on moving up two more loops and
two more loops, and you're going to work
your way up to the top and see we're right on track
because our top is matching. If for any reason they don't, then you've gone off
with your stitches and you've missed one or
gone into one twice. That is very easy to do. Just keep working your way up. I always recommend doing the seaming in a color
that matches your work. Some people think
this is a beautiful contrast seam to work on. But what I would do
is do the seam in the same color as the square
and then embroider something like this after because it's
not always this even and it really enunciates how
uneven sometimes it can be. You would prefer to embroider
it the way you want it. I always work in
the same color yarn as one of my squares. We're almost to the top. Keep on working your way up. Here we go, we're almost there. These are great to
work on your lap. I don't usually do
this on a desk. Nice small pieces you
can sew together. Keep going until
you hit that space. It looks to me like that's
probably the last stitch. The next one will be into the corner space and then across to the
other corner space. Then you always want
to end at the back. Go back down corner space. Then if you want to lock
this one into holding that yarn so this doesn't
loop up too much, come back, just bring your needle back
to the front over the top, go under that last stitch,
and give it a pull. Now you've got a
little bit of a knot there that holds it in place. There's your whip stitch seam
that joins the two squares. Again, you're going
to use a yarn that matches and you will
do that all along, and you end up with something that looks a
little more like this. This is my completed
scarf and see how they're all
whip-stitched together. You can't really see the seams. When I'm sewing my
squares together, what I usually do
is I figure out the order that I'm going
to sew them together in, then I literally pile
them backwards in order. Say, I wanted these three
to be done together, I would place this
on the bottom, then this one, then this one, and as I pull them off, I stitch them to the
one that's in the pile. Then these two would
be stitched together, and I would stitch
into this one. That way I don't
have to keep looking as to what squares next. I already have them
piled in reverse. That's the easiest way to do it. Good luck with
sewing your squares together and I'll meet you back here to start
working on our ending. [MUSIC]
31. Edging Rnd 1.1 Left Hand: Moving on to the edging, we now have all of our
squares sewing together. Again, I have 20 squares that's where I've
written the pattern for. But the nice thing about these edging instructions is they will work with however
many squares you're using. If you find 20 squares to be
too long of a scarf for you, you can cut that back a little and the edging will still work. What we want to
do is with all of this scarf that's
all joined together, we want to pull out
one of the ends. It doesn't matter which end
and lie it in front of you. Now the edging, I go up half a size or I guess it's
a full-size of hook, really. For the main square, I use a five millimeter hook, but for the edging because
I like my edgings to be soft and cuddly and airy, I go up a size in my hook. Now this stitch that I'm using actually does require
me to go up a size as well because otherwise
it would be very peccary and pulley on my scarf. Just so that you
know whatever size of hook you ended up
using for your scarf, if you felt that your
squares weren't coming out right and you
change the hook size. Just go up a size of hook. Again, I use the five
millimeter to make the squares and I'm
using a 5.5 Millimeter, which is also US nine. I'm going up from my US eight
to US nine to do my edging. Again, you can get creative and use any of the colors you
want in the edging. But my first row, I'm going to start
with my color A, that is my off-white color. The instructions say, please
scarf right side facing, so this is your right side
and this is your wrong side, you want the right
side facing you. Short edge at top and
long edges at sides. We're going to join color
A with a slip stitch in the top chain three
corner of the end square. For your right-handed version, you want the top right corner, and for the left-hand
version you want the top left handed corner. We're going to be working
across your short edge first, you want the corner
that you're going to be working across the shortage. We're going to take color A, and we're going to pull up a
slip stitch in that corner. Working across
short end of scurf, chain 1, single crochet in same chain 3 space as your
joints, so single crochet. Then we hit a star. We haven't done any of
these star repeats yet. Stars are usually a repetition. That's going to
be quite a bit of stuff repeating to an endpoint. Ignore the star for the moment, and we're going in
round brackets. We're going to chain 1, skip next stitch so working into these
edge stitches here, skip this stitch, single
crochet in next stitch. We want to do what's in the round bracket,
six times total. That was our first one, skipping the next stitch, single crochet, that's
our second one. Chain 1 skip next stitch, single crochet, and
next, that's three. Going across until we've
done it six times, total, that's five
and this will be six. Then we want to chain 1. Skip next stitch and
then in round brackets, single crochet chain 3, single crochet into next chain 3 space, which is right here. So single crochet chain
3, single crochet. Now you want to turn
your scurf so you'll be working down the long edge.
32. Edging Rnd 1.2 Left Hand: Now you want to turn your scarf, so you'll be working
down the long edge. This is a really long edge, I'll get you started on it, and then I'll meet you
in the far corner. Let's get started
on this long edge, in round brackets chain 1, skip next stitch,
single crochet next. We want to do that a
total of six times. We did that across the top, and here we are again. We're doing it a
total of six times, so hold yours scarf however it's most comfortable for you, because you've got
a lot of weight probably sitting in your lap as you're working along this little part
of the long edge. You want six, this is my sixth one here, let's just count them. Go pass the corner
here, chain 1, skip a stitch single crochet,
so that's 1,2,3,4,5,6. I'm just counting the
single crochets because that's part of what's in
those round brackets. We ended with a single crochet, so that's six times chain
1, skip next stitch. Now here's a double star, but just ignore it for now. It's going to be
used later on as a reference point to
come back down like in coda if you do music. Repeat from coda, it's
going to be that concept. Single crochet in next chain 3 space, which is right here. Chain 1, single crochet
in next chain 3 space. Now we're going to
continue on chain 1, we're in round brackets
again so chain 1, skip next stitch,
single crochet next, and you want to do
that six times. Keep on moving across, sometimes it's good to have
little marker following on your patterns so that you know exactly where
you are when you get into these
hefty instructions. It's easy to forget
where you are, so that should be six, but let's go back and count
with the chain 3 space, then we did 1,2,3,4,5,6. I get talking, I lose track. Now we want to chain
1, skip next stitch, single crochet, nope,
see I've lost track. I did the six and then I chain
one and skip next stitch, and then repeat
from double star. We're going to go back
to the double star, and it says single crochet
in next chain 3 space. Chain 1 single crochet
in next chain 3 space, and then you've got your
round brackets chain 1 skip next stitch, single crochet. I'm going to show you what
happens when we finish this part so that you'll understand these
star or repeats. We want to do six
of these working our way down this long
side of our scaff. That's the sixth
one right there, and then we chain 1, skip next stitch, repeat
from double star. You're going to
continue to repeat from the double star down the long edge of your scarf to the last chain
3 space corner, which is at the far
end of your scarf. This is what we've done so
far and you're going to continue to do that
repeat all the way down, so each of the squares
really has the same repeat, and I'll meet you
at the far corner of this long edge [MUSIC]
33. Edging Rnd 1.3 Left Hand: Now we've worked all the way
down our long edge and we are at the opposite chain
three space corner. Here's a work it down, long edge of scarf to the last
chain three space corner, this one right here. Now there's a triple star there. Again, ignore that
for the moment. We don't need it. We
will come back to that. You want a single
crochet, chain three, single crochet in the
corner, chain three space. So single crochet, chain
three, and single crochet. Turn the piece of work to work across the short
end of the scarf, which is what we're doing now. Repeat from single
star to triple star. You're going to go all
the way back and look for that first single star. Then you're going to work
all the way through it again until you hit
the triple star. Then you'll come back to
this place in the pattern. Let's go back and start that up. Single star takes us
back to round brackets, chain one, skip next stitch, single crochet and next. We do that six times. This is just like working across the short edge
at the very beginning, because that's really exactly the same thing that
we're doing here. We will do six of these. This is our sixth one. Then we chain one, skip next stitch, and single crochet, chain three, single crochet into
that chain three space. We do our single crochet. Then you're going
to turn the scarf, so you're working down
the long edge again. We turn it, and we see
what we're doing here and we're going to do the
round bracket chain one, skip next stitch single crochet, and next six times. You're going to do that just as we did the first time around. Follow through the pattern
just like we did before, until you end up at
the three stars. I'll meet you there. Here we are, we've worked
down the second long edge, and we've ended up again at the final chain three space
at the end of the scarf. Instructions had said to work from the single star
to the triple star, which would bring us down
to this last corner again. Then this is how
we finish it off, following the pattern, then single crochet in same
stitch as beginning join. Single crochet, chain three, two and three, and slip stitch in the first
single crochet of the round. Slip stitch comes
through both the loop and the one on the
hook, and fasten off. We're just going to cut it
3-4 inches, pull it through, and it has fastened off, and we have finished round 1.
34. Edging Rnd 2.1 Left Hand: Now, we're moving on to Round 2, and once you have
Round 2 in place, that will be the
same as Round 3, 4, and 5, just
switching the colors. This Round 1, set are edging in place, Round 2 will be easier, and I'm going to use my color B, which is my blue, and continuing on with
the 5.5 millimeter hook. You can see your edging, has a little bit of
area space to it, and that'll be nice as
you keep adding the rows, you're going to get a nice
lighter feel to the edging, and a nice more solid coziness to the center of the scarf
where the squares are. Round 2 it says to join color
B with a slip stitch in any of the Chain 3 space
corners of the previous round. It doesn't matter which
one you join it in. I'm not going to join
it in the one that I finished off on because
that's the way I do things. I'm just going to
go with this one, and I'm going to
join it in this one, so it doesn't matter
which one you join in. We put our hook into
the Chain 3 space, and we draw up a loop, so joining with a slip stitch, and again we're using color B, and then you want a Chain
1 and single crochet in same space. Now we have the square brackets, and in the square brackets
we have also a star. Just take note of those, but we don't need them yet. Chain 1, single crochet
in next Chain 1 space, which is right here, so single crochet into
that Chain 1 space, repeat from star to next
Chain 3 space corner. Again, simple. You just Chain 1, single crochet in
next Chain 1 space, and you repeat that
Chain 1 single crochet and next Chain 1 space, Chain 1 single crochet in
next Chain 1 space and so on, all the way down
your long edge until you get to your next
Chain 3 space corner. I'm just going to
continue on there, and have you continue
along there, and I will meet you at the
next Chain 3 space corner, which is at the opposite
end of your scarf.
35. Edging Rnd 2.2 Left Hand: Here we reached the corner, the far end of our scarf. We are repeat from star to
next Chain 3 space corner, which we have done. Then we're going to
proceed to Chain 1 in round brackets,
single crochet, Chain 3, and single crochet, all into that Chain 3 space. Now we've hit the end of our square bracket
after all that. It says to do whatever is in the square bracket,
three times total. Basically, you're working
up the three sides. We've done it the first time. I'll walk you through
the second time because it's a short one. So we go back to the square
bracket and we Chain 1, single crochet in next, Chain 1 space, and we repeat that to
the next Chain 3 corner. Chain 1, single crochet
next space and just keep repeating that across
this top short edge, which counts as one of
our square bracket times. There is our Chain 3 space. Make sure we're
doing this right. right 1 single crochet and
next Chain 1 space repeat from star to next Chain 3 corner. Chain 1 single crochet, Chain 3 single crochet
into that corner, and single crochet
again into that corner. That's the second time
through the square brackets. We have one more time
through the square brackets, which is going to
take us all the way down the next long side. Continue on on your last time through your square
brackets and I'll meet you at the Chain 3 space corner at the far end of this scarf.
36. Edging Rnd 2.3 Left Hand: Here we are finishing up
our square bracket by we repeated from the start to next Chain 3 space
corner: Chain 1, single crochet, Chain 3, single crochet into the
next Chain 3 space, and that's the end of our
square bracket repeat. Now we're going to move on. Double star, Chain 1, single crochet in next Chain
1 space which is over here. Then we're going to repeat
from the double star to the next Chain 3 space,
which is over here. You can start this in
any one of the corners, so you might be working
on your long side now. But the way that I started it, I'm actually finishing
up on my short side. Chain 1, single crochet
and we just keep repeating that until we get to the
next Chain 3 corner, which won't take us long. Then we can finish
off this round. We're almost there. Chain one single crochet, and we are at the next corner, finish off that single crochet. Now we Chain 1, single crochet in same
Chain 3 spaces joining. We're back to where we started, single crochet, Chain 3. Then we slip stitch in
the first single crochet of the round, slipping
through both. We cut our yarn, and we pull it through
to fasten off. Now we have finished Round 2. Round 1 was in color A, Round 2 was in color B, and now we continue
on to Round 3, which is just repeating
Round 2 but using Color C, which is my red. Round 4, we'll again be
repeating Round 2 using Color D, which is the beige. Then Round 5, we'll be repeating Round
2 using Color A again, which is the off-white. That'll be the end
of the edging. Go ahead and work on that, and I'll meet you back here
at the end of Round 5, and we will finish off our scarf by adding some nice
fringe to the ends.
37. Fringe - Left Hand: We're ready now to
add on some fringe. Here we have our scarf done
with all of our rounds. You recall our round one of the edging was in
the off-white putty, then round two we did in blue. Then I left you to
do round three, four and five on your own and this is what
you end up with. Again, you can mix up those colors to
whatever you prefer. But this is the result of
the one that I worked on. When you reach the
end of your edging, you can decide whether
you want to put on extra fringe or not. I like to add on
fringe to my scarves. It gives it that
extra little touch. I was showing you
here on this end, I've already added the fringe on and you can mix up the
colors the way you want. You can do them
all in one color. Here I've made sure that I have every color in
here and then I've added in the off-white in
multiple places as an accent. Because of the width
of this scarf, what I've decided on is
a six strand fringe, which doubles over
into 12 strands. I've decided to do it
on spacing them out, so I end up with seven
fringe knots altogether. I'll discussed this at
the end about blocking, but you'll see some of my
fringes a little bit kinky. It does that if I pull it
from the center of the ball, when I'm further along, it's a little straighter, but I can block that out. I'll talk about that
at the end of this. What I want to do is make three knots of off-white
and then one of each color, so to make my fringe I
use piece of cardboard. You can buy things
from the craft store that specifically are
made for making fringe. I just use a piece of
cardboard or notebook. Sometimes I'll use a notebook
about this size as well. Whatever I have in the
House is what I use. You can just use a cereal box. I'll just used a plain
piece of cardboard. What I've done is I've cut
it six inches in depth. Then I've actually cut it
eight inches across in case I wanted to use it
this way for longer fringe. But for my scarves I
like to do a six inch. Then what I'll do
is I'll wrap them around and I'll end up with the finished six inch fringe
that I can trim off evenly, so I usually guarantee
myself a five-inch fringe. We're going to take
some yarn here. I'll use the blue
this time around, easier to see on the cardboard. I cut my cardboard
again six inches. Then I put a little slit up here so that it has
somewhere to hold the yarn. I just tuck my yarn
in there, like that. Now I'm going to wrap it
six times so it count six a full wrap up
to here is one. I take my yarn and I
wrap it once, twice, three times, four times, five times, and six times. What I do here, once I have
it wrapped the six times, I'll take my scissors, tuck it under your
strands and cut it. It leaves this little piece
in here which is fine. You don't need that anymore. I take this ball
away and I should have six strands of yarn, approximately 12 inches long. I'm going to pull my little
ruler out and we're gonna say that that is
approximately 12 inches long. Depending on how tight I
pull it when I wrap it, so try to wrap it very loosely, you'll end up with
the 12 inches. You might want to
go ahead and make everything that you need
and join them at the end. But I'm just going
to do another one here off-white so I can
show you two of them. Again, I tuck the white in and I wrap it loosely
six times around, so once, 2, 3, 4, 5, and 6. Again, I'm going to
take my scissors and go underneath and cut it. I can let the ball fall away, [NOISE] pull away my cardboard and I should have
six strands which are usually lined up well. If they aren't, you just pull that one out and realign it up. Pull them all straight. Again, I have 12 inches and I'm ready to go
with my off-white ones. I started in the corner
with my off-white, so that's the one I
want to start with. You fold it in half
over your finger. It's basically lined
up at the bottom here. Take your hook, you want your piece right side
facing towards you. You're going to go underneath it to this corner chain space, poke your crochet hook through and then loop your yarn over top of the crochet hook at
the halfway point. Now you weren't going to want to keep a little bit of tension on it so your strands
all stay together. Then you're going to
pull it through to the back and leave your
strands lying to the front. Now pull up enough of a loop that you can
pull this through. You can either use
your hook or you can take your hook off and
put your fingers through. I like to use my fingers
and grab the yarn, and loosely pull
it through because you don't want to upset
the knots at all. Now that it's through, grab all the strands together
and gently tug it tight. Not super tight, but just firm. There you go. There is your first fringe. Now the next one I want
to put on is the blue. We're going to again go in and I'm going to skip
this chain space. Again, fringe is what you want. You can put one in
every chain space, but I wouldn't do six
strands every chain space because it'll get very bunch up, so I like to space my knot
but make them bigger. We're going to skip
over this chain space and go into this one. Make sure I've got the
right space there. Looping the yarn over my
finger at the halfway point, trade it off to the hook. Then hold it firm on the hook and pull it
through that chain space. Make sure you get
all the strands and pull it up a little bit, keeping it kind of firm
there so it stays together. Slip your hook off and
slip your fingers in, grab the tail, gently pull that through and then make sure you
grab every one of the strands
because if you don't, someone's not going
to get pulled tight. Then gently tug it until
you have it right up to the scarf itself and there you have two of your fringes. Once you have all of your fringes attached as I've
gone ahead and done here, you're going to want to trim
them up so they trim even. See how they're all
different lengths down here? If I were to go through here, flatten them out and look for the shortest piece because
that's what you do. Looks like it's about there. If I lie this ruler across, this helps me trim them. We're going to make sure this is straight and this is straight. Then I can just
trim them across. I'm just going to show you
that they're going to end up being about four
inches in length. That is why sometimes I'll use the long edge of my tassel
maker and make them eight inches depending on how long you want your tassels
to be or your fringe, you should accommodate for about two inches
off of that because part of it is in the
knot and part of it you're going to trim
off from not being even. If you want your finished
fringe to be eight inches long, which is a good length, you would need to cut your
strands 10 inches times 2. You'd need 20 inch strands because you're
holding them in half. You always want to take the finished add 2 inches to
it and then double it. That's the length of each
strand that you want. You fold them in half. Then once they're in the knot, that takes a good
solid inch off. Then when you trim
them so that they all are even you're probably
taking another inch off. I'm going to end up
with four inch strands. That's fine with me I don't
like them to be super long. I find sometimes the best
way to trim them is just to somewhat eyeball
it but I like to use a ruler so I'm
somewhat straight here. [NOISE] Then you just go
along and trim them across, slowly because you don't
want to mess anything up. I'll go through this
first one here. A little bit of an awkward
angle for me on this desk, and you want them
all to be the same. Let's just go there.
I started there, see how much more even there. Sometimes a really nice
quick way to do this if you're also a quilter, I like to take a quilting
grid background and a roller cutter and I push down on my ruler and I
just cut them right across. But this method
works just as well. [NOISE] You're eyeballing
them and going across slowly so that you
make sure you don't miss any. Just keep doing that across. There you go. You've
got your fringe. It's nice and even. Try to make it the
same on both ends so when the scarf hangs down, your fringe matches. [MUSIC]
38. Blocking - Both Hands: The other thing I
wanted to talk to you about was blocking. With the fringe, you just need to wet it and
then lay it flat to dry. With the rest of the scarf, sometimes I'll wet the scarf
before I put the fringe on. I like to use yarn that is
washable because with garments it's really nice if you
can take care of them by throwing them in
the delicate cycle. But you have to
make sure that you either throw it
in a hand-wash or delicate cycle because
you've got a lot of ends that might come
out, they might fray. If you do it after you
put the fringe on, your fringe will fray. You can trim it up again, but the more you do that, the shorter your fringe
is going to get. I wouldn't throw it in the washer if you're
going to do to fringe, I would do it all by hand. You have two methods
of doing it, you either can put it into the delicate cycle or the hand-wash cycle
on your washer, and then you lay it
flat and you just lay it on a towel and
press it all down. You shouldn't need to pin it, but you just press it all
down where you want it to lie and let it lay there for
about a day and it'll dry. The other way is just to
spritz it with water. Don't put it in the washer, especially if it's
not a washable yarn, like if you're using
wool, definitely do not. You're just going to spritz
it with a bottle of water. Sometimes people
soak a towel and wrap it up in the
towel and then unwrap it and just lay it
inside the towel and let the whole thing
dry together. But I like to just
spritz it so that I can mold it with my hands, and if there's any
places that pull in, I just pull them out
and let them dry like that and that works fine for me. Again, if you want something that you can throw
in the washer, make sure you choose the
right yarn for that to begin with and always delicate. Never think that the amount of time you've put
into a hand-crafted item, you don't want to put it
into a washer and have it come out all pulled
apart. You don't want that. Always air on the
side of caution. You can experiment with one square and see how
it comes out of the washer because that will
tell you how it will fare. Never wash it with
anything else. You're always wanting to go
on the side of delicate. That is how I block my
pieces and I usually just a spritz unless I really have
something that needs to be pulled out and is lying
not the way I want it. But a nice good spritz of water, lie it out on a towel, mold it with your
hands and let it dry and it will just give it
that nice finishing touch. There we have our
finished scarf. You've put a lot
of work into it, now you can enjoy it. In the next lesson,
I will show you the different ways
that I wear it and a few more color combinations to inspire you.
39. Project and Inspiration : Congratulations you did it. Be sure to post your
finished scarfs in the project section. I am so excited to see
your beautiful creations. So now that you
have all the basics down and you've experienced
putting it all together, we can discuss how
to change things up. I mentioned you could change
the length of your scarf if you were finding my scarf
too long or too short, so if you're making
your scarf as a gift, keep this in mind. My mother-in-law is a
tiny lady and the scarves I make for myself well they
touched the ground on her. Each square measures
five inches, so simply decrease the
number of squares, just shorten your scarf in five-inch increments
or the reverse, you can increase the length in five-inch increments
by adding on squares. This, of course, is
something you decide before you add the edging. I've written the
edging instructions to accommodate any length or width. I use the same pattern
to make this shawl, that is three strips of
squares instead of just one. Then I use the same edging
instructions to work around the entire piece
and added on the fringe. This pattern will work
for any number of colors. To get the best
effect I wouldn't use any less than three. In this case, I've done it
in three soft neutrals. In this one I've done in
three rich bold colors, and you can do as many
colors as you want. This pattern is great
for using up scraps. I often get asked how I
like to wear these scarves. So I'm including
a few quick clips here on a few ways that
I like to wear them. I like my scars long, the ends hanging down my friend, Even when I have them wrapped
around me a few times. That's just my preference. They work well as
a Cowell style or just loosely wrapped
around once or twice. Really depends on what you will be wearing the scarf with. Either a heavy coat
or a light sweater as an accent or as
something to keep you cozy and warm on
a cold winter day. Basically, any way
that is comfy, cozy, and fashionable to you is the
perfect way to wear yours, no matter how you wear it, be prepared for
lots of compliments on you're one of a kind
hand-crafted piece. Thank you so much for
joining me in this class. I hope you had fun and
are inspired to create many more hand-crafted
crochet items.
 Jane Snedden Peever, Living the Creative Life