Transcripts
1. Zen Crochet Hexagon Yoga Bag: Nothing quite as fulfilling as crafting something you
love with your own hands, something that's both
functional and stylish, while also serving as a
wonderful way to unwind. Crochet encompasses
all of these benefits. Now imagine walking into your next yoga
class with a one of a kind handmade bag that
showcases your crochet talent. Today, we're taking
the timeless granny square and adding
a twist to create a hexagon shaped yoga mat bag that's as practical
as it is stylish. Hey, everyone. My name is Jane, and I want to invite you
on a crochet adventure today where creativity
meets relaxation. Crochet is a fun
and versatile way to showcase your personal style, whether you're busy
on the go, unwinding at home or enjoying
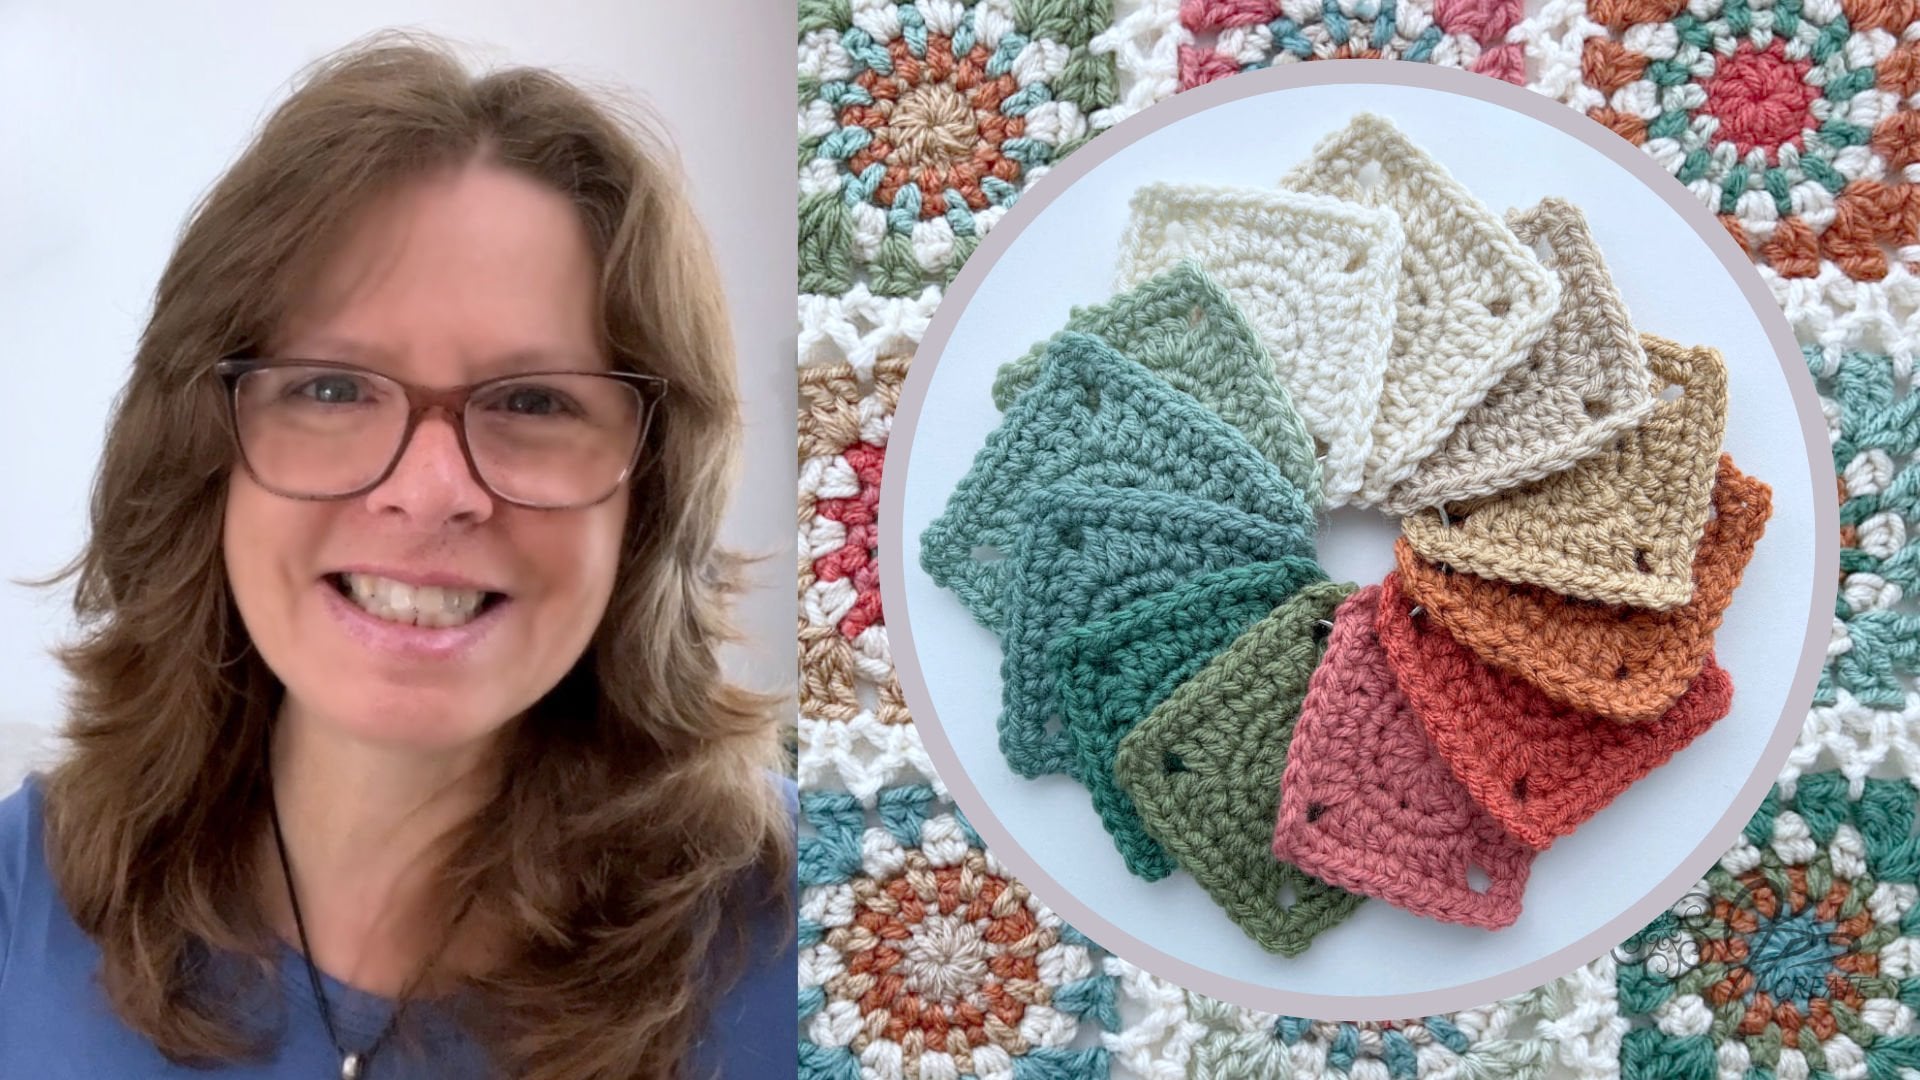
some leisure time. I bring over 40 years of
experience as a crochet designer during which I've explored
various aspects of the craft. I've shared my passion
through writing books, teaching classes, and
designing patterns. You can also find me on my blog and YouTube channel where I offer a range of inspiration for Granny squares
and color work. Granny squares are
a crochet classic, but today we're putting
a fun twist on it by learning how to create
a hexagon shaped version. Once you've mastered
your first hexagon, you'll be able to make many
more as we work towards creating a stylish and
functional yoga mat bag. I'll guide you through each step at a relaxed and
comfortable pace, sharing plenty of tips and
tricks along the way to make your crochet experience
easier and more enjoyable. Color is such a fun
part of crochet, but it comes with
the question of how to handle all the yarn ends. I'll teach you my
favorite tricks for working them in as you go, ensuring a clean,
seamless finish without the stress of tiding up all
the loose ends afterwards. This class is designed for crocheers who are comfortable
with basic stitches and want to work on a fun playful project while picking up new techniques for color work and assembling
projects as we go. I'm so glad that you're here, whether you're creating
something unique for yourself or a thoughtful gift for your
favorite yoga enthusiast, join me in this relaxing
art form of crochet, and let's create something
beautiful together.
2. What to Expect: Let's start by going over the
journey we're going to be taking from start to
finish of our yoga bag. In this overview, I'm just going to use diagrams to explain it. But during the class, I'll be doing this with real pieces and working in
real time along with you. First, we'll learn the
basic happy pedal hexagon, working together through
all five rounds. Once we've worked
through one hexagon, I'm going to leave you to
work a total of 26 hexagons. Can use my color
suggestions which are listed in the
accompanying PDF, or you can choose something different to match your style. Once all 26 hexagons
are complete, we're going to begin
to assemble our bag. We start this process by joining our hexagons into single strips, six strips of four hexagons, and one strip of two hexagons. Then we'll join these strips together just like
in our diagram, and we'll end up with one
solid piece for our bag. Now we'll be ready
to fold our bag. I'll be folding
from the wrong side or backside so that when I fold, the right side or front
side will be facing out. Flip your piece, grabbing
the top and flipping it towards you so that it
will now look like this. Next step will be to fold the
top half of the bag towards us and line it up with the
hexagons closest to us. Right side of bag will
now be facing up. Then we'll fold
the three hexagons on the lower edge in half. I'll be using pins to
hold everything in place. Finally, we'll be folding
the bottom of our bag, which is on the right
side of this diagram, by folding the
remaining two hexagons in half to meet up
for one more seam. Now with it all pinned in place, we'll be sewing our seams. Once all the seams are finished, we'll add a handle and a
tie and your bag will be ready to load up your yoga mat and head off to yoga class. Be ready for all the
wonderful comments like, I love that yoga bag. Where did you find it? You can say, Well,
thanks. I made it myself. Getting excited. Me too. Let's get started. I'll see
you in the next lesson.
3. Supplies For Class: What do we need for this class? I'll be using a worsted
weight yarn for this project. I love to use lots of colors, so I tend to use up a lot of
scraps when I create things. This particular bag I'm
making in this class, I used 15 colors, but it can be made
in a single color, two colors, or as many or
as few colors as you want. Of the techniques I'll be walking you through
in this class, we'll be working in
your ends as you go. This makes color work
a lot more enjoyable, so there won't be
all those ends to work in at the end
of the project. This is my secret to working
with a lot of color, and I will be sharing that
with you in this class. So don't let the number of
colors I used overwhelm you. I list them out in the
accompanying pattern because I get asked all the time
for my exact colorways, and I really do love using
a lot of color myself. But don't be afraid
to make it your own. I'm just here to encourage
and hopefully inspire. There is an attached
PDF of the pattern for this bag under the
resource tab of the class. That PDF, I list
the colors I used, as well as the
written pattern for the happy petal hexagon
and the bag assembly, diagrams, charts, so
everything you need to follow along with my
instructions in class. It's a really good idea
to have that handy beside you while you're
following my instructions. The bag takes a total of approximately 300 grams
of yarn total to make. If you're doing many colors, just be sure to have
at least one ball of your white for
the flower part and one of your main color for joining it all together
and possibly the handle. In addition to the
yarn and the pattern, you're going to
need a crochet hook and I used two different ones. Use a five millimeter,
which is a US eight or for the main
part of the bag, the hexagons, and
joining them together. Then I go down in size
to a 4.5 millimeter, which is a US seven, for the handle and the bag tie just to make them
a little more sturdy. You're also going
to need a pair of scissors, a darning needle. I like to use one
with a large eye, so the yarn fits through, a ruler or a measuring
tape just to keep track of the size of your squares and the length of your handle. Also, stitch markers, I'll be
using these on the handle, and it's best to have the
ones that open and close. They're called split markers. However, you can always use
something you have on hand, such as paper clips or just another strand of
yarn in a different color. Finally, I'll be using T pins to hold the bag in place
when I fold it. I find this easier because
it tends to flop all over the place and you forget where you're supposed
to be sewing. I like these pins because
of the T shaped tops. They don't get
lost in my fabric. Okay, I think we're ready to get started on making our hexagons. Gather up your supplies
and be sure to download that accompanying PDF in
the resource section. So you have the diagrams
to follow as well as the written pattern to
help you along the way. I will be explaining everything and I will be showing
you the diagrams, but it's really handy to
have them beside you. I will see you in
the next lesson, where we're going to begin
making our first hexagon.
4. Magic Ring - Happy Petal Hexagon: So we're going to
start with our blue and do a magic ring. We put it across our palm, holding it in place
with our thumb, wrap it around two fingers, then bring it back
underneath, crossing it over, hold it in place
with your thumb, and wrap it around
three fingers. Then we're going to go under the first strand over the
second and pull it through. Twist your hook. So the loop is twisted
on the hook itself. Reach over to the yarn
over your third finger, wrap it around the
hook and pull through. That's our magic ring. Slip your fingers out, and we're ready to
work into this.
5. Round 1 - Happy Petal Hexagon: Round one is all going
to be double crochets. So we're going to start with a chain three to represent
our first double crochet. We already have a chain one
to lock the ring in place. So we need two more chains. And this counts as our
first double crochet. Now we want to work 11
more double crochets into this ring. So to make our first one, yarn over the hook, insert
the hook into the ring. Yarn over, pull up a loop, three loops on the hook. Yarn over, pull
through two loops. T loops on the hook, and yarn over and pull through
the remaining two loops. That's the double
crochet stitch, and we want 11 of those plus the chain three would
bring us to a total of 12. Let's work a few more of these, and then we'll take a
look at this again. And you're keeping this nice and loose because we're going
to pull it up later. So I've got one, two, three, four, five so far. That's six, seven. Eight, nine, except they all fall off. Ten, 11 and 12. So I now have 12, and I can pull up my magic ring. I let the working arn go
and I take the cut end. I place my finger in my thumb at the base of the last stitch, and I pull on the cut end. So you kind of have to keep readjusting it a little there, so it doesn't not,
but you want to pull that right. I
pull it in tight. I don't like it to be open unless my square has open work. And now I can cut my yarn, and I can do an invisible join here before I start
my next color. So I cut about three to 4 ", and then I pull it through. I get my darling needle and
I do an invisible join. I place the arn on
my darling needle. I go to the top of that
first chain three, and I'm going to create
an invisible join by making a stitch
over top of that. So I need to go under
the second stitch. Put the darning needle under
both loops, pull it through. And then go back into the
top of the last stitch, where it comes out of, and you're creating
the same loop that all the other
stitches have. And you want it to be
about the same size too so that your
tension looks even, and it kind of just disappears. Now, this is where I
darn my ends in as I go, and people ask, how do you secure that so it
doesn't fall out? What I do now is, this is the invisible
stitch right here. I go to the back and go under one more little
bump back there, and come up through the center of that stitch I just created. So there's actually
two strands there, the bump and the stitch itself. I come up through the center, Always making sure I
don't pull too tight, and then I go back down through the center of
the stitch behind it, and I go down least
two loops again. And that creates a little knot that just secures it nicely. And at this point, I will
start to weave the end into the back loops only all
the way around my piece. Get as many as I can on there. And if I go all the way around,
I go all the way around, but I'm pretty secure with that because it's going
to get worked over again. Plus I did the little
loop here that created a little bit of a
pretend knot, so to speak. It's as effective as a not, but it doesn't have
the bulk of a knot. And I'm just going
to go ahead and cut that so it's out of my way. I can also darn this one in, so it's also out of my way. And I do that by going underneath the center stitches that I pulled in
a few more times. It's like I'm going to continue. I worked over top of it
for that first round, and now I'm going to
continue around this center. Just so I secure it nicely. Some people like to reverse
and go the other way. I actually haven't found
I need to do that, as long as I take it around probably two more times
maybe at the very most. It kind of depends on your yarn. I work with worsted weight yarn. It's 100% acrylic
most of the time. And it snags in there nicely because it's actually
hard for me to rip that out. But if you're working
with really slippy yarns or fibers that tend to slip, like bamboo and silk, you might want to do it a lot, do it in other directions, or even consider
a possible knot. I don't like knots,
but there comes a point where you actually
need to consider a knot. Cut that one off. Now all my ends are
darned in at the back, and I'm ready for round two.
6. Round 2 - Happy Petal Hexagon: I start this round with a beginning double
crochet cluster, which is a little different
than the regular one. So I'll join my white yarn with a slip stitch in any
one of the stitches, and then I chain two. Then I'm going to
work a double crochet in that same stitch, being sure to go under
my cut end at the back. I'm going to work
this end in as I go, so you'll see me doing
stuff with it here. I pull through the
first two stitches. I have two loops
left on the hook, and I'm going to take this
cut end and swing it up over top of my working yarn to
work it into this cluster. And then I work through
the last two loops. Now it's at the top of my hook, and I need to chain two. I bring it back over top of the working arn for
my first chain, and then across to the back, again over top of the working
arn for my second chain. We're working into
the next stitch. I'm going to hold my cut end at the back right around
where that stitch is. I'm going to go under
the cut end under the working arn and back around and into the next stitch
and under the cut yarn. We're working that in yarn
over and pull up a loop. Then yarn over and pull through. There's actually
three loops there because the cut end
is there as well. You want to pull
through all of those, leaving the last two
loops on the hook. You want to go again
because you want two double crochets
into that stitch. That's what our cluster is. Year over, insert into
that same stitch. Yarn over and pull up a loop. You have four loops on the hook, yarn over and pull
through two of the loops. Now you're going to do a yarn over and pull
through all three, but I want my cut
end to be worked in, so I'm going to take it up
and over my working arn here. Now yarn over the
working end here. Cut ends just hanging back here and pull through all three. That's my double
crochet cluster. It's a two double
crochet cluster instead of the standard
is usually a three, but I'm doing it smaller,
so I'm just doing two. Now I want to chain two. I bring the cut end back forward, and I chain one, and I take the cut end back to the
back and I chain two. Next cluster will
be the last one we work this cut in into because we're
getting down there. I bring it back to the front
and hold it at the work, and we're going to
do a double crochet with that cut end worked in. You're going under the cut
and under working yarn into the next stitch and under
the cut end at the back. Yarn over and pull up a loop. You want these technically two. This is actually
considered one loop, it just has a cut end across it. It looks like three year and over and pull
through that batch. You have two loops
left on the hook. We're going back down and
doing another double crochet. This is a partial
double crochet. Year and over, and we'll go
back into that same stitch. Year and over, catching
that cut end at the back. You have four loops on the hook, yarn over, pull through two. You have three
remaining yarn over, pull through all three, and there is another cluster. Now I'm going to leave
this cut end at the back. We're not going to
worry about it anymore. It's worked into three
different clusters now, so it's pretty secure. And now we're going
to do a cluster without having to worry
about that cut end. Chain two, and work a cluster
into the next stitch, two double crochet cluster, Year and over and
into the next stitch. Hook doesn't want
to go very well. There we are. Y and over
and pull up a loop, three loops on the hook. Y and over pull through two, and leave these two
left on the hook. And over and go into
your stitch again. And over pull up a loop. Four loops on the hook. You over pull through two. Three loops left, yarn over
and pull through all three. And there is another. So far we've done four. This is our beginning
double crochet cluster and then three regular
double crochet clusters. I have to do 12 altogether. So I will continue to work through those and
you can watch me, and I'll just go quiet so
you can see what I'm doing. Now I have 11 clusters, and I'm ready to
do the last one. Let's count for sure, one, two, three, four, five, six, seven, eight, nine, ten, and 11, and I need 12. This will be the last one. Then I chain two, and
I'm going to slip stitch in the top of the
beginning crochet cluster. Slip stitch and then I'm going
to cut my iron because I'm done with the white.
Pull it through. And now I'm ready to darn in
the end of my white yarn. This keeps everything
neat and tidy as you go. See, I worked that
one as I went. I'll snip that off once
I get this one in. Again, I like to
secure my stitches by taking this white and going
down into the next stitch, two pieces of yarn, two strands. Pull it down through, then bring it back up
through the stitch behind that just gives me a little loop so that it gives it a little
extra security. Then I work into the back loops only because on the next round, this will get worked
into those stitches. I get as many as I can on there, distorts the shape
while I'm doing it. But lovely thing about crochets
it always bounces back. You can go as far around
as you want with that. I'll go a little bit further. When the iron falls off
the needle and I don't have enough leeway here, I put the needle in
first and then I put the iron back
on it like that, and then I pull it through. That'll be good. That's
good and secure. I'm going to clip my white ends. They're out of my way.
Little blue one here, I'm going to clip that too. There we are. We're ready
for round number three.
7. Round 3 - Happy Petal Hexagon: Round number three, I will
be using my purple color. This is going to
be single crochets and chain ones all
the way around. Fairly simple stitch. I'm going to start with a
standing single crochet. Holding the cut end at the back, yarn around my hook. What we're actually doing is
not working into stitches. We're only working into
the chain two spaces, only the chain two spaces. After wrapping the
arn around my hook, I go into any chain
two space I want, and I go underneath the cut
in because I'm going to work that in and complete
my standing single crochet. What I've done here is
I've joined the arn with a single crochet
in any chain two space. Then I'm going to chain one. I take the cut end
and I put it over top of the working
arn, C chain one, bring the cut end back
down over the working arn, I'm going to work
a single crochet into the same chain two space. There we go. I have
a single crochet chain one, single crochet. Then I'm going to chain
one. Taking the cut end back up and over
the working urn. Chain one, bringing it back
down over the working urn, I go into the next
chain two space. In this chain two space, I will work a single crochet
chain one, single crochet. What your repeat is going to be is single crochet chain one, single crochet, chain
one in between them. Then in the next
chain two space, single crochet, chain one, single crochet. Let's
do a few of those. Single crochet, as I
work my cut end in, cut in goes up over my iron, chain one, and
then it comes back down and single crochet in
the same chain two space. Cut in back up, chain one, cut in back down.
Single crochet. Chain one single crochet. The reason I'm putting my
cut end back up and down, like it's weaving, I'm literally weaving
it into my round. It doesn't show in
these chain one spaces. Otherwise, I'd have
it in there and it also would be easy for
it to snag and pull out. That's how I say I weave
my ends in as I go. Chain one. Then I'm going to leave that now to just go because it's woven in
there pretty good. Single crochet, chain one, single crochet. Chain one. Next chain two space, single crochet, chain,
single crochet, a. You already have single
crochet and chain ones. It's just where you're
working them in. There's a single
crochet in a chain one, single crochet chain one, single crochet chain
one, all the way around, but you're working two of the single crochets
into a chain two space. I'm going to continue
to work that. You can watch me, I'll go quiet, and we can work this
round together. Here we are back at the
end of our round and I've done these little
clusters 12 times. You're going to have
24 single crochets and 24 chain one spaces. But let's count. We have two single crochets
here, two, four, six, eight, ten, 12, 14, 16, 18, 20, 22, and 24. We're good and
there's a chain space after every single crochet. I know that I have 24 those, and I end with a chain one. Now I'm going to slip stitch in that first single crochet. Just pull that loop through, but I'm not going to
fasten off my arn because I'm going to use
purple for the next round.
8. Round 4 - Happy Petal Hexagon: The next round is going to
be half double crochets and I want to do it in
the next chain one space. I slip stitch into that next chain one space
just to move me over there. Not too tight. I don't want
to puck or anything here. I just want to move to
this next chain one space. Then I want to do a half
double crochet chain two half double crochet
into that chain space. Our first half double
crochet will be a chain two. That's what we're going to use. Then you want to chain
two on top of that. I need to chain
four to begin with. One. Two, three, and four. Now I want to do a
half double crochet in that same chain space
we just slipped into. So Yarn over insert
in pull up a loop. Three loops on the hook, and
over pull through all three. That's our first corner. Now, again, we're
making a hexagon, so I need six corners
instead of four. The nice thing
about this one is I don't have any ends
I have to work in, so I don't have to
think about that. I want to chain one, and I want a half
double crochet in the next chain one space. Half double crochet into there. Chain one, half double crochet in the next chain one space
right in between those two. Always the chain one spaces
you're working into. C chain one, half
double crochet in the next chain space,
and chain one. This is one edge of our hexagon. We've got this corner, half double crochet thing
here with the chain two, and then a chain one, half double crochet three times. Then we chain one and go
into our next corner, which will be a half
double crochet, chain 2.5 double crochet
in the same space. We have a corner there. Then we do the same as what
we did on this edge, which is chain one,
half double crochet in the next chain
space three times. Make sure you get into
every chain space once. There's your next edge, three chains, three,
half double crochet. Then we chain one to go
into the next corner. And we do a half
double crochet chain 2.5 double crochet
for our next corner. So this is what we're
going to do all the way around.
This is one edge. This is our second edge. We've worked our third corner, and we're working
into our third edge. So one more time to the corner, and then I'll go quiet. Chain one half double crochet
in the next chain space. Chain one half double crochet
in the next chain space. C chain 1.5 double crochet
in the next chain space. That's our edge, chain one, and we work our next corner, which is half double crochet, chain 2.5 double crochet. I'm going to go quiet
here and continue to work around my hexagon
doing exactly what I've just done here till we get back and
we'll complete this. Here we are back at the end. This was our first corner. We worked our half
double crochet in our last chain space. We did a chain one, and now
we're going to slip stitch, and we're going
to slip stitch in the second chain because that's the half double c
representation to join our rod. This time we're
going to cut again. Pull it th and we're going to do that little
loop de loop right here, just to secure that piece in
back up where we came out, and then we work it into
the back loops only. And we go as far as we can. I said, you'll distort
your piece a little bit, just get as many as you
can on the needle at once. See what I do there.
I just jam them on. Then pull it, and then I
pull it back into shape. Keeping in mind,
this is a hexagon, not a square, so you want
to pull your corners. There we are. That's
round number four. You can use your
hexagon just like this. But I'm going to do one more border round in a
different color. When I'm using it a project, I like to have that
little border. When the round is complete, you'll have 30 half
double crochets, six chain two spaces, and 24 chain one spaces.
9. Round 5 - Happy Petal Hexagon: I. Now I have it's a different off white. It's called putty, but it's not the same white as I used here. It's a little bit grayer. I guess. It's close. Just a little bit of an accent, and you'll see in
the project this is what I used to join them all. This last round,
you can join any one of these chain
two corner spaces, and I join with a
standing single crochet. I wrap the yarn around my hook, insert into that chain
two space corner, and I work my single crochet. Then I want to do
a chain two and a single crochet in
that same space, and that's my corner
again for this round. Chain two, and then single
crochet in that same space. Now for the next edge,
it'll be single crochets in chain ones and I will only be working in
the chain spaces, and I'm going to work my end in. I bring my end up over the
working iron and I chain one, and I bring it back
down and I single crochet in the next chain space. I work that way all the
way across this edge. Only working in
those chain spaces, and for this edge, I'm
working my cut end in. Same as I've done for others, bring it up over
the working yarn, and then bring it back down
over the working yarn. And it works in up and down and up and down
into that stitch. So it's basically
woven into that round. Now, I've reached
the next corner. I do a chain one. I'm going to leave
my cut in to go. And then single crochet in
the next chain two corner, chain two, and single crochet again into that same corner. And now I've created
a corner here. Chain one, and the
next edge will be single crochet in the chain
spaces, and chain one. You're just mimicking the
same as the last round, but the stitches are shorter. They create a little bit
of a nice simple border. I've reached the other corner. See how it's just a
straight edge there, single crochet in
that next corner, chain two, and single crochet
again into that corner. Let's take a look
here what we've done. Started in this corner,
worked our way up this edge. Then this corner, worked
a way along this edge, and then we worked this corner, and then we'll work
across the next edge, and then I'll leave you to it. Chain one, single crochet
in the next chain space, C chain one, single crochet
in the next chain space. Chain one, single crochet in
the next one, C chain one. Single crochet, and chain, and we're back to the corner. So what you have on each edge is single crochets and
four chain one spaces. And then in your corners, you have single crochet
chained to single crochet. So now I'll continue this round and go quiet so
you can watch me. Oh. So here I am back at the end of the round, and all I want to do, I've done the last single crochet in the last chain space. I've done the chain one. Now
I just need to slip stitch in this first single
crochet of the round. So insert into that, wrap your yarn around
and pull it through that stitch and the
loop on the hook. That's how you're going
to end your round. Now, I've already cut my yarn, but because we're going to be joining these
squares to each other, instead of cutting it three to 4 " like I normally
do and ding it in, I'm leaving it nice and long so I can use it to sew
the squares together. It's a lot easier than
having to work in a new piece of yarn that both
ends have to be darned in. This one's already secured in, I will use it to sew, and then I can just darn
in the other end. I left this about 20 " long. It's probably more than enough. We'll see as we sew it in.
10. Make Your Hexagons: Now that you've completed
your first hexagon, it's time to start
making more before we move on to the next step
of assembling our bag. This bag will require a
total of 26 hexagons. You'll have plenty
of opportunities to experiment with colors
and patterns as you go. If you'd like to follow the exact color scheme
and layout that I use, all the details for the
colorways of the 26 hexagons are included in the
downloadable PDF pattern that comes with this class. You can find that under the
project and resources tab. However, I really
encourage you to get creative with
your color choices. Feel free to put your
own unique spin on it. You could choose to work
with a single color. Our You could work with two complimentary
colors or like me, have fun using a variety of your favorite colors to make
the bag truly your own. As you work on each hexagon, don't forget to
leave a long tail of yarn after finishing
the last round. This will be essential when
we get to the next step, where we're going to be sewing
all the pieces together. Once you've made
all 26 hexagons, we'll move on to the
assembly process. In the upcoming steps, we'll sew the hexagons into strips of four granny squares, and then we'll
join the strips to complete the body of the bag. Again, there'll be a diagram
for that in the PDF, but I will show you
as we go along. Take your time and enjoy
this part of the process. Proching the hexagons is a fun and relaxing way to get creative with your
colors and textures. I can't wait to see how
your hexagons turn out. Once you've finished
all 26 of them. Join me the next liston
where we'll discuss a little bit about
blocking our pieces.
11. Blocking Options: Before we start
joining our hexagons, I want to address the question
of blocking your pieces. Blocking your
squares or hexagons in this case is
an optional step. Sometimes I block, and
sometimes I don't. If the squares are large
or intricate or lacy, I do like to block
to make them lie better and it makes the process
of joining them easier. In this case, with the
happy petal hexagon, the pieces are not very large, and they're pretty solid pieces,
so they're well behaved. I personally would not block
these hexagons individually. If I block at all
with this project, it would probably
be after I have them all joined in
a one piece just to settle any seams and to set the pieces themselves
before I finish the bag. Having said that, this is not
a full lesson in blocking, but let me briefly go over the
methods I use just in case you feel you want to try blocking your pieces
at this point. I use either damp block
method or a steam method. In the case of a damp block, I'll lay my pieces out on a dry towel and miss them
with a water bottle. Then I pat them into
shape, measure them, if need be, to make
them all uniform size, and then allow them to dry. Your squares are particularly
wonky or misbehaving, you can steam block them. In this case, I pin them out
on a towel or a foam mat, and then I use a steamer to
relax the fibers into place. Then I allow them to dry
while still pinned in place. I will usually
stack my squares to save space and give
them some extra steam. I tend to do this with squares I'm using in sweaters
and blankets. It can soften the piece, and it also sets
the ends in nicely. If you've ever tried to rip out a sweater that's been
washed or steamed, you'll notice the
yarns very kinky. This is because the fibers
have been set in place. As I mentioned, I'm not going
to block at this stage. I will revisit this
idea once we have all our squares joined into one piece before we
start folding our bag. Now let's get on to
joining our hexagons.
12. Joining Your Hexagons: Now we're going to join two of our squares together
along one of the edges. The square that
we just finished, I have this yarn on my
darning need already, and we're going to join them to the spaces
using a whip stitch. Now, a whip stitch
is literally just in and out working your
way all the way up, and we're only going to
work in the chain spaces. The iron that we're
working with came out of the hexagon we just finished. I want to get it to the corner. I'm just going to
come from the back to the front up through
that corner space, and this is where
we're going to start. We're going to go across to
the next square or hexagon. I keep calling them squares. We're going to go across
to the next hexagon and go into the corner space that corresponds with the
one we came out of. Then just to secure it, I'm going back into that
corner space again. Then I'll just pull
it nice and firm, but not too tight
that we pucker. Now we're going to work
our way up the edge. We go into the next chain
space on the right hexagon, from top to bottom, and then come back up from
the bottom to the top in the corresponding chain space on the hexagon beside it. See how they match
up. Pull it again, so it's firm but not too tight. Then we're going
up a chain space. We're going to go
from top to bottom, and then from bottom to top in the corresponding chain space
on the hexagon beside it. Again, pull your
needle through firm, but not too tight. See here how this stitch, you can see the
stitch right there. It's blending in
with the fabric. It's not pulling too tight, so it's like, look
at that pucker, and it's not too loose, so it's holding the
squares nicely together. Let's continue up the square. There aren't many spaces, so the edges go up quickly. Go up to the next chain
space on the right. From top to bottom, and then back up from bottom to top on the corresponding
chain space, one we haven't worked in yet, on the hexagon beside it. Keep working your way up next chain space to the
corresponding chain space. Remember you're working from
the top to the bottom on the right side and then back up from the bottom to the
top on the left side. That's the last chain
space right there. Now we're going to go into
the corner on the right, bring up on the
corner on the left. And what I do once I reach the corner just to
make it secure. I go back down
again on the right. Then I pull it to the wrong side and I find
this loop right here. This is the last whip
stitch I just made, and this is the loop
of it on the back. I insert into that. Pull it a little bit tighter, and it just secures it there, and you've now completed joining one edge
of these hexagons. Let's look at the back now. This is the wrong side, and it pretty much looks the same. At this point, I would take this strand and I would
darn it back in. Now, I did cut this strand
about 20 " in length, and I have quite
a bit left here. I measured it again
and I have about 13 ". It's safe to say you
don't need the full 20. I like to have extra just in case I want to go around
a few more times. I wouldn't go any less
than 15 " to give yourself lots of space to
sew, darn your end in. To be honest with you,
I could use this. Sew another part of this
edge if I wanted to, but I'm not going
to in this case. I will work this in and I'm just going to show you
how I'm going to do that. I have it once
around this strand. The last loop I created for the seam right here at the end. I go around it again just to give it that
extra little secure, so it's twice
around that strand. Then I'm going to
work my way along the back into some of these
loops of these stitches. And I'll go a fair way
down in one direction. And then just to give it
a little extra security, I'll go across to the other square and
find my way back up. And I'm just kind
of working my way through random loops back here. No real rhyme or reason just as long as I'm moving
in the right direction, and it's not showing
on the front. The nice thing is it's
all the same colors, so you can't really
see it anyways. So then I will trim this yarn
because I'm done with it. There you have two
hexagons joined together. You're going to finish joining
for your s. So here I have two strips completed just to give you an idea of what
they're going to look like. So let's refer back
to our diagram. We have six strips of four hexagons and one
strip of two hexagons, and this will be the
bottom of our bag. Go ahead and start creating
your strips either just like mine or any random way
you'd like to place them. Once we get all of
our strips joined, we're going to start joining
the strips together.
13. Joining Your Strips: The next step is to line up your strips and get
them ready to join. Here I have two
strips ready to go. And a note, I usually try to go three times the
length of what I'm joining for the strand
of yarn that I'm using. Each of these is about 3 ". I'm joining four pieces, and they have one, two, three, four, five, six, seven sides. Determine the length
of arn for sewing, I take seven sides, multiply by 3 " per side, and I get 21 ". Then I multiply this
by three as a rule. To determine the
length I'll need for sewing them together
in one shot. This will give me 21
times three equal to 63 " for my
sewing yarn length. So I have 63 inch piece here, and it's probably too much. I'm going to show
you how to join it, and then we'll figure out how much extra we had left over. I'd rather have two
much than two level. This is the end strip, so I'll be joining
left to right, and you're going to join
one strip at a time. I'm starting in this corner
of the left strip right here. Same ways if I was
joining the sides, the only difference
will be when we reach these interjection points here. I pull my arn
through until I get about four to 5 " left because I'll be
darning that in later. Over to the corner
of the right strip, I go down and I come back
up where I joined my yarn, same corner as before,
and I pull it through. I'm working with a
lot of arn right now. Firm, but not too tight because this is going to be
a little on the lose side, this end hanging here,
but once we get going, you won't notice that, and
we can darn it in later. Go to the next chain space, go down into that
one and back up in the corresponding chain space
in the hexagon beside it. Pull it all the way through and then pull it firm,
but not too tight. Up to the next chain space and across to the
corresponding one. You go down on the
right and up on the left, pull it firm. We're working our way up
to this corner right here. And we're making sure
that the chain spaces we're working into
correspond to each other, the right across
from each other. There aren't many of them
on this little hexagon. Each side has, let's
see, one, two, three, four, five actual spaces, and then a corner at each end. So that goes up pretty quick. That's what I love
about this method, and it's pretty secure. We're in the last chain space before we reach the
corner. There we go. And now we've
reached the corner. We're going to go
into the corner on the right hand side and into the corner of this hexagon
on the left hand side. Pull it through. Back into the same corner on
the right hand side, and moving up to the corner on the next hexagon
that corresponds. It's directly above the
corner we just worked into, but we're working into the
same corner on the right and pull it through and snug. And now we're going to work
the same as we just did. We came out of this
corner from this corner. We go up to the next chain space and we work the
corresponding chain spaces. You're doing the same thing
as joining the squares again, working your way up to the next corner chain
space for chain space. This actually moves
up really quick, and you get the hang of how tight to pull
it as you do it. Nice when you do it
on a flat surface because you can see what the
tension is supposed to be. If you do it on your lap, it's handy, but
at the same time, you might be pulling too
tight because you don't have somewhere to lie at flat and
see how it's turning out. So I always recommend that when you're
learning how to do this, doing it on a flat surface
is a really great idea. Now, we've reached
the corner again, we go into the corner on the right square and up into the corner
on the left square. Pulling it nice and firm. Now we're going to be
working back up this way. You see how we're working
our way up the zig zag, and this will be exactly
the same as this. What we did here is we came into the corner on this first
hexagon of this strap, into the corner of the second
hexagon on this strap. Now we're going to go
into the first corner of this second hexagon on this
strap, so they're offset. We go into this
corner on the right, And back up again into
the corner on the left. You're double working
every second corner as you switch to a new hexagon. So this hexagons corner
gets worked twice. When we get here, it'll be get worked twice for these two, and so on and so on. I'm going to take you up
one more strip to here, and then I'm going to let you finish the strip on your own. We go in on the right, and
up on the left, and pull it. I on the right, up on the left, and we just work our way up until we reach the next corner. Here we are at the next corner. I go into the corner
on the right, into the corner, on the
left of this hexagon, the lower one we've
just been working on. Back into the corner
on the right, and into the new corner of the hexagon we
will be working on. And now we're set
for the next strip. You're going to continue
up this section, this section and this
section and this section. So four more
sections after that. You have a total of one, two, three, four, five, six, seven sides per strip
that you'll be working on. I'll meet you up here at the corner to finish
this strip off. Okay. We're at the
very last corner. I've gone in on the right
and up on the left. Go back down on the
right to finish it off. Pull up this loop at the back. This is a loop that
you've created with this strand of yarn, pull through it and under it, and it just gives it a
nice little hook in there, just to secure it, will we take a look at what we've done. Remember I said I did three
times the length of yarn. I think we did pretty good here. We probably have
maybe 10 " left, but it gives me a lot to work
with and I can darn it in. Let's take a look
at our two strips. Once we have our
two strips joined, we're on our way to getting
our bag put together. Refer back to the diagram
for strip placement. Each one will be offset because
of their hexagon shape. Join each of the strips. I like to work left to right, but it's up to you
how you join them. Then the final st only
has two hexagons. So only four sides and you start further up on
the second last strip. Keep that PDF diagram next to you to help with
placement of your strips, being sure to join them
in the right places. Once you have all
your strips in place, and it looks like the diagram, we'll continue on
to fold our bag, and then we'll sew up the seams.
14. Folding the Bag: Now that we have all our
pieces joined into one piece. I did mention, I'd revisit
the blocking idea. Since this is not a wearable, it doesn't have to fit anything
other than my yoga mat. So blocking at this point
is completely optional. I would first lay my piece out and decide if I really
need to do this. The simplest way is just
to do a quick damp block. So that's completely
personal preference. I'm actually happy with
how this went together, and I'm going to skip
the blocking process for this project as I don't feel
it's necessary in this case. Now comes the fun part.
We're going to get ready to fold our bag so that we
can sew up the seams. This is the right
side. Grab the top and flip it towards you. This is the wrong side.
Now, a lot of times it's hard to tell the difference when you're just glancing at it. So what I do is I take a color of yarn that is
not in the project itself so that I know
it's different and not just an end hanging
out there to be darned in. I double it so that it
stands out a little more, and then I just lightly
loop it in on the back side so that I can take
it out as soon as I'm done the folding
and the seaming. Now, I'm going to
bring in my pins. These are t pins with a
nice cross head on them. It's really handy so they
don't get lost in your work. And this is going to hold
the folding in place. I like to fold starting
from the wrong side because then the right side is going to end up facing out, and that's the side I want
facing when I work my seams. Make sure you have your
bag just like mine. Notice the two
hexagons at the end on the right side are now on the bottom of the
piece closer to you. I've flipped the piece, so now the wrong side is facing me. So make sure the layout
looks just like this in front of you before you
start folding along with me. Before we start to fold, this would be a great
time to do a little recap of the process so far and
where we're going next. Just to make sure we're
all on the same page. We started with our 26 Hxgons, then we joined them into strips, and then we joined
our strips together, making it into one piece. From here, we're
flipping our piece from the right side to the
wrong side of our work. Now that wrong
side is facing up. Now from here, we'll start
the folding process. This is just an animation of the folding process
that I'm going to show you and I wanted to
include it in case you wanted to come back and
look over it again. Now I'm going to
walk you through this folding process
on the actual piece. Just a note here,
these final arrows show you where the
seams are going to be, which is what we're going to
work on in the next lesson. The first folding
we're going to do is bringing this side here
down. Fold it over. Now we have the right side
of this section facing up. These hexagons match
these hexagons. You're folding across
this green one and this green one
and this blue one. They're going to be halves
these match at the end. And these match here and here. So this gets folded towards me. And then these hexagons get folded in half to
meet these ones. These ones, I will
actually pin in place, so they stay put. There's one there.
There's one here. And then there's one
more here at the bottom. And this is the bottom
of our bag down here with these two hexagons that
have not yet been folded. Top of the bag up here, where it has points
where they all meet, and they overlap beautifully. And then down here,
we have the bottom. This is going to
create the bottom. So the next folding we have
to do is these in half. Just like that, it's a
different half than these. It's folded in half differently, and the hexagon is in a square
or an even sided figure, so they look different. They're
going to look different. So I will take my T pins and
hold them in place as well, and that's going to be
the bottom of our bag. To do the seam, it's just like
we're joining the strips. You can start at either end,
but I'd start up here at the top and join in this corner, work your way down
each side across, you'll know because the
sides aren't joined, and you're trying to make a bag. You're going to
work down each side the same way as
we do the strips, all the way down to the bottom. When you hit this corner here, you're just going to
join these two edges of this hexagon together right
down to the bottom corner. So we'll get that started, and then we'll work
this last bottom seam, and then the bag will be joined. So if your bag is all
folded and pinned, then you're ready to join
me in the next step, where we'll work on the seams.
15. Bag Side Seam: First, let's determine how long our piece of yarn needs to
be to sew this first seam. There's 13 edges and
they're each 3 " long. Three times 13 is 39 ", and then my rule of
three that I use for sewing seams would bring the
length of yarn up to 117. I round that up to 120, which is pretty
long to work with, so you can do this in two
sections if you want, but I like to try and not
break the stand in the middle. Starting at our
first corner here, this is the top of our bag, and we're going to join the
first two edges together. Come up through the
one on the left. Like I said, I have a
really long strand here. Leave about four or 5 ", go down on the one on the right, and then back up
again on the left. That's how we join the strips, and that's how we're
doing this one. Into the first chain space, go down on the right, up on
the chain space on the left. You can put it so that
you can see it like this. But I am working
a side seam here. Then you're going to continue down just like we
did for the strips. If you want a refresher
on how to join these, that's the video to go back to. I'll take you to the corner. I'll remind you how
to do the corner and then everything
else is the same. Here we are at the corner. See if I can get this so you can really see what's going on. Because I have this pinned, which I don't need
to have it pinned now because I know
where I'm going. I can take that out,
can't sew it it's pinned. What I'm doing is going to this corner and
then up this side. I go into the corner of
the first hexagon on the right and in the
corner on the left. Then I go into the corner on the next hexagon on the right, and back to the same
corner on the left. And now I'm ready to work
up this side right here, just like the strips. And again, when you
get to this corner, you'll work this
corner to this corner, then over to this corner, and then you're ready to work
your way back up this side. Do that all the way along until you reach the
bottom of this bag. I'll meet you back there so we can finish the
bottom of the bag. So now I've reached
the bottom of my bag. Let's take a look here.
I've come down this way, here, here, all the
way from the top. And we're coming into our
last part of this bottom. I have worked into this side, and now we've worked
into this corner. Now I want this corner, and I want this corner. Moving along again
with our last section, we'll sew this shortly. You go into the
next space and keep going along this late the
full edge, I should say. Until you get to
the next corner, and you're working
around an edge here, so it's going to start
to get a little awkward. But we've reached
the next corner, and then you go into the corner on this side of the square. Go back and work into the
corner of the same square, but a different corner,
right the opposite corner, and come back again
through this corner. And now all you
have to do is sew the rest of this little
seam right here. Space for space, go into
this space and this space. Go to the next space, corresponding space
right across from it, this more or less center here. And then finally,
you're at the end. So what I do is I just kind
of go into that end stitch. Come over and do it again over here. Just kind of secure it. Whatever way feels good for you, and I have it pinned, so I'm
going to take out that pin. And now we have our corner
done, just like that. You're doing great. I'll
meet you in the next lesson, and we'll work across
the bottom scam.
16. Bag Lower Seam: Now, I have quite a
bit of this yarn left, quite a bit of it actually. So I did overestimate, but again, I always
like to overestimate. That will get darned in later, and I could probably
even use the rest of that yarn for another seam. I could use it for
this seam, but I've already cut
another piece here. Can do one of two things. I can start here and
work my way over to this corner or vice versa. I think I'm going to start in the middle here, where we ended. So see where you went around the corner and off to this edge. We're going to start here. And I guess it doesn't really matter as long as
we're consistent. Let's turn it around, so
how we're used to sewing. I have this one pinned, so I'm going to unpin it. And this is how we're used to sewing our stripes or strips. Keep calling them stripes. We'll come up through the one
on the left to start with. Just give it a secure down
on the corner on the right, and then back up again in the exact same
corner on the left. That gives it a loop secure. And then we start working
through our spaces. The one on the right,
into the one on the left, down into the right,
up onto the left, work our way up to
the next corner. The same way we've
been doing all along. We're at our next corner. We go into the corner here
and up into the corner here, down into the corner
of the next hexagon, back up into the same corner. And then we're back
to working our edge. Keep working along
here, work down here, and then you're going
to sew this edge to this corner exactly like we
did for this one back here. And that will complete
your bag seams. I showed you how to
work the ends in on your individual hexagons, but I've been
leaving my ends that I use for the sewing loose. Just because I like to wait and see if I can use them to sew additional pieces before
I weave them in for good. Once you have your
seams finished, then you can darn in
the rest of your ends. I flip my work to the wrong side and start working in
any remaining ends. I work them into the loops
on the back side of my work and usually along the seams
joining the hexagon shape. I find the loop that I joined the two hexagons
with in the corners, and I loop the yarn
around that again. Creates a bit of a loose knot. Then I'll work that end in, just grabbing loops at
the back of the work. I go about 2 " in one direction. Then I'll turn my needle and work in the
opposite direction, grabbing loops as I go. Sometimes the same loops. And I'll even split through
the center of the arn piece. I just darned in. This gives it a
little extra hole and ensures it won't slip out. And finally, when I've
worked back up the 2 ", I'll either turn around one
more time or I'll go in a different direction
as I don't want it to bulk up at the back too much. Continue to work in
any more loose ends, and when you're ready, I'll meet you in the
next lesson where we'll make the handle to go
with our yoga bag.
17. Bag Handle : Once we've sewn all of our seams and we have
the shape of a bag, the next step is
to add a handle. So what I've done is pick one of the colors that was in the bag. You could do it in the
main color, if you want. I've done that as well, but I've decided this time I'm
going to do the purple. I've also decided to go
down half a size of hook, so I used a five millimeter
for the rest of the bag. I'm going to go down to
a 4.5 millimeter for the handle because you want the handle to be extra sturdy. Crochet handles themselves are going to be tending to stretch. Some people like to use
a fabric handle like a canvas handle and attach
it to the bag itself. You can do that as well with little hooks or even
just sew it on. But since we're crocheting, I'm going to show you
how to make a crochet handle if that's
what you choose. The handle will
need to be longer than the length of our
bag so that we can wear the bag comfortably over our shoulder
or across our body. We will need that
extra space to fit our body in between the
handle and the bag. One I will be showing
you for this bag. I start at approximately
30 " with the chain, but you can determine what
length is best for you. Keeping in mind
that we are joining a a few inches from the
top and bottom of the bag, and we will be working about six rounds of single crochet, which is going to
add another inch to the top and the
bottom of the handle. Ultimately, my handle is
going to end up being about 32 " when it's
all said and done. Use a measuring tape and
measure across your body from the top of one shoulder
to the opposite hip. Or perhaps you have
a cross body bag that fits nicely already, and you can use that as a guide for the length you'd like. We'll be making a very
long chain and we want to measure it as we go
to get our preferred length. You'll need to stretch it out to measure it because the
handle will stretch to the max as we wear it since the yoga mat is going to
have some weight to it. Then keep in mind
again that there's about six rounds
of single crochet that we're going to be
adding onto this chain, and it is going to add an
extra inch to each end. Again, ultimately, my
handle is going to end up being 32 " when
it's finished, but I'm measuring it to 30 "
when I stretch out my chain. Not sure how many chains
that's going to be yet, but I will measure it as I go. Alright, let's get
started on our handle. So we start by
making a slip knot. There's different ways that
you can do it, of course. I like to make the loop, and
then flip it like a pretzel. It's the way I learned,
so it works for me. Then I go under this
strand and pull it up, and then I pull my
two strands together, then pull the strands apart
and slip it up to the hook. There are so many
ways to do that. That's the way I
do it. Now we're ready to make our base chain, which is just urn
over and pulling it through loops. Very simple. And I'll probably do about 100 of these, and then
we'll measure it. So I ended up doing
100 because when I pulled it out with
my measuring tape and gave it a slight pull, because once you're wearing it, it will max out to its stretch. So stretch it right out. Took me about 100 chains on
a 4.5 to get to the 30 ". You may come out with
something different. So make sure you use
your measuring tape and decide what length
you want this to be ad however you're going to carry your yoga
bag if it's going to be across your body or
just over one shoulder, and keep in mind that it needs a little bit
of slack so that the strap isn't holding the
bag like tight to your body. So with these 100 chains, I'm now going to start
working my way back. I'm going to work into
the second chain from the hook and work
a single crochet. So work a single crochet in
every one of your chains, and I'll meet you
back here when we get to the end of our chain. Now, I've come all
the way across my chain and I've worked into
every one of the chains. I'm in the last chain, and I've done my single crochet. And I'm going to work
two more single crochets into this last chain. And now I'm going to
start working my way across the opposite
side of the chain. I came down this side of the
chain like we normally do. Did it three in the last chain, and then I'm turning it, and I'm going back up the
opposite side of the chain. We're going to be working
in the bottom loops of the chain that we
just worked into. We go down and I go right into the center
right into here. Okay. Watching this back, I actually missed the chain here. However, the handle still
work great. It happens. That's the beauty of homemade. Only you notice your mistakes. Try to work into every
chain if you can. So I'm actually grabbing a
little bit more of the chain. See if I can show
you at the back. I'm going under the
bottom part of the chain, but I'm also going
under the loop that is kind of
crossing over it there. So there's two strands I'm going into to give it that
extra security. So I'm going to work a few here and just show you
what it looks like. Little easier to see
once I've done a couple. See how I'm working
in the bottom parts of the chain right into
the centers of them. And it creates a
nice sturdy center for my handle. And
that's the back. See how you're not just working under this strand all by itself. You're going into the center, so it's part of the strand
of the next one actually. You'll have two
strands on your hook, and you complete
a single crochet. It gives that extra
sturdiness by having both of those strands on the
hook. I right there? Continue across working
in the bottom portion of the chain until you get back up to the top and
I'll meet you there. I've worked my way all
the way back to the end, which is really the beginning, I'm going to work three single
crochet in this last one, so I've already worked one. That's two. In the second one, I'm going to put a stitch marker to mark the center stitch. You can mark it with
anything, a piece of yarn. I have these little
stitch markers, and then work a third
one into there. Now I'm going to just
continue to work all the way around the same way. Go now I'm just working regular single crochets into the stitches that
are already there, and I'm going to do this all the way back to the other end. When I come and I finish, I will know that I
will always work three single crochet
into this marked stitch. When I get to the other end, I didn't mark it necessarily. I could have marked
it when I did that. There's the three stitches
at the other end. It'll be this one. I'm actually going to put a stitch
marker in there. And when I get to it, I'll know, three stitches go into that
stitch to turn my corner. What I'm going to end up
with is rounded edges, and I want that because
when I sew it to my bag, it's going to fit in
nicely with the design. I'm not doing straight
edges across, I'm doing rounded edges. Continue working like this
for five more rounds, and then I changed to my putty color and
did a sixth round. Changing your color
is not necessary. It was just fun to add a
different color in there, and this will make
a nice wide strap. Honestly, a wider strap is more comfortable if
you're going to wear it as a cross body bag, and it also has more
strength to it. So keep working just single
crochets up one side. Three into the marked
stitch and then move your mark
stitch to that one. So when you do three, you move the mark stitch
to the second one, so it stays in the c, and then work your way
back down the other side. So you're going
around in a circle. Once you have the width of the strap that
you're looking for, and you finish off, and don't cut the end
of your yarn yet. I want to talk
about how much yarn you need to leave to use to sew. We'll continue on to the
next lesson where we will join our handle to our bag.
18. Attach Your Handle: So I finished my handle
doing six rounds. The sixth round I did
in the putty color. So I did five rounds of this purple and one
round of the putty. And when I finished it off, I leave the end very long. This is about 40 ", which is probably more than enough because this is
what I'm going to use to sew this end of the
strap to the bag itself. And let's just measure this across to see how
wide our strap is. It's 3 " wide, which is pretty good to support the bag if it's over a
shoulder or across our body. You can see here is the center, and then I did five
rounds in the purple, fastened it off and
darned that in, and then I did one
round in the putty, which I finished up here. And left a nice long end of 40 " so that I can use
that to sew in. Anytime I can use an end
to sew it in, I will, so I like to leave the last
ends long for that reason. Now we're going to take our bag and this is the
opening at the top. It doesn't matter which
part we sew it onto, either the front,
there really isn't a front or back until
you put the handle on. We're going to take our handle and we're going to
make it so that it fits into this
shape right here. That's why I did that
shape so that it would. We'll probably sew it
about six stitches on either side into these seams. I'm going to take this urine
that I finished off with. And get it onto my
darning needle. I have a really long end here, probably longer than I need. We're going to join it
right at the top of this hexagon right before you
get to the top of the bag. Up this middle seam here, joining it right at
the center spot. Then what we're going to do
is work it down this side about six stitches and back
up again for extra secure. Then down this side for six
stitches and back up again, and then we'll fasten it off. Then I'm going to use
this purple color, and I'm actually going to do a back stitch right
across at the bottom of where these stitches end right across here to give
it that extra security. Let's start by joining it here. I join it right on
this metal part and I'm trying to go
through both seams, so it's nice and secure. I just go in there anywhere
really and pull it up. Then I loop it again through the two loops that's sitting
on top here right there, and I loop it by going in
and then back under again, and it will loop it around. Then I like to go
underneath the loop I just created just to
create a little bit of a knot to hold it in place. Now it's secure at
that spot right there. Now we're going to
work our way down here, about six stitches, and we're going to go
into the next stitch on the handle and then go into the seam of these two
hexagons behind it. Loop it around, and then you go into the next
stitch and again into the seam, and you're pretty much following what you did here for the seam. Pulling it tight but
not so a puckers. Go into the next stitch and into the next
stitch of the seam. We've done one, two, three, L et's go into a fourth one. We might not do six, we might just go five. Then one more. There we go. That's five stitches. That's probably good. Now I'm going to
work my way back up. Go back into the same stitch. In the place that we just went, we're going to work our
way back up this piece. You're criss crossing
all the way back up. You get a nice solid secure. I like going and
following the same seam because it just gives
it a nice secure join. And now I'm back up again
where I joined my yarn. I've done one full
side of this handle. Now you work your way down this side and
then work your way back up and I'll meet you
back up here to darn this in. I've gone all the way down
here and back up six stitches, about five or six, and
I did the exact same on this side that I did over
here and back up again. I've worked twice
on each of these. It is now nice and
secure because it does have to hold that
yoga bag on your body. I'm left with this
yarn at the top. To secure it, I will
go around probably two more times in the exact
spot that I joined it. Then I'm going to take it
to the back of my work. At which point, I will darn it back in down one of the seams. And to do that, I
literally just grabs, any old loops that I can find
on the back of the work, so it's well hidden, working my way down, and then I'll go in an opposite direction just to secure it, it's in there pretty
good because I have tried to rip these things out and they don't
come out very easily. And when I feel
secure about that, I'll take my scissors, and I will now cut the end. I did pretty good. I
started with 40 " and I probably have maybe 15 left. We have the top part joined and now I'm going to
go across the center. The reason I do that is to
give it a little extra secure. Right now it's
pulling on an angle. If I join it across here, it just gives it that extra
grab when it's on your body. I will be using the
same color that I use to make the handle because
this part is going to show. That's why I didn't use the off white because if
I go across here, you're going to see it using the same color, I won't see it. Get that yarn on
your darning needle. And then we're
going to just join it in one of these locations. I'm just going to loop
it for now and we'll darn the end in
later at the back. Looping it right at
the bottom of where this seam turned
around and went back up in the purple part, and I'm going to
leave an end here that I can darn in later, and I'll loop it again, but I'm only going through
the handle at the moment, just to secure the yarn, and then maybe going
under that loop, just going to give it a t.
I don't want it to move. I want the end to stay put. You're knotting it a little bit without too much of a not there. Now we're going to sew across, but I want to do it
from the right side, but it'll show on the back side, but it doesn't matter because you're not
going to see this side. This is the side
that matters and that's why I like doing
it from this side. I put my hand into the bag so that I can make sure I'm not
sewing the bag together. I put the hand in between
the two pieces of fabric so that I want to sew between the handle
and this piece, I want them joined together, but I don't want
this piece involved. I put my hand in the middle
so that it won't be involved. And I make sure when I'm
sewing that I hit my hand, and then I know that I've gone through this piece as well. And I want to do a back stitch. And that involves going in
where right at the edge here. Because I've nodded
that, it'll hold true. You're going to work
straight across. You want to come back
up one round over. Pull it through,
and pull it secure, but not so tight,
it's going to pucker. Go back in one round, back. Go two rounds
underneath and come up, and then go back one round. See how there's one round there. Now I'm going to go
under two rounds. So not coming up here, but coming up the
next round over doesn't have to be a
perfect line just close. So you see how I went down
here and up over here, and this is where I
had come up before. So pull it. Nice and secure. I'm going through both pieces. Let's take a look. There
it is on the back. It's grabbing this
piece of work as well. Let's keep moving. Go back, one round, anywhere it'll fit and
up two rounds ahead. Pull it secure. Back, one round, and up two rounds ahead. B one, we're almost
there and up two. Then one more time,
back one and up in the exact same spot because that's where
I'm going to end. Now I'm going to go one more
time just to secure it. Then I will darn this end in as well on the back of
the handle back here. We'll do that in
a minute. I just want to show you the
back of this work. There you can see, and keep everything out
of the way here. There's where it's joined inside the bag and you're
not going to see that, but it keeps it secure. Now we have two ends
we need to work in. All we do is take
them to the back of the work. There's one. We'll work on that one first, flip my handle over, and I'm just going
to run it down one round and up another. Here it is here, I'm just
going to take it down underneath the
stitches that goes right in the center
of that round. So you won't see
it on the front, and you won't see
it on the back. Just like you're darning
anything in, pull it. You're going to reverse it and
go back up the next round, and pulling that through. And if I want to
be super secure, I will go one more time back down on the next round
because why not? Make sure I'm not
pulling too tight. And at this point, I will cut
that yarn. And it's done. I'll do the same with this one, take it to the back and
darn it back and forth, and the top of our
handle is now secure. Once I'm done with
the top handle, I want to join the
bottom handle. And remember, our handle
is longer than our bag. We have extra handle going on here so that it can
go around our body. You want to join it
right here at the V. You're going to take
your handle and line it up. You're going to join another
piece of this off white, a nice long one,
and you're going to start in the center,
is a good place to start. Work your way down
five to six stitches, then back up into the seam, and then the same on this
side and back into the seam. You're going to want
to slip your hand down there in between so that you're not joining
the bag and closing it up. You only want to go through the one piece of fabric,
not both of them. Once you join the white, then you're going to take
a strand of the purple, nice long one again, and you're going to do a backstitch the
same way, and again, keep your hand under
there so that you're not sewing through both pieces, and you're going to
sew straight across the center to give it
that extra strength. Once you have both the top and bottom part of the
handle attached firmly, we're ready to create the tie that will close up
the top of our bag. Join me in the next lesson, and we will complete
the last part of our beautiful yoga bag.
19. Bag Tie: I. Now we want to make the tie that's going to go around the top of the bag. So that's a simple one. That's just a chain,
and then we're going to single crochet one
row and fasten off. So the way I do
that again is I put a slip knot on my hook. We do the slip
knot slowly again, I loop it around my finger
with the cut end lying on top. I flip it down like a pretzel. So the loops lying on top, I go under the band
that's on the bottom. Putting my hook through it, and then I pull on the two ends, and then I pull them
apart to move it up to my hook, and
I'm ready to go. Now I'm going to chain. I think for this one,
I'm doing about 120, I'm looking for something a little longer than the handle, so about 35 ". You can just chain and stretch it and measure it with
your measuring tape. But I would suggest
about 120 chains and then see what that gets you. And then you're just going
to do a single crochet back. So let's just start
into that. So 120. Now I've chained 120,
and to work back, I'm going to start by working in the second chain from the hook. I will work a single crochet
and a single crochet in each of the chain loops all the way back
to where I started, and that's all I'm
going to need to do, and then I'll finish off. What I end up with
is this nice tie made of one row of
single crochet. When I got to the end, I just tie the two ends
together and then I darn them literally right into
the back of that first row. What I end up with is
this nice little tie that I can use to tie up my bag. Here we have the top of our bag, the opening right here, and
that's what this tie is for. And I use my crochet
hook to help me do this. I'm going to thread
this through One loop. Let's see where I
want to do this. I think I'm going to come
through this hole here, one down from the corner all the way around by these flowers. I'll show you where
I'm going to do this. I want it to tie. I guess it's
personal preference. You can have it tie on this
side, where the handle is, or you can tie it on the opposite side where
the handle is not. I think I'm going to have
my tie on this side, thinking that if
this is on my back, the tie will be hanging on
my back, which might bug me. I'm going to leave the tie
where it's hanging out loose. In that case, I'm
going to flip it over. And start on this side. Taking the end, I'm going
to start by bringing it through one down
from the corner, and I'm going to pull it all the way through
because I'm going to start working this end
in all the way around. I'm going to come
back up this side of these two petals right here. So I use my hook to help. I really don't need
the hook. I could just do it with my fingers. And then I go back down the other side of
these two petals. Now, this is all
personal preference. You can do it anywhere you
want up in this region. You could even
come down further, depending on how much
fabric you want at the top and how long
your yoga mat is. So I'm going to put
my hook to the side because I can do this
with my fingers. I'm going to come back
up one space under the corner on the same hexagon, and then I'm going to go down in the exact same place on
the hexagon beside it. Now we flip to the back, which I call the back
because the handles there. I'm going to come back up through one of
these flowers here, and I want to come
on either side of these two center parts. And then back down. Then I want to come up on the
space under the corner. Back down in the corresponding
space on the next hexagon. So see how you can see
little parts of it here. Back up beside the petal
and back down again. I'm almost there back up at
the corner, below the corner. Then I'm going to flip it
back down beside this corner. No, I have to give it a little pole because
it's going to start to get like I don't have
enough to work with. You don't want a whole
lot, you just want enough that you can
tie at the end. And then the last
place I'm coming back up is right across
from where I started. So now that I have it in there, completely all the way around. Now I can synch it up, and then I can tie it. And I can even put
it in a little bow. And that will keep
my yoga mat from falling out when I'm
transporting it. Congratulations. You have
completed your yoga bag. Join me in the next lesson, and we'll take a
quick tour of how to put your yoga bag to use.
20. Thank You And Enjoy!: And there you have it. You've
completed your yoga bag, and you're ready to
pack up your mat and head off to yoga class in style. This bag will make transporting
your mat so much easier and so much more enjoyable with your one of
a kind creation. And these make g for all your
yoga enthusiast friends. The final task for
this class is to post pictures of your yoga bags
in the project section. I am so looking
forward to seeing all your wonderful creations and your awesome color choices. Class has inspired you to experiment with more
granny square ideas. You can find lots
more granny squares over on my blog and
my YouTube channel, where I love playing
with lots of color and lots of texture. Thanks so much for
joining me and crocheting along with
me in this class. So many creative
projects await for you, so make some space for creativity
and enjoy the journey.
 Jane Snedden Peever, Living the Creative Life