Transcripts
1. Introduction: Hello everyone. I'm
Denise Love and I'm super excited to welcome you to my modern jelly plate
printing class. It's going to be a
blast seriously. In this workshop, we're not just going to explore the
jelly plate printing, we're going to give
it a modern makeover that's all about using top notch papers and paints to create some seriously cool art. We're talking about making your own sketchbook filled with funky painted plates and turning your prints into
abstract masterpieces that are going to
have you going, did I really create that? Whether you're an
experienced artist or just dipping your toes
into the creative pool, this journey promises to
be an absolute blast. So buckle up for an artsy
adventure like no other.
2. Class Project: For your class project, I want you to put
all the skills and techniques we've
learned into action. And create your very
own abstract sketchbook or freestanding piece. Feel free to experiment
with colors, layering stencils, and
mixed media elements. Let your creativity flow
without boundaries. I can't wait to see your unique interpretations of this process. Remember, there are no
wrong answers in art. And your masterpiece
is a reflection of your individuality
as an artist. Let your imagination
run wild and let's celebrate your creative
achievements together.
3. Supplies: Let's talk about our
supplies in this video. You definitely don't need everything that I'm showing you. But I want to show you
all the options and the things that I think
about and consider. When I'm starting like
a jelly plate project, I've decided that
I want to fill up some Sketchbooks with
some jelly plates. I have a couple sizes here
and I'm going to work in the Strathmore
Mixed Media Books. They are a couple sizes. I found a couple at Michael's, I found some on line. The one at Michael's
is a soft cover book, which I really thought
that was very interesting. The ones I got on line
were hardcover books, but I still want to have like just a little collection of funky plates in my sketch books. Both of these are
mixed media pads. This is a 5.5 by eight inch, which is 14 by 21.6 centimeters. And this one is 7.34
by 9.3 quarters, close to an eight by ten, which is 19.7 by
24.8 centimeters. They're both 90 pounds. Jelly plates tend to do better, the prints tend to do
better on smooth paper. That's not super heavy. You can do it on heavy paper, but I tend to like
medium weight papers. Personally, for collage papers, I like really thin papers
to do jelly plate with. I am working on mixed media, 64 pound smooth paper
in these books, and you can see where I've
already started playing, that these make a
really good surface for interesting funky prints. That is what I'll be working
in for my sketch books. I recommend a smooth paper, like a mixed media paper
or a Bristol paper, rather than a cold
press watercolor paper, which has a lot
of texture to it. You could use hot
press watercolor paper to that'd be fine. Just try to go for something
with smooth surface so that the surface doesn't
interfere with the print that we're
pulling from our plates. You could also use freestanding mixed media
paper sheets of paper, and these are also U smooth. They're a little heavier
than the sketch books. These are 184 pound paper, which is a nice heavy
weight actually. In the other jelly plate
class that we did, we used this heavier paper and
it makes beautiful prints. I like it because it takes a variety of media
and it's smooth. You could use hot press,
watercolor paper. You could use Bristol Board. I also have a Bristol
pad here because I thought I might want to
experiment on the Bristol pad. This is 96 pounds. It is a little bit lighter than that mixed media and it's
smooth and it's going to make a nice weight
for a paper that's another option for you is
a recycled Bristol paper. That's the papers you'll see me pulling out and using in class. I like to have quite
a few pages handy. That's why I have
three sketch books and a couple of pads of paper. Because the jelly
plate printing, when you get started,
it's very addictive. It goes pretty fast. You want to have lots of paper that you can switch
out things because you want to be letting some things dry while you're maybe
getting creative and putting paint on something else while it is very thin
layers of paint. And as we're building
up the layers, they're very thin layers, so they dry fairly fast, but you still want to give some of those pages time to dry in between some of those
layers. That's my paper. Then for the jelly plates
obviously need a jelly plate. I've got several
sizes of the plates I have probably every size that I think they make and shape. I have the great big
plate which I'm not going to be using today,
but I do have it. The two that I'll be
using today are new. But I got plate, you can tell I use these
at a lot of times. I don't clean up in
between the plates. It's a pain to clean up, but at the same time, they stay in better condition
if you do clean them. That's why I'm going to
start with a fresh new plate today that I've had for a while, but it's hadn't used because
the other plates I have, I've gotten nice and dirty. Same with this great big one. I've gotten it nice and dirty. I'm going to be using in class probably the eight by ten
inch jelly plate because it's a good size for doing
the sketchbook wide open, like this, like a whole page and seeing what the print
does on each side. It's also a good size for
this little bit larger. Book that I got. It
should be able to do a whole page of these then. It's also still okay for
the nine by 12 paper. We'll be like inside with our print and have a little
frame around the print. But that's perfectly fine too. And we can trim that
frame part off if we just want wall to wall paint. Eight by ten, I think for me is going to be the best
size to experiment with, but they do come in other sizes. Five by seven, you
can get six by six, you can get shapes. I've got square,
oval, octagonal. The reason why the shapes are
fun is because then we can paint a shape and then print
a shape within our design. It doesn't have to all
just be the flat print. I will be pulling
out the shapes. I may be pulling out like that, five by seven because this
might be a good smaller thing. That we can then partial page print in something
to be interesting. Five by 78 by ten
and funky shapes is. I think what I'm going
to be going for today, you want to have some things to draw patterns in the paint or at least I do jelly plate makes these little scrapers that are soft and won't
damage your plate. You don't want to use hard scrapers or things with points. I've got some of these little
scrapers in a hard plastic. You don't want to drag these
hard plastic or pointing things or anything that's going to pierce the jelly plate. You don't want to do anything
that's going to pierce into the jelly plate because it's going to ruin the jelly plate. You want things that are soft. Silicone jelly plate has
a little collection of different shaped combs that you can get those online if
they're still available. I've had these for a long time. This I use as a stencil. Sometimes you can also
get the catalyst wedges, which I know those
are available. These are silicone wedges. They're good for paint. They're
good for the jelly plate. They've got a smooth and then
lots of different shapes. That's a great option for
making patterns in the paint. You could also use cardboard, very interesting
cardboard shapes. This is corrugated cardboard
inside of a packing box. You can see how that would make a really interesting texture
on your jelly plate. I also like things
like punchinella. This is the metal sequin waste left over from
punching out sequence. It's like a metal ribbon
perfect for stencils. I've got a couple of different
sizes of the punchinella. You can also get stencils
that have different shapes. I like some of these
from PM Artists Studio. I also like stencils
from Tim Holtz. Also have several favorite
stencils from Stencil Girl. Just to give you some ideas
on different stencils and things that you might consider
as part of our work today. And then we'll just
see what we can create pattern wise
and funkiness wise. You also want some rollers, so you need some Breyer rollers. And these are in
Breyer rollers like Speedball makes
these and they're usually for printing
processes and stuff, but we're going to be using
them to roll paint onto our jelly plate and create smooth layers of paint to
then print onto our paper. They come in several sizes. I do like having the smaller
size and the larger size. I think this looks like
it's a two inch and a four inch up. Two, yeah, two inch roller
and a four inch roller. If you only get one roller, get the four inch roller. But I do think it's fun
to have different sizes. You definitely need Breer
rollers for your jelly plate. Here's another mark
making thing that I just happened to get
yesterday at Michael's. Look at these little
silicone brushes, I thought that was a cool thing. There's other silicone brushes from Catalyst Two
at the art store. Well, this is
Princeton art brush, so maybe that's Princeton rather than Catalyst. But look how fun. Oh yeah, I think
it is Catalyst H, Look how fun those are. Look at some of these
silicone brushes with patterns at the end. And this one came
from the craft store with these little patterns. I thought, oh, fun to make
stuff in our jelly plate. That's some more options. And catalyst, wedge,
catalyst square one. I love those. Okay.
The other thing that we're going
to need is paint. I use lots of different kinds
of paint on my jelly plate. All acrylic, but lots
of different types. A lot of times you
can use craft paint. I like better paints than
craft paints when I'm doing elevated jelly plates, I guess you could call them, because these are more
artistic rather than crafty. I will use the nicer paints
from like the Blick. Those Matt acrylics are some of my favorite
because they're not shiny. You could also get nice acrylic paints
like Liquitex basics. These artists loft ones
are nice Liquitex. Basic ones are like a
nice student grade. These are like a nice
level two out of their three levels
of grades of paint, but they make really
great jelly plates if you're having trouble with your paint drying
too fast and you're getting frustrated because
depending on where you live, the paint may dry faster
than where I live. You can add paint
retarder to your paint. Golden makes a retarder and
you can mix a little bit of that in and that'll give you a little more work
time with your paints. So just be aware that is
an option that you can do. Another thing, I've got
these flat paints by Golden. I like these because they're in these little canisters and they're not shiny.
That's a good option. I also like to play in these little fusion
mineral paints. These are furniture
paints basically, but their colors are
so amazing and they're a natural mineral paint that I have just become
obsessed with these. They come in big
little pint pots, but if you find somewhere where they have the little
sample size pots, they're perfect for
your art room and just collect all the
colors that you just love. I may be pulling some of these out and these are
fusion mineral paints. You can see you've
got lots of choices. You can also pull out
heavy bodied paints. They may be thick, but you could add a little
water to them. I've got Golden. I've
got Windsor Newton. Just pick a few that are
your favorite colors. You could work with those also. That's another choice. And then once we get to the point where we're adding layers and we want to create, say like our own stencils, because we've created
our own stencils in the last class two
and I still have those. But I do think it's fun to
make our own stencils or masks where we have areas
that we don't have paint. And then when we put
those down on our paper, we end up with
interesting shapes and things that
are unique to us. I thought today
that we could make some more stencils or
masks to make things with. I make those with Uo paper. Upo paper is basically
plastic paper. This is the 74 pounds, which is a fantastic weight. These are plastics. They will take a
little wear and tear. Whereas a piece of paper, if you get it wet, it
starts to disintegrate. It's going to tear.
It's not going to last. I can still be using the stencil ten years from now because
it's the Uo plastic. And as long as I take care
of them, which for me, that doesn't mean anything
more than stacking them and keeping them nice in the container where I
keep all my jelly plates. As long as you let the
paint dry in between uses, you can still just keep on using these as your own custom. One of a kind, art stencils that are going to make
your art unique to you. We can just make all kinds
of shapes and I'll show you again how we cut these
out. It's very easy. I'm just going to draw on the
upo paper the shape I want. And I'm going to take
my exacto knife and cut a shape out on a cutting mat. And we'll get these
yummy shapes. We'll see what we create in class that I do that on the Upo, I have the nine by 12. Upoi also have the smaller pads which are approximately
five by eight. That's a good size also, but if I want to do it
on these larger pieces, I might want a larger paper. I just have it available. One other thing that
I thought we could do while we're doing is create some collage papers basically
as elements that we could then put as another layer on our paintings before
we finish them. It doesn't have to
be all of them. This may just be a few
pieces of collage that you use here and there throughout your sketch book if you wanted. But there's a couple of
things that you could use. You could use really
heavy tissue paper. I have some onion skin paper, which is a very nice
translucent thin paper. I also have from, I think these came
from Costco or Sam's. Let me get that out of the way. A great, gigantic box of
heavy weight dry wax papers. And these are basically
for restaurants, and they're deli papers
to wrap sandwiches in. These are a perfect weight for making some collage papers. I like the collage papers
to be thin so they don't build up too thick as
you're gluing them down. That's why I like say
like this onion skin or this deli paper or
really heavy tissue paper. They're perfect for layering
and painting and creating. I thought just having some of
these available and making some papers for ourself would be fantastic. But these are cheap. You could get a whole big box. This is also the paper that
I used to put in between artwork to store
them if they've got something on them
that I don't want to get on other pieces of paper. These dryer wax papers
are fantastic for having available
in your art room for lots of different things. You get these from the
grocery store too. It won't be as big a box, but it's the same thing. Looks like a waxy dry paper
that liquids wouldn't like soak through so you could
wrap a sandwich or whatever. That's what those are for. All right, so now
that we've gone through most of the supplies that we're going
to be doing today, you don't have to
have all of this, but at the minimum
you need some paper, a jelly plate and some paint. And the Brayers,
that'd be the minimum. And we're just going
to see what we can create today. So
let's get started.
4. Cleaning Your Gelli Plate: Let's talk about how to
clean our jelly plates. You'll know at the beginning
what we need to do. I told you that I just let mine get dirty
and store dirty. But that's really
not the best way to treat your jelly plates. They'd say that once you pull the plastic off of
your jelly plate, not to put it back because
usually that's going to create some bubbles and air holes below the plastic that
weren't there originally. That's going to create weird
divots on your jelly plate. I generally have the plastic on one side and I take
the plastic off the other side and I use
that one side and I let that plastic live
on the jelly plate. But on these older pieces, the older plates, I've taken
that plastic off both sides. I do actually had
one that I had, just put the plastics back on, didn't even think
twice about it. Put it back in my packaging. The next time that I went to use that plate and I pulled
that plastic off, I had these great, big giant divots in my plate that I'm
like, what are those? Like where an air
bubble got caught and it just created a
permanent indention in your plate. You
don't want to do that after the plastics
have come off, Don't put them back on there. What they tell you to
do is take a piece of printer paper or just paper, and put that paper on the jelly plate and store it in your package with
paper on both sides. That's what I've done here on just bigger piece and you can see I put it away, dirty, dirty. That's not good for
your jelly plates. I want to tell you
these are mostly like a mineral based gel product
and they don't last forever. The more you take care of them, the longer they will last. But baby oil, like Johnson's baby oil is
basically a, a mineral oil. This is what you want to use to clean your
jelly plates with. Basically what you're
going to do is squirt some mineral oil
onto your plate. You can spread that
around and let it sit and soak
and do its thing. And then you'll be
able to come back in a bit and get all that
paint to come back off. You can see on here, I've got
some of it on my fingers as I'm just putting it
on the smaller plate. You can see that I can just basically rub this
paint back off with my fingers very easily
because this one's fresher. I was playing with this
plate yesterday and I just didn't clean off the
extra paint when I was done. But if you will clean off your plate in between
at the end of the day, it'll be fresh and clean
for the next time. Then usually what I do with that is I have some shop cloth. Sometimes I'll just come back, wipe that jelly plate down, make sure I've got everything off of it that I want
to get off of it. And then cut a piece
of paper about the size of the plate and
put the paper on there. And then store that in its package and we're
ready to store it. These where you've let the paint basically dry, super good. They may take a while for that mineral oil
to do its magic. In that case, you might put some oil on there and
just let it sit for a while and soak in and soften up that paint and then come back and
clean that plate. Another thing that I do
sometimes because I've got baby wipes, non scented, just plain baby wipes
over here on my table. You could also use a
baby wipe to help you come back and get
the oil back off. After I do this at the end, I don't want the oil on there and then the
paint on there. And then do my plates, unless I'm looking
for some interesting texture, usually this
is the last step I do. And then I put the paper on and I put it back and store it. And this mineral oil soaks in
and keeps the plate fresh. I don't normally clean it and then use it as a printing
plate in the same day. I clean it at the end
and then I store it away and let the mineral
oil soak in and dry and not be so oily on the top. That is how we're going to clean our jelly plate
with some mineral oil. Baby oil is good. It's good for your skin.
It's not harmful if you're playing with your
hands and you're working it really on your plate. Put some baby oil in your office. Yeah, this
plate may be ruined. I've left so much paint on it, but I could come right now, put paint on top and see if some of that
will come off too. Because we paint will
reactivate some of that paint. But that's been drying on
there probably a year. I've probably ruined
that jelly plate. This is why you want
to clean the plates before you put them away. If they've got a little bit
of paint speckle on there, not a great big deal, but that really is probably more than I even should
leave on there. Just make it a habit when
we're done for the day to clean your jelly plate
off with some mineral oil. Store it with a clean
sheet of paper, then put on top of it. Then the next time you want
to use your jelly plate, it'll be beautiful and ready. All right. I'll see
you back in class.
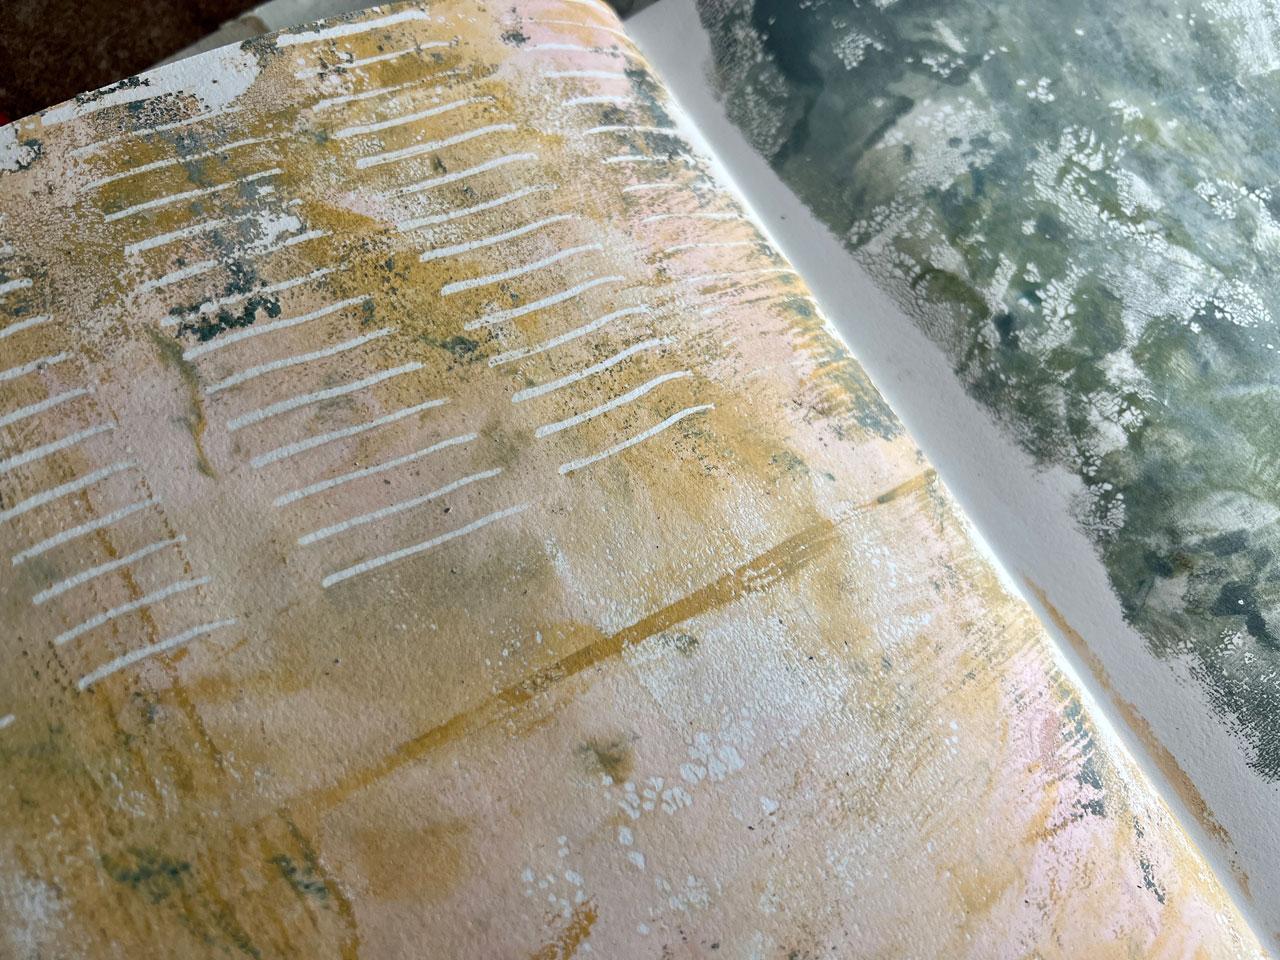
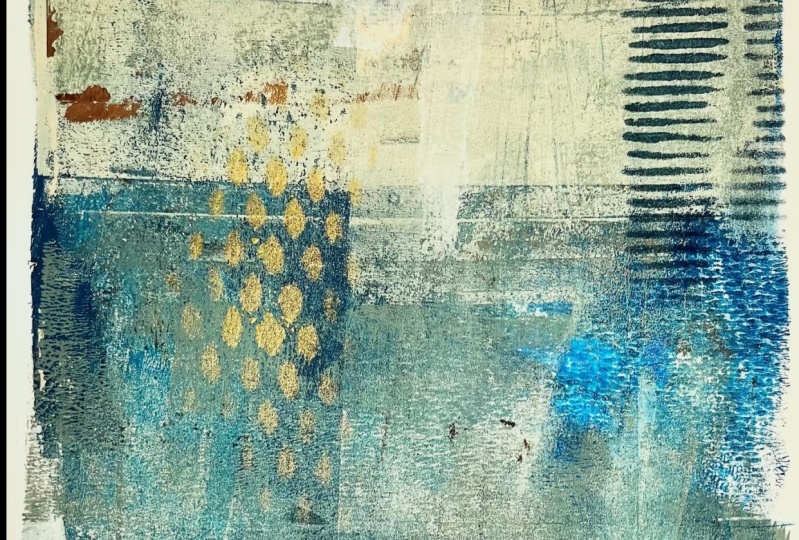
5. Layering Basics and Pulls: I thought we could start
with some of the basics. I've just taken some
of this cannon, Excel, recycled Bristol paper, which
is a bright white surface. It's a good surface,
it's a 96 pound. It's a nice weight.
And I've just cut these pages in half
so that I could work on the smaller plate and
just see how this works. I thought I would pick
a couple colors and we could do a pull and
see how that works. These are just the master's
touch acrylic paint. This is Liquitex basics. These are more of a
medium body paint. I want you to start off
with a little bit of paint and see how far that goes. Because these
paints do go a long way and you're basically going to be rubbing
these on the plate. You want thin layers, you don't want great,
big thick layers. I do want it thicker
than that though. If it's too thin,
add some more paint. You'll know if it's too thick
once you start painting stuff because it'll be squishy, like your paper
will squish around. Probably come back and put
some paper down under here. Let's do that, because I'm going to be a little
bit messy, apparently. There we go. You
want a nice layer? You don't want it so thick
that everything's going to squish around when you
put your paper there. Then I like to have a piece
of, usually printer paper, but I'm going to use what I
have over here to set this on and get all the extra off of. This is how I clean
the roller Then If there's too much paint on the
roller that it won't move, then I peel the paint
off the side here. It just peels off, but I do keep you
can have a piece of paper there and that can be like your junk paper that
you're creating on. You can have a piece of
printer paper there. I just picked a piece of whatever I had the
onion skin over there. Maybe that can be a
piece of collage paper. Then you want to put the
paper straight down on it, don't squish it around. That's why I'm saying if
the paint is too thick, it'll squish around on you, whether you want it
to do that or not. And then do your first pull. That was a pretty good pull. There's a little
tiny bit of paint on there for maybe the last
time I used the plate. The plate is pretty clean. Then we're going to
pull a second pull. The second pull
is my ghost pull, and I call it a ghost pull
or a ghost print because you just get what's left over
and you're now ready to say, okay, let's do the next layer. Maybe on the next layer
I'll do a different color. You're just squishing
it around until you get it where the
whole thing is covered. Add a little more
paint if you need to. I almost think at this point, it's fun to not cover
the whole thing and let it do its
coolness like this, Roll that paint off of there. Here's what I like about leaving the plastic on the one side. I can actually flip
this over and match it up to what I've already done and see what I've got
going on there. Then we can do our pull
look out pretty that is. Then we can come back and do our second pull of the leftover. That's why I like the
clear on the one side because the sun fun, that is layer, you can keep
on layering on top of the. Once you get that
several layers going, you will want to let these start drying before you
continue layering more on top because even
though the layers are thin, it's still wet. Paint the acrylic
dries pretty quick but be working on a whole
bunch at the same time. Set this to the side,
let it dry a bit, and then you're ready to maybe do another layer on top of that. That is our first pull, our ghost pull, and how we
can layer paints in there. All right, I'll see
in the next video.
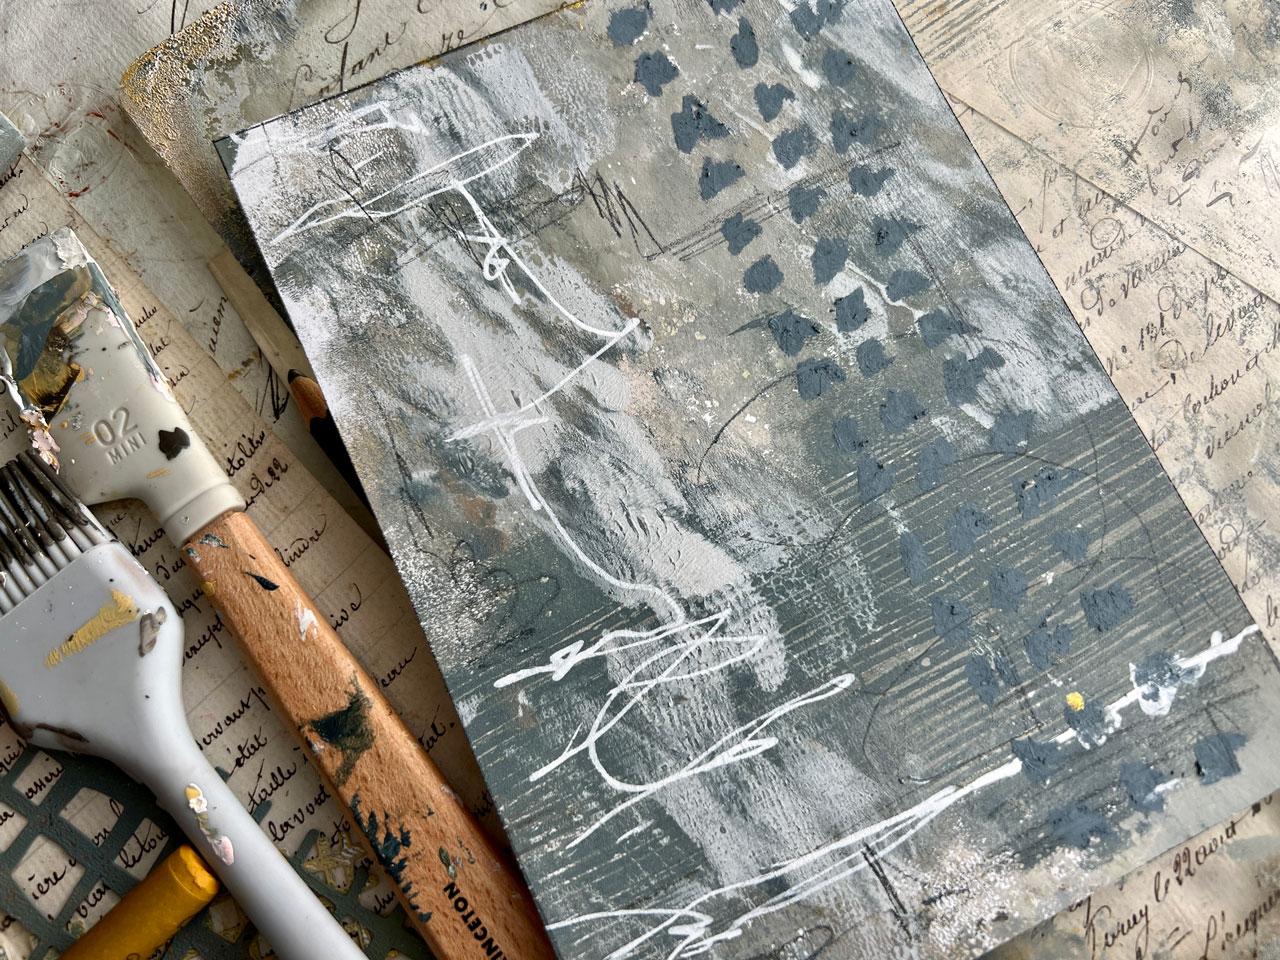
6. Mark Making: Let's talk about doing
another layer on here. But maybe doing some mart
making in our paint. Before we put that
over on our paper, I'm looking at what
I've already got on the paper versus where
we've gone from here. We could do a layer of
white. That might be fun. What I'm going to do is get the paint rolled around
and get that started. And you can see as
I'm doing this too, we can make some
interesting marks just with our Breyer and how we put that paint as how
we scribble it around here. We can get some interesting
marks just like that. We can also now play with some of our mark making
tools that we talked about, the little rubber combs, any of these things
that we talked about. Let's use this catalyst wedge. Let's just pull some
paint out of here. It's a very thin layer. It's just going to take
maybe a little bit of. We'll get that off of there. Let's see what that does with a little bit of mark
making and the white. And I can line that right up and then we can pull that off
and see what that did. Look at that we could go
ahead with our ghost pull. We just line it up in the end. Our ghost pull might
just be collage paper. It might be one that we swap
and do the first pull on. As we get further along, you'll see we'll have some paint stuck onto our piece
as we're going. That's okay, we're just going to continue
to layer in here. Now let's do something
completely different. Instead of covering
the entire plate. How about if we
just cover part of the plate with one
of the colors? That's fun. Then always
just do this as a habit. What if we take, say, one of our mark
making things and we come in and just drag
some marks out of here? Then I'm just going
to wipe that off. Let's see what we got here. And we put the paper here. I think I might want
this on the bottom. Oh yeah, Look at that. We've still got
paint on our things, so let's just do a ghost pull. I didn't line it up.
That's okay. Look at that. The second poll was actually better than the first
poll when we did that. That's an interesting thing. And different observations that I want you to make as
you're doing this. If you're like, oh, I
really loved that and I wish this was over here. Now, you know, as we go forward, that was super cool, painting it, doing
a pull and pulling, the second pull for the
more interesting design. Let's see what else we got
all kinds of paint over here. I really like these little half tiny tubes because then you can use a whole bunch of
colors when you do that. And then the ones that
you used the most of. Well, that was your favorite. Okay. What if we took some paper or we
could do U po paper, but what if okay,
this is random. But these are over
here and they're the right size already. These are just some
watercolor paper, which I really like, but
they're the right size. And I can keep using these. Like what if we want
to do like a partial, something like a stripe, say in like a color like black. We can tape it off,
we can mask it off, we can make it where we're only trying to cover like one
part of the jelly plate. Not only did I not cover it, I just pulled it back off. When I did that, that
was interesting. Again, always be rolling
the Brayer off on your scrap paper so you're keeping it clean
and you see how we're creating really a
nice pattern there. Then we can pull this off, we can use those again. What if I randomly want
this stripe to say, be somewhere right here? Let's just do it right there. Let's just do it be. Oh yeah, that's cool. All right, And oh
yeah, super cool. Check that out. Super fun. All right. This
little section is all about mark making and figuring
out what you can get. See now that might be
way too much paint. In a case like that, what I might do is rub some paint on. I already know it's too much because it's given me a pattern. So in that case, definitely have some scrap papers to
the side that you can then you rub some
of this paint back off so that you're not stuck with way too much
paint on that roller. All right, so what
if we did this? All right. We're going to try
something different here. We took a stencil. This is a PM Studio stencil. What if we took a
stencil and did this pattern and pulled the
stencil off? Look at that. Okay, then I'm almost wondering what if we should
do this on our ghost. Pull one and just see like
what did that give us? And you just want to
press down nicely, Don't swish your paper around at all. Okay, that's interesting. The reason I did that was
because when we did this one, it had a cool pull
for the second one. Let's see what the
second one does. It may be too matchy, matchy. I might not be able to see it, but I thought it would
be fun to experiment. That'll be fun going
forward playing. Okay, that is not as vivid as I thought it would
be on the second one. That's very interesting, but that's another thing
that we could do. We could do stencils, pull some paint, see if we're
liking what it's doing. And then we can do a whole
bunch of pieces in that way. All right, that is all
about mark making in your paint and just seeing what you can get on some
of these upper layers. One thing I want to
remind you about when you're mark making
on the jelly plate, do not mark make with
anything that is sharp or hard or that will make a dent or a scratch or
damage the jelly plate. Make sure everything
you're mark making with is a paintbrush or some type of soft silicone tool
that will allow you to drag across it but not stab
into the plate itself. You don't want anything like
a pencil or a sharp tool. I like to use these dip pens. And you don't want
anything with a tip or a point that's sharp. Nothing that's plastic. Like these hard plastic
ones that's too hard. You want anything that
you're going to pull or mark make with to
be some type of soft, rubbery silicone tool that's not going to stab into
your plate and damage it. All right. I'll see
you back in class.
7. Creating Stencils & Masks: Let's talk about making
some stencils or some masks here
for our paintings. I'm looking at the ones
that I've already made. I've got some little circles and some little
rainbow shaped ones, and bigger piece with the
circle cut out of it. Some of these are
pieces that are cut out and I saved
every single piece. Just looking at
what I've already got and what I
might like to have, maybe I want to focus on in a new collection
going forward, you can see how I just
out and cut out and cut out and another
like rainbow shape. I don't throw any
of the pieces away. Every piece I cut out
has another piece that can have a shape
that I can use from it. I just save those. I'm thinking like what
can we cut up today? I'm going to get out a
piece of U Po paper. I am working on a cutting mat that I'm not
cutting into my paper, cutting into my table. These you can get
at the arch store. You can get them at
the fabric store. This is a Blix self healer mat that I have. It's
a pretty big one. I have a smaller one too, but I don't know where
I've hit it from myself. What I like about po paper
is you can draw on it. You can set yourself a
line and draw a pattern, design a hole, whatever it
is that you're thinking. And then you can
use an exact knife with a nice sharp blade. You do need to maybe change the blade out if you've
got a dull blade. And I'm going to use an
exact Do knife to cut a pattern out because
you could try scissors, but that only work if
you're cutting like big pieces and you don't
have anything in the center. Scissors will work too. Then I'm just thinking,
what do I want to maybe have a design of? Maybe I want some botanical. Oh, that would be fun. What if I went outside and
got like a maple leaf? You could do just spit ball
and ideas here for you, but you could go outside
and maybe get a leaf and then we could draw the
leaf. That's one idea. Especially good if the trees
still have leaves on them. We could draw random odd shapes feeling like an odd shape day. Maybe I want some odd
shapes and you see how nicely you can draw on
a piece of U Po paper. If it's something like that, you could cut it out with scissors. But maybe I want the
outside part of this also. I can draw myself like a guide. Then I can just
take my exact knife and follow that line
as close as you can. It doesn't have to be perfect then if your blade is dull
like mine apparently was, it won't cut all the
way through the paper, but you just pick the paper up slightly and get
that out of there. You want to press
down pretty good. You want to go all the
way through the PCU Po. You want to work
away from your hand. You don't want to accidentally pick it up and
slice your finger. Just be careful and
go slow and cut the entire design
out of your piece. The paper is very thick
and my knife is dull. So now I can see that that didn't even go
through the paper, but I can pick it up and follow that cut
line that I've created. Actually, it's
almost easier with the paper slightly picked up. There we go. It's
very thick plastic. You just have to experiment. I need to change the blade on my knife then if
you have a piece. Because here's the
thing about this too. Somebody asked me, how do
I make stencils out of U Po paper cutter. See we can cut out and
refine with scissors. Their I don't know
what they were using, if it was a cricket or
one of those other ones. This paper like stretched
under their dieplate, It does have that little
bit of stretchiness, unusual feel this paper is. But you can see
I'm not using one of those cutters
to cut something. I'm going to cut
this right here. I've never used those
little cutters. I don't know how to use
those little cricket things, but you could use
stencil blank on those cutters and that would probably work out
really well for you. I'm just going to create myself some random,
interesting shapes. Maybe I would also want something like I did with this watercolor
paper and I might want some lined
pieces that I could use that I could continue using. I could just take a
ruler and cut that. You can feel that it didn't
go all the way through. But with a straight line, I could do more than one pass. There we go. Now I have a mask that I can use. I
want you to do this. I want you to create yourself several interesting
individualized shapes that you can then have as some interesting
custom masks or stencils for your work. Some of these could be
some straight lines on one of the other ones
that I did over here. Let me just pull those
back out for some ideas. I did this big piece right here, like out of the corner
of something that's very interesting because when
we're working on our piece, we could then mask off like a whole section or
different areas and get some interesting spots that can create just an interesting bit of paint and then no paint. Then on our page, we can have in just
a certain area a color of paint or something. These are how we can make some interesting areas
of paint on our piece. I do like this L shaped, something weird, come out of it, shape, That's an idea for you. I also like little
shapes like this. You can just cut those
out of each other. I like shapes like this. This made really interesting
or it was just color around, color on the inside. What was making me think of
maybe something like this. Because we could have
something like this and maybe have a series of
interesting shapes. Perhaps on our piece, that would be something
that's interesting. I'm just giving you some ideas and things to think about there. I want you to start
just creating abstract, nothing super special
or different. Just something that can be you, that you can cut out of
this piece and be like, oh, that's pretty cool. I could make one of those
out of a piece right here. With the way that I cut this, I could have some
shape right there. Let's just go ahead
and cut this. Now that cut nicely,
I must have had something on that
blade. I bet I did. I do all kinds of stuff
with these blades, glues, and who knows. And see, I can cut
this right here. And now that'll be the
whole corner of something. I'm picking up the knife, I mean the ruler, when I'm doing this,
let's just. There we go. Let's just get our
scissors and finish that. I keep pushing the knife
on the ruler with that. There we go. All right. Now that's a cool,
interesting shape or something that we
can do with paint two. All right, so I like that one. I've got some squares here I can do
different things with. Let me change my
blade out. All right. This is a whole little
exacto kit I got off Amazon a while back
which are pretty cool. They've got like all kinds of different knives in here and different blades and
replacement blades. And it wasn't very expensive
if I can find it all, link that, but it's very fun. And it's just a whole little
set of Exacto knives, stuff that come in
a little tin box. These are pretty easy to change out if you've never
done this before. These just unscrew, just hold this part right
here and like screw it out and the top part comes a little further
out as you're doing that. And will release the
blade that's in there and then be careful
throwing these out. If you could throw
this wrapped up in like a paper towel
or something because it's got a sharp edge
and you don't want to stab yourself on that
in the trash can. Now, you can put the next blade down in that same slot
to be very careful. Because it's a sharp blade, you just push it down. I'm working with the blade on this side and my hand
on the non sharp side. Then once you've
got it in there, you just tighten that
right back up and that blade is then ready. That's how easy it
is to cut a blade. Then you could then choose to do some kind of like
interesting design, like a curve, like
let's do a curve. You see how easy that cuts
with a nice sharp blade. You can do that
with scissors too, but we could do a two
sided little funky curve. Be very careful you
are working with a knife that could be some
more stencils for us. I can just go ahead
and cut that straight. That could be some
interesting little trio. Just get creative here, I want you to see how
many little shapes and masks and stuff that maybe you can cut out
a one piece of paper. And see what can we create. I've got a few to
block off some paint. I've got a few to
make some shapes. I've got some funky
shapes over here and look at all this paper that I
still have to create with. This is definitely
going to be some fun, challenging,
interesting things that maybe you can create. And I want to see what
stencils you come up with. You can use regular paper, like you could take a piece of that Bristol paper and
make yourself some mask. But it's harder
because the paper is thicker and it's only going
to last a few, a few days. A few times that you use it, it's not going to last forever, whereas the plastic
paper will last forever. You don't
have to use U Po. You could use report covers, that clear stuff that
is report covers, you can use stencil blank,
all kinds of stuff. I happen to have Upo paper on hand and I thought
that'd be perfect. This stencil that I
use that I bought from PM Artists Studios, it's Upo paper that they
used to make their stencils. I'm like see great
minds think alike. Something like this to me
would be really hard to cut on a piece of Po paper. You just have to get in
there and be really precise. Let's just try this. Let's
just be really precise. I'd need like a magnifying
glass to get it really good, or just patience.
Alright, let's do this. Look here. See a nice sharp
knife makes it easier. Look at that, I did do it. If you like botanicals, you might do like a set of
leaves that would be pretty, just kind of funky squares,
something like that. You'll definitely know
when you no longer have a sharp knife
because it'll be too hard to get through your paper
and get it cut out good. But a nice sharp knife, and there we go. All right. I'm actually loving that You might take a day and just
make yourself some stencils and be real careful cutting them so that you don't cut part of your stencil
up that you already did. Like working away from
what I've already cut up. Be careful of your hands because you're
working with a knife. Look at this. All
right, there we go. Some fun pattern like
that is super cool. I want you to practice
and play and cut out some stencils and some
shapes and some masks. I'm going to cut
a few more shapes and mask out of my
paper that I've got left over one sheet of nine
by 12 goes a long way. Look at all these fun shapes
that we've already created. All right, we've got
some stencils out. I thought it would be
fun to just play on our little ghost piece
and just see what would that look like with
maybe something on top. I'm going to use some of this
little mineral paint just to see what do this paint
versus other paint. Do this paint maybe a little bit thick because it looks like
I'll let it dry a little bit, but let's see if I can get
enough paint moving around. I need to get enough paint
on the piece. There we go. Let's see, maybe
that's enough paint. But basically this is
how we're doing it. We're using it as a
little mask painting in that little section. Then maybe picking the mask up, maybe I want to do this
outside of here too and see, let's just see what
it really looks like with a whole little
section done. Who like that, that right there as I'm pushing
stuff everywhere else. All right, then the goal here
is to pick up this and be left with this and just see like what does
that look like? And this is my
little scrap piece. You're going to
waste some paper, you're going to practice
some pieces and say, what can we get if
I do this or that? That's, oh, look at that now. We can see what it does
if we left it outside. What it does for the
inside of the stencil. That's the goal with this, I want to see what can we get with some
different stencils. What if I made one that looks like a strip thing
over here that's fun. Can stick that down. We could pick a different color and do that with a
different color. Let's do that with this one. This is a yellow, like a oak or yellow one. Just get some paint out there. I've still got some green on my roller, but that's all right. I'm mostly trying to stay
within the mask area. Let's just see how that can do. I need a bigger table when
I'm doing stuff like this. Let's pick this up then. I just let those dry. I don't even worry
about wiping them off. Maybe we'll come
right through right here and just see
what that does. That's super fun. You may not be thinking that's
the most beautiful print, but it is still very fun to see. Let's just put this right
here in the middle. See if we can get that on there. It is fun to experiment and see what can we get
this paint to do? How can I push these
prints further? See, now I've got some little ghost of that
color in there. I like that. Something like this. We
could take our viewers, let me get one of those out
and see if we cut this down. Would it be something
super cool? Maybe I'm all about cutting art, like what if I took
that right there? Look at how cool that would be as a finished
piece of abstract art. Even on the jelly plate. Things that I do, I always
look at them and think, do I need to cut that down? Where could I cut that? Ooh. Ooh. Look at
that right there. That right there is super cool. So you can see what I'm
thinking and where I'm going, I'm looking to elevate these little prints
into something amazing. I actually love this
one, just like it is. But if I wanted to cut it up, there's so many good options
in here that I could cut up. I don't want you to look at the jelly plate and think, oh, who look at that
one and think, oh, I hate it because this is
maybe what you ended up with. I want you to look at
it and think, okay, now could I cut that up into something that
really works for me? This was our ghost print. It wasn't even like
our real thing. I still have something
amazing that I could pull out of it if I didn't like the entire piece
the way it was. I want you to be thinking
about these things as we're going through
and creating stuff. Look at it and think
outside the box. And think, okay,
what else could I do to this to make it
more interesting? All right, I will see
you back in class.
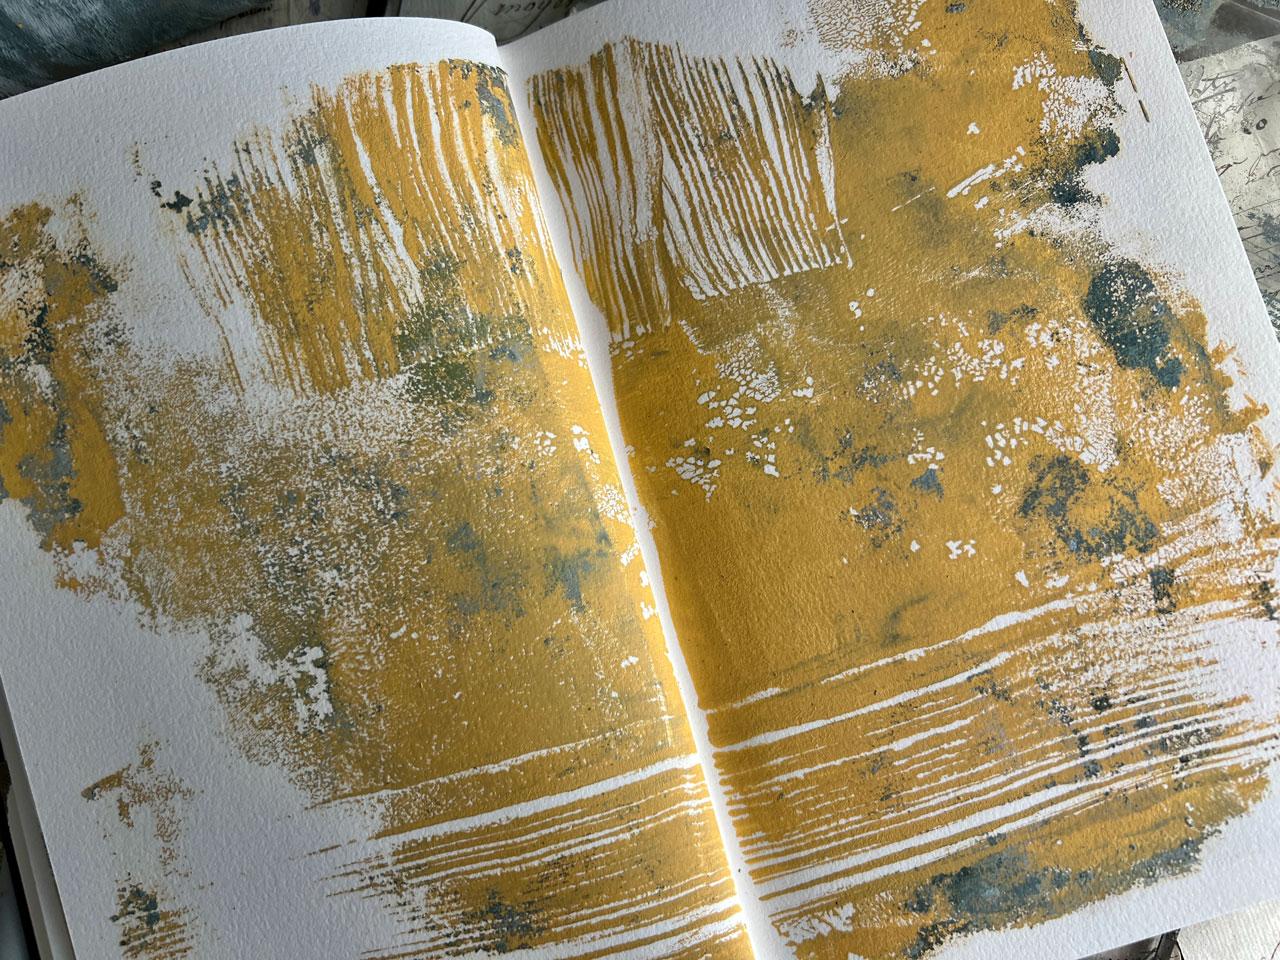
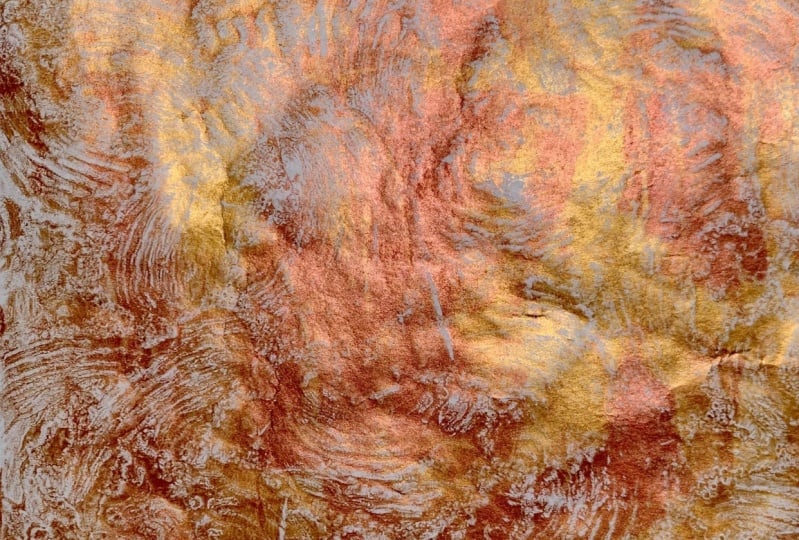
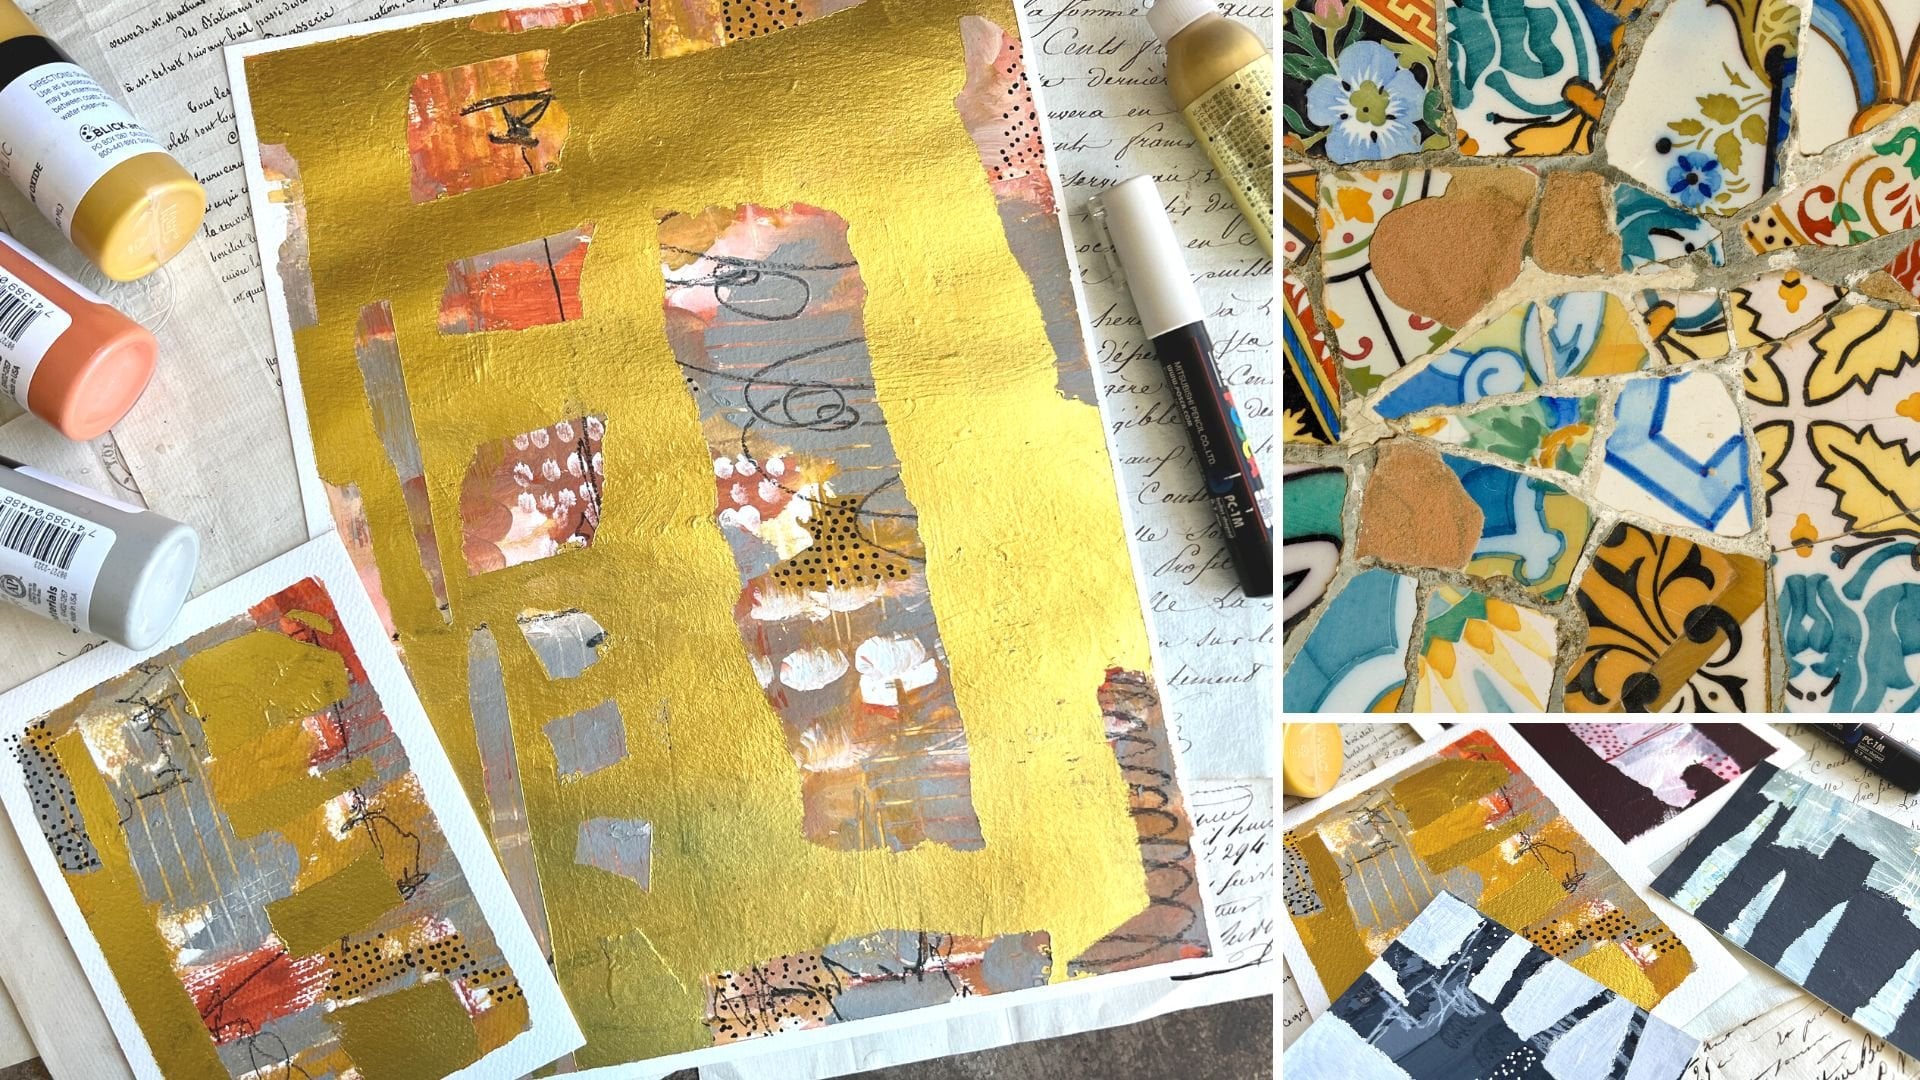
8. Making Collage Papers: I was thinking that we could get started by making
some collage papers. This is a new jelly plate. I will try my best
to keep it clean compared to the jelly plate
that I left paint all over. I think it would be fun to just play with the different
paints that you have. Different mark making tools. Get out your stencils, whatever it is that you've got that you want to
play with. Get that out. And practice with
collage papers. What I've done, I think
I'm going to play with these Fusion paints, which are like the
acrylic paint. Whatever paint
you've got that you want to play with, get it out. And I just want to have
all the colors available. So I'm putting all
the colors out over here because I got
a bunch of them. There's a little booth, that little local antique
market that has all those, and I want a whole series
with those paints. And then I think
I'm going to get a palette knife out
because I think it's easier to scoop paint
out with palette knife. Got some paper over here
for my breyer to rub on. Got some stencils and then I've pulled out like ten sheets
of this jelly paper. And it's okay if it
doesn't go edge to edge, it's basically going
to go about for here. But I just want to create some
interesting papers that we might consider using
later for collage stuff. We can do one layer,
we can do two layers, We can just play around and
see what can we create. It's and I also have maybe we'll just start
off with the acrylic paint. Look at this green gold. It's a bigger plate. A
little bit bigger thing of paint is going to be needed, but you still don't want
too much paint on it. You want thin layers. If you get too thick,
it's just going to squish around the
paper and stuff. Just feeling. Maybe we could do
something like this. Maybe you can get out your favorite
stencils and we could press some stencils and just
see what would that do. This is a random
flower, stencil, I think it's from stencil girl, but just play around
then let's just do it. I'm just going to
smooth this out. Just let it do what
it's going to do. I know these have a fold in it. I'm just not worried about that. Then we're ready to
pull that up and just see what do we get and
how did the stencil do? Did the stencil do
anything at all? I actually, because
of this color, can't really see
much stencil work. That's an interesting
observation. What if let's do some
white in with the green? I could have done my go because now I do see some
stencil work there. But let's do white on top of the green and see
what that gives us. That came up pretty good. My paint didn't dry super fast, so I don't feel like I need to put the paint
retarder in there, But I'm just going
to work in layers. There's going to be
paint left on from whatever the last layer was and we're just
going to go with it. Just going to eyeball, it
doesn't have to be perfect. This is paper I'm
using for collaging and whatever else seems fine. So let's just see what we get. Oh, that's different. And the paper is picking
up bubbles and stuff. So let's definitely
take that and do another one and
pull a ghost, pull. I can see some wrinkles
and some marks on that. That's pretty cool. Yeah, I say look at that,
that's interesting. Now, this one I can see
some of our stencil. That's interesting. Then after you
create those papers, put those to the side, move on to the next color
if you're wanting it to be completely clean without this leftover paint
shining through. Because that's going to
come on to our piece. If it needs to be
completely clean, then go ahead and
take this moment to clean your jelly plate
with your baby oil. And then do like a pull
that's not important, so that you clean that
mineral oil off of the plate. And then you can start
again with a clean one. I want to blue look at that
and I can do a ghost pull. We could actually try. I don't
want to do it with that. Let's try one of our markers
and see what we get. Making marks in here. If that shows up
what I was saying. If you like botanicals,
you might go outside and pull some
leaves off the trees. You might can squish
some leaves down on these and see what that
gives you for a pull. So that's, that's different. I can see some of the
green underneath. There's a whole lot of
pattern going on there. I like this dark
color that might be interesting with something on top or we could just
use it like it is. We could take a paint brush and just paint
something on here. Let's paint, say like this. Let's, you could paint
panicles on here too, but I'm just going to paint some marks and then see
what that gives us. You want to go fast? Well, got off my line there. All right. Before that
can draw on there. Let's go ahead and see what that gives us.
Ooh, look at that. Let's do a ghost pull
on this other side. Okay, I'm liking
that a lot actually. Good one, good one. So we've still got a little
paint on there. I'm okay with that. I'll just come up with the next
whatever it is I do. I'm going to try this kind
of pretty color here. Just going to put some paint
down to see what we can get. This one is blue, pine, blue pine is
a pretty color. Going to see if I can
mesh this around some. We're going to have
some panes gray and maybe some of that
white coming through. We're going to have just where
it's the jelly plate is, looks like it's repelling. We're going to
have some of that. We could here a little bit
and just see how that does. These are going to be
a little different on these light papers than they are when we go to
the heavy paper. That's going to be interesting to see the difference there. Oh, look at that. That's a pretty color, we could mark make on top
of just the poles. Like we don't have to put
it on the jelly plate. If we don't want, we
can just come back and mark make right
on top of this paper. Oh, look at that. I'm luck in that one a lot. Let's this one right here. Let's say we want to mark make
just right on top of this. What if we wanted to
do that Same gray. This is lamp white, so it's like a whitish gray. What if I wanted to
make right on here, don't feel like you have to do every layer on the jelly plate. If you have something
specific in mind, paint right on top of the
one that you just created. Gives you a little bit more time to work with it and you'll get some interesting marks and patterns that we're not really going to
get any other way. I'm all about mixing things up. Doing a little bit
of mixed media work with different materials. Starting off with your
base is one thing and then moving on to something else
on top, it's perfectly fine. I don't consider that
cheating at all, I consider it getting
to wherever I need to get to create whatever
I need to create. If you want to just throwing
some more ideas out there. If you wanted pencil
mark on this print, if I put pencil mark on the paper and then
put it on the plate, that pencil mark might bleed onto the plate and not come off. I've seen that happen.
I can do pencil mark on this at this point and make it like another layer
on here as I'm going. That's something to
think about too, just throwing some
ideas out there. If you look real close, you start to see some of that work that we
did and then I'm just going to set
that to the side and that's ready for us
to do something with. I actually like this
just the way it is. I'm going to go for
that if you wanted to. I really liked this one right
here where we did these. Pulled the paint in the middle. Let's go ahead with
this yellow paint. I could do whatever color, but I like this yellow. Let's do this yellow. And I need to get something
to pull paint with. I've got one of my
catalyst tools. This might be the time
that you use a retarder. If you're going and it's
drying too fast on you, just judge that how it's working and how
you're getting pain off. I'm moving fast. We'll see what that does. All right. Let's
do a ghost pull. That one's pretty, but I
want to do a ghost pull because it's not totally
seeing that pattern. And I feel like on
the second pull I might see that pattern. I'm just pressing down
pretty firm to try to get that paint to transfer
over to this paper. Oh yeah, that's what I wanted
right there. Look at that. It might be on the
second poll that you get what you're really,
really looking for. That I'd say is what I'm
really, really looking for. But I like the contrast
of the one where you, where you have more paint and less pattern.
That's pretty cool. I want you to, here's
some more that I've put over to the side. I want you to make a whole
bunch of these and just have some stuff available
as we go to get. I don't think I like
the green gold, but it was interesting to try. But I want you to make
a bunch of these, try the different
techniques out, use the thinner paper, because these are the ones
that we can now tear up and use as little collage
bits on pieces later. I think this is my favorite one where I did some
paint on top of it. Get creative work with all the different little techniques that
we've talked about. And create some pretty
thin collage papers. And I'll see you back in class.
9. Working In Your Sketchbook: I thought for this particular
video we would jump into our sketchbooks and
just see what can we create. And I've got two
different sizes. I've got three books here. What I like about having
multiple books is these get wet paint and then
you'll have several layers, then you'll want
to let those dry. But might want to
play and do like a little marathon paint session like I think I'm going to do. You want to be able to
set that to the side? Go on with the next
idea and just see what can we create
feeling like I'm going to work in the
three sketch books for this video and just make
a bunch of layouts and pages and then we'll go back and evaluate what we
did and we can add finishing marks and
do stuff like that. I want you to play with any acrylic paints that you've got, thicker paint, seems to
work a little better. I'm going to also work with
some heavy bodied paints just to give those like a little try out and just
see what we can do. I'll start off
with burnt sienna, tighten buff, and
tighten Mars pale. I want the lower layer to this burnt sienna and the
upper layers to maybe be these lighter colors and this burnt sienna
to shine through. I'm just going to give
it a try out and see it is going to work. Is
the paint too thick? Paint is thick, find
if we smish it around, we get a better coverage. And my goal here is like
lots of little thin layers. Not a great big layer that's all solid,
that's just perfect. I've got my scrap paper
over here to write things on to wipe it off. As I'm going, we might consider maybe some little marks that was just the
edge of a thing. Then I'm just going to
open these and do them as one big layout and just squish that down
as good as I can. I'm going to have some
extra paper over here. Let me just get
some of that out. Then I can use these as my ghost pulls or I can move to
the next scrapbook. Scrapbook sketchbook page. This is the Bristol paper. I'm just pulling some
sheets out to have ready for ghost pulls, and then I'm going
to pull that up and see what did we get. I did leave a little bit of paint on there from yesterday. Oh, look at that first layer. Oh my gosh. That is some
prettiness. All right. Here's where our
spare paper comes in. Just pressing down
nice and firmly. You could also, if you
feel like you're not getting a good enough Atesesian, you could take like a clean
Breyer, go over it with that. That's always an option. And then we will pull that off. Just got that center piece. That's what I was
looking for just to see what's going to pull
off. All right. I want the CNA layer
to be pushed back. I'm just going to play and see how we don't have to
make it solid either. We could here and there. I want some of that
bottom layer to shine through.
Let's just do this. I'm just eyeballing it. I could flip it over if I wanted to see exactly
what that sat down on. But just wanting to go with
it and see what we get. Nice. If I want to pull
that off, I can. Or at least most of it. Oh, yeah. All right. I'm wanting this to
be the top layer. Let's just see what we get. This is a pretty color,
it's very light. It may be really super close to that Titan that I just used. But let's just go with it, not going for anything specific. When I started off thinking, what is it that I'm trying
to accomplish with say, this particular sketch
book collection? I want it to be something where it's natural, maybe earth tones. See, we could do this way too, if you had that plastic on the back side still
and we could judge it, that's another way we
could have done that. But I want to stay
within like say, a color range of earthy tones, maybe grade down tones, maybe tones that are not
brighten in your face. Okay, That was
actually really cool. I'm going to set that
one to the side and let it be drying and
doing its thing. I think I'm going to
take the second book and see what we can get off
of this as our ghost pull. Look at that and just
work it some more. We could look like
we could do some of one color and some
of the other color. Swish them around and see
what we end up with there. That could be super fun. I just want you to
start thinking, what if I did this? Or
what if I did that? Or how could I get
a little bit of creative with the paint going
this way or going that way? I just want you to see
what can you create if you think in the terms
of what if I did this? What if I did that? Because that's how we
learn and experiment. And really the goal here is to find some
stuff that I'm like, whoa, I love that so much. And then how can I
translate that into say, a piece of art on just paper
rather than in Sketchbooks? Oh, see now that right there. All right, Let's get
our little ghost paper. We're going to call
it trash paper, but it may end up being
something we like. You never know. Oh, see more layers.
We'll get there. All right. Actually love
that, just like it is. And I'm thinking, what if we did like a little stencil
grid there? Maybe in. All right, check
it out. Let's do this in this Titan buff. My goal here is to to
do like several layouts in one color way and then I'll maybe switch to
another color way. All check it out.
What if we did this? Let's get that color
on there then. What if we put this over here? Maybe with the clean one. We just roll that right on. Well, didn't do anything
that was interesting. All right, maybe we'll get
it this way. Let's try. It might not get anything, but what's worth a try, This is how we discover. Okay, it really blended in. We didn't get much off of that. Let's do this ghost poll. I should have done a color
that was more contrasty, was maybe a different, like maybe I should have
done that, sienna instead. Let's do that. It's all about your trials
and experiments. What happens if I do this or
what happens if I do that? See, now that we've done that, we kind of know, oh, that's what happens.
Did it work? Did it not work?
What was successful? Not as successful. All right, let's try this again. This is that stencil from PM Artist Studios.
It's like wonky. It, I think is the
name of that one. All right, let's try it
on this one and just see, are we going to get any of that? See that much better. We might do a ghost pull on this side and just see if we can pull any
little bit of extra off of. Oh, yeah, see that right there, contrast color,
definitely the way to go. Let's just pull the rest of this off of here with
our extra piece. And then we'll just
leave that for whatever it is that
we're doing next. Then you'll notice
by the time that we've just done that and
we come back to this, this is fairly dry. And we can add some more
stuff to it if we want. I might think on this like what else do I want
to add to that? I really liked what that did. I really like that. Maybe. Let's go with this creamy
color here, the Titan buff. These are all golden acrylics. These thicker paints
that I'm pulling from, I'm going to pull from my little fusion paints
and other paints, and we'll just see
what we end up with. I want you to try all of the different paints
that you have, but I'm going to just
see what am I getting as I'm layering and adding stuff with the different
kinds of paints? I already know I like
all those colors though. All right, let's
see what that did. All right, not enough contrast. I can't see that I really
did anything in there. I think what if we throw
in maybe a surprise color? We could throw in this grayish
white. Let's just try it. While I'm thinking about it, you don't have to put all your
color on here with a bra. You can come back and
put color on with a paint brush with something
like that silicone piece. You can let that be your
marks that you made. We can make patterns and
designs not just with stencils, but with the way that we
spread paint on. All right. Thinking that gave me
a little bit lighter. I'm building some layers here. You'll notice that gave us a little bit of that whitish
gray color in there. I love that. Here is Chesler, which is a dark color. What I could do, just
got that on here, left over a little bits. What I could do, we could
make a pattern out of this. Do you'll want to do that
color? I don't know. Let's see. I don't
know if I'm there yet. Maybe this green. Green is really pretty. It is conservatory.
See what we could do. Do some lines and patterns and just see like what did this give
us? Let's try that. I'm not even going to
rub it in very much. See if I can get that
off of my piece here. I do like to try to clean
the paint off as I go. Then let's just see what this color is going
to be on here. Oh, I like that. That
was pretty cool. All right. So I don't want
that on the next thing, so let's go ahead
with our trash paper. Just see where we're going. Cool. Got a little bit
of paint left on there, but I am liking what that's
doing there. That's fun. All right, so I could do like a little
edge of this piece here. Oh yeah, see that
was pretty cool. I could go on to the next
layout and just let that be on that layer. All right, got that started. All right. So I can keep on with whatever colors I'm thinking
and I'm feeling like I want to go with some
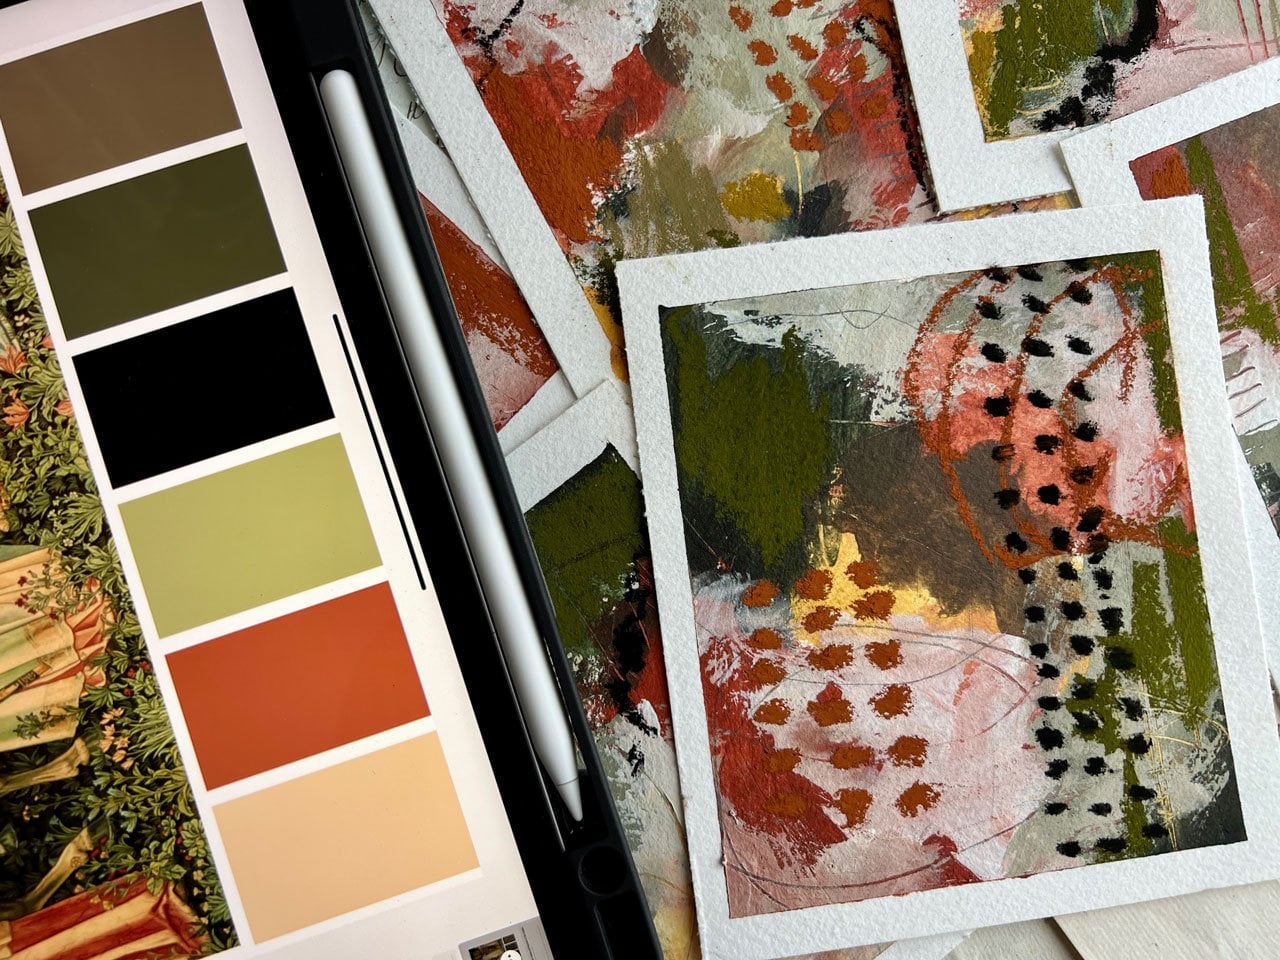
neutrally earthy. This is Kam, kam, AK, HAM. These are the fusion colors. I'm just going to
play in some of these for some of my layouts, use whatever acrylic
paints you have. Don't feel like you got to get anything that
I'm using at all. Just play with some of the stuff that you've
already got on hand as you're
experimenting and learning. Because the goal here, my goal, is to fill up my
little sketchbooks with interesting layouts. And a little tip here, if you feel like you
didn't let the pages dry enough in between
going to the next page, if you're working real fast, you could put a piece
of wax paper in between these pages to keep them. Look at that. My really like maybe I want to go with
some of this green. Now. I know that I've got a lot of paint left
here on my plate. So I know that that's still
going to come through, so that's going to give me a
really interesting pattern. Hopefully here on this, you don't even have to
cover the whole thing. Get creative in where
you lay the paints down. Oh, that's pretty cool. So what I think maybe some
of this lamp, white on top. Let's just do it. Just be
brave, Just go for it. I like getting creative. I like being brave. Be brave. It's just
paint, it's just paper. Don't worry about messing it up, it's not going to bite you. I have to remind myself
to be brave because, you know, I look
at this stuff too, and I'm like, oh, now
I really like that. I'm scared to mess it up. But don't be scared
to mess it up. You can always make it
again. It's just paint. Oh, look at that.
That's some prettiness that we got going on there. We could say, can I get
any of that to lift off? Let's see. Oh, oh, look at that. Let's move this jelly
plate for a second. Look what that did.
That actually was super cool, so the pain is wet. I'm going to take
like this clean one did better when I squished
it with my hands. That right there, look at that. Made the coolest
pattern in there. Super cool. All right. So I do want some little
patterns in here. I feel the patterns are
feeling good. All right. So what? Can I get any
more pattern on this here before I add
the next thing? Oh yeah, see, look at that. All right, so let's see here. What do I want? I think I'm going to go to
the next layout. Or I could, I could too
start doing some on this big pad because I
really like these colors. I don't want to paint
all over the covers. I need more tables around me thinking that if I
do the white on here, that I might pull some of this green with this
pattern, with this. Next let's try this. This is that lamp white, I think it's a grayish white. You can pull these in any of your acrylic paints if you're looking for
something similar. All right, so let's let's put the plate on top of the page where I can judge that. And I already know that
I'm probably going to get paint all over the covers
of my sketch books. I'm okay with that.
They're brown. We could always go back and
paint the covers later. Just chalk it up to oh, oh, oh, oh, look at that. That one pulled all the
existing colors that I had. Look at that one. Oh my goodness. Okay. That might be
my favorite layout so far. Oh my gosh. That on that one. All right, so maybe
this should have been my junk paper because that one's really beautiful,
just like it is. All right, let's pull these back over, Man, that was pretty. Now I kind of want to
just do big layouts. All right, so let's go ahead
and flip our page here, feeling like we've
got this one over here paints mostly dry. I had this initial
layout in here too. I really like these colors. I like how we've
got some stripes of something in there too. I want to keep that in mind. I actually like this with
the green stripe like that. I don't think I'm
going to change it up anymore at the moment. I'll flip to the next page. And I do try to get that binding nice and wide so that I
can get that to lay flat. Let's do that over here too. If you've got one of
these lay flat books, that'll be even better. This is rose water. This is pretty all right? I'm thinking rose water. Like this pinkish color,
maybe this brown. All right, I'm filling this pink and brown. Let's just do it. I might throw in some
of this white lamp. White, which is grayish white. Let's just start with that. I'm using my silicone
brush to do that with because I know I can
peel paint off of it, even if I let it sit there
and get all over it. All right, let's just
mix this around. This is so pretty that I'm
almost want to do it on that big page instead
of in this little page. But let's just start this
and then I know that I like that big book for clean up. That was amazing. Now I'm excited about the
larger book there. Oh yes. Look at
those. All right. That's some pretty stuff. Let's get that center a
little stripe up. Oh yeah. Super fun. We're getting
fun stuff there. You know, our trash pieces
there. We could. Okay. I think I'm actually going to maybe we want a stripe
in here. Let's do this. Let's take, before I do that, let's take these
pieces that we made, a stencils, and
let's experiment. I've got this piece that
we made as a straight, I thought I had
another straight piece because I want it to be. Here we go, throwing
stuff everywhere. I wanted to give me a line right in here without too much. Without it being too hard. Okay. All right, let's
do that right there, filling that. All right? And then we can pull our
little stencils off. Now we've got a line. I just put those to the side to dry. I want that line to be here. Oh yeah, Look at that. And we could come
back in here and pull that further
if we needed to. Like, don't be afraid to
really get that to do what you want if it didn't
quite do it all the way. Oh yeah, I like that. Then what we do, something like that down
here at the bottom. Would that be the bottom? I think this would
be the bottom. All right, let's get our
little stencil back. Maybe I want it to be
about right there. It's not quite long enough. So we'll just add the
second one right here, I'm thinking on this side. All right, let's just
see what we got there. This paint is about the
consistency of these tube paints, like these right
here. I like that. It's not too thin, it's not
like your high flow paints. It's got enough liquidity in it that I can smosh
it around pretty easy. There we go. I like that. Pull that up. There's
a little bit up here. I'm okay with that. Just go for it. Oh yeah, Look at that. Okay. I'm good
with that in that. Want to see what
does that look like. If I pull a pull
now in this book. Like in doing one
sided at the moment. What if we do the
whole thing in color? Oye, maybe I want to do it
in this kind beige color. This is just a pretty big, it is called algenquinn. A, L, G, O, N, Q, U, I, N. Yeah. Let's just do this. We're going to see how
cool this is going to be on this one, All right? Put that lid back on it. All right. Let's see
what we got here. So this would be a
good exercise for pulling these colors back off of here because it
did a really good job. So I could start fresh with
that next thing that we did. All right, let's do it
this way so we could judge it again right there. And then when we
come back and do the whole other side too, we don't just have
to do the one side. I just was getting excited
The way that turned out, look at that one. Holy cow. That one's amazing too. Yes, yes. Okay. So I highly
recommend the big book. It is super cool. Now I want to, let's just do some stuff on the big book
for a minute because I'm thinking that I like the size and these are
big enough that we could just cut
those back out and that could be the piece of
art if we cut that out. I do like having
the leftovers of stuff that we did in
our main sketchbooks. That was very cool. I'm going to keep on playing
in these books. I want you to experiment and
play in your Sketchbooks. And I can't wait to see what
some of your layouts are. So I'm going to
keep on working in my sketch books for a bit before I move to some larger pieces, and then I'll show
you what I did.
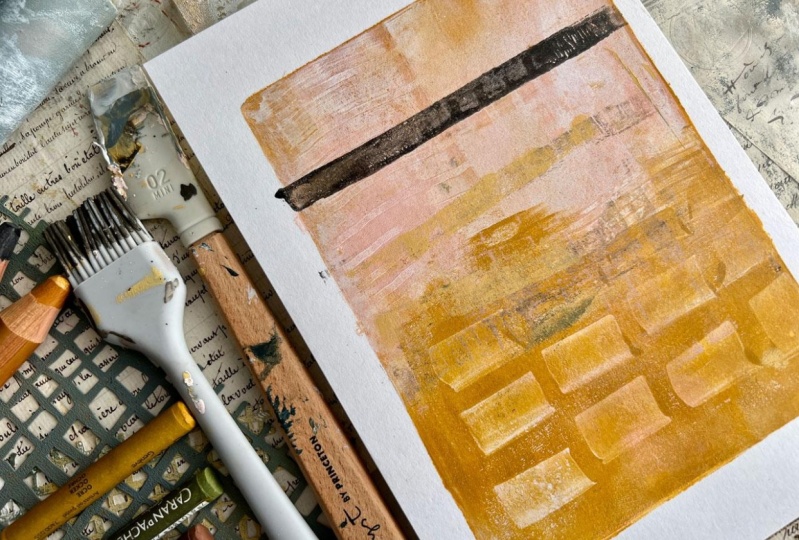
10. Trying Multiple Colors Per Layer: I wanted to show
you something else that I was doing as I was going on that first
set of videos, that first set of paintings
that we were just doing. I started out with one
color on each of these, did one color per layer, but what if we do multiple
colors on the layer? How could we get something
different there? I did this really beautiful
one with the blues, then I did a bigger layout, just picking up the scraps, it turns out so cool. When you mix the colors, I thought, let's just do that. Let's just mix the colors
and see what we get. You can just get creative here. You don't have to use
anything that I'm doing, Pick the colors
that appeal to you. And you could do it in stripes. You could do it all
over like I'm doing. Just pick a couple
colors and say, all right, what's this
going to look like? If I squish these around
and you don't want to put too much paint on your plate, you may have to do a pull of the colors if you
load it up too heavy. But let's just see what happens if you do
something fun like this. Then I was like, maybe we could pull
some paint with a stencil and see
what that gives us. This is a fun way to play
in some color mixing. Then I've got my, what is this? I believe it's called Walk
Net Artist Studio Stencil. I think it's called Wonky Net. Oh, look at that. Look at that. You already got some paper here. I think I'm going to go
down this way because for some reason I'm way off
on my other page there. I want to make sure I'm actually getting
on the pages here. I could then even
push it further. If I'm in there I can push that further down into that seam and may get it where
it's continuous. Let's see what we got. Oh yeah, see that's what I
want right there. Look at that. Look up. That that's exactly
what I wanted. Oh my goodness. Pretty.
Pretty. And we could come back with the ones that we already
have started and pick up these extra corners, extra paint on the one that
we've already got going. That's the way that
we can scrap up paint and add to
our bigger layout. All right, so fun. I want you to try multiple
colors with this. We could even do
this where we did a whole big solid
like center area. Let's do something
right in here. Then on the outsides of that, maybe some darker colors. See how would this
work for like say, an abstract, whatever
we're making. Could we get those to really give us something yummy and abstract
as we're going here? Let's see. All right, let's just see what we got. Okay, I'm trying to not completely get
everything covered, let's just see what we can get. Leaving whole like color blocks of color in certain
areas basically. Let's just go ahead and open this book real tight
and I think I'm going to do what I just did and
lay this right on that. Well, that was crooked,
but that's okay. And then I can really push
that down into that seam. Let's just see what that gives
us when we pull that off. Oh, look at that. Oh my gosh. I wonder
if I can come back and drill that
pattern in a little bit. Not wet enough. All right. Not wet enough, but that's okay. Then this is looking
pretty cool. I'm going to put
this white one on here and do a big pull on a big page and clean
our palette that way. Let's see what we can
get in our big book. We could go ahead
with our stencil, stencils and we could try to pull a pattern
out of here too. And just see like what can
we get with some of those? Let's go ahead and
pull this page here. All right. Just trying to
get that all the way on. We could get some
shapes out of here too. Oh my gosh. Look
how pretty that is. All right, let's set that
to the side and let it dry. You know what we could do? Just keep thinking
out loud here. We could do like an abstract in the middle and start
layering stuff like this. Let's do this in our big book, but on a clean page. And start doing this little game here where we layer
in some stuff. Let's just start
this. I'm going with some blues and greens because
that's what I'm feeling. And just see what this kind
of thing would get us. Oh yeah, we're getting
some cool stuff now. I can put some white in here. Not white, this lamp white, kind of a grayish white. And then pick a new page. This one's still wet, but I'm going to go
ahead and see if I can get a new page going. Ooh, look at that. That is super fun, and I'm probably getting
paint on my other piece, but I don't even mind look at that flat over
here a little bit. But it looks really cool. That looks super duper cool. All right. Loving where
we're going with these. I might even take this and
see if I can pick up any more just seeing if
I can add to it. Basically, I want
you to try that. I want you to try
two or three colors and you can layer with
just a little bit of pattern on the piece with just some scribble and lay
that on your piece. And you could also whole color with two or three
colors and try to do one color and a
second color and not completely mix them up
and see what we can get. Then you could do
some like this where you're just scribbles
of paint on there. That's really fun and cool. I want you to experiment
with multiple colors and multiple
different techniques. All right, I'll see
you back in class.
11. Dragging Soft Tools Through Paint: Another thing I was thinking
that I wanted to remind you, don't forget about is drawing and dragging
things through our paint. We can do this on one level, we can still have paint there from another layer. That's fine. But what if we had some of those silicone brushes
that I was talking about? This is the cheap ones
I got at Michael's. But even like some of
the bigger spreaders, drag that off some
of your paint there, see if you can make some
interesting designs. I'll see if I can get
this lined up pretty good because I want it to
really be a good one. And I'm going to press it
down to the seam there. Then we can see how in the
drag gives our pattern. Oh, look at that. Now, that is super cool. And I did another one
that was off the page, but still just as cool with
like some green in it. Still that's super
fun and gives us a very interesting design and pattern and that would
make a cool abstract. Then I could even come over here and see if I can pick up any of that extra on
a different layout. Let's just see if we
can pick any of that up. Of what's left? Not really. We picked up a tiny bit in the
center, but that's okay. We can put something
right on top of this and I can add another
layer onto a piece, or it can be a new
piece altogether. I think we've got the yellow. Maybe I want to do
this with peony, which is like a light pink. I've still got a little bit
of yellow here on my brush, my silicone spreader then. Because what if we did this and then dragged one of
these through there. Look at that then
Maybe in the big book, because I'm actually
digging this quite a bit. Maybe I'll do it this way. I can see where it goes. There we go, Right there. Oh yeah, I'm feeling
good about that. We look at those colors that are shining through from the other
pieces that we just did. I hope we pick up some of that. Oh, look at that one. Look at that one. See, the more you do, the better they get. The
cooler they are. I can see that being
a whole piece of art right there all by
itself. All right. So just keep in mind, I want you to be mixing colors. I want you to be
dragging stuff through it and just seeing cool
things that we come up with.
12. Evaluating & Finishing Sketchbook Pieces: Once we have done quite a
few in our sketch book, even filled up our sketch books, then I want you to start looking and evaluating
and thinking, all right, what worked? What did I really, really love? Say for instance, for like
this set in the big one. I really loved this where
there were multiple colors shining through and I could see all the differences
that we had going on. We had the line there, We had just a bunch of
interesting things that we could then look
around and play with. Then as I look at these also, I might start thinking, is there anything
that I could add to this that would
complete it for me? Like for this layout over here, I'm pulling out some
of my papers over here that are my collage papers. But is there anything, say in the collage papers that could complete a piece
like this for me? Could I put a collage
element on there? Could I do some of these markings on there that
would complete that for me? I really like this here. Let's just start looking at these and thinking,
is it complete? Is there something else
that would be interesting? I actually like
this side better. Let's just do some
evaluating and think, let's just cut this
white edge off. Could we add an element onto
this one to complete it? I am actually really
liking this element here. It doesn't even have to go all the way like most of the way. It would have helped if I'd
cut that straight, huh? But most of the way
or something like that coming in from the side. I really love that.
What you might do with the collage elements is have some map
medium available. And we could just put these
down with some map medium. As far as your brushes go for using map medium or
with your pieces. I do have a brush or two that I just used for glue
with the map medium. I'm just using the
Liquitex ultra map medium. We can just put some of
that down on our page, it dries clear, then I'm ready to just glue this
piece right on top of that. Because it's very thin, it's not going to add a
lot of weight to my page. Just going to glue
down very easily. And the medium is just
going to blend in. And I'm not going
to have an issue with that actually,
really like that. I could look at that and think, does it mean anything else? Could I have added
another element to that? You can tear your pages
if you want and just see, could we get another
element that we liked and just test it out. Because I do like
that right there. Also pull the map medium
back out of the water. I could glue that down. I could even got glue
different directions. Can make a whole collage page out of this with
different elements. But my main goal
is not necessarily to do collage with these. It's to make beautiful,
elevated abstract art. Pull out all your
abstract techniques with and just see what can
we get when we're all done. You can use other glues too, but this tissue
paper is basically, it's the thickness of
tissue paper is thick enough for that to finish out your piece with
just the map medium. That's one thing
that we could do. We could also come back in here and now draw
and make marks. I've got a stabilo Woody, and I could come back on here now and do some
abstract mark making. I could come back with my gold if I wanted to
add some gold to this. What do you enjoy? We can add to that, but I like the black look
at how good that stabilo. Mark makes on our piece. It just draws on everything. It's like a giant crayon and
totally brings out my inner five year old because it's amazing how easy it is
to make marks with that. All right? I'm
actually loving that. I don't want to get
like to doodly, I don't want to add too
much to it and cover up the loveliness that we came
up with the jelly plate. But I do want to finish out
the pages where I'm like, okay, I feel like
that's finished. And now that I feel
like that's finished, now I want you to evaluate
your other pages and think, okay, what else
could I add to this? What else might I like? You can add more
paint at this point. We could look at this
one and think, wow, I think it could
use some type of dot or stencil work or
yeah, let's do that. Let's just pull out stencil
that I'm just gaga over. We could do some stencil work on this with a particular color, using the same paints
that we're already using. That one had, I think, a sienna. Let's get that back out. It was our thicker paint. I'm just going to
put this on my. Well, that was not
it, that's the raw. Let's, we're going to use the raw Sienna because
I put that out. I think that was
the darker color. That's okay though,
because I think this will complement what we've
already got going on in here. Let's just do it. I'm just going to
strategically add some stencil work to my piece because I like
working with stencils. Sometimes you can get some interesting things and
we can pull that up and look, and see if we're even
getting what we wanted. I do actually like that. I want to come off
the page over here. It doesn't have to
be so much paint that it changes the whole thing. But it might be enough to
be like, oh, look at that. Take a little that right up
here. Maybe a little extra. Oh yeah, see I like that. That's yummy. Do we want
any mark making in here? Let's see, Maybe
I actually have, I think I think it might
be gold, gold woodie. Let's just see, is
that a gold wood? It is a gold wood.
Maybe some lines in here that are very subtle. Doesn't have to be Jump off
your page at you like that. White. That's interesting to do some mark making in there. We can do hash marks, dots. You can go back in with some of the normal abstract things that you like to do.
I like that a lot. I do feel like it needs
a point of contrast. Is there anything
that we could come back in with some pastels. Which I like the
pastels because I can get a darker color in there. Like look at this color,
oh, that is dark. I can make it water soluble, so we can make it blend in. Just testing color
here on the side for a second to see which one
do we really, really want. Here's a dark brown,
that's too dark. Let's just go with that
original brown I picked. All right, let's see.
What do we want to do? I want to do, let's
just be brave. I don't even worry now about things like, oh,
I'm going to ruin it. I don't even think that anymore. Because most of the pieces, I don't start with
a goal in mind. I look at their
little loop de loop. I didn't even intend how fun. I just want to jump
in and go for it. Just be brave. I'm
not trying for any particular thing
when I'm done. So with this, if I've
got pastel on it D, I'm probably going
to hit that with the pastel fixative so that it doesn't run into the next page. I also could separate
these pages with some wax paper so that I know that one is not going
to bleed onto the next page. I could separate
these if I wanted to keep them pretty in
between evaluating these. That's just a little hint
there on how you can keep on moving without stopping
while you're working. I'm just going to size that out, then we'll keep that pastel from bleeding into
the next page. Look how cool those
two pages are now. I'm super happy with that. This is something where
I'll look at later and I'll come back and I'll
get some ideas from. And I can see what worked
and what didn't work. What I might want to do again, what I don't want to do again. I love when you come back
and evaluate and you think of stuff like this
on a piece like this, maybe I want to come back and I could do some mark making on the
entire page if I wanted to. I like a dark brown. We could maybe use
this fusion color. I could just take a
brush and I could do some mark all the way down
or I could get a stencil. If I wanted to stencil this. Just get creative here. I think I'm going
to do some marks with the tip of my brush. That's pretty cool. I like that. I could do some collage work
on this if I wanted to. I could also do some of
our stencils that we made. I could have done some stencil
work with our jelly plate. All kinds of things
that we could do here. But I think for the moment, I'm pretty happy with
where that's sitting. You don't have to finish
every one of them out to like a fabulous
piece of art. Like these two I think are
a fabulous piece of art. But some of these could
just be backgrounds that are waiting for whatever
that next great idea is. Whatever the great idea is
that we're going to come up with for our bigger
painted pieces, let's just put a piece
of wax paper right here while that paints wet
so I can keep on going. This piece, I actually, really, really love it, makes a
really cool abstract. And if I were going to keep it, I'd probably trim this out. If I were going to use
it for like a piece of art for somebody. I love that, just
like it is actually. I don't really want
to change that up. Okay, this piece right here, I'm over the moon
about it is amazing. This piece right here, I could maybe add some collage work. I could add some pastel to it. I could think about what I
might want to do with that. And then I got into
this yellow ochre pink feel where I wanted
to play with that again, because I liked this piece so much that I wanted to play with that again and
drag stuff through it. That's where I was,
that with these, I actually really
loved this one. And this is a really
pretty subtle background for something I could
add to the top of that. I really liked this one where it had all the
stencil work in it. Some of these you
can see how they're really beautiful backgrounds for whatever our next thing is, you don't have to
finish your whole sketchbook in one setting. Some of these you might want to live with for
a bit and think, okay, what do I want
to do with this? Or you might be making a piece of art or
something and think, okay, now I know what else
that needs. Some of these. You might love so much
that you're like, wow, let's cut that out
for a piece of art. I do consider cutting up the sketchbook if I
find I love something enough if we go back
like this right here to totally love that
that's a finished piece of art. I could move it up a little bit if I'm thinking
of composition. And I could have this
line right here on the lower third and this
pattern at the top, that's one of my favorite. We could look back at some
of these other pieces. Like when I said
that right there, that could be
finished right there. We could also do it like this
if we wanted to be taller. So much good stuff. Some of these we're
going to consider as backgrounds for
future things. Some of these I would consider
finished art like this. This is finished. Look
at that right there. That piece right there. I am loving that we
could even come further down. Where that right there. See, I love that.
Then this piece here, totally feeling this right here, that's a finished piece for me. What I want to do, okay,
we've looked at those. Actually, I want to evaluate the little ones
before we move on, because I want you to use these as inspiration for
your bigger pieces. This right here, totally
a finished piece to me. I could frame that out
and that would be done. I loved that these are more like a big
background for something, or I could pull that out
and I could frame that. It's still beautiful like it is. We might do some mart
making on this piece. This one could use some
scribble, maybe some dots. We could finish that out
with a piece of collage. I just want your
brains thinking here. Look at that one. Super
cool. This one's even cool. And I would leave the
white bit if I framed it, love that got on a kick with
the yellow in this one. But all of these right there, perfect Where I was
dragging just one, it almost looks like from
like the kitchen store, one of those butter things
that you use on the grill and you just drag these through that paint
while it's wet, everybody needs that one. I really like this right here. I totally frame that one. I would use this as backgrounds. Maybe add some collage or some dots or maybe some writing. If you do writing, I love those. Let's see what we did
in this last book here just to evaluate. Because I want you to look at these and think,
okay, what worked? And now what can I take to
a big piece? Look at that. See, I love this. It
almost looks like alligator skin over
here. That's so cool. Again, like alligator skin, these are more like
little backgrounds. I think this is more like
a finished piece to me. I could frame that
out just like that. Those are definitely
yummy, yummy. I could mark make
on them if I want. That's more of a
background for me. I really love how the white is in there from where
we did that stencil work. So that's super fun. We can
maybe mark make on this. I love this one with the
long drag marks in it. That right there
could totally be a finished piece for
me. I love that. I want you to look
at your pieces after you've done your sketch
book work and decide, okay, what could I do to now elevate these
particular layouts? What did I like? I
want to collage and mark make on top
of them and then finish those out
slowly As you're thinking of what you love and
what you want to add to it. You don't have to
finish every piece the moment that you
start creating. You save these for later ideas, and then I want you
to take these ideas into our bigger piece that
we're going to create. So I will see you back in class.
13. Creating Larger Pieces & Cutting Them Up: Let's take a look at
doing some larger pieces. But real quick, I want to
look at trash piece that we were using to scrape
up the extra paint. Look at that right there. That right there is a super cool abstract
that I think I would definitely keep
out of this trash piece. I could come over here
too and look at some of these and see like what
works out of this. I'm going to keep this
one in mind for later. And I might still be using it as my trash piece here
too with this, because I could do pulls and ghost pulls and then have
a trash piece left over. I was really obsessed
in our sketch books with the yellow and
pink sets that I did. I just love this color way. I loved some of the things
that came out with that ochre. I'm just looking back
at some of the pieces that I did and thinking of the elements that
I really liked. I really liked the
dragged paint. I liked the combination of the colors of the
ochre and the pink. I really liked this white
of that stencil that, that pulled off when
I used that stencil. I also like this pink
and brown combination. I might be considered
doing some of that then in our bigger book, I really loved these
combo pieces that we did. I liked where we added some brush marks on top
to finish our piece out. I really loved this piece with the pink and the yellow
and the lines through it. I did quite a few of those. I love this one right here. This one right
here. Actually, if we look at it with
our view finder, I can definitely see a lovely composition coming out of this with the
lines and the colors. It's lovely. I'm going to
take those inspirations forward and use those on my piece here that we
create several pieces. This is a case of
work on lots of pieces and then evaluate them after you get
them on there. I'm going to work in the
ochre and a light pink, maybe some brown and pink and maybe some of
that blue that I liked. I'm just going to start spreading paint,
making some ideas. And then I've got my
Bristol paper over here to the side in the
larger sheets. It's just time to put some of that experimenting into play. Let's just get started. My jelly plate is extra dirty because I've just gone from thing to thing to
thing and I'm okay with that. I'm just going to keep
adding paint to it. I could clean it off with the mineral paints
if I wanted to. With the mineral oil? With
the baby oil, I could. But I think I'm going to go
with what I got and just get started and doing some polls
and seeing where we can go, Ooh, ooh, look at that. Oh yeah, I might add some
more layers or I might not. I might decide that that's so cool that I'm going to
leave it just like that. We're going to just play
with all the techniques that maybe we started
with in our sketch books, because at this point now there's definitely some
things that I think are cool. There's some stuff
that I really love. I think I'm going to do another pull right on top of this. If you're wanting
to be more exact, you could put the
paper down and put the jelly plate on
top of the paper. Oh yeah, See that's pretty cool. But now I want some
other color coming back through almost
a little darker. Maybe I will do some yellow. And I don't know what other
color might we do here. Might just do some pattern
on this yellow with my Wonkie PM Artist
Studios patterns. That's pretty cool. Let's see if that gets us anything because
there's actually, with the color way
that I'm using, there's not very much contrast. That's pretty cool, though I might consider on
a piece like this, how can I add some contrast? What else can we do to really make this stand
out a little better? Start evaluating your things
as you're going thinking, okay, what can I add to this? Maybe for us that
maybe some brown. Let's see what that
does. It still, it's all about play for me. I'm not really trying
to create something. Oh, look at that. Let's see
if we go the other direction. I'm trying to create something
amazing that I can sell. I'm trying to and
just experiment. All right, let's go back
on top now with this P. I just want you to pull out all the
stops at this point. What can you do to now get this pushed a little further
for each of your pieces? Maybe for this, I want to go ahead and move to
another piece of paper. I'm using this Bristol paper because I like the
weight, 96 pounds. I don't necessarily, oh, see, now that's pretty, you can use the mixed media
paper which is a little, I like the lighter weight
papers with a lot of these feeling like
maybe something like halfway with some mark in it. Let's see, See I really
liked these drags. I want to control
where I put this, let's flip it over like this, where I can actually see
where that's going to go. Then we can pull that right
off. Oh yeah, I like that. That one's super fun thinking that we're not getting any
contrast on some of these. I might add some contrast with other materials at the end. But it is fun to maybe start off with a darker color and build some lighter
on top of that. Perhaps that might be one
way to get some contrast. And I'm just dragging
through with some of my silicone tools. We could even drag the other way and just see
what that's going to give us, a clean piece of paper. I feel like that's
two pieces because it is, oh, look at that. Now, I feel like we could
come back with say, a pink on top of that. And we'll have some of this like for another
piece we'll do, I like that ghosting of a
pattern that we've got there. We're going to use that and pull a piece with this as a
lighter on the background. Just see what we
get. Clean paper that I probably
just put paint on. That's okay. Oh, look at that. That's super cool. Now, that might be nice
with some yellow on top that I can
maybe drag through. We're just going to
build layers ideas till you get to the
point where you're like, whoa, coolest thing I ever made. Don't be afraid to not cover
the whole jelly plate. Then maybe we'll drag
through one side here. I want to control
where this goes. Right there we go. And we'll pull that up. Oh yeah, look at
that super pool. And I might do some of that on this other one
that we already started, a ghost pole. That's fun. Then where
do we want to go now? We can, we just playing,
we're layering, we're adding ideas and just thinking maybe I want to go in this yummy blue
direction for a bit. I could mix that with
some of this yummy green. Don't ask me what
all these colors are, I don't even know. I'm just pulling them out. This prairie sunset, this pony, this was conservatory
blue blue pine. I'll just mix these
around a little. I might go ahead and pull some of that paint
off with a stencil. Oh, look at that. I like it. I need some more Bristol
paper out of here. You want to have a couple
pads of paper as you're going because you're
definitely going to use them. It's addicting making these, even if there's nothing else
besides collage backgrounds, and I've got several
collage classes, you can check those out and
just see how you can play. Oh, look at that one.
That's super cool. All right. Actually love what the stencil did
on this piece here. Okay, so what do
we want to do now? Let's just keep on playing. We could come in here with
some colors that I like, this mars pie and that tightened buff.
That was really cool. We could actually
come through here, oh, you know what
else we could do? Let's do it on a new one though. We could, Let's go
ahead and get this out. This is that thick paint so
you can see how you can work with medium thickness
to thick paint. But I don't like the thin paints because the high flow
paints are almost too thin. All right. Let's start
with that right there. New piece of paper, please. All right. We'll get that
on there, Get us started. Whoa, look what that did. That was super cool.
At this point. I could come through
and do some designs. Let's see, what do I want to do? I want to, I don't know.
Let's think about this. Maybe with the brown, we could. Let's do this with
this walkie thing. Let's just put some paint on it and then draw on
the jelly plate. We'll get that to
come on off of there. Then come back with our piece. You can flip it over if you
needed to see where that was going, look at that. All right. That was super fun. Now we can put paint
on top of that, pull to another pol,
let's do the yellow. I'm filling yellow ocher,
whatever you want to call that. I'm getting paint everywhere. I'm going to have to change out my drop cloth after this little project because I'm just going to get
paint everywhere. This is a vinyl drop
cloth that I work on behind these because
they're pretty for filming, like a vinyl
photography backdrop. They're good for protecting
a table surface. Then once it gets
too dirty or I get a lot of pastel dust everywhere, then I just change it
out for a clean one. That's pretty what else we could do that
I didn't pull out for the other things because
I was not thinking about it. But our we can paint our little shapes with some paint and color
and stuff like that. We can do those
down on our page. Maybe we'll do it with
like a little bit of pink. Now, I can come back on
one of these and see, Let's see which one
will show up on it. Show up on this one.
Now I come back and then we can do shapes. Don't forget if you've got any of these
little small ones. They're perfect for
shapes and patterns. And that did a really
nice edge detail there. That was cool. All right. That's
another little idea that I was thinking
earlier and I didn't end up doing it
on my little pieces. It is super fun. I'm thinking maybe Let's
do with this gray. I want to do an abstract
painting piece where we get a lot of the design before we even get
it on the paper. I did that one time with doing like one color
on the inside and then surrounding that
with some color and then they didn't
really mix perfectly. I have the yellow
still on there. I could clean it if I wanted to, my baby oil and just
clean it up really good, but I don't want to want to go ahead and just see
what I can get here. All right. So I'm not trying to cover the inside
with my solid color, I'm just trying to
see what can we get. Let's see if that did
it. Sometimes it's just an accident and you're
like, how did I get that? Oh, that's fun. Not quite
what I wanted, but it's fun. Maybe this pull off
will be better. Let's get another piece of paper and do our ghost pull
paint all over my hands. Look how pretty that paint is. It's like this. Look
pretty pattern. All right, let's
see what we got. Oh, look at that.
That's super fun. Actually, I can build on that. Let's build on that with some real thin layer of
pink and see what we get. All right, there we
go. I like that. Ooh. Look at that. That's pretty, let's build on that with this yummy gray color. Maybe up here, maybe with some drags. Let's
just go for it. I'm not even being super careful about where it lays because
I can trim these up. Oh, see that's pretty all right. Maybe with some of
this lighter color, we can pull some of this
lightness out. Oh, look at that. What if we just did
that right there? Okay. So, I'm going to
flatten it a tiny bit, but I don't want to be too flat. I look at that.
Oh, look at that. Okay, let's do that all. Let's see what we get here.
Oh, that's super fun. Okay, I like that. I might do that on this other
piece just as a ghost pull, just to get that
extra off over here. On our junk piece, we'll see what we can get there. I'm definitely going to have
some major cleaning to do after this because these paints are now good and stuck on here. I'm thinking, now we've
done quite a few of these. I want you to keep going and make 1 million of
these if you must, because usually I must. It's fun to just keep going
and playing. It's addicting. If you make collage papers
like we did earlier in class, that's addicting because can
you ever have enough thin, pretty papers that
make something cool? I don't know. I don't think
you can ever have enough. Let me shut up some of these paint cans
and then let's just take a look at what
I got for now. And then what did I love? Is there one in here
that's maybe a piece that I consider that could be
finished or added to. Because I'm actually really
loving this piece right here. I feel like if I cut
that right there, that's a finished piece. I'm actually going to
commit and cut this up. Sometimes you don't have
to cut any of these up. I like to cut up art. It's the most favorite part of creating that I like to do. I like finding compositions
within the bigger piece. Let's say let's
just get our cutter out and cut this with the
cutter because why not? All right, it's not
perfectly, there we go. This thing has a
little wire under here that you line
stuff up with. And I didn't even realize
that's what that wire was until one day. I'm
like, what is this? And it just dawned on me, even if it's not, like, perfectly straight on here. So you're not
cutting it straight with this line that's up here. You can get it
straight with whatever you drew on your piece. How cool is that? I can just
line it up with that wire. I don't like genius.
Whoever thought of that. Look at that. Okay,
this one, love it. All right, let's set this one up here and let it do its
thing for a moment. While I'm looking at
some of these others, actually liking this right here, I think it can use some contrast or something else in here. Let's see. Because some of these I actually want to commit to
something on this one, because I love this right here. I like this. Let's just go ahead and say on our
trash piece, we like it. We'll cut that out. Oh
yeah. Look at that. Oh yeah, Look at that. See that piece right there? Crazy enough, but I love it. Let's sit that one
back over here. Let's look at what
else we got left over, so this we could save
for something else. I don't throw any of
these pieces away. I do try to keep them and evaluate them. Think about them. I'm wondering, do this
piece right here. Feeling like I do. We can move these and look at this from
a different angle. I filling that one right there, Let's just commit.
I like that one. Then after we've got the little pieces where we like them, we could come back then and
add extra marks and things. After we're like,
okay, this is it. Then we can come back and embellish our
finished composition. I like to search out
compositions rather than stressing out
on something like the jelly plate trying to get exact things I like to play
and have fun and let loose. And then search out
interesting things, going without a plan, but maybe planning
colors and ideas. And then seeing what did you create when
you were finished? Look at that. Oh my gosh. Look at these. Oh, so
amazing. All right. Let's see, what else do we got? Got anything else that
we can do out of these? If you want to leave them big? You certainly can see. I feel like that right there. What are you thinking? Are
you thinking that one with me feeling that right there. But you can definitely
leave these as big pieces. Don't mind either way. This is a double mat that I
got at Michael's. I like the double because
then you can cut to the bigger size and then it frames out to the
inside of that. Anyway, I got those
at Michael's and I just like seeing it, what it looks like framed because then you
get an idea of oh, how cool it is actually finished and what it
might be framed up. I like cutting stuff up. I start with a bigger piece and cut down, but you
don't have to do that. You can certainly go with
the great, big piece. If I had a piece
that I liked enough to leave large, I
wouldn't cut it up. Good one. All right, let's see. I also liked this. Let's see what we got
out of this here. See like right in here, I like those half circles
coming in from the edge. Then this down here
at the bottom. I could do it where I've
got this at the top. That might be super cool. We could also come
in this direction and come in from the side. What do you think of
that? Almost feeling that I could even come further
over and have one. Okay. Yeah, I'm thinking
that right there. All right, let's set
this up so I can draw with everything
I keep throwing down. Here we go. Okay, I'm feeling
that composition wise, I like 23.13 and I like that these little half circles
are at the bottom, peeking out at us. I like that. Oh yeah, that one. Look at that. All right. Let me get this where
we can see that. Look at that. Yes. That's
exactly what I was hoping for. Okay. Out of the large ones
that I've already painted, these are the ones
that I really, really liked, my trash
piece that was so amazing. So these are the
ones that I liked. And then I'm thinking, does
it need anything else? Can I do any extra mark making? I'm almost feeling like on this one it could
use something else. Could it white dots? Could it white lines? Let's see.
14. Finishing Marks: Now the white Woody is fun. I could also do white posca pen. I've got plenty of little
white Posca markers that was not started. Let me find one that's started. See, now that might
be fun having some white marks
come up on this, maybe even some dots. I can see some lines and
dots could come through. Let's just commit
now that I did that, I like scribble and things that go off the frame
and you're like, wow, what is that?
Where does it go? What else is going on there that I'm thinking that's really cool. Okay, so that is
really cool actually. And I got a big gray Posca. I'm almost not wanting that, I'm almost wanting some pastel oil pastels. And look at here, I've got
like a pretty gray oil pastel. Like I could do some
type of great big mark. I am thinking, great big mark. Do I like that color? Like this color? All
right, so this is a, Karen can do some type of line. This is going to blend in. When you get close, it's one of those things
that you're like, oh, what's going on there? Oh yeah, see, that is
exactly what I needed. It's way subtle, but when you get real close,
look what that does. It's an interesting
what's going on there. I feel like I could use a pencil in there just
as some extra mark making something that maybe
going to be very subtle. Until you're close
and you're like, oh, look at that extra detail. Oh, yeah, definitely
thinking that pencil, yeah. Oh, look at that.
It's very subtle. Just an extra element in there. All right, so that one, I would definitely say, nicely finished. Let's look at these
others and see is there anything else
that we would add to them. Because that one
definitely needed that. It's got oil pastel
fixative on it. So of course, I
would finish it with some oil pastel spray
fixative so that, that oil pastel dries
and that senelie. Okay, so definitely
I would call done, let's see, this
one I really love. I'm thinking, what else
could I add to that? I could go ahead with some
pencil in here just to give it some little movement marks, just interest as you're getting
closer and looking at it. Okay, I love that. Also liking the pastel so much in that piece that I'm
looking at it thinking, could this use a little
detail like that? Because I've got plenty of yummy greens here.
That's too bright. That's too bright.
Oh, here we go. This one's more like.
Oh yeah, see this one. This one is like a moss green. Now, do we want to have dos, Do we want to have great
big lines like we just did? I'm feeling like I liked those
and we could even follow our stencil basically
and fill some of that in if we wanted to add
that detail over here. Definitely feeling that now
that I thought about it, look at that like a little detail in between the little white
lines of that mesh. All right. I like it there. Let's just come on down to
the end of it. Look at that. Look at that. And we could even add just a little bit of green along further so that it's not like the only
bit of that green. Just some extra interest. Look at that. All right. Totally digging that one. Totally digging that one. I'm loving those two now. This one I'm thinking it looks pretty darn
good like it is. I could come back in with some pencil because I like
the pencil and that would be some extra see.
Totally needed that. Oh yeah, Yeah, Yeah. Some of the marks
that you end up enjoying using are
going to become like the signature
things that look at in your pieces. I love that. I want things to be
my signature things. Look at this color, feeling like this color might
be cool in here, It's cool on there. It's like a green gold. If you look at things
and you're like, I don't know, I don't
want to commit. I'm scared. Save things
until you're brave. Like you've practiced enough
and you've played enough, and you're like, oh, I know
what that piece needs. It needs this mark I just did. I want you to just practice
and play and experiment, and work on all the pieces
that are your ugly pieces, so that you're not
scared to mess them up. Then the pieces that
you're like, wow, this is the most amazing
thing I've ever created. I don't know what else to do
with it, but it's not done. Put those to the side until one day after you've played
and practiced enough, You're like, I
know what that one needs and you can finish it off. And maybe that one day
is a year from now, maybe it's five years from now. Just save it until you're ready to mark on it or make
some color copies. And practice on the color copies and then one day you're
going to be like, I got it. This is it. Okay. No, I don't like that.
Oh, yeah, I like this. Let's what do I like about this though? Let's see
what I want to do. Oh, yeah, that's
what I wanted to do. Look at this one. All right. So that one is a yum. Yum, Okay. Now we got these and I just
got to decide, are they done? Do they need more stuff on them? Let's see. I feel like this
one could use some stuff. What could we do? What
do we want to do? We want to do some pencil. I'm just going to go ahead with the things that
I know that I like, that I'm working and
I'm thinking, oh yeah, these are adding the
elements that work for me. Then I can come back and add some other elements to it
that are experimental, like lines and
stripes in a color that I wasn't even
considering to begin with. Because look what that did
to that little outside bit. Completely perfect like that. Totally added some
yumminess for me. And then I might come back
in here to the wrong color. Let's see, that one
is like a yellow. I don't know, I might be
done with that one right there and I could come back
with some stencil work. Maybe a color in
a stencil that I like would be an option. Or if you're like, I don't
know what else it needs, you could stop right there. I think everything could
use a bit of gold. Let's do that. Let's
get some gold out. This is my favorite
Ai gold mica paste, which I've actually got in
a fine line applicator. Got the gold ink
in an applicator. This is a cure
talkie, gold mica ink in a fine line applicator. What I like about
this is we can do shapes and lines and circles. What I like about this is
I could spread it along the piece and I could take like a palette knife and spread
that out like that, Almost feeling like
this is what I want. Let's just commit gold
right up this side. Yeah. Oh, yeah. So that. There we go, That's what I want. There we go. Okay. I'm liking that didn't spread out
as far as I wanted. So let's do another line. Oh, look what I did. It's very interesting how
this spreads differently on these Jell plates than
what I normally get. I love that. All right. Yummy. Okay. I'm liking that. What I really like about is how shiny
it is when you shine it. I think I'm good with
that right there. I could add some dots or I
could, but I don't know. Does it need dots or something? I don't know. Let's see. I'm just going to have to think about that one for a bit and see if it's finished in my mind, I think that gold paste, you could use any gold
paint to do that with. I could have used some of my golden gold paints
that I've got down here. I could have used some of these golden iridescent
gold paints. It could have done
the same thing, play around with your different materials
that you've got, but I think I'm
going to call that one for the moment done. And then look at
this one and think, does this need anything else? Maybe we could add
some extra details in here and maybe use the gold ink. Let's try the gold ink,
Pull that back down, shake it up. All right. So what I like about
the gold ink in a fine line applicator is you don't have
to use a dip pen. You can shake it up
and then you can go, I find that if you hold it down at the angle as
you're working it, you get a better
control of the ink. If you do it straight
up and down, the ink just flows
out really fast. I'm actually like in that, even thinking like maybe
some gold dots, you might not see the gold dots necessarily just staring at it. But it'll shine in the light. You can be as careful or
sloppy as you want to be thinking right in there. Then we can look at that in the light and
that gold will shine. All right? I'm
liking that a lot. These are my individual pieces. You can see how I'd definitely cut some of these out
of my sketchbook. If I liked some of them, you could easily make those into individual pieces of art. I want you to play
on the big pieces. If you like the
entire big piece, keep it as it is,
don't tear it up. You might also consider on these pieces some
collage material. This would have been pretty
with the collage on it also, definitely all the different
things that we talked about. I want you to experiment
and play and mark make with all the tools that
you have in your art room. Start thinking outside the
box and thinking how can I create some yummy backgrounds that are going to make
amazing abstracts? I can't wait to see
what you're creating. Definitely come back and
share those with me. This is one that actually was a collage paper that
I actually liked. The entire big piece that would have made
a great large piece. Just play and experiment and see what you
can come up with. I can't wait to see those.
Definitely come back and share and I'll see
you back in class.
15. Final Thoughts: Well folks, we've reached the end of our artful
adventure together. I hope you've had as much fun as I have because
we've just scratched the surface of
what's possible with the jelly plate printing
and mixed media magic. Remember, art is all about exploring and experimenting
and expressing yourself. Don't stop here, keep pushing
those creative boundaries. Try out new techniques and keep those sketch books filled with your unique and
beautiful creations. Hey, if you ever
want to dive back into the world of art, you
know where to find me. Until then, keep making art and embracing
your inner artist. Cheers to your artistic
journey ahead.
 DENISE LOVE, Artist & Creative Educator