Transcripts
1. Welcome: Have you ever looked
at a plain bag and thought, that could be cuter? Or maybe you've been
stitching for a while, but you're ready to take your embroidery work
out of the hoop. If that's you, you're
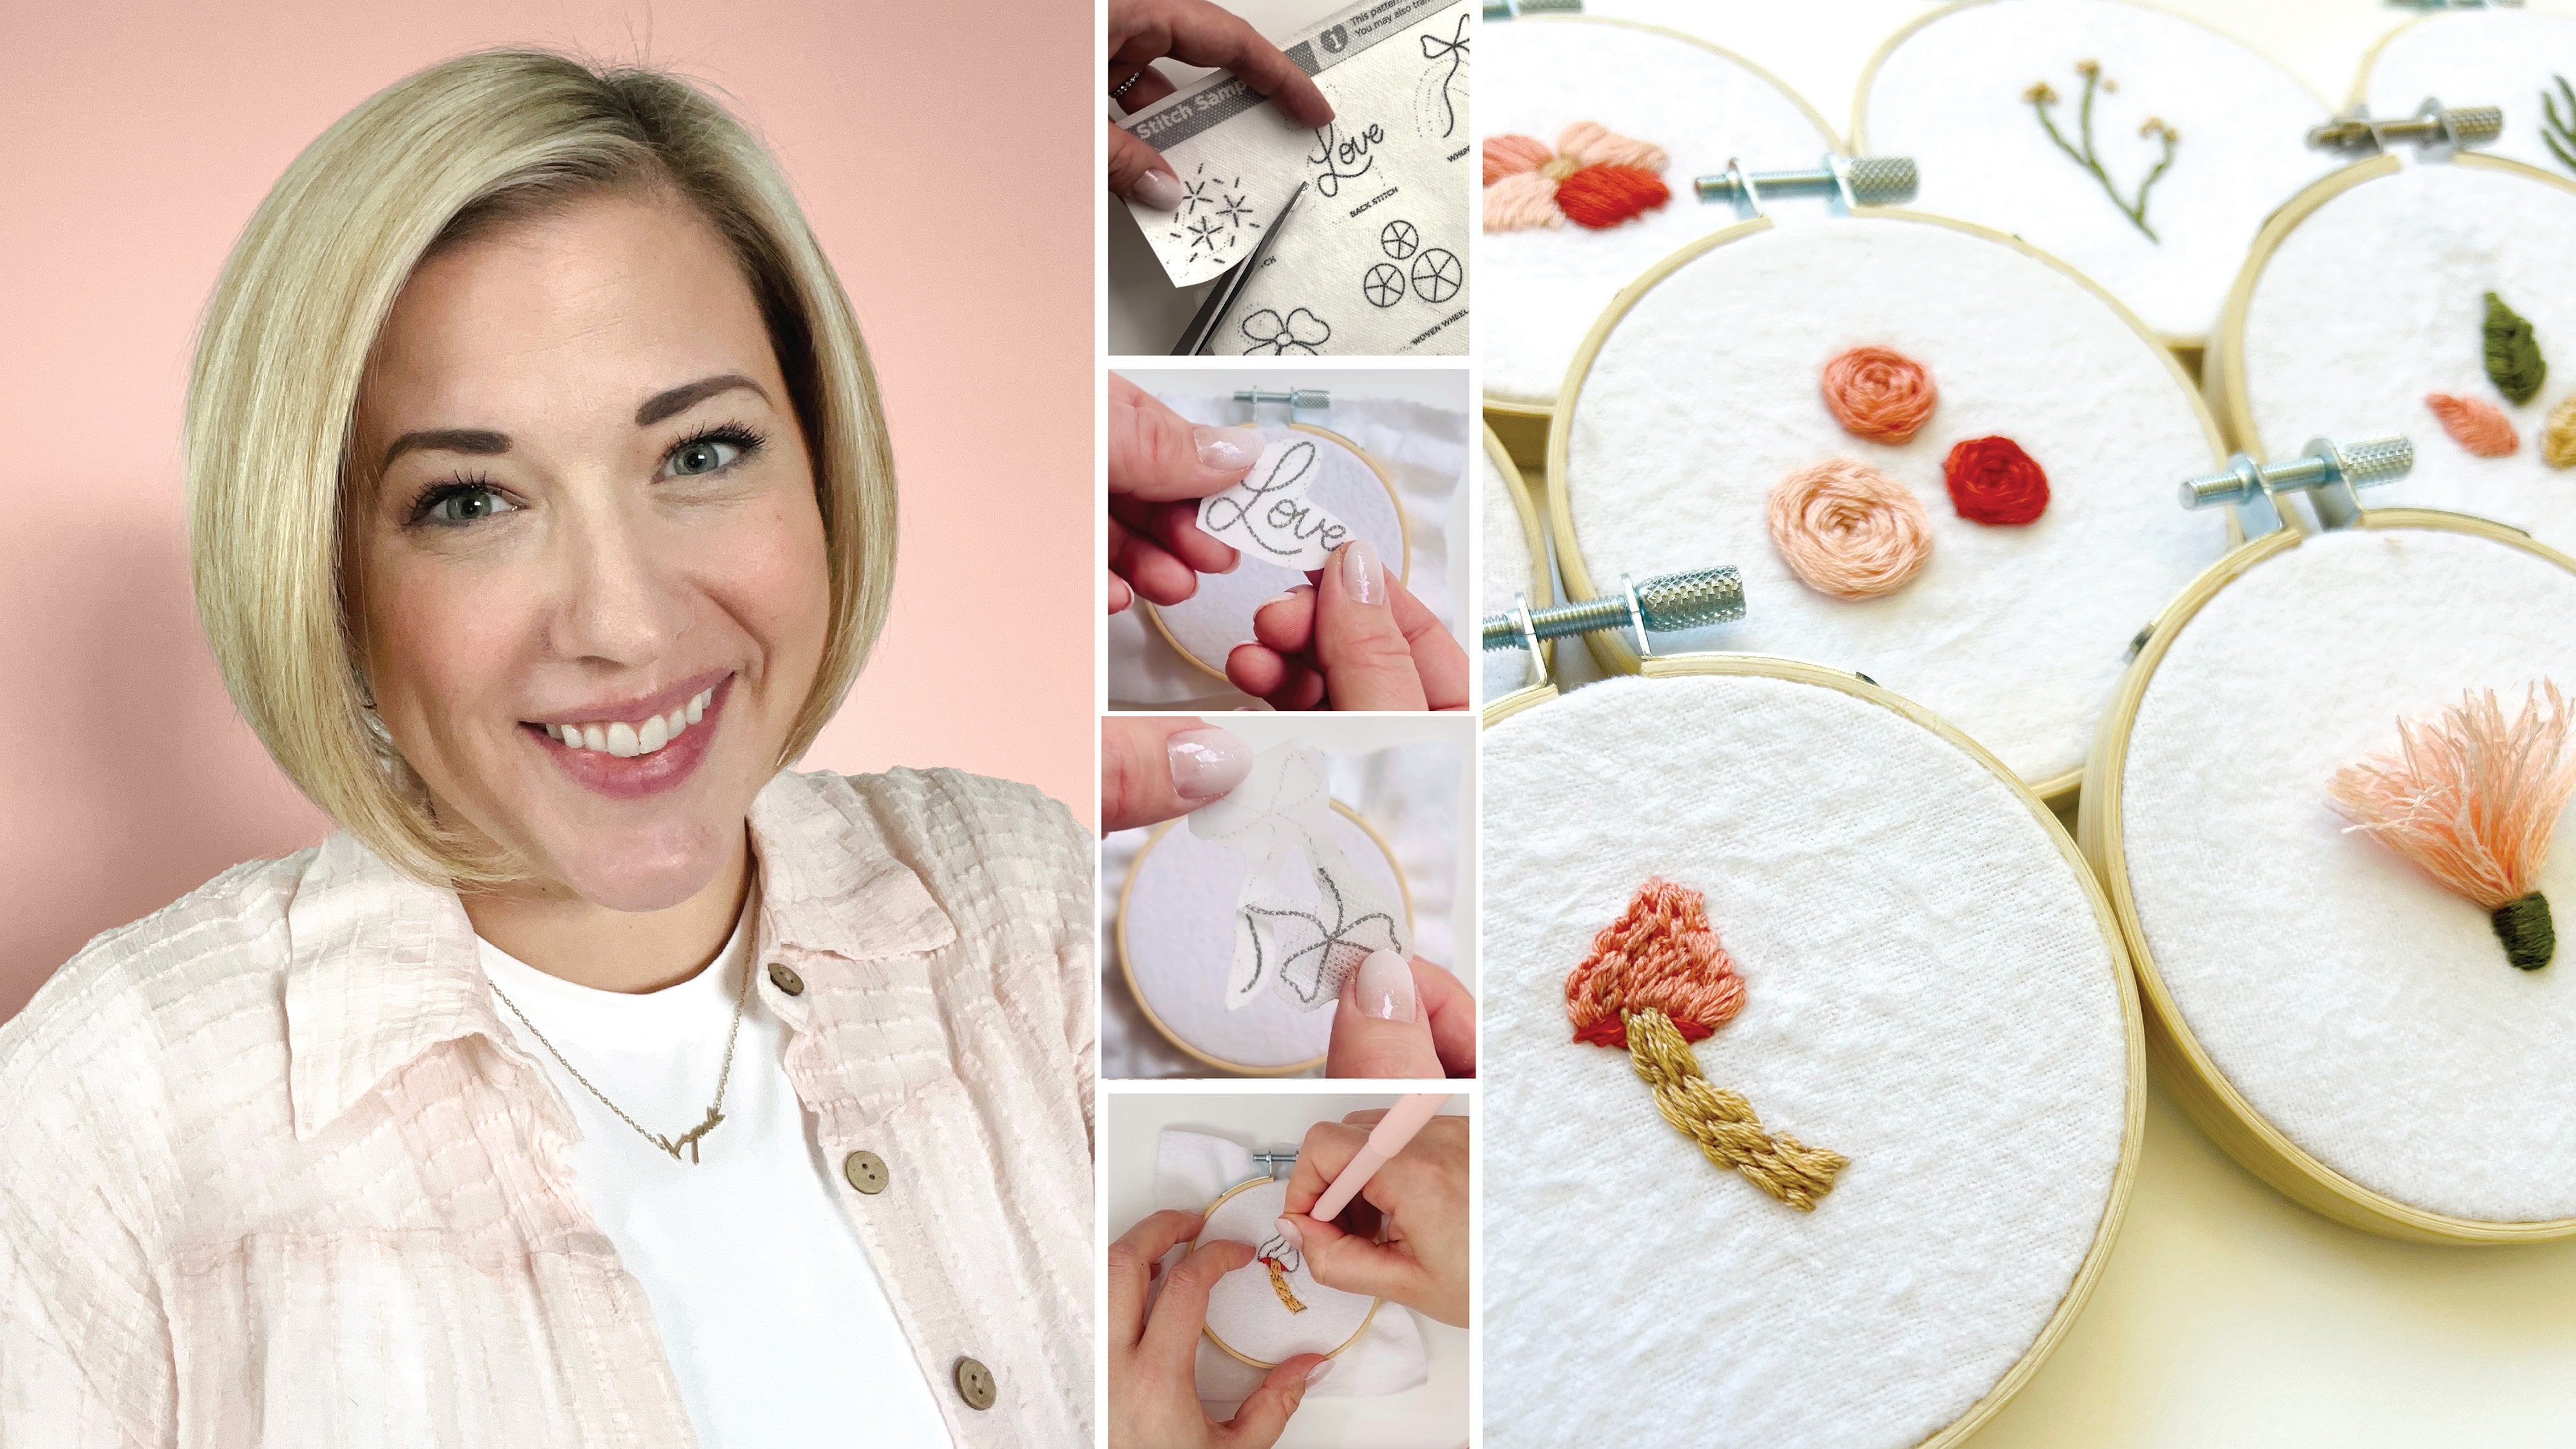
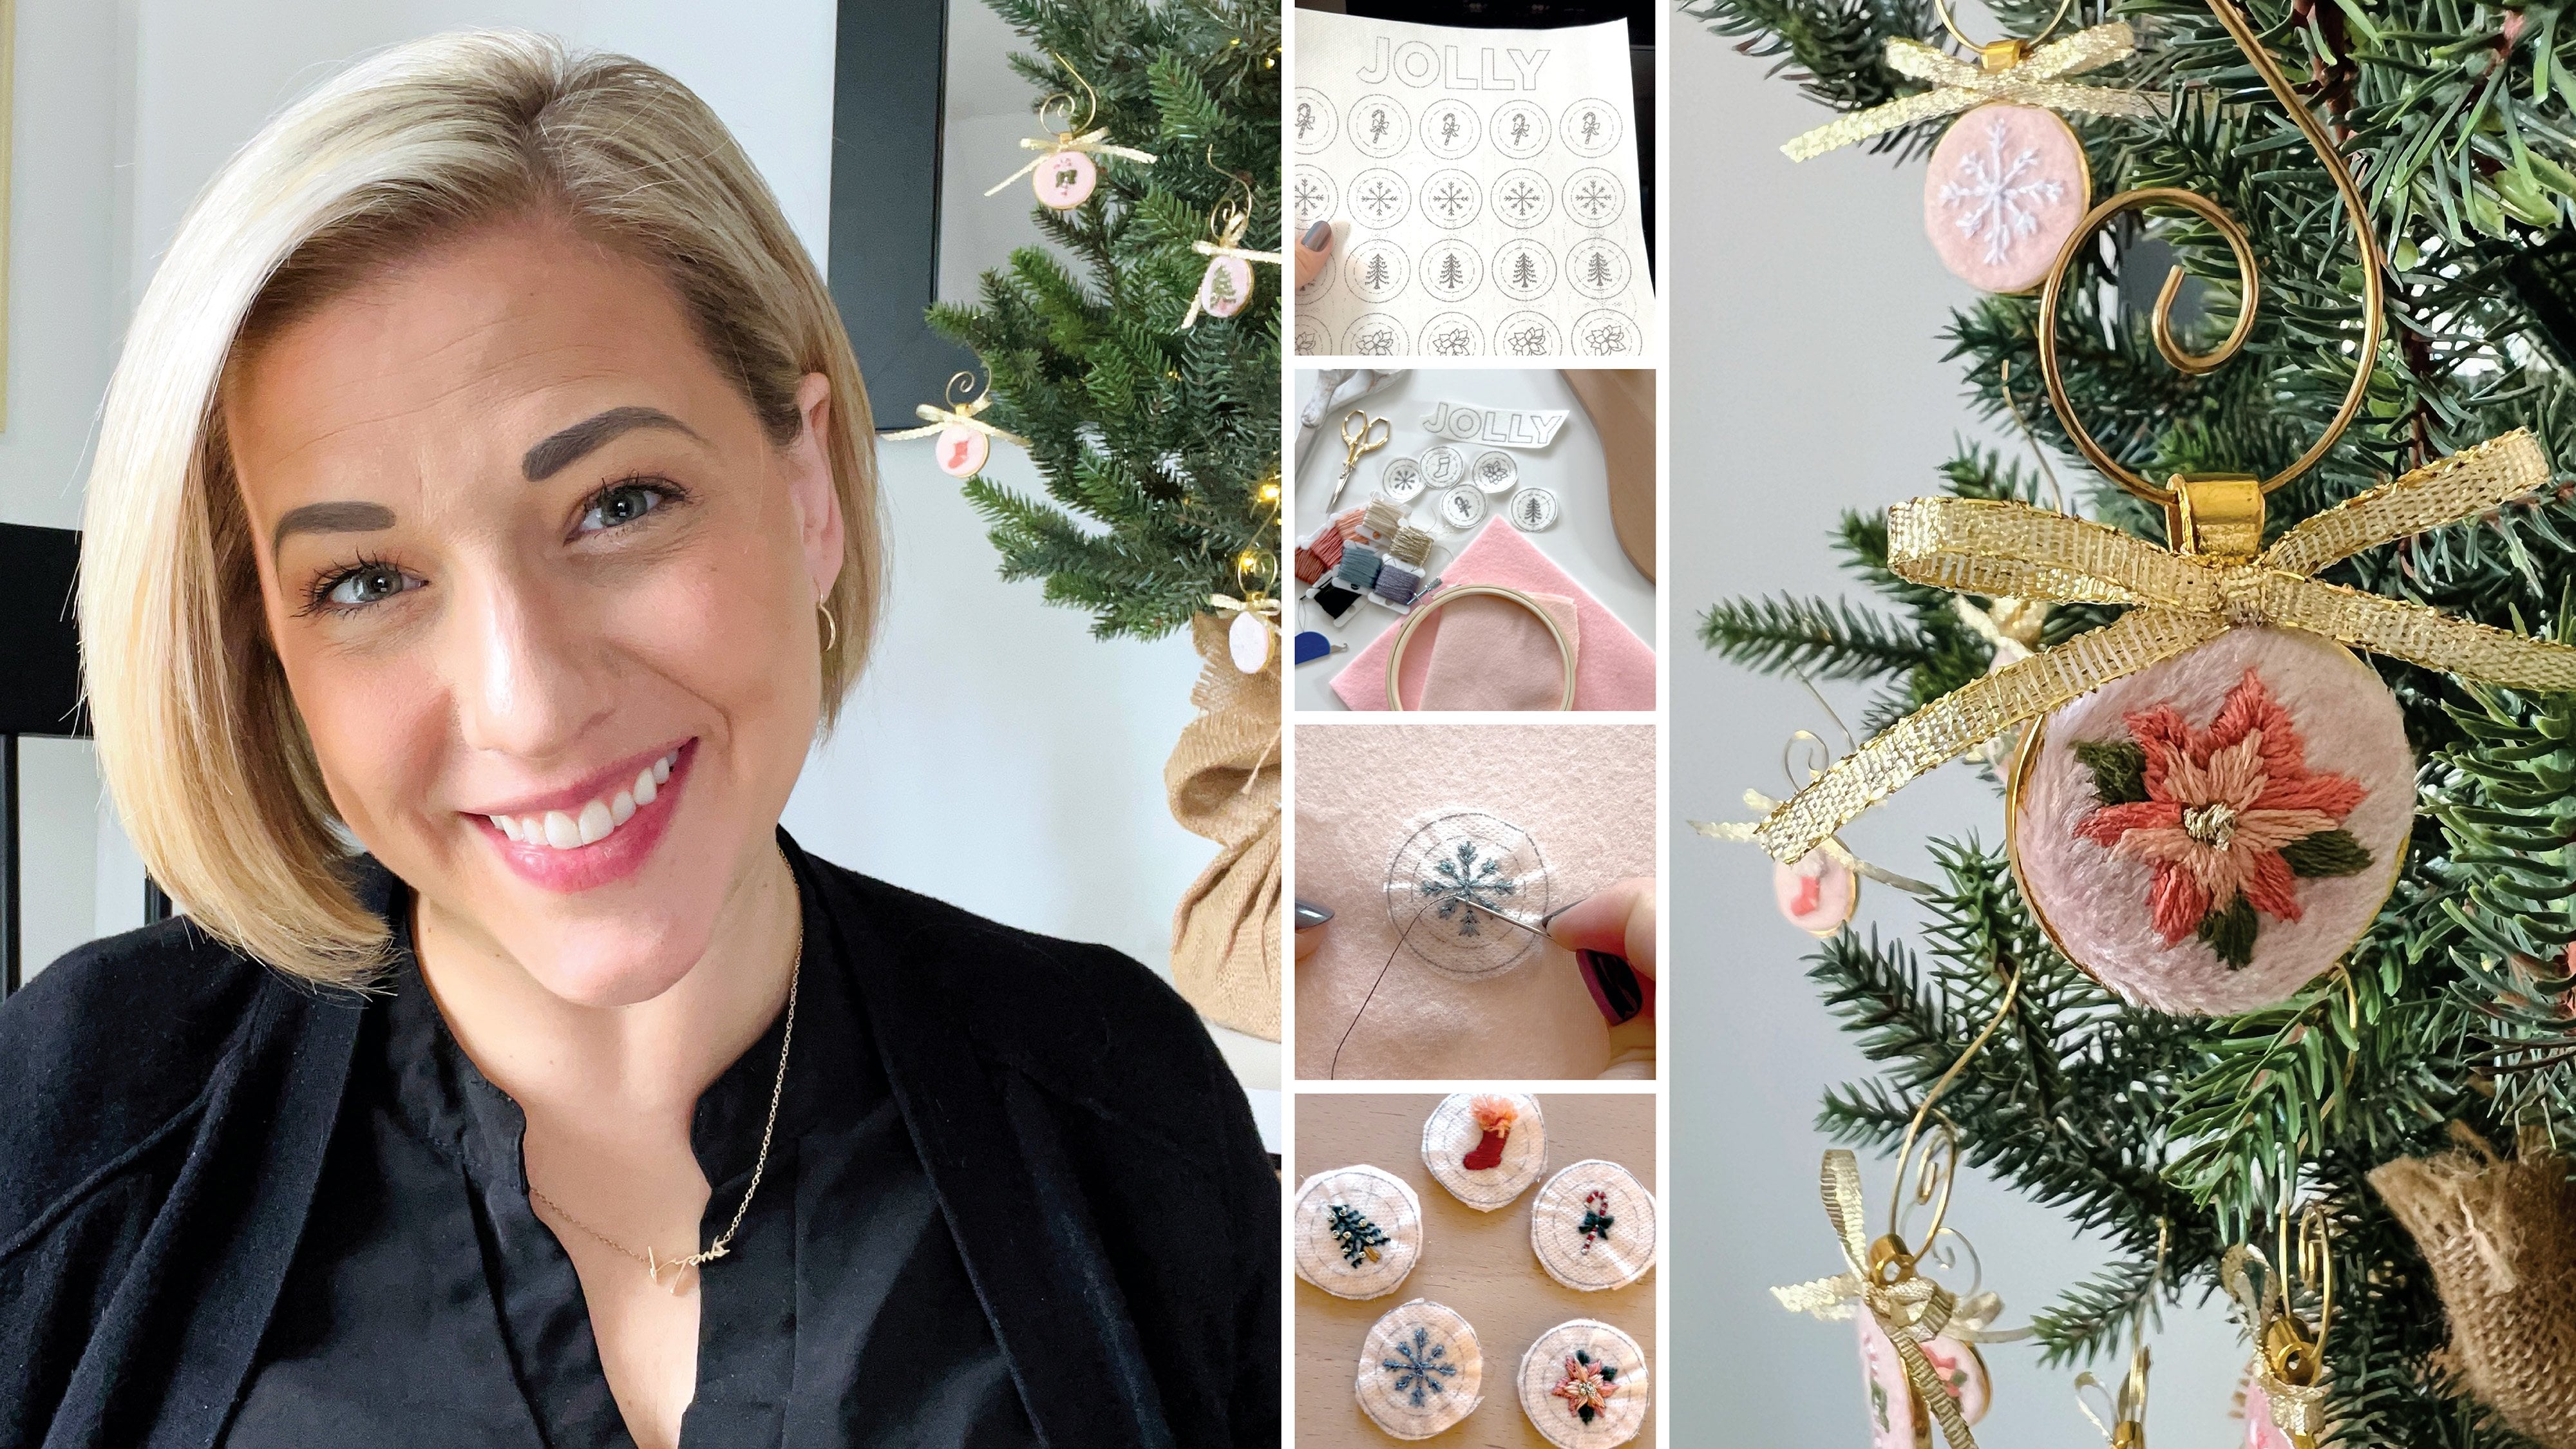
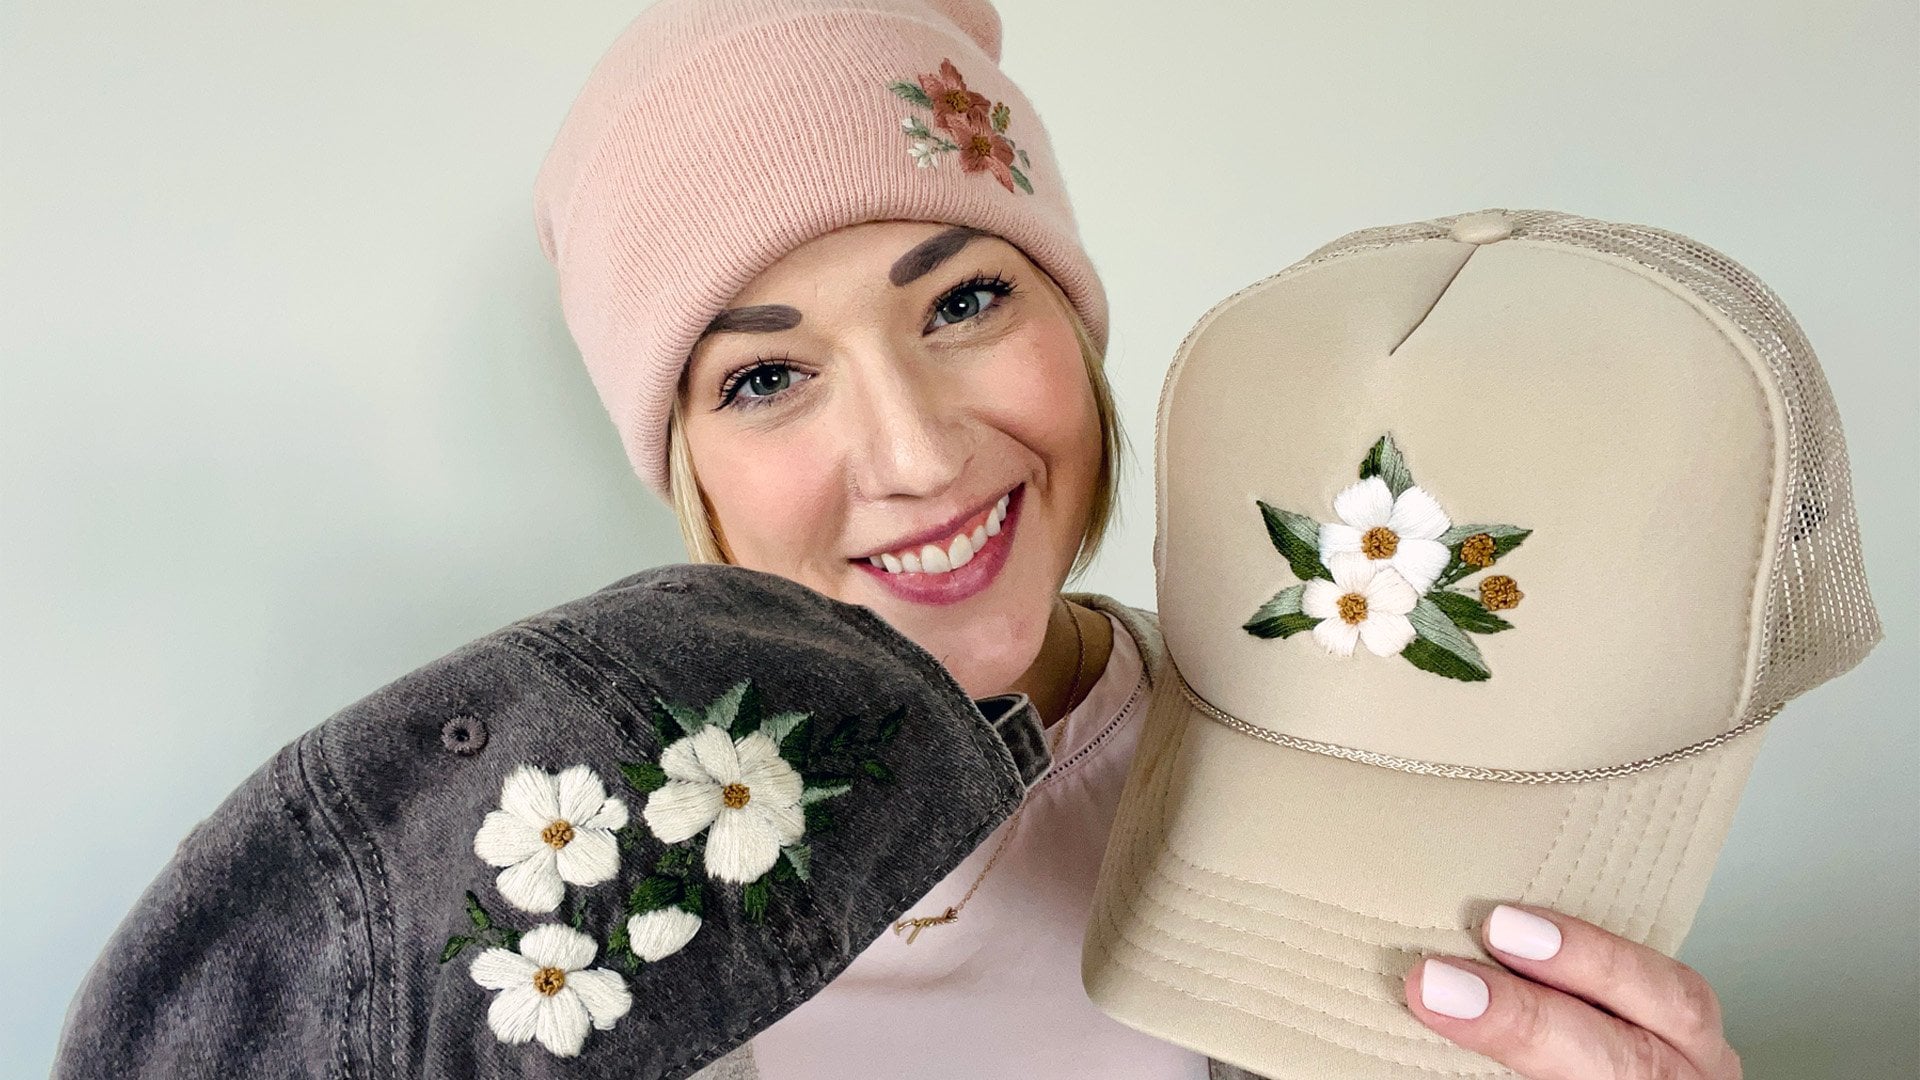
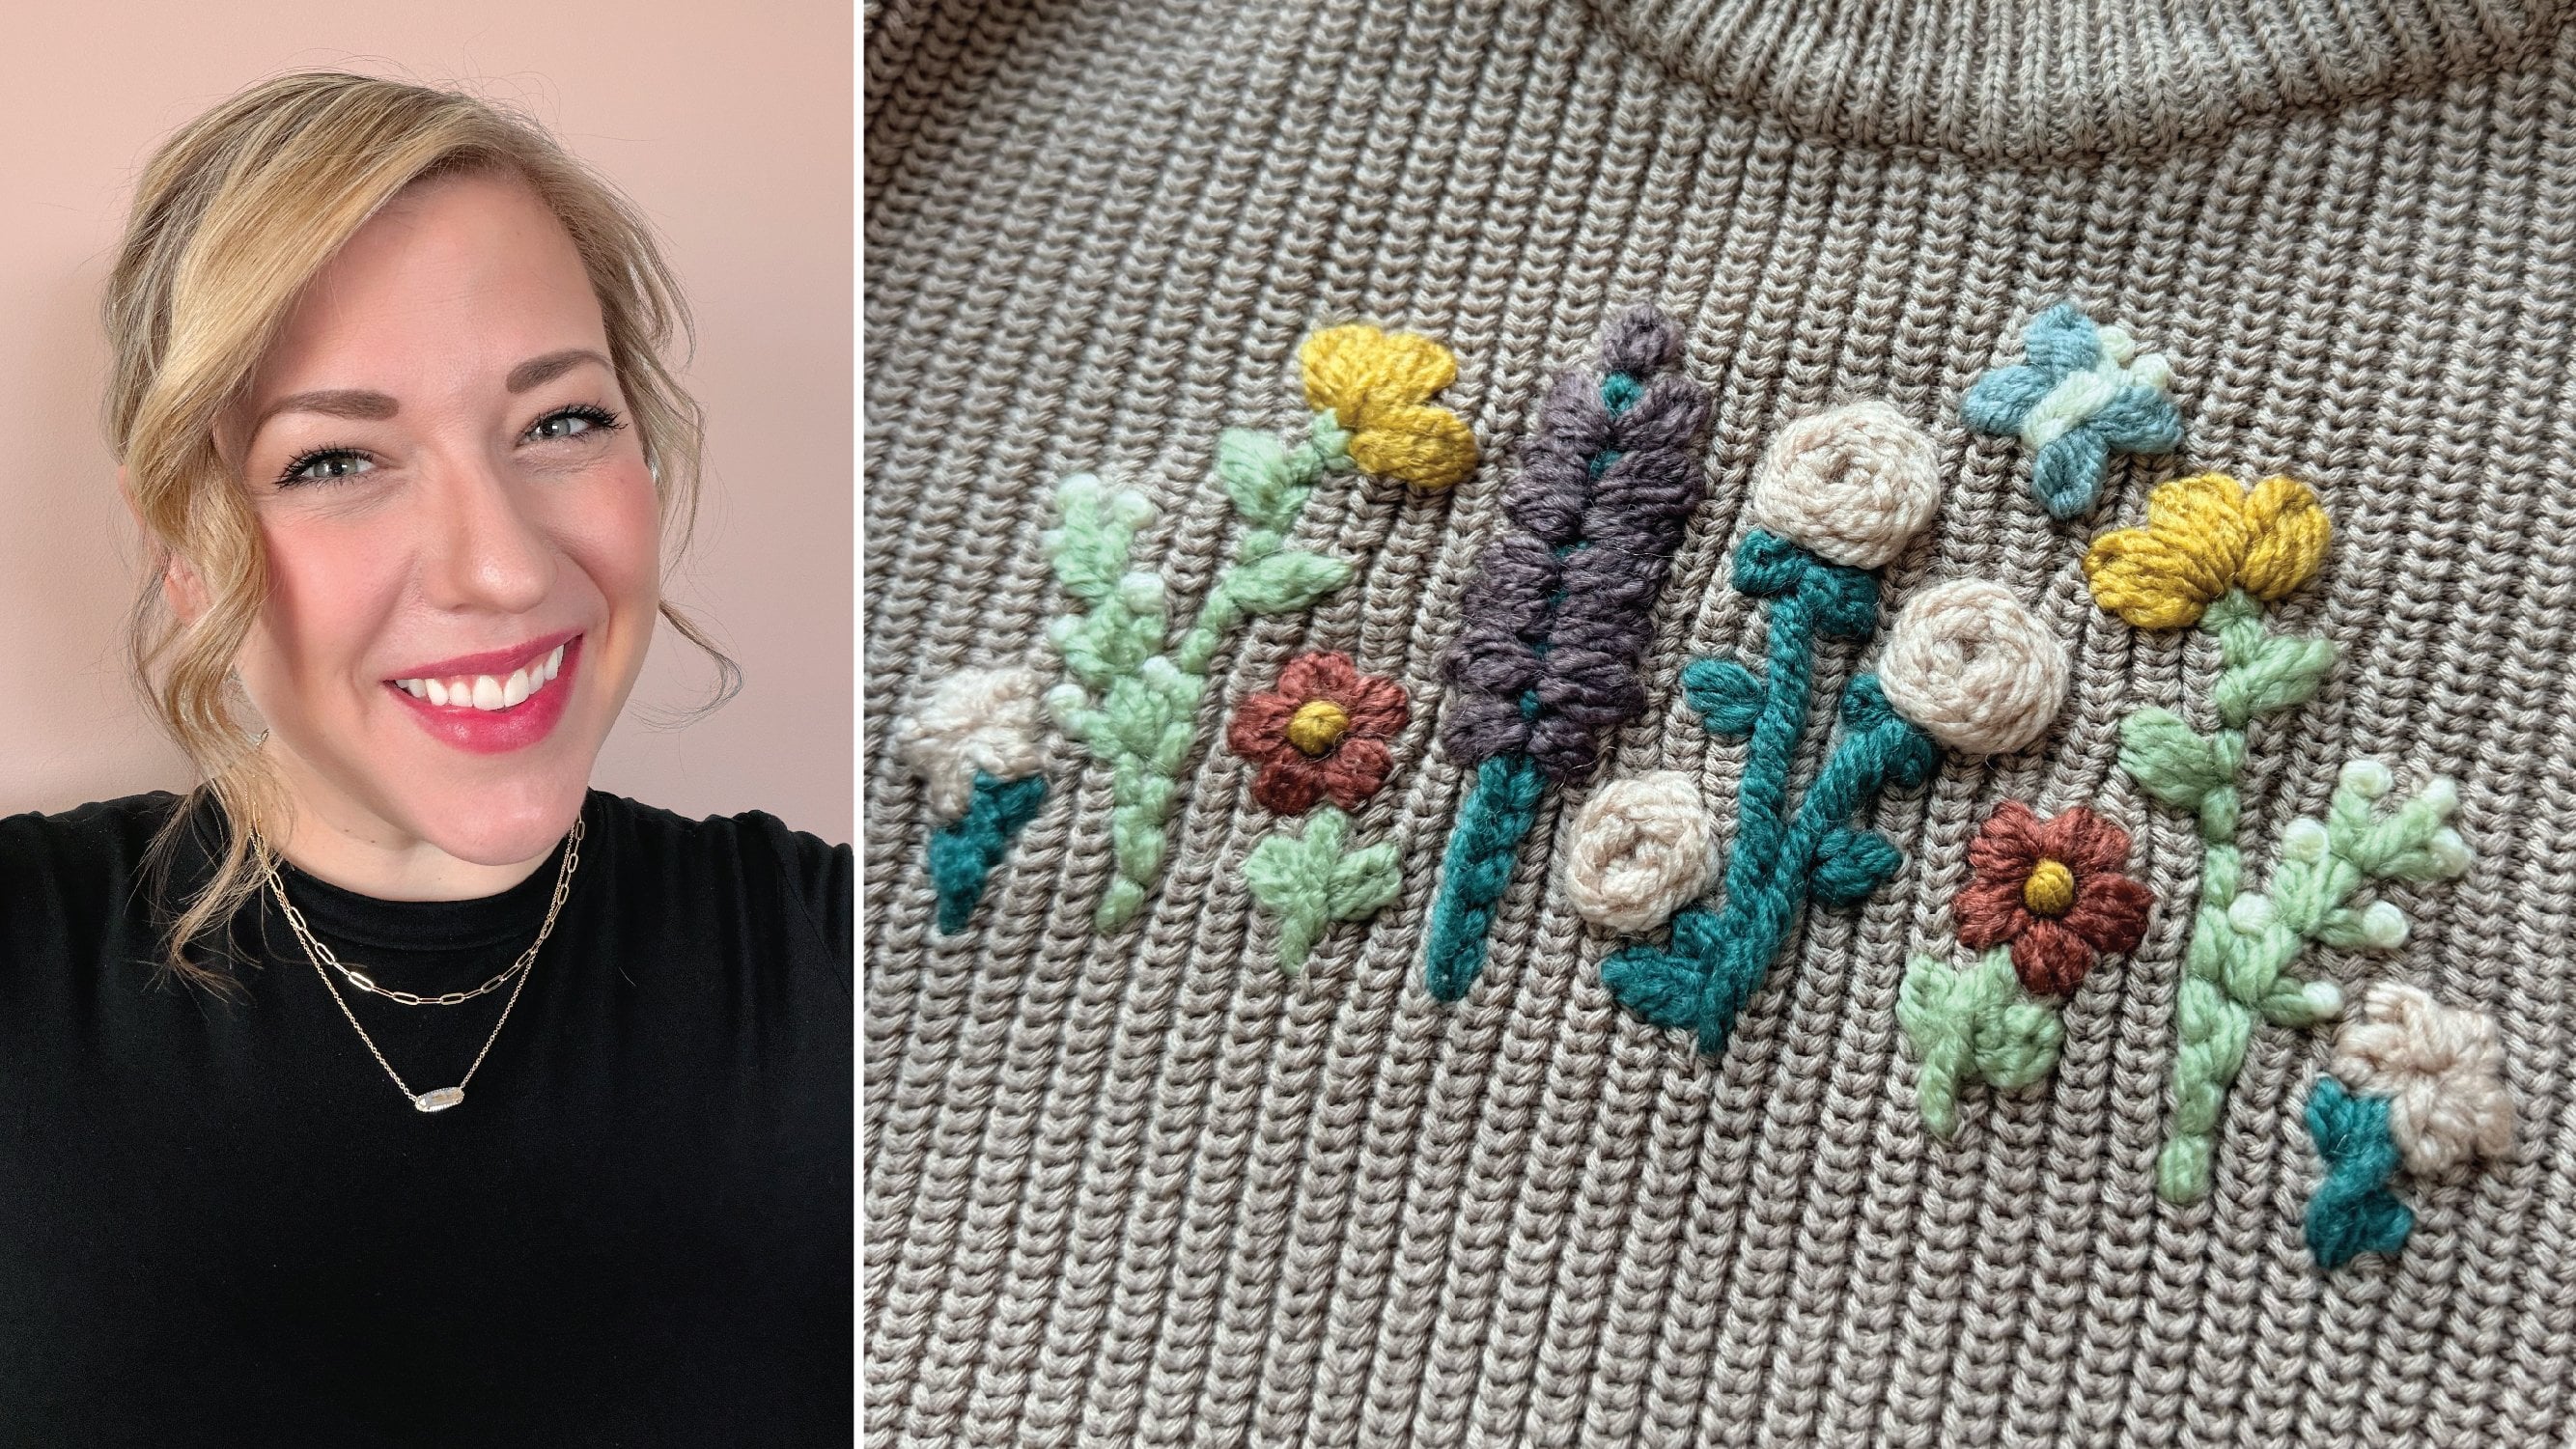
in the right place. Hi, I'm Kathleen Lyons. I'm an embroidery teacher,
creative entrepreneur, and mama of two based in
Nashville, Tennessee. I studied art and design
at Otterbeine University and started my career as a graphic designer
outside of Chicago. Today, I split my time between digital marketing and pursuing my creative career on
nights and weekends. My embroidery journey started when I was pregnant
with our daughter Ella. We had a ton of gender neutral clothes
from Big Brother Caden, and I wanted to find a way to make them feel uniquely her. So with just a little bit
of thread and a needle, I was able to transform some simple basics into
something sweet and grilly. And I was hooked. Embroidery has a unique way of making something
ordinary feel special, especially when
it's done by hand. In this class, I'll be
teaching you how to add some floral flourishes
to your favorite bags. I'll be going through
three, a cross body bag. It's really fanny pack. A canvas clutch and
a classic tote. It's a creative and
fun way to personalize your accessories and be able to take your art with
you wherever you go. Whether you're new to
Han embroidery or you're looking for that next project,
I'm so glad you're here. So let's take those
stitches from the hoop to the street and turn something simple into something beautifully you.
Let's get stitching.
2. Class Project: It's class project time. Your class project is to
use one of the patterns, pick your favorite,
pick your favorite bag, and stitch floral design on it. You'll need just a few items. Obviously, you'll need a man, and then you'll need needle,
thread, and scissors. If you're working with a
water soluble stabilizer, you'll need that as
well, and a printer. However, you can
also trace these if your fabric allows
or go freehand, get a heat respo pen and
draw your own floral design. For those using this
stabilizer, we'll print those. We'll stick it onto our piece, and we'll stitch right into
it. That will wash away. You want to make sure
that you're using your own selection
of unique colors, although you're welcome to
follow mine and stitches. Use the stitches
that you like best. And finally, share your work. So if you're sharing
here on Skillshare, I would love you to add it
to the project section. If you're sharing on social, be sure to tag me. I
love seeing your work. I'm at Art Lions on Instagram. And if you have any questions or any more tips, reach out. I'm always happy to
help. Happy stitching.
3. Supplies: And this lesson will cover
some supply recommendations. They're also in your guide, so don't forget to download them. The easiest way to get
started is to have a printer and then use
water soluble stabilizer. So, I have two here. Sulki is my favorite brand that's linked in your resources. Also use new Bothrd. It's a little bit
stickier, in my opinion. So if you're just starting
out, I would stick to silky. But either will work.
If you can print those, you can actually use
either kind of printer. I find that the ink chat
works a little bit better. The laser printer kind of, like, creates a shadow and
melts it a little bit. So at your own risk. But any printer will
do you could also take this if you print on a regular
piece of paper and trace. If you're using a heat raasable
pen or water soluble pen, you can trace onto the water soluble stabilizer if you don't want to put
that through your printer. So just to tip if you're not feeling
comfortable with that. You'll also need a
bag to stitch on. So any kind of bag we'll do, this is one that we'll be doing. But I love I love an
opportunity to upcycle. Especially if it's a bag you're
going to wash, that way, your fabrics already ready to be stitched on. You
also need scissors. So these are my I
had these forever. These are my little
embroidery scissors. I love them. I travel with them. They're my favorite. Then
you also need needles. So I keep all of mine. I think this is actually
for yarn needles. You keep them all in
here. I'm typically using a size five
when I'm working, but any embroidery needle should work if
you're using floss. If you're using
yarn or something, it may be a little bit trickier. You'll want to make sure
that you get a needle that is the right size for the
thread that you're using. So speaking of Floss, make sure that you get
the colors that you like. I'm going to be using
lots of pinks and greens. Those are obviously
my color palette. I use some golds and
gold tones and things. I always recommend starting
out with black and white, get your neutrals and then fill in with some of
your favorite colors. But make sure you're choosing the colors that you like best. If you're going freehand, I do love these heat
erasable pens. There's also markers. You
can get those on Amazon, just do a quick search and you'll be able to
pull those right up. So no matter which
way you're going, if you're going freehand,
you're printing, you're tracing,
get your supplies together because it's
time to get started. I'll see you in the next lesson.
4. Stitches: And this lesson,
we're going to talk a little bit about stitches. So if you're new to
hand embroidery, I highly suggest
you jump back to my modern embroidery one oh one, learn 15 essential hand
embroidery stitches. So you can learn the stitches. So you'll be able to
mix and match and choose the stitches that
best match your style. However, I will pull the stitches that I'm
using into this lesson, so you can stay here and watch just those specific stitches
if you want to follow along. But if you want to mix and match and be able to
make it more you, I'd suggest going to
the one on one class. Now, if you've already completed the one oh one class and
you're more intermediate, go ahead and jump
to the project. Videos, you'll be ready to
dive in. That being said. Wherever you are, I'll meet you in the next lesson.
I'll see you there. Hello, my arts friends. Today we're going to be
learning the backstitch. Let's type in. So we're starting with a
water soluble stabilizer. I'm sticking that on, and then I'm just going to come
up through the mac with my needle and straight back down to start that
initial straight stitch. Now, for the backstitch, I'm going to come ahead
one stitch length. And then when I come back
down through the front, I'm going to be going into the same hole as my last stitch. So that ending hole of the initial stitch, I'm
going to go into that. And then I'm going to repeat
that all the way around. So that is the pattern
for the backstitch, going up a stitch length and
then coming back down and sharing that same hole
from my previous stitch. This is a great way to outline. It's great for hand lettering. And just keep in mind
as you have curves, you might need to go
a little bit smaller, so as you're determining
your stitch length, be sure to note that. And again, it doesn't
have to be perfect. Sometimes those little
imperfections are what make our work unique. And
that's the backstitch. Hello, my artsy
friends, in this video, we'll be learning the satin
stitch. Let's jump in. Starting with a water
soluble stabilizer, I printed on this,
and I cut it out, so I'm just taking
that out my fabric. I'm gonna come up through the back, down
through the front. I'm splitting this
centerpiece here. I do that a lot with
satin stitches just to help keep me a little
more even as I'm working. And I'm gonna come up
again through the back, down through the front, right
next to Matt First stitch. So these are essentially
straight stitches that are side by side by side, and I'm going to keep
them as close as possible because my goal here
is to fill the shape. So the satin stitch is
great for filling shapes. I would advise keeping them on the smaller side if you
have some larger areas, maybe explore the long
and short stitch. But the satin stitch
is great for filling in small areas and doing
it fairly quickly. So I'm gonna speed this up here. Again, I do like to split my shapes just to help keep it a little more consistent and keep my stitches from
getting too wonky. And that's it. Quickly
filling this in, this is our satin
stitch. Check it out. Hello, my art friends. Today we're going to be
learning the leaf stitch. Let's dive in. Starting with a water soluble
stabilizer, I printed this, cut it out, and I'm
just going to stick it here onto my fabric
and get started. It's gonna come up
through the back, down through the front,
and I'm going to come up at the top of my leaf, and then I'm going to come about three quarters of the way down in the center and
push that back through. Now when I come back
up, I'm going to the left of my
initial stitch and then I'm going to go back down just over to the right
of that first line. So I'm going to
be crossing over. And that's the most
important part of this is to make sure that you're getting that crossover so that you're getting
the leaf effect. It's going to create this
seam down the middle. So I'm going to come up on
the other opposite side, so on the right side, and then back over and cross
over to the left. I'm going to keep doing this
down the edge of my leaf. I'm going to come up
and then cross over my center and just back
down to the opposite side. So again, I'm going to continue doing this through the leaf, and I'm going to go
all the way down until I hit the bottom and
I run out of space to fill, and I'm going to do that
for all three of these. So I'll speed this up so you
can see the final effect. But it's just up
down, crossover, and the crossover is the
most important piece to make sure that you're going to get that seam for the leaf stitch. We're all done. Check it out. Hello, my artsy friends. And this video we'll be learning the Lazy Daisy. Let's jump in. Starting with a water
soluble stabilizer. I printed this out, cut it, and now I'm just gonna
stick it onto my fabric. I'm gonna come up
through the back. I'm gonna go through the center, and then I come back
down in that same home. If you're familiar
with the chain stitch, this is the same thing.
They're just detached. So I'm going to come up through the middle there at
the end of my petal, and I'm going to hook that loop onto my needle and
pull that tot. Now to secure it, I'm
going to go right back down just over that floss, and that creates
one of my petals. I'm gonna repeat this. This is, again, the lazy daisy. It can be used for
obviously, daisies. But it's also a great
stitch for leaves. So if you want to have a
couple of different leaves, I'm going to do some of these here to look more like leaves. But you could
actually make a stem and then have these
shooting off of it, and that creates more of
a greenery type effect, or you can use it as
small flower accents. It's a really nice stitch to add some floral
elements to your work. So I'm going to speed
this up, and like I said, I will go ahead and
fill in a couple of these so we get that
greenery effect. And this is our lazy
daisy. Check it out. Hello, my arts friends. And this video we'll be covering the French knot. Let's jump in. Starting with a water
soluble stabilizer. I printed on this, cut it out. I'm just going to
attach it here. And I'm going to go ahead and do a backstitch for these stems, and then we'll get started
with a French knot. It's going to come
up through the back. I go to wrap it two
to three times and then push it down right
next to where I came out. So this is going
to create a knot. I'm going to keep this
parallel to my hoop. Sorry, it's getting stuck. And then I'm just going to
pull that right on through. So we'll do that a
couple more times. Now, be patient with yourself. French knots are
notoriously difficult. So up through the back, go
to wrap it two to three times and then come back down right next
to where I came out. Go ahead and keep the
other side taut with my other hand and let
that slide on through. Okay, one more time. You notice I did goof up a
little bit there. So be kind to yourself
as you're wrapping. Sometimes it gets
a little tricky. So wrap two to three times and then back down right next
to that initial stitch, Hold it out to the side and let that start going
through and then let it go. There's your French knot. So I'm going to finish this up so
you can see it all completed. But again, please be
kind to yourself. These are difficult
to get the hang up, but once you get
some wraps, they start coming a little
more naturally. A wrapping it up here, and this is our
Brenchkot. Check it out.
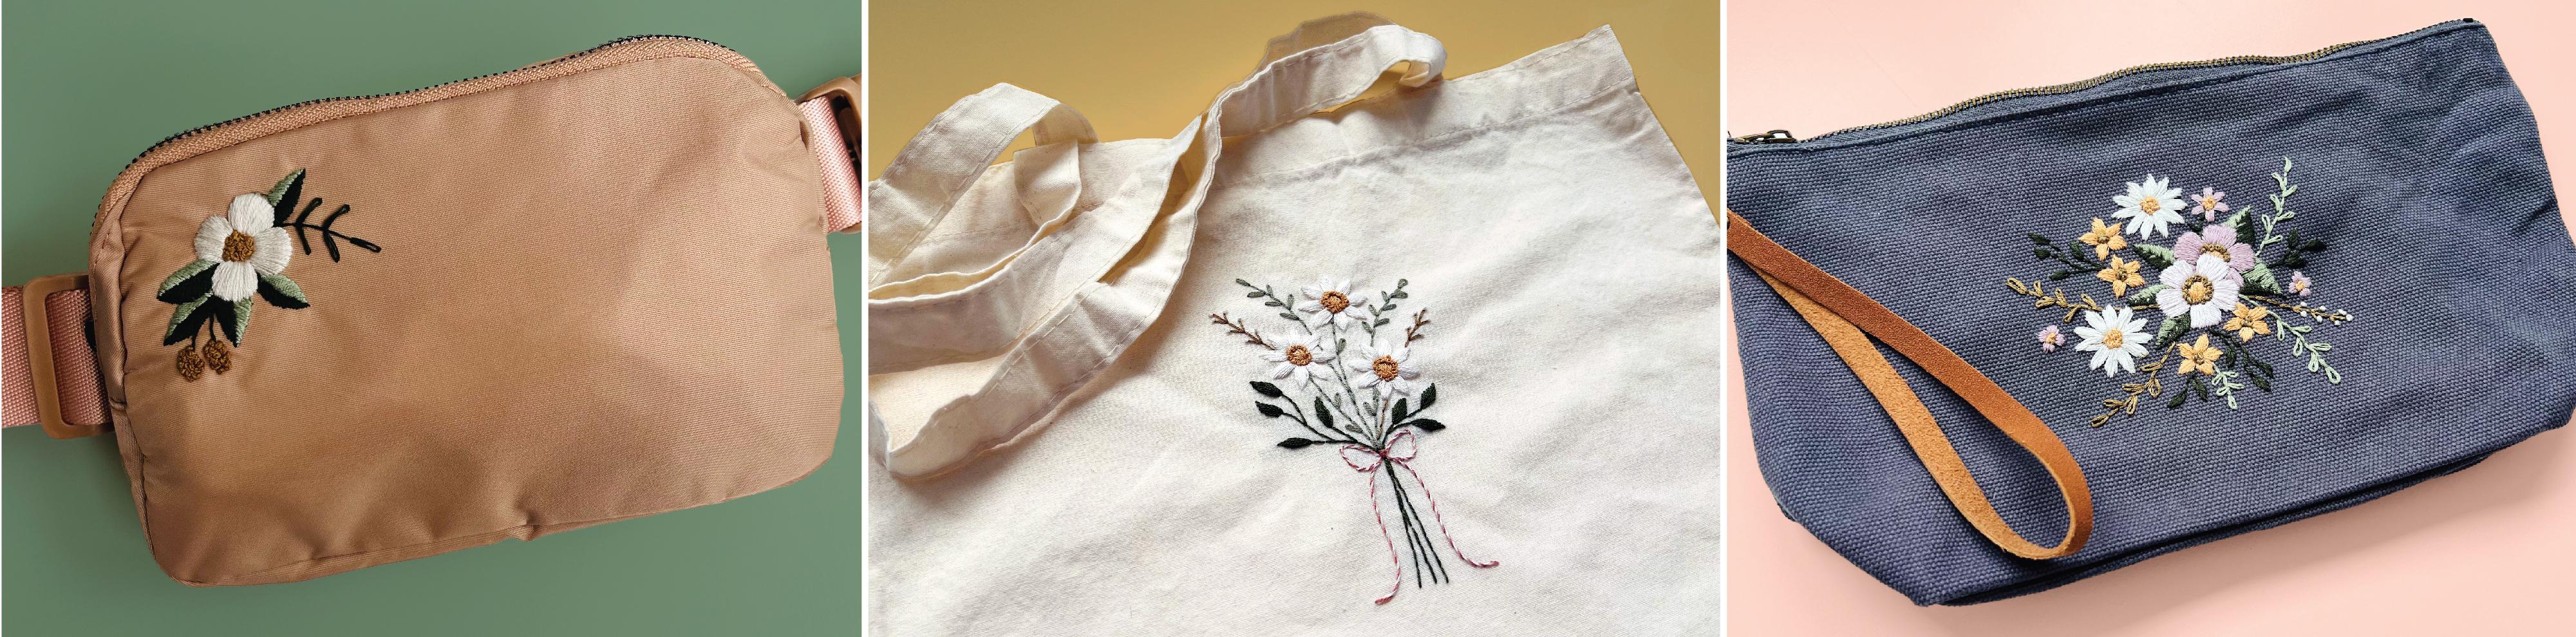
5. Belt Bag: Hello, my artsy friend. Today, we're gonna be stitching a small floral design on the
ever popular cross body bag. We know it's a fanny bag.
So let's get stitching. We're gonna be starting with our water soluble stabilizer. I printed and cut this out. I'm just gonna peel this and
then apply it to my bag. Now, I did work with
some placement. I decided on the upper left, but you can place this
wherever you'd like. You could also put
it in the bottom. Wherever it feels good to you, get that applied, and
we'll start stitching. So I'm going to start
with my dark green. So I'm going to begin
with these stems. I'm doing a backstitch, and make sure you're not sewing anything shut on the inside. I think that's what
I just checked. So you're going to
start with your stems. So I'm going to do
a backstitch here. I'm gonna come up
through the back, down through the front to
start that straight stitch. And then I'm going to
backstitch each of these stems. So I'm
going to do that. I'm gonna come up a stitch
length ahead and then back down into the last
hole of my initial stitch. And if you need help
with the stitches, refer back to the
one on one class, but these are just
simple back stitches. So I'm going to do this
for all of the stems, and then I'm also going to be shading my leaves
with this dark green. So my goal is to do all of the same color and then come back through
and start my next color. So I'm going to speed
this up for us. I'm going to finish
these stems and then meet you back for the
shading of the leaves. Okay, now we're back
for the leaves. So as I mentioned, I'm gonna be making this kind of a shade. I've been really liking
these two tone leaves. So the bottom where it might
be a little bit more shaded. I'm going to be doing
the dark green. And when I do my satin stitch, I like to kind of
cut it up in pieces. And I'm basically giving
myself guidelines, so I can keep my
stitches consistent and make that shape a
little more structured. I tend to get a little
wonky if I don't do this. So I'm really just setting
a structure and then going back through
and filling that in. So I'm gonna fill
these in and then I'll get all of the
dark pieces done, again, doing backstitch on all the stems, and we're
gonna come back up. And now I'm going to fill in
this little leaf over here. So this is set up
for lazy Daisies. So I'm coming up
through the back, down through the front, and
I'm going to create a loop. And once I get my loop,
I'm going to come up, and I'm going to catch
that loop with my needle, so I'm gonna pull
that through here. And then to secure that, I'm just going to go right
over top of that floss. And stitch it in place. So
this is the lazy daisy. I would This would also
really, really cute filled in. So if you want to
make them leaves or maybe you want to create
little flowers here, you could do a
different color here, make it a little bit of a lavender or
something like that. Feel free to mix it
up however you like. Okay, so I'm finishing this up, and I'm going to
come back through. So I mentioned I did
all of my dark green. Now I'm going to come back
through with this light green, and I'm still doing
a satin stitch. So I'm splitting it
up through the back, down through the front, side by side by side. This
is our satin stitch. I'm coming at an angle to kind of create that
seam for the leaf. I guess it's a vein here,
but I'm creating that vein. I'm also splitting it two tone as if there was
some light and some shadow. You can also mix your floss, like do one dark, one light, maybe two
darks, two lights. Feel free to play around
with that as well. I enjoy color blocking, so
that's what I'm doing here. So again, I'm going to be doing the top parts of my leaves in this light green and leaving the bottom where it's a little
bit darker, dark green. You could also do a leaf stitch for these and have
it all one color. Again, make sure that you're
using the colors that you like best and mixing in the
stitches that you enjoy. So I'm going for a
satin stitch again. On these petals, I'm
creating a white flour. Now, one thing to
note, if you're using a light color with a
water soluble stabilizer, you may need to soak it
a little bit longer. Maybe even overnight
to make sure that that dark print from your
printer does not come through. So if you're using anything
in the pastel family, maybe a nice yellow or a pink, especially white, I would suggest letting it
soak overnight. A lot of times I use the sprayer and my sink
in the kitchen, and that works fine, but I am more sensitive when
it's lighter thread. I've seen a couple of times
where I've maybe missed it and that dark piece
is showing through. So just make sure that you soak it if you're
using light colours, darker colors probably
doesn't matter as much or if you've
completely covered it. And again, make sure you're using the stitches
that you prefer. I'm going to start using
a French knot here. So if you prefer a satin stitch or something else,
feel free to swap, but I'm going to bring
it up through the back, wrap it two or three times, and then go right next
down to where I came out. So this is going
to create a knot. And again, if you need help, refer back to the
one oh one class. I'm going to do
several of these to fill in the center
of my flower here. I really love the texture
that it gives to the piece. And so I'm going to fill that
in. And then I'm actually going to do the buds
down there on the left. Going to do those with
French knots, as well. Again, you can
swap these out for any stitches you prefer,
color, et cetera. Make sure you're using what you like and what you enjoy doing. So if it's a satin
stitch, go for it. If you want to mix in
some long and short, go for those two. I'm
going to continue here. So again, I'm just wrapping
two to three times and plowing that through
to create the knot. So I'm going to fill in here, and then I'm going to fill in those buds down at the bottom, and I'll meet you back to wash off the water
soluble stabilizer. Right now that we have
everything stitch, we're ready to rinse this off. So I said, I mentioned before, I use the sprayer
in my sink a lot. I also use my upstairs sink. So we're going to soak
this. We're gonna start it. I go to see how well
this comes off, but likely I'm gonna
soak this overnight. And when I do that, I just
put it in a bowl and I will put this one face down and just let it soak overnight, grab it in the morning
and let it dry out. I do want to mention if
you're using a bag that you plan to wash, I
would wash it first. Always, always, always
wash your fabric. That's why I love upcycling. It's kind of a hack, 'cause
it's already been washed. But you want to make sure that if you're gonna
be washing it, you do that beforehand so it
doesn't ruin your stitches. I'm going to finish getting
the stabilizer off, and then I'll come
back and show you my final product. And
here's the final bag. I love it. So pinks and greens and golds
are totally my thing. I cannot wait to see what
colors and stitches you chose. Key takeaways. Use the colors and stitches
that best reflect your style. To avoid dark lines, be sure to dissolve the water soluble
stabilizer completely. This may mean soaking
it overnight. If your bag is washable, be sure to do that
first so your fabric doesn't shrink on you
and ruin your stitches. Remember to upcycle
when possible. This is also a hack
because if it's upcycled, it's probably
already been washed. Happy stitching. I'll see
you in the next lesson.
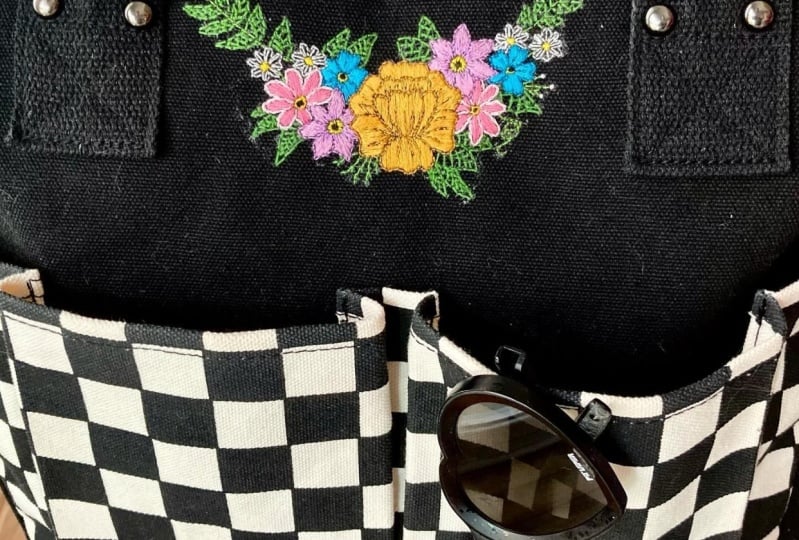
6. Clutch: Hello, my artsy friends. Today, we're going to be adding
some fresh cut florals to a casual canvas clutch.
So let's start stitching. So we're starting with our
water soluble stabilizer. I'm gonna peel that, and
then I'm going to stick that right in the
center of my bag. You can choose to put
this wherever you like. We're gonna start
with our stems. So I'm gonna be using a
backstitch for all of these, so I'm starting with my straight stitch up through the back, down through the front,
and then I'm going to continue that by going up
a stitch length ahead. And then coming back down into the last hole of
my initial stitch. So again, these are all
in the one oh one class. We also covered them
in our stitches. So I'm going to go through
these a little more quickly. So we're doing back stitches
for all of these offshoots, so we're going to
kind of start from the outside and work our way in. So for this one, specifically, I'm going to be doing the
backstitch all the way up. This is also called
a fern stitch when you see it kind of with
the offshoots here. You can just complete this with a backstitch and
leave it as it is. I'm going to come
back through and add a few little French
knots. So feel free. Again, you can leave a plain or you can add a French knot here. So we're coming out
through the back, wrapping it two times, and then going right back down
next to where we came out. And so I'm doing
little buds here. You can add color. I'm just
doing some little white buds. Feel free to make this
as unique as you like. Be sure you're using the
colors that you prefer. I'm going to finish this up, and we'll move on to our next stem. So for this one, I have it
laid out as a lazy daisy. So again, I'm going to finish the stem with back stitches, and then these little offshoots, these little loops are
meant for lazy daisies, which is what I'm
going to put in here. Now that being said, you
can feel free to fill this in if you want to make
it feel more like flowers, maybe a lilac or
something like that. Feel free to make it yours. So I'm going to
come back through after I finish this backstitch. And I'm going to come up
and make that loop for the lazy daisy, come
right back down, and then I'm going to
catch that loop at the very top so
I've got my loop, and then I'm going to
pull this through and use my needle to catch this as I'm pulling
the thread through. So as I catch that loop, I'm just going to tighten it and come right over
top to secure it. And that is lazy daisy. So I'm going to do that
for a few of those. I'm also going to
be mixing in color. So again, make sure that you're choosing the colors
that you like. I have a lot of beige here, some white, neutral tones. I'm going to add
in a green stem, as well, and then I'll be working into
some darker colors. But for this one, same thing, it's gonna be lazy daisy. I'm using a lighter green. And you've seen this
throughout the class. I'm using light green
and dark green along with some neutrals and then
pops of pink and purple. So again, feel free to mix
the colors up how you like. And I am using two
to three strands of the floss, so keep
that in mind, too. The thicker you want
it to look, the more floss you'll use, and the more dainty
you want it to look less that you'll use. You
can also play with it. I made sure that my stems and
things were two to three, and then my flowers,
I can bulk up to three or four if I really want to make that pop in the middle. So now that I have
my lazy daisies in, I'm going to go up here
and just finish these. This is just a quick backstitch. I switch to a darker green, and I'm going to fill these in, and then I'm going to go over. There are a few little
vines with leaves. Now, I've been doing
some two tone leaves, but for these smaller ones, we do the leaf stitch. So we're gonna come up
here after we finish those back stitches and
create our leaf stitch. So I'm coming up through
the back at the top, I'm going about three
quarters of the way down, and then I'm going to
be switching sides. So I'm going to alternate sides. I'm going to come up on
the right side here, and then I'm going to
make sure I cross over that center line to create
that vein for the leaf. And I'm going to do the same
thing on the left side. I'm going to come
up through the back and then cross over the center. Now, all I do is follow the
outline for this and work my way down crossing over back and forth to make sure
that I create that vein. Again, this is the leaf
stitch if you need to refer back to any
of the stitches. I'm going to speed
this up to fill it in, and then I'll be meeting you back to start some
of our florals. So these are all going to be satin stitches for the petals, so we'll work through
this pretty quickly. I like to plot out
my guidelines, so I'll do it in a couple spots, and then I kind of fill it in so that my stitches
are more even. If I go side by side by side, I tend to get a little wonky. Feel free to do
whatever works for you. And then in the centerpiece, I am going to add a French nod. Again, this could
be a satin stitch. Feel free to mix it up. Coming up, wrapping it
two to three times, and then pulling it
right back down. And so I've got that nice little center for my purple flower. Now for these more
star shaped flowers, I'm gonna be using a yellow. Again, feel free to
mix up your colors, and I'm going to be doing the same thing where
I'm splitting my petal and then I'm filling
in with a satin stitch. So that's up through
the back down through the front
side by side by side. So I'm gonna go ahead
and speed this one up, we'll fill in, and then we'll come back for that centerpiece. Again, I really love
the French knot, but feel free to fill
that in however you like. It could just be
another satin stitch. Or if you want to try the
French knot, go for it. I am using the full floss
for the French knot. So I wanted this to
be pretty bulky, so I'm using the full floss and wrapping it two
or three times. I'm pulling that
through, and all done. So I'll finish up scalas and meat you back
for the daisies. So here we're gonna be
filling in the daisies. This one I'm not as concerned with splitting the petals because they're pretty
close together, but also daisies in general have a little
more I don't know, they're a little more unruly. They're a little more wild. I'm gonna go ahead
and fill these in, and then, again, I'll be using French knots for the center. I'm going to come up
through the back, wrap it two or three times
and come right back down. So again, I'm just filling
this whole center space in with French knots and giving
it a little more texture. So I'll speed this up and
meet you back for the leaves. So again, we're still working our way from the outside in. So I have the daisies done, I'm gonna be going into
these larger leaves. Now, I'm gonna be using
a satin stitch for this. You could do a leaf stitch. You could do a long and short. Feel free to mix that
up however you like. I'm gonna be coming in at an
angle with a satin stitch. And for this one, I am
definitely going to put in my guidelines to help keep my stitches a
little more organized. Now, I'm going to
fill this in with a lighter green on top and then come back with
a darker green. So I've got that filled in, and I'm going to come back with the dark green and
doing the opposite. So I'm coming at that angle
to help with the vein and make that look more like
the separation of the leaf. Now, I did add a couple
little accent stitches, like little straight stitches to blend the light green
with the dark green. You don't have to do
that. In hindsight, I kind of wish I
hadn't you'll see that later when we get
started on our flowers. So you can kind of see
those little tick marks. It's growing on me, but feel
free to add any kind of accency and now we're going to finish up with our
two focal leaves. So I'm going to do
satin stitches again. And because these are
such large petals, I am going to really
make sure that I set my guidelines and
then fill it in side by side by side
with the satin stitch. So I'm going to do
that for all of the petals and then come
back in the center. I'm also going to do
a satin stitch in the center and then outline
that with French knots. So again, I'm using the full floss coming up
through the back, wrapping it a couple of times, and going right back down. But that's going to help give
a little more texture and break up all of the satin
stitches here in the center. I'm going to outline
that one and then come back for that
very last flower. And now we're on our last Lower. So I'm going to do a
slightly lighter color here. So I did a little bit darker, basically the same hue. It's a purple that
I have in the back, and then I'm doing slightly lighter in the same
family here in the front. Feel free to mix this
up how you like, but I kind of like the
idea of playing with shadows and having
this one more forward. So I'm going to fill that
in with satin stitches. I have the center
with satin stitches. And again, I'm just outlining this little border here
with French knots. Again, using the full
floss to give that a little more texture
and a little more bulk. And now it's time to wash off our water soluble stabilizer. Now, this one gave me a
little bit of trouble. It stuck pretty
well to the canvas, so I did end up
soaking this one, and I just soaked it face down. So I get started
with the sprayer, and then I move over
and just let that soak. And here's our final piece. I love it. I can't
wait to see yours. Key takeaways. Use the colors and stitches
that best reflect your style. To avoid dark lines, be sure to dissolve the water soluble
stabilizer completely. This may mean soaking
it overnight. If your bag is washable, be sure to do that
first so your fabric doesn't shrink on you
and ruin your stitches. Remember to upcycle
when possible. This is also a hack
because if it's upcycled, it's probably
already been washed. Happy stitching. I'll see
you in the next lesson.
7. Tote: Hello, my artsy friend. Today,
we're gonna be stitching a sweet floral bouquet onto a classic toad. So
let's start stitching. I'm gonna be starting with
our water soluble stabilizer. So I'm gonna peel that, and I'm going to put
mine in the center, but just a little bit higher. Feel free to mix it
up, put it down in a lower corner or
directly in the center. And we're gonna get
started with our stems. This is, again, a backstitch. Then coming up through the
back, down through the front. You get started with
that straight stitch and then coming up a
stitch length of head, go to come up through
the back and then back down into the last
hole of my initial stitch. I'm going to follow
that pattern and create back stitches for
all of these stems. So I'll speed this up and
meet you back once I have the stems and the ribbon
complete with back stitches. So now I've done a few of these. I'm going to be doing
back stitches for all the stems and then
starting it on a leaf stitch. So I'm coming up through the
back down through the front, about three quarters of
the way down that leaf, and then I'm going
to come up again on the opposite side and
cross over that center. So I came up there
on the right side. Now I'm going to alternate
over to the left. And then I'm just
crossing that center line and working my way down
the outline of the leaf. This is going to give us a vein like seam down the middle. So I'm going to
keep alternating. I'll speed this up
and fill it in, but I'm going to
be doing this for all of those vines
with the leaves. Now, feel free to use a
satin stitch if you prefer, but the leaf stitch
is really nice here. The next I'm going to
be working on some of these nds that
have lazy daisies. So I'm doing back
stitches for all of the stem pieces and
then coming back through and putting
in the lazy daisy. So I made my loop
there, and then I'm going to catch that and then just secure it by going
right over top of that loop. Now I'm going to do that for
all of those little loops. So all those will
be lazy daisies, and then I'll come
back and finish up some of those other stems. So we have these stems
with the little buds. I have done a backstitch
for all of those, and I'm going to come
back through with these little circles and
just do a French knot. So I'm coming up
through the back, wrapping it two to three times, and then going right
back down next to it to create
those little buds. Feel free to add some
different colours here. Maybe they're pink or purple,
whatever colors you like, feel free to make those
little flower buds, or you could even
leave it blank and just have the stem there as is. I'll speed this up, and I'll meet you back for the flowers. So I'm considering these
daisies, so I'm doing white. Again, I'm still using two to
three strands of the floss, and I'm gonna be doing satin stitches for all of the petals. So when coming up through the back down through the front, side by side by side, I do like to separate
my shapes when I can. I'm not as concerned about
it since these are daisies. So I'm gonna fill this in, and then I'm going
to do I'm gonna mix it up a little
bit in the center, so I'll meet you back for
the center of our flower. So now that the
petals are complete, I'm going to come through and continue with the satin stitch. So I'm going to fill
this centerpiece with satin stitches and then outline it
with a French knot to give it a little
more texture. So I'm coming up
through the back, down through the front,
side by side by side, again in the center,
and I'm going to mark out this centerpiece,
especially with a circle. It just helps keep my stitches
a little more uniform. And now that the
center is filled, I'm going to come up
through the back. I'm going to wrap
my needle two or three times and then pull
it right back down through. So this is going to
outline that centerpiece, and I'm using the
petals as dyes. It's just adding some texture
and interest to the flour. So it's not just
smooth satin stitches. So I'm going to finish that up, and I will meet you back
for finishing touches. Now, that the flowers
are complete. We're going to come
back to the ribbon, and I'm going to come up
through the back, wrap my needle two or three times and go right back down to create that French knot to secure the center
of that ribbon. And I did use the full floss to give it a little more volume. Now this is a bonus, but I decided I wanted to do
a whipped backstitch. So we're gonna come
up at the base of our ribbon and then
we're just gonna wrap it. And you can go with your
needle backwards or forwards. I've seen it both ways, but
I'm just going to go under each of these
stitches and wrap it. So I'm going to continue the
wrap in the same direction. Again, this stitch is in
the one oh one class, but I just wanted to add a little extra flair to this one. This will
give it a striped look. It's great during the
holidays to make candy canes, but it's also nice as a cleanup. So if your backstitch is
you're not in love with, try whipped backstitch,
even in the same color, it gives it a nice rope effect. So I'm gonna finish
that up here. You can see our stripe
ribbon. So cute. Now we're ready to wash away our water soluble stabilizer. Now, because I used white, I did end up soaking
this to make sure that all of those
dark lines were gone. And this is our final product. Check it out. Key takeaways. Use the colors and stitches
that best reflect your style. To avoid dark lines, be sure to dissolve the water soluble
stabilizer completely. This may mean soaking
it overnight. If your bag is washable, be sure to do that
first so your fabric doesn't shrink on you
and ruin your stitches. Remember to upcycle
when possible. This is also a hack
because if it's upcycled, it's probably
already been washed. Happy stitching. I'll see
you in the next lesson.
8. Final Thoughts: Thank you so much for
stitching with me today. I hope this class gave you fresh inspiration and a few
new favorite accessories. Don't forget to download your free guide and
pattern right here on Skillshare and be sure
to share your final pieces. I love seeing your work. If you're on social tag me at Arts Lions and use the
hashtag Arts Stitches. I can't wait to see
what you've made. And if you've enjoyed
this class and want more creative inspiration behind the scenes peeks
and helpful tips, check out my blog
at artoliens.com, forwardslash blog or
tune in to my podcast, rt ambition, available
on Apple and Spotify. You can also find it
at artoliens.com, forwardslash Podcast. And if you want first
divs on new classes, freebies, and
creative resources, be sure to join my email list. Lastly, if you have time, I
would love to hear from you. Be sure to leave a comment and
review here on Skillshare. Thanks you again for being here. I'll see you in the next class. Until then, Happy
Stitching my rts friend.
 Kat Lyons, Artist + Educator + Entrepreneur