Transcripts
1. Welcome: Hi, I'm Daniel, and I want to show you how to take
attention-grabbing watch photos with
just a mobile phone. You'll learn several skills that are actually really easy to do, but will have a big impact
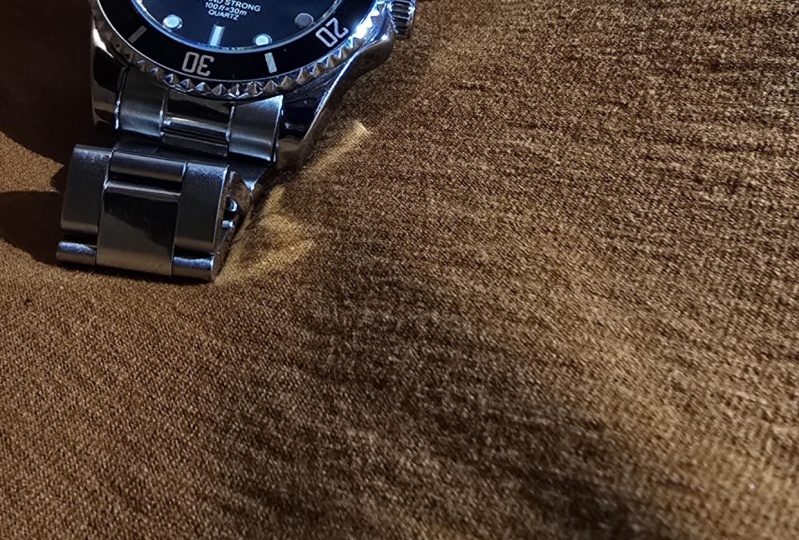
on the photos you produce. So you can go from this to
this or this or even this. All those photos were
taken here with a mobile phone with the
light from that window and I'll show you how.
My background in photography starts when
I was a little boy and I got a film camera
for my birthday. I loved that camera,
took many photos with it, and in the decades since then, I have built up that experience. I've had photos published
in magazines in the UK and here in
Japan, where I now live. I'm a member of the UK's
National Photographic Society, and I have an art and
design specialization from the Museum of
Modern Art in New York. I want to share that
knowledge with you. If you're a beginner
to photography, or even if you're not actually really interested
in photography, you just want to
take better photos to share on social media. Even if you're not a beginner, I still think there are things that could be of value to you in the course in terms of
ideas, inspiration. Because let's face it, when
we have creative hobbies, we never really stop learning. Now, although I enjoy using so-called proper cameras
for photography, I genuinely enjoy
using phones as well. The simplicity means that there are a few
things to go wrong. And also you can divert
all your attention to the image rather than to the settings and
things like that. The image quality
is also excellent. And all the photos
that you can see now we're taken on
my mobile phone. For that reason,
the requirements for the class are
really minimal. You'll need a watch
and a phone, and that's pretty much it. It also means that we don't
need any extra fancy apps. We won't be doing
any extra editing. So just the default
camera app is fine, whether it's an iOS phone
or whether it's Android. Although the focus of
the class is watches, it's relevant to other
small items like jewelry, which face the same problems of reflections on
shiny surfaces. I think some of the skills like composition and lighting will also be relevant for more
general product photography, whether that's a beautiful
ornament that you have, or even some delicious cupcakes that you've baked and
want to take a photo of. In any case, by the
end of the class, you'll be able to
produce a photo, or hopefully many photos, of your watch that you'll
be proud to show to others and maybe even
make them a bit jealous. So let's get started.
2. Your Project: Your project for this
class is to create a photo of your watch
using a mobile phone. Obviously, I tend to use
a square format when I do mobile photography so I can share it on social media easily. But if you prefer vertical or horizontal, that's also fine. It's pretty easy project. However, you can add
complexity if you want to, depending on how much time and energy and creativity you have. What I would like to see though, is you try to use the different skills
that we're learning in each of the lessons. So that's composition,
background, reflections and how
to control them. Exposure, prompts and lighting. Now if all that sounds
overwhelming, please don't worry, each lesson is pretty short
and we're going to take it step-by-step, nice and easy. One thing I recommend is
to take as many photos as possible more than is necessary,
which sounds obvious. But we may have a
tendency to try and align everything up
perfectly and then go for that one ultimate shot. It's possible. But I think it's
much safer if you just take as many as you can
during your whole process, during the whole photo session. If e.g. you would take
some safety shots at the beginning as
you're setting up. Then when you think
you've got everything, how you like it, you go for what's hopefully
gonna be your best shot, then you are just a few things may move things around,
change the composition. Move things based on where
the light is coming from. Take a few more shots so they might be better, they might not. Then when you've done all that and you think
you've got your shot, you're happy with
what you've got. Now's the time to make
even more changes. But also experiment and
go a bit wild. E.g. I. Was taking photos of
diving watch recently. The background was
some pebbles to evoke the C and the lighting was good. I tried a few different
compositions. I got one I was
really happy with. Great. Just about at the end. And I tried to force myself
to do something extra. So what could I do? And I decided to get the spray out from the spray
it with water. It's a waterproof watch.
I'm spreading the water. I wasn't sure how
it's going to turn out. But I was delighted. This is it, this is the shot and it's one of my favorites. This should be a fun challenge, producing something at the end that you can share with others. You may find that even
through the class mid lesson, you suddenly getting inspired. That's fine. Stop the video,
take a few photos, go back to the lesson, and then take a few more photos. However you approach it. When you're happy with
your product image, go to the Create Project button on the project plate
and upload it. You can change it
later if you like. And also look at other
people's projects as well, because that can get
even more inspired. So let's get ready.
What's the first step is to prepare a few basic items. Obviously, you will
need a mobile phone with a camera to take photos. And you will need a
watch or something to be the subject of your image. Then a table with
a nearby window, ideally away from
direct sunlight. So I'm in the
northern hemisphere. This is a north-facing window. We're gonna be
using just natural light during this class. A soft cloth for
wiping fingerprints, things off the watch, but also for wiping the
camera lens on the phone, which is something
we often forget. And finally, this piece of very expensive
camera equipment, it's just parchment paper or baking paper from the kitchen. And we're going to
use this to reduce shadows and control reflections effectively using it as
a kind of light tint. So probably the cheapest bit of photo equipment
you'll ever buy. That's the essential stuff. But I do recommend getting some different textiles or objects or things to use as a background and also as props. That basically is up
to you depending on what you have available and also depending on the motion or the message that you want
to convey in your image. Anyway, that's all we need. We're ready to get started. See you in the next lesson.
3. Phone Setup: Now before we start shooting, I've got five
recommendations for very quickly setting up your phone so that it can be the same as
mine and you can follow along the class pretty
much exactly as I'm doing it. The first recommendation is
to not use portrait mode, just use regular photo mode. Portrait mode will
add a fake blur to things in the background. But because we're gonna be taking pretty close up pictures. When you take a photo of something and it's
close to the camera, things in the background
will automatically go out-of-focus. Just naturally
there'll be blurred. So that's the effect we need. We get it for free when we're
doing close-up photography. You don't need to
use portrait mode. Next, if your phone has multiple lenses, I recommend
not using the widest one, or sometimes called
super-wide or 0.5x. Again, we're going to be taking
pretty close up photos. And when you do that
with a super-wide lens, straight lines are likely to become quite bulged and curved. Kind of like a
goldfish bowl effect. We don't want that with our
beautiful watches. Stick to the regular 1x lens. If you have a telephoto
lens or 2x lens then give that a try as well, but best to avoid super-wide. My third recommendation is
to switch off the flash. Flash will give you
a lot of light, make everything look
really flat and we want nice shadows and
texture and shape. We want to be able to see all that. So switch off the flash and that's pretty easy. In all iOS and Android
cameras that I've seen, you go to the camera
app and there's the little lightning
bolt symbol there. If you press that,
you can toggle between on, off, maybe auto. I recommend just
switching it off. My next recommendation is to switch off a thing called HDR, which stands for
high dynamic range. Basically what this does is
it makes things that are too bright in the picture
not quite so bright, and things that are too dark, not quite so dark, which is really helpful if you're
taking a picture of people in bright sunlight and their faces are
all in the shade. But we want shadow, we want bright parts, and we want full control. So I recommend
switching that off. And in many versions
of iOS and Android, from the camera
itself you'll see a little HDR icon and you can just press that to toggle
between on, off or auto. In other versions of iOS, you might have to go to the phone settings
and then to camera, and then to Smart
HDR or Auto HDR. For Android, it varies
based on the version. But generally if you go
into the camera app you can click on
the Settings icon, and then there might be
an Auto HDR option there. If not, look for Shooting
Mode or Advanced, and within either of those, there should be an HDR option. My final recommendation is
to switch on the grid. Now this is an overlay that's
visible in the camera app but it doesn't show
up in your photos. And it's like a
tic-tac-toe grid, two vertical lines and
two horizontal lines. I'm going to explain
how to use this in the next lesson
about composition. To switch it on, on iOS you go into phone settings, Camera, and then Grid. On Android again, it depends
on the version, but generally in the camera app, if you click on
the Settings icon, and then it might be in
a Composition section, but you should be able
to find Grid type, Grid lines, Assisted grid, something phrased like that. And you can either
switch it on or off, or in some versions you'll
get a choice of grid. And I recommend using
the 3 x 3 grid. So those are my five easy
recommendations for setting up the camera as I'm going to
be using it in the class. If you have Live Photo
or Top Shot mode, feel free to use
that, it's not going to have any effect
on the final image so that's as you prefer. And I'm going to leave
you with one bonus tip. When we're taking photos sometimes we're going
to get quite low, and if you're finding
that you want to take a really low shot and the
table is getting in the way, just turn your phone upside down and the shutter button will
then be at the top probably. But that's okay. The phone usually will work out the correct
orientation afterwards, if not, just rotate it, but that's really handy way of getting very, very low shots. So I think we're ready for the first lesson on composition. See you there.
4. Composition: OK, let's kick
off lesson one, and it's about composition, which is effectively
the position or the layout of different
things within an image. Now to help with composition, I'm going to share five
simple rules with you and you can try and
follow all of them in one image, that's
probably a bit too much, but you can pick two or three to help you with
the composition, to help you with the layout. However, like all rules, they're there to be broken. So it's fine to
understand the rules, but then break them if you wish, but do break them on purpose. So kicking off with
the first rule of straight lines being level, it doesn't just
apply to the sea and horizon in sunset
pictures obviously, but it also applies to
our watch photography. So let's get started. Okay, I'm going to start off
with a base level photo, which I'm not going
to think about. Let's bring it down a bit. I've got my flash
switched off on my phone and I'm going to take a photo and it's pretty bad. So the first rule which we can use to
try and improve this, and it's to make
straight lines level. So as you can see,
we've got lines on the table here with the wood. So first of all, I'm
going to make sure it's lined up with that. And then within the frame, I'm going to make
sure that the watch and wood are also lined up. I think that's level. It's still not very exciting, but that's following
the first rule. The next rule is
another simple one, and it's to allow
breathing space around items or parts of
items within the image. So for example if you have your watch, just give a little bit
of a space around it rather than making it touch up right to the
edge of the image. Because again, that
can feel a little bit jarring and unsettling. Now, it's a rule, it's
there to be broken, so if you don't want to
allow breathing space then break the rule on
purpose and actually have the item or the part of the item partially off the screen. A lot of this can be done
at the cropping stage so in general, it's better
to move out a little bit, take a bit more of the
photo than you need, and then later on you
can crop it down. Now, obviously I can think about the face of the watch and allow breathing
space around there. But it's also different parts of the watch which
stand out like these metal bits here and even though the
buckle at the top. And so when I'm taking a
photo, if I'm not careful, I can really think
about the face and sort of ignore what's
happening with the buckle. And so I could take this photo. And the buckle is
kind of half there, half on the edge, half chopped off. It's a bit unclear what I'm
trying to do with that. So let's try it again
and this time we'll actually give some breathing
space to the buckle. Okay? And I think that's
a little bit better. The third rule is coincidentally called the rule of thirds. And this is maybe something
you've heard of because any photography book or
course will cover this. And what it means is
you split the image into three parts vertically
and three parts horizontally, and the main subject, the main thing you're taking
a photograph of, should be positioned roughly
on one of those lines. That's either one-third in
or two-thirds in. Imagine you've got a
tic-tac-toe board – where those lines are drawn and
also where they cross, that's where the item you're
photographing should be positioned to make it
feel really natural, to make it feel like
an engaging picture. There's a tic-tac-toe image
overlaid on here and so I'm going to line up the watch on the left-hand side. Let's leave some breathing
space for the buckle as well. The lines are straight and
take a photo like that. Now obviously I could
do the same thing on the right-hand side. Now I think I prefer
the second one because with the first picture where the watch is on
the left-hand side, this shadow here gets cut off. It's very easy to forget
about the shadows, but the shadows in
photography are so important. And this one gets cut off a bit when the watch is on
the left-hand side. When it's on the right-hand side the shadow is fully visible and to me that feels a
bit more comfortable. Now we've just thought
about the rule of thirds vertically. Let's think about
it horizontally. And so, as well as
having the watch positioned to one-third or
two-thirds in from the image, I'm going to put the face
at two-thirds from the top. So it actually is
positioned where the grid lines cross at
the bottom-right. Let's take that. Okay. I'm
going to try changing it a bit so that the face is now at the intersection
of the top two lines. Top right. As you can see, that
actually made me move the camera away
to fit it all in. It's made the watch
quite a bit smaller, but it still kind of
feels balanced, although it's off to one side. Everything is visible. And to me that feels
kind of interesting compared to just the central straight on photo
that we started with. On to rule number four and it's to use diagonal
lines or leading lines. Now we may not realize it, but we actually really like
diagonal lines in pictures. I don't know why, but they can
really transform an image. And again, it's breaking the first rule of keeping
your straight lines level, but it's doing it on purpose. And it's in two parts. So first of all, using
diagonal lines in an image can really
enhance the image, but also leading lines are when we take part of
that diagonal line and we make sure
that it's roughly in the corner of the image. And what that does is it brings our eye from the corner of the image into whatever it is you want the viewer to look at,
into the main subject. So, so far we've had
everything straight. Now let's get diagonal. And again, we're going to
break the rule on purpose, the rule of having the
straight lines level, and we're really
going to go diagonal. And so I'm going to stick
with my overhead photograph. Have it at 45 degrees, why not? And take the photo like that. And I kind of like that, but we've been doing it
overhead all this time, why not move around a bit and have the camera
itself on a diagonal? So when we say
diagonal, we don't mean just the object
in the photo, but put the camera
at the diagonal and then see how that goes. Doing it this way, it means the strap is
thicker towards the bottom and so it creates a
feeling of perspective, bringing us into
the picture more. Now we can obviously
change things around, make things a bit more diagonal. Let's try not 45 degrees, but having it at roughly
30 degrees, I suppose. Now I think this is
interesting because you can see the crown more clearly. However, the strap is not coming into the
corner of the image and so it's not really bringing the viewer's eye in as much
as the previous image. So I think I prefer it
coming in from the corner, but we're getting to
the stage now where it's up to you to choose
which you prefer. You're the artist. You can create the
image however you like. And finally on to
rule number five, which is not talked
about as much, but it's the use of
spirals in an image. I don't mean literal spirals, but having objects or things that create the
feeling of a spiral, and this can really
draw somebody in to the image.
Now onto spirals, and although I can't create a perfect spiral shaped
with this watch, I can twist this strap around to create a spiral-ish
kind of shape. And it won't go into
a really nice curl but if I just tuck
that under and try and make sure it's level, thinking
about our first rule, then that kind of creates a spiral bringing the viewer
to the face of the watch. So let's give that a try using the angle of the camera
that we were just doing, like from the side, lower down. And again, I want to tap
on the screen just to make sure the face is in-focus. Take that. And that's quite good. That's quite interesting. What about if we go back to the overhead style that
we were doing earlier? Let's try that. Focus. Make sure the lines
of the table, the wood on the table are
straight and level. Okay. One thing we talked
about earlier was giving things room to breathe and also pay
attention to the shadows. So we've got quite an
interesting shadow here with a bit of light peeping through.
In the image I just took, the shadow is just coming up
to the edge of the image. I, ideally, should be chopping it off deliberately or giving it breathing space. So I'm going to try
and do that again and let's try chopping
it off first. And what this also does is it means that the watch face is now on the rule of thirds
line. It's on the grid line. So that's good. Take that photo. Okay. However, I'm not really happy with this being
chopped off that much so let's try the
opposite thing and give it some breathing space. And what this does, conveniently, it moves the
watch face to the right hand rule of
thirds line on the grid. Take that photo. And now I'm really
pleased. We've got all this breathing
space for this shadow. You can see the interesting
light shape there, as well as the spiral bringing us into the
face of the watch, which is on the right
hand third of the image. And for me that's
the best one so far. You might prefer one
of the other ones we've taken, but that's fine. It's creative, it's artistic, so we're all going to
have different opinions. But anyway, I think
we can agree. We've definitely improved
on the very first image that we took just by playing about with composition and the different
rules of composition. Now I've demonstrated
these rules using a watch on a strap, which is super easy
for either generating a straight line or a curve line. However, you might have
a watch on a bracelet, which is a bit more tricky. You can't adjust it and move
it into different shapes, but you can keep
it on your wrist. And now you've got a straight
line that you could either position within the
tic-tac-toe grid, the rule of thirds, or using as a diagonal line to lead in. So to recap those
rules of composition, we've got making sure your
straight lines are level. Giving things a bit
of breathing space. Using the rule of thirds. Using diagonal lines
and leading lines. And then trying to create
the feeling of a spiral. So you can use one or more
of those in your images, but they should make
a big difference. We're still quite
far away from having something that's really
going to grab people but we'll make more progress in the next lesson where
we'll cover backgrounds. So, see you in the next video.
5. Backgrounds: So far, we've been
taking photos of our watch just
straight on the table, so the background has
been the tabletop, but the image has been quite
boring because of that. What I think we
should do now is try different backgrounds to make
the image more interesting. I'm going to keep using the black diving
watch I've got here. And instead of
this wooden table, let's first of all go
with a white background. Pretty much as simple
as you can get. And I'm going to stick
with this sort of spiral-ish shape that we used in the
composition lesson because that was,
that was my favourite. Something like that. Oh, there's always a bit of dust that finds its way onto the glass. Right. I've got my phone ready. I've wiped the lens on this. I've got the flash switched off. And same kind of composition, let's just go for that. Okay. And I've got to say it's not really doing
anything for me. So I want to get rid of
the white and try black instead. I'm going with white and
black because the watch is pretty much mostly
just monotone. And already, I'm thinking
that could be better. Let's try again. Let's just take
this. Okay. Not bad. I'm quite happy that
we can still see the shadow even though
it's a black background, so I like that. But what about if we try
it a different colour? And I've got orange here,
a nice bold colour. So again, the same
kind of composition. Oh, there's a slight crease
on the paper there so I'm going to move it across. And let's line it up.
Aha, this is not bad. The shadows and even
slight reflection from the buckle is quite visible there on
this background, which I do like, I like that. An obvious alternative to just plain paper is
plain material. And obviously there are many different types
of texture and colour that you can use
depending on the type of watch, whether you want
to complement it, whether you want to
contrast with it. But of course, you
don't have to stick to pieces of cloth like
this or a tablecloth. You can even use
your own clothing, a bright colored jacket or some interesting
fabric with a pattern on, depending on the message or the emotion that
you're trying to create in the image. Right, I've got some material
here laid out flat. Which… flat like this is not much more interesting
than the plain paper. So I'm going to scrunch it up and that should do
a couple of things. One, it makes it more
interesting because we now get different areas of
light and shade. But also we should have
some creases like this, which maybe we can use as leading lines into the
corners of the image. So let's try this first of all, just as it is with an overhead shot that we've been doing. And I'm going to
position the face on the bottom third of our grid, leaving a bit of breathing
space for the buckle at the top. Press to focus. And I'm not super
in love with that. So let's try an alternate
composition. And I'm going to put the
watch face at the top, on the top line of the
rule of thirds grid. And it's still not great. Also one thing with this watch, it's got a domed glass crystal
which is very reflective. It picks up everything
and I can even see the reflection of the
camera in the image. I don't want that. I'm going to talk
about reflections in another lesson, but for now, the easy thing to do is to simply move the
camera to one side. And this now actually reflects the window
just over there, but I think that's a
bit more acceptable. So let's give this a try. And as I mentioned earlier, I'm going to try and
use this crease at the side as a leading
line up from the corner. So I've got that leading
line from the corner. I've got the watch face
positioned at the intersection of the top and the right
hand side, grid lines. Let's give that a try. That's not too bad. I could create
another leading line by positioning the
strap at an angle. So that's going to
the bottom corner and this crease is coming into
the left-hand corner. Let's try that again. And as with some of
the other shots, it's really a case
of which you prefer. I think they're both acceptable so the choice is yours. In addition to thinking about the texture
and the colour of the background and whether it complements or contrasts
with the watch, it's also important
to think about the vibe or the atmosphere
of the watch itself. Watches are made for
many different purposes, many different target audiences, and as an example,
I've got one here. It's actually a
world time watch, so kind of for travelling, but I've put it on a khaki
kind of green strap. And so for me, this now has feelings of either the military or of
something related to nature, so hiking, bird watching,
something like that. That's the vibe I'm getting. It might be different for you. But anyway, to go with that, I handily borrowed from my son his laptop case,
which just happens to be this sort of
camouflage pattern here. So maybe this is
kind of creating or enhancing the atmosphere of the watch and
that could work. Let's give it a try. Let's stick with, I think, a head-on shot and see if I can just keep all the
camouflage in there. And I've got the
watch lined up on the left-hand side of
the rule of thirds grid. Okay, that's not bad, but
it's also not super exciting. And I think although the camouflage matches
the vibe here, it's still a flat surface
and I'm really not, I'm not getting
anything from it. It's not exciting me. So I've got an idea. I'm going to try something else continuing this kind of
nature, outdoors theme. I've got some moss
here from the garden, which I think might
work a bit better. I'm keeping the laptop case because if there are
any gaps in the moss, at least something greenish is kinda show through
rather than the tabletop. So let's give that a try. There goes the watch. And because the space
with the moss on is actually even smaller
than the laptop case. I'm going to have to
get pretty close. Let's try another overhead shot. I'll keep it on the
left-hand side as before, but I won't be able to
include the whole buckle in so I'll zoom in a bit tighter…
which is okay. I like the background, but
because I had to get so close, my hands and the camera are very visible
now as reflections. So to get around that, Let's put the camera at
an angle and try again. I can try to get the buckle in but I might include some
of the background. No, I… I think I think that's
going to work. Let's give it a try. So I'm giving the buckle
a bit of space there. I'm having it at a diagonal. I've got the leading
line and I'm putting the watch face directly
in the center. And that's not bad. But I'm going to try
getting an even closer and being careful
about the edges. I'm going to deliberately
cutting off the buckle. But these other black loops, I want to not have them
sort of half in, half out. They're included
and they've got a little bit of breathing space. Let's try again. The watch face is now sort
of upper right a bit more. It's at the intersection
of the top and the right hand side lines
on the rule of thirds grid. And I think I prefer that. So that was a variety of backgrounds and
ways that you can use them to improve
your watch photography. But one thing you'll
notice I haven't included is very,
very shiny surfaces. Sometimes you see
these in magazines, a beautiful, shiny surface and
the watch reflecting on it. It's possible, but it's actually
quite difficult because reflections can cause
all sorts of problems. And that just happens to be
what the next video is about. So stay tuned. I'll see you there.
6. Reflections: We've seen how reflections
can cause a bit of a problem. So let's try and tackle that now with some easy solutions. The first one, if you're
taking an overhead shot, is simply to move the
camera further away. That's what I've
done in this shot. I was getting reflections, so I moved the camera higher. And I also positioned
the watch to one side. And that also reduced direct
reflections of the camera. So that works fairly well. Another easy thing,
as we've done before is simply move the camera
to an angle at the side. Then you don't get reflections
of the camera obviously. But you do get reflections
of things surrounding you. And that could be okay or
it could be distracting. So sometimes it works. Sometimes we need to
go a step further. The next step is to
try and cover or hide any objects
that are reflecting. So firstly, I've
got a red phone, which is really not a good
idea for close-up photography. So ideally, I should cover
this in a more neutral color. Similarly, depending
on your skin color, you might want to wear white or black gloves so that yours, your skin, your hands,
and less distracting. If there are still objects
around you that are reflecting and you
can't do much about it. Then there's a thing
called a light tent, which is often used in product photography.
It has a flap here. You put your watch or
whatever inside there. And you can either
photograph it like this. But mostly you close up the flap and then
you've got a slot in the front to photograph the object with really,
really minimal reflections. It's very useful,
available pretty cheaply. But if you don't
have one, there's something even cheaper. And it's the baking paper
I mentioned before. This works very well
as a basic light tent, reducing reflections and
also softening shadows, which is sometimes a very nice effect.
On its own like this, it's kind of floppy and
difficult to handle, so usually I'll just
fold it in half, which makes it a bit stronger and then it kind of acts as a tent with one hand and
then the other hand, you're free to take
the photos as usual. This is the setup that
we've had before. And I mentioned at the time that the glass crystal on this watch is slightly domed, it's curved, which
really reflects a lot. And we had trouble with the window being
reflected last time. So let's just recreate that. And now for the secret
weapon, the baking paper. So I try and create
a kind of tent here. And that seems to be doing a good job of shutting
out the light. I'm trying not to get the paper in the
corner of the image, but if it does, I'll
just crop it out later, it's not a big problem. So let's try again. I think that's much better. One thing it's done, it's also reduced the shadows as well. So we've still got
shadows in it, but they're not as
harsh as they are there, without the baking paper. For this one, I'm
putting the watch on a diagonal instead of a spiral. So I've got the strap making a leading line from the
corner there into the face, which I've put in the middle, I'm breaking the rule of thirds. I'm not having it
one-third or two-thirds in, and I'm deliberately putting
it right in the center. So that looks okay to me. Let's take that. But if I look closely, I can see there's reflection
of both the lamp shade just above and also the window
just over to my right. So let's bring on the baking paper tent to try and get rid of
those reflections. And it can be tricky to not get the baking paper
itself in the picture. But something like
that seems okay. And I think you'll find
that is a big improvement, not just with the
reflections in the crystal, but also these shadows by
the side of the watch. Now you may like them. I think
this is an artistic thing. You may like them, but what the baking paper does is
it reduces those a lot. Try that again, and makes the watch much smoother,
gives it a much smoother feel. Not just the shadows, but also the tone of the metal
around the watch. Another example that
we've used before, this watch here on the moss. And I kind of like this composition where we sort of have it at
an angle like that. But there's a bit of
reflection coming in. Actually, reflections
are not too bad on this because it's
not super shiny. But I'm still going to see what effect that baking
paper's going to have. So let's bring the
baking paper tent down and create that tent effect. Let's take this shot.
Get the focus right. Now if we compare that to the first one without
the baking paper, now we can see
there's a difference. Okay? We've seen several ways to
control reflections there. But you may have noticed
in the ones where we use the baking
paper light tent, some of them were a bit bright. And that's because the
camera is automatically adjusting to the change in brightness and trying
to compensate for it. We sometimes don't
really want that so in the next lesson, I'm going to show
you how to very easily adjust that
and in the process, make your photos even cooler. So join me in the next lesson.
7. Exposure: You know those adverts
where they say, with this one simple trick, you can change your home or
change your life or whatever. Well, really with this
one simple trick, you can change your photos. It's simply adjusting
the exposure. Now exposure is another
word for brightness really. So it's making your photos
a little bit brighter, or more commonly, making
them a little bit darker to transform them, make
them look really cool, like they've come
out of a magazine. And fortunately with mobile
phones, it's dead easy. The reason why it is effective is because with
watches in particular, you have a metal part which reflects things like windows and they're called highlights. So we have bright
highlights here and there, but we also have a lot of
dark parts, e.g. black dials. And ideally we want the black
parts to be properly black and the highlights, we want
them to still be there, but not too bright. If we reduce the brightness, reduce the exposure overall than the black dial
will be black. The highlights on the metal
will be reduced and also any background will be darker and therefore
less distracting. So the whole result of that is the important part of the
watch is emphasized more. It's a great effect. It's very easy, but you need to see examples
to appreciate it. So let's get into it. I'll show you how to do it and the effect that it has. I haven't used watches
on a bracelet very much so let's do that
now with this one. It also means a lot of
reflections going on there. So I'll bring the camera in. As you can see, I've
got my white glove to reduce the
reflections of my hand. I'm also borrowing
my wife's sort of silvercoloured phone. So I'm really trying to reduce the distractions in the metal. I'm positioning the watch
to the right-hand side. And I'm using this
black background which is slightly textured, which I think is a nice effect. So I'm just going
to take this photo first of all. I'm going
to tap once to focus around the sort of
the logo on the watch. Okay. And It's okay but for me it's a
little bit light. The reason I think that
is because there's a phrase in photography called
"expose for the highlights". And so if I look at where
the highlights are, especially around
here on the watch, around the edge of the watch itself and the right-hand
side of the bracelet, they're washed out. They're almost white and they
shouldn't be like that. It's metal. I want them to
look just a tiny bit grey. So what I'm going to do is make
the whole image darker, reduce the exposure
of the whole image, and that should make these
highlights less washed out. Other parts will be
darker, which is fine. It's the highlights
that I want to think about and the
watch face itself. This is an iPhone, And so to do that on an iPhone, you long press until you get this little flashing effect
and then this comes up: "AE/AF lock". AE is auto exposure. AF is auto-focus. So it's locked the focus, it's locked the exposure,
the brightness. And now moving my finger
up and down the screen, I can make the whole
image brighter or darker. On Android it's very similar. Some Android phones
will be the same. Others, you only have to tap once and then a little
slider will appear on the side with a picture of a sun or a picture
of a light bulb, and you move that slider to
make it brighter and darker. Anyway, some Androids are
like this iPhone – long press. And then I'm gonna make this whole image
darker as I mentioned. So I'm looking at
the highlights, I'm looking at the dial
and that's a bit darker. I'm going to take that. And I think I prefer that not only has it reduced
the highlights, but also the background, especially at the
top-left corner there is pretty much black, which is fine because it's just unimportant and I
like that affect. It brings the attention down towards the watch at
the bottom right. Now, if we try with a
different coloured background, I've actually got a magazine
here, a watch magazine that I'm going to use
as the background. And sort of try and
put that straight. And again, the watch will go at a diagonal like that.
This background is lighter and so if we try just with the camera default setting.
Let's press to focus that. Take the photo. The whole image is sort
of correct brightness, but the watch itself, which is what I'm
interested in, it looks pretty dark to me. The camera has automatically
made the image dark because of the
light background. So what I want to do is I want
to change the exposure, but I'm going to try
making it brighter. So long press again. And then I'm going to slide up. And now some of the highlights
are going too bright but the main part of the watch, the dial and that
bezel around the dial, they were too dark and now
I've made it brighter, I think they're okay. So let's take that. And I prefer that.
Some of the page, the background, is sort
of washed out a bit. But again, the important part
for me is the watch face and so for me, that
makes a better picture. I think you recognize this, the watch on the green strap
with the moss background. I'm going to use the same
composition as before, which was kind of on
a diagonal like this. As before. I'm going to bring
in the baking paper tent. And that's reducing the shadows
and reflections nicely. I like that. Overall though, it's quite bright. It's a white dial. And so now I'm going to use the exposure trick
just to reduce it and I think it's going to
really make a big improvement. So first of all,
let's long press on the dial and that will lock
the exposure and the focus. And now I'm going to
reduce the focus, the exposure,
just by sliding down. In my mind's eye, I'm ignoring everything except
that white dial. That's the important
thing for me. I want that to be the
correct exposure. Everything else right
now, I don't care about. So I'm adjusting the exposure. That's too dark.
Let's go up a bit. And maybe about here is good. So let's take that. And now if we compare
before and after, I think you'll see there's a big difference. Now it's up to you how dark
or how light you want to go, but even just changing
the exposure a bit, I think really
improves the image. So changing the exposure,
how cool is that? And so easy, I love it. And what we're gonna do
is we're going to take that skill and some of the other things
that we've learned and now we're going to move
on and bring in some props to really make our images more interesting and more engaging. That's all going to happen
in the next lesson so I'll see you there.
8. Props: And now it's time to
play with props. Now adding props to
an image can change the picture from just a
photo of a watch into a photo with a
story, a meaning, or that generates some kind of emotional response
from the viewer. When it comes to choosing props, it may be obvious
based on the watch, or it may not be so obvious, in which case, you can
think about colour. Are there other props
of the same colour for consistency or a very
different colour for contrast? You could think about the
type of watch it is and the situation that it's used, for example diving watches
obviously could be related to some water activity. A world time watch could use
props to do with travel. And if it's a fancy
dress watch, well, that could be worn
when you're going out on a special occasion so you could have a glass of champagne or something
in the picture. Whatever you choose, you
don't necessarily have to have a lot in the image
to make a big difference and so you'll see in
the following examples, I've tried various props but generally, I think simpler
has worked better for me. However, it's a personal choice so get your props ready, go crazy, and let's
see what we can make. For this first example, I want to use a diving watch. This is a Seiko diving
watch from the 1960s and it's sort of monotone so the prop I'm thinking
of is also going to be monotone so that it doesn't
distract from the watch. Also something similar, it's 1960s, it's to do with
outdoor and sports, so I've got a little
model car here, which is also from the 1960s, is also monotone and it's
also got this sort of outdoor sporty
kind of feel to it. I'm going to use
that as my prop. Keep it simple, just
one prop this time. In terms of positioning, I want the watch this way. I like it sort of pointing slightly diagonally and towards the window so that the
light comes on to the face. And the car I'm going to have pointing
towards the watch so I try and get the
viewer's eye to come around towards where I feel the most
important part is. Right, so that's roughly the kind of
composition I want. For the camera, this time I'm going be using this old iPhone 5s from 2013, because I want to show
that you don't need a fancy phone to
take good photos. I mean, even the screen
is getting cracked, but I think it'll
still do a good job. So let's have a go. First of all, the composition
kind of like that. How does that look?
Yeah, I'm quite happy with that. I'm going to focus on the watch. And I'm going quite close here, and one thing that
happens is when you get very close to your subject, things in the background tend
to go a bit out-of-focus, and that's what I want. Well, I'm pleased with
that composition, but as you can see, there's a terrible reflection on the glass. It's just pure white, so you know what we're going to do! We're going to bring in the
baking paper light tent. And let's position that so that it hopefully blocks
out that reflection. And yep, straight away, that's doing a really good job. Okay. Let's take that. Okay, pretty
good. It's getting better. One thing we saw before is how to make
things a bit darker because on the right-hand
side of the watch in particular, it's looking quite
bright and washed out and you can't really see the
details on the watch face. So going to long press to lock the focus and
lock the exposure, and now I can
adjust it manually. It's actually done quite
a good job by itself, but I want to bring
it right down. And I'm ignoring the background, I'm ignoring the car. I'm just thinking about
the face of the watch and maybe a tiny bit brighter. Let's try that. Okay. I like that. You
can see the watch, but it's got the car
in the background a little bit out-of-focus to support the whole
kind of message and the feeling of the picture. Sticking with the car theme. I've got a Mini-branded
watch here, which makes it nice and easy
when thinking about props because anything to do with Minis is probably going to work. So I've got the watch,
I've got a Mini book, and I've got a
keyring here with the same Mini logo on. So that should all work, I think. I could have the watch on the book
vertically like that, but I think it's a bit
too close over there, so I'm going to try
it at a diagonal and adding the keyring… I'm thinking about the
composition lesson, and spirals are good in terms of directing the viewer's
eye to the important parts. So let's see if we
can use the keyring as a kind of spiral. There. Back to the trusty
old iPhone 5s. And let's see how this goes. I want things to either have breathing space at the edge
or definitely be chopped off. So I'm going to
definitely chop off the keyring and the buckle. And that's okay. That's not bad. It's maybe a
little bit cluttered for me, so I'm actually going
to try it without the keyring after all
and see how that works. So I could come here. And that's not bad, but the watch is a little
bit small in the picture and the word "Mini" is a
bit too large for me. It's just too in-your-face, and so what I want to
do is I want to make the watch face bigger
by getting in closer. And I'm going to
try chopping off the word "Mini" completely. And if I have this at an angle, the strap will come into
the top-right corner, creating a leading line
towards the watch face, and then the red Mini is
just on the corner of the left and the bottom lines
on the rule of thirds grid. Let's give that a try. And I like that. I think the black
and the yellow and then the red provide a nice
interesting contrast. It's a relatively
simple composition but we have the leading
line coming in, we have that… we're following
the rule of thirds, and I think that works overall. Obviously it's a
creative decision so you may prefer
having extra props in there to really get
that message across. Sometimes less is more, sometimes more is more. This setup is
similar to one I've used before that I
was very happy with, so I'm recreating it here. As you can see, I've got a load of pebbles
here on the table and they're kind of acting
as a prop themselves really. And they also help to
"prop" up the watch. And I've got
extra props here, which is a snorkel.
Because this is a diving watch, the pebbles are supposed to represent the side
next to the sea. And somebody is just about to go snorkelling or has
just been snorkelling. So that's the message. That's sort of the
story I'm going for. And I positioned the
snorkel and the mask like this so that I can have them sort of coming
into the bottom, ideally to the bottom corners. Something like that. There's a line coming in to the
bottom corner there. And I want to have the watch
right at the top left. So actually beyond
the rule of thirds, and I'm doing that on purpose. So let's give this a try. And it looks like I'm getting
some reflections there so I just want to try the baking sheet, and instead
of using it as a tent, I'm just going to have it
kind of as a curtain really, just softening the reflections
coming in from the window. What that's done is it's made the watch face much brighter. So that means I'm
going to turn down the exposure of the
whole image like that. And I like the sort of atmosphere now, I definitely
like that being darker, but I'm not super happy
with this layout so I'm going to try
something a bit different. And this time I'm
going to see if I can somehow go back to
the spiral effect, where the top of this
snorkel kind of points to the watch.
Maybe something like that. Let's have a look. So I'm going to put
the watch in the corner. Oh, yeah, that could do. I'm chopping off
some of the mask. That's fine. As long as it's
not just at the edge. Either give it breathing
space, chop it off, I've decided to chop it off. And the snorkel is coming up and it's kind of a
spiral, isn't it? So yes, I'm pretty
pleased with that. I'm still getting
those reflections so bring back the
paper as a kind of curtain. And therefore I'm going
to reduce the exposure of everything so that the watch
face looks good to me. Let's try that. I'm pleased with that. And one thing I've
tried before that worked is the final flourish. Spray it with a bit of water, just so it looks like it
really is by the sea. So let's give that a try. I want to keep my
phone out of the way. This is a waterproof watch, so I think we'll be okay. Maybe that'll be enough. That's made some of the
pebbles darker, which is good. So let's go back to
adjusting the exposure. I want to move away
a bit actually. I was chopping too
much of the mask there. So moving away,
bring the exposure down. Yeah, I really like that. I could add flippers or other things like
that, more props, but this is where you can take it in whichever
direction you like. So those are a few examples
of using props in images. And as you can see, I tend to favour more
simple pictures. I don't have too
many props in there, although I do think they
add something to the scene. I hope I've also shown
that you don't need a fancy phone to take a
good picture of a watch. You need the skills that
we've been learning. You need some imagination
and you need good lighting. That's the final
ingredient and it's something we haven't
talked about yet, but arguably the most important. So I'm saving that till last. Join me in the next lesson and we'll learn how
you can control the lighting to take full
control of your pictures.
9. Lighting: You may have noticed
in the lessons so far that the light of me doing these introductions
has changed pretty much every time depending
on the time of day, depending on the
weather outside. And so that's something that we maybe subconsciously
have to deal with. If the color or the tone
of the light changes then there are some
camera apps which will allow you to change
the white balance. But generally we've been using the default camera app and we haven't really worried
about that too much. The thing that has
a bigger impact is the light direction. And that's what
we're going to do now, so here's a couple of
examples that show just how dramatic
the change can be just by moving the watch around relative to where
the light is coming from. For this first example, I'm not actually going
to take any photos. I'm just going to video the watch here and then move
the whole scene around so we can see
how the direction of the light affects
how the watch looks. I'm starting off here with a position that I've
used actually for all the examples in
the lesson so far, and that is with the light
coming from the side. So the window is over
in that direction, which means the light is hitting the watch like that on the side. And that means that
where we've got sort of bevelled areas
here we can see that's picking up
the light nicely and just on the inside there. And in the other side, there are shadows here and some shade there. There is another window,
smaller window over there, so it's not completely
dark around here. The mini dials in
there are recessed and so they're
actually quite dark because they're pretty
much in the shade as well. But as you can see, we've got lots of midtone areas, but we've also got bright parts, we've got dark parts, which means that the whole
watch feels kind of 3D. It's standing out nicely. We can imagine what the shape is and it looks
pretty interesting. We can also see the text here which is
engraved in the side. So let's try something else. We're going to rotate the
whole scene so that the light, the window, is now
behind the camera. And you can see if I
move out of the way, there you can see
the window behind. Okay. It's directly in that direction, which means the light is
hitting the watch straight on. So there aren't really
any areas in… with shadow. There are some highlights, but that's because I've
got another window just sort of behind over there. Instead, everything is
kind of a middle tone, mid-tone red, which is
really good for readability. As you can see, all
the dials are visible, the display is really visible. The text that is engraved
is not really visible, so we lose that
sort of 3D effect. And from a creative
point of view that makes the whole watch
look pretty flat. So in general, having
light coming from directly behind the camera doesn't make
a super interesting image. Let's try the opposite. Turn 180 degrees now. So here we are with the
window in that direction. And so the light is hitting the watch from the back there, which means that it's reflecting off the top of the strap here. So we're getting some highlights there, which is kind
of interesting. But the rest of the
watch is all in shade. And so it's very hard to
see any of the details and it's all pretty
flat and dark. What we could do if we
were going to take a photo here is really
increase the exposure, increase the brightness,
and that would make the whole background area
probably look really, really bright and
white, which is okay. And the watch itself would
be much more visible. So this is kind of
interesting if you want a dramatic effect
because you've got quite an extreme here
of light and dark. But it can be hard to get
this to work successfully. So for that reason, as I
said, every lesson so far I've used the watch like this
with the window to the side, so the light is hitting every watch from the
side, from 90 degrees. In this example, I am
going to take photos and the watch I'm using is this one. It's got a
slightly domed crystal, you might be able to see there.
The dial itself is also slightly domed and
it's a textured dial. So I'm hoping these details
will really help us see the differences when we change the lighting direction. The lighting direction
I'm starting off with is straight on. So the window is that way
just behind the camera, which means the light
is hitting the watch sort of straight on, but
kind of from the bottom. I'm just going to have a very, very simple composition so that we can focus
on the lighting. And we can see, well, not much really. Those details I was
telling you about, they're not really visible because the lighting is so flat. In particular, the
textured dial is hardly noticeable at
all unfortunately. So again, this is not really a successful lighting
direction in general. What I think will work better is having the light
coming from the side so let's move around 90
degrees and give that a try. So now we have side lighting. The window is over
there on the right, which means the light is hitting the watch from this direction. And let's give that a shot. We're kind of familiar with this setup. Let's see how it differs. And we can see some details
in the textured dial there, especially the small sub-dial at the bottom, which I like. There are highlights on the
right-hand side of the crystal, so we can kind of see it's slightly
dome-shaped there. In particular, the dial is
now starting to look domed. Also, we are getting
a shadow on the left. The watch itself is
producing a shadow which lifts it off the background
rather than being flat. So we're getting a
kind of 3D effect and the whole image is now
much more interesting. We have top lighting here, meaning that the window is
over in that direction and so the light is hitting the
watch from the top there. When we did this with
the red G-Shock watch, the whole face was really
dark and that's because the watch was sort of tilted up and we were at a lower angle. But because the watch
is lying flat here, we haven't really got
that problem this time. Now let's give that a shot. See how it looks. It's off to one side there but anyway, you can see the dial now has really got
a nice texture to it. The highlight at the
top of the crystal is showing that
it's slightly domed. We've also got quite
a distinct shadow underneath the hour
hand on the left which really lifts that
away from the dial. And I've noticed that the
hour markers at 10, 11 and 1 and 2 o'clock have got
both highlights and shadows, showing that they're not flat, they're
slightly V-shaped. And I really like
that detail there. I have to say,
I was expecting to prefer light coming
from the side, but in this case I like this top lighting. It, to me, makes it
feel more dynamic. Now as this is the last
example and the last lesson, why don't we go a step further, and let's finish
this off properly. Let's make this
into a proper photo that hopefully we can be proud
to share on social media. So I'm going to take the background and just make
it a bit more interesting first of all.
And I'm trying to scrunch this up so that it
can look kind of natural-ish. Maybe that's quite good there, sort of tucked in the centre. Now one thing I want to do
actually, before I forget, is changed the hands so
that they point to ten, well, 8 or 9 minutes past 10, I can't pull a crown out. There we go. This makes the whole face
look much more balanced. You've probably seen this in
magazine photos many times, but it's kind of like the standard thing to do when you're
photographing a watch. If the watch is ticking
or still running, then it can cause a problem. You could pull the
crown out to stop it. Ideally, though, a stopped watch
is much more useful. I also want to make
sure I've not got any fingerprints
and dust on there. And that means also on
the camera lens as well. Okay, let's see how that looks. And, yeah, I think that could work. I've noticed that
we've got a big bright reflection at
the top of the crystal. You know what that means! We're bringing in the baking paper. So let's get a little tent
set up there. That is muting the highlights and the shadows and the watch a little bit,
but they're still visible so I think that's okay. And the whole thing
is pretty dark. I want it dynamic. I wanted to kind of moody. So I'm going to
reduce the exposure. And the dial is
still staying really bright even though
everything else around it is going dark, so that's working nicely. I can't quite reach… I'm going to have
to go down with my thumb. And how does that look? Well, I like that. I was trying to take a photo to be proud of on social media and I'd actually be proud of that if I'd taken it with
a digital camera and a studio setup! To think that we just did
this with a mobile phone, well, I think that's
pretty impressive. Hopefully that has
demonstrated that changes in lighting can
really affect the photo, making it boring, making it
detailed, making it dramatic, depending on what
you want to achieve, what the purpose
of the photo is. An awareness of lighting and being able to control
it even partially, I think is key to
great photography. Now we've gone through
the lessons and we have one more video left
where I'm going to wrap things up and just
reflect on the skills. But I'm also going to give
you a couple of examples of where I've used those skills for watch photography with a mobile phone in
the outside world, not here at this table. So join me then, I'll see
you in the next video.
10. Graduation!: Well done. You've made it through all
the lessons and I hope you enjoyed it as much
as I enjoyed making it. I also hope you found it
education as well. We've learned several different skills through the lessons. We looked at the rules of composition right
at the beginning. Then we looked at
various kinds of backgrounds you can
use in your photos. After that, we dealt with reflections and how
to control them. Then there was the magical
feature of exposure. Then we played with
props a little bit. And finally we looked
at lighting and how changing the lighting can have a dramatic effect
on your images. I did promise I'd
show you a couple of examples of where
I've tried to use those skills in photos that I've taken outside in
the wild, so to speak. So here we go. This first example, it's taken on the
terrace of a cafe, and I really like the dappled
light at the back there, so that's what I
wanted to include. The composition that
I was thinking of, well, I positioned the watch kind of on the right-hand side of
that rule of thirds grid. It's almost actually
bottom-right, isn't it? And balancing that, I've got props over towards the top left, which are the glasses
from the cafe. And my wife very kindly
posing for me there. I had trouble getting
everything straight, so what I did is I
deliberately broke that "keep things level" rule and put everything at an angle. And because of that, my arm, being at a diagonal, has
become a leading line bringing the eye in from the
corner up to the watch face. There is a reflection
on the watch glass, but I kind of like that so I deliberately
left that as it is. Finally, I wanted to make sure I gave things breathing space, so the straw coming
out of the glass at the left has got a bit of
breathing space around it. Similarly for the corner of
the table at the top right. And again, the metal strap loop at the bottom right
has got a bit of breathing space
around it as well. In terms of exposure,
I didn't touch it. I was quite happy
with it how it was. In this next example. In terms of composition, I didn't put the watch
on the rule of thirds. I actually broke
that rule and had it right over there
in the corner. Instead, I tried to
create a kind of spiral-ish shape using
my wife's body, that's here again, to sort
of bring the eye in following the line of the foot,
the legs, and then gradually round along the
arm towards the watch face. I think it kind of works. Maybe it requires a
bit of imagination. But anyway, that
was my intention. But I did keep to the rule
of keeping things level, as you can see with the
horizon right in the back there. I deliberately
kept that straight. If that's not
possible sometimes, then what you can do is
obviously just rotate the image afterwards when you
look at it and edit it. The background is… partially it's the beach which is a
nice neutral, sandy color. And then the blanket, I tried to keep that
neutral as well, so it hasn't got any
distracting patterns or bold colors in there. And finally, with the exposure, the bright sun meant
that the watch face, which was in the
shadow, was a bit dark so I just increased it
slightly, but not very much. So as you can see,
you don't need to use every single skill that we've
learned in all your photos. You can think of them as
ingredients in the kitchen, and then you mix and match, combine them with your ideas, your imagination, and produce attention-grabbing
watch photos. I want to thank you very much for following
along this course. It's been a lot
of fun making it, and I hope it's been
fun following along. Now, I just want you
to get your watch, your phone, get creative, and I'm really looking forward to the images
that you produce.
 Daniel Davis, Making tech & photography easy