Transcripts
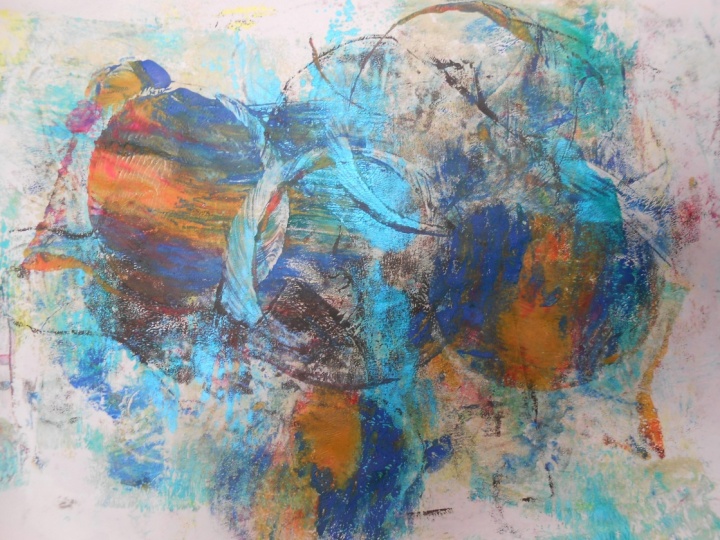
1. What To Expect: Hi and welcome to my mixed media class. I'm Jessica am an abstract artist and this is my second course on skill share. I created Sumi ink mark making class previous to this. And it basically explains an illustrates how to build a visual vocabulary using different brushstrokes and household items to create abstract work. So this time we're just going to apply color and different mediums that I like to use. So this is an example of what I will be creating. You will notice that this particular painting looks very different from the way I left it in these raping class. And this is to illustrate how It's a constant work in progress. And if you really want to get the benefit of this course, I suggest just being very open-minded, being very loose with the way you are going to use the mediums on the paper and not get too hung up on the end product. It's really meant to be a process of, of slow and meditated growth through artwork. And you will, I think, surprise yourself if you are patient with the way your art looks throughout this class. So I suggest doing a few pieces and maybe not just one or two at the same time. And really taking your time to explore how the mediums work together and what color combinations really speak to you. In it. It ends up being just a very, I'm productive pathway towards self exploration and really bringing to life what is inside of you, the thoughts and the ideas and the beliefs really can come out in abstract work. And it is a very rewarding experience. So thank you for taking an interest in this course and I will meet you back to go through all of the supplies that you'll need. And, and then we'll get right into the lessons.
2. Watercolor: Hello and welcome to lesson one. We will be doing watercolor. And these are a couple examples of previous works that I had just made. This one was created using these watercolors, and then the second was painted using these two watercolors. And we will go through both just in case you don't have full. And as you can see, there really isn't much of a difference in the end result. So whichever one you choose is totally fine. We will need some pallets. We will need all pressed, preferably something that you can pour from, select something small, and then only the water colors, obviously water and some brushes. I'm going to use a Hake brush, this one. And then I'm also going to use some regular watercolor brushes. So let's get started. And first what we're going to do is take a little bit of water on your brush, so have it be wet but not soaking wet. And we're just going to create a shape. And then we're going to decide which colors to use these or does she take off this air, which is why we like to use expensive brushes and not cheat brushes, because then that won't happen. Now you can start in the middle. You can start on an edge. I'm going to start on an edge because I like this effect. And it's important to not have a huge puddle because then you won't really have a lot of control how the end result will turn out. I mean, you know, that's also a nice aspect to this medium is it is so fluid that it does take on a life of its own. So if you have a puddle and you messed up, don't waste the paper. Just blotted out with a towel and you can just keep going. So I'm going to come back in here and smooth out this. Here. You don't have to do that. You can just keep adding. You could also do some dots. And you can add more water. And then if you want to keep going, can keep adding. Or if you want to just do one color, you can always stop there too. There's really no rules to this first step. So as you can see, I do have. A bit of a puddle. And if you're into it, you can let it drip. If not, don't let the paper up. Oh, I did forget. Yeah, you do need a table for this if block part of it to light in some of it. What's important is to kinda work fast because you only have as long as the paper is wet. So this is good. This is the first one, and then we will move right into the two border color. So this palette had some watercolor already on it. I'll go ahead and just add some more random color here. Yeah, that's good for now. So for this example, I'll use this watercolour brush and the paint flowing. And just like the previous example, any shape, I'll try to make my examples as different and varied as possible just so you can physically see that there really is no set way. This is all about just being loose and expressive and using it as an opportunity to visualize what's going on, the inside of your wind. Or maybe some kind of subconscious thought that you're holding onto that will somehow be released into the work or not. You could also paint a flower, a tree, painted face. As you can see, I'm letting this puddle here and I'm letting it drip on working over the paper to get that effect. And I think I want a little bit sepia. And I changed my mind. I don't want it down there. And then that's good for now, I guess. Maybe a little more. Red. Don't overthink it, just let it kind of flow. Well, it also just copy exactly what I'm doing if that makes it easier just for, for now. And if you want, you can lift the paper up again and let it drip. You can also do fun things like this just to get it to vibrate a little bit. Feel free to blot. You're into it. If you're not up to you. You could also drag it around like this and that, that makes a nice effect. And then I'm going to let this sit here. So then it dries and is a little bit darker than the rest. So we'll let these dry. And then I will meet you back here and we will add pastel. For the next lesson. I did take out these pastels, which are a little bit more affordable than the other ones I showed you that are right here. And we'll continue with these two examples. And I'll use the less expensive version with the tube, watercolor and the more expensive version with the shoppers. So I will see you here after the strike.
3. Pastel: Hello, so this hasn't fully dried yet, but I'm impatient, so I'm just going to work. On top of that. I have my pastels here. And let's get started. So I also mentioned about makeup brushes. So here's a bag that I'm going to have on-hand. And you can start cutting in to your drawing or you could draw around it. You don't necessarily have to draw on top of the watercolor. And the key to getting the mixed media to really blend together is in the color choices. So see I have oh, you know what I forgot to do? Put this on. I put this on. Every time I work with pastels, It is kind of a protective barrier to keep the pigments from getting on your hands. You could also use white gloves, but I find those difficult to work while wearing, so. Okay, Let's continue. So we can extend that Brown and create a pleasant shape. Looking with mixed media is really such a forgiving process because you're never tied to the original appearance of the watercolor. You have the power to change it. Very, very easy. And even if you mess up now, always spray paint over it later, or paint over it with acrylic. Can kind of play with. Notice how much the sponge picks up on the paper. What the makeup? Spanish. So sometimes it's easier just to use your hand. You could also use paper smudge sticks that people typically use for charcoal. So just keep, keep going and we're going to build on this with another similar colors. So also, when you're shopping at the art store online, Keep in mind this, this pointer about having similar watercolor and pastel colors so they can blend together. Don't overthink it. Stay loose. The number, we can always fix it. Later on. Acrylic. You can also add some graphic elements. If you wish. You could also have dots. Try not to overthink it too much. Or then you'll kind of get stuck. Because we do not want that to happen. We want to keep keep moving. Could also take a sponge and go over. And I already know that this section I want to put acrylic on because it's looking a little sparse sued. I'm not gonna worry about it because I know that I can always fix it with a different medium later on. And now I will show you the two watercolor with these little stoke, some gray. I actually really like the way that this came out, so I'm not going to add too much to it. These are definite is soft, but they still get the job done and they're pretty affordable. You know, I think we're good. So I did a very minimal amount of pastel and some, you don't have to use all four mediums in every painting. Just, Just do what you feel like doing. And how C dot it will work out. Because if it doesn't, then we can still fix it. You can always spray paint over it. You can always go back and use watercolor again. You can use acrylic again. And I will show you at the end how to do that. But just to keep things simple, I am sticking with with the order of the watercolor, pastel, acrylic, and spray paint. So yep, I will see you at the next lesson, which will be acrylic. Ok. All right.
4. Acrylic: We are here with our acrylics now. As you notice, this still isn't dry because I am shooting the, these lessons one after the other. And I I like that it's still wet because there's something I definitely want to show you with the acrylics mixing with the water color. So you can start by getting some tube acrylic. Because I feel like these are, are great and I definitely prefer them in the end. But I feel like most people will definitely have more access to buying these as a set. I think it's more affordable. You don't have to buy golden. You can buy a brand that's like, like whatever. That works great too. So I want to start by creating a, a, an opaque graphic shape to add some contrast. And I chosen this bolt yellow. You can go ahead and mix colors ahead of time. If that's what you're into. Or if you like a really vibrant painting, you can use a strain of the tube. And I know that in art school they say not to do that. But I think that because we're mixing so many different colors and mediums, it helps to have vibrant colors because it creates a, a pure image. It, it makes it more vibrant. But that's just my own personal preference. Like as you can just see, I mixed some pale green and yellow. And I'm going to very boldly just open. It also occurred to me that I never showed you how to do that. One grade brushstroke that I showed you in this example. So we can go ahead and do that during this lesson really quick. As you can see, this is bleeding through the acrylic. If you don't like that, you can take some white gesso and painted underneath wherever you plan on painting. Acrylic over your watercolor. I don't mind it. I think it creates a lot of deaths and interests, so I'm just going to leave it. And do I really know what's going on here? No, I don't. I'm intuitively painting and just letting them materials do their trick. And just kind of letting one step lead me to the next step, not overthinking it. Let me show you that ONE great trick really quick. If you do have your watercolors on hand, you can go ahead and join me. So I'm gonna take this big flush. And then I'm going to, to random colors and the wall. I mean, it's not random. But you can decide what you want to use. You can use however many you want. And then to use three here. And what I'm doing is applying it to the brush. And I want to add a little yellow ends, but not a vivid yellow. This color is interesting, is called Tapestry. And you can do this also by squeezing the tube of watercolors out or dipping your brush into different parts of the palette and get the same effect. To put this. And then you get this very aesthetically pleasing line. I've noticed that this has become a popular technique because it is so nice to look at. And there it is. So we will continue with more acrylics. I like to let my brushes get a little dirty just to add some interest, but you don't have to if that's not your personality, but this water is already quite Brown and I'm just going to pour some of my fluid acrylic on top. You just saw. And I'm going to just gently work. It says top can let it mix in. Notice how it's so watery. And as you can see here, it's still a little wet. And I'm going to just show you that it doesn't mix quite nicely. And if you don't like it, remember, you can always take your towel and wipe it off. Like, it's great. And you could also say that the towel, which I tend to do quite a bit of, and we can also just add some paint. This is one of my new favorite colors, red oxide. I'm just gonna put a little on my palette. And you can see here in this color orange there. And then I'm going to take a different brush, probably an acrylic blush. And oh, let me use a round. Just see here. And just kind of smush the colors together and you'll get a similar ONE Bray effect. I would just say not to go overboard with the Combray. And unless you like it, do what you want. But I just think it can take over a painting and not in a good way. But that was just my own personal experience. It's course. Smoosh it like that. So just some. And I think that's good for this one. And as you can see, this still has a little bit of a puddle. And I'm going to use titanium white tightened bus. This is just an equations quite nice. Oops. You could also do a little of flattery thing. I suggest not going overboard with that. And I'm not even going to use a brush, I'm just going to smoosh it. And as you can see, this pieces definitely doesn't have as much contrast. It is on the lighter side. So if you want, you can always add some contrasts with some darker acrylic. And we will do that using some sepia. What else do we have here? Some sap green. You can also use high fluid which comes in. This is just a little more translucent, transparent, I should say. And I'm going to use my Brush That is dirty still. Then I'm going to just, wow, I really don't like that. Let's say, okay, let's get a different brush. Let's try acrylic brush. And we're going to go back, add some. Lu. Notice it's, I am working like a slob. You could also use this to extend the life of these acrylics so it doesn't fly as fast. But because we're working on these small little pieces and we're going pretty fast. I'm not going to use it. And just be free. There's really, there's not a ton of technique involved. It's just being very intuitive and forgiving. You know, what happens is when I like the watercolour, it's very hard for me to continue working on it, but I want to cover it up and this definitely is What I had feared. So I'm just going to stop and move on to the spray paint lesson. So I will meet you back here in like two seconds and you can get your spray paint. And I will see you in a minute.
5. Spray Paint: Well, there are scraping. I suggest using a mask like this one. Just going to go ahead and put it on some really nice lines on your face. And afterwards, just in case you planned on going anywhere right after this. It looks kinda funny. Raping I showed you before. And I'm going to cover, although it doesn't always come out perfectly. I usually write it off on a different piece of paper or my job quality. And I think we're ready to go. Bear with me 1 second, I'm gonna get another color. It's and then you can do that. You could also lightly spray mist. I can show you on this other piece. And do you see that? I'm not getting upset about that. She's going to keep going. So as you can see, the spray paint is still wet. If you use a brush on this wet spray paint, it's going to ruin your brush. So I learned that mistake by using this brush. So now this is my special over spray paint brush. You can also use a towel. But I decided that this part needs to be brown. I'm not gonna get upset about that. We're going to keep going because I keep saying it's all about just building building wires, being really free with the materials. And now, as you can see, this is laying on top. So I'm going to cheat a little. So it's reintegrated with the rest of what's going on with spray paint. That is it. We're going to let these dry and we will have an final discussion about spraying them with some varnish and some other tips and tricks. So I will see you in a few. Okay.
6. Ending: Thank you so much for taking my lessons on skill share. I would suggest now to take that white tape and hang up your paintings and let them sit for a few hours or a couple of days and revisit them with fresh eyes and see if there's anything that you would like to change. Oftentimes I find that there are a few adjustments. For example, I already know that this one is bothering me, so I will probably revisit it on my own. If you wish to draw over acrylic or spray paint, I recommend using It's called pastel ground and I'll write it in my show notes so you know what to look for at the art store. And also when you're completely finished, spray with the UV spray, if he used the dropper watercolor. And then you can use an all-purpose varnish that comes in just a silver can like that. And it's very simple. You just spray it and then let it dry. And before we go, I thought I would share a few examples of mixed media work. So this is a study I did of flaming June, and this is colored pencil and water color, and this is acrylic. So you can see that you can use colored pencil and you can make representative mixed media work. Here is some Sumi ink and colored pencil. Here's some pastel, acrylic and watercolour. And I think these little sheets, little sheets, little envelopes. So cellophane are great. You can order them on Amazon. It's a great way just to protect your work, especially with the pastel so it doesn't rub. This is watercolour, acrylic, and that's it. So these are obviously very different from what we created, but just to give you some ideas for future work. And then here's another, this is watercolour colored pencil. And that's if if you have any questions or if you would like me to look at your work, please feel free to send me a message or email me. You could also direct message me on Instagram. I'm at Jessica Mateer. And thank you so much for taking my class.
 Jessica Matier, mixed media artist