Transcripts
1. Welcome!: Hey there design, prince.
I'm so glad to see you here. Welcome to my class, where
I'm going to teach you how to mix colors digitally
with Adobe Illustrator. Now, you might already
have a basic understanding of how to mix paints, let's say, with primary colors, or you might have a
background in color theory. So if you do, you're
off to a great start. However, when it comes to
mixing colors digitally, it can be a little confusing. Do you use RGB or CMYK or HSB? Don't worry, I'm going to
explain all those to you. And if you want a
little bit more background on color theory, I encourage you to
check out my class on Skillshare designing a color theory poster
in Adobe Illustrator. In this class, we're focusing on a skill that many
designers struggle with, and that's mixing
colors with sliders. So whether you're a
surface pattern designer, graphic designer or illustrator, get ready to feel
more confident about mixing color in just
less than an hour. Well, it's for how
to think about color digitally, not
just artistically. I'll show you how to
mix using RGB, CMYK, and HSB sliders in a W
Illustrator's color panels. I'll also show you how
to use the color picker. Though I'll be teaching inside Illustrator on the desktop, most Adobe apps and even other design software
use similar concepts. What matters most is learning how digital color mixing works, so you can apply it anywhere
in your creative process. In this class, we'll cover the fundamentals of
the color panel, color mixers, and color
picker in Adobe Illustrator. You'll practice mixing colors, and you'll create a
custom color palette based on the theme
that I give you. I'm Chico. I'm an artist and designer with over 30
years of experience, and of course, I'm
also a color lover. I started designing logos
and album covers as a team, and now I specialize in surface pattern
design and branding. Here's a look at
some of my work. As an educator, I
teach on Skillshare, and I also help creative
entrepreneurs level up their design skills
in Chico's Design Club. I have a private membership
called the Inner Circle, where I give designers feedback and help them grow week by week. And if you want to delve
deeper into color, then join me in Color Camp. After Color camp, your color
confidence will be off the charts and you'll be able to take on any creative projects. You can find links to
all these in my Bio. If you want to see more
of my colorful work, check out studiochico.com or find me on Instagram
at studio dot chico. Don't forget Chico's
filled with an X. So who is this class for? This class is for beginners, whether you're a surface
pattern designer, illustrator, hobbyist, or just someone
who wants to learn more about working with
color. This class is for you. If you've ever felt unsure
about mixing colors digitally, I'm here to give you the
clarity and confidence you need to succeed at all
your creative projects. All you need for this class is a D Illustrator on the
desktop or laptop. The tools I teach are
foundational so that they can help you create
with more precision and more intention when
it comes to color. By the end of this
class, you'll feel like a pro when it comes to
mixing color digitally, and you'll be ready to apply your skills to any
design project. Alright, let's jump in
and start mixing color.
2. Class Overview: In this class, you'll
learn how to mix digital color in
Adobe Illustrator. I'm using Adobe Illustrator
on the desktop, the latest version from 2025. I'm going to be showing you
how to use the color panel. I'm going to be showing you how to use the Swatches panel, and I'm going to be showing you how to use the color picker, which is my favorite way of mixing color in a
Dub Illustrator. Now, you can use other
apps if you want to. You're going to find
in most Adbe products like Adobe Photoshop
and in design, you're going to have very
similar color mixing tools. However, I think
for this lesson, Adobe Illustrator showcases
all of the options the best. You can also use Adobe Illustrator on an iPad
or an app like Procreate, but the interface is going
to be quite a bit different, and you might see more
of a disk like spectrum rather than a square spectrum
and things like that. So you can try to get along through some of
those apps if you want to, but I'm going to
encourage you to use Adobe Illustrator on the
desktop for this class. I'm also going to provide
you some templates at the end to walk you through a couple of exercises
and projects. Your first exercise is going
to be mixing colors on this grid and filling all
of these gray squares. And that will really
help you *** in on mixing colors in
Adobe Illustrator. And then, lastly, you're
going to be picking a theme, and you're going
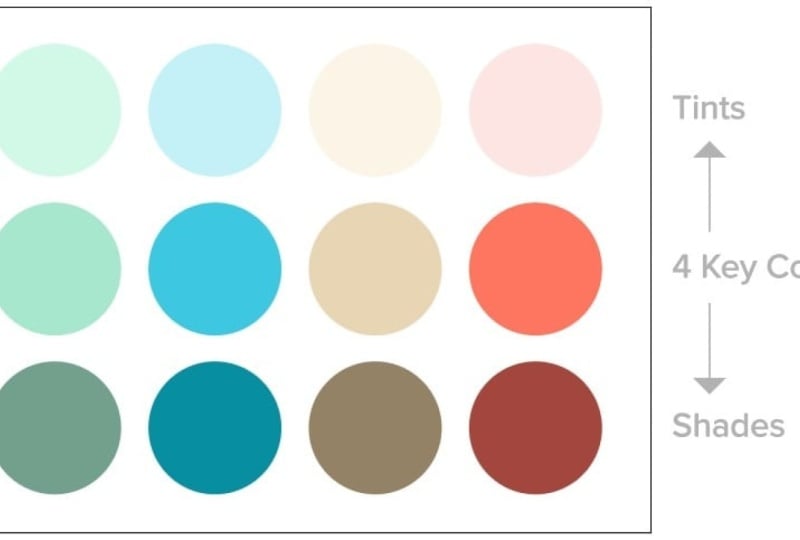
to be developing a color palette from that theme. You'll develop a color
palette of 12 colors. You're going to have
four key colors and four tints from those colors and four shades
from those colors. And I can't wait
for you to learn more about mixing
color digitally here in Adobe Illustrator and see the palettes
that you come up with. And I would love
to see it if you apply one of your
palettes to a project. Alright, let's get into mixing color digitally in
Adobe Illustrator.
3. Color Panel Set Up: Before we get started, I
want to make sure we're all on the same page with the tools that
we're going to use, and we're going to use a
few different color panels in Adobillustrator. So I just want you to open
a new file and you can open a letter file from prints probably
pretty easy to get to. And you're going to see
it has CMYK color mode, and you can keep it set of CMIK and we're going
to get more into the differences in CMYK and
RGB in the next lesson. So let's not worry
about that right now. I'm going to click Create and
when this window pops up, what I want you to do is I
want you to go if you don't have a color panel or
swatches panel pulled up, I want you to activate
those by going to Window, and you can go here to color, and that will launch
the color panel. And you can also go down
here and find swatches, and you can see that
the color panels that I do have open and
activated are checked, and you can get
those panels open, and those are the basic
panels that we're going to be using in Adobe Illustrator. Now, the color panel I'm just going to pull it
out over here for now. What you can see here is that if you go to
the Hamburger menu, we have different options. We have a gray scale option. This just shows us our
work in black and white. We have RGB. RGB is made for viewing on a
screen like the computer, your mobile device, the
television. We have CMYK. CMYK is made for print, printing things like magazines
and posters and books. And we also are
going to be looking at hue saturation
and brightness. This isn't really
a color profile, but it's a different
way of mixing colors and understanding
what hue range you're in, what saturation range you're in, and what brightness or
value range you're in. Sometimes you'll see
that HSB is called HSV. Instead of brightness,
they use value. And we also have WebSafe RGB, but we're not going to really
cover that in this class, but what WebSafe RGB is is that it has more set limiting colors. And as you adjust the colors, it will give you
a hex code read. In this course,
we're just going to focus on grayscale, RGB, CMYK, and understanding how hue saturation and
brightness relate to those. Another thing I want to
show you is that when your color panels nested over here that you can expand by going over
here and when you hover, you can drag this down. And you can use
this as a quick way to get to color with
the eyedropper tool. Now, you can see that this has
very, like, stepped color, and that's because we're in a limited web safe RGB where we have the fewest colors really possible from
our options here. So let me just go back
to RGB and show you. Now you can see that's
really smooth transitions between all the
colors that we have, and I can roll over
if I want to create a shape and I can use this to select where I
want to start with my color. Okay. And another tool that we're going to be
using is the color picker. So if I double click on this square here in
the color panel, you can see that it pulls up another window called
the color picker. This gives us more
of a dashboard of everything happening
with our color, and we can make really
quick color decisions. We'll get much deeper into
this in a feature lesson. I just want to show
you where it is. Once again, it's activated by double clicking this
swatch in the color panel, and it will activate
the color picker, and you can click Okay or
Cancel to get out of it. When you double click the
swatch in the swatches panel, it also gives you
the color picker. If you double click a
swatch in the swatches, it will give you a
different window called swatch Options. Now, looking at the
Swatches panel, you'll see that
you have a set of default colors that come pre
installed in Illustrator. Let's just pull that and
look at this for now. And you have different ways of viewing your swatches
as a list or as a grid. This is a newer addition to Adobe Illustrator where
you can generate patterns, but I prefer to make my own
patterns and not use AI. But if you go over here
to the Hamburger menu, you will see several options
to create new swatch, deleting swatches, generating
patterns once again. You have different
thumbnail views. So you can see your
swatch is bigger. And you can also open
swatch libraries, but this is more
advanced information that you don't really
need for this course. So I like to have
small swatches. And once again, these are
all default swatches, and as you work on projects, you can delete
swatches and we'll get more into that in
the feature as well. Also, there's a few
controls down here. These have to do with
your Adobe library. So we're going to kind of
skip that for this class. But here is a different way that you can sort your swatches. So you can see if I go
to pattern swatches, for example, it will only
show my patterns watches. If I go to show Color Swatches, it won't show the patterns
watches and only the colors. So I usually keep it
on show all swatches. And you can also create swatch groups like this
right here with the folder. These are each swatch groups, and you can create
a swatch group. Here, for example, if I have, I'm just going to
use option to drag this and actually let me hold Shift to select
both of these boxes, and I'm just going
to click the stroke, and I'm going to
take off the stroke. I'm just going to fill
this with another color. And I'm going to go down here and select another random color. And let's say I was
creating a color palette. And I wanted to use
all these colors. I can select all of these. And now I can click
New Swatch Group, and I can name at this point, let's say, brand colors. And I can click Okay, and now it will create a new swatch
group with those colors. I can add the swatch
group by just simply dragging something
down into here if I want, or I can click and
delete a color. And so you keep your palettes grouped with swatch
groups is another option, depending on how
you like to work. Alright, so those are
the basic panels and where to find
everything that we're going to be using
for this lesson.
4. RGB + CMYK Color Profiles: When working in
Adobe Illustrator or creating any digital file, it's really important that
you understand whether you're working in RGB or CMYK. RGB is generally for screen use. So if you're doing
video, animation, websites, illustrations that are going to be used on the screen, then you're mostly going
to be working in RGB. CMYK, however, is
made for print. The general difference between these two profiles to keep in mind is that RGB has a greater color space and can create more and brighter
colors than CMYK. Now, this gets really
nuanced when you get into production, and these days, there are some print
on demand sites that actually use RGB files to print because of their
different printing techniques. However, traditionally,
CMYK is used for print. But once again, keep in mind
that RGB has a greater range of color and CMYK has a
smaller range of color. Let's go over the key differences
between RGB and CMYK. RGB stands for red,
green, and blue. Now, we're talking about lights. These are red, green,
and blue light sources that are coming together to
create different colors. They're used for
things that you see on the screen because
they're made from light, things like your phone, your computer, or
your television. RGB is considered
additive color, meaning that you add
light to make colors. The more light you add,
the brighter it gets. And when all the lights
are added together, red, green, and blue
create white light. CMYK stands for cyan, magenta, yellow and black. Now, why is black
represented with a K? That's because in the
four color process, black is the key color. That's where the K comes from. The key color is used to align color separations so that
when you print cyan, magenta, yellow and
black colors together, they create different
colors accurately. CMIK is used for
printing on paper, like magazines,
packaging, or posters. CMIK is considered
subtractive color, meaning that you're taking
light away by adding ink. The more ink you add,
the darker it gets. And all colors
together make black. Well, it's really more of, like, a dark brownish, but let's just call it black
for this purpose. So remember, RGB is
made with light. It's like stage light shining together to make a
white spotlight. And CMYK is made with pigment. It's like mixing paints together until you
get a muddy black. Those are the key differences
to keep in mind as you're visualizing RGB and CMYK. Now, whenever you're
opening your file, you're going to go to new file, and you'll see
that a print file, for example, will be preset
for a CMYK color mode. You can see over here
on this drop down, we can choose between
C MIK or RGB. If you go to art
and Illustration, it's preset with
a RGB color mode. Film and Video RGB color mode. So I usually start
in RGB because I know that I want my artwork to look the best it can on
screen and presentations. And then when I want to, I can convert it to CMYK, but understanding that there
will be a loss of color. And that's part of the process. There's nothing we can do
about that as designers. So it's important
that you understand what color profile
you are working in to get the best results
for your own process. So I'm going to open this file, and I'm going to open
it in RGB format, and let's just say we're going
to do a letter and create. Once you're in Illustrator, you'll see up here that
it tells me in this tab that I'm in RGB color profile. You can also go to File, document color mode
and see here that I'm in RGB and I can
switch it to CMYK. But let's take a look at both of these
profiles in action. So I'm going to just create
a series of boxes here. I have a white box. Let me just give it color so I can see it. And I'm going to hold Option and drag and make a copy of it, and now I'm going
to press Command D, which will duplicate that copy and then move at the same time. So I'm just going to make
about five boxes here, and I'm just going
to give these some bright vivid RGB colors. All right, now we have these
very vivid colors here. We can see we're
in RGB color mode, and we can see that in our
color mixer over here, that it is in RGB color mode. Don't forget in
your color mixer, you can click here to switch
different color modes, but we're going to
stay in RGB for now. The next step I want
to do is I'm going to open another new file, and this one I'm going
to open as a print file. I'm going to open a
letter file as well, and this one's
going to be in CK, create, and you can see here
that it says CK format. We can go down and see here
as well, where in CMIK. So why does my color
panel say RGB? That's because my color panel is independent from
the color profile, meaning that I can mix with all these different
techniques RGB, CMYK, hue saturation,
and brightness. Those are the three
mixing profiles we're going to focus
on in this lesson. So now that we have
this file with the color profile of CMIK and this file with the
color profile of RGB, I'm going to copy these colors, Command C, and I'm going to
paste them into the CMYK. You can see what's
happened to the color. They're automatically
desaturated. We've lost a lot of saturation and color when
we converted this to CMIK by copying it from
RGB file to a CMYK file. That's because CMYK once again has a smaller color
range than RGB. Now, if I copy
these same colors, Command C over to my RGB file, they are not going
to gain color back. Command V to paste. You can see they're the same dull color
as we have in CMYK. That's because it's
already been converted. This color that's in this
square has been converted. And so when we paste
them back into, they don't gain any color back. So when you're going
from RGB to CMYK, you have a loss of color. When you go from CMYK to RGB, the color usually stays
about the same because RGB does have that
same range of color, most of it that CMYK has. And so it doesn't
brighten it and add color back and convert
it back to an RGB color. It stays within
that CMYK spectrum. So if I wanted to recolor this, I would have to go and bring color back into this to
brighten it up again. So it's important to
understand working between RGB and CMYK and how those
color shifts happen. And always remember that
going from RGB to CMYK, you lose color and going
to CMYK back to RGB, you don't gain any color. You have to manually
add that in again. So those are the basics of
understanding the difference between the RGB and
CMYK color profiles. Now, remember, you can change your color mixing profiles here, but that doesn't alter the actual color profile
of the file itself. So when the files set in CMYK, you're setting parameters
on your canvas here that is set within
a certain spectrum. And when files are in RGB, you have a bigger spectrum. You can even see a change
in the swatch file here. Keep that in mind as you move forward with the
following lessons, and we learn how to mix these colors in the
different color mixers.
5. Grayscale Color Mixer: Let's get into it
with the basics and learn more about Grayscale. So I'm going to go to New File, and I'm going to just go to Art and Illustration and just
open a letter size file, and this is going to be
a RGB color profile. Now, I'm going to drag my
swatches back over to here. I like to work with my color
controls all on one side. And I'm going to
just create a box. You can see that it's
filled with white and it has a stroke of black. I actually want that
stroke to be none. And I'm just going
to go over here, and you can see that
Adobe Illustrator has some presets set over
here in RGB grays, and you can see that
they have RGB value. You can see that they're
all aligned up at the same spot when
we switch the grays, looking at them in RGB value. But I want to just look at gray scale in terms
of black and white. You can see that this value, when converted to gray
scale is 20% gray. So when we take out all the ink, black, remember,
represents our ink. We take out all the
ink we have white, and we add 100%
ink, we have black. Now, when something's printed, let's say it's 50% gray. Then when it's printed, it's going to be made
with a series of dots. This is called a half tone. And when you look
at a dot screen, when it's printed small set
of dots, it appears lighter. Think about pointless
painters when they would mix color using little tiny
dots and optically, those mix to give us
a different color. So in Greytale we're talking about 100% means
it's 100% black ink. And if I say 30%, it's 30% of that ink, which would be represented with a series of dots in printing. Now, I also can
convert that like we saw earlier
into an RGB value. You can see that the
sliders are all aligned, and I can also convert
that to a COIK value. You can see here my sliders
are all set different, that's because Illustrator's
trying to find these color values that work differently than RGB because we're putting different colors together now to make black. However, we have a black plate. So if I wanted this to be 30%, I can treat this just like
grayscale and say this is 30% and set all of
these to zero ink. So now I have the same value as if I go to my gray
scale, it's 30%. Now, if I go back to CMIK, it's also set at 30% because
I specifically keep that in. People do do some grays by
adding other colors into them, and you can still
have it appear gray, but maybe have it feel
a little warmer or a little cooler when
you're using CMYK values. But if we look at 100% black, we can look at it this way, where we set all
of these to zero, and we're only setting
our black plate to black. Or we can look at it by
putting everything up to 100%, and it still appears
a deep rich black. Now, if you're printing CMYK and you wanted a
four color black, which this is called
because you're getting black made from all four colors and not just the black plate, which makes a richer black. Then you want to check with your printer to see what
their specific formula is for printing a
four color black because it's usually
not 100 hundred 100. They have a specific formula
that they'll give you. Now, RGB, when we
get 100% black, we're looking at all
the lights off, right? When we add color with light, we're adding green light, and it gets brighter
and brighter. We're adding red light, and it's getting
brighter and brighter. And when all the lights
are ful on, we get white.
6. RGB Color Mixer: Well, since we already
have this RGB file open, let's start working and understanding more
about the RGB slider. So working with
this square here, I'm going to just enlarge it and make it a
little bit bigger. I'm holding option and
shift to constrain my proportions as I'm
enlarging it from the corner, and that keeps it constrained and moves it from the center. So you can see that all
the lights were off, Let's use that analogy, and I have black
and my red channel, my green channel,
and my blue channel. When I slide red all the way up, I get basically what's
called 100% red. However, in RGB channels, your number is going
to be 255 at the highest and zero when
it's at the lowest. If I slide green all the way up, I get a really
bright acidy green. And if I slide blue
all the way up, I get a very vivid bright blue. Now, remember that we're not mixing color, we're
mixing light. And so when I turn on
my red at full red, when I add green light to it, my light's going to get more
orange and then more yellow. If I add blue light to it, then it's going to go
more to a bright pink. So when I add all the blue, you can see the colors turning, and it gets a very bright, kind of a magenta pink. Now you can see that if I
want the pink to be lighter, I can start to
turn the green on. And the reason why that
is is because remember, when all the channels
are on, we get white. So that last color
basically allows you to control the tint
of your overall color. If I start to take the blue out, you can see that it's
changing more yellow. If I want the yellow more green, I can slide less red out. If I want the green darker, it now will go to a shade. And if I slide them
all the way over here, you can see that I get black. Now, you can enter the numbers manually if I want
to enter values. Or I can slide them. Now, when you're making
a gray with RGB, remember that when we have
them all off, we get black. Well, if I start sliding them, I can get a pretty close gray if I put them around
the same area, but you can see that
they're not accurate, and then I either need
to manually type it in, or I need to adjust the slider till it gets
to be the same numbers. Another trick, however, is if you slide them
all the way off, and I click and I hold shift. So what I'm going to do is
I'm going to hold shift, and I'm going to click
on all three arrows. I'm going to hold shift,
and I'm going to click, click and click and
hold on the last one, and you can see I'm
holding shift still, and you can see that I
can move them all in the same increment and so that I have a gray that's even in RGB. So remember with RGB, it's all lights off
and we get black, all lights on, and we get white. And if we want to
get a mix of colors, we're going to vary the amount of light that we have turned on. So now if I set this
to the pink here, if I remove red, it's getting more blue. If I remove blue, it's getting more orange. And you can tell that once again by the direction that
you're moving the slider, what kind of color that's
going to change to. So this is how you use
your RGB color mixer. Next, we'll get into COMIK.
7. CMYK Color Mixer: All right. Let's get into CMYK. Let's start a new file for this since we're going to have
a new color profile. Let's go to a print file
and just use letter, and you can see that it's
already set at CMYK color mode. When mixing CMYK, you can see
that when we open our file, we have a default
setting for our fill, which our fill is white
and our stroke is black. I usually like to
remove my stroke right away and then
get into my fill. And you can see that I have my RGB color mixer still set up. I can use any mixer I want, even if I'm using an RGB
mixer and a CMK profile, but that doesn't mean that
my color is going to be fully represented as it
would be in RGB file. So you should use the color mixer for the color profile that
you're working in. So I'm going to go to CMYK. And with CMYK,
what's happening is we're starting out with
white because we're starting out with no ink on the paper. And you're going to
think about this as having no pigment. And then when it goes to 100, it has full pigment. So this means that
you're pritting 100% black or 0% black, and we're just seeing paper. If we set this at 40%,
we're printing 40%. Now, remember I said that
when you're printing that your colors are represented in black with a dot pattern
called a half tone. That's also true when
you start to add color. So if I have 10% black, then I'm going to have a very, very fine dot of black because
it's going to mix with the bigger field of
white in the background and optically look like
a very light gray. The same could be said if I wanted to have a
very light blue. I could have 100%
blue with cyan. It's not a true blue, but let's just call it
blue for the moment. And I could also have a lighter blue if I
went down to 10%, and it would also
be printing the same way with a
very fine cyan dot. Now, if I wanted to have green, then I can add yellow ink, and I can add a very
light yellow ink. And now this is going to
print two sets of dots, a yellow set and a blue set, and when they optically
combine on the paper, we'll see this
light green color. So I want you to think
about when you're mixing in CMYK that you're adding can ink, like you're adding paint,
you're adding magenta ink, and you're adding yellow ink, and you can also add black
ink to start to get shades. So if I want a green, I'm going to add blue if we think about it in
terms of primary colors. These are very much related
to primary colors, cyans, a blue, magentas are red, and yellows Well, it's yellow. And then we have black.
So let's think about them also in terms of
adding pigment and pink. So if I want to make a green,
I'm going to add cyan, and you can see that
my yellow is already showing me that if
I add more yellow, it's going to get more green. If I add magenta, it's going to make
that muddy color. So you want to be careful
about making muddy colors, and so sometimes that
means you need to slide the other colors
other directions. So now you can see if I
want to make this darker, it could be like a
darker maroon red. If I want to be more pinky red, I can slide it this direction. So you can see your sliders
always indicating as you move one of them and
the other stay fixed, it's always adjusting
and showing you the colors that you might be getting
in the next step. So if I want to now
make this blue, I can take out magenta. If I want to make a brighter
blue, I can add Cyan. If I want the blue, more
green, I add more yellow. So it's really adjusting and mixing these colors as you want. Now, if I want lighter colors, I'm going to bring everything
down into this end. And now you can see I
can add a little bit of yellow and make more of a gray because they're
about more even. If I want it to be more orange, I'll take out the blue
and keep the magenta and the yellow and adjust the magenta and yellow till I
get the orange that I want. If I want it to be more purple, I'll take out the yellow and add some cyan to the magenta. So you can really use color
theory and think about the primary colors when
you're using cyan, magenta, and yellow, and then black would start to give
you shades of the color. So if I had purple, I can add shades of that by adjusting the black and
getting a darker purple. So that's the basics
of the CMYK slider.
8. HSB Color Mixer: For this next exercise, we're going to open a new file, and we're going to use art
and Illustration file, and you can just pick
letter or any slides that you want and hit Create. Now, we have a RGB file, but we aren't really
going to be working in any specific color profile when we're talking
about this next mixer. This next mixer is a HSB mixer, and HSB stands for hue,
saturation and brightness. Some people call it an HSV
mixer for hue saturation and value because brightness
and value are often used to describe the
same quality of color. So in this case, what we're going to
be looking at is, I'm just going to
make a square here. I'm going to remove my
stroke and go to my fill. And what we're going
to be looking at here is the HSB slider. Once again, H is for hue. S is for saturation, and B is for brightness. Now, let's take a look
first at saturation. Our hue appears
totally white right now because that is the color
that we're seeing here. So you can see that our
fill color is white. Our hue right now is
represented as white. That's because the brightness
is turned all the way up, which is white, and the saturation is turned all the way down,
which is white. So we have white, white, white because this
hue won't show us color until we either turn up the saturation
to give it color. And you can now see the
band of hue is appearing, or we turn down the brightness, which takes out
light, which is just giving us black now because we don't have the
saturation turned up. So now with the combination
of turning down the brightness and
raising the saturation, I now start to see
all my hues at this saturation level and
at this brightness level. If I want to see them
in their full splendor, I want it to be fully bright. And fully saturated. And this is all the
brightest colors that my hues have to offer. So now what I'm doing
is moving this slider. You can see it's right between a red zone and a blue zone, so it's a pink color right now. So I'm just going to move this, and you can see
as I move my hue, it's adjusting the
hue of my fill, and I'm right about
in the blue zone. If I want it more green,
I slide it more green. I can slide it all
the way to yellow, and we get all the way
back again to red. So this red, that
loop is going to start again on this
side with our spectrum. So now we're going from red
to pink to purple to blue to green to yellow to orange
to red, and back to red. So it just is a loop
of hue spectrum. Now, with our saturation, if we want a tint, we would take out
our saturation. If we want a shade, we would take out
our brightness. So when you're using hue
saturation and brightness, you're able to adjust your hue at the same
saturation and brightness. I'm able to adjust my saturation at the same hue and brightness, or I'm able to adjust my brightness at the
same hue and saturation. So that's how the
hue, saturation and brightness mixer works. Now, that's going to take us in to my favorite way of mixing, which is the color picker, and I'm going to get into
that in the next lesson.
9. Mixing with the Color Picker: My favorite way of mixing color is using the color picker. It doesn't matter the color
profile you're working in or the color
mixer you're using. The color picker is really my key to getting color mixed
as quickly as possible. And I think it's because of the way that I think about color in terms of hue,
saturation, and brightness. So let me show you how
the color picker works. When I'm starting
with any color, I can always start here in the spectrum and just kind of pick a color that
I want to start with. If I want to adjust the color, I can adjust it
using the sliders. But another way that I can
adjust the color is to double click here and
access the color picker. Now, the color
picker is going to show me, here's my
block of color. Here's my most
saturated pure color. Here's if I go this direction, I'm taking color out and I'm creating a
tint by adding white. If I go this direction, I'm adding black and I'm
creating a shade of that color. And if I move diagonally
or within here, I'm creating various tones of
that color. By adding gray. Now, I can adjust my slider
just like I do in the hue, saturation and brightness option by moving it up and down
and going from a range from red to magenta
to purple to blue to cyan to green to yellow
to orange and back to red. And that loop of
spectrum begins again. You can see as I move
this and I move this, all these numbers over
here are changing. And here, once
again, I have HSB, hue, saturation, and brightness. I have RGB, red,
green, and blue. I have CMYK, Cyan, Magenta, yellow and black, and I
have my hex code showing. If I click only web Colors, that shows me that
limited palette again of steps that colors are
calibrated for the web. So you want to make
sure that that's unchecked to get your
full range of color. Now when I'm creating a palette, I love using this option for mixing colors, and
I'll show you why. So let's say I'm
going to start by creating a little
seaside palette here, and I want to have my blue, and I'm just going to
hold option and hold shift so I can just drag
that over and create a copy. And then I'm going
to press Command D to duplicate the move, which means it
duplicates the copy, and it duplicates the movement. So I'm going to make
four sets here. So let's say that I want to now have a darker shade
of this blue. What I can do instead
of adjusting this and kind of adjusting the
color of my blue, I just want to change the shade. So I'm going to double
click on my color picker, and I'm just going to
drag it a little darker. And you can see here this is my original color
on the bottom, and at the top, it's showing me the color I'm
adjusting it too. So let's say I want to have a pretty significant
darker shade. I can click Okay,
and now I have it. Now, let's say I want to have a tone on tone in the
background of a pattern. So it was just a little bit lighter or a
little bit darker. I want to say a little bit
lighter than this blue. What I can do is click here. I can press eye for
the eyedropper tool. You can see it's over here on the panel, my eyedropper tool, and I can click on this square, and it colors it the same color. Now I can click up here in my color picker again,
and now I can say, I want to make this a little bit lighter just so
I'm going to put a really subtle tone on tone color in there and a
little bit more saturated. And so now I'm starting
to develop my palette. Let's say, a tint of
the original color. I'm going to go up here and
I'm going to add white to it. You know, I can add a
more saturated color, but if I wanted a true tint, I would add quite a
bit more white to it. That would be a nice tint. So now I've started to
develop a color palette. I'm just going to
click over and drag all these as my selection tool, I'm going to click on them all, and I'm going to
hold Option Shift to drag another set down. So now let's say that I want to change this color to
be a magenta color. But I want it to be at the
same value and saturation. I'm going to keep this dot here, and I'm just going to move
this color picker slider up till I get into kind
of a magenta world. And now I have a
color that's around the same saturation and value. And I say around because colors themselves hold different
values to them. Like, yellow has a very
intense high value and saturation to it when
we see it automatically. So sometimes you have to
adjust and tone colors down. So let's say I want to have the same color as this in
this world, but in this tone. Now I have to say, Well, what is the hue value of this? So I can double click into my picker and I can see the hue is at 292. I'm going
to click Okay. I'm going to go to this
one. Double click, and I'm going to
change my hue to 92. And you can see it jumped
up to the Ms gentazone. So now I have a color and
the same hue as this color, but the same value as
this original color. So when you're
recoloring artwork, this becomes a really valuable
tool to be able to say, I want to change my artwork
from blues to purples, or I change my artwork
from cool palette to a warm palette and understanding how the
hues, the saturations, and the values all
contribute to building a color and how you
can interchange them to keep some
at the same hue, but change the saturation and the brightness or to keep it at the same brightness
and adjust the hue. So that's why the
color picker is my favorite way of mixing
color in a W Illustrator.
10. Hex Codes + Panel Tips: There's a couple last
things I want to show you about the color panel. One is about a couple warnings that you might get
in the color panel, and the other is
about hex codes. So no matter what color mixer
we're working in, HSB, RGB, CMYK color is always
represented on a screen to us, and a hex code
represents that color. The hex code is identified
with a hash tag, and it's made of six
digits. Hence the word hex. The hex code comprised
of alphanumeric digits, and the first two set of
digits represent red. The second two set of
digits represent green, and the last two set of
digits represent blue. Now, you don't really need to know how to mix with a hex code, but you will have a hex code as a result of the color
that you do mix. Once again, if you
watch the hex code, you can see that if I turn all my ink down,
so there's no ink, and I have white, my hex code
is FFF FFF, which is none. So you can see if I go to RGB, I still have white, and it's still FFF. If I go to CMYK, I have all white, it's FFF. If I go to HSB, I have white white, and then white's
represented here, so it's all FFF. So a Hex code will keep
your colors on screen consistent between
your color profiles, and you might often
pass a hex code off for a branding project
or use them on a website or use them
in your newsletter. But that's where you find the hex code for the color
that you're working on. Now, you'll also
see down here that we have some color
options. We have none. We have the default black, and we have a default white. Let's look at them
in our RGB spectrum, and we have default white. We have default black, and we have none. When you see this
little arrow up here, it will take the color
that you previously had and it will fill
it into that color. And one last thing I want to
show you is the warnings. So when you're working in RGB, remember that I had said
at the beginning that RGB has a greater
spectrum than CMYK. And you can see that
when I'm mixing this color and I have
a RGB color profile, maybe I want to get a
very bright color here. Well, you can see I have a
little warning sign here, and this shows me that this
colors out of the gamut or out of the color
range for CMYK. And if I click this color here, it will correct it to
make the color the closest it can make it
for the CMYK color range. When I click this, you can see that it's
still an acid green. You can see it's much less
saturated and not as vibrant. So once again, if I adjust
that to make it more vibrant, you can see that it breaks it out of the CMYK color range. So I can correct it
by clicking this. You can see here I
have another warning, and this is for out of the
gamut color range for web. And we're talking about the
limited web palette and it's not something
you need to be super aware of unless you're
a web designer. But you can also see
that if I go here, I can go to WebSafe RGB, and this basically just limits your palette to fewer colors. If I expand this, you can see that there's
actual steps of colors here and that there are
fewer color options. I don't have that
smooth blend of all those tints and all
those shades in here. So I only have steps here
that give me fewer colors, and I don't do web
design so much, and so that's why I don't really use this color palette
in my design process. But someone who was doing web design might choose to
use this color palette. But I think for designers who are publishing their work and
creating their own brands, I don't think it's necessary to worry about that
web color palette. All right. So there's a
few more tips for you about the color panel and
using hex codes in your work.
11. Digital Color Mixing Exercise: All right. What I would
like you to do is to download the templates
that I provided, and these are like
little worksheets. So you can open your PDF file. There's a RGB version
and a CMYK version, but we're going to start in RGB, and I'll leave it up to you
to work out the CMYK version. So, what I'd like you to do is, I would like you to
complete this chart. And what we're looking at here is mixing in
different color ways. So, what I'd like
you to do is adjust the colors of all
the gray squares to fill between the purple and the red and the
purple and the blue, our key purple to
the dark purple, key purple to the light purple, and so on from the red and the blue and filling
it all to squares. And there's no right or wrong, do your best to get the colors
as accurate as possible. So let me show you how
you might do this. Alright, so I'm
going to click here, and I want to use
the eyedropper tool, and I'm going to
select this purple. But now I know this purple needs a little bit
more red in it. So when I look up here, I
can see I can go more pink. I can go a little bit more
red if I take out some blue. So maybe I'll just move this
a little bit this direction, and you can see it's
already going a little red. Maybe I need to take
out a little green. And then maybe on this one, I'm going to select the red and maybe add a
little bit more purple. So it looks like it needs to
go a little darker already. This probably needs to go
a little bit more purple. Maybe this goes a little bit darker taking
some more red out. Now it's getting too purple. So here I can see in the blue, I need to take out more red. And now I'm getting there. Maybe they all need to be a
little bit more saturated. So I add a little
bit more saturation. Maybe it needs to be a
little bit more purple. Add a little bit more purple. And then we're going
to go this direction and adjust for the blue. So I'm going to start with this using the eyedropper tool, and I'm just going to add
a little bit more blue. Maybe a little bit
more blue this way. Take out a little bit of cream. And you can see that I'm starting to adjust
to get to the blue. Now going this direction, I'm going to start
with my darkest, so I'm going to hold command
to select this square. I'm gonna use my
eyedropper tool, and I'm going to say, I want this to be lighter. Well, the easiest way to do this is to use the color picker. So now I'm going to
take this and go a little bit more toward the
white a little bit lighter. And then maybe I'm going to hold command to
select this square, use my eyedropper tool, double click here, and use the color picker and take this
a little bit more darker. And I probably want to try to
make them about even steps. So if I make some a little darker and adjust them back
and forth, I would do that. And then as you create this
vertical going up and down, you're going to
have lighter tints and you're going to
be making tints in between your tints
of all these colors. And that's going to help you get a better understanding of how to use the RGB color
mixer N AW Illustrator, then I'd like you
to open the CMIK and use the CMYK mixer
and the color picker to do the same in CMIK so you can understand how that
version works as well.
12. Color Palette Creation: For your final project, I would like you to open
the provided templates. There's one in RGB
and one in CMYK. And I'd like you to make
two color palettes, one in RGB and the other
using the CMYK template. I'd like you to choose
from this list of themes and create a color palette
that has 12 colors. You're going to have
four key colors, and you're going to make a tint from each color and a
shade from each color, completing the 12
colors in your palette. You're going to
start from scratch, and you're going to
think of four colors that you think encompass the
theme that you've chosen. So if it was a seaside theme, I might pick a blue
to start with. I could start with
a default blue, but I would like you
to actually start and choose maybe a blue from
the color guide here. Don't forget you can
expand the color guide. So maybe you want a
darker blue or a more teally blue or a more foam blue. And I'd like you to start there and choose your key color. Make any adjustments
using your slider. Maybe you want a
little bit more blue. And maybe that's my key color. Then from there,
I'm going to use command and select
here for my tint, and I'm then going to use the eyedropper tool and
select that same color. I'm going to use
the color picker and create a tint of that color. And then I'm going to use
command to select my shade row. I'm going to use the
eyedropper tool to select that same C foam green, and I'm going to now create
a shade of that color. So I would like you to complete your color palette of 12 colors, one in RGB, one in C and YK, use two different themes, so you can practice
your color skills, and please post your project because I would love to check it out and give
you some feedback. I hope you have so much fun
creating these palettes and bonus points if
you put it to use in a project and toast it,
I would love to see that.
13. Thank you!: Thank you so much
for taking my class. I really appreciate you. I'd love to hear any
feedback that you have. You can reach out to me
on Skillshare anytime. I'm always happy to help
if you have any questions. I would really
appreciate it if you could take time to
leave me a review, and I can't wait to
see your projects. You can post your exercises,
your color palettes, or any project that
you've applied, one of the color palettes, too. I really can't wait to see
what you create. Don't forget. If you want to learn more
about color with me, join me in color camp or join me in my design club
to learn more about design. You can see more of
my colorful work at studiochico.com or find me on Instagram at
studio dot chico. Thank you, again so
much for being here. I really hope this class
has helped put you forward on your creative
journey and help you feel more confident
about using color and mixing with color sliders
digitally in Adobe Illustrator. Don't forget to check
out other classes on Skillshare to learn more about
design and color with me. Thanks again for being here, and I can't wait to see
you again in the future.
 Xhico, Artist, Designer, Creative Educator