Transcripts
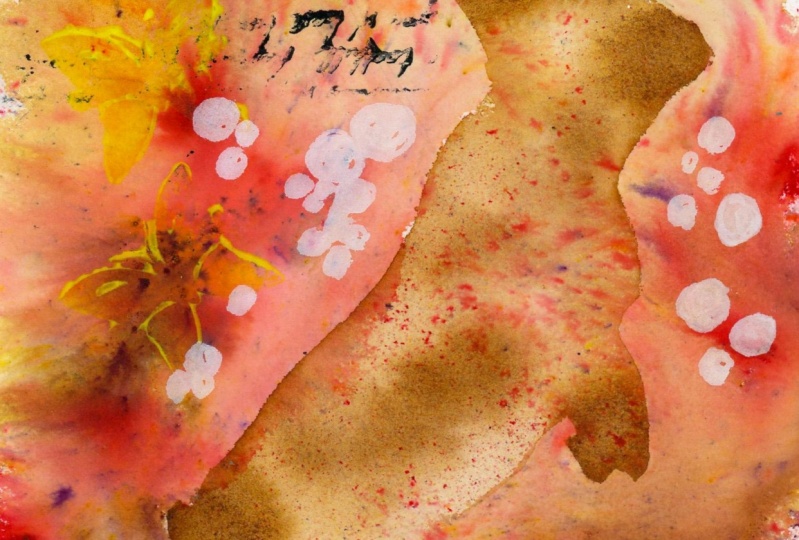
1. Intro: Make a Minimalist Watercolor Card: Hi everyone. My name is Dena and atoms and I'm a painter and Illustrator in Minneapolis, minnesota. Today, I want to help familiarize you with using masking fluid with your watercolor or transparent ink washes. Masking fluid used well, can be really magical. It allows us all the freedom of wet and wet paint with the control of a reliable, hard and defined edge. And this opens up a world of design possibility with watercolor paint. But the best way to take on that wide design world is one small step at a time. So let's start by creating some sweet rabbit cards in a handmade and rustic minimalist style. I love the way that this shaped silhouette project shows off the beauty of Earth-based pigments. But you'll be free to use any colors that you like and feel inspired by, will learn to trace mask, paint and cleanly remove our masks. Most importantly, we'll even embellish our cards to balance all of that beautiful and evocative whitespace. Now if you're not confident with your drawing skills, no worries. I've included a traceable PDF, so you'll have everything that you need to explore masking fluid with total confidence. And U2 will make your own lovely rabbit, the equipped card.
2. Minimalist Watercolor Card Materials: So the first thing that you will need to do is to download and print your template. I've included these rabbits silhouettes as part of this class with your PDFs. So you can go to that PDF section, download and print these bunnies and they will be ready for you to use. Just print them onto a conventional sheet of printer paper and you'll be all set. The next thing that you will need is masking fluid. And this is a product that comes in lots of different brands and lots of different formats. I like this latex free PBO drawing gum for a number of reasons. One of which is that the light blue color makes it very easy for me to track on my paper. A lot of masking fluid is white. And when you put the white fluid on white paper, it can get a little bit confusing in the process of painting. So I like that this is kind of a shocking light blue, really easy to spot on my sheet. Another thing I like about this product is that it is a bit more gentle than some of the others that I've used. So there's always a little bit of likelihood that we can tear or stain our work when we use masking fluid, I just find that this tends to do both of those far less frequently. You will also need a basic bar of soap. So any type of soap, just grab a bar of soap and you will need a craft brush. I describe it as a craft brush, just a small round nylon brush. Keep it as inexpensive as possible. The use of bar soap is going to make it less likely that we will ruin a brush with masking fluid. However, masking fluid is pretty notorious for ruining brushes. So use a brush that is very inexpensive or very well used and well narrow, disposable. That way if it does run into trouble or starts to degrade, you won't be terribly upset to say goodbye to that brush. For the purposes of the project in the demonstration, I will be working on one of these watercolor cards. This is a Strathmore product. Canson makes something equivalent. If you don't have a pre-cut card or you're not interested in making a pre-cut card, then you can certainly work on a student grade of a 140 pound watercolor paper. You could even cut a 7 by 10 sheet and fold it to five by seven so that you have a five by seven card as well. Five by seven is about the scale that I will suggest to working on. I've really sized my template for use as greeting card. So it will really be sort of ideally size to work to that five by seven, maybe six by eight range. We are going to be tracing our template images. So here's the thing. If you have a light pad or if you are using a window or any kind of backlit apparatus. And you're going to use light and transparency to trace your image. Then you're going to want to use a pencil that is either a very hard bled like a 4 H, or just a mid gray colored pencil. This could be water soluble or water insoluble. Either is fine, just a mid value of colored pencil. Out of your colored pencil Stash will do the trick. If you do not have a light table, then you are going to need a soft graphite pencil. So something like a four, B5, B7 be nine, be any of those really soft drawing pencils that you probably have one or two of. And then you would also need either a heart and pointed pencil or something like a ballpoint pen. This is going to help you transfer that soft graphite onto your substrate. So both tracing methods using graphite transfer or using transparency are really helpful. And I'm going to demonstrate both of those methods so that everyone will be on the same page and everyone will have a great traced image. You will need watercolor or ink or any kind of water-soluble paints. So any grade and any type is fine and most colors are fine. I'm going to create this project using just one color of watercolor. If you want to combine colors or mix a new color, that is totally fine too. It's very open-ended. If you want to do this, the one color that I tend to avoid using for this kind of project would be yellow. It just doesn't have enough of a difference in value from the white of the paper to really jump out. The exception to this would be an earthy yellow, like a raw sienna or a yellow ocher. So it's not that yellow is out of the question or I have anything against it. It's just that it tends to be a little bit light for our purposes. I'm going to create this project to using Payne's gray watercolor, which is a combination of blue and black. It is premixed for the convenience of people who love this color like me. So that's just what I happen to be using. Use whatever you want to use, use what makes you happy. And I'm going to use artists grade materials because that is something I have. But if you don't use craft grade watercolors, use your kids watercolors. You could use a little bit of drawing ink. If you are somebody who's not really a water colorist, but maybe a little bit interested in this type of project. This type of project will go great with lettering. So if you have standalone ink, just watering that down to a wash consistency will be a fine way for you to create this project as well. You'll need a watercolor brush. And 90 percent of the work I do is accomplished with a six round and eight round or a combination of both. So having that as part of your gear is definitely going to continue to give and give. It's definitely worth having. I have a, what I would consider a mid-priced, really good soft synthetic called Onyx by trickled brushes. But any soft synthetic will do the job. So all it needs to do is be able to hold a point. To be able to hold water. The software, the bristles are, the more water your brush will hold. So you just don't want to use anything that's a really stiff bristle and really geared for oil or acrylic. Something that is not mandatory, but it is helpful to have in removing our masking fluid once we're done with our masking, is to have either some type of rubber eraser or a purpose-built item called natural rubber pickup. That is how it seems to be described and listed. This is available through art supply stores specifically, and it's usually in the same section as the masking fluid or drawing gum itself. This is a little bit pricey for what it is. But if you tend to use masking fluid or if you are interested in masking often, then this is something that you will want to invest in. They're a little bit pricey for what they are, which is just a hard piece of rubber that gets quite grotty at the edges as you see on my example. But it is really helpful for removing that material from your drawing when you're completed. So that is why I've shown that and why I recommend having that. If this is a one-off investigation for you and you're not sure that masking fluid is going to become a big part of your life. Don't worry about it. You can remove this material by rubbing it with your fingers. As an optional extra for this card, it is nice to have some added embellishments that can add just a little bit of texture or glitter or possess to this project. A lot of us will have some scrapbooking, embellishments, some stamps, some collage extras. If you have any of that stuff, try and select few items that might just add that little extra to a very simple image. I will be demonstrating what this piece will look like with the addition of just a little bit of metallic watercolor. That's the embellishment that I chose. You can certainly go off in your own direction. And I'm sure that there will be something in your stash that will add a little bit of a subtle extra to your piece and make a great card if you have lettering skills, this is also a great opportunity to get out your pen and combine your lettering skills with a fun and very simple little anchoring image that will make a great greeting. Some other things that are really helpful to have to complete this project is one, obviously water, so you can create a wash with your ink or watercolor. The other is paper towel or a sponge because inevitably water or paint gets somewhere it shouldn't, and this just helps us pick it up really quickly. The other thing that might be helpful is tape. You could use masking tape or washi tape. And this will just help you anchor your drawing for tracing if you are using a graphite transfer method. With that, I believe we have covered everything that we are going to need to make our project.
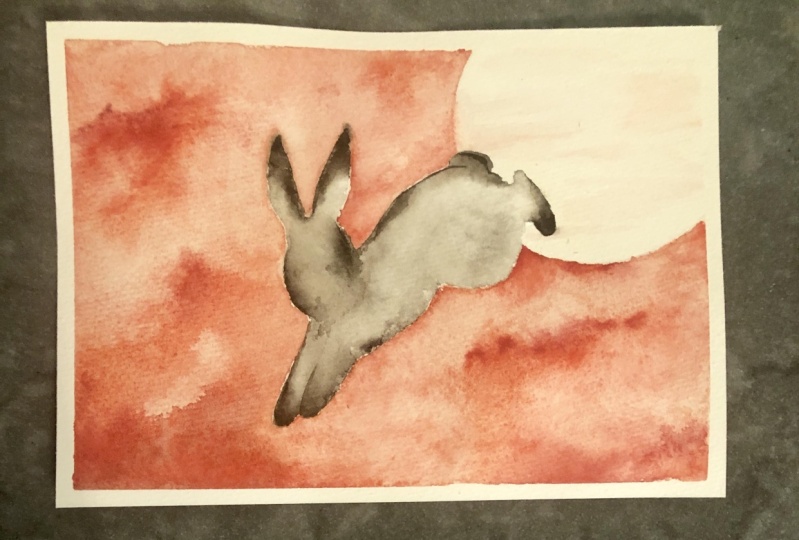
3. Minimalist Rabbit Card Tracing: So let's say that I'm using my light pad as my transfer method. So the first thing I need to do is select which bunny I want to use as my card image. And I can probably fit more than one onto the card if I choose. But in this case, I think I'm going to use this larger, larger bunny that I kinda think of as the curious bunny. What I need to do is to open up my thicker watercolor paper. And I'll superimpose this on top of my image to be traced. Now sometimes I like to tape these two things together so that they don't get any wiggling. That throws off my line work. But in this case, my heavier paper and this seemed to have kind of a friction any relationship and I think that this will hold steady. So what I need to do is just position this onto my card, being mindful of how the card opens. So this will open, this will close into this orientation and open into the correct orientation. And I just kinda wanna sit this somewhere on the page that feels comfortable maybe centered or close to centered. And if I look closely, I'm able to see the outline of the rabbit pretty clearly, especially if I exert a little pressure onto this paper. Some light paths you can adjust the degree of brightness by pressing and holding. So this will actually dim my light. And if I turn it on again, it will come on at full brightness. So I'm going to use one of my mid gray colored pencils to trace the outline of this. And when I trace this outline, I'm going to exert just a tiny bit of pressure working my way around the image. And I can even draw with a very light, somewhat broken or dotted line. I just need to keep some sense of where the very edge of the silhouette is. I don't need to fill anything in. I just need to trace the very edge of this shape. It's pretty self-explanatory and you will see them using hardly any pressure at all. The more I press on my pencil, the more visible this wine will remain in relation to the watercolor that I laid down. Additionally, if I do make a mistake in my tracing, let's say I get a little bit off. It is so much easier for me to erase and alter this very light, slightly broken, extremely sketchy line versus a line that is very smooth and heavy and thick. So again, very self-explanatory, just following this edge. All the way around, keeping close to the edge of the silhouette and making sure that there's nothing poking out that I didn't get off somehow at the very end, I'll be able to see pretty clearly what that looks like. I think this tail got a little bit off, so I'm going to fix that. Keep it in line with the silhouette. And with that, I'm done with transferring this image. I'm going to demonstrate an alternate way to transfer the same image onto a card. Okay, so let's say that I do not have a light box or my window is not oriented in such a way where the sun will shine through and it's hard for me to superimpose this and transfer it. What I can do instead is use my soft graphite and I will just flip my sheet, my transfer sheet around. And these being printed solid black, you can kind of see through on a conventional piece of printer paper, which is helpful. All I need to do is start rubbing a little bit. I don't have to get really intense with the graphite. I've just need to rub a little light graphite over the image that I want to transfer. So I'm just using the side of the soft pencil for a nice broad coverage here. And I might go over this once or twice. I need to make sure that the graphite is going over the edge of the image. Because when I transfer, if there's no graphite behind where I draw, it's not going to leave any line behind. So I'm just trying to get an even coverage. And I really want to make sure that the edge of this is somewhat dark enough. All of this will make more sense after you do this once or twice. And you'll get a better feel for how much pressure you need to use. What implements do the job really well. So, okay, so this, I think should work. I have my soft graphite covering the reverse of my image. What I need to do now is simply to flip this and figure out kind of place it on my piece. Now it's not mandatory to tape this into place, but I find that it prevents sliding, which can be kind of discouraging. So it's a good idea to take a little bit of LacI or something like that and just tape that if you have some if you don't just make sure that as you work your line around that this doesn't slip around because then you will not get a clean transfer. So now I'm going to use my harder, sharper pointed implement. In this case, I'm just gonna use a ballpoint pen. You can use a harder pencil and more sharpened pencil, something like that. And I'm going to just draw around the very edge of my silhouette as I see it here. You don't have to press. You don't have to dig in and really hard, but you do want to exert some pressure, a reasonable amount of pressure. I would say press pretty hard. I tend to draw really heavy handed. So this level of pressure is pretty much mine normal for a lot of people, it might be extra pressure. And I'm just going to work my way around my silhouette. Staying as close to the very edge of this line as I can. If I make a mistake, I need to kind of back up over the line and re-establish it. And that's okay because it's just going to be graphite on the other side and therefore erasable. Those little mishaps will be easier to erase if you don't press really, really hard. And I think I've worked my way completely around this now. So what I like to do is pull up one piece of tape and kind of peak. Yeah. And just see what I have. And if it looks good, then I lift completely. If I know I've covered all of this. If it doesn't seem to be transferring because I've taped, I can just lay it down again, tape it down, and resume drawing with more pressure if I need to. But in this case, this has transferred just fine. And we have our little rabbits silhouette in place. So either way that you want to get your image onto your substrate is totally fine. Once we've done that, let's reconvene and we can start using our masking fluid.
4. Minimalist Watercolor Card: Adding Masks: So I have the tools that I'm going to use to apply my masking fluid, my drawing gum, to my image. What I have on hand right now for this step is the masking fluid. I have my bar soap and I have my inexpensive, somewhat disposable little nylon or tack line brush. This is a four round. You could use a 43 to a small size that gives you a little bit of precision is good, but nothing so small that we can't actually get a bunch of our drawing fluid down onto our page. I also have a little bit of water which I will just need for a second in order to dampen my brush. I also have my card with my outline, which I hope is at least somewhat visible. I will make sure that I film this from a different angle as well so that we can really see what I'm doing to put my masking fluid down onto my paper. So I'm going to start by just dipping my brush. I just need to dampen it like that. That is really all I need to do. And I'm going to use this damp brush, just swirl it over the surface of the soap and pick up a little soap on the bristles. And that is all I have to do. The soap is going to act as a protective layer so that my masking fluid does not absorbed deeply into my brush bristles. When I use masking fluid, I make sure to shake it up a bit. It just keeps things from separating inside the container. And you'll see that it's a light blue fluid in this jar. There are some bubbles at the top, but that isn't very important. They're not going to interfere. What I'm going to do is paint to the outside of the line on my paper. So everything from the line inward toward the body of the bunny has to be very carefully kept white, no masking fluid inside of here. But I can have a solid stripe of masking fluid and it doesn't have to be super pretty or super fine or precise on this side of the image. Any masking fluid that I get from this edge outward is fine. It's going to be helpful. I don't have to cover my page in it, but it's nice to have something of a wide band of coverage. Here's what that looks like. So I'm going up into this little divot between that Paul and my paper. And I'm just painting on a stripe of this blue masking fluid, which will be nice and visible as it goes on. The masking fluid doesn't absorb deeply into the brush and I don't want it to. I need to constantly kind of dip my brush and pick up just a little of this fluid. And continue on with this line. Again, very careful to not go inside the shape, but to bring this line outside my shape right up to its edge. So I turned the orientation of my wrist a bit as I go. You might notice me do that. So that this is always kind of in a comfortable position for me to paint. And it helps the flow of this line get tilted away from the inside of the shape toward the outside. So I'm just painting along and making sure that I have decent coverage. I don't want this fluid to get really, really thin. I want it to err on the side of being thick, but not drip onto the inside area of my image. And that is all I have to do. I'm just bringing this line all the way around. So you'll see I really just want to barely touch that graphite line on the one edge of my masking fluid. And what this light blue fluid represents is a place where my paint is not. So everywhere that is light blue right now is going to preserve clean paper, paper that is not painted over at all. So all of the space inside of this shape to the one side of this blue line is going to get water color applied to it. And everything on that blue line and outside of it is going to be blank and not have paint applied to it. So for this reason, I like to just sort of check up a little bit on this line and make sure that no area that I've covered is looking too thin, really transparent. I don't need to build this up hugely, but I do want to make sure that there are no little gaps in this coverage, no obvious gaps along this surface. Now as soon as I'm done with my masking fluid application, I need to get up and wash my brush in a sink with a little bit of soap. If I do this, this inexpensive brush will happily live to fight another day. So I'm going to clean up right away this application of masking fluid. It needs to dry a 100 percent. So I need to just give it time to completely dry. I will know it's dry. If after about 10 or 15 minutes I can come back and touch this and it just feels rubbery and not especially wet or damp. It doesn't stick to my fingers. So I'm going to go and clean my brush. And then we'll come back and add our paint.
5. Minimalist Watercolor Card: Painting with Masks: Okay, so our masking fluid has dried and we are at the magical fun and altogether too brief part of this project that is painting our shape. So I have my brush, my paint. If you have your paint pelleted, you'll have a little pellet at your side. When I use paint that literally just comes out of one tube like this, I'll often just uncapped the tube, tap my brush to the paint and lift it out of the tube directly. It's not the best habit in the world, but for something like this is fine and it will suffice. I have lots of clean water and I have a tissue to blot with. This is helpful to have every time you use watercolor, just in case water or paint goes somewhere you don't want it to go. I'm going to start this piece by picking up a lot of water on my brush and working this water over the entire inside of my shape. Just laying down plenty of clean water totally evenly on one side of my blue masking fluid, but not the other. So all of this puddle goes to the inside of the shape. And if my masking fluid has been applied thick and properly, the masking fluid will actually act a little bit like a fence or a seawall and it will keep the water from going to the outside of the limits of the shape that I've painted already. So I want paper on the inside of the image to be nice and shiny and glossy and really indicate that all of that area has been covered. Once I've done this, I will uncapped my Payne's gray paint and pick up just a tiny little bit of it. And I like to concentrate this really dark concentration of paint initially on where the rabbit might have some ColorPoints, like on the muzzle, on the tip of the ears, on the pause. On the tail. Not all rabbits, not all domestic rabbits have this kind of coloration, but I think it's really cute, so I'm going to paint it onto my version. So you'll see that this paint bleeds outward and gives a soft edge. I don't want all of this to be really, really light or white. I do want some contrast, so I'm going to just put a little paint unevenly into this wash throughout the rabbits body. All of this is still very wet, so this paint is going to travel, it's going to bleed and it's going to soften significant length. I can add more paint to the ColorPoints on my bunny. If I notice that there's water that's literally pulling or peddling. Also, something that I'd like to do is to use my towel to just take a little bit of the water off of my brush. And I can reintroduce that paint with a slightly drier brush. This will also pick up some of the water in those areas. As I go over them, the brush. So you'll see that a lot of that uneven painting is starting to soften quite a bit inside the wash as the wash develops and dries. I do need to be careful not to touch any of the areas outside the shape. But because my line has been painted thickly, it gives me a little bit of wiggle room and it keeps me from getting paint somewhere. I don't want it. You can play around and you can add color and change value. But eventually you'll start to reach sort of a point of diminishing returns. And that is kind of where you want to stop messing around. So I am going to stop right about here. I don't want to keep adding and adding and adding until this all becomes one uniform value of dark color. Now, I can just cap up my paint. And I'm going to call this little guy done. I'm going to let it dry and see if I like what I get. And if some areas feel a little underdeveloped, I can always layer in another layer of paint, but I want to do this once everything has completely dried, for this little piece is unlikely that I want to develop it with additional layers. If it looks like this, honestly additional layers, we'll probably just start to cover up some of the charm and some of the organic beauty of what I have so far. So I am going to wash my brush, set this aside, and then come back, evaluate and remove my masking fluid.
6. Minimalist Watercolor Card: Removing Masks: So now that this is dry and we want to evaluate what we have and we want to preserve what we have. How do we finally get rid of our masking fluid? Well, it's rubbery and it can in a pinch just be rolled away through some simple consistent rubbing and pressure with your hands. So this is one way to do it. The danger of this is that sometimes they're a little sort of particles of watercolor that have not totally dried. If you're doing this within a timeframe of an hour or something like that. And those little particles when they get rolled back and forth over the paper will sometimes stained. You can use an eraser and this will cut down on this somewhat. But it's the best tool for removing masking fluid is a purpose-built rubber tool that looks like an eraser but doesn't function as one. This is a natural rubber block with kind of a hard edge and a hard consistency. This is sold with masking fluid in the art supply store. It is not a must-have, but it is a nice to have for what they are. They're a little bit pricey, but I don't regret getting a hold of one. You'll see that the edges do eventually become dirty over time. But this doesn't really affect how it works and it doesn't transfer this dirt onto the page. It just gets really embedded into the rubber somehow and it works really well. So what you do is you simply use this item as you would an eraser along the masking fluid. If I'm picking up a lot of masking fluid eventually will happen, is it will start to ball up and masking fluid will work as its own pickup as well. So that is also something to keep in mind. But I'm going to clean up this bunny just using this pickup and working my way slowly and gently around the edge. And I don't find myself rubbing parts of the paper where I don't need to do it. I really just want to keep the attention focused on where the masking fluid is. My advice for this step is to take your time, get into the Zen of it, and just go slowly. Be careful not to rub things that don't really need that attention, such as the watercolor that you have painted or the paper that you want to remain blank and clean. Before long your masking fluid will be pulled up and you'll notice that you have a nice solid intact shape. What masking fluid allows us to accomplish, which is much harder to accomplish by deliberately creating a shape with the edge of the brush, is it allows us to make a space on our page that includes a lot of soft fluid transitions and soft fluid dynamics and paint interaction that has a hard and defined edge. The edge of this bunny is a little bit jagged and a little bit organic. And the more attention you pay to making that edge smooth and consistent as you go around your shape, the less of that little wiggly line, you will develop. A piece like this is really charming, organic and handmade, and I'm happy with that result in this case, it does not need anything desperately in order to be better. But I do think that it might benefit from a little bit of thoughtful embellishment. So I'm going to add a couple of sweet extras before I call this card completely done.
7. Minimalist Watercolor Card Embellishment: So I really gravitate toward metallics with neutrals. But I think that something like this glitter washi tape is just a little overpowering for this project. I really like the soft linen light colors and the botanical shapes of these pressed flowers. But in order to adhere them to the card, I'm going to have to use quite a bit of adhesive so that they're adhered fully. These are really delicate and any part that's not adhere to, It's just going to snap off. The best way to do that would be to use some matte medium. But the problem with this is that the matte medium will still remain kinda visible on this blank, clean paper. And it would start to disrupt the really clean aesthetics that I have of this piece that I really like. So I don't think that those are necessarily the way to go either. What I'm going to add instead is just a little bit of my metallic watercolor. I'm going to use a more subdued gold, this light gold color. And in order to use this, I'm using my inexpensive brush that I used with my masking fluid. It is now clean. And the rougher bristles of this brush help stir the metallics of this paint up and just help reconstitute this paint a little bit better than a super soft dedicated watercolor brush will usually do. The result is that it's better for the brush and it's better for the application and the consistency of your paint. In the case of these metallics. I really like the shape of that plant. So what I'm just going to do is kind of doodle in that similar shape using just the point of my brush. It's really uncomplicated, kind of abstract, kind of folksy. And I don't need to worry so much about the specifics and it doesn't have to be very detailed. And yours can have fewer leaves or fewer branches than mine does. You can just really feel free to create this in a way that feels and looks good to you. Your rabbit also may take up a different position on your cart than mine does. And you might want to place your branch in a completely different place. You might also want to have more than one. This is up to you and you can really develop this so that your card has your own personal stamp on it. Another thing that is fun to do is some type of lettering. If that's a skill that you have developed. I'm going to add a second one of these towards this side, just to lead our eye around a little bit better. I like to vary the size of things on my page. So this is going to be smaller and less complex than the plant up towards the front. I'm really happy with this and I think it's just the right amount of effort to make a really sweet and minimal card. It has a wonky handmade charm and it has a subtlety of color palette that I really think is a nice and rustic sophistication to bring to our little spring project. So here's the thing. We have, this beautiful gift, double sweet little project, and that is wonderful. But even more importantly, you now have a familiarity with an, a comfort, with a growing comfort with the use of masking fluid alongside your watercolor. Masking fluid allows us to work very freely with the knowledge that our paint is going to stay within design confines that we want it to stay within. So what I'd like you to do is just start to think, start to let the idea percolate that there are lots of different applications for this material. I'll bet you can already start to creatively think of several different ways that you can apply masking fluid. In other contexts. We will look at some of those. But for now, I really am happy that you've chosen to make this project along with me and gain a foothold in the idea of reserving areas where we don't have paint and maximizing the areas where we do have paint. I look forward to speaking with you again and until then, take care.
8. Wrap Up: Your Challenge and Thank you!: Well that's it, everybody. Congratulations. You now have the skills that you need to mask like an absolute pro and you'll have great results with your masking fluid after watching this class. Now for your challenge, go ahead and post a similar greeting card or mini watercolor painting under the Projects tab. Don't feel limited by the templates. If you want to use a different shape, by all means do so. Similarly, if you have a color that is speaking to you, go off in your own direction and use that color. Enjoy it thoroughly. It's been a blast painting with you today and I can't wait to see your projects. If you liked this class and found it helpful. I encourage you to follow my Skillshare channel and you'll be among the first to know when new classes are released. Until next time. Stay safe, take care, and have a great time painting.
 Dena Adams