Transcripts
1. Intro: Well, hi, everybody. My
name is Dina Anne Adams. If you and I have
nodded the pleasure, and I am a painter, illustrator and instructor based in Minneapolis, Minnesota. I'm thrilled to welcome
you to class today. I'm going to share my
favorite tips, tricks, and tools for getting loose, experimental and having
lots of colorful fun. We're going to create an
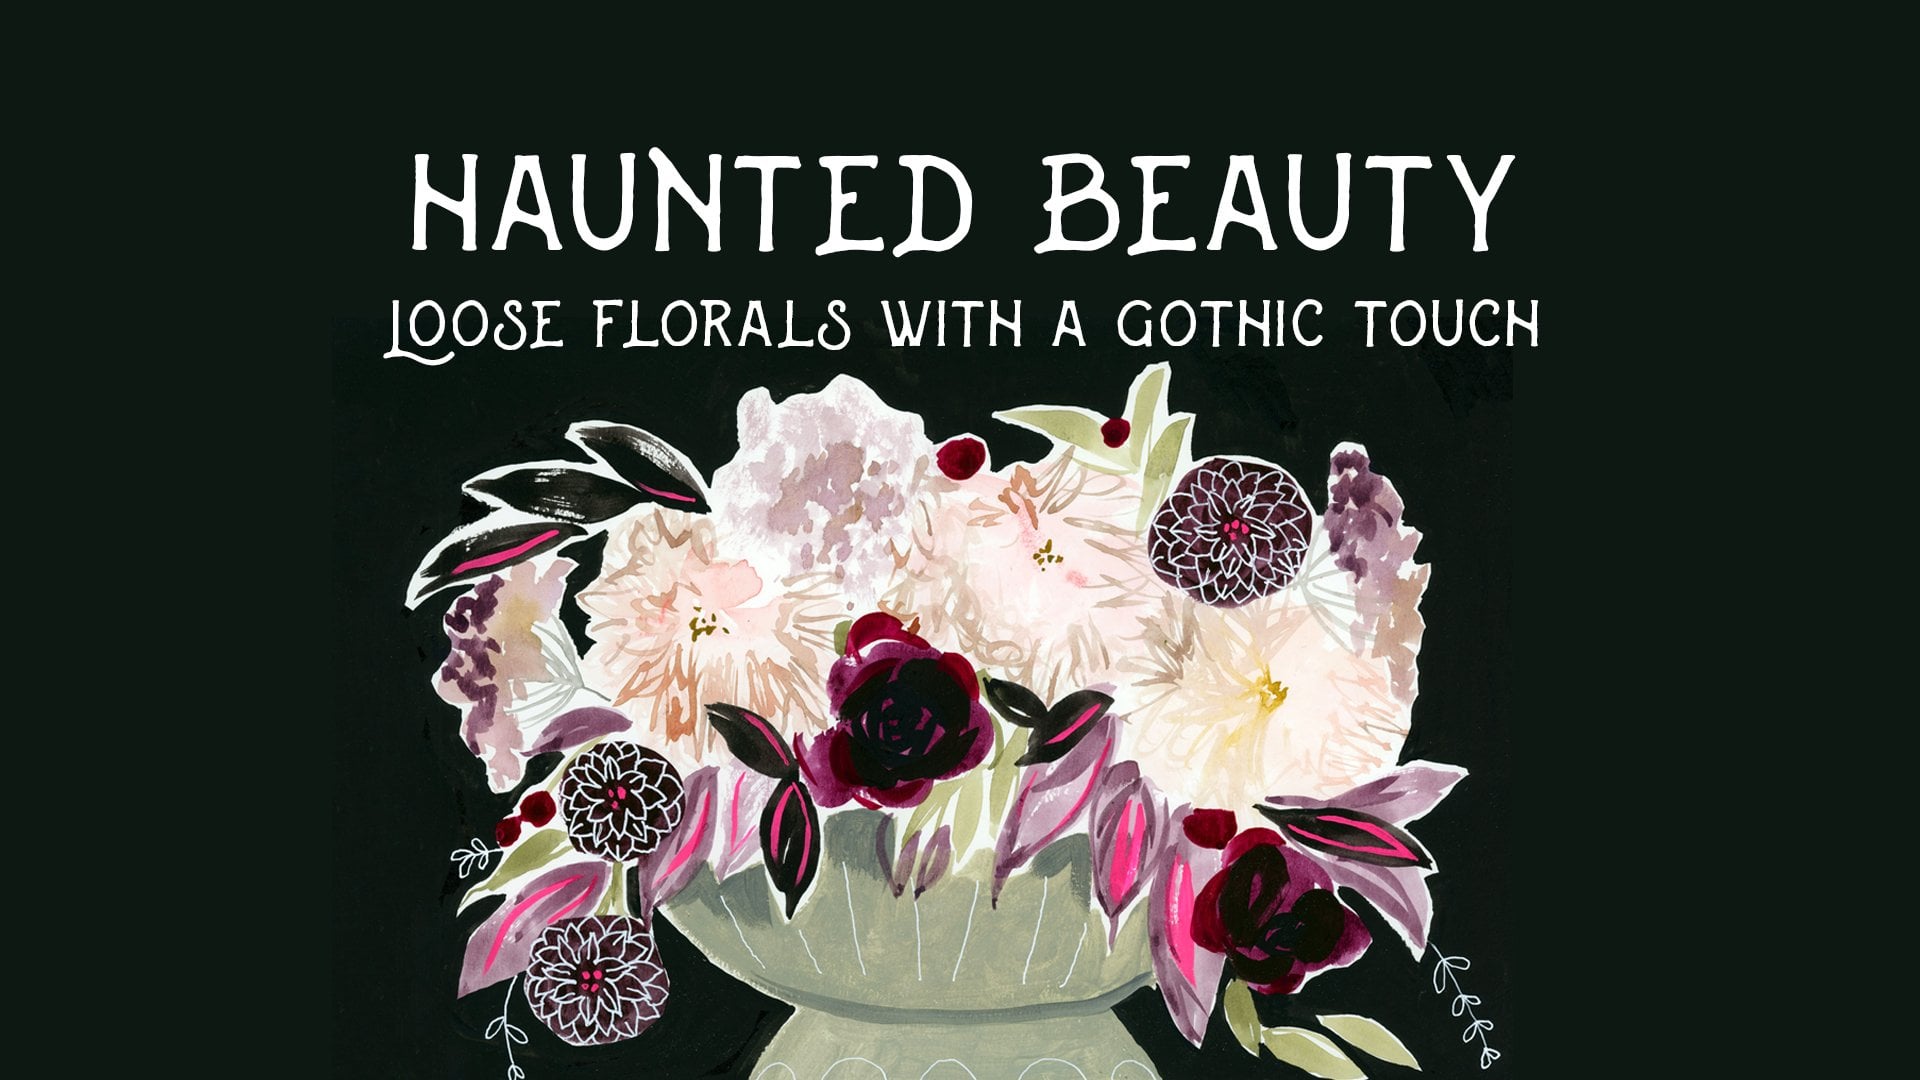
inverted hanging bouquet. I've noticed that dried flowers are all the rage at the moment, and I've always loved
them a great deal. So our bouquet is going to
be hanging in the breeze, waiting to transform
into beautiful, long lasting dried flowers. A painting like this
makes an awesome gift. I encourage you to paint it with a special someone in
mind and maybe present them with a unique bouquet of flowers of your own
design and creation. I can't wait to see
what you create, so let's get down to work
and start this project.
2. Supplies: Let's quickly run down
the materials that we're going to need to complete
this project to start with, as always, you will
need plenty of clean fresh water for
your watercolor painting. Whenever I paint in watercolor, I like to have a little bit of student grade paper on hand, just because 100% cotton
paper is expensive, so I don't like to use
it for warm up practice. Now, some people say that you should always paint
on cotton paper. I don't think that this
is always necessary, but when I use a lot of water, I do reach for my cotton paper. This project uses
a lot of water. So if you have 100% cotton
paper, I recommend using it. I find it most cost effective to buy my watercolor paper by the full sheet and then cut these sheets down into
manageable, small sizes. A single sheet can
go a long way. Now you can use any
type and format of watercolor paint that
you're comfortable using. Here, I've got some
liquid colors. Those would be a good option. I also have some artist
grade tube colors. Whatever colors you choose, try to make sure that you have colors that either
are a green or will result in green if
you mix them and something that would serve the purpose of
painting a blossom. So a red or a yellow. In this selection of colors, I have all three primary colors represented a yellow,
a blue, and a red. But to keep things interesting
and a little bit faded, I've chosen a raw sienna for
my yellow instead of a pure, clean and clear yellow. This Earth tone is going to make things a little
more subdued, and I really like that
for this type of image. Next, you may want to
incorporate some white guash, as well as some white ink, if you have a white gel pen. I like to have a cotton bud Q tip applicator
when I paint. It gives me a nice
flexibility so I can stamp some little
round circles into my work. If you have colored pencils, then gather up an assortment that dovetail with the colors that you'll
be painting with. It's fun to add some
little drawn details at the end of a
project like this, and having some colored
pencils allows me to do that. Water soluble colored
pencils are really nice because you can blend
them with your water color, but they also will
draw with a nice, deep rich line as well. It is extremely helpful to
paint with both a pipe it, so I can lift water and transfer
it from place to place, as well as something to control
the flow of water with. In this case, just a paper towel or napkin will do the trick. My watercolor brushes are a size six round and
a size two liner. Notice that the liner has
longer bristles than the round, and it is much
smaller in diameter. Watercolor brushes are best when they are soft and
hold lots of water, but you don't need
to go out and get anything extremely
fancy or expensive. One of my brushes
is by Princeton and one by tracel and I like
them both very much. One thing you'll definitely
need to complete this project is a small
sprayer for your water. So a little missed bottle like this is something that you'll need in order to
complete this painting. I can't imagine painting
without this tool. It is incredibly useful and versatile when I work with
watercolor and water media. Last, you will need some
type of well palette or plate so you can spread
and mix your colors. With that, you'll have everything you need to
complete this project.
3. Warmup: The way that we paint our
flowers relies on a technique. So let's practice it
a couple of times. I use my practice paper and spray my spray bottle
onto the paper. I hold the spray bottle at a distance of about
eight to 12 ". Take a moment and observe the surface that
we're trying to. You'll notice a series of spatters and droplets
of water on your paper. This is exactly the formation
that you want to see. What we don't want to do is wet our paper evenly in this case. When I'm satisfied with the irregular spray
of water on my paper, I pick up a wet brush and pick
up some watercolor paint. Using the very tip
of my brush only. I gently dot a little bit of paint into the water on my page. What you'll notice is that the pigment on your
brush automatically gets drawn up into the
irregular shapes formed by the water
on your page. It takes very little effort. You don't see me moving
my brush much at all. All of this work is being
accomplished simply by dotting the very tip
of my brush to my paper. I encourage you to try this on your practice sheets and
to get into a meditative, open minded and
experimental frame of mind. Now you're able to pick up different colors at
random, to mix colors, either on your page
or on your palette, and to notice the
different ways that your colors interact
with this wet surface. Different paints have slightly
different properties, so you may notice
that some colors travel more widely and
more rapidly than others. If I notice a beating or pooling or puddling of water that
I consider excessive, I can use my paper
towel to control it. I block these areas of excess water with the
edge of my paper towel. If you notice that
your color is really not moving across your
sheet the way that mine is, I have a couple of
recommendations. Number one, try adding a bit
more color to your brush. It's okay to be a bit bold
with the application of color because the water will push that color along
and make it spread. Sometimes if I have mostly water on my
brush and less pigment, that water doesn't
really travel as much as a more pigment
loaded brush will do. Another thing is to consider
the paint that you're using. I'm using professional
artist grade, and I believe that a student grade of
artist water color like Van Gogh or cotton would behave very similarly to the
paint that I'm using here. I personally have no issues with inexpensive pan sts that you might get from
a craft store, but it is possible that some of these colors may not
disperse quite as well. So if you have paint
like that and you're not getting the kind of result that you
would like to get, I would encourage you to try a little bit of artist
grade material. You don't have to get
every color under the sun. You can start with just three. If you're interested in that, in detail, I have a class
called Power of three, which deals with color
mixing and setting up a very rudimentary and inexpensive artist
material palette. So that is basically the
technique that we're going to use in
focus for a moment. So take some time to experiment with it and
just get familiar with it. You will get a certain
amount of travel and a certain amount of that
irregularity on a student paper, but just know that
whatever you do here, it's going to be magnified. It's going to work even
better once you move onto a cotton sheet
of watercolor paper. So that is just another
thing to keep in mind. You're going to do
great as you translate this activity into the
actual painting project. But I really strongly
hope that you are inspired to make a series of little experiments like this. I hope that playing around like this helps you find yourself at a jumping off point for exploring color mixing
and interaction, exploring the shapes
that you can create, exploring compositions
on the page. There are so many
directions that you can take this simple exercise. Imagery that you create
with this technique alone can be so compelling
as an abstract image. Another thing to think
about is that we can let these little experimental sheets dry and then repeat
this process, creating a new layer of irregularly shaped color and information on top of our
dried layer of paint. Do take notice of
the degree to which dried water color looks different than it
does when it's wet. So one thing I recommend is letting things dry
every now and again. Every time I paint
to the point where I reach a problem and I
feel a little bit stuck. I always try to step back and have the discipline
to let that sheet dry completely because the jury is always out on how
our water color looks until it has dried
and it will dry with some significant
differences in color intensity. Depth of value and color texture versus how
things look when they're wet. So have some fun with
these experimental sheets. Get your head around the way that we're going to
handle our paint and just keep in mind that it's going
to be even more easy to do when we switch to cotton
paper and have some fun. This is a beautiful, relaxing and meditative way to paint, and I really love the piece of mind that this kind of
painting has given me. I hope it does the same for you.
4. Flowlayer: Let's switch our
practice paper for our 140 pound cold press cotton
rag paper if we have it. We'll also make sure that
we have plenty of paint and plenty of water in each of
our paint palette wells. Just as we did with
our practice sheets, we'll spray our paper 8-12
" away from the sheet. When I want to paint a bouquet
that's hanging inverted, I concentrate most of the spraying on the
bottom part of my paper, about the bottom one third. I also need to aim a
little higher on the page as well to form the
stems of the florals. So a little more spraying
where the majority of the blossoms are going
to be found and a little bit of spraying
where the stems would sit. Next, I do exactly as we did in the practice exercise to
create some of the blossoms. When I'm painting this motif, I concentrate warmer colors on the bottom part where
most of the flowers are. So in this case, I'll use some of my rociana right
out of the tube. I'll use some of my red
right out of the tube, and I'll use some
mixtures of the two to form an orangish color. By picking up a little of
the blue on my palette in the form of purples
that I may have mixed during my
practice session, I managed to dull down these
warm colors just a tiny bit without making them
too dull or too muddy. Just a little bit
of an addition of my ultramarine blue makes this a more dimensional and more interesting volume of
a shape to look at. If you find that you need
to respray your paper in order to fill out the volume of the water a little
bit, this is fine. Just try to avoid overspraying the same part of the page
over and over again. It's a good idea to include some really bright intense color if you have it on your palette. In my case, I added some
of these strong fiery reds right from the tube of
my quinacridone red paint. As I work my way up
toward the stem and toward the part of
the bouquet where most of the leaves
are going to sit, then I start mixing my
blue and my raw sienna. This is going to give me a very dull, slightly greenish color. I tend to avoid using a lot of really bright green for
the greenery in a bouquet. It tends to distract
from the florals. So by dulling down one
area of my painting, I'm able to call some attention through contrast to another. You'll notice that I
handle the bouquet stems much identically to the way that we've
painted the blossoms. The marks and the saturation
of color fan out and get softened by the presence of all of those water droplets. The way that I use
my brush is the same as the way that I
used it in the exercise. Not a lot of brush strokes, very slight tentative, delicate dabbing of the tip
of the brush to the page. I'm really letting the water and the paint do
most of the work. The one thing that
I have control over is my choice of color. So that is one area where I suggest being attentive
to using warm toward the blossom
area of your page and cooler color up towards the top where the stems
and leaves would sit. Keep in mind that this
is a general rule. So it's also nice not to have a complete separation
of those two things. I add some of my greens into the area where
the blossoms are. I add some of my bright color back up into where
the stems are. This integration gives
this a more soft, organic and realistic feel. As you can see, this
first layer takes hardly any time at all to finish when we're painting
small like this. A lot of watercolor is simply having the patience
to let things dry and developing the
judgment to know when to step back and let
that drying process happen.
5. Focuslayer: We've allowed our layer to dry. Now we can spray our
sheet very lightly, and we can add some
additional detail. I use a medium concentration of some of the paint
built up in my palette, in this case, a sort
of muted purple color. I use this medium
concentration of paint to add some small leaves to the
edges of my composition. When I touch this paint to the
sprayed area of the paper, it feathers out and forms similar shapes to the ones that I've already
added to the page. But by deepening
this layer of color, I get a little hint of detail. When I paint on dry paper, I get distinct
leaf shapes simply by pressing the round
brush to the paper. It's almost like
stamping with the brush. And the beauty of it is you don't have to be
terribly precise. The purpose of this layer and the way that we
paint in this image is to create a quick illusion of detail rather than
specific detail. By adding little hints of leaves and twigs and
details here and there, we can sort of trick our viewers minds into
believing that there's a lot of dimension and shape within the
structure of this image. Painting loose is all about
this abbreviation of detail. Another thing to think
about is to look at your image carefully
and take its hints and its clues as your inspiration for where to put a little
hint of shadow or detail versus what areas you might
want to leave because detail is already
being suggested by the paint and the marks
that you've created. Again, painting loose is all about letting your paint
do the work for you. So, in this case, your
paint is already suggesting volumes and textures within
your bouquet of flowers. You can use the addition of just a few details to add some
solidity to this illusion. And to emphasize the shadows and lights that already exist
within your painting. I like to concentrate some
of this attention toward the stems because that's where we would see linear details, deep shadows and leaves. So to help with this, I like to flip my
sheet upside down, and then I take out my
liner brush and I use my liner brush to add some
stems to the florals. When I draw this type of
organic stem line in florals, I like to make it very quick, very light and very easy. The faster and more haphazard this line is the more
organic it winds up being. I touch the tip of my
liner brush to my page, sit nice and straight, and sharply paint this line backward by moving my
arm from the shoulder. So the stems are a quick
jerk of my arm backward from my shoulder as my paint brush touches the page very lightly. You don't see my wrist
move much at all. If you're not confident
in creating these quick, whiskery lines, try a few on one of your
practice sheets first. You'll soon get confident with
this kind of line making, and it's really helpful
in a botanical image. Once I've added what I feel are sufficient stems and leaves, I need to let my sheet dry
completely once again. There are a lot of
little t breaks built into making a
watercolor painting. One of the things
I like to do is to start another while
the first dries. This really helps me stay in a calm and comfortable state of flow throughout my
painting session.
6. Flourishlayer: Our layer is dry again, and now we're going to use some mixed media implements in order to increase the sense of finish and detail
that really gives our painting a sense of
polish and completion. I'm going to start by picking up my colored pencils and
starting to doodle in a few details where
The image that I have suggests that
details would be useful. And I know that that sounds
a little bit ambiguous, but try to be
intuitive about this. Just casually glance at your image and look for
little shadow areas, little variations in the
shape where you think that a little bit of drawn detail would
be an enhancement. Your intuition will almost
certainly be correct. You're looking to add just
a few little doodles. So what I mean by doodles are things like lines for twigs, little circles for berries, tiny little doodled
florals for florets. These are very
simple daisy shapes. We're looking to be very
abbreviated and very reductive. So there is absolutely
no need to stress about the level of accuracy that you create with
your drawing here. Little abstracted
botanical forms are what we're looking to add, and the thing is,
we don't want to add a lot of these
drawn details. Just a few. They're
an enhancement. I like to think of
it as a strategy for leading your viewer's
eye from point to point. We do this because in a semi
abstract image like this, things are very abbreviated. So when we pull someone's eye from a place to another
place with a detail, their mind
automatically fills in the gaps between those details
even more effectively. So the illusion of space, volume, color
intensity and warmth, all of the different things
that we would expect to see in a photographically
realistic image. They get abbreviated,
they get skimmed over, and our viewers minds
and imaginations do the work of filling in
the gaps in information. When you engage somebody's
imagination like this, it means that they linger on your image just that
little bit more. We're in a very noisy and
image saturated world. So a quiet and soft image often doesn't feel like
it stands a chance. If you manage to capture and engage your viewers
imagination a bit, and this is a great
strategy for doing that, you're going to capture
just a little bit more of their attention and their focus
than you otherwise would, and you're also going
to give them a gift, you're giving them the gift of a little bit of a
breath of fresh air, a little open space, and it's a very quiet, calm and restful oasis for them in a very noisy
and crowded field. So this is mutually beneficial. The more you're able to
lead their eye around, and the more you're
able to give their eye some beautiful spots of
rest and open space. The more successful and the more satisfying your semi abstract
paintings are going to be. So this next step is optional, but I love including a
little bit of a ribbon or string that holds our inverted
drying bouquet together. So this is super simple. I just add a few diagonal lines, and I weave them throughout
the stems on the piece. This doesn't have to
get really complex. You can superimpose
your colored pencil drawing on top of your painting, and you can break the
line up to suggest that some of the stems
overlap the string. You can use any material or color that you like for
this part of the piece. It could be pencil, but it
could just as easily be guash. One last way that I love to
add detail to an image like this is by incorporating just a few dots
of white gel pen. These tiny dots are
a subtle difference, but they really feel
like a little bit of sparkle and magic in
an image such as this. Before we go, I want
to show you how to incorporate a little bit of gouache painting into an image. This is particularly useful
if we have an image that feels a little bit too dark
or a little bit too busy, such as the secondary
painting that I created while my
first painting dried. I add a drop of white
guh to my palette, and I usually do this in
an empty well because any color will start to
influence that bright white. So if I want to use any
whites in my painting, I need to keep my watercolor separate from my gouache paint. A Q tip gives me a nice, soft, regular circle shape, and I love the playful
stamping that I can create with this
simple found implement. I want to keep things
pretty widely spaced, and I don't want to
get too carried away, but I can use my
white guh to break up any areas that might feel a little too dark or a
little too crowded. Another way that I
can use my guh is by incorporating some of my
watercolor paint back into it. The full range of
colors that are available in guh paint
are fundamentally no different from
incorporating white guh into brightly
colored water color. So if you want to
save some money and use just a little bit of gouache with your
watercolor paint, white is really the only
color that you need. I add a washed out
grade out color to add some neutral
details to this bouquet. And I think that this
helps alleviate some of the degree to which some of these dark colors
feel a bit heavy. I also use a brighter blue tint of my gouache paint to create my ribbon and a few florals scattered throughout
this bouquet. I can even experiment
and draw in to this almost dry gouache
using a sharp pencil point. This helps break
up any blocks of texture that might feel a
little bit too heavy or solid. So much of loosening up is being willing to
be responsive to the conditions in
front of you and to respond to the changing
conditions in front of you. It's certainly possible to
push things a little too far. That's the beauty of making lots of small multiple images. If I paint one bouquet, there's a lot of pressure
on me to get it right. If I paint five at a time, one of them is inevitably
going to be a standout, and maybe one or two of
them will be not so strong. I can then use an editing
process to make my work strong. And this takes so much
pressure off of me. It also allows me to
really experiment boldly and push things further
than I ordinarily might.
7. Project: Well, that is it.
Congratulations, everybody. You now have all the skills
and tools that you will need to create one or
more images of this type. I would love to see all of your different floral creations. So please post
your project under the projects tab when
you are ready to do so. I'd also love to see any of the experiment pages that you've created in the process of
learning this technique. So post those under the
projects tab alternately. I hope that you have had
tons of fun creating one or more of these
beautiful floral paintings. It's been so much fun
painting with you today, and I can't wait to do it again. If you have found this
class useful and helpful, please consider doing me the favor of leaving
a review and a. It really helps the
Skillshare channel grow. I'd love to hear any
comments or suggestions and any ideas that you might have for classes going
forward in the future. I really want to create
the classes that you want to take and that address the questions that you have. You can keep up with me
by following the channel. I also encourage you
to visit my Instagram dedicated to my floral
a day side project. If you like today's class, this will really
be to your liking. This project is located at backslash Floral of the Day
on Instagram and on Tumbler. I look forward to seeing
you around and until then, take care and have a
great time painting.
 Dena Adams