Transcripts
1. Introduction: Hi, I'm total a
stop-motion animator and filmmaker based in London. And in this class, you're gonna be learning how to make some miniature books. And miniatures are
useful not just for props in your own
stop motion film, but you may want to
make these to go in a Doll's House or
in a diorama scene. I'm gonna be walking you through how to make a basic
book like this, which has plain pages inside. Also, how to make a book
with text on the pages. And even give you some
tips and techniques on how to age a book and
make it feel old. Perhaps you would
want to use this in a haunted house scene or in a really ancient sorts of library where the books on their best and they
aren't brand new. This is a super simple class. By the end of it, you'll be
able to go away and within an hour have made yourself
several books of your own. If this sounds like something
that you'd like to try, Let's get started up next, I'm gonna be telling you
about the class project.
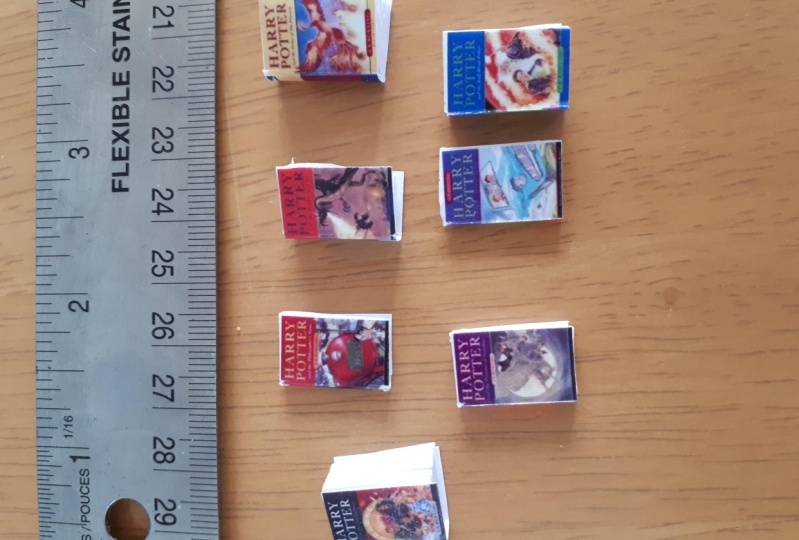
2. Class Project: In case it wasn't obvious, the project for this class is to make your own miniature
book or books. I don't mind how many you make. They can be brightly colored, they can be plain. They can have text on the
pages or nothing at all. You can have them looking
absolutely brand new, or you can even age
them to make them look older or dirty
for a horror film, wherever you want to
do is fine by me. I just want to see the
work that you create. So make sure to start a project and stick some
pictures in there. Like I said, this is a really
quick and easy project to get going with. And once you've made one book, you will want to make
a whole library. They're really fun,
they're really effective, and they look really good too. If you have any questions or anything that you
haven't quite grasped, you can also start
a discussion and I'll try and reply as
quickly as possible. Up next, I'm gonna be telling you all of the
things that you will need to create your
own miniature books.
3. What You Will Need: To make your own manager books, there are going to
be some tools that you need such as paper card, scissors, things like that. I'm going to show you now
exactly the stuff that I used. I've tried to make it as
accessible as possible. So you don't need
lots of fancy stuff. But if you do happen to have
some tools around the house, it will make your life easier and make your books
a lot neater to. To make some miniature books, you will need a cutting mat, a metal ruler, a
paper guillotine, a pencil, some craft glue, a scalpel or craft knife. It's in plain white
printer paper, some brightly colored
paper or card. If you want to make a textbook, you will also need a
printer and some scissors. If you want to aid your book, make sure to have
a pot of water, some acrylic paint, brushes, sandpaper, and a few tools
to distress your design to most of these things you
should have around your home. And if not, they're all
pretty inexpensive. Up next, I'm going to be
explaining how to set your own miniature scale and get your books the right
size for their setting.
4. Setting A Scale: So setting the scale, if you enter adult houses, you will have probably
heard of the 1 12th scale. It's quite common, quite
popular with stop-motion films. I tend to work on a 1
tenth scale because 1 12th for especially films with characters is just a
little bit too small. One temp for me is
more appropriate. Dioramas might even
be smallest still. In fact, a lot of people
use this scale 120th, which is absolutely tiny. Any scale goes, the
mass is really easy. I'm going to be explaining
everything right now. Working out the scale for your manager isn't as
difficult as you might think. Take a real life
object, in our case, now a book and measure it. The height and the width. You can do depth to top tip. Working in millimeters makes things even easier
and more accurate. This book is 155 millimeters
wide, 225 millimeters tall. And I'm not going to worry
about the depth as bookish come in all different
sorts of thicknesses. I plan to make
money for my scene. Once you have your measurements, you want to divide
your numbers by 100. So now in this case, we have 1.5 millimeters
and 2.25 millimeters. Then you want to multiply
these numbers by your scale. And those will then be
your miniature dimensions. So for doll's houses, this is often 1 12th. Stop-motion films tend to
be 1 tenth and upwards. And dioramas, they
can go as small as 120th wherever you
set your scale to. Just make sure that
all of your prompts in your scene or reduced
down to the same scale. So let's work this out. For my scale, I'm gonna
be using 1 tenth. So 1.55 millimeters
times ten equals 15.5 millimeters and 2.25
millimeters times ten equals 22.5 millimeters. So that will be the size
of my miniature book. To recap, measure a
real book in your home. Divide the measurements
in millimeters by 100, and then multiply that
new number by your scale. I, 1 tenth, 1 12th, or
something different. Up next, I'm gonna be
showing you how to make the plane pages for a
basic miniature book.
5. Making A Plain Book: In this lesson, I'm gonna
be showing you how to make a plane page
miniature book. Now this is the easiest out
of all of the examples. You need less tools
to create this. And I honestly think that
anybody can successfully make a book with plain pages and make a pretty good
looking book as well. So now I'm going to show
and talk you through the entire process of
making a plane page book. Making a plane book
is super simple. Begin by getting
about five sheets of plain white printer paper. Bring these over to
your guillotine and cut a strip that is the height
you worked out for your book. You can mark with a pencil
first or you can use the ruler on your cutting
machine as a guide. Each strip you cut will
be for a different book, so keep them separate. Next, we want to cut that strip into shorter pieces
along the length, about 30 millimeters or
just over an inch for each. Once you've cut your
whole strip like this, you will have a pile
of paper pieces. We want to align these
all up in a stack. Use the amount that you need for your books thickness, top tip, tapping them on a hard
surface several times usually will make all
the edges fall together. Once you have achieved a perfectly straight
edge to your stack, you want to go and
get your craft glue. I'm using an acrylic paper glue. Spread this onto your flat edge, making sure to touch all
over the spine of the pages. Hold the stack firmly to prevent
any pages falling loose. You will now want to
lay this down to dry, but make sure to keep
this sticky edge slightly elevated so that it doesn't
stick to your table or Matt. I've rested mine
on my metal ruler. Now when you pages are all dry, we're going to
bring the book into form by trimming our pages. Measure the correct width for your book and place your
metal ruler on top. We're going to use
our cutting knife to carefully cut all the
pages at this point. Top tip. Don't try cutting
them all at once. Cut a few sheets
through at a time, and just keep your ruler steady. Once you've got through
all the sheets, you will see that you have a perfect little book
minus the cover. Don't worry, we'll get
to that to make sure the blade on your knife is nicely sharp on
this part as well, blunt blades will
drive you crazy. So to recap, five sheets of printer paper is
plenty. Take your time. Miniatures are all about
the details and precision. Get your edge straight
before gluing and leave it to dry before cutting
your pages shorter. Oh, and sharp scalpel
blades work best here too. Up next, I'm gonna
be showing you how to fit a cover to your book.
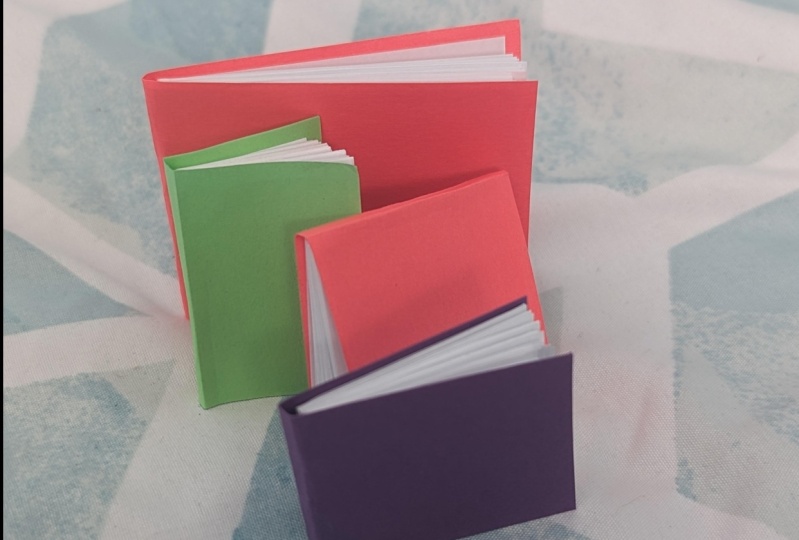
6. Attaching Book Cover: Okay, so you've got your pages and he now
might be thinking, well, what about the cover? Well, I've decided to put that
in a separate lesson just because it felt like
it made more sense. It's a separate part
of the process. So you're going to see
how to do that right now. I suggest getting some
bright colored cards. It makes things look
a lot more fun. But honestly,
wherever kinda cover you want to make is fine by me. Let's get started. Attaching your book cover
is super simple as well. So grab your book pages, choose your cover
material, card or paper. And let's get measuring again. Firstly, place your book pages
onto the cover material. You want the cover to have
roughly the same size border on all sides. Use a pencil to mark where the bottom
edges on your cover. Then bring this piece of card
over to your guillotine. And we now want to
cut that strip off. Line. Your book caught up
with the end of your strip. And we want to bend
that around the pages, making sure to get a crisp fold around the spine of the book. Grab your pencil
again and make a mark where the cover
ends on your strip. You can cut this off
with scissors or a craft knife and
metal ruler, like me. Now that you'll cover
is the right fit, we need to stick it on. Apply some glue to your
page spine again, top tip. When attaching, make sure
to learn the pages up with the equal border at
one side of your book. First, hold this family whilst folding the
card around the spine. Hold it while it dries or place it under something
heavy for awhile. Now I'm going to quickly run
through the process again, this time with a paper cover, because different
thicknesses of cover will change how your book
naturally sets. So to recap, we laid
the page core down onto our cover paper and mark the bottom
edge with a pencil. Cut the strip off, and
then fold it around our pages to find where
we need to cut the cover. Again, mark with a
pencil, and then cut, apply glue to the page
spine and load the pages up making sure that the
cover is firmly pressed on. If any glue spills out, you can use your craft blade or a pin to carefully remove this. Now, we have these two
books side-by-side. You can see easily how they
hold themselves differently. For reference, the purple
one is 300 GSM card, and the brown one
is a 180 GSM paper. You can always place
heavy things on them overnight to encourage
them to stay more shut. Thicker card will make you
book naturally sit more open. Just bear that in mind. If plain pages weren't
enough for you. Up next, I'm gonna
be showing you how to make text on pages. For a minute. Your book.
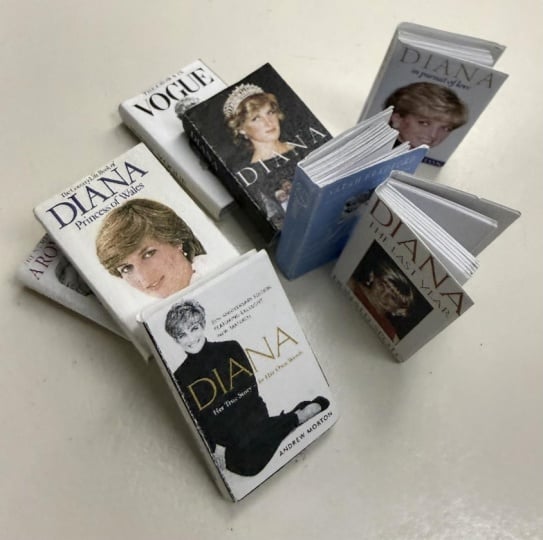
7. Making A Text Book: Now if you're a more
adventurous crafter or if you want things to
look even more realistic, you might want to
have a book that has actually got
text on the pages. And this is fairly easy to do, although it does require
some preparation. I have created some
pages in Photoshop. I'm going to talk you through
briefly how I've done that. And to make your
life even easier, I've actually created a PDF. It's just using lorem
ipsum, the filtText. But where it says chapter, I've written chapter in English. And that means that you can
print this out at home, flip it over, and print on the
other side in the printer. And you'll have some
double-sided pages that you can put
into your textbook, which will save you a
lot of hassle and time. It took me a while to get
this designed to work, to look good on both
sides and line up correctly to make
your own text pages. I used font point size
five with line spacing 52. I made a textbox with the correct dimensions
for my book in Photoshop and then
duplicated this many times, altering the text slightly
to give diversity. You can create
this for yourself. However, to make
your life easier, I have included a PDF
that you can download and print yourself to
use in this class. Once you have your
page printed out, we want to use a metal ruler and craft knife to cut
the page strips. Be careful to make sure
that the border around the text is roughly the same
at the top and the bottom. Once you have all
of your strips cut, we want to separate
the pages out. And I suggest either using
your metal ruler and a craft knife or if you
have really steady hands. Since this can work to
stack the pages in a pile as you cut them until you have enough for the
thickness of your book. Then same as before. We want to line up all the pages on the edge for our spine, tap the pages on the table and shuffle them
together neatly. Then apply glue to the spine
and leave it to dry top tip. Remember to put that
sticky edge up so that it doesn't get stuck on your metal
table whilst it's drying. Once dry, we can carefully
trim off any uneven edges. Usual metal ruler and craft
knife to carefully shave off any pages that are hanging
on the sides of your book. Fitting your cover
is just like before. Lay your page core onto your cover material and mark the bottom
edge with a pencil. Then cut that strip off. Then the cover
around the book and mark the cover edge
to cut that free to apply glue and then attach we'll cover
just like earlier. So to recap, with a textbook, it's a little more fiddly. Take your time
lining up your pages and cutting them accurately
for best results. The cover fitting process
is the same as before. Next, I'm gonna be
showing you how to atrial book so that it would sit
right in an older setting.
8. Aging A Book: So now you've made some books. You may find that they look
a little bit too perfect. They look gorgeous, but they've got very
crisp and clean edges. And often in real life, a book can become
a bit battered, whether that's a
slightly bent cover, a little nick or a
tear here and there. Depending how old do you
want your book to look? What sorts of seeing
you want it to sit in. You may want to dirty it
up and age it alphabet. So in this lesson, I'm
going to be showing you some tips and tricks
on how you can add your own miniature books so that they sit a little
bit more comfortably. In an older or dirtier scene. Often a perfectly clean book
won't fit into your scene. You will want to age your perfect little
miniature piece of art. To do this, we will
need some acrylic paint in dark colors like burnt
umber and Payne's gray. Black is often too dark, will need some water and brushes as well as tools
to damage the book, like sandpaper, a craft knife, and some sculpting tools. Don't be afraid to get stuck in there with whatever
tools that you have. Add little cuts, bends, imperfections to
your book, top tip, and Emery stick or
sandpaper is great for adding texture to the
spine and cover edges too. When you've added
lots of texture, you'll want to water down your acrylic paint and add some to pick out those details. The paint will naturally set
in all of the damaged areas. I've made my paint a
little bit dark here. So remember to start
lighter and build it up. You can always use
kitchen towel to absorb any excess paint. There we have it to
lovely old books, perfect for a horror film or
an ancient library setting. Just to illustrate the
difference here is a perfect purple one side-by-side
for comparison. So to recap, be brave and
don't be too precious. Make some marks,
daddy things up, and you'll be
surprised how nice and aged book can look to make sure to really water down
your paint and mop up any excess paint with
a kitchen towel.
9. Outroduction: I hope you enjoyed
this class on how to make your own miniature books. Don't forget to send
me some pictures. Make a project, photograph
them in your set or seen, or just on their own,
as well as that, you can follow me here
on Skillshare to be notified of any new
classes that I make. I really want to make more
classes on miniatures. I'm always making things
for sets and films. And I want to share the
knowledge that I've learned through trying to figure out how best to make
different things. Another idea I've
got coming up is how to make miniature boxes. So if that sounds
appealing, definitely follow to find out
when I've made that. Oh, and if you did enjoy this class or even
if you didn't, don't forget to
leave me a review as well to help other students know whether this class is
valuable for them to take two. And if you want to find them
elsewhere on the internet, I have a YouTube channel,
I have a website. I'm just about to start a
blog where I'm going to share some tips and advice and things that I've
been working on. So make sure to check
all of that out. Thank you very much for watching and for taking my class today. I hope you have made some wonderful little
miniature books and are having a great day. I'll see you again
in the next class.
 Tortor Smith, Animator, Director, Artist