Transcripts
1. Introduction: Hello, I'm Tortor, and I'm a stop-motion animator with over 14 years experience. In this class, we're going to be doing some claymation stop-motion animation. We're simply going to be shifting shapes, changing shapes from one shape to another in lots of fun and playful ways. One of the most common questions that I get asked relating to stop-motion animation is how do you know how far to move things? How do you know how to get that realistic look in your animation? Weight and timing, how do you know those things? Well, the truth is that you don't really know those things. They're things that you learn by observing and understanding the rules and principles of physics and life and movement and just how things work. It's through observing and understanding these rules and then applying them to your work that you're going to take your animation up a level. If you're a hobbyist or a self-taught animator, then this is the class that you need to help you take your skills to a whole another level. Up next, I'll be telling you about the class project.
2. Class Project: For your class project, you're going to be making a claymation shape-shift. What I mean by that is you're going to choose a shape and you're going to shift it into another shape. It's going to go on a journey. It's going to transform in to a new shape or multiple shapes. You can do whatever you want. You can be as ambitious as you want. This class is going to equip you with all of the skills and all of the knowledge that you need to bring your animation up a level. I want you to start a class project right now, choose your shapes, write it down, tell me what shape you plan to start with, how you want to get to the next shape, and where the shape's going to end up. Maybe write it out as a sentence or two like, "I am going to begin with a square. It's going to wiggle itself into a triangle." Or, "I am going to start with a circle and it's going to burst into squares, circles, and stars." Or, "I'm going to start with a star, and that star is going to fluidly morph into a triangle." Whatever it is that you plan on doing, get it written down and create a project. In a few lessons, we're going to be going through some playful planning, and at that point, I'll get you to draw these shapes on a piece of paper, and we can start visually planning out the journey and how things are going to happen. Up next, I'll be talking you through all the different clays that are available and why you might want to use a specific one for this class.
3. Types of Clay: There are many different types of clay that you can animate. The two main types are plasticine, which means that you can change the shape, it tends not to dry out. You can move it and sculpt it, if you drop it it's going to deform. Then there's oven bake clay, which you can also animate in its pre-baked form. But you can harden it off as well, so you can make it into a permanent shape. You can bake it in the oven and it will become hard and in some instances, this can be useful. I've used this before in animations. I did this series of animations where I had nuts and I broke the nuts into their separate parts of the word, so peanuts became pea and nuts, and walnuts became wal and nuts. I sculpted some of their parts out of clay, baked them in the oven so they were nice and hard. That meant that I could animate with them and they weren't going to deform or get squashed. But for this animation, we're going to be using soft clay, so plasticine or clay, that is an oven bake, but before you put it in the oven. So when it's still malleable. Different clays have different compositions. Newplast clay is a clay which I love. It's easiest to get in the UK. You can get it elsewhere in the world. It's what Odman use, so it's pretty up there. It's a good quality clay. It's slightly stickier than other clays. You may not like that. A different clay is Jovi Plastilina, which is a Spanish plasticine brand, and I love that clay. All of the animations that you see in this class today will have been animated with Jovi Plastilina. This clay has a really nice quality to it. It looks great under studio lights. It has a sort of almost translucency, but it's more oily. It's not sticky. It feels good and it's got a nice softness, so it's easy to work with if you're not sure which way to go with, that would be my recommendation. If you prefer to work with something a bit firmer, then you may want to go with one of these oven bake clays in their pre-baked form. The most common brands in this type of clay of Fimo and Sculpey. A lot of animators animate with Sculpey. There are so many different types of clay out there. If you really aren't sure what to use, my suggestion would be to buy a few different brands, try them out, get a feel for it and work out what you like. Every animator is different. We have got Cernit, this is a translucent clay, so you can mix this with colors and it will give a translucency when it's baked, but in its raw form before it's baked, it just looks white. Again, you can animate with whatever you want though. Another clay that exists is made by the same people that make Newplast is Uro hot set clay. This is not a good clay to animate with because it's very crumbly. You get it out and it will crack and fall apart. You may find that with some oven bake clays yourself. You can see here I've also got a pack of Das clay. This is an oven bake clay, and this is also really crumbly. It does say on the back, "Encourages you to use a pasta machine." You know those machines where you roll to bake your own pasta, a lot of people condition their clay with one of those. They mix it up and they get it through there to soften it up and flatten out. You can use one of those if you want. But if you are animating with plasticine today, which I highly advise you to do, my recommendation if you can get your hands on it, it's Plastilina. I think it's brilliant. It's a clay that I've only started using this year. It's not as easy to get a hold of in the UK, but it's just the perfect softness, is really easy to work with. It holds its shape, comes in loads of bright colors and it not only looks good on camera but if we're using hot lights, it's not going to melt or get more sticky or anything like that, whereas Newplast can get sticky and it is a more sticky clay. This is Newplast clay. If you're in the UK, this is probably cheaper and more easy to get a hold of than Plastilina, and it is still a great clay. I've used this clay to sculpt many different things over the years, and this is a clay that I personally have been using for about 15 years now and I love it. You can well, do lots of things with it. With all these clays you can mix colors together. If you want to color that is in-between different colors, maybe you want a more yellowy-orange, you can mix yellow and orange and create your own color. I've tried this with Plastilina as well, and this mixes really well as well. You'll see that in some of the examples that I show you today in this class. Just play around, Find out what clay works for you and what you'd like to work with, and then we can start sculpting and creating our shapes. Up next I'll be talking through the essential tools that you need for stop motion claymation.
4. Essential Tools: When you're working with clay it's good to have some tools to help you sculpt. You can buy sets of tools. There are metal sets which I love, these tend to be branded as dentistry tools, you can get them from places like Amazon, they're really cheap and they're really good. They're really strong, you can use them for so many different things, they're really diverse and helpful because they're double-ended. Basically, you have a tool there for everything. You can also get more diverse ranges of tools, this set here was from Artesia. These are branded as sculpting tools for pottery, but they work just as well for animation and for claymation. As well as this, there are sets of tools more aimed at kids, like these plastic ones, they're good too. You can also get tools marketed for cake decorating that work just as well for claymation too. So literally whatever you can get your hands-on, whatever jumps out at you, whatever is affordable that you can get, but if you don't have a budget for tools, don't worry about it because there are plenty of things that you might have lying around the house, which are equally as good. Things like cocktail sticks or dental floss sticks, lollipop sticks, planter sticks that you put in the ground when you're planting fruit and vegetables. These things can be good if you wanted to get flat edges to a shape. My personal favorite tool is the most cheapest and simplest thing that you will have in your house and that is any sort of pin. My favorite would be the T pin because it's got a nice bit to its end, it's got this T-shape which is really nice to hold, and a pin that can achieve a lot of detail. You can use it for various different things. One of the other most important tools that you'll have, it's attached to your body, is simply your hands. Hands are great because your fingers can smooth down the clay and you can roll a ball, you can pinch, you can do all sorts of things. I'm going to be showing you some tips on how to use your hands and other tools as well to create different shapes. Something else that's good is to have something flat, you can buy flat pieces of acrylic plastic like this. If you don't have something like that though, you might have a protractor lying around or a ruler or something, they can be equally as good. Also, a small rolling pin can be really useful. Sometimes clay can be a bit firm and can just ruin your hands trying to flatten it out, so a rolling pin can make that a lot easier and really speed things up. You can buy small rolling pins, here I have a wooden one and an acrylic plastic one. I would say if you have the option, go with the acrylic plastic, it's easier to clean, it doesn't get discolored, and it's really smooth and gives you a really good result. You've decided what clay you're using, you know what tools you need, in the next lesson, I'm going to be giving you some sculpting tips and tricks. I'm going to be showing you how to use the tools that you have with the clay that you have to get the results that you want and create the shapes that we need for our shape-shifting animation.
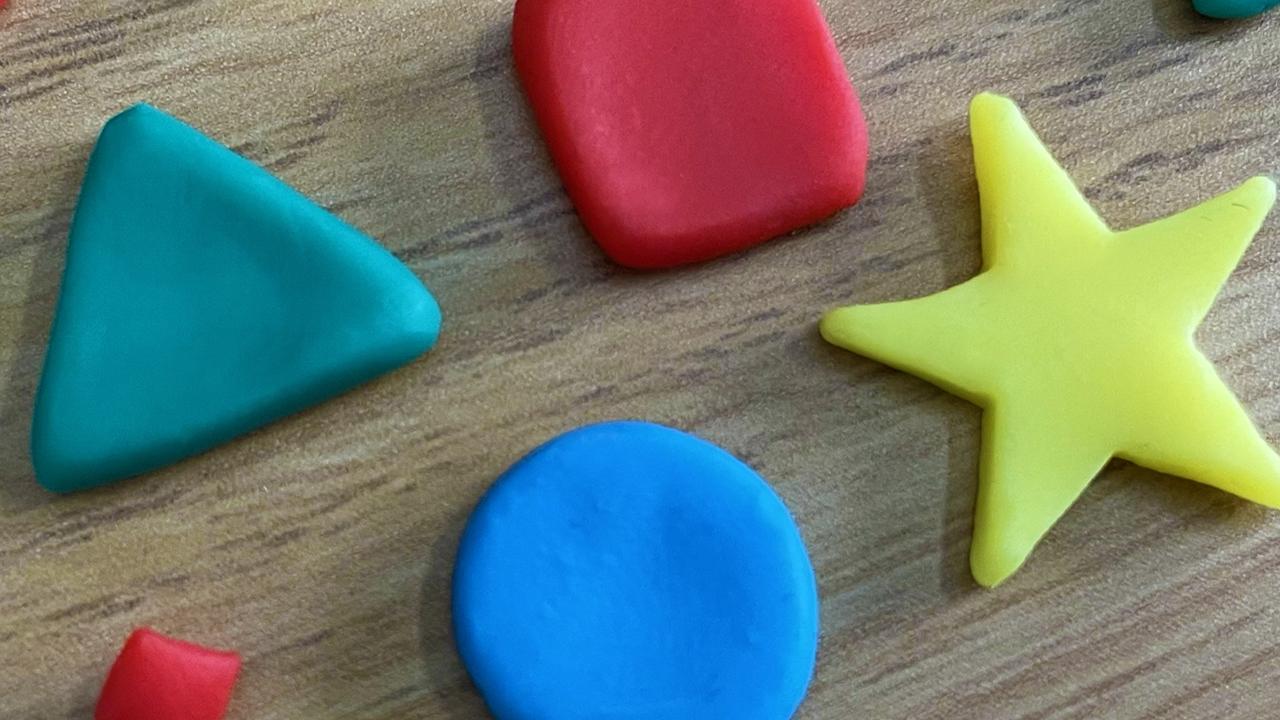
5. Sculpting Tips: You've got your clay, you've got your tools, now you want to make your shapes. I'm going to be showing you lots of different techniques and ways of creating different qualities in your sculpted work. Here you can see the different shapes that I'm using in my animations for this class. Now, I'm going to show you how you can sculp these shapes easily. Some shapes, you can see have straight edges, some shapes have rounded edges, and other shapes are little bit more intricate, but there are some tips and tricks for all of these. Let's start with how to create a triangle or a square. For this, we're going to need straight edges. So you want to get yourself a piece of clay. Now one way of creating straight edges is to simply use your fingers and squash it like this. So you're pinching and then you're pinching the other way. Pinching, pinching, and you can even pinch the corners a bit to get those straight edges. Now you can see that this looks a little bit rough and ready, it's not as sharp as it could be. What we can do. When I was showing you the tools before, things like lollipop sticks. These are the things you put in plumps to label them. You can simply use these. You can put one either side of a piece of clay and you can push like this to create flatter edges. You see here that this square is now looking like it has much sharp edges. You can also push down on it, make it flatter and then you can go back in and neaten up those edges. So simply by using two sticks, two lollipop sticks, or two plump pot labels, you can create much straighter sides to something like a square. You can also get acrylic plastic, so you could push down like this. So you're sandwiching your shape between two layers. You can see we're getting much flatter shape. Let's say you wanted this to be a triangle instead. Let's squash it back down. The triangle is a little bit different in shape. It's obviously got three sides. What you want to do is, again, use your fingers, pinch. We're pinching to create the corners, like this. Pinching to create the corners and now we have got a rough triangle shape. Again going with this and you can use them in exactly the same way to just flatten those edges. Then you can use it to flatten the shape as well. You can squash it between two things like this. You can see it's starting to look a little bit neater. You can literally just push the shape down to get the flat side, just keep rotating the shape, maybe pushing it down to flatten it like this. Push it with your fingers and you can get quite nice sharp edges just like this. That's another way of achieving a straighter-sided shape. These don't have to be perfect. Your shapes can be a little bit rough if you want. Is clay off through and we're going to be moving them and changing shape as well. If we move on to a circle. To get a circle, we literally want to make a blob. So we're just going to roll a little bowl and then we're going to squeeze it between our fingers. It's starting to become circle-like. Now, this is not the easiest thing to do with one hand. But essentially you can use your thumb to smooth the clays. If you just rub with your thumb like this, you see these cracks here, you can see that that they're just covering over. If you want to get a soft edge, something that's rounder, you can just use your thumb or finger and you can smooth that clay down very easily just by rubbing the surface. If, of course you want your circle to be flatter, you can do the same method and squash it between two bits of plastic. You can even decide to roll it on something flat too. You can just roll it along like this to try and get a neat edge. Still not completely perfect. Like I say, that doesn't really matter. But you can tell that that is definitely a circle compared to our other shapes which are square and our triangle. That is how you can get soft edges. Use your finger to just rub it to smooth stuff out, and then use straight-sided things to get sharp edges on your straight-sided shapes. Now if you're going for a more ambitious shape, like say a star here, you could hand sculp this, but it would be a little bit fiddly. So a really good trick, a really nice hack for getting a star like this is to use something I've mentioned already. Baking tools. These are for cake decorating. They are punches that you can use to cut out icing and you can use these for clay too. All you want to do is roll out a flat piece of clay. You can do that with your acrylic rollers. So I would just roll this out like this, get it nice and flat. Then you literally will go in there with your cutter, push it down into the clay. Give it a wiggle. Then to release it, you just depress the thing on the top and it will pop out. There you go, we've got a perfect star. That's an easy way to get more intricate shapes. You can get these cutters in all sorts of shapes. We have got a leaf, so you could do a leaf, we can do a heart, a different kind of leaf. They're literally all sorts of things you can do. Definitely play around with cutters and things like this. Up next, we will be starting some playful planning. How you're going to get from shape A to shape B or shape C. Wherever is that you have in mind, we're going to work it all out before we even start animating.
6. Playful Planning: I hope you've got an idea already about how you're going to shift shapes. If you haven't, though, this lesson is all about playful planning. This is going to be a lesson to work out what you're doing if you don't know already. If you do know, then we're going to get it down on paper and we're going to have a really clear plan of how we want to get this shape-shift to happen. We want to get it really clear in our heads what it is that we're going to be animating, how we're going to be shifting our shape before we even start. Grab yourself a nice, plain piece of paper. It doesn't have to be as big as this. It can be as big as you want and get yourself a pen or a couple of different colors. What I want you to do is roughly plan out what's going to happen. On the left-hand side, perhaps draw out the first shape that you plan to start with. In this example, I'm going to start with a triangle. Then I suggest planning out the journey that it's going to take. Do you want this to change into a different shape or do you want it to explode into multiple shapes or spin into multiple shapes. For example, we could have this triangle meet a circle. If we have a circle, let's shade this one in as well. The triangle could be moving towards the circle, and the circle is moving towards the triangle, and at this place where they meet is going to change into something new. To show that it's a new shape, perhaps we could change color. So when they collide in the middle, they become a square. This could be a form of transformation. We've got the triangle and a circle transforming into a square. That could be a simple way of illustrating an idea. It gives you some idea of what's going to happen. You could also put some rough planning for timings. Say if these two shapes are going to accelerate together, the spacing for moving the pictures is going to gradually get bigger. You're going to want to follow slightly bigger lines for each picture. You'll move your triangle in to this line, then go a bit further. Then the space will get bigger and bigger and bigger until you get in. On the other side, the circle will follow the same formula. The spacings are getting a little bit bigger until finally they meet in the middle. So some simple ideas. We could have a circle, and our circle might want to roll into frame. To show that you could do a straight arrow or you could even put a rotating arrow around the ball. When the circle gets into position here, perhaps it's going to self combust. This circle is going to split into other shapes. Let's draw a circle in again. We may want to just write rolls into frame. We're showing that the circle is rolling into frame. Then we might want to say self combust. Our circle is going to self combust. When that happens, it's going to become all these other shapes. We can draw all these little shapes here. All of these are going to be flowing outwards. This is basically the plan: our circle rows into frame, and then self combusts and breaks in to these other shapes. For those of you that are a little bit more ambitious, perhaps you want to start with a triangle, triangle here. You want to change this into a circle. But it's going to arc so it's going to come up like this, motion of travel. At this point here, it's going to become a circle. We can draw a circle. Then perhaps that circle will now arc again, and this will then become a square. Perhaps you want to show that more clearly by how the shape will travel on this line. It's morphing into a blob. This blob is going to travel across and then change into the next shape. This is essentially like a moving morph. We're going to change the shape twice, from a triangle, to a circle, to a square. This could be a way of illustrating that your shape is going to move dynamically while it's changing. There's no wrong or right way to do this, but I'd really like to see you draw something out on paper to visually explain what it is that you intend to do. There are so many ways to do this. It's a little bit like story boarding, but a lot simpler. For an even more complex idea, you might start with three circles on the screen, perhaps they are all a little bit, different sizes. These three circles are going to end up as a square, a triangle, and another circle. The journey, they're going to change from this to this. But in the middle, to get there, we can show what's going to happen. This is going to change. The shapes are going to move about the screen in a fun way. They're going to become drops. Then they're going to have a sausage shape. They just literally going to zip about, and then they will settle into this shape here. What you're essentially just illustrating is the beginning, the middle, and the end of what's going to happen. The whole point of this stage is to literally plan out what's going to happen. You want to know where you're going to start, how are you going to finish and ultimately how you're going to get there, so what's going to happen in the middle. In this example, our original circles are going to morph into sausages. They're going to zip about bow then they're going to change into these new shapes. In this example, our two shapes are going to move towards each other, and then in the middle, they're going to become a new shape. This drawing is showing the starting position, what's going to happen, they're going to move together, and then how it's going to end with the square in the middle. In this example, we're showing that we're starting with a triangle. That triangle is going to change. It's going to move on this arc, become a circle. That's going to change, move on an arc, become a square. If you wanted to make this even clearer, you could number 1, 2, 3 to just show that the order of which the shapes are going to change. Here we have another example where we have a circle, and that rolls into frame, and then it self combusts. Again, we're showing the beginning, this rolls in, the middle, there's a bit of anticipation, and then, wow, it just explodes into all these other shapes. That's the end. Yeah, there's no wrong or right way to do this. Whatever makes sense to you, just get something down on paper that's a little bit visual, put it in your class project, and this is going to be your plan for what you're aiming for. I bet you're itching to animate by now. Don't worry. The next six lessons are going to be showing loads of fun and creative ways to animate your shapes shifting. In the next example, I'm going to be showing you how to bounce and break your clay.
7. Bounce and Break: I have a few examples to show you in this lesson. To begin, I will walk you through an example where the animation could be improved on and I'll explain the reasons why the decisions that I made could have been better. Firstly, because all the examples in this class are filmed on a table top aerial view, you will need to imagine where your floor is. To do this in Dragonframe, you can use the drawing tools on the right-hand side of the animation window to draw a horizontal line. If you are not using Dragonframe and don't have this functionality, a simple hack is to just place a piece of paper in the frame to act as your floor and objects can fall onto and bounce off from that. In the first example I'm going to show you, I am animating a red square. I begin by bringing it in with my right hand and then I want to release it. The trick here is that as soon as your hand has let go, you want that shape to start dropping. Begin with a small movement and then start increasing the space between moves as it hurtles towards the floor. You will see that when the square reaches the floor, I have swapped it out for a squashed square, a rectangle. This is to show squash on impact. Squash and stretch are really helpful for enhancing a drop or a bounce in stop motion animation. You will notice though on this example, that I didn't use any stretched square shapes as it was falling. This is the first thing that could be improved on this example to make it feel more natural to the human eye. You can see here how this would look with another example side-by-side. There isn't anything too fancy going on here, and you only need simple shapes to make this work. You see on the slide on screen now all the different shapes that you would need if you were dropping a square. But let's go through a few more examples to show you how other shapes might look with this same principle applied. Adding these additional squashed and stretched shapes till drop or bounce can really help make your animation performance pop. What next? Well, this example is called bounce and break. So when my shape hits the floor, I wanted it to shatter into smaller versions of the same shape. Something to bear in mind composition wise is that often odd numbers look best in situations like this. You can see here that I have broken my shape into five fragments. Nothing in nature is perfect and if you tried to make things look too even it will look unnatural. You can also see that I varied the angle and height of these shapes too. In this first example, you can see that the pieces bounce up into the air. Now we apply another fundamental of motion here. We want to be varying the speed of movement. The fragments will move quickly to begin with, and then at their highest point in the air, the speed will slow down, giving the animation space to breathe at the top of the bounce before the pieces fall back down to earth. The most important thing here is to keep things moving in the same direction, but in really small amounts. Keep the direction of travel constant otherwise, again, the illusion will be broken. Now when the pieces come back down to earth, the distance between movements will begin increasing again. I'll show you how to better keep track of where you are moving things in the next example using screen guides. For now though, let's just focus on spacing. You can see on this slide how the spacing should be broken down to give an aesthetically pleasing movement. Of course, do practice and experiment for yourself with how many pictures that you feel gives the best bounce effect that you want. You can see that eye fragment things further too so when the medium-sized squares hit the floor, again, they break into the tiny squares. We will apply the same method for movement and spacing to them too, as well as this. When the tiny squares land, they finish their journey and settle on the floor. They don't just stop though. Their weight stabilizes over several frames. It might have a little jump or slide to one side, or even wobble on the spot. Don't have your shapes just stop. You want to ease into the final resting position to give that reality too. Top tip, you remember the tools I showed you for sculpting. Well sometimes these can be really useful for animating too. Fingers can be a little clumsy and if you have small shapes, you are wanting to move ever so slightly, then a tool can sometimes help you move things with more accuracy. Let's look at the square example again. But in this version I have added in the stretch as well as the squash on the initial drop. To help you understand better how the smaller shapes should travel, I'm also adding in some more guides to better show you what is going on. Another fundamental of animation is that things naturally tend to move in arcs. So when you're thinking about your path of travel, forget about straight lines and get more into the habit of smooth curves and bends. This is starting to look a little like a spider but hopefully you can see that each separate shape fragment has its own colored line path to follow. Top tip, if you are using Dragonframe, you can select the curved line tool to do this and you just want to make sure to double-click when you have dropped your last point to release the line. Otherwise the curve will just keep going. It can be really annoying. Now you can see more clearly the trajectory that the smaller shapes are moving on. Again, we're switching up the pace with the movement. Starting out fast as they move upwards, then slowing down at the top of the bounce and speeding up again for the dissent. The middle-sized shapes break again when they hit the floor just as before. Remember that things rarely stop instantaneously so make sure to ease into the resting position over a few frames. As if that wasn't enough, I'm now going to show you an example using a different shape. This time a circle. You'll notice it follows the exact same set of principles. We have our squash and stretch on the initial drop. The shape then breaks into two different shaped sized fragments, three medium-sized and two tiny. These fly up with pace, slow down at the highest point and then drop back down to our floor. It's also worth noting that there are slight height and timing differences. Try to make your shape fragments slightly offset from each other. If they all move in the exact same way with the exact same height and pace, this would all look less natural and less real. Again, I have added guides to show you the arc paths that I used. Play around with this idea. Play with the spacing of your shapes and learn from each example you create. Doing things on a table top is nice because it will take less time and if you have sculpted all the shapes, then you can just keep reusing them. It's a great way to learn and really hone your craft. Let's recap what we've learned in this lesson. Add in squash and stretch to your shape bounce, this will exaggerate the movement and make things look more correct to the human eye. Off-set landings so not all shapes land at exactly the same time. Make all of the shapes move on arced paths, we don't want straight lines here. Use different sized shapes to mix things up and keep things interesting. In the next example, we're going to be doing a Claymation spin cycle.
8. Spin Cycle: In this example, we have a shape at the center which spins and out flies other shapes. Now there are many ways to approach this idea and again, we want to think about how those fundamental principles apply and improve how the motion looks. I'm using my own hand again to begin the motion, but you could totally have your shape just start spinning on the spot by itself too. Remember to ease into the motion gradually increasing your movements until they reach a constant pace. Top tip, if you're using Dragonframe or have the ability to put markers, make sure to place a center marker to ensure that your shape always lines up with every picture so it spins on the spot and doesn't drift while spinning. When the other shapes fly out, you can wing it, you can add lib if you want, or you can put down guides. I'm going to show you both options. When the outside shapes appear, I suggest making them spin with the shape at the center. As you start to move them outwards around the central shape, they travel with the same momentum. Whichever direction the central shape is spinning, your outside shapes go in that direction too. The further outer shapes go, the bigger the spacings can get, so they will speed away from the central shape. Alternatively, you can add guides in Dragonframe. Let's see another example where I have drawn arked paths for the outer shapes to follow. Now there is no rule here, you can be playful with your path shapes. You can see them on spin and bend. Now you might even want to make your shapes rotate too, so as well as moving them along the path frame by frame, you can also rotate the shape on the spot as well, is absolutely up to you, I'm just giving you ideas here. You can also mix up your shapes, have as many or as few different ones involved as you want. There are so many possibilities and this idea is really simple to master. Let's recap what we've learned in this lesson, mark your mid-point or use onion skinning to line up that middle shape. Have more than one group of shapes fly out. Create curved paths for your shapes to follow as a guide if that's helpful. In the next example, we're going to be self combusting a clay shape.
9. Self Combust: This idea is one of my favorites and it's something that I've used before to explode a marshmallow. We're going to have a shape self-combust. You could use any shape at all. In my example, I've chosen a circle because it meant that I could roll it into frame first. But if you had a shape that couldn't roll, you could instead slide it in or just have it already there in the scene and maybe wiggle it on the spot before the explosion occurs. Remember the rule of easing in and easing out, if it's going to slide or roll, you want it to ease into that stop, then give it a moment. Another rule of great animation is anticipation. So leave it to sit for a moment before the action starts. Now we want to self-combust the circle. My method is to place the smaller shapes around the circle first. These are the shape fragments that the circle will explode into. Then I will take the big circle out, and move all these smaller shapes inwards to be closer in position to where that bigger circle was before. We are using the same principles as with the bounce and break example here. All these shaped fragments are going to move upwards with a little bit of speed, stay in the air around the highest point for a few more frames, and then head back down to the floor. Remember to stagger their heights in the air and make sure that they don't all move in exactly the same way for things to feel more natural, and also when they land, that they don't just suddenly stop. Instead, you want to ease them into their final position. You can even have them look into each other on the floor if they land close together. Top tip. Don't forget those handy sculpting tools for making smooth movements a little easier. They will give you so much more accuracy and control than your fingers when working out the scale. Just to recap what we've learned in this lesson, give your shape space to breathe before the explosion, a moment of anticipation. Vary the height of the shapes and don't have them all land at the same time. Ease into your final positions over several frames. The next lesson is all about transformations. We're going to be transforming your clay from one shape to another.
10. Transformation: This example is similar to another clause I made here on Skillshare. When two objects become one, where I made different objects collide into each other to become new objects. It's a nice, easy idea again here. So you want to begin by sliding your two shapes towards each other. Ease out of your starting position to get your shapes accelerating naturally. You can put marks down in Dragonframe if this would be helpful, or you can just do this by eye and by flicking between the current picture and the picture before. When the two shapes meet in the middle, they will become a new shape. This could happen instantly or you could have an in-between in the two. Top tip. Think about the colors and the shapes that you use. Maybe play with color theory. So if you had a blue and a yellow shape combined, the new shape might be green, for example. Now you could even have the shape meet and then the impact could explode them into other shapes; a little like the effect we created in the previous lesson with the self combust. Remember to move the smaller shapes using all the principles that you've learned so far. To recap, these are using arcs instead of straight paths, easing in and out of the movement, and having a gradual settling into the final position when it lands. For this particular animation as well, remember to accelerate the shapes towards each other by increasing the space they move in each picture. If you want to do a smooth morph, don't worry that lesson is coming up next. So keep watching.
11. Smooth Morph: This lesson might be more classically what you think of with claymation. When the clay changes form over a sequence of frames in a fluid motion. This is all about subtlety, and again, if you're switching shapes and colors, you may also want to think about where the color of the clay might transition smoothly to. Top tip, if you want to do this, just mix some in-between colors before you start animating. In this example, I have mixed a bit of yellow and green clay to create a lighter green color, and I've also mixed a bit of green and blue to get this turquoise. Pre-mix some in-between colors to speed up the animation process. You want to make really small and subtle changes consistently over a series of pictures to create a good result here, and you can ease into this too like we've discussed before. The changes could start really tiny and get a little bit bigger and then get smaller again. When you're morphing in this way, don't feel afraid to fully take the shape out of the frame to re-sculpt it and then place it back in. If you flip between the current picture and the picture before, then you can line things back up quite quickly, or you can even use the onion skinning tool, which I'll demonstrate in the next lesson. To recap, pre-mix in-between colors if you are changing shape and color. Keep changes small each frame to get a smooth transition, and don't be afraid to take your shape out of frame to re-sculpt it, and place it back in for the next picture. In the final example coming up next, we're going to be doing some moving morphs. These are the most complex type of shape-shifting that I'm going to be showing you today. We're going to be applying everything that we've learned so far into a more complex shape-shifting scenario. It's going to be a lot of fun.
12. Moving Morph: Right this lesson is going to combine everything into one compound example, the moving morph. In Example 1, we're going to have some structure. We'll start with the shape and it will blob across the screen, changing shape every time it lands. Obviously, we will be making use of those classic arcs. If you're in Dragonframe, you can draw them out as a guide. Create one, and then click "Off", select the mouse and right-click on the "Curve". You can now copy and paste a few more times and all your arcs will be the same. For this example, consistency is good. But you could also have the arcs lose height over time if you wanted to. In my example, I am starting with a circle. I will be observing both the color and the shape changing throughout the animation again. Top tip, remember to premix your in-between clay colors to speed up the animation process. To create this moving morph effect, we are gradually going to change the shape and form of our clay into more of a teardrop shape that follows the path of the arc. Just before the shape leaves its position on the floor, we want to even the weight out a little, essentially changing it from a teardrop to a little bit more of a sausage. Then this sausage will squash back into a teardrop that follows the arc path over the next few frames. When the drop is just about to touch the floor at the bottom of the first arc, we want to shift the weight again, squashing that teardrop to become shorter and fatter. Now because I am also changing the color to move into the next shape, I'm now switching out the clay blob for a premixed turquoise color before it becomes the next shape. At this point, I am shifting the weight further to the base of the blob and the next shape will be a triangle. You can see that we are making a rough unrefined triangle shape here first. Now pause for a moment before moving on again. I suggest holding for about eight frames or so. That's if you're animating at 12 frames per second like me. You can just take eight pictures, or in Dragonframe you can right-click on a "Frame" in the timeline and click "Hold", and then input the number of frames that you want to hold for. If you are doing things this way, make sure to conform your take before exporting to ensure that your sequence retains the hold. Now we're going to come out of the triangle in the exact same way. We're going to stretch that triangle up into a teardrop over a few frames, keeping a little more of the weight at the back, and then move that teardrop along the arc. As it drops back down on the other side of the arc, we want to shift that weight forward again until we arrive at a blob. My next shape is going to be a red square. I've mixed a brownish color for the blob to create a color in-between. Then finally, I'm going to place in that perfect red square. Feel free to change your shape as many times as you want. It can literally keep blobbing all day long. I also have a second moving morph example that is slightly less structured in style. This is for those of you looking for a challenge, and that are perhaps a little more confident in how these principles that we have discussed work, and can be applied to the clay. Remember with this one as well, the odd numbers often look best. I've gone with three colored circles, but feel free to add in more if you're feeling like you can manage it. We are going to shift these shapes in a really dynamic way. Also for this example, you will see that I am making use of the ghost layer, the onion skin, where you see the previous frame on a drop to opacity. All stop motion softwares should have this function. In Dragonframe, you simply slide the red dot at the bottom to the right-hand side to activate this feature. You can always slide it back again if you find it to be annoying. Why am I using this now? Well, in this example, I'm free styling. I am not drawing any glides on the screen. To keep track of where things are and line the clay up in the next picture, I find it useful to see the frame before on screen. For this particular example, a lot of re-sculpting is required. The easiest way to achieve that is to take the shape out and re-sculpt it before placing it back in. Onion skinning is a great way of knowing where to put it back more accurately, it will save you a lot of time. We're going to be making the teardrop shape again to begin the movement, starting with the weight at the back. After this picture, we'll shift that weight forward, essentially like turning the teardrop around 180 degrees. The momentum of this movement will then stretch the teardrop. Because of the force, we're also going to create a little color trail. The last part of the teardrop, the little tip at the back is going to break off and get left behind. This can be a really great way to show speed of movement, and it almost feels like a motion blur. The blob behind will keep moving forward each frame whilst gradually reducing in size until it has completely disappeared. It will follow the path of the teardrop in front of this just ripped away from. We're essentially easing the baby droplets out by doing this. As my teardrops continue to move forward, they are stretching out further and becoming more sausage like. You'll notice that they are also all following curved paths. To make things feel more impressive, you can even layer things up and have the colored sausages overlap each other. You can use little pieces of clay underneath to hold the ends up, so that they sit neatly on top. To end this animation with these wisps of color, all sausages are going to re-form into new shapes. We want to start reducing the space between forward movements to ease into their final position. We're also going to begin squashing the sausages and shortening them, slowly easing them into becoming the new shapes that we want over a few frames. We will then swap out our blobs over our more accurately sculpted new shapes. Top tip, as discussed in earlier lessons, try not to make all the shapes change at the same time. Offset the move by a frame or two to make the action look more balanced and natural. To finish off this animation, we want to keep those shapes moving ever so slightly for a few more frames, so that they settle into their final position instead of just abruptly stopping, which we always want to avoid. That's it, all shapes are successfully shifted. Now let me wrap up the key things to remember. Things don't often stop suddenly, always ease into a final position. Make movements travel on arcs rather than straight lines. Mix in-between colors if you are shifting colors as well as shapes. Play with speed, make your movement move fast, then slow, and then fast again, for swooshes and bounces and anything really to make it look more dynamic. Ultimately, just be playful. Try to do something a little unexpected and really play with the more complex sequence ideas as well.
13. Outroduction: Thank you so much for taking my class today. I hope you learned something. I hope you now feel more confident in your animation abilities and are able to apply everything that I have taught to your animation work. Please do start a project. I'd love to see what you're doing. Take pictures, tell me what color you're going to use, show me what tools you found around your house. I want to see a comprehensive plan of action to what you're going to create and then of course, post your finished animation as well. I can give you feedback. I can help you out if things still aren't quite right or you feel like you've got an issue with something. Start a discussion, ask me a question, or just ask for my opinion and I'll give you an honest answer. If you like the way that I teach here on Skillshare, you can also follow me to be notified of other classes that I make. I know I haven't been the most consistent recently, but I do plan to make more, and if you have any ideas for what to make then let me know that too. I also put out loads of videos on YouTube which are completely free for you to consume. You can follow me over there, subscribe, and you get access to so much more. I have made over 100 videos. There's loads of stuff that you can absorb and learn from there too. You can find me on pretty much any platform, @animatortor or @tortorsmith, so make sure to follow me, tag me, and share your work. I'm always open to ideas. Let me know what it is that you need help with and I will do my best to help you out. Don't forget to also leave a review if you want to help other students know if this is a good class to take. Be honest. I learn from it. I read all the reviews, and I try and filter all feedback into new classes that I make. Thank you very much for watching. I hope you're having a fantastic day and I'll catch you again in the next class.
 Tortor Smith, Animator, Director, Artist