Transcripts
1. Introduction: lip sync. It's so important when it's done well, you don't even notice that it's happening. But when it's done badly, it can ruin your film. In this class, I'm gonna show you how to make mouth shapes as well as how to import mouth sets into dragon frame software so you can plan out your lip sync before you even start animating your project. We're gonna go through how to track read, breaking down your dialogue frenetically and all of the other tools that are available to you within the dragon frame interface. Good Lip Sync is an art form all on its own. If you ever have the pleasure of working on a big stop motion production or a feature film , there's usually one or two designated people to the lip Sync alone. They literally sit there all day doing track, reads, listening to the audio and putting in the correct mouth shapes on assumes that is signed off by a director. Then the animator can get on with the animation
2. Working Out Mouth Shapes: when you've never done lip sync before, Working out mouth shapes can feel a little scary. It's quite an unknown thing, but it isn't as hard as you might believe. One of the easiest ways to learn how to do mouth shapes is to simply observe and look at your own mouth. We all speak slightly differently. Andi. Well, you have a mouth. Watch it. Look in the mirror. Actually, we're talking film yourself, really analyze when your mouth opens when it closes, what shapes its making and use that as a reference and as a guide to help you. If you've got a line of dialogue that you voiced yourself, record yourself voicing it. Watch how your mouth moves. I find that really helpful. A lot of animation and how to get better is simply observation. So observe yourself, observed other people, learn how to lip read, and it will help you get better at lip sinking. If you have a kind of person that likes learning from books, I'm gonna put links to a few books, which I find have helped me learn mixing better. When I was studying back at University, I purchased these books and they all have several pages on lip sync alone, as well as massive amounts of information on everything else you could ever think off relating to animation on performance.
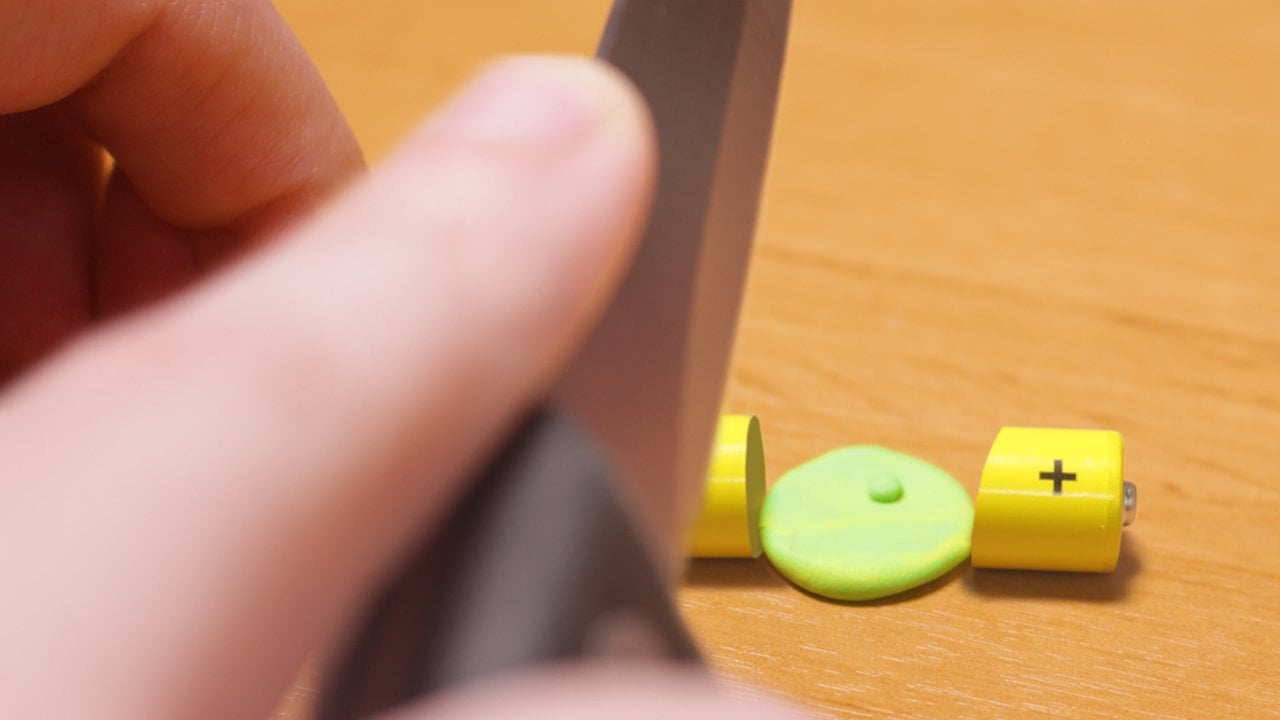
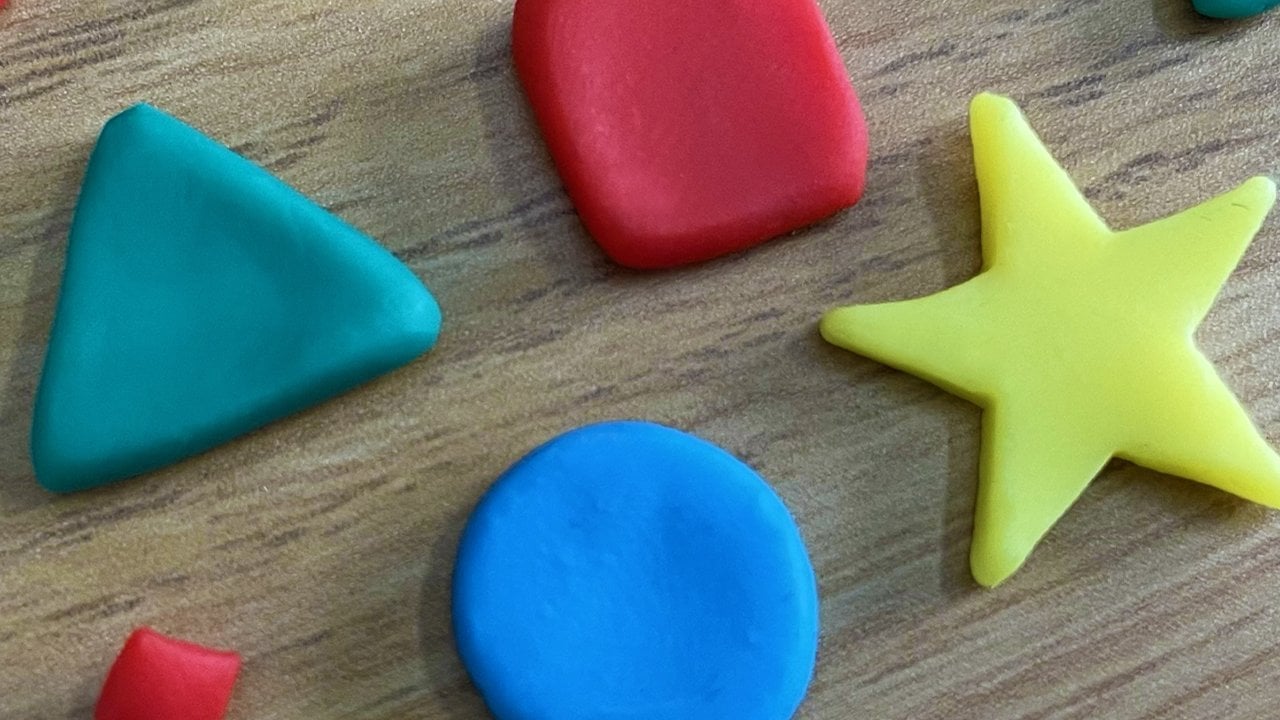
3. Making Your Mouth Set: you can create a mouth, set out anything, you could handle them. You could make them out of card. You could sculpt them out of clay. You could even make them out fabric, whatever you choose to make him out. So out off is completely okay. Like there is no wrong or right way. I started by drawing out all of the mouth shapes. You may choose to use screenshots off reference footage that you shot of you making Mash it in the mirror or you may choose to draw them out like me. My final aim is to create these out of clay. I want to do a claymation set off mouths now. You could use anything. You could make yours out of felt fabric. You could hand draw them. You could make them out of wool Needle. Felt them. You know, anything is possible. I drew them out like this as a reference for my sculpts. So I knew what I wanted each sculpted mouth to look like. I felt like this was the best process. And this might help you to. Then why did is I looked at these shapes and I started off with making those backing shapes out of just black clay. And I'm using fine mo oven clay here. So this is gonna go hard when you bake it. I'll put links to where you can get that in the description box. So after making the black backs, I went and made teeth. Now to make the teeth I used obviously white clay. And my method for making teeth was to simply roll a very long, thin white sausage. So I knew that all my teeth were gonna be roughly the same size. And then I would just cuts off little tiny pieces for each tooth. And then I would kind of squeeze them and mold them a bit between my fingers to adjust their shape and size and make sure they had nice, smooth edges. And then I just kind of pushed them together to make small sets of teeth for all of the mouth shapes that required them. The next thing I did was I made tongues, so I got some pink play. This was a different brand, but you know, any oven bake clay works, and then I started putting my mouth together. Sometimes the tongue is behind the teeth. Sometimes in front, so make sure that you layer up your colors correctly on the final part. Two knee and it all up is the lips, and I just again made a really long sausage for this. And then I just kind of put it around the edge, pushing it down, making sure it's very neat. You can see they look quite effective. And because these are going to be cooked in the oven, they're going to be hard, which means you can handle them as much as you want. You're gonna have to be constantly putting them on in your character, taking them off and then never going to do for mawr get dirty or broken or anything because they are permanent.
4. Lip Sync In Dragonframe: you can do a lot to help yourself with lip sync in Dragon Friend. There's an entire interface within the software, which I'm now going to show you where you can do all of your preparation so that when you come to animate is absolutely perfect. So the first thing you want to do is go to the wave form icon at the top right hand corner on. This is going to open up the audio interface where you can do all sorts, of course stuff, and this is where you can import your own face set. You can use the generic face sets. They're in there and you could do, track reads. You can break down your dialogue into phonetics. It's incredible. So you're workspaces breaking down into a few sections of the top there. That's where you'll see your face set. Then in the middle is where you will have your wave form. So that's where you bring your audio in. At the bottom is where you'll see all of your different mouth shapes. So when you bring in a mouth or face set, you'll see them all there. It really easy Teoh use. I'm going to show you in other lessons specifically, how to do certain things you can see on the left hand side. You can open up the audio pain and to add audio in you simply open a foldaway. You've stored it, dragon drop in. It is easy is that And if you find that on the timeline, the end of your audio, your dialogue clips, it's Noel. There my method for getting around this. If you go back to the animation window with your dope sheet, you can click on the end frame and just extend that. Make the number bigger until all of your dialogue is within the audio editing interface. I just want to drag the little yellow endpoint so that that is at the end of your audio as well. And that will ensure that all of your audio is within the workspace similar to editing programs. Now we want to add in a character from the left hand side. This is where you can import face sets. If you've already done a track reading, you can import track reading. But for the purposes of this, do add character. Now, within the dragon frame software, there are a couple of generic character is already built in, which is really useful. And if you want practice doing lip sync, then this is a really cool way to do it. So if we open up the character one, you can see that all of those mouth shapes are dropped into the mouth shaped window at the bottom of the screen. On that, you can see that in the little gray boxes on each picture. Are the sounds for that mouth shapes That's really gonna help you when you aren't sure which mouth shape to use. There's also a second character in there, which I really love. Really cute one. It's a sock puppet on again. Similar idea. You have got all of the sounds for each mouth shape in a little gray book. Bottom right hand corner on each picture, which really helps you get a feel for which mouth is needed for each sound. There's also an I layer on this character, so if you wanted to, you could add blinks in there as well. So now you've got a little feel for where things are in the next lesson. I'm going to talk you fruit, even more features in a track read. So let's move on to that
5. Adding Blinks: So, actually, I can just show you with this character as well. You've also got the options toe Have eye blinks so you can make your character blink if you want. So if you want a blink, wherever the cursor is up here, you just click on blank. The blink full arrive. And then when you want to stop the blink, you click on this black square on and the bank will stop. So if we play that back, we will have a little blink off the character. So that's how you do that? Um, I'm actually going to take those blinks out to do that. Just select the frames with the eyes on. You can select more than one by holding down shift and then just literally hit the back space and they will remove out.
6. Track Reading: you can go straight in there with your images on and put the different pictures in. Or if you prefer, you can type in the words. So if we listen back to the dialogue, I feel so good to be talking right now we can type that sentence into the speech bubble road here. So if we click here, we can type. Ah, it feels so good to be talking right now. So you want to type that in and put space between each word and then hit return. And as you can see, it has spaced out so that each word is sitting on a different frame. Now, that's not where those words are. So we need to move these about and we can literally just pick up a word on drag it to the correct position. We can play back the audio to here where the word starts, So So, boy, you're so good. So we got feels here. So if we want to move, that feels to where it starts about there and then this is big. So we got so here. And we've got good here and then to to be to be and in talking be talk walking right here. It feels so good to be talking right now. And then now there. And then if we put the Ah, you're so good. Be talking. I feel so good. So we've put all of those words in the correct positions for our sentence. Andi, if you want to add even more information, you can go to the next row here, which is where you can type the genetics off the words so you can type the sounds that that word makes when you say so Are is straight board. That is as it is. So it's just all it again it toe it. So you might want to break that down into on it and then a to now to change and right in the phonetics you want to double click on the square and then you contrite in, um, for fields who got so foot e le so we can put in if and then we can put e He said so good. It was so good to be so well. So in the musical. Oh, good, good, good. Good to be Go, go. Okay. Good. Who put d B now? It's up to you whether you want to go in and do the fanatics like this. Some people may find it helpful What Some people may not. To be honest, I don't particularly find this helpful. I would prefer to write the words where the words start and then just make the mouth shapes with my own mouth, perhaps looking in a mirror or filming myself. Andi, using that as a guide as to where a mouth shape needs to change. But this is just to show you how you can do that. You can add your phonetics in there, there, and then when we go back to the capture window, you can see we have got our dope sheet. Here we have got column for audio. Now we can also add extra columns. So we have got the dialogue on that will add in the words where the words begin. We can also add in the phonetics, and that will add in those sounds that I was just typing. If you would like that, if you decide, actually you have too much going on, and perhaps you don't want the fanatics on your dope sheet or any of the other columns you can do control, click on a Mac or right click on a PC, and then just remove column and it would just disappear. So now we've just got the actual words and the dialogue wave form on. Obviously, we can also add in character mouth, which here would have the pictures when we have put them in, which I'm just going to do so. We'll go back to the waveform here into the audio panel on. Now we're going to start choosing the correct mouth shapes for the sounds that we have in our dialogue. I feel so good to be talking right now, So this is an aw sound. Oh, so there isn't our shape, so we can add that in there again. You just want to make sure your curses at the right place click on the shape on that wall, populate in so you can see it's changed from closed to open. All right, so the next shape is e e it. So we may find that for a ah, they e sound is the right mouth boy, you may find that that is a little bit too abrupt, and you actually want to put a different mouth shaped like an in between between the on the e. So for that we might want to put the other e. So there's this other one here, so I I feel I feel that kinda Goujon in between. Between the are on the e on then you you tough one t but the t there I do. I feel sick. Get the f So is F. You choose only what I just tried to do drag and drop. No, you just need to click on it bats and it will just go and populate in the correct place use So we'll get an E again. And then I think before you put an L and then and it's don't be afraid to look a little bit silly and actually speak the words with your mouth will look at your own mouth because that is, it can be really helpful off how to see how the mouth shapes change. Sometimes you have to just feel how your mouth is moving to know what shape it's making. So let's see how this is looking now. I feel so good. I feel so good. I feel so good. So we go our feel, so I feel so. It's looking quite good. So now we want to do the good Teoh feel so good. So actually, I think I might want to go back to the E and then straight in to good to be the who, and then we're going for A T and then a B show. I think we'll go straight in for a BB weren't doing in between there, see how that looks. And then we're going for a e again e there. So now we've got feel so good to be next. We'll see how that looks. I feel so good to be I feel so good to be talk now. It's no like That's not quite right. So I feel so good to be so hid. The oh goes on for too long, so good. I want to bring in that good forward a bit good to be last looking better. So if you want to change the position, you can see where the mouth shape changes. Thes frames are highlighted in this turquoise color. You can literally hold down on a frame and drag it, so if you want to move it a frame forward so it starts to be earlier. You could just drag it across a bit on, move the position quite easily. You might want to also change where a word begins if you've added in text on and also the frenetic placement just so that you don't get confused. And this is all trial and error. The more you do this, the more accurate you're going to get. Andi, it's also down to the individual. Some people will put a completely different mouth shape to you, and that's OK, as long as you feel like it works. And it looks right. So we are. We're over halfway on this, so I'm just going to quickly finish off doing this track. You Do you? No, I think that's all right. But we confined to Nestle. Been. I feel so good to be talking right now, so I'm just thinking about in betweens. So we had this shape here, and then we were going straight to this shape, and I felt like the mouth would close more before it comes out like that. So it might be good to have this in between. And I think that that does improved afloat you so good to be walking right now. You could literally player play around with this for as long as you want. On Bia's picky and precise as you want this to toil is more to show you how things work and where things are one thing I will say. I begin a mistake that a lot of people do is people tend to use too many mouths shades, more mouth shapes than unnecessary to convey what is being said, so really be critical over your mouth. Shape choices on def. You're like you don't want to be changing the mouth shape every frame, especially if you're doing it at 24 frames per second. Your mouth shape is going to be held there for 23 sometimes even four frames before it changes on. Also, if you weren't sure, I am doing this at 24 frames per second, keep practicing. Record yourself talking, say a few different lines. Bring in and try and do the track. Read and see if you like. How the mouth moves doesn't look right to you. Show it to a friend. Show it to someone from your family. See if they think it looks right and really practice before you even perhaps stop putting mouths on your pop it because if you get your lip sync perfect, if you really nail it, your animations are gonna be fantastic. And people are really going to be like blown away, because so many people do lip sync badly seriously. Even movies. I've seen movies where animation, their lip sync is terrible. These like feature films in the cinema. But when lip sync, when you take that little bit greater care and you really think about your mouth shapes, it can completely bring your work up a level. So do practice. The great thing about dragon frame is you have these preset mountain. Don't even have to make your own. You can just bring in a bit of dialogue playing around like this on DA. It's just a bit fun, literally. I just want to reiterate that there is no wrong or right way to do lip sync. Obviously, there are guides. There were certain shapes that your mouth does make when you say certain words. But as for how often you change your mouth, what parts of a word you want to announce? She ate with the mouth shape that is purely down to you and your specific preference. Everybody's going to do it differently. Everybody's gonna put mouth shapes in a slightly different place. There's no where you feel like it works on. It reads well to you. Then that's what matters. Don't get caught up in all. It has to be an E here, and it has to be a new there, you know, Just go with your gut instinct. What looks right to you, Andi? Try not to overthink it. Less is often more. Don't put a mouth shape for every frame. It will be far too much, and it will just be a little what it will look insanely crazy. Pace yourself. Don't put a mouth shape for every sound. Play around. Experiment practice and before you know it, you will get to grips with how to do this, and you're probably surprise yourself at how easy it really is. There really aren't the secrets that you might have thought there were. Lip Sync is an art, but it's something that you can definitely master
7. Building A Mouth Set In Photoshop: So if you're used to using Photoshopped, this is going to be incredibly simple. What you want to do is a bring in all of your mouth shapes. Now, you could have done this by just taking photographs off them. I used Dragon frame, and I just had my camera mounted above and I took pictures. Aerial view. If you've made them out of paper, you can scan them into your computer that way. Now, when we're in a photo shop, the best file size for Dragon frame is 600 pixels by 600 pixels for your mouth set. So you want to create a new document with that dimension on. Then we're gonna pull all of our mouth shapes across onto their and create a layered file with all the different mouth shades. I have just called mine clay mouth set so you can split your screen by going to window and then choosing a two screen layout. And then that means that you can just drag across each mouth shape. So I'm just dragging across that I'm closing that image dragging next one across and so on until all of my mouth in my 600 pixel by 600 pixel square. Once they're all in the same document, I'm gonna close my other window. So I've just got the one window open on. Now it's a case off, cleaning up the images a little bit on making sure that they're all lined up within the frame. So to make sure that they're all lined up, I'm starting with the generic closed mouth. Andi, I'm just positioning that as centrally as I can in the frame on making it a good size in relation to the parameters of the 600 by 600 pixels that looks about right. And now, to ensure that all of my mouths are in the correct positions, I'm using the guide tools. So what you wanna do is at the top of that the side. Make sure your rumors are showing in your photo shop workspace, and then you simply click on the ruler and dragged down and you'll get your guides. So I've put some horizontal and vertical guides there to make sure that my top lip is lined up in each frame. Andi, that the mouth is centrally in the frame as well. I'm just using the arrow keys on the keyboard to nudge each mouth up or down wherever it needs to go to line up. And then I'm just going in there with the clone tool to needing up a few of the details. There are a few imperfections on from off the mouse, and I'm a bit of a neat freak, so I'm just correcting that on making them all look really neat and pretty. You don't have to do this step. This is literally just for reference. Anyway. You actual mouths are really physical things, so this isn't going to affect them. I'm just a bit weird. So now that all of the Mauser in the document and they're all cleaned up and I'm happy with them, I now need to name them correctly. So the format that you need to name each mouth with so that dragon frame recognizes it and formats in the correct away. You want to put the name of the mouth, so I'm going with mouth one Mattoo etcetera on. Then if you put a dot and then the sounds of the mouth when you import that in two dragon frame, it will show the sounds separately to the file name. So there'll be a little gray box on the mouth shape, just like the generic sock puppet that's already default within dragon frame. This means that your custom mouse can also have this sounds written on. So you want to do like mouth for DOT and then the sounds or mouth six dot and then the sounds. And then just put a space between each letter. If the sound. If that mouth represents motor pool sounds now as well as doing mouths, you could expand this into a face set so it doesn't have to be limited to just mouths. You could add eyes, ears, nose in there as well. You just want to make sure that each different facial feature is within a different folder , so you would put all of these mouths into a folder called Mouth. Then, if you had eyes as well, you would make a separate folder called Eyes and put all of your eye layers in there. And then that means that dragon frame will be able to understand your file structure. Hopefully, that made sense. Now I'm going to show you how to use your own mouth set that you just made in photo shop in the Dragon frame software
8. Using Your Own Mouth Set In Dragonframe: So what do we do? We go up to the wave form here in top. Right then we go to the drop down on the left hand side and we want to import our face set so we get import face set. Mine's called Clay Face. It's would click on their import face it and it says, Loaded face set into dragon frame said, Now we want to put our audio in. So I've got this new line of dialogue. Bring that in on. I'm gonna go back to the capture window on to the end frame on the dope sheet, and I'm gonna just quickly change that to 100 on, then back on the way form. And now we've got that whole line of dialogue here. Nothing has been clipped off the end and then back to the left hand drop down window. We're going to now add a character and character, and it's going to go to the default dragon frame mouth set. Now, to change this, you simply click on the image and you get the options off the other default character, Dr Suck, and also any face sets that you have put in yourself so I have put in my clay Face it, as you can see, because we saved our images in photo shop with the file name dot On then the sounds in the little grey box Here you have got the sounds for each mouth. I put in a swell, which is really useful because sometimes when working quickly, it's just a nice prompt to help you choose the right mouth shape for the right sound. So as we did before with the generic mouth shapes, I'm going to use the's rose up here. So we've got the dialog box. So this enabled us to type in text so that it lines up with away form and oh, wow, I never knew my mouth could So if we have Oh, wow, I never knew my mouth could move like this. So we've got Oh, wow. I never knew my mouth could move like this. You want to double click in the books and write each word with a space between We're gonna go. Oh, wow. I never I knew my mouth could move like these men hit return, and it will space them out so that they each jumped to a new frame, so we just need to place these in the right places next to our wave form the best. So this is here. Apply that we go like that. It's good. Could I never knew I never new when you my mouth could move my melts when you my mouth could Oh, wow. Oh wow. So now we've got all of our words lined up there on the dialogue crack. If you want to put the fanatics in that line below exactly same thing, double click on the box and you can start typing in the phonetic sounds for the words. Now if we go back to the capture window way, but you don't shoot, you'll see you have the audio waveform here. If you also would like to have your dialog, click this plus on the dope sheet and you've got all the options here so we can add dialogue. Onda. Then the words appear next to the way former as well, which can be really helpful. But let's go back to the audio window. So now we obviously want to put our mouth shapes into the timeline. We're going to start with a mouth at rest, so to do this. Get the curse in the right position where you want this mouth shape to go and you simply choose the mouth shape and take on it. And it will populate every single frame. But on that point on, so it is only gonna change when we move forward. So the first thing we're saying is Oh, wow. So Oh! Oh, wow. Oh, wow. So it's gonna be a oh, and then we're going to go a little bit smaller and then Wow, so we're going to come out wide quite quickly and then go back down to that small Oh, for the end of the WC. Let's see how that looks. Oh, wow. Yes. Wow, Perfect. That's a little about a bit. Oh, wow. Oh, wow. Wow. Okay, so Oh, wow. I never move things about Wow, I nip. Oh, wow, I No, I know. No. Oh, wow. I never knew Oh , wow. I never knew my mouth could move like that. Oh, wow. I never knew my mouth could move like this. Now, if you're not quite happy, perhaps a sound start to be earlier than you originally thought. To move these frames around, you simply want to click on and drag. Oh, wow. I never knew my mouth could move like this. That's that's kind of good enough, I think for what I'm doing here, just for the purposes of showing you you can literally play around as much as you want on. You know, there are people in the industry at that are specifically lip sync people. When I worked on Frankenweenie, there was one man who was doing the lip sync and the mouth shapes for the entire film. So if you're really into this kind of thing, there are jobs out there specifically for this. But as somebody who is just trying to show you how this works, I think this is good enough. But yeah, you can play around really for hours and hours and hours, but yeah, this is basically this is a guide for you when you're animating, so you know which mouth shapes to change and move for each frame. And it's also really good for you to test your mouth shapes out because perhaps they know animate as well as you would have liked, for example, this shape here this smaller Oh, I think perhaps I could have made that almost like a closed mouth like a closed over could have made it even tighter. So if I was to make my mouth shapes again, I might just tweak things a little bit. And you might find the same with yours. But yet, for now, this is why I've got Oh, wow. I never knew my mouth could move like this.
9. Adding A Second Character: so the audio workspace in Dragon frame also allows you to add more than one character, which is really helpful. If you've got a scene, perhaps with multiple characters who are having a conversation together, I'm gonna show you now how to add multiple characters to your seen. It's really, really simple, a really cool thing. If you want to break your audio up as well, you have got a spice tool within the audio works based similar to editing programs. You can use this to cut an audio track and to split it and rearrange it. Perhaps you want more of a pause between two characters speaking, or you want to move some dialogue closer together. Now, adding, a character's really simple. You go to that left hand drop down window and add character. You can then click on the icon to choose what character, Whether you've put your own mouth sir in or you're using a generic dragon frame. I'm going to stick with the sock puppet for this one. Andi, I'm just gonna be doing the mouth. I'm gonna ignore the eyes, Aunt. To add a second character, you just go to the left hand side again. add character and you'll get a character to You can rename these if you want. If you're characters had specific names, you could call them names as well. But I'm just keeping them character one and character to for the purposes of this video, another really cool thing you can do where you have the characters right at the top top right hand corner. You can flip it so you can turn the way that the characters facing some sort of facing the right it can face and left on. This is really cool because it almost looks as if they're looking each other and they're having a conversation. So I flipped mine the other way. Yes, basically that simple. You just add multiple characters using the ad character tool. So let's see what our sock puppets had to say. Yo, aren't you a little close? Ever heard of personal space? Sorry, pal. The software won't allow me. I just keep picking right back like a magnet
10. Organising / Storing Your Mouths: keeping your mouths that organized is pretty essential. Boxes like this are cheap and easy to get hold of. I'll put some links toe way you confined when yourself. If you're not too sure, put one mouth in each compartment, and as well as doing this, it is good to label them to make sure you keep them in the same order. I've named mine mouth one mouth to mouth free are four etcetera. On. This is the same file structure that I used when I created my mouth set in photo shop on important them into dragon frame. So everything lines up when you see mouth shape three. In your dope sheet, it will be mouth shape. Three In your box makes things a lot easier. Trust me, it will save you a ton of time if you do this, so try and find something to store your mouth in. If you don't have a compartmentalized box like the one I have, try not to worry. You can always make your own Back. When I worked on Frankenweenie in 2011 they used in old VHS like a cassette tape video box on. They put in cardboard compartments so they cut strips of cardboard on. They crisscrossed them to make little spaces, and that's how they stored the mouse. It was really easy. Cheap, efficient. A lot of people, probably you at home as well somewhere have got some old VHS cassette tapes. If it's something that you're not keen on, perhaps you would have got rid off. Just take the cassette out of the box, used the box. It's got a lid, put some cardboard in, compartmentalize it and stole your mouth that way instead.
11. Animating With The Dope Sheet: animating. Using your dope sheet as reference is really quite simple. You've got your dough sheet here on the right hand side, and as you can see, I've got column for my wave form, and I've also got a column for my character mouths. Now, this is where store in your mouth really comes into play. So however you'd labeled your mouths in your photo shopped document this applies if you've made your own mouth set whatever you called them. You want to have a record off that in the way that you store your mouth as well so that it matches up. So mouth one on this dope sheet, which I labeled in photo shop, wants to be mouth one in my box of mouths so that I make sure that I pulled the right one out and stick it on. You can see as I'm taking frames going through the dope sheet, you can see where the mouth is going to come in. So at frame number eight, I'm going to be using mouth nine on. That's going to be on the puppet for two frames and then is going to change to mouth six and so on. it's really quite easy to follow. It means that you can put more of your energy, more of your thought, process into the performance of your puppet because you don't have to worry about the lip sync. You've already planned out, and you're going to know which mouth needs to go on at which frame. I just decided to go of a simple blob character for this animation. It is expressionless, other than the mouth. This character doesn't have eyes or anything. I'm just gonna do some subtle movements on the main focus here is just going to you on the mouth shapes on what I'm doing using the dope sheet, because that is what this class is all about. So we're going to put mouth shape nine on this frame, so I'm gonna choose that mouth. Andi, I am going to position it on my blob character. Now when you're using mouth like I am, they aren't replacement mouths that clip into place. I'm lining them up each frame a really good thing to do to help you get your mouth in the correct position. Each frame is to go to guide layers on your dope sheet on select the line tool. Use a nice bright color. Andi, just put line where the top of your mouth shape is on also through the center of your mouth and then either side. So you know that you're gonna get your mouth centrally and you're gonna get it to line up so that the top lip is in roughly the same place that's gonna make your mouths look consistent. Andi, more realistic. So if you're doing mouths in this way, definitely usual guidelines. This would apply if you'd made your mouths out of stickers or handled one paper, and we're replacing them that way as well, because I made my mouth shapes out of oven. Cook, Clay Aiken Handle them as much as I want, and they're not going to deform If you want to do claymation, I highly advise you to do oven baked clay mouth because it means that you can keep handling them on. Use them over and over again on multiple characters. Andi, they are just going to stay the same. And if they get a bit dirty and you want to clean them up, we can wash them. That's not going to damage them either, so It's a really great way of making your mouth shapes. Now, another really useful tool available to you in Dragon frame for your lip sync. If you go back to guide layers and you go to the track, reads lay a panel on the right hand side. You've got these options to see three images so the actual mouth shapes that you planned out in your screen. Or you can change this to just viewing one mouth shape. This is great if you haven't organized your mouths well, perhaps you haven't got a box to store them in, so instead you can bring this up. And it means that every single frame you can see which mouth you on, which is the one in the middle for that frame, which mouths coming up on the right hand side and then the previous mouth on the left. This can really save some time as well, especially if you're a visual person. Perhaps seeing a mouth to doesn't really make much sense to you, so seeing the actual picture on the screen as well will just help you be a little bit faster. Andi just gives you a bit of confidence that you have, in fact, picked up the right mouth shape. So go to the guide layers for that and trouble on the three image preview on dawn, the left hand side. You just want to make sure that enabled, because otherwise it might not be showing up. So if you click there, it will enable the preview and you get up on your screen as well. So yet that was how to animate with your dope sheet on your track. Read in triangle frame Really easy, really simple. Putting in that initial preparation and planning out your lip sync will save you a lot of time during the animation process on it will also make sure that your lip sync his perfect , which is ideal.
12. Project And Outroduction: thank you so much for taking my class today. If you like the way that I teach, don't forget to follow me here on skill share to be notified when new classes that I make come out on the platform. I also make content on YouTube, which is free to view. My link is on my page. It's youtube dot com slash animate auto on its all stop motion related content over there as well. Please do also give me feedback you can review This class helps other students know how much value there is on. It also helps me improve because I always want to make the best content that I can. And I do take all feedback on board. And I hope that that helps make future glasses more helpful. Onda more valuable to you as well. The project for this class is pretty simple. Just record or find a line of dialogue. Andi, bring it into dragon frame. Used the generic mouth in there, too. Try and do a track read. If you are feeling more ambitious, maybe make your own mouth set. Andi, import that into dragon frame on, then animated on your own character. I'd love to see anything that you create, no matter whether it's using the generic mouths or using your own mouths. Do drop links in the project window. Send me screen shots I want interact with you as much as I can, so please do share whatever you are creating.
 Tortor Smith, Animator, Director, Artist