Transcripts
1. Introduction: I'm total and I'm a stop-motion
animator based in London. Now, aside from animation, a really fundamental
part of stop motion film making is in the worlds
that you create, and more importantly, the
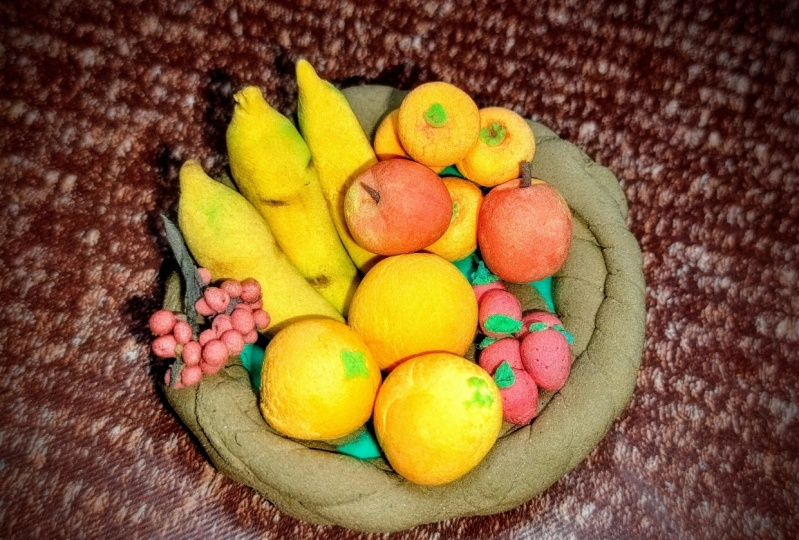
props that you put in them. So in this class, I'm gonna
be showing you how to make your own bowl of fruit. Will be making the bowl and
then the fruit as well. Almost any kind of fruit
that you can think of, I'll be showing you how I
would approach making that. And then you can populate
your little bowl of fruit. However you wish. Put whichever
fruit that you want to put in to your
idea, film or seen. The most important
thing is getting your scale right
and making all of those little props and things as real and believable as possible. The main things to focus
on are the colors, the textures, and the details, all of which I'll be
covering in this class. So if that sounds interesting, if you want to make a stop
motion film yourself, or just make some props for
a diorama Doll's House, whatever you wanna do. Then this is the class for you. Let's get started.
2. What You Will Need: When making managers,
it's really important to observe real life
objects for reference. So grab yourself some
fruit if you've got some handy or get some
reference pictures to help you along the way and make
sure that your miniature fruit or as realistic and
life-like as possible, I like to work straight onto my baking sheet and I put
a piece of parchment, grease proof paper on top. This means that my
sculpting doesn't stick to the table and it's ready to
go in the oven straight away. My favorite tools that I'll
be using in this class, or a pin or something like this. This is a double ended
tool from our teaser. I'll put a link so that
you can get some yourself, but you can get these
from most tool suppliers. And basically just this
sort of pointed pen is incredibly useful
and I'll be using this for various
techniques in this class. Another tool that you might
want to try and source is one like this where it's
got a little bull head. This one has got two
of different sizes and the small ones are particularly
useful for miniatures. So this is something that
I would recommend you consider him as a play. Some sort of translucent clay. It might be useful especially for doing
things like berries. There's this translucent
clay you can get by Senate. And there's also this
one is by scopy. You can see it says translucent. And you can see that I pick up Clay whenever I see it reduced. This was a really
heavy reduction. So I'm pretty pleased
with that bias. But any clay will
work for this class. Any oven baked clay. I'll also be using these das, smart clays, which
I really like. You can see it's
cracked but it's actually really soft
when you work with it. And it's really easy
to sculpt these. You can buy in packs where you get loads of
different colors in one pack. Means that, well, it's just a lot easier for
making miniatures, especially like fruit
and other things, because you've got
all the colors there. There are different
approaches that you can take with oven baked clay. You can add in soft
pastels to color things. We'll be doing a little bit of that in this class as well. You can also paint things
afterwards with acrylic paint. But if you can get things right with the
actual clay itself, that can be really helpful. And sometimes you don't
need to add anything else to it, as well
as all of this. You're definitely going to need a ruler because we're going
to be measuring things, trying to make sure
that we get on miniature scale correct for everything that we are creating. On top of that, you may find
something like this useful. I haven't used this yet, but I might use this in
this class to try it out. It's a clay guns. So you've got all these
different heads that you can add in and then you can literally
push clay through it. And it will easily and quickly get you some shapes
that you might need. Now I mainly bought this for plasticity because I do a lot of Pleistocene sculpting and that tends to be a softer
clay and I'm not sure how wellness is going to work
for oven baked clay, but it's something
to just be aware of. It's a tool that you might
want to get yourself. Maybe you don't want to
get clay gun like that. You can also get cutters that are meant for cake decorating. The most useful cutter shapes
are often the round ones. Sometimes the flower shapes. It depends what you're doing, but always look out for cheap sets of these
as well because they can really help with your
clay craftsmanship and make your life a lot easier. So that's essentially it. That's a good starting place
to make sure that you've got these sort of items ahead
of creating anything. I am going to talk about
the class project next. So stay tuned for that.
3. Class Project: The class project is
a pretty simple one. You'll be making a fruit bowl and populating it with fruit. Like I said in the introduction, any fruit that you want, you could fill it
full of grapes. You could have bananas, apples, and maybe an orange. You could put berries, raspberries, blackberries,
whatever you fancy is fine. Just documented process. Take a picture of your
finished fruit bowl and post it in the project window
because I would love to see it. It would be amazing just to
see your take on a fruit bowl filled of fruit and what
that looks like for you, every single bowl of fruit, I imagine it will be completely different and I
think that would be fascinating to see
altogether as projects. So don't forget to
document what you're doing and post me a picture. And I'll definitely
leave you a comment.
4. Baking: So now that all of your
polymer clay fruit is sculpted and you added any soft chalk powder
to them that you want. We are ready to bake. So you want to look at
all the different types of clay that you use and you want to use
the lowest settings, the packet with the
lowest temperature, to decide how long you going
to put them in the oven, because they're very, very tiny, you can actually get away with a lower temperature as well or putting them
in for less long. And here you can see
that out of the oven, they're baked and they're
perfect and ready for adding some acrylic paint to our next, I'll be showing you how to make a super easy fruit bowl
to hold all your fruit.
5. Fruit Bowl: Make fruit bowl.
We're going to use this wonderful material
called warbler. Lot of people use
this in cosplay. You can get it in
this brown color. You can get in clear
black and white. Now clears great, because you can make
something that looks like a glass bowl
to hold your fruit. And if e.g. is banana that I made,
you put that in there. It looks like it's a glass bowl. Can add in an apple. You see you can make a
cool fruit bowl like this. But you can also use this colored warbler to make something that looks
more like a woven fruit bowl. Or you can have black fruit bowl and you can paint this with acrylic paint to paint this in whatever colors
you want and make it look ceramic or wherever
look, you want. To do this. You need to use a heat tool
or less a heat gun. These are quite cheap and you use this to hit this material. This is really easy to make. A bowl. What you want is
something to mold around. So a bowl on temp scale is about two-and-a-half
centimeters, which is this. We could use
something like this. Again, that's about
two-and-a-half centimeters. So a couple of methods
for making a bowl. You could heat a piece
of days and you can bend it around here or you
could push it into here. So let's do an option
with each piece up. Bend it into this, and then heated
piece up over that. And you'll get an idea for
how you can make bold. There's a smooth side
and a textured side. I'm going to leave
the texture side on the outside of the bowl. So first of all, you
want to heat this up. Then when it's hot, you can see it goes
on so you can push it into this boot camp
will push this down, push in, and create
a bowl this way. So essentially we're using
this tape reel as a former. You can see there you've
got a nice bowl shape. Obviously we want this to sit. So you might want to just make sure that it's
got a flat base. So it's going to sit nicely. You can heat it up again. Push that down to make sure that it's got
a flat base so it's going to stay upright and
this will dry rock hard. So here I've just reheated the material to make us
all of lip to my bowl. I want the edge to
be curved under, so it feels like it's
got more of a rim. So I'm just like bending this softened warbler
around the edges and I'm going to push it back
into my roll of tape to try and get a nice shape
to the edge of the bowl. I want this to
look quite organic and I think this is gonna
give me that sort of effect. Like I said earlier,
you can also paint this material so
you don't have to leave it in this base color. You can also paint this to
make it look however you like. I just wanted to show you a
really easy method for making a bolt with a new material that I think is quite exciting. Now you can of
course, also just use polymer clay to make a
bowl that way as well. Hagen, say what not to do. I told you you could
move this over a plastic shot
glass and that was a really wrong decision. I'm quite new to this material and don't try and
pull me over plastic because this is
essentially plastic and plastic gets stuck to plastic. I think that the best
method is using a roll of tape and pushing it
in mind that because you can see here we go, lovely bowl, which sits nicely and we can
fill that with our fruit. We can arrange
some routine here. Another option if you
don't want to make your own fruit bowl
is to just use some that are made to buy for those houses and
for miniature sets. You can pick these
up really easily. Here's a few examples
of once I've got that, I've used to show a bit more diversity in how you might want to put your
fruit bowl together. Up. Next, I'll be showing you
how to make some bananas.
6. Bananas: To begin with, you
want to select some polymer clay
colors that you can mix together to achieve your
desired banana color. Now this banana that I'm
using as references, semi ripe and a little
bit of green there, little bit of brown
and of course yellow. So I'm mixing together
some yellow, brown, green and also a piece
of it's not white, it's off-white, almost
like a flesh color. And I'm mixing that
together to create something that's a little
bit more banana tree. I would advise never using a polymer clay colors
straight from the packet. Always try and add a bit
of something else in to just make it feel more natural. The colors out of the packet often are more unnatural colors. It depends what you're creating, but I would always mix colors myself in between mixing colors, always make sure to
wash your hands. A baby wipes are really
good and as you can see, the color comes straight off. Now grab yourself, your ruler, and we're going to start making a banana usual route
of a reference. Check my cheat sheet for the dimensions of how big
your banana needs to be, whether you're working on
attempt scale or 12 scale. And we're going to
scope to banana shape, that is of the
correct dimensions. So here you can see
I'm lining up with the ruler measuring and it
making sure it's right. Now I'm going to
refine the shape. You will see on a banana. It's got sort of almost
like sharp edges. It has a square
shape to the body. So there are these lines that go down the length of the
banana and I'm just using my finger to rub along the polymer clay just
to try and give it that look of a sort of more defined line
along the length. And now that I'm
happy with the shape, I'm really paying attention
to all the differences in color on the bananas
and the green at the end, the little brown marks. And a really great way to color polymer clay is
to use soft pastels. So here I've just got a regular sets of
pastels and I'm going to use a craft knife to just shave off some of that pastoral. So you get a little
bit of powder, put it onto a piece
of plain paper. And again, like with
the polymer clay, I suggest mixing colors to
create your custom colors. Here I have put two
greens together, and I'm going to do the same with the brown
color that I want. I'm going to mix
some brown and I'm also going to mix another brown. And these two are going to add some different
colors to my banana. Now the brown I've
got there might be a little bit too dark, so just to blend it in, I'm also adding a piece of yellow. Now to add the powder
to your polymer clay, just use a regular
smooth brush and then you just going to add it
to your polymer clay. Just literally paint it on as if you're painting a picture. You'll notice that the
color is very subtle. It takes quite a bit of
application to get a solid color, but this does bake on. So when you bake it in
the oven, these sticks, and I think it's one of the most natural ways of
coloring polymer clay, especially for things that are organic like fruit and veg, even if you're doing
like baked goods, just adding a little bit of
brown to make it look baked. Soft pastels. Perfect for this. So you can see I'm just
adding green to all of the areas where the
banana has a bit of green and then also mixing together at my brown
powder to just add a bit of detail where there's some
brown on the banana. And again, this will depend on how you want your
banana to look, how ripe it is, what
your reference pictures. I have to add any Postel at all. Later on I'll be showing
you how you can also use acrylic paint after it's
baked to add some color. Now also bananas, they're soft, they often have imperfections. So now I'm going back in with my craft knife and I'm just adding some little nicks,
some little dense. And these are going to make your banana look more realistic and to make
it look even more real. Often in the dense, There's
a bit of discoloration. So I'm going back
and getting myself brown powder and I'm just
working that into the cracks, getting it to sit in there and really make it look a
bit bruised and battered. Using the soft pastel is
a really subtle look. So this does look really natural even
on a minute to scale, I would always prefer using soft pastels
to acrylic paint. Often acrylic paint is too much, but I'll show you later on exactly what effects
you can get with the acrylic paint
and how it can be used to our advantage as well. So I'm pretty happy with how
this banana is looking now, as you can see, now,
they're all baked. And this is the one that I added some dense and
some powder to it. You can see it looks pretty
realistic for obeyed banana. Here's a second one that I made. And I like how they look. I also sculpted some
just plain to show you these different techniques
using acrylic paint. There's the spotting with the brown that occurs on
bananas and sometimes that can be really hard to achieve
in well using soft pastels. So instead, we're gonna be going straight in
with acrylic paint. You can use any acrylic
paint you want. And again, I advise
you to be using very smooth brushes because
this is very detailed work. So I'm just going to pop out the colors that I
think I'm going to need. And I'm going to show you what to do and also what not to do. So how acrylic paint
can be good for your sculpts and your
designs and how it can. So like with a lot
of things in life, I definitely say less is more and acrylic paint
on polymer clay. If you are just adding details, less is definitely more. So here are my
teeny tiny brushes. You can see they've got
quite small points. I've got the one I was
using for the soft pastels, and I've got one with a
finer point there as well. These brushes come
from our teaser. They were in a pack of like miniature detail brushes and
they're really, really good. So if you need to
get some yourself, I advise getting
them from there. And I will put a link in the description of this
class if that's helpful. So basically, the best way to use acrylic
paint is less, is more. So here you can see I have mixed a brown color
and I was just adding some little tiny
dots to the banana. You can see how it just adds that little
bit of extra detail. Now here's something
not to do with acrylic. I've just mixed a
light yellow color and I'm painting it all over my sculpt literally all over it. And you can see that you could tell that I've painted this. It looks just looks a bit off. I mean, you might
like that look, but for the detailed
and realistic look, I was going for this is
not the way to do it. Now you can put a
little bit more paint on your brush and get some really like opaque
spots on your banana. This is a look that
you might be after. Again, this was too much for me. I wanted something a
little bit more subtle. I'm really trying to go
for a more realistic look. But you can see, you can
just vary the brown color slightly and you can paint spots on your banana like this. All depends on what
look you're going for, how realistic you want it to be. Some really dark spots
can look alright, especially if you
blend that in with some perhaps soft
pastel coloring that you did before you
beg gyroscope as well. This is a banana that I didn't
add any soft pastel too. And you can see how these spots really stand out and
they look a bit harsh. These are all the different
bananas that I did. You've got the two
at the top where I colored them with soft pastel, the one on the right, I also added some subtle acrylic paint. Then below you've got
this one which I just painted and you can really
see that I did that. But again, that might be
a look you're going for. And then at the
bottom in the middle, you've got the hash
brown spots that I added on an acrylic paint. And finally, you've just got
a plane one to solid yellow. I didn't add anything to it. So anything goes wherever
you find works for you and wherever achieve your desired results
is the way to go. I've just showed you
some methods here, is how I would approach
creating my own bananas. Up. Next, I'll be showing you
how to make some apples.
7. Apples: So now we're going to
make an apple in manager. First of all, grab your
reference apple or a picture of an
apple and look at the pattern nation,
look at the colors. You'll notice that on the
sample that I'm using, there's a whole variety of colors in the skin of the apple. It really isn't just one color. There's speckling,
there's bleeding from yellow to red and all sorts
of shades in between. So I'm going to show you
how I would approach this and make my
own manage apple. I'm going to first
start by selecting all the different colors of polymer clay I want to be using. I'm going to pick up all
the different colors in the apple's skin. I've got red. I've got a sort of oak tree, orange, yellow, and green. And I'm just going to break off a little bit of each of these. I'm going to break off
less of the green, more of the orange, more of the red and a
little bit of yellow. And mix this all together. But I'm not going to mix
this together completely. I've decided that because the look at this apple is
very variegated in color, I'm going to leave this
as a sort of marbled, semi mixed piece of clay. This is another way of
getting a variegated color, and I think this works
really well for apples. I'm breaking off a small amount, roughly the amount I
need for an apple. And then I'm going to shape
this into an apple shape. Apples are pretty round, but they taper in at the
bottom and at the top. I'm just rolling this between my fingers to get a
rough apple shape. Apples tend to have
shoulders on the top. They are often a
little bit smaller on that base with a slightly
more rounded top. I'm going to use
this bull tool to create those shoulders where
the stem comes out as well. So to do that, I'm just going to push it in to the center of the apple top. And then I'm going to use
it to push down around that hole to create these
sort of slope inwards. This is very classic
of an apple shape. You just want to like
push the clay towards that inner part and
this is going to make those lovely shoulders
that the apples have. And then later on
we're going to insert a little polymer clay stem
into this hole for the base. I'm just going to
make a little indent for the stock at the bottom. Pretty easy. These tools are
great for doing miniatures. You can get them in all sorts
of different sizes as well. To make the stalk of the apple, I'm going to take
a little tiny bit of black polymer clay. And I'm going to mix
that with some of the orangey ocher clay to
create a sort of brown. But likely said before, I don't like using colors
straight from the packet. I prefer to mix my own. So I'm going to mix
a custom brown here. And to make the stalk
is pretty easy. I'm just going to take
a small piece of clay off and I'm going
to roll this on the surface of the table with my finger to create
a very thin sausage, and this will become
the stalk of the apple. Now in miniature, everything
is absolutely tiny, so you may make your stalk, I'm thinking it's
the right size, but realize that it actually
has to be even thinner. This is really delicate work, so take your time, be patient, and scissors are really helpful for
getting things neat. I've cut mine to an appropriate
length and I'm just going to put that in the apple
to see how it looks. You can see that it looks
about the right size, but it's definitely too
fat for this apple. I'm just going to take
that back out and roll it even thinner to make a stalk fits a little bit better proportioned for this
particular manage apple. Once I'm happy with
the new dimensions, I'm going to cut that short again and just pop it in place. Long as you've made a
good hole in the middle, it should be quite easy to attach this and
if it's too long, you can always cut
it short afterwards. Here you can see my lovely
variegated apple's skin, semi mixed polymer clay and
then the tiny little stalk. Another really important
thing is to get your ruler in and to just
check the size of your Apple, makes sure it is to scale with all your other fruit and check it against my cheat sheet to make sure that it's
correct for your scale. Now when you have got your app, who's baked, they're
out of the oven. You can add some extra
details with acrylic paint. Like I've said in
the previous lesson, less is more with
acrylic paint and you want to not have too
much on your brush. You want to subtly add color. And with things
that are organic, you want to use lots of different shades a bit
like how we mix the clay. There was lots of
different colors on the apple and build up layers of different colors to create a variegated
and natural look. So I started with a
pale yellow color. Now I'm going to mix this Reddy brown color
to add some more detail. I find it's best to add
the paint to the shoulder and the base of the apple
to get the best look. Because the variation
and the clay does look really nice
just on its own. So you don't want to
spoil all of that. Just very gradually
add your paint. And if you've ever
put too much on it, it's usually quite easy to wipe off as well with a
bit of damp cloth. Slowly work your way
around the apple, adding different colors and to get variation in
your apple skin. Here you can see I've
also added green. This is my finished result
and I think that it can really enhance an apple. If you like that sort of look. Feel free to add some acrylic, paint it to your own Apple. I'm gonna mute down
this green a little bit by adding back in some
yellow and red on top. But anything goes
wherever works and looks right for your specific
needs is absolutely perfect. You can always just leave
it as clay on his own or use the soft pastel technique and add some detail before
it's baked as well. Here we can see a
comparison of an apple. I've added acrylic paint 2.1 that I have
just kept playing. So you can see the
difference and hopefully get an idea of what
sort of look you want for your specific
miniature apple. Up next, I'll be showing you how to make a bunch of grapes.
8. Grapes (Red & White): Grapes all probably one of the more challenging fruit that you could try making miniature, purely because they are tiny. The berries have to be so small and then he will
try and connect them up. And it's going to take
a little bit of work, but it's not impossible
to make my grapes. I'm first mixing
and grape color. And to get this red grape color, I'm using a blue or
red and some brown. So I'm going to mix
this together and make a nice base color. Now that I have
that color mixed, I'm quite happy with
how that's looking. My trick for doing fruits like grapes is they have this
translucent quality. They're not opaque. So what you wanna
do is you want to, after cleaning your fingers, grab yourself some
translucent oven baked clay. It doesn't have to
be the same brand. I'm using a primo scopy and you want to break
off some of that. And you want to do about two-thirds translucent to one-third of the
mixed colored clay. Then you're going to
mix this together and create a more
translucent berry color. When I've mixed it up, I will
show you the difference. Now, wherever clay
you have left is really useful to store it in a box and label it so that you can make more of
that fruit in the future. I'm not mixing all of my color with translucent
clay at this point. So there's a little bit left, and I'm going to label up
this box, grapes, red grapes. And then I know exactly what that color is perfect
for when I find it again. Otherwise, all your little
scraps of clay can get lost and you don't really
make the best use of them. You wouldn't alike waste stuff. And I find this is a really
good way of saving clay. Anything related to
grapes can now go in this little pot and I
know exactly where it is. I'm just mixing this
translucent clay with the red grape color
that I have created. And now you can see it's
got more of a sheen to it. It looks a little
bit more shiny, a little bit less dense. If we get the
original clay color, you can see here how it differs. It's less shiny, but
the translucency really does add a quality that I think it looks more
realistic to a grape. To do make grapes, you
simply want to pull off the tiniest
little pieces and roll them in your
fingers to make smooth grape like pieces. Each little piece is one grape. They're not quite round. Well, some of them can be, but they're more like
cylindrical, were rounded ends. So you want to just rub
little pieces of clay between your fingers and make yourself a whole bunch of great loads, a little grapes on
your table or surface. And then I'm going to show
you how to connect these together and make
yourself a proper bunch. Have patience with yourself, visa tiny and it is
really challenging to do a tiny berries and things
like grapes in miniature, but it is possible and the
results can be stunning. Persevere. Once you have got a whole
load of grapes there, we're gonna make the vine that connects these grapes together, the stem in-between them. And to do this, we're going
to mix a custom color. Again, I'm going
to use some green. I'm also going to use
some brown and black. And I'm going to
mix this up to make my grapevine stem color. Now my method for connecting
the grapes together is to break off pieces
of the stem color. And we're going to roll it out, get it nice and thin. And I'm talking
really thin here. And when it's really thin, you can break small parts off and then start attaching
the grapes to it. And this is still too thick. We really need it.
Almost like your hair. It's well, not quite a hair, but this has to be really
thin to work for this scale. It can't be as wide
as the grapes. It's got to be
narrower than that. So you have to just keep
carefully rolling until you have got a piece that
is as thin as you can go. And when we're happy
with the diameter, we will start to break
little pieces of this off. You can either break it with your fingers or you can
cut it with scissors. You may find cutting
with scissors easier. Once we have a little
piece like this, we can start attaching
our grapes to it. So you want to pick up your first grape and just pop it near the
end of your stamp. It's gonna be a bit fiddly. And excuse the focus here. But you just want to
stick it on the end. And that's your first grape
for your bunch of grapes. And then we're going
to take more pieces of stem and we're going
to overlap them, create a bit of a pile. And you'll start to
see there are bunch of grapes is coming together. To connect this next piece, I'm actually making
little indentations in the ends of the grapes. There's a little bit more
for the clay to connect to. And I'm actually going to
attach to grapes to this piece, one to each end. I think. I'm just going to overlap
this on the first grape. You can see it's come away. They're very, very fiddly, but you just need to be careful. Essentially the easiest
method that I have found is to create lots of
little strips of stem, overlap them, create a pile,
connect them together. And then wherever
you see an end of a stem and a grape to it, as well as that you can
add grapes on the stems, really start to
build up a bunch. And it can be as full
a bunch as you want. You can have it a
little bit sparse, or you can have it completely bursting with grapes,
anything goes. You can even add two grapes to the end of a stem-like
I've just done there. And like I say,
grapes in between. And you can start
to see this coming together and looking quite
like a bunch of grapes. It's amazing what you can
achieve with a bit of patients. Now the final bit of stem is going to be
slightly thicker. So you can add that on
and then you can just literally cover all of
the little imperfections, all of the joints of the
stem with more grapes and make it feel
like a whole bunch. You can see how tiny this is. It is like literally
smaller than my thumb. Now, you gotta be really
careful with this. Try not to move it
around too much. You don't want to squash or squeeze or knockoff
any of your hard work. You can see how this is
looking pretty good. And this is going
to be to scale for our fruit bowl so we can add
our fruit in around this. And just having this sprig of grapes is really
going to elevate. Or miniature fruit bowl
going to really like, I mean, anything like
grapes or berries. Miniature is going
to look incredible. If you have the patience to persevere and follow
my instruction, you can make a really
nice variety of fruit. And it will be
really impressive. People will be like,
what is that real? On my word, that's
amazing, honestly. There we have it, there is
our little sprig of grapes. Now at this point, you can bring in your ruler
just to check how big it is and
make sure that, that is to scale. Use my cheat sheet
if you haven't got your own dimensions and if you're happy with the
sizing, then that's it. You're done. Now some of you, instead
of doing red grapes, might want to do white grapes, and it's a completely
similar process. Instead, we want to mix
a white grape color. So for that, I'm gonna be
using some green polymer clay. I'm going to mix a
few different greens together to get a more
natural looking green. And then when this is mixed
exactly the same as before, we're going to add some
translucent clay to this. So two parts, translucent
to one part mixed color. And this is going to give our grapes that more
realistic look. They're not going to
look quite so opaque, and they just look more real. You don't need to do
anything else to them. You don't need to add pasta,
we don't need to paint them. They're just perfect
as they are. If you want to make
a fruit that is just spot on in its raw
form just to polymer clay, then this is the one to do. And then exactly the
same process as before. We want to pull little bits off, roll it in your
fingers and start making your individual grapes. Make yourself a
nice pile of these. And then we'll
connect them up with some stem and vine and make a little bunch
of white grapes. I always suggest sculpting more grapes than you
think you will need. Because when you're in
the assembly process, it's nice to just be able
to grab another one, add it on where you want. Be patient with yourself
and just pull off enough, definitely enough grapes for the bunch that you
wanted to make. Then exactly the same
process as before. We're gonna get our
grape stem color, which I obviously
knew where it was because I'd put it in that
little pot from before. That's a really great top tip for sculpting a polymer clay. Have somewhere to
store your spare clay. It shouldn't go hard in the air because it's not water-based, so it
doesn't dry out. But putting it in a little box is helpful to keep
it where it is. Yeah, we're rolling out our
stem to be a very thin stem. And I'm going to break pieces off or cut them with scissors. And then Just bend these pieces and add grapes to the end and
start layering things up. This time, I'm actually
making a connected a piece of grape stem and then I'm going to add all the
grapes on afterwards. So you can see how I'm just designing this sort
of a bit like a hand. It's got lots of fingers
and a main stem. And then on the end of each one, I'm just going to
add a grape and then I'm going to add
grapes at the joins. And I'm also going to add double grapes on the
sum ends as well. If you've got some grapes
for reference, that's great. Or you could get a
picture of some grapes. Really important to look at. A real piece of fruit to guide you when you're
sculpting your miniatures. Because you want it to look
as realistic as possible. Don't have to be exactly the
same because like I say, all fruits different,
you're never gonna get two pieces identical. So just sort of go
with what you want, what works for your fruit bowl, and what it is that you want to create for your short film, your diorama or
your doll's house. But yeah, there's no wrong
or right way. Anything goes. You can have as many or as
few grapes as you want here. Now we have it. I'm pretty happy with that. Teeny tiny it is, is very, very delicately be incredibly careful when you're
picking your grapes up. And once it's baked in the oven, it will be a little
bit stronger, but it will still
be quite delicate. But here we have our
little sprig of grapes. And I'm just going
to leave that now. Here's, here's my red grapes. With my white grapes, you can see how
they look together. And I think they
look pretty good. Bearing in mind these are
smaller than my thumbnail. I hope this has given
you the confidence and inspiration to maybe make
some grapes of your own. Up next, I'll be showing
you how to make some pairs.
9. Pears: So to make pairs, I'm going to mix a
custom green here. I've got pack of lots
of different greens. I'm just gonna put
off a little bit of each one and just mix a customer base
green with pairs. They tend to have this
sort of rough texture, sort of brown in this
on top of the green. And so my plan is to make a claim polymer
clay pair and then use the acrylic paint to
add the details at the end. Because adding the acrylic paint sort of adds a bit of
texture to your parent. I think what you're finished
thing wherever it is. But I think for a pair
particularly that, that is going to look really
good and really effective. So I've mixed my
greens together. I'm pulling off a
pear shaped lump. I'm just going to shape
this into a pair. A pair is sort of like
a teardrop shape. It's got a nice round base and then it's got
a narrower neck. And often the neck can be
a bit tilted to one side, sometimes it can be upright. The nice thing about
organic things like fruit is that every single
piece is different. They're all different
irregular shapes and no two pieces of
fruit with the same. So that means that when you're
making your miniatures, they don't have to be identical. But it's good to get your
ruler out and to check the dimensions and to
make sure that it is correct for your scale so that all of your fruit
looks right together. Now at the top of my pair, I'm going to use this pen tool to make a hole for the stalk. And I'm also going to make
little indent at the bottom because they have
a little bit of stock at the bottom as well. And then exactly the
same as with the apple. I'm going to make a very thin piece of
polymer clay out of this custom brand that I mixed and make a stalk for my pair. So I'm just going to
squeeze in role that with my fingers and try and get it to the diameter
that I'm happy with. For this scale. Again, it will often be
thinner than you think. So make sure to have some careful fingers
and roll it as thin as you can to try
and get the scale right. When you've got a small bit, just try it in your
pair and see if that it looks about right. And then you can trim it with scissors to get it the
right length. Again. I'm pretty happy
with how that looks. So I'm just going
to cut that there. And I'm gonna put a
little bit of brown in the base to the
store at the bottom. And just cut that off. So it's nice and flush. Just to give the sort of idea that there's
a bit of stalk, fair? It doesn't need to
stick out very far. And I'm quite happy with that. But then when you
look at this pair next to one of the
apples that I made, you can see that this pair lose a little bit big B on the
chunky side for my fruit bowl. So now I'm going to
make a smaller pair. So exactly the same process. I'm sculpting a
teardrop shape and just making sure that I'm
using less clay here so that it is smaller
than my first pair. And then the exact same
technique as before, I'm going to make a hole
in the top from the stem and a little indent
in the bottom too. You can just use a pen for this or you can use a tool like mine. This came from a
clay sculpting set, but a pen will
work just as well. Then, just like before, I'm going to roll out
a very thin piece of brown polymer clay for
the stalk of the path. And then just carefully
insert this in. Use this as is to trim it to the length that I'm happy with, is really as easy as that. Once these are baked, we will add the acrylic
paint and I will show you how you can build
up a more pair like texture. You could of course, also
take the approach of using soft pastels
to color your pairs. Instead, It's totally up to
you and what you prefer. So feel free to do your
own thing as well. You can use the techniques that I have mentioned in any of the lessons in this class
to make your fruit. So just Go with your gut, go with your instinct, and do whatever you
feel most happiest, whichever technique
works best for you. Now that my pairs of
all baked in the oven, I've got some acrylic
paint here and I'm going to start mixing some colors and layering up some texture and pattern nation onto
the skin of my pairs. I'm going to start with
quite a dark, earthy green. And I'm going to just paint this in patches over the pair, trying to not put too much
paint onto the polymer clay. Like I said before,
less is often more. But with the approach for pairs, I think it's all
about the layers building up different tones and different colors to create a
more realistic looking pair. So this will mainly not be seen by the
end of the process. But I think it's good
to have a dark color underneath as a base layer. And we're going to
build up on this with some paler colors and layer up some brighter
greens on top as well. But yeah, just doesn't
have to be perfect. Just add a darker color
onto your pair first. Little tiny patches. Don't do a solid
coat, just have it. Little tiny blobs. Focus on making this around the base of the pair and
also around the top, a little bit of
color everywhere, but also make sure that some of your original polymer clay, green clay is showing through. Once I'm happy with this
layer of dark acrylic, obviously you want to let your paint dry before you
move on to the next color. Because otherwise,
adding more paint will actually pull the paint
off your polymer clay. As you can see there, the stalk
is born out of this pair. But don't worry, I'm going
to show you how you can stick that back in later
on in this lesson, I've now mixed a
slightly lighter color. This is a bit more sort
of gray, bit more yellow. I'm just putting that on top of the dark color that we
added to our pairs skin. You can see here how the
texture and the color of the pair is really starting
to build up quite nicely. Once you've done this,
the secret is literally mixing loads of colors that
are similar to each other, but not quite the same. So now I'm mixing up a
more brown color and I'm just lightening it
with a pale yellow. And I'm going to add some
of this to my pair skin before I go back in with
some green layers as well. This variation of
color really does give a more realistic pair look. I think that because of
how pair skin looks, this is a better
method when using the soft pastels because the
soft pastels are so much more subtle and the coloration
on a pair is a little bit more opaque and a
little bit more solid. So I definitely would recommend using acrylic paint if you're
making miniature pairs. So next up, I'm mixing
some green into that light brown I'd made to make a slightly different color. This is a lighter green
than the one we began with. And I'm going to add this
on top of what I've already got to bring back
some of the green. You probably can't see a lot
of difference happening. But like I say, this is all in the layers and how the
layers work together. So bear with the technique. Also keep looking at your
pair image for reference. Wherever pair you're
aiming to achieve, keep looking at your reference
picture to make sure that your coloration is
accurate to that pair. Now you can see I'm mixing an
even brighter green again. This is going to again, bring back some of that
original green and really add some variety and depth
to the finished pair. Now, a lot of classic
pairs have that sort of brownie patchy
look on the outside. So now I'm starting to add that. I'm actually starting with
a lighter color here. And I'm just adding on
these larger areas of gray green that I've mixed
to add that blobby, brownie gray texture
that you get on pairs. I'm now mixing a darker
version of that color, so an even more gray color, but with a bit of
green mixed in. So it's not gonna
be too different. Making sure that the
pagination is varied. And these areas are
quite large too. If I feel like it's sitting
a little bit too solidly, I'm just using my finger
to rub off any excess. Now, on top of that, I'm going to add a bit
more of a brownie color. So I've had mixed yellow and brown and a little bit of black. So I'm making a sort
of dark brownie color. Like I said, anything goes, you do not have to
methodically follow this particular process
of layering colors. Literally, you just go with
whatever works for you. Mix different greens,
yellows, browns, keep layering up
the paint until you have a look that
you're happy with, that it looks accurate
to your particular pair. I'm dotting this brown color on. This is sort of giving
that final layer of color and texture on
the skin of the pair. And I might add some
lighter details on top of this right at the end. But this is getting
much closer to the look that I wanted
for my particular path. I'm lightening up that color
just to add the final layer. The more colors,
the more different variety in color that you have, the more realistic
it's going to look. One of the most common
differences between an amateur artist
and a professional is that the amateur doesn't use as many different
shades of color. It really is about mixing colors that
are similar but not the same, and
layering it up. If you feel like
there's too much of a color and just go back
in with a brighter green or a yellow and just move down the areas that you
feel aren't working. And you'll end up with
something that looks like quite a nice, realistic
manager pair. Now, I said I was going to also touch on the fact
that the stock fell out. This glue is the glue
that I like using. It's called cosmic shimmer. It's incredible,
It's really strong. And you can just use the
tiniest bit of this glue and it will hold things
together like magic. So I'm just getting a little tiny piece of this glue on a pin and
I'm just going to put that pin into the
hole where the stock was and then just literally
pop the store back in. And that's it. It's stuck, it's solid, it's fixed. We're not going to be baking
these again, so that's it. You can just glue something that's fallen off back
in just like that. There we have it. Up next, I'll be showing
you how to make an orange.
10. Oranges (& Satsumas): So for oranges and grab yourself an orange or a
picture of an orange, and let's start
mixing some clay. Now, I always keep excess polymer
clay colors that I have mixed from
previous projects. And I happen to have
some yellow and orange pieces that I think will work really well to make
some miniature oranges. So I'm just going to use
up my polymer clay scraps and mix all of this together
to create an orangey orange. I'm quite happy with this color. And I'm gonna get my ruler
in and make sure that I am sculpting my orange to the correct
proportions for my scale. Oranges are quite easy. They're round, like a ball. There's not a lot to them. The most identifying
things they have, I suppose, are very texture. They've got a little bit
of texture to their skin. And the best way of achieving this with polymer clay I have found is to use a fairly
coarse sandpaper. You could also use something
like an onion bag. Push the clay into it, rolling over it and get a
texture onto your polymer clay. But yeah, sandpaper I have
found works best for me, especially on a miniature scale. So just literally
roll it around, try and have a clean
piece of sandpaper. My one here is a
little bit grubby. It's not too bad though. But look, it gives
a lovely imprint into your polymer clay surface. And this looks like the same texture as an
orange, but in Manager. So I'm pretty happy with
that now I'm going to mix some clay to make a
sort of STEMI, stalk. Because oranges often have a little bit of a stalk on top. And I'm just using
green and white to mix a lighter color. And I'm just taking
very small pieces and sticking those onto
the top of my orange. These are sort of like the remainder of the
leaves of the orange. And then that'd be
the central part where you would have had
it attached to the tree. And I'm just going to neaten up the shape of these with my pin. You can see I'm just trying
to give it a bit more of a sort of leafy shape. And I'm just going
to push that into the clay as well in Denton, give it a bit of texture. And I think that looks
quite orange like. Now we can add some
detail as well using our soft pastels. You can see that on an orange, the orange color isn't
completely consistent. So we're going to
vary that up a little bit using our soft pastels and also add a bit more color to the stalk with the
soft pastels as well. But make sure that you
clean your hands because the polymer clay does stain
your hands quite easily. You can see it
does come off very easily with a baby wipe. I am just mixing up some yellow and orange
soft pastel and brushing it on to my
sculpted miniature orange. Simply doing this to
vary up the color in the skin and make it not
quite all one color. So now you've made
an orange and whilst you already have
some color mixed, a very similar fruit to
an orange is a sac tumor, but it is in a slightly
different shape to make us out. Assume you want to make a smaller ball of clay and
you want to squash it down. Zoomers aren't quite surround. They're a little bit more
like squashed bulls. And again, roll it on to your sandpaper to
get a nice texture. So as soon as have a slightly different shape to an orange, they actually have
an indented top. Usual brutal to create this. And then we can just use the same clay we mixed
for the orange dork and add a little bit in to our SAT Suma for this, assume as dog. Again, just a tiny
little bit of clay here, and we can poke that in with
our pin tool to get it to sit nice and deep in that little indent
that we've just made. And it's really as easy as that. There you have a perfect
little baby, says Sumer. And you can see here is side-by-side with our
miniature orange. You can see that as that
suma is quite a bit smaller. And either would work
well in your fruit bowl. And anything goes, like I've
said in the other lessons, all fruit is
different so you can have variations in size
and shape as well. Now that offer is
baked in the oven, we can add more detail
with acrylic paint. So just like before when we
were varying the color of the surface with soft pastels, you may have found that
that wasn't intense enough for the look
of your orange. So you can go in there and
add different shades of orange acrylic paint
to your sculpt to make the variation in color a little bit more dramatic and
you can wipe off any excess, dab it off on your fingers. Good, even once you've
painted the orange, roll it onto a piece
of kitchen roll just to take off some
excess paint as well. But generally using
small amounts of paint and brushing it on, you can get a really
nice varied skin color. When you put it side-by-side
with a plain orange, you can really see
the difference. It's just making things
look a little bit more real and a
bit more natural. The most important things with making miniatures
are the colors, the textures, and the details. So really observe
your reference fruit and notice anything that might just add that extra
bit of realism to a manager. Exactly the same for this. As soon as you can
add more variation in color to the skin using some
different orange pants. And again, if there's
too much there, just allow it to come off on your fingers or BiPAP
on a kitchen towel. I'm quite happy with
how these are looking. I feel like the stems could
have a little bit more green. So I'm also adding
a little bit of green acrylic paint to the
stems of all of my fruit here. There you go. I'm pretty happy with those. Up next, I'll be showing
you how to make a kiwi.
11. Kiwis: So now we're on two key ways. Another nice and easy
miniature fruit to make. I'm using this orangey
colored clay mixed with some brown to create my base
color for my key ways. And because kiwis are
a sort of dark brown, I'm also going to add
in a tiny little piece of black polymer clay mixes together and
make my base color. Now it's mixed, you just want to make a sort of egg shape, which is what a kiwi looks like. Get your ruler out measure. It makes sure it's
about the right size. And just like with our oranges, lemons and limes,
there's a bit of texture on a Kiwi,
it's like ferry. So to create that texture, we're going to use
the sandpaper again. So just roll it around
on the sandpaper and get a texture all over the
surface of the polymer clay. And now we're going to
enhance that texture by using some soft pastels to color and vary
the surface of the. So I'm just mixing together some yellow and
brown soft pastels, scraping it off
with a craft knife. And then I'm actually
going to just roll my polymer clay into it
rather than brushing it on. I want to have a bit more
of a dramatic result. And I'm going to
rub that in so that it really gets into the clay. You can see here
there's some light and dark colors that have
stuck to polymer clay. I'm now going to roll it back on the sandpaper to get some
of that texture back on, make the texture a
little bit deeper. We're also going to enhance this with some acrylic
paint later as well. So I'm quite happy with
how that's looking. This is the prebaked kiwi fruit. It's got some variation in brown there and it's
got a nice texture. Now they're baked in the oven. I'm gonna get some yellow color and some brown colors of paint. And I'm just going
to gradually add this on so that it
gets right into that texture that we created and varies up the color of the kiwi. Going to use my fingers to just smudge off the excess paint. We just want a
really subtle layer, just a suggestion of
the variation in color. So dapsone paint on with your
brush and then just rub the excess off with your
finger so that just a little bit remains
on your sculpt. You can see that this
is really starting to have that more fairy look, that variation in color. And it's more
accurate to a kiwi. So I'm gonna do that with
all of my kiwi fruit. You'll also notice
that I have done a little bit of variation in
the shape and size of these. They're not all quite
the same because like I have mentioned,
fruit is organic. It's every piece of
fruit is different. You never going to find two
pieces of fruit exactly the same in nature,
things are buried, so you really don't need
to get too caught up in things looking the same if
you're making lots of fruit, just make things roughly
the same size and shape. And yeah, I'm pretty sure we're there now I
really like this look. I think that having the combination of
the soft pastel and the acrylic paint
on the Kiwis really does add to that fluffy, furry look, especially
when you are using a texture like from sandpaper
to create on the clay. Because the paint and the past to really does
sit in that texture. And that gives you this depth
of color and variation. That looks really nice, really realistic and natural. So yeah, play around. Use your reference picture or your reference fruit until
you're happy with the results that you have got on your
specific fruit mixed. I'll be showing you how to
make some strawberries.
12. Strawberries: Making miniature strawberries
is super-simple. Grab yourself a
strawberry for reference, or an image of a strawberry. And we're literally just
going to use some red clay. And I'm mixing in a little bit of orange
to my red as well, because you'll notice that a strawberry isn't an
intense red color, is a little bit of
more of a soft read. An orangey red. I'm going to mix this orange
and red together to create my base color group
is a super simple. They're literally like
little cone shape. So you want to take a
small piece of clay and make it into a cone shape. And then literally just get
some tiny little pieces of green polymer clay and make
some leaves to go on top. The hardest part about
things like strawberries on a miniature scale is the
fact that they're so tiny, they're literally
millimeters small. So you gotta have some
really delicate hands here. And I'm just using this little pokey tool to poke the leaves on top
of the strawberry. So we're going to keep
these strawberries simple. And for the scenes, I'm
using my pin tool to just indent where
the seeds would be. There's no point
trying to add in any light clay here because it's just going to make a mess is
too small to get that right. So I'm just making
a suggestion of the middle pips in the
edges of the strawberry. And it's really as easy as that. So obviously you want
to make more than one because you don't often get
asked will be on its own. You usually get many. So just follow the same
process over and over. And if you want, you can also add a little stalk in the top, like we've done before. You can just load
a very thin piece of polymer clay in green and
just stick them to the top. When you strawberries a
baked and out of the oven, you can even vary up the color of them using
some acrylic paint, mix up a slightly darker or lighter red and
just roughly paint now that it covers
some of the red, you can even add a bit of yellow and teal stem to vary
up the color there too. If you're not keen on using acrylic paint within Polymer
sculpture, remember, you can always add a
soft pastels to just enhance the color
and very things up slightly before
you bake them. That's another option. Next, I'll be showing you how to make some raspberries,
blackberries.
13. Raspberries (& Blackberries): Making raspberries, just as difficult as great, but
it's not impossible. And you can actually do this really well
on a small scale. So we're using
translucent clay again, mixing that with some
ready pink clay. And that gives us
this lovely hybrid, but looks much more
shiny and very like Van gestural,
ordinary opaque clay. So I definitely recommend you getting some of
this translucent clay. Like I said, it doesn't really
matter about the brand. Brands do differ slightly, and I'm using Primo
scopy accents. Now for a raspberry, we want to use a pin or a tool like this that
has got a pin end. We're going to take the tiniest
minuscule little pieces, roll them into balls, and we're going to make the
individual little berries that are in a rose Barry. So these are absolutely tiny. The smallest little flakes. And we are going
to use the pin to help us craft a perfect berry with a hole in the
center as well. When you've got quite a
lot of little pieces, we're going to use the
very tip of the pen tool. And we're going to simply mold these little barriers around the edge of the tip of the pin. So you want to line them up
side-by-side very carefully. If you are too clumsy, you're going to knock them
straight off. Like of nature. These don't have to
be perfectly round. They don't have to be
the same size exactly, but close in size. And you just want to work them around the tip of your
pen tool, just like this. Very carefully, add a
little bit of pressure. Just said that they're
all stuck together. And then make sure that
you've put a couple on the end to cover
the tip of the pin. Then we very carefully going
to slide this berry off. And there you can
see we have got one individual raspberry and it's got a little
hold down the center, just like a raspberry would. Absolutely. Miniscule and perfect. And you can see that once
you have many of these, it's going to just
look fantastic. In your fruit bowl. Have some raspberries and they just look perfect
and they're just so tiny. But it's not
incredibly difficult. Just takes a little bit of carefulness with your
fingers bit of patients. And you can make some really
gorgeous little berries. You can see here, get your
ruler in, check for size. Makes sure that this is to scale for the purpose of
your fruit bowl, you can see that it's
only literally 2 mm wide. It absolutely tiny. And you can of course,
make these bigger. If they were slightly bigger, they could be Logan Berry's. If you change the color, you can make blackberries. Here. You can see that
I've got a whole load of them together and
how cute they look, and how tiny they are. And once you've got this many, it really feels like you've got y-component of raspberries. For doing blackberries,
mix your base color. I'm using some red
and some are black. Bit more red there. Mixing a color. For the very often there's a blue hue in
Blackberries as well. So I'm going to add a
bit of blue in there as well, mix this up. And then I'll be mixing
this with some of that translucent clay to get
that lovely very quality. So just like with the grapes, is sort of two parts
translucent to one part color. So I'm going to mix
all of this together. And that's gonna give me a
really nice translucency. You can see it's
really shiny and slick and exactly
the same process. Tiny little bulls for each of the individual berries
just pulled this off, rub them in your fingers, make a little pile. And then we're going to
use that pin tool or pen to craft a BlackBerry
around the tip. Carefully, place each
little berry piece around the tip of the pen. And with a very light
amount of pressure, you want to push these together. So they actually connecting
and becoming one whole piece. My advice would be make a ring of berries
first and then make a second layer and then add a few tip to cover the
tip of the pen tool. And then just very
lightly squeeze these before you
pull the berry off. And that should give you a quite sturdy
little Blackberry. You can see you have to be
quite careful, delicate. Pace yourself. We're just going
to release that. And you can see that we have
a perfect little Blackberry, and here it is next to
one of my raspberries. They've got the
hole in the middle and you can see the
individual berries. Up next, I'll be showing
you how to make a lemon.
14. Lemons (& Limes): Lemons and limes are other really easy for it
to make in miniature. I'm going to start
by showing you how to make some lemons. Here I'm mixing some
yellow clay with some sort of white clay because lemons aren't
always a bright yellow. Sometimes there are
sort of muted yellow. Lemon is a bit like an egg shape but with
slightly more pointed ends. So you just want to sort of use your fingers to shape
the clay into that form. Use your reference
picture as guidance. And just like oranges, lemons have got a
texture on their skin, will roll our polymer clay onto our sandpaper to get a nice texture that
looks like lemon skin. You may need to reform your shape a little
bit afterwards. And if you find too much of
the texture has rubbed off, you can always rub it back on the sandpaper again to
pick up some more texture. But really it's just
as easy as that. Just like all other fruit, the size and shape will vary so you don't need
to be too precious. Here we can see a lemon
next to an orange. And now that my
lemons are baked, you can see that I'm also adding acrylic paint to
vary up the color. And he could have taken
the soft pastoral approach instead if you prefer that. But I'm just adding in some
different yellows in paint. And I might add a little
bit of green paint as well. You can see that I made
two different lemons, one slightly bigger
than the other. So when I put my fruit
bowl together at the end, I can decide which ones work best with the rest of the
fruit that I have made. Often lemon do have a bit
of green at their ends. If they're not completely ripe. Less is more like I've said
already with acrylic paint. But you can just add a little
touch of that to the end. If you want to lessen the yellow and give a little bit of a
suggestion of green there. And it's really as
simple as that. That is all you need
to know about lemons. If you've added too much
green and you're not happy, you can always put more
yellow paint back on top. And now we shall move on
to making some lines. So limes are a little
bit different. Lines are more round. Here. I have mixed a green, but I haven't
completely mixed it. So I've used a couple
of different greens and I've left it very
slightly varied. Just so you've got variation of color
in the skin already. And limes are generally a little bit smaller than lemons as well. And they also have a texture. So you want to roll it
on your sandpaper again. And let the polymer
clay pick up some of the texture from
the sandpaper. You can make your
line a little bit oval or more round is absolutely dependent on what
you are wanting with your fruit and the reference
that you're using. Here, you can see a
line next to a lemon. And again, because
there's so much variation within fruit, you may think, oh well actually this line looks a little bit small
compared to that lemon. I'm going to make a bigger
one because after all, you want all of your fruit to work well together
in your fruit bowl. As well as measuring your different fruit
sculpts against the ruler. Also look at your fruit compared to other fruit that
you've made and make sure that the scale of those separate
fruit work well together and look correct so that we have a slightly better
size for a line. And now my lines are baked
and out of the oven. I can now add some
paint to them too. And I'm just going to take
exactly the same approach as I did with the lemons, but I'm using a
slightly darker green. And I'm going to be varying
the green color fervor on my lines to just make them look a
little bit more natural. Because fruit has got many
colors within the skin. It may not be that obvious, but there are multiple
colors there. They're just very subtly
different from each other. So adding a little bit of a
different color of paint can really enhance the final look
of your miniature sculpt. You can see here I'm even adding a little bit of yellow too. The skin as well. This could show that
the lime is more ripe. And it can also just
again vary the color and make the finished
look look more real. Lots of different, slight variations in color are gonna
get you the best result. And if there's too
much paint on there, dab it off with your fingers, will get yourself a piece of kitchen roll and
W off like that. It really is that easy. If you're struggling
with the scale of fruit, lemons and limes and oranges are some of the easiest
ones to get a good result with that we have it.
15. Outroduction: Thank you very much for taking
my Skillshare class today. I hope that you are now
fully equipped to create your own fruit bowl
and fill it with whichever fruit you want
for your stop-motion film, your diorama or
your dog's house. Don't forget to document
what you're doing. Post a picture of
your finished bowl of fruit in the project window. I'd love to see it. Like I said earlier, I imagine
every single bowl of fruit submitted will look different
from all the others. Your fruit bowl is a unique
representation of you. Well, not literally,
but you know, I mean, I hope that you have
enjoyed learning with me. Do leave a review
to let our students know about your
experience, good or bad. Let me know how I can improve. Post a discussion
and let me know what other miniatures
you would like me to create classes on. I'm always open to suggestions. And this class itself was
a suggestion from a viewer to if you want to find the
elsewhere on the internet. I have a website, I have a YouTube channel. You can find me at Animate auto or at total Smith on pretty
much every social platform. Thanks again for
watching and I'll catch you again in
the next class.
 Tortor Smith, Animator, Director, Artist