Transcripts
1. Introduction: Hello, and welcome to my
Blender Animation Mini class. I'm Harry, a season three D
artist with over a decade of professional experience
and the privilege of being recognized as a top
teacher on Skillshare, specializing in
blender tutorials. In this class, we'll
learn how to create a futuristic looking
animableFero fluid material. You have full control of
the spikes emerging from the liquid by animating the placement of an
invisible magnet object. You're unfamiliar
with ferro fluid, it's essentially a
metallic liquid that responds to magnets in
really interesting ways, such as creating
these moving spikes. I Blender classes are well regarded for their
clarity and ease, thanks to a step
by step approach that's perfect for beginners. While this is a
shorter mini class, you can still expect
thorough explanations that anyone can follow
regardless of their experience. Please note that Blender 4.3 or later is required to follow
along with this class. You can download the
latest version of Blender completely free
from their website. By the end of this class, you'll be amazed at how easy it is to create a realistic and
animate ferro fluid material. So if you're ready, I invite
you to join me in class. Let's jump into our
first lesson together.
2. Setting Up the File: In this lesson, we'll
begin the class by setting up our working
file. Let's begin. If this is your first time
taking a blender class, I'd highly recommend
you start with my complete beginners
guide to blender first. This class was designed
for the absolute beginner to blender and three
D art in general. We cover every single
necessary topic in order to get you up to
speed and running and blender. We'll accomplish this with
short and focused lessons that cover each topic from
a beginner's perspective, utilizing a well
organized starter file. We end the class with an
easy project where you set up and customize your
very own cozy campsite. With that out of the way, let's
continue with the lesson. Our goal for this lesson is to make sure that we
have everything we need set up for creating the
material in the next lesson. This will include some
simple render settings, output settings, an object
to place the material on, a camera, and some lights. Before we begin, make sure you open a new blender file and then select the general file
type found here on the left. Also want to make sure
that you're using Blender version 4.3 or later. This material is really only
possible with the use of the updated EB
displacement settings found in Blender version 4.2. I'll be using Blender
Version 4.3 for this class. So if you want to
ensure everything works like it does in the video, I'd highly recommend using
Version 4.3 or later. With your file open, let's start with the render
and output settings. We'll find the render
settings over here on the right side
in this tab here. This tab should be open
by default, but if not, simply click on this icon here and it'll
switch to this tab. First up, you want
to make sure that your render engine is set
to EV, which is found here. Next, we're going to scroll down here until we find the
setting called ray tracing, and we're going to
check this box on. The setting is really important, as it makes sure
our reflections on our material look a little
bit more realistic. We won't need to adjust any
of the settings found inside ray tracing as the defaults will work fine for our project. Now let's scroll all the way
down to the very bottom, and then we're going to
twirl open color management. And then scroll down a little further so we can
see these settings. The only thing that will be
changing in this setting, assuming it's not
already set by default, is the view transform
found here. Right now, mine
is set to filmic, and that's what I
want to leave it on. If yours isn't set to filmic, make sure you switch it
to filmic from this list. This setting just
changes how blender handles brightness and
color within our image, and for our purposes,
filmic works best. Now let's adjust our
output settings, we can find those
here at the top, and it's the tab just
below the render settings. It looks like a little printer
printing out a photograph. We're going to scroll
all the way up to the very top of this list, and we'll start by switching
the X resolution found here to 1080 and
then hitting Enter. That way, it matches
the Y just below, which means we'll be
creating a square image. Then lastly, we'll go down here to where it
says frame rate, and we're going to switch
from 24 FPS to 30 instead. This will make our animation
just a little bit smoother and it'll make
some of the math a bit easier when we
get to animating. With that last setting changed, we're ready to start
editing the Viewport. So we're going to
start by selecting this default cube and then hitting the delete
key to remove it. Now we can hit Shift and A at the same time to
bring up our ad menu, then go to mesh, and
then we're going to choose ICO sphere,
and then click that. And then before we
do any other clicks, we're going to go down
here to the bottom left. Twirl up in this option box, and then we need to change
some of these settings. So first, we're going to set our subdivision from two
all the way up to eight. This will make the
sphere much smoother. This additional
geometry is going to be important for our
displacement later on. Next, we're going to go
down here to the radius, and we're going to
make it a bit smaller. We'll set this to 0.85
and then hit enter. So it's 0.85 meters. Important that we have a pretty
high subdivision amount, as that's what
controls how smooth the spikes coming from
our material will be. Lower values will create a much more jagged spike
with less definition. This will somewhat ruin the liquid illusion that
we're trying to create. With these settings changed, now we can right click
on top of the sphere, and then we're going to
choose Shade Smooth. We want to make sure that
the liquid surface looks as smooth and free of
faceting as possible. With the object created, we
can now position our camera. Our first step is to
look through the camera, we can do that easily
by going over here on the top right and then
clicking on this camera icon. This will jump us into
our camera's view. Now while hovering over
this middle viewport, we're going to hit N on our keyboard to bring
up the side menu, and then we can go over here to the item tab found at the top. Now on the top right
outliner list, we're going to select the camera and then we'll go over here to the side menu and we're
going to change each of these values into an exact
number that I give you. That way our cameras are set up in the exact same position. Just make it a little bit easier to follow along with the video. Starting from the top
for the X location, we're going to type in 2.85. The Y location, we'll
type in negative 10.85, and then for the Z,
we'll type in 0.9. We're not quite done yet because we have to adjust the rotation. For the X rotation,
we'll type in 76. We'll leave the Y
rotation set to zero, and then the Z we'll type in 57. These are the exact values
that I'll be using for the position and angle of
our camera in this class. Feel free to adjust the view of your camera as you'd like. But if you want it to be easy as possible to follow along, I'd recommend you stick with
these values at least until you create your own version after we finish these lessons. With our camera placed, we're getting close to the
end of this lesson. Let's get our
interface customized a little bit before we move
on to the next step. To customize this
viewpoint layout, we're going to go
over here to the top left corner with our mouse. We're going to wait
until it turns into this little plus sign found
here at the top left, and then we're
going to click and drag and then drag it over
here to the right side. And now we can see
we're dragging out a border between the two. Drag it about halfway, doesn't need to be perfect,
just roughly halfway, and then we're going to
let go of our click and drag to place the two
different viewpoints. Now while hovering over both of these different viewpoints, we're just going to
go left or right. So on the left side,
we're going to hit N to hide this side menu, and then the same thing, we're just going to
hover on the right side, hit N to hide the side menu. Now let's change this left viewport so that it's not
just a copy of the right. We're going to switch
this left side to the shader editor. We can do that by going
up here to the top left. We're going to click on this
drop down menu found here, and then we'll go down this list and choose shader editor. And then again, while
hovering over this left side, we can hit N to hide
this side menu. The next lesson, this
is the viewport that we'll be creating our
ferro fluid material in. For now, however, we'll be
using the shader editor to add an HDRI to our scene so
we have some lighting. If you're unfamiliar with
the concept of an HDRI, they're essentially just images with a lot of hidden
data stored inside them that allows you to generate realistic lighting and
reflections from them. To add this HDRI lighting, we'll be using the
shader editor. That's because the HDRI is an image and not a
traditional light. At the very top left here, we're going to see a drop
down that says object. We're going to click
on this dropdown and instead choose world. And before we begin, to make
our lives just a bit easier, we're going to enable
a really useful built in add one called node wrangler. To enable this add one,
we'll going to edit, then down to preferences. Then we'll go over here
to where it says add ons. And then up here
in the search bar, make sure you don't have
enabled only checked on. So make sure this
is checked off. You'll type in the
word node NODE. And then you should see
node wrangler pop up. Now yours might be unchecked. If that's the case, just check it on so that it
looks like mine. Once you have node
wrangler turned on, we can just close
this option box. There's no need to restart
blender or anything. It's ready to go right away. This node wrangler add on
does a ton of useful things. But the main thing we'll
be using is the ability to make nodes automatically
with just a single click. If this is your first time
diving into the Shader Editor, you shouldn't have any issues following along in this class. However, if you'd like
a much deeper dive into all aspects of
material creation, I'd recommend my magic of
materials class on Skillshare. This multi hour class explains everything
you need to know about material creation and blender from a complete
beginner's perspective. As a quick explainer
of how to navigate, you can move around in the shader editor using
your mouse wheel. So if we scroll up and down, that'll allow us to
zoom in and out. If we click in the
middle mouse button, it allows us to slide
the view around so we can pan left or
right or up and down. Each of these squares
that we're seeing here on the screen
are called nodes, and we connect these
nodes together with these wires by attaching
them from socket to socket. These small dots here
are called sockets. These nodes pass their attributes
from left to the right. So this background node
is transferring all of its different properties
to this world output node. By chaining multiple
nodes together, we can make complex materials by combining simple effects. Can left click on this background
node here to select it, and then we're going to
hit Control and T at the same time on our keyboard to create three brand new nodes. We can zoom out here to
see the nodes that they created and then click in our middle Mouse button
to pan to the side. Without node wrangler installed, you could still
manually create each of these three nodes by
hitting Shift and A, then going to search and then typing in each
of these names. However, the node
wrangler add on just lets us do all this really
easily with a simple click. Now let's get the HDRI added to our scene so we
have some new lighting. Let's zoom in here
to this orange node called environment texture. Then we'll go over here
and click the Open button. The HDRI that we'll be using for this class is actually already downloaded
to your computer. You just don't know
it yet. This HDRI is installed along with
Blender when you download it. So all we need to
do is find it on your computer and
link it to our scene. On a Windows computer, you can follow along to this
path shown on screen. On a Mac computer,
you'll need to find the Blender foundation
folder and the Apps folder. Once you've found the
Blender foundation folder, then you can go into the version of Blender
that you're using. In my case, Blender 4.3. Next, we'll go into 4.3, then data files found here
at the top, studio lights. World, and then here's where
we find all these HDRIs. The HDRI that we'll be using for this class is called
interior dot XR. So we can select this
and then hit Open Image. With our HDRI loaded, we've successfully added
light to our scene, but we can't see it in
our viewports just yet. We need to switch our
right viewport to the rendered mode so that
we can see our new HDRI. We're going to do this up
here at the top, right. And we actually need to click in our middle mouse button
on this option bar. That way, it lets us
drag it to the left because right now these buttons are hidden that we need to see. So we're going to
drag it all the way to the left until it stops. And then over here
on the far right, we're going to click
this far right button. You might notice that
your computer freezes for just a second as it loads the image. That's
completely fine. Just wait for it to
load. And now down here, we can actually see
our lighting as well as the background image
that we just loaded up. This HDRI makes it look like
our sphere is floating in the middle of a hotel room which has some pretty
nice lighting. We can improve the
lighting, though, by rotating the
HDRI on the Z axis. This will spin the room
so that the large window is behind our object instead
of directly in front of it. We'll be spinning this
image over here on the left side by zooming
out a little bit, and then panning over
here to the mapping node. And all we'll be doing
is going down here to the Z rotation and typing in
180. And then hitting Enter. So we can see here
it's rotated the image completely around so we're seeing the exact opposite side. If you wanted to pick
a different direction, you could just
slide this back and forth until you find
a view you like. But for this glass,
I'll be using 180. This large curtained window in the background
is nice and bright and also isn't too distracting from the actual
orb in the center. Over here on our right view
port, if you'd like to, you can use your mouse
wheel and also click in the middle mouse button to zoom in a bit so you
can see better view. With our HDRI finalized, let's go back over here to
the Shader Editor and then swap from the world tab
back to the object tab. And now the last thing
we need to do for this lesson is to save our file so it's ready
for the next lesson. To do this, we can go up
here to file and then save, and then just navigate
to somewhere on your computer that you'd like
to save your blender file. Then lastly, we'll go down here and then change
the name of the file. I'll call mine Faro fluid
material, underscore 01. And then when I'm
done with my name, I just click Save Blender
File, and that's it. We're ready to move on with
the rest of the class. And the next lesson,
we'll create the Faro fluid material.
I'll see you there. The
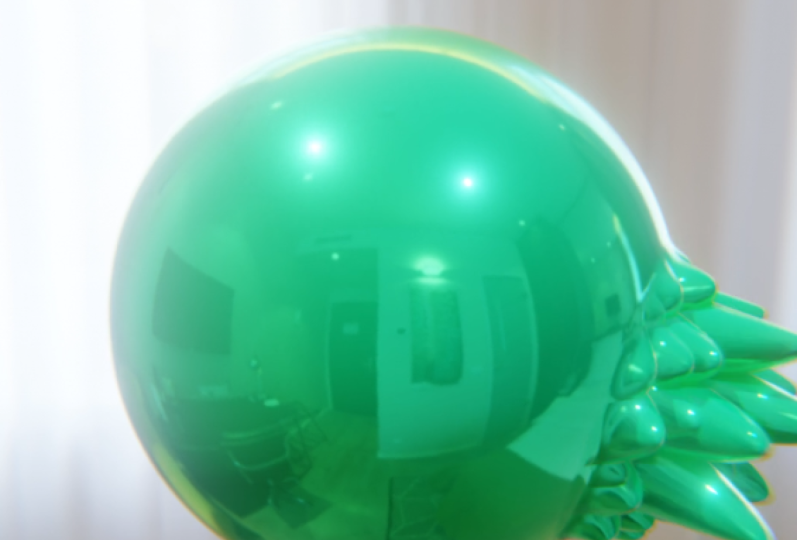
3. Creating the Material: In this lesson, we'll create
the ferro fluid material. We've got a good bit
of work to do on this material, so
let's jump right in. First, make sure your
right viewport is set to the rendered
view like mine is here. Just set this viewport
to the rendered view, go up to this top option bar. Click in your middle
mouse button to pan it all the way
over here to the left. And then make sure that this
button here is clicked. This is important
as we actually need to see our material
as we work on it, rather than the plain gray
of the default solid view. Now in the right viewport, go ahead and click on your
orb here to select it. With it selected, go over
here to the left side, and then we're going to
click on this new button at the top of the Shader Editor
to create a new material. Now let's click in our
middle mouse button up here to pan this view to
the left a little bit. And then right here
where it says material, we're going to
name our material. So we're going to
type in faro fluid. Our first step is to
make the base material look a little bit more
like ferro fluid. This won't include any
of the spikes just yet, but we need to make a convincing base material to animate first. Now let's use our mouse wheel to zoom in here and we're going to zoom in so that we can see this entire green node here. Now let's select this white
box next to base color, and that'll bring
up a color picker. We have two main ways of
using this color picker. You can either click and drag here to just pick a
color on this wheel, it's nice for just
choosing a color that you want and you don't need
to be too exact with it. So you can click and
drag this little circle, place it where you want. And then on the right side,
you can click and drag this box to either make
it darker or lighter. While this is an easy
method of picking colors, it's not super useful when you're trying to
get an exact color. If you know the exact
color that you want, the sliders at the bottom here are actually
a bit more useful. So for this tutorial, we're
going to use these sliders. So first, we can click and drag on this slider here
at the top for the hue and just drag it all the way to the left so
that it's set to zero. Next, we'll do the same
thing for the saturation. We're going to drag it
all the way to the left, so it's also set to zero. And then lastly, we're
going to click on this value slider here,
the third one down, and we'll type in 0.02, five, and then hit Enter. This will make this base
color almost entirely black. It's a really, really dark gray. Should work great for our
ferro fluid material. Now we can hover our
mouse over here to the left so that it
hides the color picker. Our next change is for the
metallic slider found here. We're just going to
click and drag on this metallic slider and drag it all the way
over here to the right. This will make the
material fully metallic so that it reflects light
like the ferro fluid would. It also makes the material have much deeper shadows and
brighter highlights. Then our last change
here, we're going to be changing the
roughness value. We're going to click on this
roughness and then type in 0.05 and then hit Enter. Makes the reflections on the orb significantly sharper and
a lot more like liquid. A lower roughness
value like 0.05, will make these reflections a lot sharper and
more liquid like, whereas a higher roughness value will make them more
diffuse and blurry. In our case, we want it
to be more like liquid. So we'll set it back to 0.05. Now let's add a
subtle waviness to the surface to make it
look more like liquid. We're going to need two
new nodes for this effect. So first, let's zoom out. So we have a little
bit more room over here on the left side. And then we're going
to hit Shift and A at the same time to
bring up our ad menu. And then at the top
for the search bar, we're going to type in bump BMP, place that here
just by clicking, and then we shift in A
again, go to search. Click on this and then
type in noise NOISE, and we're going to
choose noise texture, not white noise texture. We want the top one.
So we'll choose noise texture and then place
it over here to the left. Now let's zoom in to
these new nodes that we just added so we can
see them a bit better. Now let's connect this
factor socket found here at the top of the noise
texture by clicking and dragging on this dot down here to the height socket
found on the bump node. And then lastly,
we're going to drag from this normal socket here on the bump node over here to the matching normal socket found here on this principle BSDF. And now we can see
the results here of these new nodes
added to this node. It's creating a wavy surface
on the surface of the orb. However, right now,
it's pretty strong and the waves aren't quite the
right size. So let's fix that. First, we'll go over here
to the noise texture, and the only thing that
we're going to change over here is changing the scale. We're going to set it from
five down to one instead. So we'll just type in
one and hit Enter. This lower value
for the scale has actually made the noise
pattern much larger. Larger numbers for your scale will actually make
a smaller pattern, whereas smaller numbers like one will make a larger pattern. Now we can go over
here to the bump, and we're going to change
the strength slider because right now
it's really strong. We're going to lower this
down to a much smaller value. We're going to type in
0.025 and then it enter. Setting the strength
to a really low value, as we want the wavineess
to be as subtle as possible when we animate
it later in class. If it's too strong
when we animate it, it'll be really distracting. So even though it looks like
it's not even visible here, we can tell that it is doing a little bit of waviness
along the edges, and when this waviness
starts moving, it'll be a lot more noticeable. Next up, we'll be covering
the sphere in spikes. Adding spikes to
this whole sphere is the first
important step before we limit them to only the areas nearest the magnet object
that we'll create. Let's start by
creating a few nodes and then we'll connect
them together. So over here on our left side, we're going to zoom
out a little bit with our mouse wheel. The pan down. Now we can hit Shift
A, go to search. Then we'll type in displacement, DS and then we can see it here
at the top, displacement. We'll just click and
place that here. Again, shift and A, search, then we'll type in color
and we're going to choose color ramp,
the second option. Click that and then
place it to the left. Then one last node,
we'll hit Shift and A, search, and we'll
type in Voronoi, which is spelled V OR, that should be enough to
find it here at the top, Voronoi texture, then we'll
place that here to the left. Now let's zoom in down here on these new nodes so we can see them better as
we connect them. We'll drag from the
distance socket here down to the factor socket
found here at the bottom. Now we'll drag from
the color socket found here to the height socket
on the displacement. Then lastly, we're going
to zoom out a little bit. Pan over, and then
we're going to click and drag this material
output from the top here. So we're just moving
the whole node. We're going to drag
it down a little bit. And now we can zoom
in a little bit more and then drag from displacement here to
displacement over here. Now before we make
any adjustments to these new three
nodes that we added, we do need to enable
a new setting. To do this, we're going to go over here to the right side, and we're going to click on
this material properties found here at the very bottom. It's this red circle with
a checker pattern on it. Now we'll scroll down this list. Until we find this area called settings and make sure it's twirled open if
it's not already. So you just click on this and it'll twirl open the options. And then the setting we
need to change is found underneath the surface
options found here. So make sure that's
twirled open. And then we're going
to go to displacement, and right now it's
set to bump only. We're going to click on
this drop down and then choose displacement and bump. This setting allows blender to actually displace the geometry of the sphere rather than
faking it using only the bump. This is integral for the ferro fluid animation we'll be making. We can now see the results of the new nodes that
we just added. The displacement node allows the previous two
nodes in the system here to move the surface of the sphere and
give it spikes. Before we move on, let's go
up here to the top right. We're going to click
on this button here to hide the
viewport overlays. And we'll see when
we click this, it hides this annoying orange
circle that we see here. Kind of ruins the illusion, so we're just going to click this button to hide it for now. Now let's start making
adjustments to these notes. We're going to start with
this displacement note. We're going to go over here
to where it says midlevel. We're just going to
click on this and then type in zero and hit Enter. This will allow the spikes to protrude further
from the sphere. Next, we're going
to go to the color ramp around here in the middle. We can zoom in a little
bit for this one. And our first step is to click here on this little drop down. We're going to choose
flip color ramp. So it's going to
flip this gradient instead of being black to white. Now it's white to black. You can see that's made a difference over
here on the spikes. By flipping the colors
on this color ramp node, we're inverting the black
and white image produced by this finoi texture and essentially
turning it inside out. This has the effect
of converting the crater style
spikes that we had before into these more pointy mountain styles
that we're seeing here. This looks a lot more
like ferro fluid, so it works great
for our purposes. Now let's begin adjusting the positions of these
colors on the gradient. Want to move this black
slider to the left slightly. So we can either select it by clicking on this little
triangle here at the top of it, and then we can
move it this way, or if you want, you can use
these buttons down here. So if it's set to one, it's going to choose the
far right slider. And if you click
this little arrow, now it'll choose the
far left slider. So it's zero for here
and one for here. So we're going to
set it to one so that it's selecting
the black slider. And then this position can also be controlled
down here as well. So, for us, we're going
to set this position to 0.85 and then head enter. This is going to add a little bit more black to the texture. And also over here, if
we look at our spikes, it's making them a
little bit sharper. So as we add more black, we're making the spikes a little bit narrower at the bottom. Now let's move over here to the left and adjust
the Varanoi texture. Let's start from the
top, and then we'll just go down the list and
change each value. So we scale, we're
going to set to ten. This will make the
spikes tinier. We're going to drag
the roughness all the way to the left so
that it's set to zero. The lacinarty below, we're going to set
that also to zero. And then lastly is the
randomness found down here. So I drag this over to
the left a little bit. You can see the full names. So this randomness,
we're going to set this to 0.1 instead. The two most important
settings that we changed here are the scale
and the randomness. The scale is pretty
obvious as it changes the size of
the Varanoi pattern. This will make the
spikes smaller or larger depending
on the value. So if we just drag
this left and right, we can see higher numbers make tinier spikes and lower
numbers make larger spikes. So we're going to
leave ours set to ten. The randomness value
down here changes the chaotic and
random pattern of the Voronoi texture into
orderly rows of spikes. So a lower value here will
make them more orderly. And a higher value will
make them more random. Because our spikes right
now are so strong, it's a little bit hard to tell the difference between
the randomness values, but we're going to
leave our set to 0.1, which makes them a
little bit more orderly, not entirely in rows,
but mostly in rows. In real life, the spikes
of ferro fluid align themselves in orderly rows
of concentric circles. This is thanks to the magnetism pulling their liquid
into rigid patterns. This point, these spikes have been so strong on the surface of the sphere that they're
basically breaking it apart. This is why some of these
spikes can sometimes appear a little bit broken or
speckled or see through. To fix this broken surface, we need to limit the effect of the spikes to only
specific areas. We'll be limiting the effect by creating a black and
white circle across the surface that is tied to
an invisible magnet object. The closer the magnet
is to the surface, the stronger the spikes will be. Anywhere not close to this magnet object will
have no spikes at all. Let's start this
process by creating all the nodes that we'll
need for this effect. So over here on
our shader editor, we're going to zoom out a bit and then pan here to the side. Now we need to make
some room over here. So we're going to pan over
a little bit further. Click and Drag over top of this color ramp and
the Vorenoi node. We're going to drag them over to the left to create some
space here between them. Now let's hit Shift and A to bring up our ad menu.
We'll go to search. We'll start with
typing in mix Mix and choosing mix color. We can drag that over here and place it just below
this line for now. Now we'll hit Shift
and A again, search. We'll search for
color ramp again. So we'll type in color and
then choose color ramp. Place this over here, just
below the other color ramp. Lastly, shift and A, search. This time, we'll
type in gradient. So GRA should be enough
to have it show up. We'll choose gradient texture. Click that and then place
it over here to the left. Now we can begin attaching these nodes and adding the
remaining support nodes. First thing we'll
do is we're going to click on this mix node here, and we're going to
drag it on top of this line where we
made this space. And we'll see as we drag it
over top, it highlights. So once it's highlighted,
we can just let go of the drag and it'll automatically
connect it for us. Now, let's zoom in
a bit down here. And we're going to drag from
the color socket here on the color ramp up here to the B socket on this
mixed color node. Now we can drag from
the factor socket here on the gradient texture, down here to the factor
socket on the color ramp. Now we can zoom out here
on the shader editor, and we're going to select this gradient texture node
found here at the very bottom, and then we're going
to hit Control and T to use node wrangler to
create two new nodes for us. And this will create the mapping and the texture coordinate node. We're going to drag select over these two new
nodes that we have. And then we're going
to move them up here. We kind of want them
floating out here in space between the top and the
bottom of this texture. Node wrangler, luckily
already connected the vector socket from
here to the gradient node. However, we do
need to connect it also to this texture
node up here. So we're just going to
zoom in a little bit. We're going to drag from
this vector socket here over to the vector socket found here on the noise
texture here at the top. This is told blender to use this node to power the vector
for both of these nodes. So whatever this node
does is being applied to both the gradient texture as
well as the noise texture. In really basic terms, these two new nodes
that we added, both the texture coordinate and the mapping node found here, basically just telling
Blender how to place these spikes along
the surface of this orb. There are a lot of
different modes here, and we'll get into
them in just a minute, but that's basically what
these nodes are doing. Let's go through each
of these new nodes that we just added and
get their value set up before we add the
new magnet object that will control
many of the aspects. So we're going to
start by zooming out. Going over here to this
yellow mixed node, we're going to zoom in here. We're going to click this
drop down here where it says mix and then set it
instead to multiply. This will make sure that
only the black portions of the gradient texture
that we added overlay the underlying
Vornoi texture. This is an important
part of making sure that the magnet only affects
the areas we want. Now we'll go down
here to the factor. We're going to drag it
all the way over here to the right side
and set it to one. This will make sure
that the black parts of the gradient are
completely opaque, meaning it will fully suppress
the spikes in those areas. Now let's zoom out. We're going to go over here to
the gradient texture. And right now it's
set to linear. We're going to set this instead to spherical found
here at the bottom. This changes the linear
straight line gradient into a circular gradient. This will work perfect
for replicating the pool of a magnet on
the surface of the sphere. We can already see an
example of that here. Now we can see the spikes are
only on this bottom side, and it's completely smooth
over here on the right side. Then lastly, we're going
to go over here to the color ramp. We
can zoom in a bit. And now we can
select the far left black slider by either setting this slider here to zero or just clicking on this little triangle found here above this square. We're going to set
this position to 0.1, Enter to move it up
just a little bit, adding more black
to this gradient. And now we can select
this far right slider by either clicking on this
triangle or setting it to one. And then for the position,
we're going to type in 0.595, and then hit Enter. This has pulled this slider
here over to the left, making more bright
white in this texture. Essentially all this has done is increase the contrast
of this gradient map. Our last step for
this color ramp is to change how blender is
handling this gradient. By default, it's set to linear. But if we click on
this drop down, we see all these
different options. The one that we want
to use is called Ease. So first, let's take a look here at the edge of this spike. We can see a really harsh line here where the spikes
start and they stop. If we switch it to ease instead, we'll see it as it loads here that this transition
here is a lot smoother. It's more eased into it. So linear is a bit
more harsh than ease. Ease has a bit of a blur
here between the two. Smoothing this transition out and just making it
look more natural. Our last step is to create the
invisible magnet that will control where the
sphere gradient will be placed on the
surface of this orb. The placement of the gradient is what reveals the
spikes on our orb. So let's zoom out here
on the left side. And we're going to be
focusing over here on this texture coordinates
and mapping node, one on the far left that's
connected to both of these. So we'll zoom in here. Now let's change the mode that this
texture coordinate is using. Right now it's set
to generate it. We're going to instead
switch this to object by clicking and dragging from here and then dragging it to vector. This object mode here is simply another option for placing these textures on the
surface of the orb. But it allows us
to add an object such as the invisible magnet to control the placement in real time rather than
inside the Shader Editor. This will be really useful
for animation later on. So first, we'll need to
create our magnet object. So over here in our
right viewport, we're going to hit Shift and
A to bring up our ad menu. Then we'll go down here
to where it says empty. We're going to choose empty sphere down here at the bottom. Before we click or
do anything else, we're going to go
down here and change the radius of the sphere. We're going to set it to 0.8, eight, and then hit enter. 0.88 meters is roughly the size of the influence of the gradient
texture that we created. So setting the size of the
sphere to the same size makes visualizing the influence of this magnet a bit easier. Before we move on, we
do need to re enable this viewport overlay
found here at the top. So we'll click this,
and now we can actually see this empty
object that we added, and that's this
orange object here. Since this empty
object isn't really visible for anything
in terms of rendering, it's more or less just
a utility object. It's hidden when you hide
the viewport overlays. Now let's add this
new empty object to the texture coordinate node. So first, we need to select on this ferro fluid orb again. That way we can see our
texture over here on the left. And then on the far left side, this texture coordinate node. We're going to go down here
to where it says object. Click this eyedropper icon found here at the bottom right. Then we'll go over here
and we're going to click on this empty object
in the top right list. That will apply this empty
object to this field. With this empty object added to the texture coordinate node, we're ready to check
out the results. Let's select this empty object
either by clicking it in the viewport or going over here and selecting
it from the list. Now we can hover our mouse over here in the right viewport. We're going to hit G on our keyboard to grab this
and then begin moving it. So now we can see as we
move this object around, we can actually control exactly where these
spikes appear. We can make them weaker by moving the orb
either further away, or we can make them stronger
by moving the orb closer. So we can see as we
move this closer, the spikes get stronger. However, you will
notice that there is a point at which once
you move it so far, the tips of the spikes
start breaking again. So you do have to be careful
how far you move this orb. There's basically a maximum that these spikes can go before
they start breaking. So we'll have to keep that in
mind when we're animating. We'll also notice that by
moving this around, again, using the G key, we can
see that the subtle wave that we added to just the smooth surface of the ball. So even without any spikes, we can see just by
moving this back and forth that we're
controlling that as well. That's because we connected
this texture coordinate node to both the noise texture as
well as the Voronoi texture. So the Voronoi is the spikes, and the noise texture
is that subtle ripple. So by connecting that
spherical gradient to the position of this empty, we've essentially made
an invisible magnet to affect our ferro fluid with. At this point, we're ready
to move on to animating our material by moving around
this empty magnet object. In the next lesson,
we'll animate the invisible magnet
object to make our ferro fluid react.
I'll see you there.
4. Animating the Magnet: In this lesson, we'll animate the invisible magnet object to make our ferro fluid
material react. Let's begin. Before we
begin our animation, let's get our file
set up and ready. We'll be working in
the layout workspace again just like the
last few lessons. However, we'll want to switch the left shader editor back
to the three D viewport. We can do that by going up
here to this option bar, clicking in our
middle mouse button, and then panning it
over to the right. Now we'll go over here to
this left dropdown menu and then choose
three D viewport. On our right viewport, we're going to go over here and turn off the viewport overlays to clean up the
view a little bit. If you're unable to see these
far right buttons, again, just click in your middle
mouse button to pan this bar all the way over so
you can see these buttons. So we'll click this
viewport overlays to hide the overlays,
and then lastly, we'll switch it back
to the rendered view if you're not
there already, which is this far right button to make sure that
this one is clicked. We'll be doing the
bulk of our animating in the left viewport over here as it's a bit easier to navigate without being bound
to the view of the camera. We'll just be using the
right view board to see what the final result for the
animation would look like. And then the last thing we
need to do is make sure that we can actually see our timeline
down here at the bottom. You may or may not be
able to see yours. However, in my case, it's actually collapsed a little bit. So I'm going to click on this
little border here above this timeline and
pull it up just so I can actually see
the timeline below. Before it was so small, I couldn't actually see
the timeline below it. Now let's determine how long our animation is going to be. I think 6 seconds should
be long enough to show the animation we want to create. So let's start there. We know that we set
our file to 30 frames per second in one of the
first lessons for this class. So all we need to do is multiply 30 frames per second
by 6 seconds. This means that our animation
should be 180 frames long. To change the length
of the animation, we can go over here to the bottom right
where it says end, we're going to type in 180, so 180 and then hit Enter. We'll see down here that it's actually shortened the
length of the animation. We can center this timeline a little bit better by
hovering our mouse over top of this timeline and then hitting the home key
on our keyboard. You can find the home key above the arrow keys on the right
side of your keyboard. This will zoom the timeline in so that it fills
the entire space. And at any point,
if you feel like your timeline is a little
bit too tall or too short, again, remember you can
just click and drag on this border to make
it taller or shorter. Now on our left side, we can simply rotate
this view a little bit to pop ourselves outside of the camera and get a bit
more of a free view of it. This will help us get
a better idea of where this magnet object
is within the scene. Let's discuss the plan for our animation before we actually start placing
any key frames. It's important to
know what you want to do before you start
animating it. Our goal for this animation is to have the spikes
start out hidden. Then they'll appear
at the top of the orb before traveling down
the surface of the orb. Next, they'll
submerge themselves into the orb a little bit, leaving only small
bumps as they travel across the surface of the
orb from left to right. Lastly, the spikes will grow again at the
bottom right side of the orb before retracting all the way back into the
orb and disappearing. This animation won't be
entirely seamless by default, but we'll discuss how to do that near the
end of the class. For now, let's begin animating. We're going to
start by selecting this empty object or also
known as the magnet. So just make sure you
have it selected here in the viewport or from the
list on the right side. Now hit Alt and G at the same time on your keyboard to set this
magnet back to the home point. This will set it to the
origin of the world, which is zero on the Y, zero on the X, and
also zero on the Z. This is a useful key
bind to remember, just to reset an object back to the center of the scene to
get it ready for animating. Now let's enable something
called a keying set. To do this, we're
going to go down here to where it says keying. We'll click on this drop down, and then we're going
to go up here to this empty field
and click on it, and then we'll choose location
found here at the top. This keying set will ensure that when we
place a keyframe, we're only placing keyframes on the location parameter
rather than the location, rotation, and scale
all at the same time, which would do by default. This will just help us keep our keyframes as
clean as possible. Then lastly, we're going to
go down here to the playhead. And we're going to grab this
blue icon here and drag it all the way to the left
until it hits zero frame. Now we're ready to begin
animating the magnet. We'll start by going up here and switching to our move tool. Then we can grab this Z
handle, the blue one, and drag this up until
on the right side, you'll notice that the
spikes disappear completely. You want it to be basically
soon as the spikes disappear, that's where you want
to stop the magnet. You don't want to be
too far up as it'll change some of the timing
for the animation later on. So move it until it's just
outside of the orb here, and we look over here, we don't see any spikes. Now we're going to
hover our mouse over here on the left view port and hit the I key on our keyboard to place
a manual keyframe. To see the values
for this keyframe, we can go over here to where we find the
object properties stab. It's this little orange box, so we can click on this tab. And now we see we
have a bunch of values here that are
marked in yellow, along with these little
diamonds next to them. Any values that we see here in yellow mean that they have
a keyframe placed on them. We can also see down here that there's a
little yellow dot. So this little yellow
diamond icon on frame zero. And then lastly,
we'll notice that only the location
has been keyframed, not the rotation or the scale. And that's thanks to the keying set that we set up earlier, setting it to only
keyframe the location. Now let's move down here to our playhead and
drag it to frame 30, which is exactly 1 second
after the first keyframe. In this left view port, we're going to grab this
blue handle to drag this magnet down and then we're going to look
over here at the right side, we want to move this
magnet down until it's just about to touch the
edge of the frame here. So these spikes are just
about to make contact. If you're having trouble
moving it slowly, you can hold in shift while you're dragging this
thing up and down, and that will slow
down the movements. You can be a bit more precise. So we'll move it to about
here. That should be fine. Now we can look over here and see that the edge of the frame, which is the edge of what we're actually going to be rendering, these spikes are just shy of it. And before we place
any keyframes here, we'll notice a few
different things. Now that we've moved the magnet, we're not quite done yet, and that's because we haven't
placed any keyframes. All we've done is actually
just move this magnet. We haven't told it
to stay there yet. So if you look over here, we can see that these values
here are green, and this value here is orange. That means Blender knows
that these values haven't changed because they were zero before and they
still remain zero, but there still
isn't a keyframe. However, this orange value here, Blender knows that
this value used to be keyframed at a
different value, and it still doesn't
have a keyframe, so it's essentially
a warning for us. So to fix this, we're just
going to go over here to the left port and then hit I again to place our
manual keyframes. And now we can see that they're
all back to being yellow, which means that they
have a keyframe on them. We can also see the keyframe down here placed
on the timeline. So if we drag our
playhead back and forth, we can see that the magnet
now moves between frame zero and frame 30 to the
location that we specified. All of the guidance that
I'm giving you here for this animation is just
that. It's guidance. Feel free to customize
your animation, timing, or placement
as you see fit. But if you want to have the
easiest time while learning, I'd recommend that you at least try to follow along with me. Don't worry about
the exact values. Just try to match what you're seeing here on screen visually. For our next keyframe,
we're going to move our playhead down
here to frame 50. Now for this move, we're going to rotate our view
just a little bit. We want to keep
in mind that this is the camera in our scene. So this is where we're actually
seeing this view from. So keep that in mind as you're
moving this magnet around. I'm going to start
by hitting G on my keyboard for the quick
key bind for movement. And then I'm going to
move it down here, lower and then to the left. Until it's around here, and then we can move our
view up a little bit. And I'm going to move it
now towards the camera a little because I
want these spikes to go from the very top
of the orb and then start traveling down towards
the front side of the orb. So from this top down view, I can just grab on this
little blue square here or I can hit G again. It doesn't really matter. And we're going to
move it over here. And we want this magnet to be just touching
the surface here. So we're seeing a little
bit of these bumps, but it's not huge
spikes poking out. Then feel free to adjust
the placement as you like. But you want your
spikes or your bumps, in this case, to be roughly
about where these are. Once you're happy with the
placement of the magnet, just hit high on the left
port to place your keyframe. Now if we go down
to our timeline and drag it back and forth, we'll notice that something
interesting happens here, is it starts out at zero, the magna moves down
to make some spikes, and then it goes 30-50, and we see these spikes get really huge here
right in the middle. That's because this magnet is
actually just traveling in a straight line directly
through the center of this orb. So as it goes
through the center, if I move down here right around the middle
of this movement, it's really far into the orb, which makes these
really huge spikes. That's not really what
we wanted to happen. We wanted it to be big
spikes that recede into the orb and then start out being small down here
around frame 50. It's not necessarily an issue
if you like how it looks. But if you wanted to make the spikes a little
less extreme, we're going to move
here to frame 40, which is right in the
center of this movement. Then we're going to
move this magnet out of the orb a little bit, trying to keep it roughly
in the same spot, but just moving it out of the
orb in a diagonal pattern. So we can move it to about here. We want the spikes
to still be present, but not huge spikes. So about half the
height maybe of what the original spikes
were here on the top. And then once we have our
spikes here that we like, now we can just hit I on this viewport to
place a new keyframe. Now if we go down here and drag our playhead
back and forth, we can see the spikes
are pretty large. They start getting a
little bit smaller, and then they
slowly recede until around 50 when they're
just these little bumps. All we're really doing with
this frame 40 keyframe is just guiding the movement to get a look that
we're actually after. We'll be doing this process a few more times during
the animation. Now we can head to frame 80 and we're going to
continue moving this magnet down so that the spikes that we're seeing here appear right around here. We want them to be about
the same depth of Cs, so they're going to
be more or less just bumps and we're looking for them to land right
around here on the bottom front
side of the orb. In our left view, I'm just going to rotate around so I
have a bit better view. I'll hit G to start
moving this magnet. Going to move them down. So this might be a
two part movement. So first, I'm going
to move them down to roughly the right
position on the orb. Then I can rotate my view. Again, I'll hit G,
and then I'll pull this magnet out of the orb a little bit so these
spikes stay smaller. We can position them up
a little bit higher. Until we find a position
right around here. Again, once you're
happy with what you're seeing over here
on the right side, you can just hit I to
place your keyframe. You might have guessed already,
but we're probably going to have to place a keyframe
here in the center. So if we drag back and forth, we can see here that the spikes grow pretty considerably
right around this 65 framewrk as they travel to where it is supposed
to be here for the 80. I'll leave it up to you if
you'd like to fix this issue, but just as a quick
example of how I fix mine, we're going to go to frame 65. And again, in our view here, we're just going to
move this orb so that it's not so far into
the sphere again. So we can hit G,
move it out so that these spikes remain pretty
small right around here, and then I'll hit I to
place my key frame. Now I can just drag back and forth and see if it
looks like I wanted to. And they stay a pretty
consistent size, so I'm happy with that. Now let's go to frame one, ten, and we're going to make the
spikes completely disappear before they emerge again right before the end of the animation. And we're going to
want the empty object, so the magnet placed
basically right in front of the camera at the
lower portion of the orb. So we can do that just from
here on the left side. I'm just going to
rotate my view, so I'm basically just
directly above the orb. And we're going to move it directly in front of the camera, and I only want to move it until it's basically just gone. So if I look on the right side, we can see that these
spikes just start disappearing. So
right around here. So I have a little
bit of a gap here, and the cameras basically
right in front of this magnet. If I spin around,
you should also have your magnet pretty
low below the camera. Once you're happy with
what you see over here, we can just hit the eye
key to place our keyframe. Now we can had to frame 160 over here near the
end of the animation. This will be the last
keyframe featuring large spikes just before
the end of the animation. And we're going to want
them to appear down here on the bottom right side,
basically in this corner. So in our left viewport, I'm just going to rotate
my view around, so I'm kind of seeing from
where the cameras looking. I'm going to move this off
to the right side using G. I can adjust my view from the top and
move it a lot closer, we can see here that I'm
starting to see spikes. They're a little high, so
I'm going to move it down. But first, let's get the spikes about as
large as we want. Something like that is fine. I'll rotate my view down again. I can pull this down so that the spikes are more popping
out the bottom right corner. And this might take a
little bit of fiddling with to get it exactly
where you want it. And again, you can place
these wherever you like, but this is where I'll be
placing mine for the video. So I think right around
here looks good. In this case, I don't mind these spikes poke outside the frame, as I want these to be
relatively extreme. Once you're happy
with the placement, you can just hit I to
place your keyframe. Now we can drag back and forth 110-160 and see
what our spikes do. As we can see here,
they go from 80. They're just little pumps,
then they disappear. And then they start appearing
here and then quickly get really large as they
move towards the right side. And then our last keyframe, we're going to move
our playhead here to the very end to frame 180. And this last frame's goal
is to make the spikes disappear into the orb before
the end of the animation. Recommend that as you move this magnet to make
them disappear, that you actually
start moving it towards the back side as well. This will make the
spikes disappear as they move around the corner, so to speak, as if they're traveling towards the
back side of the orb, and then we just
lose sight of them. So in our left side here, this would probably be pretty
easy from the top side. So we're going to look at the
top of the orb here, hit G, and we're just
going to move them out to make them disappear, and then we'll push them back a little bit
because we want it to look like the spikes
of travel out around. So somewhere around
here should be fine. And then once you're
happy with the placement, just hit I to place
your key frame. Now let's quickly check this movement, just
moving 160-180. We can see here
the spikes emerge. They're the largest
they're going to be, and then they start receding
and as they recede, they move towards the
back side of the orb as if they're just receding and
then going around the orb. Now that we're done
with our last keyframe, we can go over here
to the play button and see what all this
looks like in motion. We can just hit the
play button found here. We can now see the
spikes emerge and disappear as they travel
across the surface of the orb, giving it an almost
living appearance. If there's any timing that seems too fast or
too slow to you, feel free to select
the keyframes and slide them left or right. This will speed up or slow
down the affected movements, based on the distance
between the key frames. More distance between them means that that
movement is slower, less distance between them
means that movement is faster. I mentioned at the beginning
of the lesson that this animation isn't
technically seamless. This is due to the moving
liquid noise pattern on the surface of the orb not resetting to its
original position. You'll notice that right
as the animation ends, even though there's
no spikes on the orb, we can still see a distinct pop, where the noise pattern
resets back to the beginning, and then the spikes
appear at the top again. This is what's making
it not seamless. This isn't necessarily an issue. If you don't plan on
making an animation that can seamlessly
loop on itself. But if that's important to you, we'll need to add more time to the animation
so we can return the empty object to the same location it
was at frame zero. So if you'd like to
make your seamless, we can go down here and
pause the animation. Then we're going
to add more time to the end of this so
that we have time to move the magnet back to the top before it
starts over again. We'll go down here
to where it says end and we're going to
add just one more second. We're going to set this to two, ten, and then hit Enter. Down here at the bottom
right, we'll see this scroll bar has a
little black dot on it. If we click on this black dot and then drag it
over to the right, that'll let us see the
rest of the animation. Now we're going to
go here and grab our playhead and move it to the very end
of the animation, which is frame 210. And then over here
on the far left, we're going to hover
over this gray portion down below the lighter area. We'll click and drag over
top of this keyframe here, highlighting it in yellow. Now we can hit Control C
to copy this keyframe. And then we'll hit
Control and V to paste the keyframe over here on the right side where
the playhead is. So all we've done is copied this very first keyframe and pasted it again
at the very end. So if we drag back and forth
here between frame 18210, we'll notice that the magnet
here on our left viewport, travels right back up
to the very top of the animation so that it's
ready to begin again. However, we'll also
notice that it's taking a direct path because it's always going to move directly from one
place to the other. It doesn't know that we want
it to curve around the orb. So to fix this, just
like last time, we're going to
move to frame 195, which is about right
in the center. Rotate our view a little bit over here so we can
get a better view, and we'll just hit G
to move this magnet. We're going to move it
pretty far outside of this because we really don't want it to get
anywhere near this. So somewhere over here
is probably fine, pretty comfortably far
away from the orb. Then we can hit I to
place our key frame, then go over here and
drag back and forth and just make sure that it doesn't
poke into the orb at all. And that's it. We've
now made it seamless, so we go down here and
play our animation. We'll notice that there's no
really noticeable difference between the beginning and
the end of the animation. It simply loops on
itself and just keeps playing from
the end back to the beginning without
the ability to really tell where it's going from the
beginning to the end. With our animation finalized, we're just about finished. And the next lesson,
we'll render our final animation and discuss the class project.
I'll see you there.
5. Rendering the Final Animation: In this lesson, we'll render our final animation and
discuss the class project. Let's begin. This is it. We're ready to render
our final animation so we can share it with all
of our friends and family. Luckily, we've been using the EV render engine to
create this project. So we can expect
some really fast render times for the
final animation. Before we start the
render, though, let's add a few
compositing effects to improve the look of
the render even more. We'll start by heading up here to the compositing workspace. This workspace allows us to add additional post processing
effects on top of our render. Add things like glare
or lens distortion. The default layout for this workspace isn't
super helpful, in my opinion, so let's quickly customize it so
it fits our needs better. Let's start by going over here
and clicking on use Nodes. Can hover over this viewport and hit N to hide the side menu. Now let's move our mouse over here to the top right corner of this viewport until it turns into this
little plus sign. Now we can click and
drag from this corner. And move it over about halfway to make two
different viewports. We're going to switch
this right viewport by going over here to
the top left corner, and then we're going to
choose Image Editor. Now let's quickly render a still image that we have
something to look at. Let's drag our playhead to frame 160 down here on the bottom. Then we can go over here
to the top left to render, and then choose render Image. Or you could also just hit
F 12 on your keyboard. Okay? And just like that,
the render is done. However, we can't see it yet, and that's because we
need a viewer node. So we're going to
go down here to where it says render layers. We're going to hold
Control, Shift, and then left click on
this render layers node. This will use node wrangler to create this new viewer node. For now, let's just drag this viewer node over
here to the right. We can also drag
this composite node over here above it to the right. If you can't see your
image like I can here, go up to this
backdrop button and then turn it off and then
turn it back on again. That should hopefully get
your image to show up. Once you can see the image, we're actually going to
turn off backdrop for now. So we'll just click
this button to hide it. In the right viewport,
we can go over here to this small button
with the picture on it. We're going to click
this drop down and then choose viewer node. This will allow us to see
our render over here in this image without having to see our node sitting
on top of it. Before we start adding new
nodes to create new effects, let's clean this
up a little bit. So we're going to hold down
Shift on our keyboard, and then we're going to
hold in our right click on our mouse and drag
across this line. And we can see when we let go, it makes a new dot here in
the middle of the line. Now we can drag
from this dot down here to the image socket
on the viewer node, and this will allow us to use the same line for
both of these nodes. Now on the left side, let's
zoom out a little bit. Drag select over all of these, including the dot
so that we move it. And then we're just going
to move them over to the right to make some
room here in the middle. Okay, so now we're
ready to start adding some effects
to our image. Let's start by adding some
glare to the image so that the brightest parts
of the highlights have some subtle
glow around them. In this left port here, we're going to hit Shift and
A to bring up our ad menu. Then we can click Search, and we're going to type in glare, GLA, and then you can see it here at the very top of the
list, we'll choose glare. Now they just drag this over
here to the left side of this line and then once it's
highlighted on top of it, just click to place it and it'll automatically
connected for us. Let's zoom into this
glare node that we added so we can
see it a bit better. Over here on the right
side, we can see that this is already making
an effect on our image, it's adding these
bright hot spots in this shape of the stars
across our image. While this is an
interesting effect, it's not really the
look that we're after. So we're going to
change some settings over here to get a better look. First, let's change the
mode. So that's up here. Right now it's set to streaks,
which is the default. We're going to switch
s instead to fog glow, which is found just below it. We can see now that these
stars are gone and it's replaced by a subtle glow around each of
these bright spots, which is a lot more realistic. There's two more settings
that we change here. So the first is the threshold, and make this a
little bit larger, you can see the word, and
then below that is the size. So first, let's just
change the size. So if we set this down to seven just by clicking
this little arrow here, we can see here that the glow is just a little bit smaller. If we increase it, the glow goes out further
past the highlights, and if we lower it,
it gets smaller. Slider for the size only
goes as small as six, and it goes as high as nine. So this is the largest
we can make it, and then six is the smallest
that we can make it. For our project, we're
going to set this to seven. Next, we have the threshold
found here above it. This is what determines what's bright enough to receive glow. A lower value for the threshold will make more things
receive the glow, and a higher value will make less things
receive the glow. So things need to
be even brighter, so the pixels on this image
need to be even brighter in order to receive glow if
we increase the threshold. If we lower it, they don't need to be quite as
bright in order for blender to start adding glow on top we're going to make ours
just a little bit lower. We're going to set it
to just 0.9, hit Enter. And it just makes
the glow prevalent on a little bit more of
these bright surfaces. Next, we're going to add one last compositing effect
called lens distortion. So in our left port,
we're going to zoom out a little bit so that we can see the gap between these two. Then we can hit Shift and A to bring up the
ad. Go to search. Then we'll type in lens LEN and then we can choose
lens distortion. Again, we're going
to drag this between the glare and the end here and just place it
on this line and click to have it
automatically connect. Let's zoom into this node. And this new lens
distortion node allows us to do just that
distort the lens. So if I make this node
just a little bit wider, we can see the sliders
here at the bottom. We have distortion, and
we have dispersion. Dispersion is typically what you'll be using when
you add this node, but we'll go through
both of them first. So distortion, if we
increase or lower this, we'll see that it's changing
the distortion of the lens. So a higher value will
make it more spherical, and then a lower
value will distort the middle so the middle is
smaller than the outside. These negative values here mimic something similar
to a rectilinear lens, and then these positive values mimic something more
similar to a fish eye lens. We won't be using any of the
distortion for this image, so we're just going to
set this back to zero. We will, however, be using
dispersion found here below. Let's go down here and
set our dispersion to 0.05 and then enter. So we'll notice that our image
moved just a little bit, and it also seems to
zoomed in a little bit. This dispersion value, though, is mostly found here along
the edges of the frame. So if we zoom in on this image, we'll notice down here that we're starting to see a bit of a rainbow fringe around
the edges of our object. And the closer we
get to the corners, the more obvious it is. So it's pretty obvious here, whereas if we move closer
here, we can barely see it. And that's because
this dispersion effect primarily affects just
the edges of the image, and it leaves the
center untouched. If we increase the value higher, so if we turn it up really high, something to say one, we'll notice that it does come along with some distortion, such as the slider above it, but it's primarily adding all of this rainbow
effect we're seeing. But if we zoom into the very
center of the image here, we're not really seeing any
of that rainbow effect. It's because even at
these really high values, you still only get
it along the edge. Obviously, this is pretty high, and we don't really
need this much dispersion for our image. So we're going to
set it back down to 0.05 and then hit enter. This small amount of dispersion that we're
seeing here along the edges makes it look similar to something like
chromatic aberration, which is something you find
on actual camera lenses. So while it's essentially
making the image imperfect, it is actually a little
bit more realistic to have a tiny bit of dispersion found along the
edges of your image. In our case, I
also think it just looks cool having this
rainbow blur at the edge. And that's it. That's all the
compositing effects that we're going to add. So we're ready to finalize our animation for
the final render. All we really need
to do is set up an output location and an output file type.
So let's do that now. We're going to go over here to the rendering workspace found directly next to the
compositing workspace. You notice that
this image here in the center looks
like our render, but it's missing all of
the effects that we added, and that's because we added them after we rendered our image. So if we simply render
our image again by going up to file render image, we'll now see all
these effects that we added are applied
on the image. Now let's adjust the
output properties. We can find those over here with this little printer
printing out a photo. So we'll click on this tab.
We're going to go all the way down here to the output
settings found at the bottom. And then first, we need
to set a location for our animation to save when
it's finished rendering. We'll do this by
going over here and clicking on this little
white folder icon, and then you'll need to
navigate to a location on your computer that you'd like
to save this video file. I'd recommend that you save
it in the same place as the blender file if you're
unsure where to choose. Lastly, we need to go down here and choose a name
for our animation. I'm going to name
mine Vero fluid, underscore animation,
underscore 01, and then lastly, I'll end
it with another underscore. So I'm going to put one more underscore at
the end of the name. The underscore at the
end of the name is important as it provides
a space between the name and the
automatic numbering that Blender places
after the filename. Without the underscore, the
automatic frame numbers that Blender places
at the end of the file name would
run right into the version number that
we added here being 01. Underscore just adds
a little bit of a space between those so
they don't run together. With our name
finished, we can just choose except down here
at the bottom right. Now we need to
change the file type this animation will be saved as. So over here on the right side, we're going to
choose file format, and we're going to
change it from PNG to FF MPEG video instead. Now we'll go down
here to encoding, twirl this open, and
then for the container, we're going to choose
MPEG four instead, which is just an MP
four video file, which is a very
universal file type. And then, lastly, we'll go
down here to output quality, and we'll change it from medium
to perceptually lossless. This will ensure
that we don't have too much compression
on our image. With all of these settings,
we've told Blender to create an MP four
video file with the quality turned up
slightly so that we get a minimal compression on
our video. And that's it. We're ready to render
our animation. To do this, we're
going to go up here to render and then we're going to choose Render Animation instead. Or you can hit Control and F 12 at the same time
if you'd prefer. This will begin rendering
your animation, starting from frame one,
so you don't have to worry about setting the playhead
there at the beginning. It's going to do
that automatically. Also, don't worry
if it seems like the compositing effects that we added aren't being
shown on each frame. Blender sometimes skips the visuals for
these as it renders, but it will still show
in the final video. This should only take a
few minutes to render, so I'll see you in just a
moment when mine is finished. I recommend you pause the video until your render
finishes, as well. I'll see you in just a
moment. Alright, my animation is finished, and it looks great. It only took my computer a few minutes to
complete this animation. So hopefully yours
wasn't too much slower. Now that the animation
from class is complete, what can we do to customize
it for our class project? There's a few simple
changes we can do to give your
animation a unique look. Let's go over some of these simple changes
we can make now. First, before we make any
adjustments to this file, let's save a new version
that we can play around in without
affecting the original. To do this, we're going
to go over here to file, and then first, we're going
to save our file as is. So make sure that
you save the file first so that you can save
the original as it is now. And now we're going to
go back to file again. And this time we'll
choose Save As instead. Now we can go down
here to the name. We're going to click on
the front of this name. We're going to type
the word class. Project and then add an underscore to put
a space between them. This will give our
file a brand new name and then use the original
file as the base. Now we can go over
here and choose Save As, and there we go. Now we're inside the new class project version
of this file, and our original is saved
and safe somewhere else. With our new version saved, we're ready to
begin customizing. The easiest change is simply changing the color
of the faro fluid. Let's head back over here to the layout workspace where
we were working before. Now we're going to
switch this left UPort back to the Shader Editor. So we can do that by
using this dropdown. The choosing Shader Editor. In our right viewport,
we're going to select the orb here in the center so that we can see the material, and we're going to
zoom out a bit. So we can see the
principled BSDF this large green node here. We'll also need to
make sure that we can actually see the material
here on the right side. So at the top right,
we're going to switch this to the
rendered view. And we can do that
just by clicking this button here
on the far right. Changing the color of our
faro fluid material is as simple as just changing
this base color found here. So if we click on this color
box next to base color, we can use this color picker and just choose any
color we'd like, you'll move it to somewhere on this circle here
to choose the color, and then on the right
side, we can drag this up so that the
colors a lot brighter. So maybe I'll make mine a
really bright red in this case. Free to change the color of your material to whatever you'd like. We can also change things like the roughness
for the material. If we zoom in here to
get a bit better look, we can drag this
roughness slider up to make the material a
little bit less mirror like. So if we want it
to be a bit more blurry, we can make
it really high. Or if we still want it to
look a little bit metallic, we can move it to around here, maybe 0.3, in this case. Another change that's relatively easy is adjusting the HDRI. That's what's controlling
the lighting for our render. So in our Shader
Editor, over here, we can go up to object
at the top left, and we're going to
switch it to world, which is where we set up our
HDRI image to begin with. Now we can click on
this white folder icon on this interior dot XR node, which this is actually the
file name for this file. Can go over here and click on this white folder to open it. Then we have all of
these different options that we didn't choose before. In this case, I'm
going to choose maybe the sunrise image here
and then hit open. Now we can see on my render
on the right side that a new HDRI can really change
the mood of the image. We can also use this
Z rotation found here to adjust the rotation of this HDRI to change
the lighting. I think in my case,
for this HDRI, somewhere around 300 for
the Z looks correct. We're getting some
nice highlights here. We have a relatively
unintrusive background and everything generally
looks pretty cool. You don't like any of the
options that you have already downloaded and you want
a completely new HDRI, such as the one that you saw for the intro video in this class, you can find them free at
the website Polly Haven. There are a ton of
different options here, and I'm sure you'll find
something that you. So you would simply just
choose the HDRI that you like, then you can go over
here and download it. That'll give you a file
that you can use in that open menu inside Blender and then choose
that as your HDRI. I recommend you
save this new HDRI along with your blender file and the animation
that we rendered out. Depending on the
HDRI that you use, you might want to
add a little bit of depth of field to your camera. The HDRI images included with Blender are relatively
low resolution, so they can appear kind of
pixelated at certain angles. So we can see here if I zoom in, it's pretty obvious that this
is a low resolution image. Depth of field that we add, we'll apply a soft blur to the background to obscure
this pixelization. So let's zoom out here so
I can see my whole image. Then we can go over
here to the top right, and we're going to
choose our camera. Now we'll go down here to
the object properties tab, which is this little
camera icon in green, and then we can turn on
depth of field by checking this box and then twirl it open so that we
see the options. For our purposes,
we can just use the focus on object setting. So we'll click on this
eyedropper here at the top. You can click on this sphere, and that will make
it the focus object. So Blender will use
this camera to do its best to focus on this object
in terms of its distance. This will lock the
focal distance to the center of the orb, which works perfectly
fine for us. Then lastly, we'll go down
here to the F stop values. So lower numbers will
make the background blurrier and higher numbers
will make it less blurry. So for our purposes,
we'll set it to one and see what
that looks like. So now if we zoom in on
the background here, it just has a soft
blur overtop of it and you can't tell
that it's pixelated. But our orb here in the center
is still relatively sharp. If you wanted it even blurrier, you could set it to
something like 0.5. But then you'll notice
that your orb is actually starting to get a
little bit blurry, as well. Would recommend
something around one, but it's free for you to choose. And if you didn't like
quite how blurry this is, you could set it to a
higher value like 1.5. That will make the background just a little bit less blurry. The last obvious change I'll be explaining for this
lesson is the animation. This render is largely about
the animation of the spikes. So if we make any changes
to this animation, it will make a noticeable
difference in the final video. I won't be walking
you through how to customize this entire animation, but let's walk through
just a few things that will be useful when
customizing your own. Firstly, how do we update
the value of a keyframe? This will let us
keep the keyframe at the exact same place on the timeline while updating the position of
the empty object. So first, when you just select the empty object,
which in this case, is the magnet for our scene, then on the left
side, we're going to switch this back to
the three D view port. So after you're done
adjusting your HDI, you might want to switch
this back to the object. That way you can adjust the
material for the object and not be adjusting just
the world settings. So again, we'll go up
here to the top left, and we're going to switch
this to three D view port. And now let's go down here on our timeline to a keyframe
that we'd like to update. So in this case, just
for the sage of example, we're going to go to frame 65. And then here in
our left viewport, I'm just going to move
this magnet object a bit closer to the orb so that
the spikes are even larger. Now in this left port, we're just going to hit
I to place our keyframe, and that's going to overwrite the original keyframe
that was there. If we go over here to
our object settings. So if we go over here to
our object properties, we can see here that
the keyframe has been placed because
these are all yellow, and it's using these new
values that we moved. Now we can zoom our
view out a bit, so we can see the
full animation. So if we go down here and drag our playhead back and forth
to see our animation, we can see that the subtle
spike that used to be here at frame 65 is now a
much larger spike. So we've completely updated this keyframe to
change the animation. The last thing I'll show
you is how to retime the animation by moving
and scaling keyframes. This will let us keep the
overall animation the same, but allow us to make
certain movements faster or slower based on where the
keyframes are on the timeline. The easiest way to
ret an animation is to simply just drag
around the key frames. So if maybe in the
beginning of the animation, we want these spikes to appear much faster
than they are now. Instead of taking a full second, maybe we want them to
only take a half second. We would just drag select
over this keyframe here, turning it yellow to let
us know it's selected, and then we can click
and drag it and move it over here to frame 15. Now if we drag our
playhead back and forth, we can see that
it now only takes a half second for these
spikes to appear, and then they stick around for a little bit longer because we've changed the timing
between these two as well. You can also click and drag
over groups of keyframes, maybe we drag over
all three of these. Can reposition these as a group, so we can move these all
to the left as well. If we move our
keyframes to the left, it'll make them happen
sooner in the animation. And if we drag
them to the right, it'll make them happen later. If we move keyframes
closer to each other, such as moving 30 and 40 closer to each
other by five frames, it'll make this whole
action here much faster because there's less
time for it to happen. If we instead drag them apart, it'll make this
action a little bit slower because there's more time for this
movement to happen. One important thing about
moving keyframes, though, is you don't want keyframes to cross over top of each other. So if I grab this keyframe
here currently at frame 46 and I drag it
past this keyframe, now I've reordered
what's happening. So this action here now happens after this action when before,
it used to happen before. So we can see here this really changes the way it's working. So it's moving backwards now because I've reordered
these actions. That's something to keep
in mind when you're retiming and reordering
these keyframes. Another option for
retiming is to scale an entire
group of keyframes. This will allow us to
scale the distance between a group of
keyframes uniformly. By scaling them, we're not only changing their positions
on the timeline, but we're also
changing how quickly the animation plays
these movements. So as an example,
we'll drag select over frame 160 all the
way to frame 210. So we'll highlight all
four of these keyframes. Now let's drag our playhead over to frame 210 and
place it here at the end. Now while hovering
over the bottom, we'll hit S on our
keyboard for scale, and then we can start scaling these keyframes and moving
them further apart, or we can make them
happen much sooner. So in this case, let's make this happen a little bit slower. So we're going to scale it until the last keyframe ends
right here around 130. We've now made this
entire portion of this animation
occur much slower, so it takes longer for
these actions to occur. Important note about
scaling keyframes is they always scale from the
location of your playhead. If I put my playhead here at 1:30 instead of at
the end and I hit S, well, notice that
they're now scaling from 130 rather than from the
end of the animation. This is important to remember
when you're scaling, that way you don't accidentally move something further than
you thought you would. If I put it here, we
can see here that it's moving these keyframes from the center of the playhead. With that last change made, we reached the end
of this lesson. These are by no means
the only changes that you can make
to this animation, but this should
set you up to make some really cool
looking class projects. If you're looking for
more things to change, try adjusting things like
the Vornoytexture and the shader editor to
change the look of the spikes or apply this
material to a different shape. I can't wait to see what you all come up with for
your class projects. I'd highly recommend you convert the final video into
an animated gif, so it's easier to share on
platforms like Skill Share. You can find a full tutorial on how to turn this into
an animated gift in Lesson 16 of my cartoon
bumblebee animation class. If you'd prefer to figure
it out on your own, I'd recommend the free website,
easygif.com slash MAR. Good luck with your
animated Gifts. In the next lesson,
we'll end the class with some conclusions and
farewells. I'll see you there.
6. Conclusion: Congratulations on reaching
the end of our class. I wanted to take
a moment to thank each and every one of
you for taking my class. Your participation and
excitement for learning is incredibly rewarding for me as a teacher, and I can't
thank you enough. I hope you've had fun
learning how to create a simple animate hero
fluid material in blender. It's been a pleasure
guiding you, and I hope you found
the experience both fun and valuable. You've got these awesome
new skills under your belt, I can't wait to see where
your creativity takes you. I wish you the best
of luck in creating your own awesome
animations and blender. If you like this class, let other students know
by leaving a review. Your feedback really helps me understand what you found
most valuable in class. You can leave a review easily by going to the Reviews tab just below this video and clicking
the Leave a Review button. I appreciate the support. After leaving a
review, you might want to follow me here on
Skill Share, as well. You can follow me at any time by clicking the Follow button above this video or by going to my teacher profile and clicking
the Follow button there. Following me is the best
way to get notified when I release a new class or make
important announcements. Don't forget to check out
my teacher profile as well. You might find more classes
that you like there. Lastly, I want to thank
you all again so much for taking my class and participating
in the class project. I can't thank you all enough. I hope to see you
in another class soon. Farewell for now.
 Harry Helps, Professional 3d Artist