Transcripts
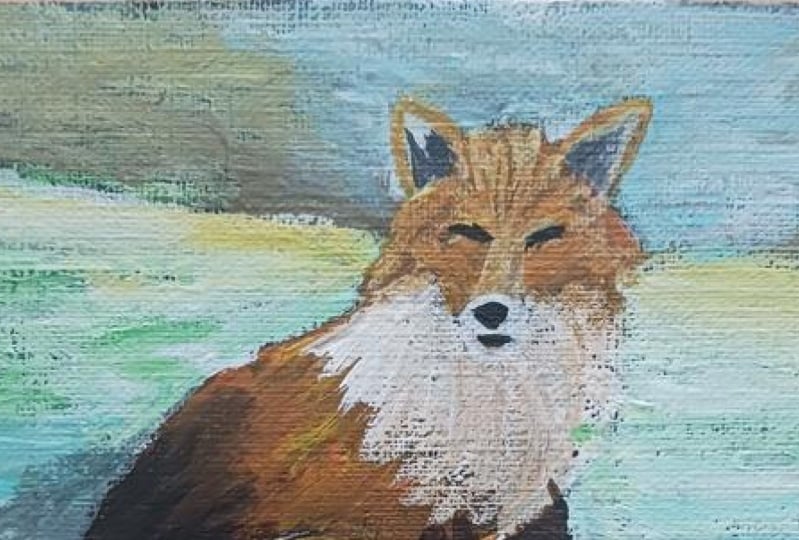
1. Introduction : Hi everybody and welcome
to today's class. In this class we are
going to be creating some little mini canvases. We're gonna be
working with acrylic. It's gonna be really good
to use these mini canvases because they really give you
the confidence to not feel, to stress, to finish
a big painting, but to work on these little studies and
get used to planning out ideas for paintings and getting the results
really quickly. In a class, we're
going to sketch out what it is that
we're drawing, which in this class as a fox. And we're gonna go ahead and
put it on the layers and really taken out of time
thinking about light and dark. The angles of the folks
come along and let's have some fun creating lovely
little pieces about work. But you can be proud
of C, you said.
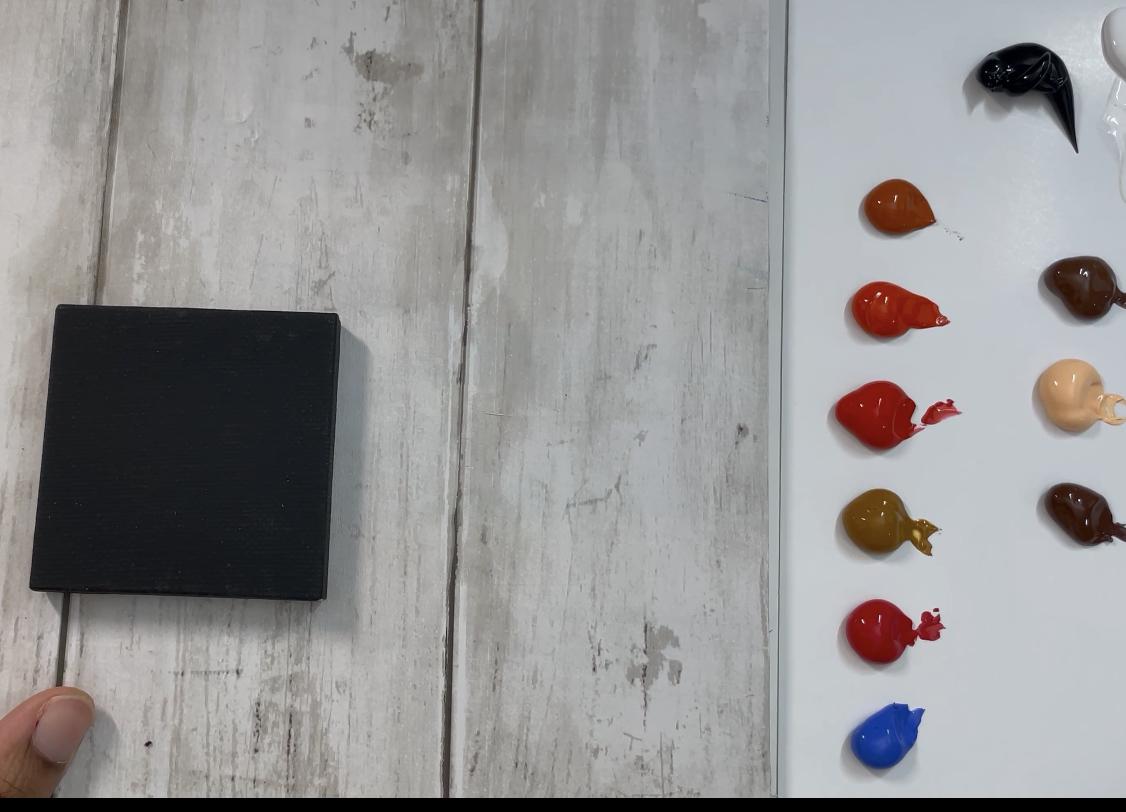
2. Tools, Substrate & Paints: Hi everybody to this class
here on Skillshare today, what we're gonna be
doing in the class is creating some little
petite boxes. So what I will do is put
up in a corner of the page to show you examples of foxes
have been doing recently. Large size 116 by
20 canvas pieces. And what we're gonna do
today is really just to create some foxes, but some mini ones. And I thought it'd
be nice to just do that as part of an
exercise for me, but also just to share how
to go about kind of paint sketching with results on
these beautiful little too, but 2.5 by 2.5 inch canvas pieces that have already
been pre painted black. And so I thought it'd be
really cool to use this. Gonna prepare this
here so you can see the different items I have. I have my also my tissue
which has good to have for your paint to clean it off
or if you have any spillage. The canvas is I have also this little postcard paint for details if I want to use it. Another kind of gel pen, white, this is all going to
be for drawing on the canvas so that
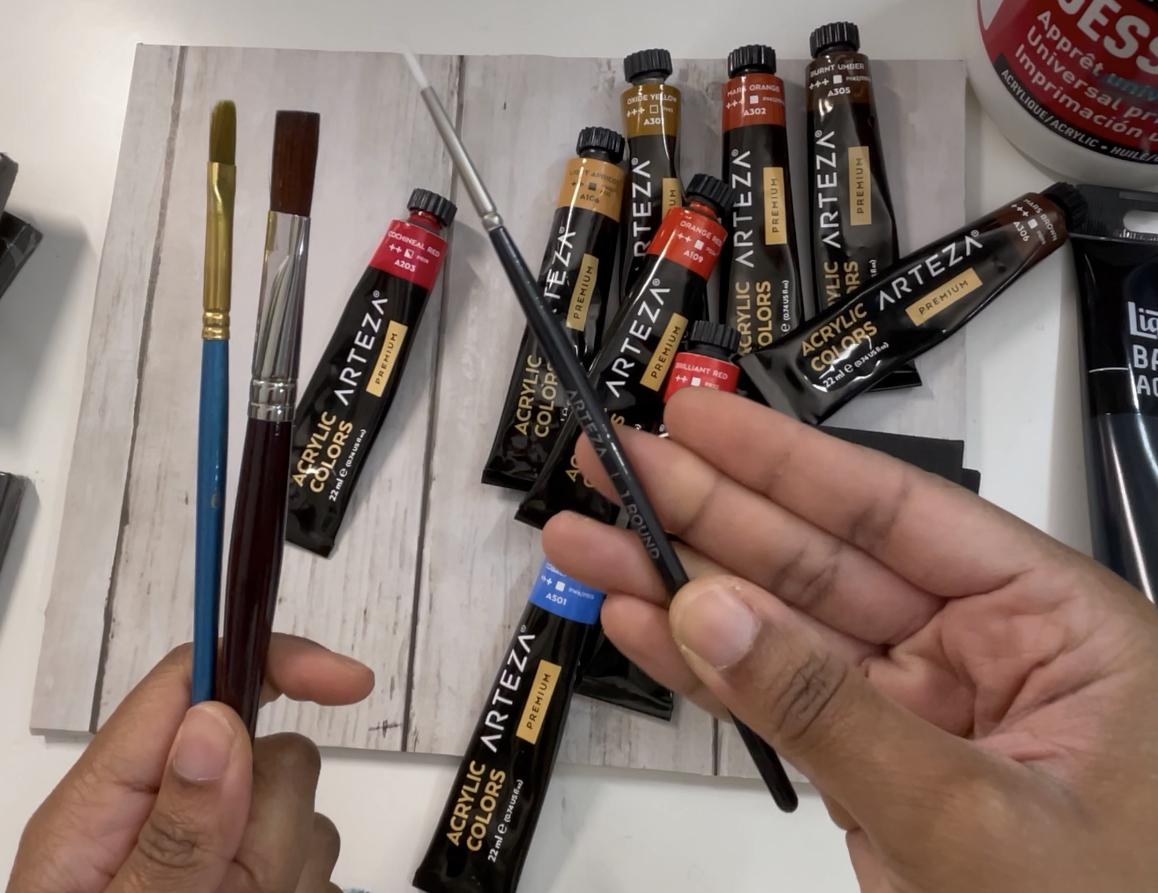
you can see them. And then I've got here three
brushes that we can use. The brushes are like, I've got the smallest
has our title one, which is like a size
one round detail brush that will be for going
and closer to the fox. Then this is kind of a
society to six flat. This is a bigger one in case I wanted to really
feel some spaces. It's, it's a twelv milliliter, meter flat as well. So I mean, you can look for whatever detailed
brushes you have and things and you can use
them on the canvas. I'll do this. Many of
these canvases is, I think is required
for the class. I've got a handful of them. Just going through
what you need. I've got a lot of different
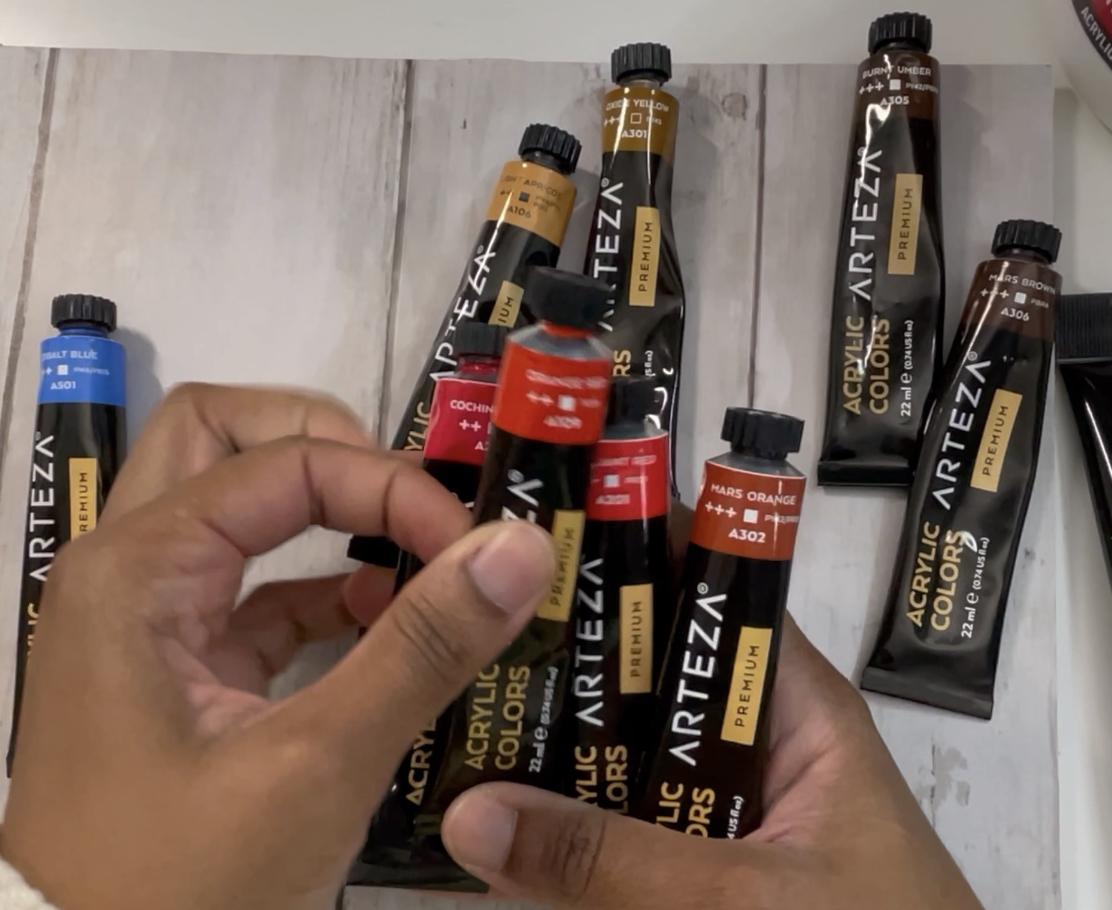
acrylic color as well, not too much variety in them. But for some reason I
like to have a blue. And so it could be
any blue you have. We could always add
white gesso to it. If it's too dark,
then I've got black. Jess, I always have
white and black, either acrylics or gesso to use. And then the colors
that I'm going to use. And I could have limited
the colors, but I didn't. So I want you to
think of colors that are kind of synonymous
with foxes. So I've got a variety of colors here that
look very similar. So I've got two
different kinds of reds. Even though this is saying
it's an orange red, I'm going to call it orange. But it's basically orange,
red, brilliant red. Cock Neil read, which I
can never say probably, that might not still
be how you say it. Maurice Orange. Then I've got light
apricot oxide, yellow, burnt umber, and then
Mars brown as well. Basically be super colors. I've got here, you might
think of other colors that fox reminds you of, but these are the colors I have. So we're gonna go ahead and
put these onto my palette. And then we'll get started.
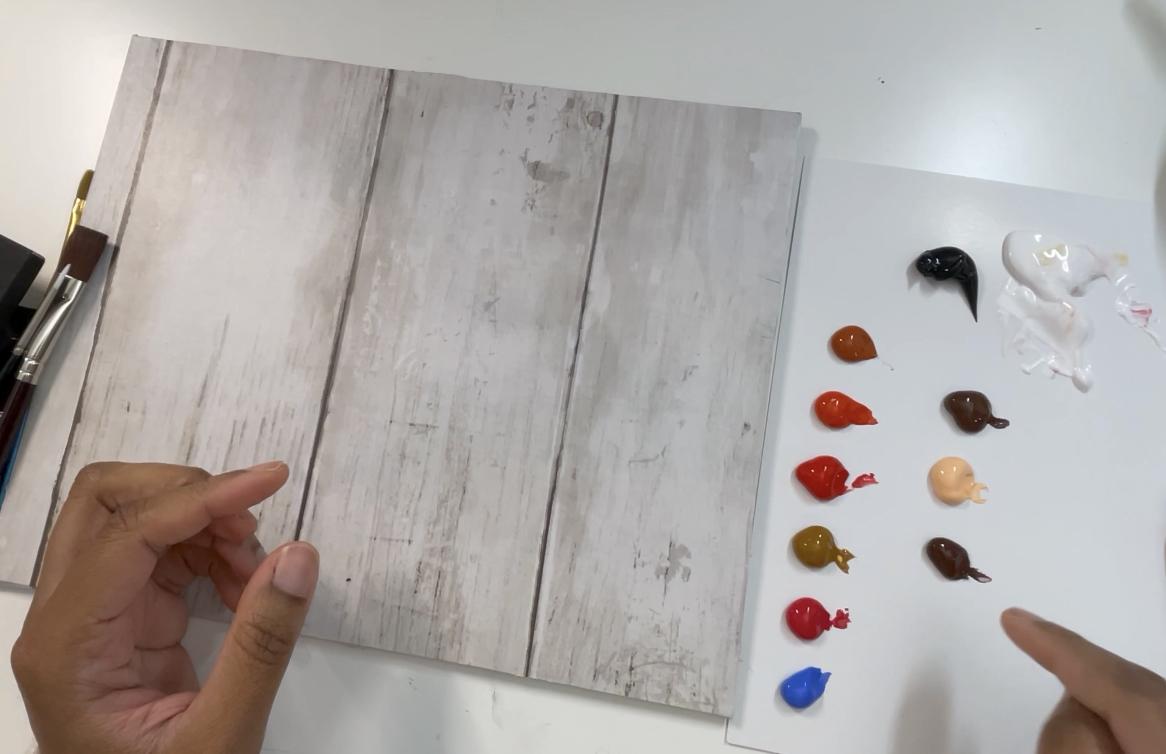
3. Laying Out Paint: I've got my palette here, which is actually an old kind of like Canvas packaging here. I'm just going to use
that as my palette. Because why waste paper? The surface is quite
nice and smooth as well. So that's going to be useful. So if we just put
the colors out, I'm going to start with like my main colors at the top here. I'm going to use 100. I'm painted on black. Why would I need
black in some colors? You might want to kind
of mix a bit darker and then that would work
quite well without having to get a palette
knife to get this out. My palette knife might paint, oh my gosh, my guess, it's terrible because
I have so many colors in there because I am a deeper, I've heard of that
as the reference for people using their paint
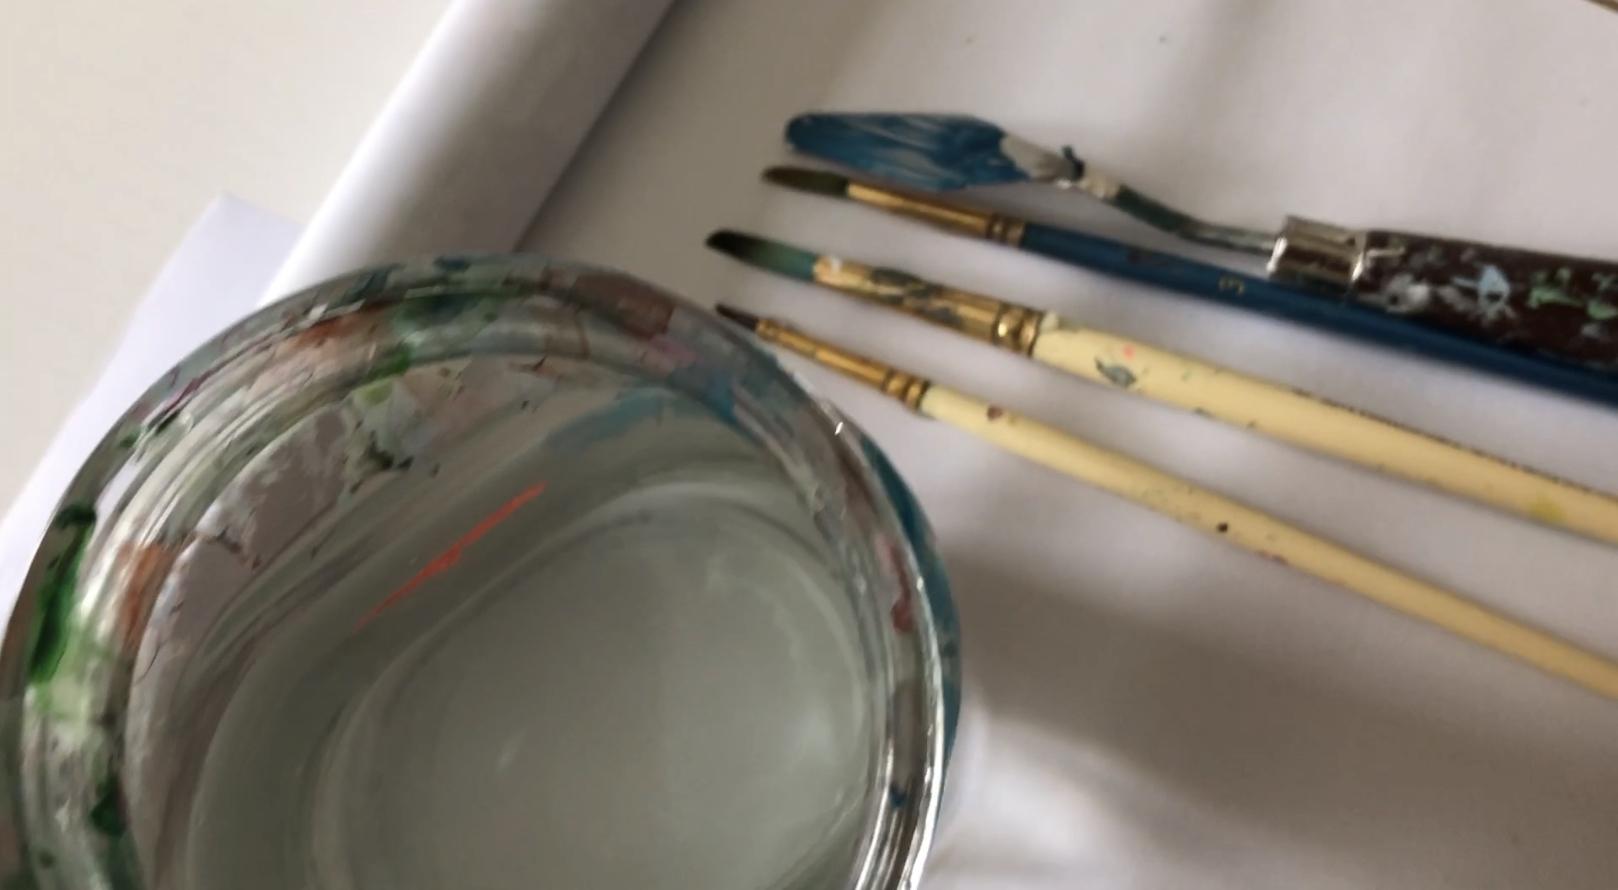
in side there, gesso. So that's what that is. It's very messy in there. It's going to put this aside. Let's see. Just put it over here. I've got that going on. I've got my water over here
as well that gonna be using. Then I'll just start
laying out my colors. As I said before, this is Morris, orange. Orange, red. There'll be as quick as I can
put in these white boxes. I love focuses a lot. This is brilliant red. I just that they are villainized a little bit
more than they need to be, but it's still everybody's
opinion, I guess. Oxide yellow. I just think even just in general that they just
beautiful animals. I think that's the
main thing for me. I loved wildlife. This is a cock, Neil red. I just loved wildlife. So a lot of my classes
to do with animals. Cobalt blue is blue. I've got here burnt umber. This Mars orange is very
similar to a raw sienna, which I've been using a
lot of recently as well. So light, apricot,
I'm trying to really embed the color names
of paint into my head. I love using colors. And I think I wanted to be more technical this year
with my terminology. This is a Mars Brown that was burnt umber and Morris
Brown was at the ductus. Depart from the black.
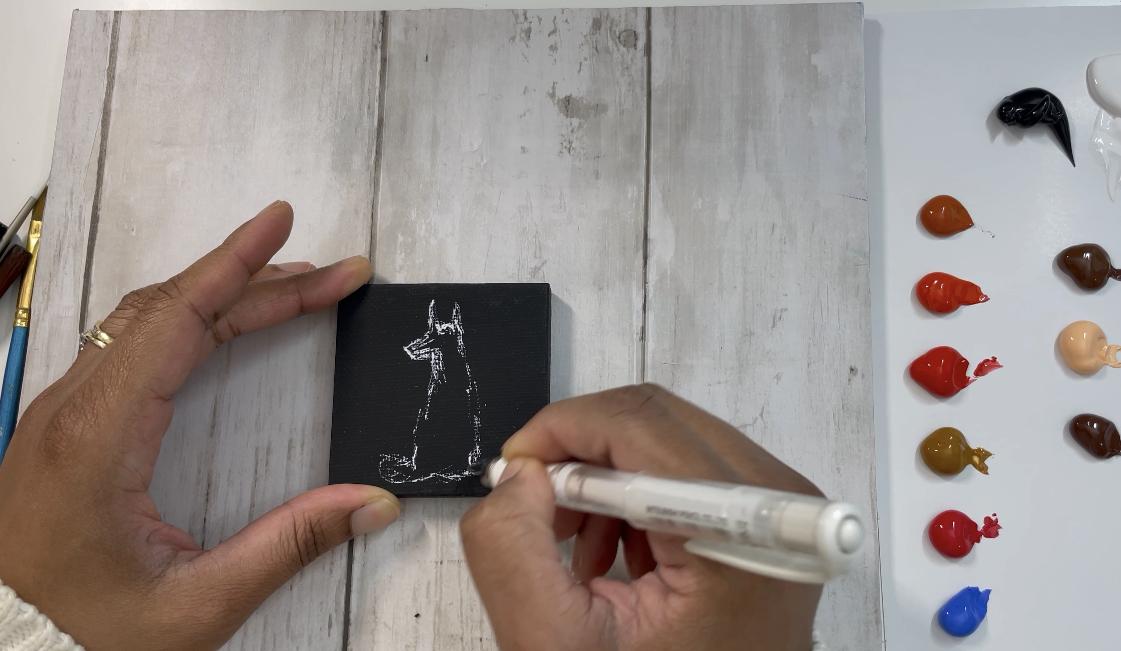
4. Sketching The Foxes: I'm just going to go in and just start creating little foxes. I'm trying not to
be squint here. I'm trying to
straighten this out. I'm just going to go in and just start sketching out a fox. I have different sum
using the gel pen. And I'm hoping this shows up
quite well on your screen. Just going straight in and
just sketching out a fox. And I love it because
when you see a sketch, you just think, well, okay, that doesn't look very
exciting sometimes. But I promise you it will turn into something very interested. That's the first sketch. Let's try another one. I've been trying to do
one of where the fox is actually standing at this one could be looking up that
way, they'll be interested. It was good to get like a
free images on maybe pixel. Decode it again pixels. There's different apps. Basically, they give
you free stock images. Pixabay is one of
them textiles as one. There's my fox. Number two, I was going
to do another pulse. I could do another fox
sit in facing this way. I've also done ones that I've shown you there of a
fox with its babies. So there's so many options of
how you can do your foxes. Because I'm gonna be
painting and I don't want to miss out on the
painting part. I am just going to go
straight into this very quickly and give you some
detailed painting instead.
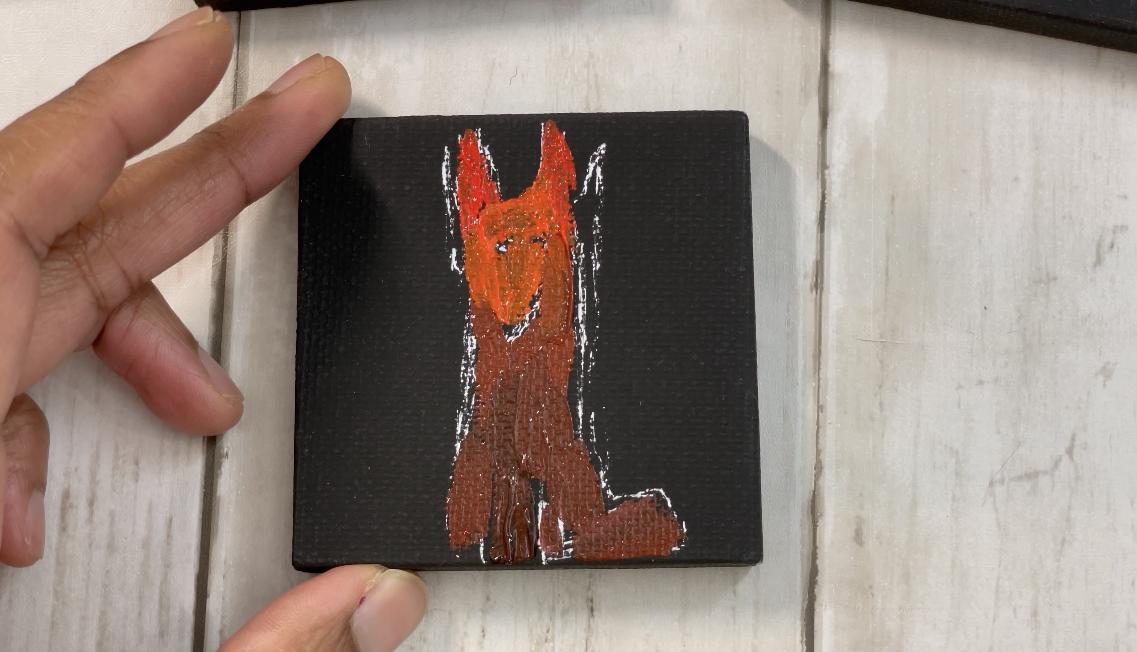
5. First Layer Of Foxes: In this segment, we are going to get straight
into painting. So I'm gonna go in, I think
that my detailed brush first, I'm just going to wet
the brush a little bit. I have my tissue here. I'm just going to start using some colors and see what I like. Maybe just because I
wanted to get it a bit. The colors in there
straight away, I'm just going in
and using my red, orange and the different
rates just going in. And using the darker, you can mix some of the brown, the browns and the burnt or
the Morris Brown and get darker areas like wherever they're supposed to be, shadow. Mix a bit of the black
and with the dark brown. And just play around with that. You can wait for layers to dry. I'm just kind of putting
that under Mapping. I'm going to add a
bit of the blue. This area here,
there'll be some white. Folks go back and add some black that goes
on its nose, eyes. This is through layers. So what I can do is go from a one of the
books to another. Basically build the layers. So while one is drying, we can go onto the next one. But I'm going to add the
background in this as well. I didn't quite clear is because
I wanted to kind of stay. And then I might start
adding some background, some of the apricot. And I'm not cleaning my brush. You can see it's not at, not actually gone ahead
and washed my brush, mixing that apricot
and width of the blues and browns and things that
we're still on my brush. Given a really
textured background. Once I've done this, I will go ahead and start
working on the next piece. So you've got some of that
black showing through. That's quite nice. Let's let that dry and let's
go into another piece. I'm going to rub off this residual excess and start
the same process again on this mixing and just with
the colors on a pilot and whichever side you want to do first the head,
the ears wherever. Not minded about the colors
mixing because that's all part of the layers. But as I said, this dark area is just thinking about where
does dark areas in the hips. So the Fox or if one side is light and
the other is in shadow, I think we could do
that with this one. The idea of light and shadow. This area here has light. Then this side where it's
faces as in the dark. You could do that. This side is dark. What I like to do sometimes
is used the reds and the black dark effect
because it's really cool. You can use just to
hint of color in with black and you get a shadow. Colored shadow of sorts. I'm adding the brilliant red with a black that
makes a kind of a brown. But you can go over
another layer again. Once that dries, you
can add more black, add some more black. You can see how much
black I'm adding the year and I'm just going
near the edge of the fox, some of it on his tail, but If it's not sticking out enough, like I feel like this might
not be sticking out enough. You take your time and
you build the layers. And it's just very rich. I might try the
blue in this sense. It looks like there
we go, the blue. It's very like it's, what I've been thinking about
with the blue recently is that the idea of
it being a cool, this is a cool side of the
fox and the other side. Because if we want to
be in that thinking, it would add more of a yellow. So if I put the yellow
Oxide on this side, remember again, I haven't
washed my brush up. Yellow Oxide and
then we can add some of the apricot and this
in a minute as well. And if you put a
layer that is dark, like, Oh, what do
I do about that? Let it dry and then
go over that again with a lighter color. But I love to mix because
people wonder sometimes how you get acrylics to have the
effect of oil paint. First, you have to
work quite quickly. Quickly, as you can see, you have to work quite quickly. And then second of all, you have to work wet
into wet so you can see this delicious texture that's being created and
that's, this is acrylic. I work very fast. I love acrylic because
what it's given me is the same results
sorted as oil paint, but it dries quicker. Just going in here and trying to add some light
into the side of this box. So I'm not adding some of that API call might
be using my white. Another way of this is, but you don't always
have to use white. You can use much lighter
colors to build your paint. Because I'm trying to
go from light to dark. I am introducing like the
Yellow Oxide a little bit here. I'm trying to get
the idea of going from I'm just going to put some of the burnt
umber on this side. I'm trying to tell
them myself, right? Any to remember
that it gets darker and I'm mixing it in and
going back and forth. And the colors mixing. The more you do this, the more you will
understand what to do with your painting. I like that one.
That's quite a lot of time I spent on that. Just maybe add the nose. We will come back to this. I'm going to go into this one and the ground can be
maybe the darker areas. I'm just going to
introduce this in here. You can see I'm going round
the sketch that I've painted. This experience that is making me just dumped the colors on. If I'm doing anything
dark, It's dark corners. If it's anything liked,
it's in the light. Where do you want the light? So it's that kind of
decision that you're making. Also, that side of that, you have an idea in
your head of what it is you're trying
to do this folks, is it a mysterious box? Does it? What is the falx doing? You can put a whole story
around your character. Basically.
6. Layers Continued: As we're going, we just
keep adding and adding. Then letting it dry
the layers dry. So I'm going to
straighten into my blue. As I said, I didn't wash my brush going into the brilliant red and just going into the brilliant
red and just add in. Thinking about how the colors really interesting to do that. This one, I'm going to
bring in a bit more of the blue, cobalt blue. I could add some of
the white to this. Still got the red
and now it's kind of making a purple color. Belt this down a bit. So I need to think, do I want
to keep it adult like that? But some white. There we go so we can see
how fox stuffed going on. It's outside, it's looking up. What is it looking at? What is the story of the fox? And it still has a little
bit of black in it. Add some darker color. Black shadow so I can
let this dry as well. Just looking at where there's
going to be shadowing it. I know it still have to
add some other areas. And another thing I've been
doing as well is that like on this one of that story
of light and dark and really be an extreme with it and dramatic for a small painting, that's probably a really
good idea to do that because then it makes the painting just look
very, very impactful. If I do that here. The thing you see,
once they dry, you can look at them
again and go No, I don't like I
want to change it. The reason that they
didn't foxes recently. Yeah, just a lot of
people love focuses. So I make folks like
Fox sculptures as well. So I'm gonna see if I can do some more of those
classes as well. I have other classes. I have a class here
on Skillshare as well that may not have other
classes here on Skillshare. And I do have one
sculpture class. I'm happy with,
but I wanted to do some more because I've
been doing a lot more. Just more classes coming up. I thought I would just mention that I want this
side to be lighter. I've added that bloom, but I'm going to
add this on top. Just having fun, the
color see layout. You can mix them
in so many ways. You can limit your color. Notice that I painted all
over my cream jumper. Not the best thing to be wearing for a class at the
moment. Here we go. Now I'm going to go
in and do the fox. Does have fun. Little fox. You can do folks
is at nighttime, can do them in yellow. You can mix the colors. It doesn't have to be the
colors I've done here. I just wanted to make something in this range
with these colors. Because from what I've
been doing recently, this just seems to be
what my palette was like. I'm making a whole
series of boxes. Yeah, I thought I
should do this. I like the way this
one is looking. And once it's dry, we'll add its face. More of his tail. Added as much white
as I could probably. Because there's a lot more
white to come on this. I'm going to leave
that one and I'll go back to the one we did first. I've had the idea of
making a mum one, but maybe that could be
a project for yourself. You could make one that's like a family of foxes or something. I think with this
layer, I'm going to try and make things a bit more. Some of the lighter
areas I'm going to add.
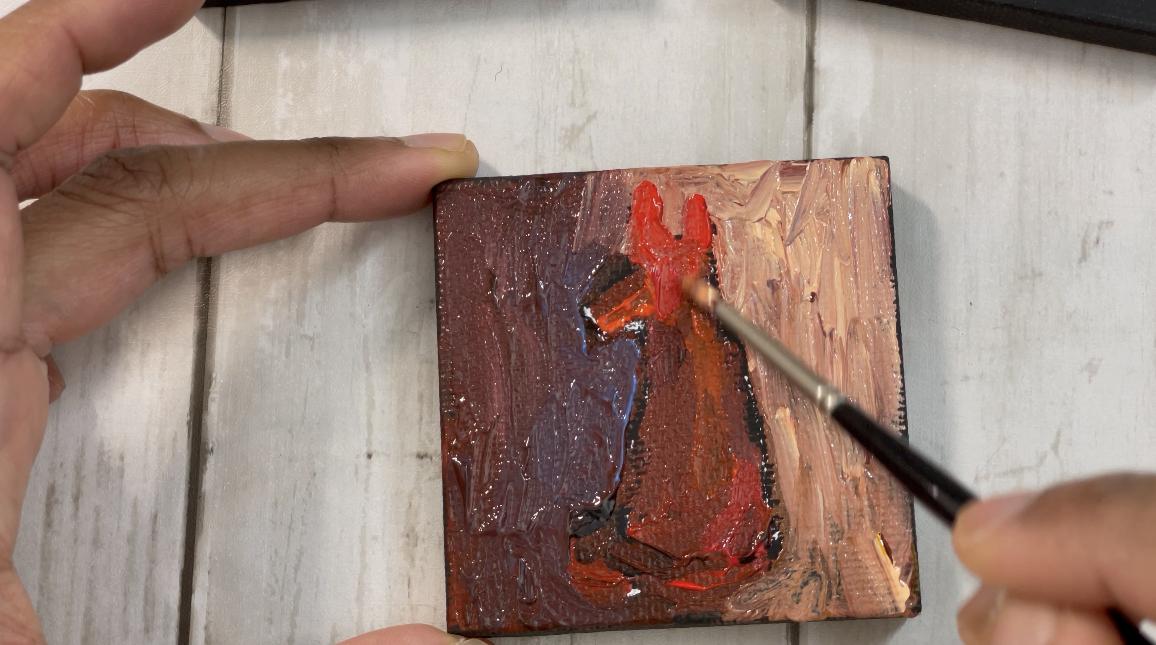
7. Final Layers : For this final part, we're going to just be working on an n. Some finishing touches, just puts in more
of the red into the box and trying to fine
tune it a little bit more. Also, getting some more of the white and as well
the white on this next. So what I will do though is
go through all the foxes. Then I'll come back and
do that final part. Making the legs have
some blue here. Some kind of older ones that have a bit of a white as coming in. This will be a bit more orange. White, bit more orange. I think is still very wet. So this is the part
where you have to wait sometimes a little bit for you try adding
some more details. Because I'd like to add some of the white shadow. This dot add in the
detail on the fox. I am putting the color
than doing it thick. I have to just drag it
and leave it alone. I can't be playing with
it because then it will it will raise
itself up basically. So you have to let it similar to add some of the
areas that also help to make the fox but more
the signature and stuff. So I'm gonna just add some more things
to emphasize. Just a lot of fun
just to keep on adding the layers just build up. You can fine tune it. Very simple exercise, but you get to practice painting
and just a small surface. Really loved this
apricot color as well. The blue mixed in it. But you can really take your
time and see how you mix the colors in a
bad at some white into this apricot and blue. You can mute it down
into the apricot. Just rub it a little bit more. I said at no point
did I wash my brush, which carries the
colors across as well. And so if you put
these together, they will look
like a collection. Just going to go into
this one a bit more. So there's two of
them. I'm not sure if the more time I take on them and then they
dry and different things, they'll look even better. So just add in more
and more detail. Add some of this blue in here. I'm going to bring in some
lighter colors. Mix it. And if you want to blend some more and then
you feel it's too dry, you just add a little bit
of water and blend that in a bit more blue. And then I'm going
to add some white. I like the texture on it. I don't want to lose
too much of it, but when they blend and a lot, then you end up doing that. But you can choose to leave
some areas without that. As you go and you get so many interesting
variations and things. In some more of this. Go down with the blue
and the API call, it looks a bit green now. Just got interest in mixes because your brush
doesn't always, you don't always end up
getting rid of all the colors. So I'm just going
to put blue there because I didn't know why I want this to
be a bit more blue. I want to go around this ear. I'm going to add some
more to the ear. Brown, bringing back more brown. Next. I can just
drag it lazily over that to kind of get kind of fade effect
on this lower area here. I'm gonna go back into the
actual falx and start adding in some more of the orange. Make an stick out a bit more. Just touch some of
the white and give them some more white
on those areas. Run it through back and forth
into the orange just to get some more fox colors going. Orange a bit more here. This is like a shadow just to
show the tail is coming up. A bit more shadow. Using black here to
show that it's dark. Black and the ear. Just light touches. If you want it really to be dark and just blend things together. We've gone over this again is
a bit of the brown and the red and the orange as well. So just taking that and
they're still got the shadow which has some more brown and some more black to
build that shadow backup. Yeah, it's just if you can hear my heater
or the background. My studio space is
in the gut ridge. These are the foxes,
so I'm just going to line them up for you to see. Is the class. You just try this out
for yourself as well. And see how you go. Similar colors
across all of them. You can make them
even more so similar. Here where I've got not
as much of the apricot, I could add a little bit more. Kind of drag that in a bit. It's dry it a little bit. You'd have to start
working on it again. Playing around with it. As you saw at the beginning, we used the gel pen to draw, sketch out the Fox. Then from there, we used acrylic paint and
built up the layers and looking at that idea
of where there was light and where there is dark. So that's how you get these
cute little paint is. And go ahead and do your own, and let me see what
they look like. And hopefully you
have a lot of fun and you'll be able to knock
out painting yourself. Doesn't have to be foxes. You can select something
else to use yourself. Yeah, That was fun. I will see you in the next
class. Thanks for joining.
 Beatrice Ajayi, Founder of HyssopArts