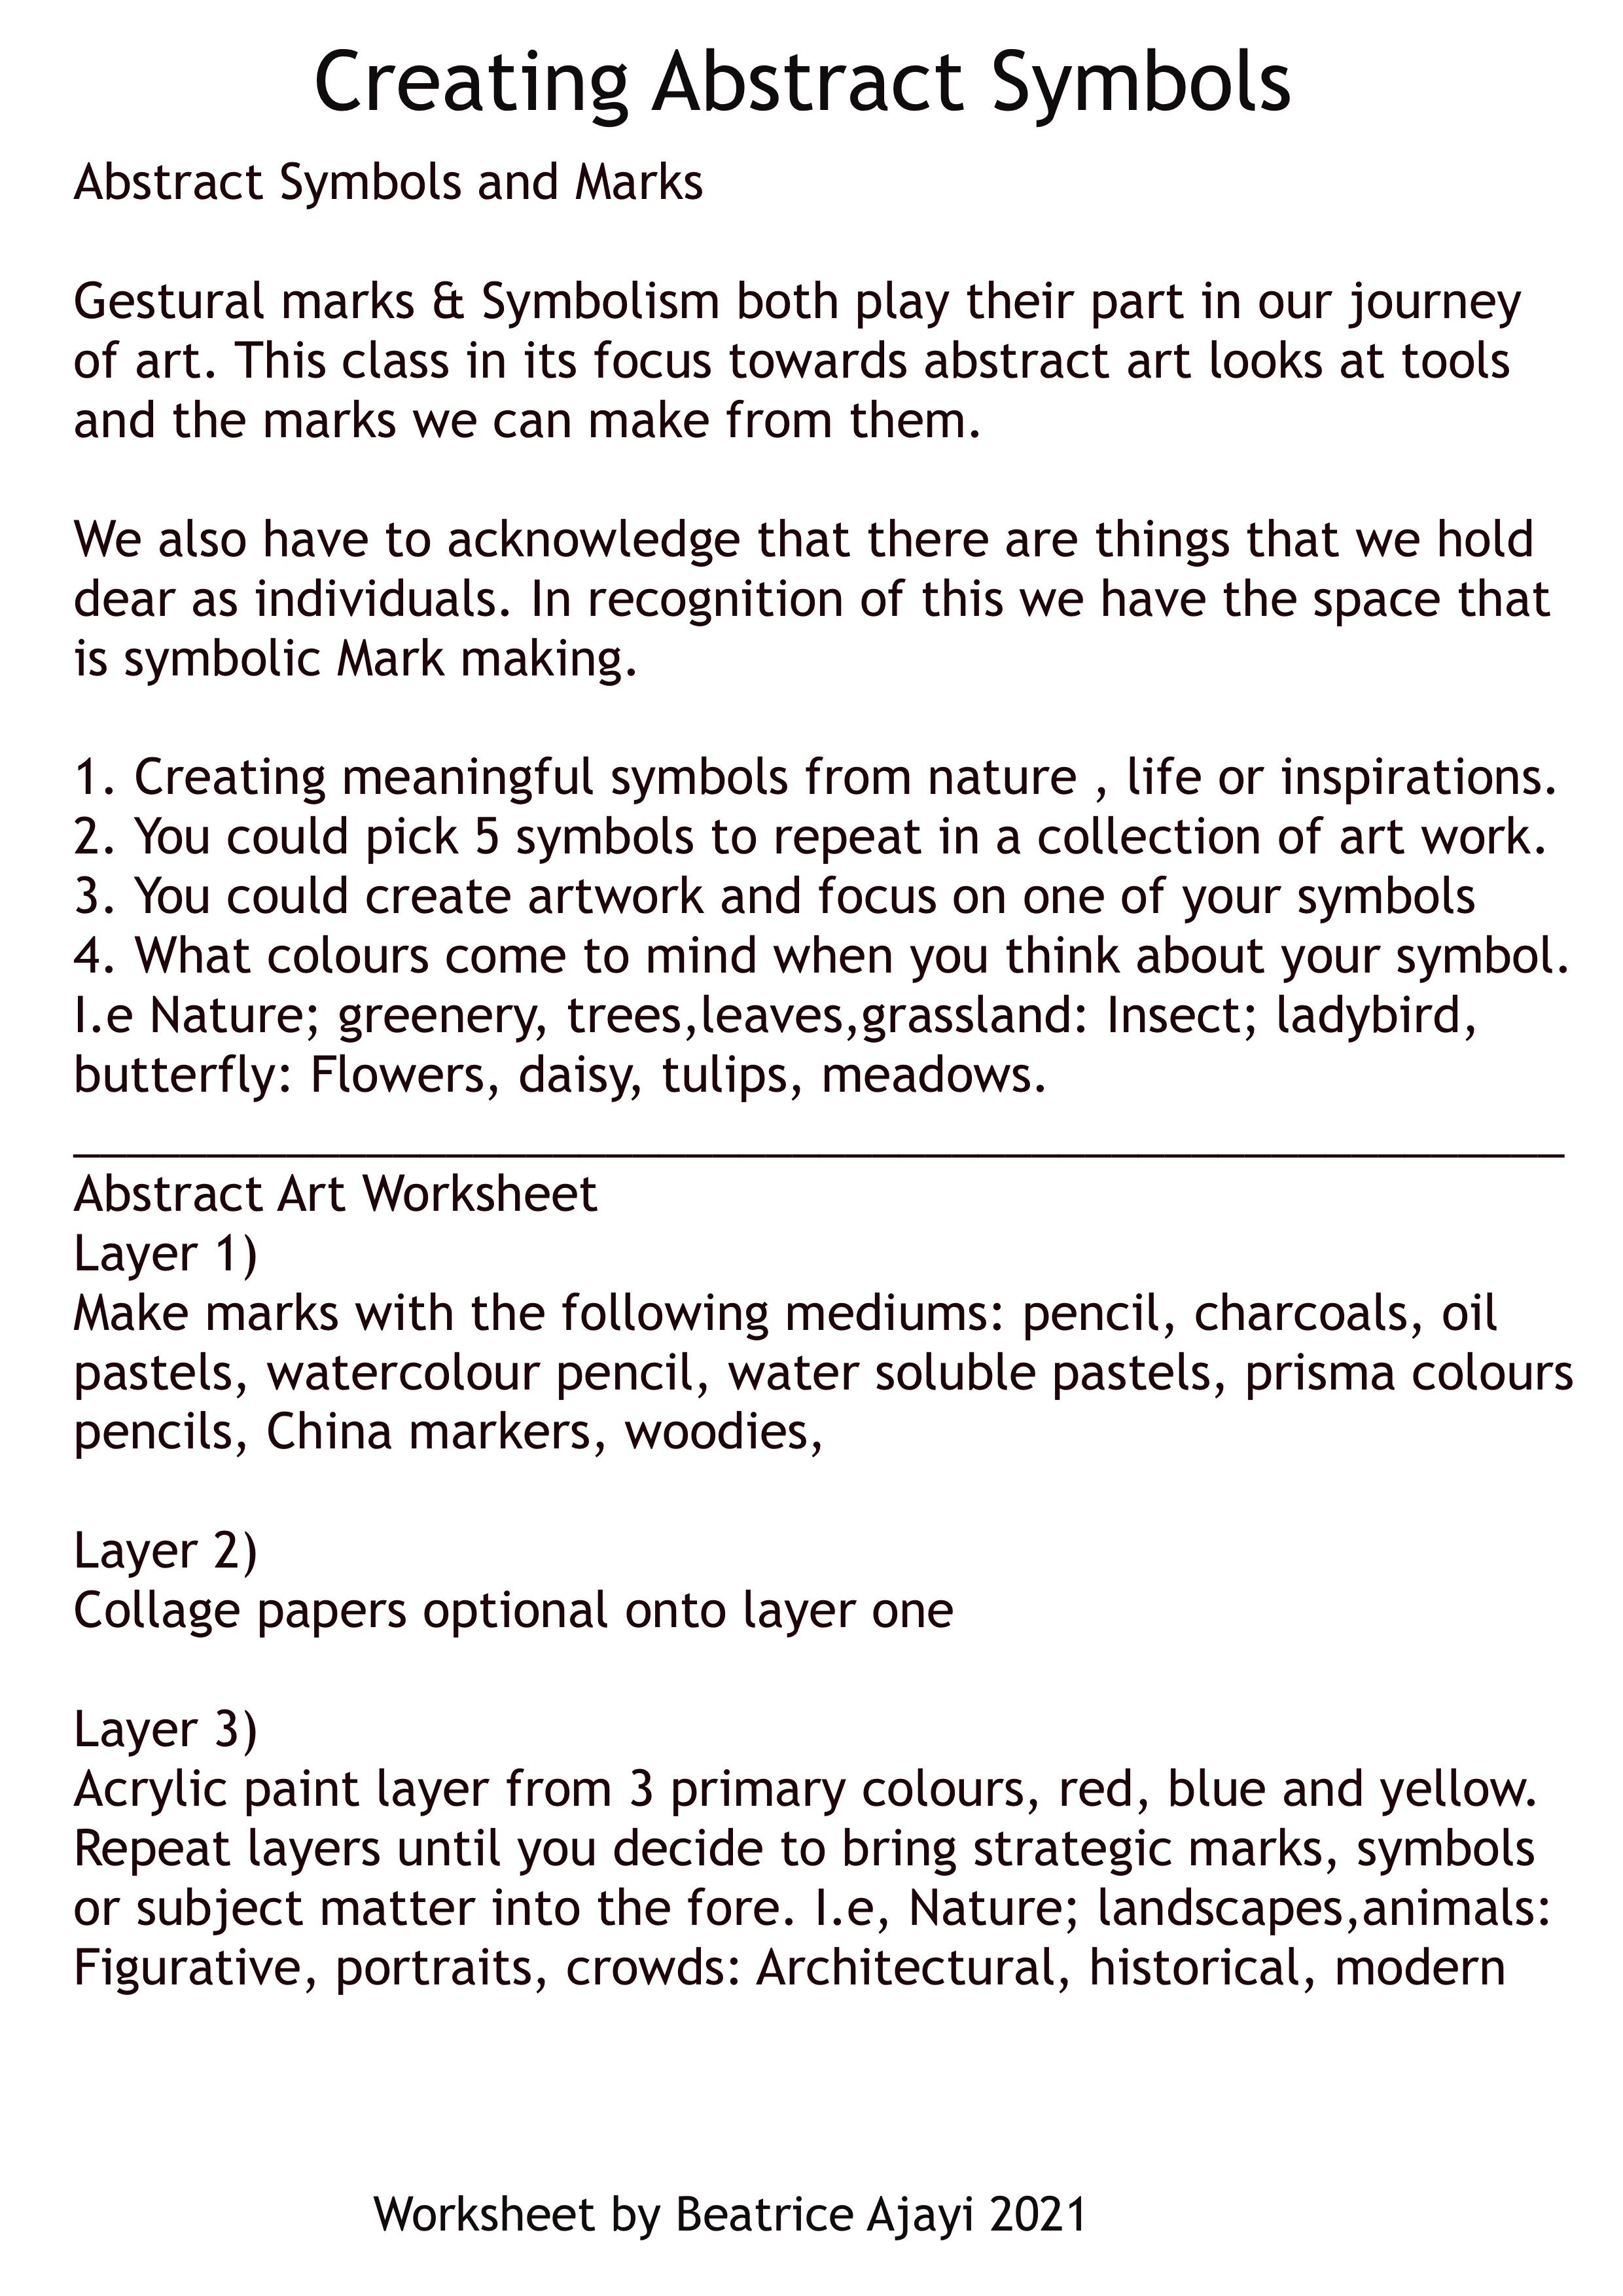
Transcripts
1. Introduction To JIAA Series : Hi everyone and welcome to my class here on skill share entitled abstract painting Series class two, tools, a mark making. In this class we're going to delve deeper into making marks. And we are going to be looking at the tools we can use to do that. So I have an introduction to mark making, but this class is going to go deeper and we're going to explore more and really get into some techniques that can help us get and the kind of end result that we want. So if you're interested in abstract art, this is a class for you on how to lay your foundations, how to dig into your technique, your reasons for using the forms and shapes that you do, the marks that you make. And it will all help to inform you on how to go about creating the effect that you want. So come along and let's have some fun.
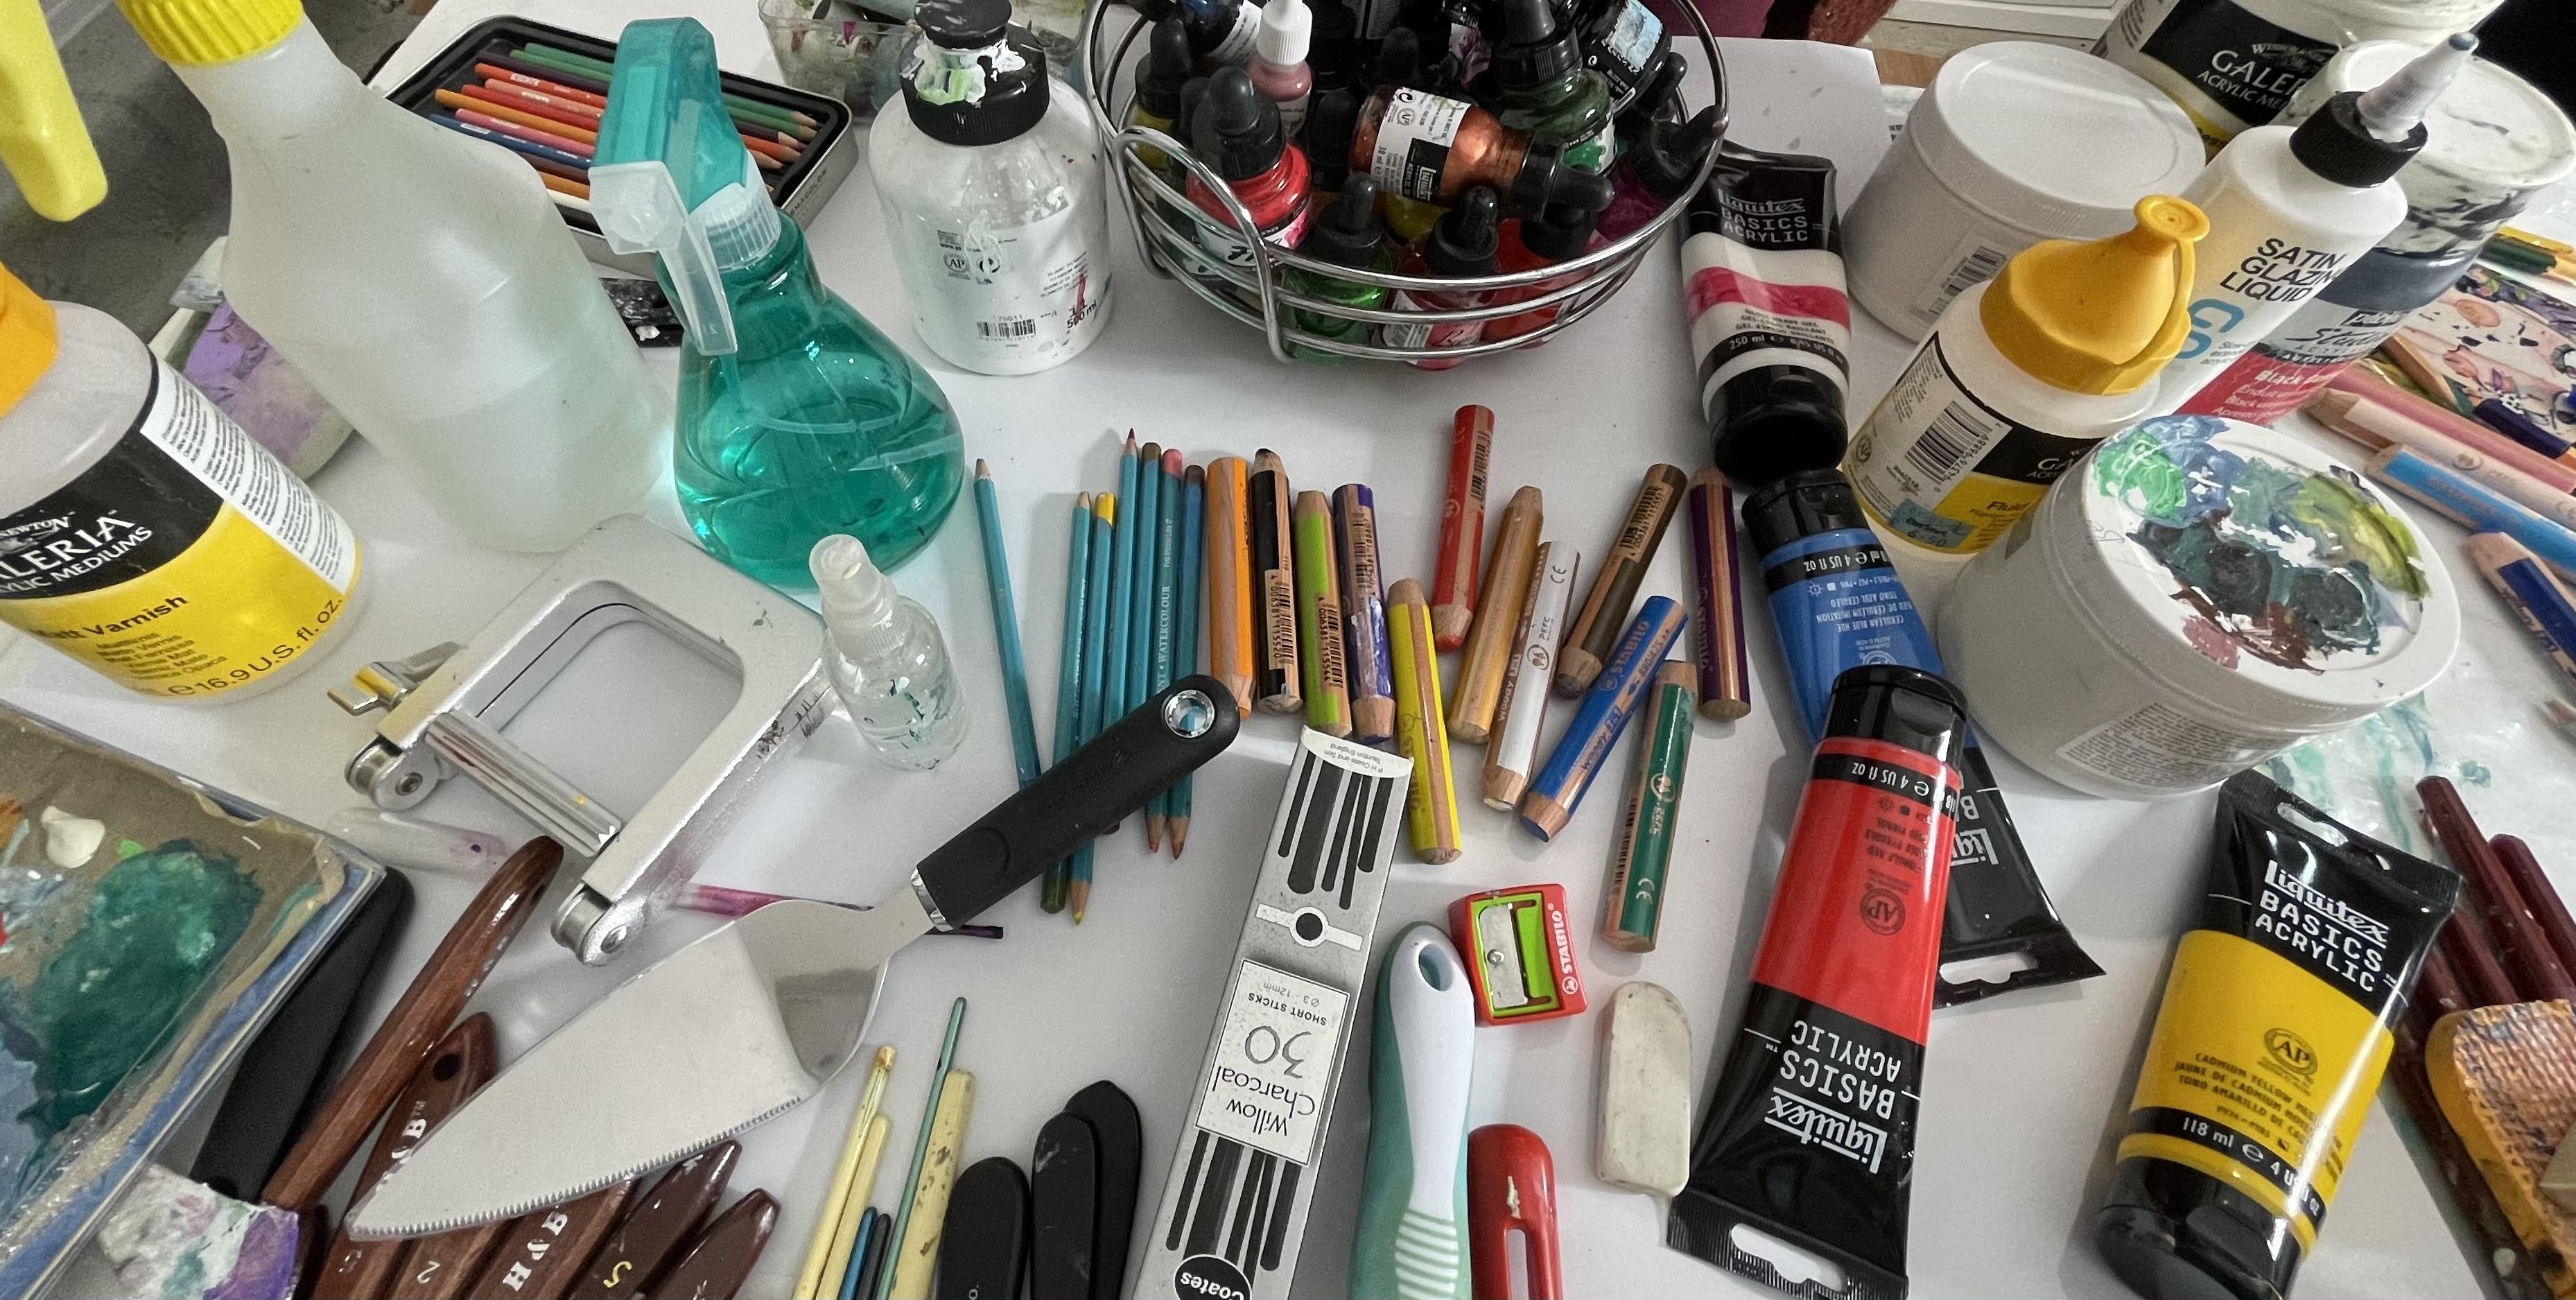
2. Tools for Mark Making: In this segment, we're gonna talk about some of the tools we can use for mark making. And as you can see here, delete them out for you to see. These are the actual tools that I just wanted to point out because of the varieties you can get within them. But there is so much more tools you can use this for scratching, mark making into your artwork. So we have a selection of palette knives here. And a lot of these, like a police began in here, are actually used for bacon and shaping, basically shaping the icing on a cake. So this is like a really large pallet knife, which you can see the shape here is like a trial, can then shape. And then this is similar as well, Tibet for Eisen. And you get different sizes of this and the so much variety and pellet mouse so as to look out there and to see what you can get. So you got these ones that have all these ridges on them, which you can use for scraping into your artwork. It's kinda plastic tube here has also palette knife. Just use it for scraping. And you can use the edges, basically any angle, even the backend to make marks into your artwork, so on. And these are generic ones here. Got we usually see there can be different lengths. I've got one here that's a bit longer than the other one. And then this one here is a lot smaller. So you can see that there. So yeah, you can get quite a variety different shapes of palette knives here again some more. And when you push into them, there's different designs that they make as well, like this one here, which reminds me of frogs feet. This one here that's got those squiggly lines on a kinda make a design either side. And then this really nice simple kind of rounded edge, rectangular one here as well. So those are the palette knives have gone out. But you can have a lot more variety out there. I get a lot of my tools from Amazon because I haven't got a local art shop near me. But if you have a local art shop near you, there's somewhere that you can go to look for tools like these. I have what they call different shape or tools. So user smaller ones and that can be used also for clay work. But you can use them to scratch into your artwork and they come in different shapes. So these also I got from Amazon, so different designs. And when we go into the mark making you see the different results you get from some of these. This are some larger shape or tools, the same kinda silicon kind of fabric used for these smaller ones are used for these bigger ones. So you can see here also you get what they call which tools which I'll just show you. So this one here is like a two, but is used for scraping as well into the artwork. So that's another kind of wedge to here. I've got first roll off that we can use for and you get different sizes of these actually have a smaller one as well as about half the size of that somewhere. And you can use it for rural and you're paying on that as well. This tool here I have is actually for I think window cleaner for a scraping down when you're cleaning windows. And I use this for spread in the paint them across my substrate, whether that's a canvas or paper. Oh, fabric. And then here I've got some brushes. I didn't put too many brushes, disseminate brushes, you can get out there. I've got these examples here of flat brushes, since a larger one, and then the smaller ones as well. So I've got those brushes. This is a flat brush as well, but this is obviously smaller than these. And discover the longer hand, therefore, the different grip you'd get on. Much smaller flat brush. So there's a range of sizes of flat brushes, a range of sizes and round brushes as well. So this is a really tiny one. Tiny brush here. This is a size one. Really is like a detail brush actually. And once precious or where they usually fit out a little bit so you can use them either flat wise or sideways. We, or you can start with bone. You can do so many things for them. So this is another brush I got from a friend of mine, and it's called a cat's tongue. So cat tongue, this is a size four and RT shells art. So she is online. Rt shells are art and her detail there. So she has a range of brushes she's created. She's based in India. And she has a whole collection of art brushes that she's actually developed. So that is, this is just some of those that I've got here to show you. Then your basic fan brush that you can use to make patterns and designed. I hardly ever use a fan brush in and trying to use it more and more. So this is a perfect opportunity to use it again. And then here we've got a rigor brush, and these come in different sizes as well. So once there are wet or just do that now, they are going on. And you can use them for kinda rebel one script kind of marks and very thin lines like for blades of grass or something. So there quite a long restful, end their brush and very slim. I've got here some other ways of making marks as well. Which is what this Draper, which you just kinda collect the water or the ink and just drizzle out drops of pink dependent on the consistency or inks. We can use this for inks can see this is quite dirty that I've got here and oh, bottle of a glue up, lucky that I had. And I felt inks and kinda like water down. And I can, I can draw with that with this nozzle where it's got here as well. So yeah, little selection does much more. But I thought I should keep it simple for this class just for you to see where you can go with making shapes. There are tools that already have quite interesting details on them to use. And there's a lot more that you can get. I will show you actually one more set of kind of a i sin, decorative tools you can use for scraping as well and making tools. So here I have kind of like this is my sons. He had an alphabet map which you could use different shapes to connect to form the alphabet. I think this was like from the middle of an oh, it's kinda like a foam texture and then it's got a design on it like a slipper, which is what this is, which I've cut. And then cut the shapes into to kind of make a design that you can use for a stamping. And there's different designs in the back and the front as well. So this is kinda like circular designs. And this is a formula. So you can use these to print and make marks as well. And then these here. Also different shapes of scraping tools for ice and really interesting shapes that we can use as well. That you can get online as well. As a very big scraping tools similar to this one and the shapers. So these are usually used for ice in a quite, they're quite good for painting with as well. So this is the two section and I thought I would show you these and we'll get on to the next segment, which is the mediums that we'll be looking at using and working on our abstract art with. So let's go into the next section.
3. Drawing Tools: So what I'm going to start off in this segment is to show you some of the basic mark making tools that you can use in this class to start off making your abstract artwork. So here I have some watercolor pencils which are really good to start off with. Your work. Starts some general lines and marks. And what I do as well is you can try drawing your eyes closed. You can try drawing with your weaker hand. So you can start feeling a bit more loose in your begins of your artwork that we are not overthink it. I've got here and what we call Moody's, which you can get a big pack of bone. There's a lot of different colors. And quite a large range, actually of gum. Gould and this pack as well so that some of them there. Then here's some more. And then you can also see get some other kind of first initial mark making tools, which I've got some oil pastels here. So these oil pastels. And then I've got what I've got cold. Well, they're not I've called them but China markers. So I've got a couple of them here. And I think have a red and a blue somewhere as well, so you get different colors of them. And these up here are water-soluble ones. You also get some other crayons as well. They are water soluble, so water-soluble Pascals. So these are all up here, and all the water soluble ones are up here. And then down here. Actually, you can get another water soluble and open neo color to range are also water-soluble, so that's a black one there. For an example. You get the watercolor pin. These water color pens are water soluble as well. Then down here I've got the non-soluble, so away I was going to add charcoal up here as well. So we've got charcoal, then got to the oil pastels, China markers. We've got PRISMA colors here. So this range, pencils as well for mark making. Just generic color pencils as well. I have here. This is a water-soluble one, but you can get the stable range of fine line markers as well. So they'll be with a watercolor one there. I also have for your use on drawing and sketching and different layers. I have these Pete sticks, which are oil paint sticks. So these can be put on layers after you've done maybe some of your line work, your some acrylic layers, you can start drawing over with these ones. So acrylic wise, I have these three. I'm colors here, which are just the primary colors because I wanted to give an example that for this class you don't have to have a huge variety of colors. You can just have whatever red or green, red, green, red, yellow, or blue that you would want to use. And we can mix our colors from that just to keep it simple. And to go into that whole area of taken out time and getting different range of colours within this mix. So I think this is all I had at the moment. You can always add white gesso to help, or white Titanium in acrylic paint or black acrylic or black Jensen. So I usually use the black, the gestures the way anti-black, just because it adds to the layers Gibbs opacity like makes it darker and not translucent. So these are kind of the range of colours and paint's we're going to be using to make our marks. So what will go to next is some of the mediums that you could use if you wanted to affect European in different ways. So we'll go on to that next.
4. Mediums: So in this section where we're looking at mediums and some other things that can help you with your artwork. I thought I would just briefly mentioned two other things. You can also mark make marks with obviously your pencil as well when you start off and there's different hardness, softness and pencils, that means the darkness and lightness of your pencils. Also for your tubes, you know, if you are squeezing out your pain and it's running out in your tube, and you can access a paint at the bottom of your actual tube. There are tools that you can use like this one here where you put your you put your pin in the little contraption here like that and you actually just squeeze it through. So I need to squeeze out the right way. And that will help you to actually get your pain out of the tube and make sure that it's empty as well. So that's what this contraption is for. Probably works better with the metal lungs actually. See, I'll show you the rigidness of this smaller one here. You can see how I have crushed that out with rigid to area there. So but it takes a while to get a hang of it. So to stop it, you should know about the tool that you can use to squeeze your pin out. So these mediums here gets him back to the mediums and all help in different ways. So this is my white. Just so the Albee's in mixed colors. I have my black Jesu as well, could get different colors or gestures. This one I've found out they can care about there. But I can use it while it's thick as well. So I have another one that's thick. This is an old container, so I've mixed some more water in there to make it better for pouring. This is a map varnish which you can use at the end of your painting to kinda see where in there is water-based varnish, which I learned recently. You can actually use in between layers just to get an idea of the depth of your painting and things. So, but this is not, this is not a water-based one. This is a map varnish and it's not, it's not gloss either as well. So you can choose gloss satin or Matt varnish. This is clear Jessup. So this you can mix with your colors and it doesn't change the colors. Very much of what you're curlicue using all the different mediums. Like even with your, you know, your crayons and things like that, water soluble. And so whatever you use in, it doesn't change the colors of the. So that's quite a nice one to have a like having a clear gesture as well. For acrylics, dry out quite quickly sometimes. So there's different ways to make them stay wet longer. This is one of the ways which I don't use that often, but I have used in the past. This is mostly empty, but I've had this for years. But it's a fluid retard or so that makes it slows down the drying process. So that's that one there. Gel mediums I have here are mainly for you can use this for sealing as well in-between. Painting like if you're using crayons that are water soluble, you can layer this over them. Or if you're doing coal ash, which I haven't mentioned, but we are going to be used in college in between some of our pieces in this class. So I've got the thinner medium, gel medium here. And this is a max one, and then this is a gloss gel. Meet him. So they are good cuz they're archival quality for your college work. And they are very strong as well. It is very good for ceiling in your papers. So you put it underneath the paper and above. So you're gluing it and your ceiling so that whatever you put on top Next, you can always scratch back to have that effect in the background. This here is another slow drying medium and this is a satin gloss liquid. And yes, so it's it's got another name for it is a GSC. Trying to remember what the other C usually under the name Golden satin glazing liquid as go anyway. So you basically use it in mixing into your pain and it gives it a nice consistency. If you don't want to use water, there's different ways to go about it with these two fluid retards and the solute Ryan medium. You don't have to use water, which is one coming onto next. So I have these tools here for Adam Alter to my artwork. Apart from this happened a big bowl of water, which I do as well, which I just spring up and show you here like this. So I have like this big tub of water. It's not very clean. I need to clean up. But yeah, so these are springing tools to get different effects, either to wet your canvas before you use it. In between using inks, just realize it and put nx and this collection of mediums I've scatter. So I've got a collection of inks here. And another mark making two here, which is just a piece of foam that I've cut out the shapes and you can use in our work. But I've got a collection of things here that are liquid paints, basically acrylic ones. And you can use your dripper for these, which I mentioned them before by then sure you. So you can use a dripper to drip onto your artwork. And then also sort of put this back here. So you can have your inks on a piece and then you can spritz this and let it drip. So show you those different effects. This is another sprayer, so this is a small one. And this is a bigger one. So and then this these kinda spray like aerosol, very small, fine spray comes out of these ones, whereas this one is a very direct, really sharp projected water. So I'm hardly use this unless I'm using a really big piece and I can stand back from afar and really soak the peace, then that's a fine idea. But if not, this is quite, I don't use this as much because I prefer these small ones. One thing I'll say about keeping your paint as wet as possible for longer, Is this just show you? So what this is is a little container that I have put some tissue in. The tissue. It's kinda your heavy duty tissue that's just show you this. So this blue kind of heavy duty tissue. And so I've put a layer, a couple of layers of that underneath an unused to this heavier water, one like this, is to show you that and you can see the reflection of the water going in. So that's what I've been using it for recently actually. And so that's where I've got this here, baking sheet. And I put my curly corner and that helps to keep your acrylic but moist for a bit longer, having that damp Walter tissue underneath it. So that's one way of also keeping it wet for a longer, just to the side. So these are all the different things that we're gonna be looking at using. And so the next part of this class will now be actually looking at the substrates, but we can use to create artwork. So we'll get onto that now.
5. Substrates & Sketching 1: So in this part of the class, I am just going to point out some simple substrates that we can use to paint on. And so here I've got this canvas. This is like a long rectangular Canvas we can use. Here. I have canvas board that you can get in the shops and you can also use to create your artwork on. And here this is a square canvas, is, I've got here that we can also say our work on as well. So these are kind of some of the substrates that ego WorldCom with all these tools and mediums we've discussed so far in the class is 15 down here. You can also use sketchbooks. So to create artwork on. So give some blank pages just to show you so you can go ahead. So use a sketchbook. And you can just draw your designs on this and you can pay within the sketchbook or you can cut pages out and work on them individually as well. So using all the tools that we have discussed, we are going to go on now to start to work some details with some of these pieces of mediums and tools that we've got here. And we're going to start creating layers using these tools so that you can see how we can create some marks. So that's going to be the next part of the class. So let's go ahead and start working on some of those tools and really getting into the details of seeing how they work and what we can do with them when it comes to mark making and just tried to create a language that we can use to tell our own narratives, our own stories, and the artwork that recreate when we come to the area of working on the abstract art in later classes. So here we will just go ahead now and just close in, zoom in, and start working on some areas with some of our drawing tools. Let's do that now.
6. Sketching 2: So I've just zoomed in a little closer so that I can get you to see a bit more detail of what I'm going to be doing. And why I wanted to do is I'm going to have worksheets. And I want you to just have a look at those worksheets and go ahead and use those worksheets to create your own designs as well. So undoes worksheets, I have different examples of Art. Ways of marks. Sum just can't find something hopefully that's visible for you to see and just go in here and on the worksheets I have, for example, spirals. And so here I'm just using the watercolor pencil and just doing some spirals. So examples of Marx he can make, you can make circles. And just even within the circles, all sorts of marks. So here we've got, for example, four different circular situations and Shall I might do some more because I'm thinking of some more and one more just to show you what I'm talking about. This, get that into the camera, possession and myself. And there we go. So you can see 123456. And what I'm doing here is just kind of playing around with this idea of circles. Because one way with, with our artwork and the feature that we can look at is organic shapes. You can look at shapes with pointed edges like a triangle. You can do the same thing as we've done here again, for example, just following the same rule. So during the idea of the spiral, just doing the full sheath, full shape, and just adopt Senate. You can put any kind of shape in there. Actually. The shape here again with just the lines. The shape again with another one of its shape inside and shape again. And this way here I've put circles so I could put triangles around that. But you can really take your time and make details out of this. So I'm gonna do one more just to show you what I'm talking about. And this is all about exploring what you can and can't do within your marks and really just forming a language you can use. So once you've formed those alphabets for the language, you can use it over and over again in different ways, which I will show you what the class. So as just trying to make it simple to understand as well, I'm doing. See already we've got here a lot of different shapes and symbolic things here to use. And so you can apply this in the artwork going forward. So is the habit written language to use watercolor pencil there. You can do the same again. So this is with a woody and you could pick one of these and say, right, okay, maybe number three on the circle. And just put that there. And you get a bigger, thicker basically art piece here, maybe the round one with circles around them. So you see already you've got something really interesting going on. You can use different colors for by use the water color here. And I did the same thing, just playing around with the same pieces or the rectangle. Or another one. I like these ones with the kin of lines and it's really interesting to me. So, and just keep repeating them, playing around with these ideas of shapes and forms. So I've got the worksheets. You can look at those, expand on it, what your interests are, you bring them in and you play around with that. You can find different objects and draw around them. I confess, show you here just in this one or these tools here that you can use for scraping. But look at the way I am now using it to create something there. So you can stamp by or you could do this and the response to water, these are, So if I now zoom in a little bit more, if I can get the zoom closer. So if we look at this one here, and if I spray that with my little spritz or have it already starts to bleed stray away and we can get that to move around centric to core. And they go, it's leaking them. So different ways to weren't clicking condition acquaint him about up. Also on this one here, if we just out a little bit, you can see that Farrington lead as well. So these are the water-soluble ones, which is why I wanted to show that example of how you can go about creating. Lets go out and to see that you can see them believe in their, so with different, different marks that you can make, you can go on forever. So this, this, these pencils of PRISMA one. So these are not actually as water-soluble. Some particular OBOR of water and I went into small as actually this is movement, so this is more soluble than I thought it was actually. Just the ordinary watercolor pencils I'm thinking are not soluble is try this one as well. Actually, I think you can make it a mistake is to think I've not used that with water before. So they actually water soluble, so I take that back. So the PRISMA color is a bit water-soluble as well. Let's see here. So this is an oil Pashto, and I'm just gonna use this in this as well. And it's just mixing things in, playing around with things. So you can use it to do the same drawings as I've just done. Their oil passed on. And this field, that texture of the, the medium that you use in and feel how it slides across the page. All those different things will help you to inform how you are creating your hour or so. I'll put some charcoal here, which I want to use to kinda current and this wet surface a little bit. We're going to use one more term, this as well. See when it's like when I scripts and so on. So you can see that bleed and there isn't my finger. Finance well, about sketchbook like this one is if you prepare the actual background with Jess, so first, then you wouldn't have the tiers consumed getting tears in here. So I'm trying to be very light, but it's good to have a layer of some kind of a gestural on top before you use certain mediums though, you can always see, look over with the gesso at this point and create glazes and layers from bat as well. So yeah, That's quite nice. They are trying to add some of the drawing tools that you can use to turn this over. So what we'll do in the next segment is mixed some acrylic paint here and get those colors for you to see as mixing the primary colors to get a variety of shades. Next, so we'll do that next.
7. Using Paint : So what I've done here is I have got my palette here that I'm going to use for my acrylic paints. So I'm gonna just squeeze out my blue paint here. And I'm going to try and mix some colors here. And this is just two. And show what you can do with very limited amount of colors. I guess use my palette knife. Am I looking for here? I really small one is what I'm looking for. I'll keep looking until I find it. So yeah, I got it. So this here is what I'm looking for. So I'm just gonna go ahead and start trying to mix some colors for here. And what I do sometimes as well is mixed with considerable size of yes. So I'm just going to take some of this gestural out and just put it to the side here. So this will be my spare just so and I'll put some extra dam here that I can mix with these actual colors and go on. A trial run of those actually wasted quite a lot of pain. So I'm trying to be careful with what I'm doing. So I'm going to start working on the blues and see how this works. I would actually mixing paint the blues. Why am I doing this part of this? So for mark making, we obviously if you want to use paint, you have to prepare your pain. So I am this mixing of blue here with a wide variety of shapes with this. So it's, it's fun. Mix them with a palette knife because it gives you an experienced or you wouldn't get just using your brush. Because then you can just go into your collection and paint and start using. So I know I showed you about how to keep your paint moist. But I actually just mostly and mostly don't do that. I mean, I'm starting to try and do as a practice, but I'm more comfortable just diving in to my paint. So you can see the difference of colors die. I've got, they've got a much lighter one, and I've got the darker one. So let's see if you can see they're about better. So that's the lighter blue and darker blue. That's just from using the white on the white just so m with the blue acrylic. And the blue amusing is surrealism. Blue, yellow I'm using is cadmium yellow and the red is viral. Viral. Read. And think that's how you call it spiral red. Just focuses on my camera's gonna focus on that viral read. I'll write out the descriptions of different things we're using invest. So I'm just going to clean up my brush and give you an example of the kinds of marks you can make with some different brushes with this blue. So I've got my rigor brush here. So the rigor brush, I'm just gonna show you four. You can kinda do with that. So I can use my spirit so to make this water but wetter so that I can just go into my blue and it's more moist and not as spec, and just drag it back and forth. So some artists will use this for signing their signature as well. Cuz it gives you very thin lines that you can use to create detail. So I like to use this for some of my artwork, for my stack antlers and just redrawing like an overall shape. So until forebear. So when it starts to get a little bit more choppy, you can just put some more water on it. You don't have to use just the point. You can use the side as well so you can drag it sideways. You can pull it down sideways and get all sorts of interesting effects. You can predict the overlay and pull it sideways that way, depending on how much paint you Piton it has, put some more water in them and you can drag it a bit more with more water on it. So different ways to use your tools that can help you with creating your artwork. And I'm going to use this cat's tongue rush as well and see what this does. So this is quite wet. Now because I've put some more Walter and I always wet my brushes before I used them. So if I just pull it down with that, so star itself with a kind of a point and then let's just drag. So your mark making is going to depend on what you're trying to do. And it's got very interesting, kinda like spear headed designs on that. I'm trying to think what else you could do. You could just do like the ones I did on the other page of a square going in a spiral shape or just over square. And it's got its kind of own texture on that. So that's quite
8. Using Paint & Marks 1: It's kind of own texture on that. So that's quite nice and tend to think or else I could use, for example, using a palette knife itself, right? Well, other pellet name should I use? Oh wait, I'm just going to use a fan brush just to make sure I use it. Unless when it's wet it has these little finger E points on it. I really liked. Actually. I have not used it enough, so put more water in it and then that's what it looks like. Then I just did to our water again one more time and told them. It gives you that kind of a sharp point at the top. You can use it sideways as well. So let's see if I can come closer. So up here if we look at it, but actually that's too close. If we look up above here. So pulling this way and thank that looks so nice. Actually. I like all those creep in areas that are going across all those lines like where I've just scribble there. If we put that across. It's like there's a whole thing going on in there of the effect. It's actually reminded me of flowers actually as well. But let's try another one. But sideways with the thin line. That's that one. It kind of just do half hard to lay its got some shapes. Just pulling that back really quickly. Now either more water and so you can see all those scratch an effect that's really interested in actually the fan brush. You can get a lot of different ideas of how to do things and seeing people do. With the lines during the candle of trees, tree effect of fica corner far after I had been that long line. So let's go back and just started another piece of paper. I think at some point let's just let this often but silicon see a brand new sites. So yeah, that kind of like chalk, chalk. I might actually, it's really interesting. Champion design. So it's like just try everything with your brush and see what it does. Is this can be like a background to something before you add layers, somone layer. And so you can do that with different colors. Going to change the page so that we can have another color and try that out. Let's just see, on the other page, I'm just going to close this. A liver cell takes it to be so I don't mind. So I think I'm going to use this kind of scraping until as well to get some effects. So you can always put my dots up a color on and just show you put this down. So what you can do is you can get your color and need to do a couple of a few dots or something. And so that's me using the tongue, a tongue brush, and then you just use your scraper is straight down. We've got so many tools that array there is great. And I think even if I am also spritz that as well it will have a different effect again, but go back and is written a little bit still wet. Now, let's give it a minute and then I will fill it back again. And you get an added effect of more liquid. Cannot respond in that book is pulled all the way down as well. So that's a really interesting look. It looks almost like a strange tree. Actually You like that. So we can use other colors as well. I'm gonna see if I can draw a red with red, not mixed a red. Let's mix the red with the brush. The tongue brush. Since coming in pink. Let's just drag that across the page. Like different bits. And also i'm going to spritz as well, stray away amendment and a weight color. So you can start to bleed already interbank blue. Then I'm going to call it. And that's just really interested in the way that those lines can be seen. And then also just the rest of the day I drag down like that. So.
9. Using Paint & Marks 2: So I really liked the way that bats strike ban and just going to wrap the rest of this over again because there's quite a bit on my scrape into that looks quite cold. Let's see if this does anything. For no for oil. There's two are coherent. Scrape and some of the overnight. There's so many ways to play with them. And I put this over this, and I'm going to use a scraping tool this time. So let's just put this here. Mixins him into food. I'm not going to spritz it on this screen. So I'll scrape for this two. And then I'm gonna take the extra says, great dentist credit, fair? So the scraped back and look at bat. So you can see that script area. This side is scraped as well, that kind of like opposites in the way that that's responded. So I like that a lot. And it's just to keep on going with the paints. And this can take some of these colors, some more white. And so I don't want any drip him. This left at thick clay that I want to drip him, then I would actually let's try it with us one more time and see what that looks like. So that's through different layers. And then this again, sunlight to a one sentence give different results with different, you know, color makes us. So this was mostly were pink from the end. That's at the top. That's really interested in ICT. But let's see if we can get some more designs. Another page. So that's come through into this. And this is why I was saying as well about JSON, your pages. I'm not minding them sticking together like that.
10. Using Paint & Marks 3: Like that because they will create that grounds for me. So I'm going to use my actual Hamlet may appear to mix this in and create pica purple. If it's possible. Blue colors, you just take the time and mix. What you wanna do. Can you get variety of colors? And this is me mix into the red and the blue to get this kind of a deep. And I want to try with my other pallet knife and just put that there. It's a palette knives are really nice to different designers themselves. I want to do this stretchy frog leg design and see what that looks like. So these are all textures you can create and then you just still scrape again, turn it around and use it all up. And that's just really interesting. Scrape effect you can go across, even with what you've done on the other side. Whatever colors can I create if I take some of those purple, what will be yellow? And those make muddied colors. But it was this going to be a kind of a green. And then I can add some way, succumb Brown at some way, and it will try and until I got beige color actually, it does look very, very interested in. And we'll turn to be prominence and be like a nice peach color and small y. And like make someone pilot nice because he just it just looks so yummy when you're mixing. That's got a hint of the yellow. You can see that color there from these three colors is really nice, rich color. And I'm just gonna put that there. You can make it lighter as well. And thank you because I am repeatedly going over this isn't showing the full white underneath. So I need to go on and on, but it's lighter in there. You can see the difference. I'm going to make some more white in here and it will get lighter. And I can add some of the yellow, the red, and we start making a peachy color as well. And so look at that. Nice cream. That's come out. Clean, nice time to mix it in. See what this does, coin in. It's not really doing very much, but you can't see it as well as you probably have to zoom in. But it's creating a kind of a pattern like this kind of a leaf pattern, the frequency. So I'm going to zoom in in a minute feeds to see that. And that's another one of the tools there. Let's go a bit closer and see that. Let's see if we can zoom in.
11. Using Paint & Marks 4: So you can see how that has created a pattern there. And then also the same pattern I've used in a negative there. So let's see if I put another cream here is different ways to use the tools. So that's what I'm looking at here. Let's see. Coming like to laminate. So I've got this one. I'm just going to scrape this Dan screen. And you can see those big chunky areas. And then I just basically go in and fill in that. So it's like an, an officer dragon the dragon. Or even go sideways, loops and then go back and do it again. The star come on here. And so I basically went down and I cut across. So let's see if we can see that. Design their 4-bit closer. Let's go one out. So you can see how scraped across and the strict elastic net off counteract may my palate. So it's just making design after design and playing around with all the different tools and seeing what they can create. Then apart from all of this, you can, oh, obviously close the page and get a different result as well. So you can close this page. And well, I'll show you now is using my roll-off that's from here. I'm going to get that page to blend with the peat underneath. And then in stem into something else. So you can do this with paper as well. So as just so that's all now picking up and create an a texture as well. On the surface. You can use those saying the NX as well. So many ways to do this. I've got inks here. So with that we can just do drips, going to split some of that. But actually we're up to his clothes at first. Then do this again. They can do this with separate bits of paper. It doesn't have to be in this guest book like I'm doing now. And then you get these results. Then on top of that, you could always spray them and get areas to drip as well. So you can just spritz really of streets in a lot of water. And then they will just direct as well. And then this trait is bigger ones. It's a lot more for my sake. So it can see its dripped here as, here as well. So that's quite wet on that page. But I really love how the colors are mixed in here with the NX. And you can just keep on ad and Mike, let's add the Sap Green. And I'm gonna use a drug breakfast that's not get an end knew. So little gripper. So this area is going to get some. And if it is pollutions here because of the water, dots, Walter, spit, spit sprints. Let's close this and roll it. Again. Roll it, roll it. It's very wet. And just to show you what it can do. And looking at that candle texture. So yeah, we're gonna leave this to dry. And we'll try some more tools to make some more marks on. We can try a canvas next actually, just to see what we can do with the marks on that one as well.
12. Marks on Canvas 1: So here I have a canvas that I wanna use for us to do some marketing they can adventures on and I have actually put some water on this already and is probably now silhouette. I just wanted to get it to have some kind of a surface. So what I'm gonna do next is actually use some inks on this, as I wanted us to actually know, first output some acrylic, some Gesso, and then up at some things. The reason being I don't want the NX to disappear into the background of the campus. So I'm just gonna go over this edges that I did for this. I was trying to use this canvas for another project, but I'm gonna use it for this. So I'm just gonna try and go over this and cumbersome areas as much as possible. Some of the colors are coming off on this, for this shape or tills, really cool unity, is it gently on your canvas? So you don't like dented. But yes, so think of it a bit on now is trying to reuse what's online pellet here. And I've been using, and then I'm going to start dripping some ink onto it. So I actually like the sap green quite a bit. So let's try some of that again. And I can use the drip par. And just kind of like split set around. Really like that actually. So you can see how you can get effects from this. You can shake it. Depend on how much mass you want to make. Just squeezing it just a little Anna and trying to get out a bit more water in it and then she kinda out. So to wash it, kinda does put it in my water. And I'm going to try and use mother color, like my marine, green enough. So I'm going to just use that sum of F. I can open it. Wow, let's see. No, it's not this one. Case find. Find it. Already taken out. Let's see here is I'm gonna use my spirits to it's already quite wet, but I'm gonna do it again, just but set. And you can see that it's getting quite wet. Love fat that flow. It's I think it's because I'm just so that this is happening here. This looks so nines to my gosh. That is very interested in design, that's come out to that. And I'm going to just use my think I'll use my fan brush and just Go into and come from the ages as well down. And because of that, just so that's n already and I'm just regular endless design in. And so someone was asked can mean one of the classes about how I make a colours flow together and it's, if it's wet, you can get that kind of effect into your Canvas. So a wet Canvas helps actual acrylic and the colors flow together. So I'm just going to let this dry and we could probably work on another acrylic. I'm in another canvas. What going to do actually is just because let's see what happens if I put this one on top of this and just lightly rub it does quantitate some of its chain off because it was never going to dry sublingual I'm doing now is just going on and do what I did with the pages basically. And then peeling that off, let's see what happens there. That's kinda got a new texture on it. And I'm going to put that there. This lean left to dry a map. This is got this texture. This is looks really nice. My fan brush, just different designs. I'm going to start using some of my colors on my palette. And this, there we go. Different designs on my palette. Actually trying to pin only with just a fan. Brush might be an idea. As one layer, at least. Very nice mixing in some of my age that I mixed earlier on from my primary colors. Some JSON there to try and blend that engine. But obviously you keep it in layers on layers. So all the drawing I was talking about, you can do on this, this can dry and he's still draw with your pencils and different mediums. So once this dries as what we'll do in the next segment is draw on this with some of our Drawing tools, but I think I need to make it probably a bit lighter. I wanna do that. So I need to add some more of my Jesu areas. It's going to do is China. So this is an interesting design. It kinda reminds me of a water fall a little bit. I'm going to use some of the purples I have in this, like the DQ. Because this is so wet, dependent how I hold my rush. I can get the lines. Or if this gets kinda smudged like this. So there's some yellow here and I can introduce a bit more yellow on my palette. Mix-and-match. And, and how in twister, very surreal. Look so strange these designs and near this patent. Never done like that before. And I'm trying to remember that I can go this way as well as I always say, as well as select the layers drives. So we're gonna let this one go as enough playing with it. But you can do this in your sketch book as well as I said. You can do on campus board. A piece of paper that's by itself. It doesn't have to be on an actual canvas. And we'll let this dry. And I mean, even now, if I use the back of my brush, I can scrape into this and just do different things. But very likely we've got a little line here that a script. And so yeah, just really interested in ways of adding marks without thinking too much like the circles I've been talking about. Spirally, spirals to scratch in them in, and you wouldn't see them fully India piece. But they will be there and they will catch on the paint in different ways and make that into something else the way that the girl, I will show closeup. So these in a minute, I'm gonna rinse my brush off. Right? So what I wanted to say is if I just show you the areas that I've scratched off frequency, the little spirals that I've drawn into this and into this area here. Scratched this, these lines in here into the pain as well. So that's an interesting result, just putting your paint on and Ben just playing around with that one brush. As I said, there's so many other ways to do it. Different brushes, scratch em, and creating textures and adults and scratch and into the backgrounds. So we'll let this dry and then we will see what other mocks we can make on it with some of the Kinda like the drawing tool, psycho pencils again, and maybe more ink as well.
13. Marks on Canvas 2: In this section, we're going to be looking at using some of sketching and drawing tools that we've used originally in the beginning on some of the other artwork pages. So I'm gonna just go right ahead and just start drawing and making some marks with here I've got some of the watercolor pencils and the China markers. And we're just gonna go ahead and start drawing with these so I can zoom into an area and just to show you how we can use, as I said before, the spirals that we created here. And you start drawing into this canvas that we did earlier on. So I'm just going to use my scalpel and just to get rid of some of the paper on this marker, I mean, you can peel them back. I find that it's laborious, so just use my scalpel and just basically just take some of the paper off. So I'm using the green because this area has some green and diamond. So just going along with some of the marks that I did on the papers and just spirals is doing some circular marks in here. And this is Canvas so you can decide how much pressure you are putting on it. But if you don't want it, then to E, have to be quite careful. So this is quite delicate. Located them designs on this. Let's see if I can get closer again. So as quite right there we go. So this is the one that I've just drawn here, which is quite delicate and remembered. Some of these are water-soluble. This is the China market, so it's not, it's not insoluble. So this marks will go down a lot better. So, and this, and this area, this kind of sketching and playing around with some marks. And we'll just keep building the layers like that. Other color can I use? So I can come here and maybe say is a triangular shape. This principle color. And I would say more, this is more about drawing aspect that I'm doing here. But you could obviously still after this, go ahead and use pink. To create more designs. So I'm just using the different tools that I mentioned before. So this is a worthy one and we can teach the areas of it. And just like inbetween here, just see if anything shows up. It's not showing up. Encke is a lighter color. We can sharpen this white one. Constructor. To see how much do I have to have a little bit. So what I wanted to do is in this area here you can see now I'm marking over that. So some decisions you're going to make, its because if you're trying to get contrast on something and you can't see. And if I use any other darker colors is going to be a lot more subtle like this. Green is not very clear on that. And see what this PRISMA colors like on it. It's a little bit visible, but not very much. Still very subtle. So here I am using this, or I can use this white PRISMA color as well. So these two will be quite good to draw. And this is, So I'd like to do dots and I like to do spirals. So on these kind of areas, you can show contrast. You can see this if I have just very subtle, Really. There's a yellow china marker. Let's see if that shows up on the green. So a bit better but still not got the yellow water color. This would be soluble. Going to pan out a little bit more. And so we can see like these other areas, the lighter areas. So they kinda is, we can use some other colors in this lighter areas. So obviously this is a light color. I won't show up that much, though. White won't show up quite easily. It's soon a below that we're over these. So you kind of have an subtle lines overlap. And.
14. Marks on Canvas 3: We can use like the ones that weren't showing up before, the darker one. So we zoom in a little bit. Again. We can see this area that Benzer and inspect to see that show up. So part two, few decision-making for making marks. Both B, that you need to be looking at the contrasts as well. If you want something to show up, if you want similar colors together. So I have this hint of blue in here as so on. Thinking about going into this flu. So PRISMA blue. And just going over this circles is the remarks I've made, just going oh, alone. And you end up building a lot of layers on this. This was one of the Sybil pens that I showed earlier on. So we're gonna just use that and try sketching something. It's got a very fine tip on it. You can see. So usually it would probably get spoke on a canvas like this. Maybe if you have really a lot of layers of gel medium, it would be smooth and down a bit. And then you can actually draw a little better. You can get the current in amps. Actually. Another kinda sketch in drawing medium by, I forgot to mention was markup in Bismarck. Appends are another group by E can actually use to grow with. I have some marker pens around, but not to handle the momentum. Quit. And I have some alcohol pans. There's a variety of bone you can use. So this is kind of scratched a little detail into this. You could obviously put lines if you can. Take your time gently and creates fire rows. Because each of your tools will work differently. I really like spirals. It seems to be an easy enough one to show you. This is the water color pen I used earlier on in my sketch. But so there's another spiral again, over the terrain and over a lighter area. And then obviously at some point you could split some of this. And it's kinda respondent there and bleed a little bit. But just remember that you can see that color bleeding. And so with this, you can mix colors and scrape into the canvas again as well. And so you can see all these little details we have already added into this area here. And you can walk around. Your Canvas admin and then they can marks. So I've not used like this kinda darker color. That's red, that's very bright. So and you can use more anger and more whites. I go closer again, actually. Just think of a colours you want to use this one to add. I can see if I can get this to work. This is one of the paint sticks. And what happens is usually it's kinda dries out and so the tip ends up being kind of sealed. So usually sometimes have to peel it back to be able to use it. But this goal was really lovely and against the green of the really nice thing is actually as a bronze, it's not a goal. So just pick some here that you can see over this area and then put this. And it has a very oil paint smell to it and then you can scratch into. I had something here where you can scratch into and get back on to make this a bit closer, just to show you. So this is the area here. You can just start Scratch in into and you can see the color in the background. You can see these kind of three little scratches. See if I can. So you can get details until US and different ways or else to use. So it's also soluble as well to soluble so can differ into the water. Actually, I'm bringing it back out and paying two events and the soon orange. And I'm gonna use a spray plur and income is too close to this. Since this area here that's wet, flat across like that and they can make put some paint on there so that we can I ruin didn't make sense in green. The other days. I'm like this in the other segment, so I might mix a little bit of a green energy green here. Yellow light green actually mimics this. And in the limbo of Walter, I mean y in there, they can see changing already, get more away. And it's just so nice screen and we can make it more yellow for more dark blue. So that's a quick green next favorite, some white. And you can go over this and start making some designs stretching through it. Let's come out of it. So I'm gonna scrape that look this this way. I think. Similar green area but lended to dark stuff to make cement some areas yellowy. And you can block out colors like that. So what we're gonna do actually in the next section is go ahead and start. Fill in this piece and playing around with scratches and painting and drawing and drop-in and working on it.
15. Abstract Stag Painting : So for this segment, I've been trained as contemplate If I should create a stag or I have different ideas of what we could try and do this. But I think I will stick with creating, I think I'll stick with creating a stack frame on this one. So what I'll do is I will outline what we're going to be painting in. So I'm gonna just try and have a look a minute and see for, I think the character should look like what parts of this. Because once you commit, that's the thing it's done. So I think, I think I can see a character. Let's go with that. So I'm just going to start drawing straight on like this. And just be brave in so many ways to draw this. And you can adjust it as you go along if you want to. Convince the IRR is lower down, slimmer. So let's sketch that out. And here I just show you what I think gets out. It's this character here and I'm gonna paint it like this so that you can see the progress of it coming out of this shadow. So you can use different colors to do this. It doesn't have to be white, but I'm just going to use this to start off. This way you can see the outline and you take your time. And you think of what you might want to paint point, you start to outline your character. So that's what this is to show you that there's different ways to approach abstraction. There are ways that you can start off and make something that you can adjust for yourself going forward. So it doesn't have to be this subject matters and end product. You can do so many different things. Even as I'm doing this, it's good to let that black line dry. But I'm just gonna go straight in and start mixing this up. And sometimes actually you can mix other colors. It doesn't have to be why, as I've said. And I can always draw my lines again. Sometimes he can let some of the other colours underneath still show so you don't have to cover all. Can still pull, let it have a hint of a colour on the knee. So you can see this is sticking out now quite a bit. And because that's the main color, I like this here, but I still want to be a bit of a separation so that you can so you can kinda tie and do some play around with some even thinner brushes and and make it different. And so the whole point here is negative things in is two. Make your character and, and so you can come back in and start playing with other colors. So under here as well as suppose to go under its legs here as well, need to kind of give that areas some painted into it and then you can scratch into it. You just find my little scratch into. And you can get some of the background colors back again. And I'd like to do plants into this. Scratch plants into the design of leaves and stems. So you can see the colors behind. And I'll show you a close-up of that. Now. See. So you can kinda see here kind of leaf scratch ones that I've put here as well. So before it dries, just scratch into an event that will lambda altogether as well and carry it through an alphabet that more cohesive all the way around everywhere. All the bits that you have redacted, you have made them into negative painting areas. So maybe that was from the abstract mark making. And then we have picked a subject. And then we've gone around that subject to create what you're seeing now. So you can do this with almost any topic. Landscape, floral, portrait, figurative. It can do this with almost anything. So as I said, the layering of the different mediums, pencils, crayons, and paints, your inks dripping and kinda scribbling different designs and spirals and symbolism. But you can create yourself. And then from there, picking what your subject matter wants. What do you want this painting to be about? If it's about, for example, in the abstract and it's not a physical recognizable character, then it can be something that's symbolic. Maybe there's maybe leaves or spheres or cubes, whatever it is that's of interest to you. Make that the, the star of your narrative. And make that into something that you can draw people's attention to through your language, through what you've created and make them the focal point. So we will look at composition and some other details in one of my next abstract classes or abstract journey classes in this series, because it's not just about creating the marks and things. You can still plan within that. So even within this one, you know, I was lucky knows, like Would I want this area to be at the bottom? I like the color here. So those more of that band there. So I thought that would be where its main body would be. And then up here it's neck. I can still see some of those colours up here. So I can still tie it together. So there was a whole planet involved in creating the peace. It wasn't that, it was just by coincidence. So all that still needs to be taken into account with an abstract art as well and your mark making, there are layers where you can allow freedom and flow and this experimentation. Then you can cohesively bring it all back together to create something that is like the end of the narrative or to be continued. Its like it's taking you on that journey. So I hope you enjoy the class. And I do have the bonus part at the end of this class. And I'm looking forward to bring it about more abstract art classes that we can play around in and create more artworks. So I hope this wasn't too long for you. I'm trying to break it down. And the easiest way I know how in trying to work on these kinds of 4K. And because we do have a lot of other artwork that, you know, it's quite common for people to work on, but abstract art is one of the most difficult ones, I'd say because there's so much variety in it. And to try and explain it to people. It's not that easy because it's not just about, I want to paint like bam, you have to fit your story into it so you are part of your artwork. And I hope this has helped in getting you closer to knowing exactly what it is you want to say and how you want to approach it in a technical way in creating your own art. So I'll see you in the next class. And thank you for joining me. Bye for now.
16. Bonus Extra Abstract Bird Painting : So here I have another one of the pieces I did earlier on. And as this started growing with my pencil into it and recreate and all these kind of little lines which I can zoom in just to show you. I mean, so like these little lines here that this thing delaying and this add them this detail. So I've been doing that and I'm going to go into next is shrines as this purpley oil stick, this, peel it back a little bit and just start 0s in it. Which is so it's actually too aggressive. So I'm gonna go on to use in my paint. And you start creating some other Marks. Thank you. Wanna use quite a bit in Canvas one. When I can do is stresses, i'm going to spritz it. Look for Beethoven. Very wet. Sees this income. I use red, I get very scared of them. Maybe some of my colors from Ray is quite scary color, right? And so a lot going on in this lecture, I'm going to fit some marine blue, so it's like a green, a blue. And it's my, my brush, rigor brush. You can draw with that. Or actually I can use this, my fan brush again and just extend some of the same idea as a regular brush. See kills everything across my, let's see and talent. You can do little designs and then I'll show you what happens when you use your scraping to get. And they scratch into mixing the colors here. To just create so many interests in Scratch. This isn't my palette knife here and this I can get on the actual canvas. And this is like a great class. I can gray and scratching. And somehow right in here. And this stick close. So I'm building this color here. This is like the grey is stretched into the background. Different ways it can use a flat securities, the edges of things. And if this had this here, I'm not scared of this looking possibly.
17. Bonus Extra Abstract Bird Painting (Continued): Possibly too dark or anything like that. I am going to always be adding white cane or whoever Collins required to get what color from one son is mixing then what's left here? My blue and the yellow and red. And I'm trying to unify some areas because I feel like really, really wild. And then this color here, this ray. And we want this reg t Again. I'm just feeling how my palate mind consumer it can and scraping off the other side. And to me it's my frog. One to sphere concern and interest on and then pull this frog leg down there. I don't really know if I like all of us here. So might just take some of our own way. And straw into this. It's about texture because what's going to happen is at the end of all of this, when we come to paints, we are going to have an interest in surface to paint. So it's not only about what's on the page now, it's about what's going to come. And then sometimes you can think about your color palette. What do you want? If you want to use Green's, then you'd stick with this making different shades of green beans. And we just kind of stay in the family of colors if you don't want it to be. So mishmash, stay in the family of colors. So this isn't till white. So you can see in between all the different things going on. Then, because I want to mix and a lot of different colors here. When drag onto bank too much by what I'm doing, I'm just then feeling how it is with my tools. I think that's one way to do it as well as just to see what your tool goes. Take the colors you like, and play with it on the canvas, like play time. So there's a lot of different things on this. Scraping and then taking that scrape and scrape and similar L's and the concepts not dry things, I guess refinance briefing, but they go at what we've done there. Scratch in, in, and like, I deliberately left this array here which is interested. And once we let this dry, we can work on this as well and create something else. I just had an idea for something else I might want to scrape into this. Like strange into this is using my pencil over. Yeah, so let this dry as well. And another thing is, yeah, I've just realized that I couldn't use, which was this glue? A clicky things. So you can go ahead and let that, just to show you how this can scrape into that, what random following all of that, this plane, what you're doing? Well, let this dry and then we'll work on it to create the redacted space painting.
18. Bonus Extra Abstract Bird Painting (Finished): So it's not fully dry. But what I wanted to do was to show you what I mean by the, the kind of things you can do with your painting once you've played around with the mark making. So I'm gonna try. I can see in here what I think is like a bird. So I'm just gonna go in and you can mix different colors. It doesn't have to because white. But I'm going to start going in and actually I'm going to use this drawing to here and actually cut out the shape of your eye can see as my bird because its birds that I'm thinking of. Deck ten in this painting. So I can see the part there. So if I just turn this around so you can see it like fat. And what I'm gonna do is just paint around this bird. And can they unify a color a little bit? Scope blank on it. And I should have waited till this dried, but I'm not going to, so I'm just going to show you how you go round and just is gonna watch the output. And just go around. And you can see that rare. So what you can do with those areas is you can always blend them in with the background in some way. So all those colors are really like that. So you can see the design in this. And what you can do is you can push the other colors back. But if we don't want to make it to push back, this is currently still wet, so, but if we want to keep some of the designs so elements, you now need to figure out what part C1 to C0. So if it was dry, you bend scratch into areas. Here. You've got the fucking get n here. So you've got that color, that CNN client at the same time. It can still stretch into it. So make here, make some of those areas quite a bit. And if you don't want it all to be the same, you just, you just do only So for any leave the rest you give it enough distance. Lambda m. So I'm just trying to figure out. So that's that bird then done. And you can add some more details and scratches. So yeah, so that's an example of how you can create from the market-making, from the painting. It might look like it's not going anywhere to you, but you can start finding out what your subject matters can be, what you want to put into it, how you want to build on your character. So this, I can see that there's an I here maybe. So you can always work on that. The bats and the abstract painting right there and it came out of all our mark making. And so I can say the construction to these areas here, I'm bringing out some of the colors in the background, which will tie the whole piece together. Sometimes I'll add like floral, so I'll do like flower shapes and see if I can go closer is to show, I mean, so in this area here, you can see the detail of the scratching. And you could go along and then just start creating like leaves shapes. Which so unlike, you know, floral based, to show that it's kinda in-the-wild onto the upper part of the plan. Okay. And just trying to show for each indecisiveness area here, you can have like a leaf and it's easy scratching into them and creating some more scratch. And is continuing to scratch into and get a backbone. Taking let us all over. Like if I do over this areas as well. So variance and so I will do another class kind of focused on this case. I think it'll be fun to just have one where we just create different parents. But I thought I would just add this at the end because class to show you what you can do. And what we've done in the class. Yeah.
 Beatrice Ajayi, Founder of HyssopArts