Transcripts
1. Introduction to Mindful Mark Making: If you've ever tried an adult coloring book or is entangle, you know how meditative art making can be. But it can be even more meaningful if you put your own spin on it. And it's so easy to dio. In this course, you'll learn different mark making techniques that are simple, fun and relaxing. Hi, I'm Nikita Calhoun. In this course, I'm going to be teaching you some of my favorite simple prompts for mindful Mark making. I started this practice in 2018 as part of the 100 day project. I was looking for a way to just get making in the morning because I was a little rusty with my final practice, my day job. I'm a graphic designer focusing on brands, and I also do surface pattern design. But I wasn't creating very much for myself, and that felt a little intimidating with a brand new sketchbook. So I started with what I knew, creating simple, repetitive marks, whether you're a seasoned artist or just someone who likes to doodler color. The promise offered in this course will offer you a new daily ritual that can reduce stress , increase creativity and invite a sense of grounding com into your day. The lessons in this course are intentionally slow paced, designed to be calming to watch. I encourage you to practice right along with me and to share your progress by posting to the project gallery. We'll start by making what I like to call a mark Glossary, a collection of Marx unique to you that you can revisit any time you're stuck or intimidated by the blank page. Then we'll fill a whole page or spread with a simple, repetitive mark using brush and ink or watercolor. Once you're comfortable, you'll be ready to break in a new sketch book if you haven't already by lettering and inspiring quote on the first page and surrounding your quote with more mindful marks. From there will explore layering watercolor in making marks on top with pens, brushes or whatever you like. The materials I use in this course are sketchbook, lacking a paintbrush, a sharpie pen, a white gel pen and watercolors. But you can use whatever drawing utensils. You already have a home, forage outside or around your house and put everyday objects to new use or splurge on new our supplies to explore all include a list of the supplies and sketchbook I used in the class. Resource is, but don't let supplies KEEP you from getting started If you follow along with all the lessons in this course, you'll have several sketchbook pages filled with your own marks unique to you, including an inspiring phrase or word to remind you why this matters Every time you open your sketchbook. I can't wait to see what you do. Let's get started.
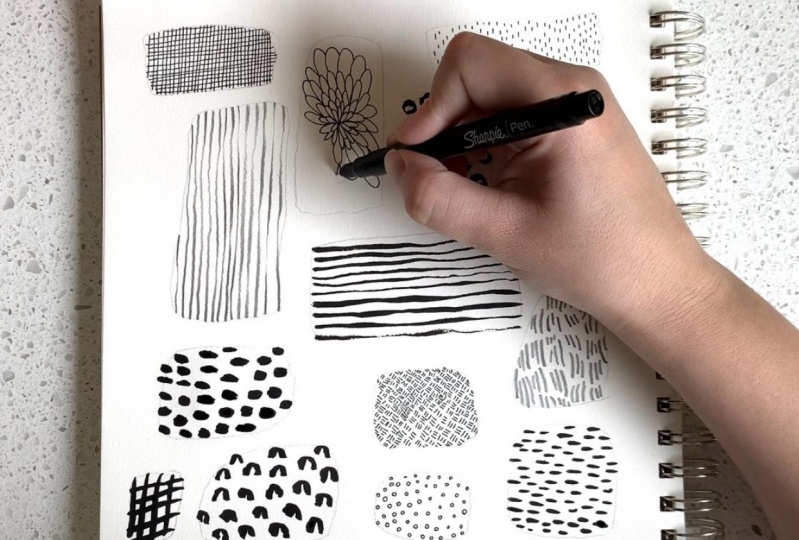
2. Create Your Own Mark Glossary: with one of the most intimidating parts of keeping a sketchbook can be just not knowing what to draw in the same thing with a mindful mark making practice. If you come to the page worried about how you'll fill it or what you can do, it can be intimidating, so you can start by creating what I like to call a glossary of marks. And this is simply just to test your own range in your own ideas. See what Marx Air unique to you in your hand, what you're drawn to creating without thought and sort of cataloguing them. So when you are stuck, you have, ah, well of inspiration to draw from, so you could make this a really orderly grid. I've also included a download of a worksheet you can use to fill this in if you don't want to do in your sketchbook. But I'm just going to create some really loose boxes of different sizes to fill in. This reminds me a little bit of zone tangle. If you've ever done that because you're just filling in shapes with marks, do some longer ones a case I want to do lines really give it space to play. You can dio bigger shapes you want Teoh, Depending on how you work with marks, you could fill a whole two page spread with this and maybe do you different pages for each media type. I'm just going Teoh switch as I feel like it. So I've got a new to me supply a pen, tell pocket brush pen and I want to kind of test out and see what I like about it. I've got just my simple pencil this Ah Palomino Black Wing, which is one of my favorites. I've gotta brush and ink, and that's really all I need. Do you get started so you can think about the types of shapes, marks and wines you might want to make things like dots hatching lines, circles, triangles, whatever where you can just start. Which is what I'm gonna dio. I'm going to start with my pencil and do some waited lying, meaning I'm going to vary the pressure from light to dark. So I'm gonna work in this one. So I'm gonna start light and go dark, go light again, dark and you can see even with something as simple as a line, how interesting. It becomes when you just think about the pressure that you're putting. You've been turning my pencils, so I have a sharper point. We're allowing the broader point changes. A. You could meticulously take notes during this if you wanted to, or just notice as you create the marks. Now I want to try lines again. But with this new pocket brush pen, then it mentioned you can see it's almost like a paintbrush. There's pink inside. Um, so we're going to see how that works. Because I know you can vary the fins and necks quite a bit with this, too. Not worried about consistency and kind of just exploring range. The imperfection of the hand is all part of it. What makes this unique to you? I'm gonna try working with my p brush and ink doing just some dots and you can see already my brush is about to drip. So that's where good, cause that's about what I was gonna get. They're not perfect us. They're just the shape the brush makes when I drop it down. Likely also, the more you can set up your workspace when you come to the page, the better you could do that the night before if you want us to be a morning practice. So the only thing you have to contend with us, the blank page. I'm enjoying working with this paint brush. So I think I'm going to keep going with that. Um, just for variety, I'm gonna move across the page, and I'm gonna dio kind of some bigger circular dots lately in my own practice. Um, brush and ink has been my favorite way to work. It's just so fluid. And you already are a little bit out of control because the ink has its own mind in a way, um, so you can get out of your way a little bit and just see what happens, which I really enjoy and just keep going with whatever shape occurs to you. Do these your shapes a lot. My hand is really shaky this morning from caffeine that shows. Okay. - Got my Sharpie pen out now. Gonna explore maybe some denser lines. Okay, so now I have a page of a series of different marks that when I'm stuck, I can pull from I can come back and add to this any time if I need to just jog my mind and do something simple. Um, but it's taken a little bit of the intimidation of the blank page away, and I'm ready to do something more complex.
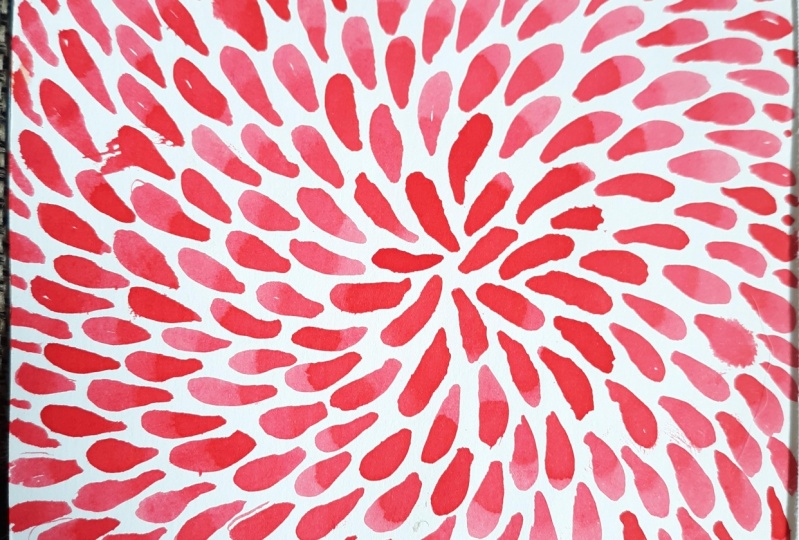
3. Using Repeated brush Marks: for this exercise. I'm going to be working with ink paintbrush, and that's it. You could do a pen or pencil or brush pen. I really like working with ink because it's really fluid. You don't have to load up your brush very often, and it allows you to just get out of the way. You could very colors with us, but I'm going with just simple black for this. Put some on my palette. You could very brush sizes if you want, but I'm gonna keep this really simple as just the grounding exercise. I'm gonna use this size 10 round brush. It's a little bit bigger, so it'll fill the page a little bit sooner, since I'm just wanting something simple to start my practice. But if I had more time to work, I might do a smaller brush and take a little bit more time. So you want to start just working in the center, though it could be anywhere and kind of radiate outward. I can see I need to saturate my brush a little bit more, although if I wanted this dry brush effect, it could be nice. But since I'm wanting to just get into a place of stillness and not have to reload my brush a lot that I'm gonna floated up a bit more. I could go back over these if I want to, and I'm kind of letting the brush make the shape and trying to repeat that movement. I can be very methodical about this. We're just follow where my interest takes me, - really ? Just allowing yourself to relax into it, not to hurry yourself, but just get lost in the making if you only have a few minutes. But this time, maybe you don't feel the whole page and you come back to it. It's there waiting for you to pick back up, especially if you're working in a single color. It's making a simple mark. You can enter back into that at any time. You can leave your sketchbook in a certain place in your home and come here whenever you just need break. - My mind naturally goes to composition, so I'm noticing that I'm drifting toe one side. What? I'm just accepting that and remaining here, allowing the marks to fill the page, reminding myself that this will all be filled when I'm done. So I'm not having to worry so much about balance composition as long as I'm making a simple , repetitive mark keeping somewhat consistent spacing, the marks themselves are evolving, depending on how I ankle my brush where I am on the page. I could also be moving the paper, too, instead of just my hand, which allows the mark making too again be more repetitive, allowing this to go out the page. Sometimes I might have some instrumental music and allow my movements to sync up the music itself. Sometimes it's nice to just have quiet, and you simply just keep going for as long as it feels good or until you feel the page. I'm gonna speed this up again so you can kind of watch. We don't take too much for your time. I have filled my page, so I'm done with this. For now. Um, you'll notice. Near the end, some of my marks weren't quite as consistent had this area that I just couldn't quite get. The coils were in the way. Mistakes are just part of the process. The imperfection also becomes beautiful, especially because this is just a moment are a way of marking time and moments of mindfulness. Even looking at this, you might remember a thought you had or something you let go of, um, I can even bring you back into the state of mind while you were making it. So any part of that is beautiful. You don't have to show this to anyone. Um, but hopefully you'll walk away feeling a bit more grounded.
4. Creating a Hand-Lettered Quote Page: one of the most intimidating parts of starting a sketchbook, I think, is the first blank page. It's kind of the hurdle you have to get past. There's so many possibilities, but that can feel daunting, especially if you're new to having a creative practice. And one way I like Teoh, help myself get past that IHS, starting with an inspiring quote to set the tone for the rest of my sketchbook. This allows me Teoh set an intention. It gives me something inspiring and having someone else's words. There just seems to give it more credibility in a little less intimidation for me, so if you read a lot, you may already have a lot of quote stored away. But if you need some inspiration, there's brain pickings dot warg that is a block by Maria Popova, and she goes through a lot of archives from a lot of thinkers and writers and compiles some of the best of their writings and talks, so that can be a great resource. You might watch a Ted talk or a documentary might just be listening. Maybe you have a word or phrase that sticks with you, but thinking about what your intention for this creative practice in the sketchbook is is a good place to start, and then just picking something that makes you happier inspires you. One of my favorite artists is Agnes Martin, and she has a quote that I love. That I think is really perfect for what we're doing in this course, and it's that you have to hold your mind still in orderto here inspiration. Clearly. So that's the quote that I am going to be working with. And so we will be hand lettering for this, which can be intimidating for some people. One tip to think about is that when your hand lettering you're not actually writing the words, you're drawing letters so you can take it one letter at a time, and what I'm going to do first is just to simply in thin lines kind of map out where I want my quote to be, and then I'll kind of fill out from there kind of giving space between letters, because I know I want toe picking these up. You could be thinking about if there's words you want to emphasize, or if you wanted to be all the same. I know my quotes a little bit longer. I'm trying to keep that in mind authority a little bit off, so we know will be adjusting it. Stillness is kind of a key. Take away that I want to happen this, so I'm making that a bit bigger. Praises that aren't is essential can go smaller again. You'll notice my lines are kind of wavering. One thing when you do this, if you're doing it in the morning, especially if you're a coffee or tea drinker, you'll actually see the effects of caffeine on your marks, which is just something to notice that's not good or bad. Not worrying about style of the letters at this point, just mapping it out already. Know this one's not good, that race that I think my last three words air here. Inspiration clearly. And I think maybe I'll just let them each be on their own line, fill the space better without undoing, one of already mapped out. You also could pick a fund that you like and print something out on the computer and either trade off, reference that with your eye or trace A. If you wanted to kind of working backwards here to find the center. All right, Now that I have this loosely laid out, I'm gonna think about not only how I want to fill out the words which I'm thinking just kind of simple block letters, so picking them up a bit, but also how I want to fill the space around it again. If you're new to this, keep things simple as possible, especially if this is your first page that you're trying out. So you could possibly take some watercolors or markers and paint around this and then work with pen on top, which I have done in the past. For example, here where I started with the letters and then painted the background and then worked with White Joe pen on top to embellish. So that's one approach. No. You can also kind of create space around the quote itself and then work with just simple marks and create a design you could lay your water color underneath and then work on top, and I think I'm going to loosely map out the space around and just do some type of repetitive mark in the background, and I'll keep just separate tips for visual interest. Then you can tell this is not perfectly centered, but it's fairly close, and I'm not gonna worry about it too much. So if you want, you can come back with pencil and picking this up, you can actually sort of sketcher with like this. You could sort of draw around, get the shape, or you can just sort of eyeball it. Part of me is thinking I actually may want to go thicker and then go all the way to the edge of the letters. So then the letters would be white, and then everything else around it would be filled. So I may do that. Well, in that case, start with pencil go a little bit thicker. Remember that with marker pen. It's gonna end up looking thinner. And this Justus, you outlined things actually thinking that's gonna give these smaller ones too much prominence. So what, I might dio yes, let those be simple line and then keep these bigger ones black. I'm coming in with just a simple Sharpie pen, Nothing fancy way . - And I'm not really a hand letter. This is not perfect. That's not really my aim. I'm just trying to make a grounding statement for my sketchbook, so it doesn't have to be perfect. It just needs to work for my purposes. You way, way, way, way, way. Okay, so I have my lettering mapped out. I'm going to clean it up with an eraser once the ink dries. And I could leave it like this, but I want to kind of fill it out when really do some of that mark making? I might even break this up into two days if I were doing it. Um, So meet me in the next video and will fill this in.
5. Filling Your Hand Lettered Page: Now that I have my lettering laid out how I want it, I'm ready to fill the page in with marks and because I do have a bigger space to fill, I think I want to use brush and ink again. Like I did it one of the earlier exercises. And, um, again, I want to use kind of the shape of the brush, but perhaps a longer, more directional line. So that has a bit of energy. I'm gonna fill right up to the edges of thes black letters and then just fill in around the space of these filled in letters, and I am going to use a smaller brush this time instead of the larger one. Um, just because I have a little bit more time, and I want it to be sort of meditative and give myself a little more fine detail ing with the direction way. - And actually, even though I was planning to go straight up to the edge of thes and treat them differently As I'm working through this, I'm wondering if I just want Teoh keep consistent throughout. So I'm still kind of feeling that out. Sort of adjusting the direction based on the words and kind of seen how they can blend together, interact maybe coming up a little closer to these 1,000,000,000 this base more. Maybe I'll end up filling thes block letters in black. Well again, nothing sudden stone. You're creating the rules. Things can kind of solutions could just come to you as you work and you can adjust. This is not about having a plan. We're creating a perfectly polished piece, though some cool things can come of it. It's just about slowing your mind way . - Now that I've mostly filled this in, I can look at it and see what still needed. And I do think I want to go ahead and fill these letters in, and I may then paint over the ones that I did in pen so that it's more consistent. Um, and I think that should feel good. - Way , way, way, way. - Okay , so now I feel the page, um, after this dries, I'll probably erase any of my guidelines. Probably take my Sharpie pen and clean up a little bit of the lettering where things are a little money. But overall I'm happy. And when I go to work in the sketchbook now, I can feel inspired and motivated instead of intimidated
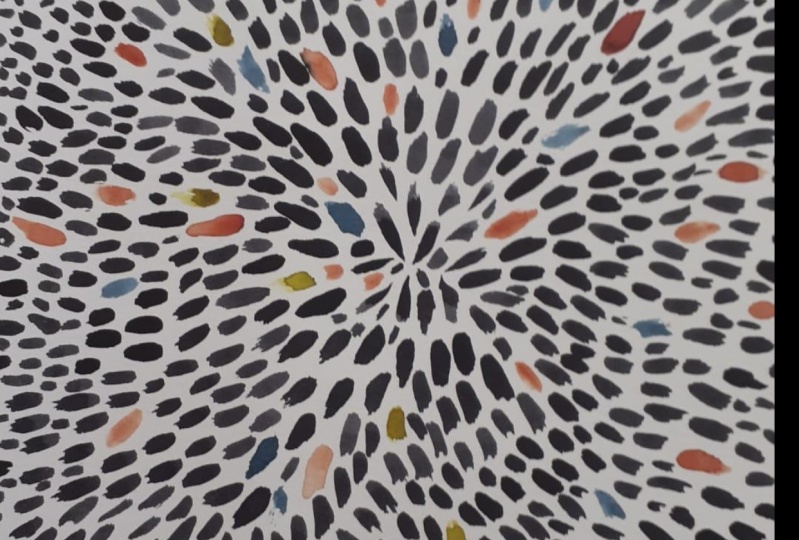
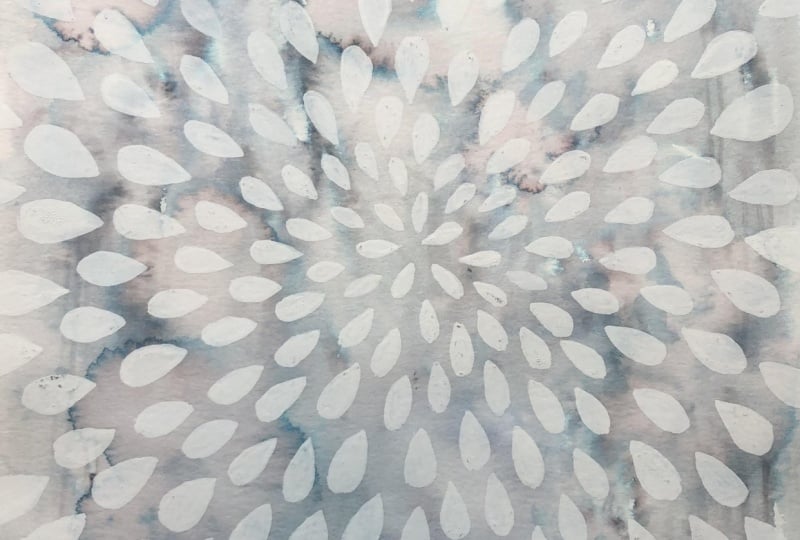
6. Layering with Color + Pens Part 1: So far, I've stuck with mostly black and white because having some constraints on what you're doing removing decision making from the process allows you to be more present and not worried about the outcome so much. But once you've gotten comfortable with that, color can be fun to play with, and you can use something like a Tom Bo marker brush pen. Um, a lighter color that you can layer on top of. They're these art easa brush pens that air water color. I'm using a watercolor pan set today. You could also use colored inks. You could really use Crayola markers, anything that your kids might have or that you can pick up at the dollar store because we're playing. The quality of this doesn't matter so much, but you want to think about something that you can layer on top of. So for me today, I'll be using watercolor and probably just limiting my palate quite a bit. Just you get some type of color underneath, and what I like to Dio is create just kind of broad shapes that I could then later work on top of, and you could do these as bigger marks as well. You can explore making some areas denser with colors and letting that fade out where you can keep it consistent and use something like gosh and do flatter color. This brush hasn't been cleaned very well from when I was using ink earlier, but that's OK again. This is kind of an under layer, so maybe you might experiment with some shapes having less color than others. Some really layering up the density you can explore whether you want to fill up the whole page or leave some negative space. This could be something. You do the first thing you wake up in the morning, and you really don't have to worry about the outcome at all because you're going to be working on top of this later, either the next day or just when it dries and you come back to it. Nice to make bigger, more expressive mark here, letting your body move with it. It's a lot of the mark making That I do is smaller shapes where it's really just small movements of my hand. So it's nice to do something more expressive as well. I wanted to I could come in with another color in spots that are still wet. Normally I would have a palate or something to mix, but I'm just using straight from the pan. This morning my kids used this palette as well. So some of the colors air pretty money from them, as well as my brush that already had the ink in it. Fine, you could use just one color, or you can explore bringing war into it. Whatever feels right moment. Just don't overthink it. My plan is to go over this with some different pens, But you could also work on a composition that you're happy with with just the simple watercolor washes and nothing layered on top. It's really up to you with these. I like to think of a conversation that I'm building so again limiting my need for decision maker making, just giving myself to respond, something to respond to later, when I come with, um, my markers or pens or whatever it is, I decide this feels like just about enough for now, so I'm gonna let that dry and come back to it.
7. Layering with Color + Pens Part 2: Now that my initial layers are dry, I'm going to you start working on top of them. As you can conceive, this isn't the prettiest final results with this, but I'm not too worried about that because I'm gonna try to layer up and see where I can get. And again, if it doesn't end up looking beautiful and pretty, That's fine. It's just kind of a peaceful process, and I'm coming to this with something to react to. I have some of these art easa brush water color pens that I'm gonna try just to bump up the color in some areas. But I may decide I don't like it. Just keep going. I have some jelly roll white pens, a couple different thicknesses that I'm going to layer with and then again, my Sharpie pen to go on top So we'll just see where we get with us working kind of intuitively and slowly and just reacting to what's there. I do. I don't want thes shapes that I painted to be quite as heavy focal points, so I'm starting to think about the negative space and filling that in, so it's becoming more of ah, collection of mark. Now I'm gonna begin layering with the white jelly roll I'm using the away. It's a little bit thicker, which I think a work better for these broader shapes. Yeah. So now I'm gonna take my black Sharpie pen and kind of highlights in different areas and bring some contrasts. Okay. - Okay . So I could keep going with this for a while. Um, but I feel like it's a good place for me to stop. Some of it's just knowing when you have enough, where sometimes it's just what you've got going on that day and how much time you have. But usually you leave this feeling a lot more grounded and with a still mind, which is the goal.
8. Final Thoughts: for your class project. I encourage you to break in a new sketchbook or blank sheet of paper and fill it with your favorite mindful marks. First, try the prompts in the lessons. Be sure to post your mark glossary and your favorite exercise, then test out some of your own ideas and choose your favorite to kick off your new, mindful mark making practice. Remember that there is no right or wrong way to approach this. You'll find your own mark making vocabulary, and you're afraid to try mimicking mine or coming up with something new using a size paper or sketchbook that doesn't feel intimidating. Try each of the techniques in the lessons and even make notes along the way about how it makes you feel and what you could do for a long time and what doesn't resonate. Experiment with working in layers, putting down fields of color and then working on top with a black pencil or pen. Pick your favorite technique and fill a whole page or a piece of paper. Post what you've tried in your finished piece in the Class Project gallery and share it on social media. Tag me at ritual morning studio and add the hash tag. Practice mindful marks. I want to thank you for going through this course with me by now. Hopefully, you have several sketch with pages or spreads filled with marks and your own unique glossary that you can refer to any time you're feeling stuck with what to put on the page. I hope you've enjoyed this course and experience the still and calm that can come with a practice like this one. Be sure to follow me on skill share and connect with me on instagram for more techniques like these. Thanks for joining me.
 Nikkita Cohoon, Sketchbooking, collage, + intuitive art