Transcripts
1. Milanote Intro: Hello and welcome to
Milanote for Beginners, I'm excited to be your
guide for using Milanote to optimize your organization
and use for Productivity. My name is niches Snow
from this Shea snow.com, I host the Studio
78 podcast where I interview every day women
doing extraordinary things. I also love helping
people make time for their passion
and what better way by using these amazing
tools that continued to come out and help us with
all things productivity. In this beginner-friendly
Skillshare course, I am going to walk you through
every part of the program and unleash its full potential to enhance your
creative projects. So if you're ready to embark on this exciting journey and transform your
creative workflow. Let's dive in and get started
on Milanote for Beginners. Know that I have designed it so you can skip around
just in case you're already dangerous enough
in Milanote and was curious about how to
use a specific tool. But if you're completely
new to Milanote, I take the time to
really truly walk you through all the toolbars
in the features. Choose Your Own Adventure,
and let's begin
2. Milanote: Getting Started: You can click here
to sign up for free. And this is where you would
put in your information. I already have an account, but here is where you
are putting your name, email, and choose your password. Now, when you get here, it's going to ask
you some questions like which of these
best describe you. So pick one that makes the
most sense for you it has. Are you a graphic
designer, illustrator, photographer, writer, or other? Just pick whatever
makes sense for you. So of course it has their
privacy policy down below which you can click
and read if you so choose or click off. And you start with this
clean board and they walk you through how to use milanote
when you first get in it. So you see over
here it says drag out a new board from
here to get started. And this is where it's saying
give your board a new name, like project plan or daily task. I'm just going to
call mine dream life. Great. Now, double-click the
board to open it. I love the instructions
that they give you. It says notice that
the top bar has updated to show you're
inside the board. Okay, Got it. It's like a website where
it has cookie crumbs. So we were home and now we're
in the dream life board. Now down below it says,
choose a template. You could choose the
template Mood Board, creative brief, project plan,
storyboard, weekly plan. Then they also have more templates that
you could choose from. Or you could just say, Continue, I'm going to just click on the
mood board just so you can see what that looks like
when you choose a template. So you see it gives you an idea. Different things that you
could do within milanote. I'm going to go through all
of these different things. But just so you can see
you have a textblock here. You have some images. You have an image with
text underneath it. You have, you can see
where it's been like handwritten an arrow drawn
to a particular image. I love also using
Milanote on my tablet, my iPad, you'll see here, which we'll get into. It's like a Board within
a Board which is great. Again, Bar images. And then you can also create
these little Color Swatches. These can be colors that could
be images inside of these. They'll make more,
it'll make more sense. Once we get to it, I could choose from several of the different templates
before committing. So I was on Mood Board. Here is a creative
brief that they give. An example of. Here is project plan. Here's a storyboard and
this just gives you some ideas on the different
ways that you can use milanote in order to
really brainstorm something out for personal
reasons or business reasons. Then you have weekly plan, which is really cool. So you can see how it has
Monday through Friday, and you can create these
to-do lists within each of these areas
and also have images. It is really cool if I
go to more templates. You can see if I'm an agency, I can choose different templates from project plan
to design brief, to move for, to
Productivity lists. They have it for creative
directors, game designers, illustrators, logo
designs, and you name it. And don't, that this is only
for creative businesses. You can really use milanote
for almost anything. It's just that a lot of
creative businesses love to Vision Board out either their marketing content
or YouTube content, or online, whatever
their online content is. But personally,
you can use it for a Vision Board and Mood
Board to keep recipes, to do so many different things. I'm going to click on another
one or writing templates. So you can see within
the writing category, they have ideas for if you
want to plan out a novel, maybe you want to plan
a character profile, a story outline,
a world builder, Story Map, My God, is just so many different
ways you can use Milanote to really
brainstorm almost anything. I am totally in love with it. I was seeing if
they had a recipe, one, they do not, they do have a Vision Board and even a web
design mood board. Let's say if I chose mood board, I can click this, keep Example Content
and Use this template. Or I cannot have it keep
the Example content, but still use the template. But I'll have to go in
and put my own things. We're going to learn how
to do one from scratch. So I'm not going to use
the template at this time. Instead, I'm just going
to click off of choose a template and take us
back to this clean board. The next prompt here
says now you're ready to add some
content to the Board. Try adding some notes, some images, and links. I'm going to click the OK here. And voila, now you are in
the Milanote, my friends, you are ready to
use it to create whatever your project is and be a dream
life recipe Board, website inspiration,
homedecor board. Maybe you're redoing your office or your bedroom
or what have you. Let's just dive in and
begin your project. But of course, Before we begin, we need to understand what are the different tools
that you can use?
3. Milanote: Notes Tool: So step one, you have
a milanote account. You've played around
with the templates. Now it's time to understand
how you use the tools. On the left-hand side. These tools are going
to allow you to create your own setup
and in some cases, templates that you
will use in order to help you visualize
your creative project. If you look on your
left-hand side, you will see several tools. And if when we talk about
the advanced feature, you can customize which tools you want to
see on the side. But for now, by default,
you have Notes, Link to do, Line,
board, Column, Comment. You have three little dots
which we'll get into. And you also have at an
image upload and draw. The first thing I'm
going to have you do is use the notes. When you drag, you're
going to click and then drag the
note onto your board. One thing that I
want you to notice, if you look on your
left-hand side, now that you've dragged
that note onto your board, you see you'll get some options. A textile bold, italicize, strikethrough, bullets,
a numbered list. You get also on the alignment. It's grayed out right now because we don't have
texts highlight it, but it also gives
you a link function. You can also change the color of card and you can add an emoji. So I just wanted to at
least to know that change. And if you look at the top left of all those options
now that have come up, there is an arrow that
is leading to the left. And when you click that arrow, it takes you back to
the main toolbar. And you'll see that I'm
no longer clicked into the textbox because I've gone
back to that main toolbar. But when I click
into the box again, the toolbar shows backup. I am going to write
in here goal setting, and I'll show you a few things. If you highlight it, you can double-click
to highlight it. Or of course, you could just simply go left to right to
left to highlight the text. In here is where you
can click textiles. You can make it a
header, small text. You could change the color. You can make it
highlighted text. You can italicize strikethrough, make it a bullet, make it a number's list. And you can enter a URL if
you want to provide a link. Have FUN with that. But note that is an option. You also can change
the card color, so you can have a gray, pink, you can have it see-through
where there is no color. Then you can also create some custom colors
if you would like. I'm gonna go back just for
the sake of this demo, just change it back to white. You might want to add
a color to the top of the box instead of having the
whole boxes specific color. This is where you can do that. And of course you could
do custom colors too. So really a lot of PFK-1. The next thing that I
want to show you in this box is when you
double-click on the text, you'll see this
little bar pop-up. And essentially you can
just click it and drag it, and it will pull
the texts out of the box and move
it somewhere else. So you'll see the styling and
everything is still here, but it just took
that Texts part out. So even I can
double-click on this and literally just
pull that text out. No, it doesn't keep the
same styling as that, but it's cool that you
could pull the texts out. Another thing I want you to
know about this now also, is there a three little
bars that show up when you hover over the bottom
right side of the box. And you can make
the box big small. So you could change
the size of that. To delete these boxes
simply right-click. You'll see when you
right-click you get a variety of options. You can cut it, you could
copy it, you could duplicate, clone, delete,
group into Column, lock position, bring the front, bring the bag, change colors, and convert to a document. Oh my goodness, a
lot you could do. So when I took out
the texts earlier, let's say if I wanted actually this to look exactly
like this box here, I can right-click
and duplicate it, and then it will duplicate
that box for me. What I want you to do here, so you don't get overwhelmed, which is maybe why it's
good to start with a template is just know that you have several options when it comes to creating your board. And it's always good to try to sketch out what you
want to do and then come back into the
board and then start creating your template. I also want to point out there's a difference between
duplicate and clone. When you clone something, you'll see that here
are other copies. And it will show you, it'll link all the
copies together. So in some cases, especially in some
business cases, you want your notes to be linked in cell that's getting
a little bit advanced, but I at least wanted you
to understand why there is a clone and why
there is a duplicate. The clone sinks the
things that it's duplicating together where
when you just hit duplicate, it just duplicates it. Now, you can also
like locked position. I think everything else
here is straightforward except maybe group into Column. And this is where I'm just
going to do live life. And let's say I duplicate this and then
duplicate it again. I have everything within this. And just so you can
see how it's moving. I just want you to see this is as and when
you move your notes, you're moving them together. So it's like notes within notes. And I'm just putting some Greek texts right here
just as give you an idea of, even though this is a header, you can have multiple
style font within a note. The other thing that
I want to point out about this note now that
we have it in a column, is that on the top
right hand side, you can click this minus sign and it will open and
close this for you, which is comes in handy. Trust me, I use this for vision boarding
my home projects, and sometimes you don't
want to see certain things. So this is a nice way to do it. So that essentially
is the note card. I am going to go back over to the left-hand corner and we're going to go
to the next option.
4. Milanote: Link Tool: The next option is Link, and when I drag it, it says Link cards. Let you save a visual
preview of any site. I am going to just put my
personal website in there. And it's so awesome because
I love when it does this, because I love a
good preview link. It'll take that
image and the texts, summary texts if
the website has it, and then add that
in there for you. So if you are doing research, you can choose to have visual
cards, which is awesome. And again, you can
right-click it to get that same menu and with
some customization. So you see here it has replaced image and copy link address, whereas this doesn't have it. So when you right-click
on something, it provides you with the necessary things
in order to modify it. In this case, you
have to replace image and the Copy link
address if you need it, just like with the notes card, when you're clicked
on to that link box, you get a customized menu that shows up where the
Tool Bar used to be. And I could change the color. I can add, again, a color to the top, and I can choose my
own specific color. I can choose to show or
nache show the image. I can also choose to show the description or
nacho the description. And it also gives
an AB reaction. This is gray, especially
when you're sharing a Board, because then people can react to the content that you've
put onto the board. So essentially that is the link. So if you're doing research
or something like that, no, that is an option. Okay. So next on the list is the To Do
5. Milanote: To Do: So here is the to-do list. It says To Do list
lets you group and prioritize tasks visually. Tip, you can set due dates and reminders from the
toolbar on the left. Let's say you have we
want to go on Saturday. You want to go to
the grocery store, you want to go to CVS. You want to make sure
you work out and you want to wash the car, okay? Now a couple of things
I want to point out. One is asking me add
a title to this list. I'm going to say yes, I am going to make that title
Saturday called saturday. Now, you'll see as I
hover over this list, there's three little bars that show up on the right-hand side. I can move those little
guys in any order I want, which is a nice,
if I right-click. This one is different. It has an undo, select
all a new note, new link, new to do, new line, new board, new
column and so forth. And it's interesting
because really this is in for this particular
to-do list. This is for just
the board itself. So this one, unlike
the other ones, doesn't have a special
right-click Jess for it. But that doesn't mean
you don't have options. If you select the box that we just creative
for the to-do list, you will see on the
left-hand side the due date. And so I can do of course, this isn't the due date, but I can to a due
date of February 24th, I can add a time I
could say 1 h before, and I can add one to
each one of these items. You also can assign people. So if you have multiple people that are
within your milanote, especially if you're
working with a team. In my case, I actually from
my home renovation milanote, my mom is on it, so she is my team member. When you click assign, a box will pop up. Anyone that has access to this particular board
will be listed. And then you can let
them know that they are assigned to that
particular task. You can also, from
the left-hand side, indent any of these to-do items. And you'll see on the bottom of this there's a
color and a title. This is really for
the title of the box. So once I click,
let's say Saturday, you'll see that left-hand
menu becomes even smaller to only focus on
the top area of that box. I can then add a
color if I so choose, or I could choose to show
or not show the title. And then if I click, let's say back on
washed the car, you'll see the other items, the due date and
assign show back up. So that left-hand side
is your lifeline. As you click on
different things, you will see the different
options that you have. And of course, when you
right-click on certain boxes, you will also see the different
options that you have. So we've done notes Link, and to do, Let's
talk about the line
6. Milanote: Line Tool: So let's talk about the line. The line is a very
interesting thing. Notice that once I
put the line there, it's not connected to
any particular thing, but I can connect
it to this box. So I just click
that white circle that was at the
top of the arrow. And now it is
connected to this box. So anywhere I move this box, it's going, I'm gonna show
you what I did again. I'm hitting undo for a second. That white it's like this white circle that's
on top of the arrow, is simply clicked it to
the middle of the box, and now it's connected. Another thing about
this arrow is I can move it like this. And you see this white, the white circle at the
bottom of the arrow. I can use it in order to
move the arrow like this. Or again, I can connect it by two this box by just throwing it in
the middle of the box. So anytime I move any of these, it will follow it, which is pretty
cool with a line. Of course, what do you have? You've got options for colors. You can choose where
the start and end are. So you see when I
click this arrow, turns on and off on one
side and the end part, the arrow turns on and off too. So you could choose where
you want the arrow. You can also label this. I'm just going to
call it connect in. So now you have the texts here. You can just click on it once and it will allow
you to rename it. I'm going to select
the arrow again just to get our toolbar back. I can make it a dashed line, and I can change the
weight of that line. So lots of different
options, they're my friends. And when I click and
hold on that arrow, I can actually drag the two
things that I have connected. Now, I can easily disconnect it from
something by just simply, I'll show you that again. Clicking the little circle
that's in the middle, just clicking it off of the box. I've disconnected it. I'm going to click
that white box again, and I've connected it back. Magic. Magic. Okay, Let's see. Then if I right-click
on the arrow, I get a cut copy, delete, duplicate and delete. And I also can
lock the position. So let's say if I
locked this position, that means it's not going
anywhere, regardless. If I tried to highlight it, this will move with it
still since it's connected. But if I click on this, it will not do anything. I should mention too. Of course, if you
click and then drag, everything is highlighted on the board so you can move
everything at once to, and then when I click
off, it's unhighlight it. I just want to make sure
I've mentioned that. I'm going to right-click on
this and I'm a hit unlock. And let's see also, you can bring the
front, bring to back. So no, that is an option. Really cool. People have the your wheels are turning when
it comes to you, what you can do and how you
could customize your board
7. Milanote: Column & Comment: Okay, so next, let's
get into Column. I'm going to drag this here is essentially just like this. But let's get into it. I'm just going to
name this planning. And so this is where you could drag different
things into this column. You can drag images, you can drag other
notes in here. We were able to create
a column when we did a note to put
it into a column. But this is just another
way to create a column. We're gonna get into
images in a second. I'm just going to leave this
column blank for a second. I also want to drag on comments, and here you'll see use comments to leave messages for your team. If I had selected a
specific team member, I could send it to
that team member. But of course I am
the team of one. And then you can always, if you see on the
left-hand side, you can create a
color and then you can always collapse this. And you can put it on top of something and you
see how it sticks. Then that team member can
then click on it and see like either the remark or
reply or what have you to that comments. So love that, especially if you're working in a
Board with other people. But you can even
leave a comment to yourself and you can move it
anywhere and it's sticky. And it doesn't have
to be on something. It could just be by itself. So love that, love
that, love that. Okay, so let's talk about
the three little dots. So the three little dots
are additional things that you can have on
the main toolbar, but they're just
kinda hidden away just to minimize the toolbar. You have Sketch, color, Document, Audio, Map, and video
8. Milanote: Sketch Tool: Let's talk about Sketch. When you drag this sketch over, it says double-click
to start drawing. When you double-click,
it's going to bring up a little
drawing board for you. And you're gonna
get a pen option, a selection tool option
and erase option. Of course, you could choose
a color and then you could choose how thick
you want the pin. I have pen selected now I have a color and I have thick pen, and I am just going
to write my name. Really creepy, like this, Chez. And if I did this
selection tool, I can move these little
individual pieces or I can, let me show you how
did that I click hold, drag, and then I can move
all of the different pieces. Then I can erase any
of these pieces to, if I do Control Z,
it'll bring it back. But if I click on that piece, it will erase it. When I hit Save, here's my creepy little drawing and I can move it
anywhere I want. But you'll also notice again, on the left-hand side, I have other
options. I can make. If I choose color, I can make the
background black or gray or whatever color I want. And of course we
have the top strip. And then also I can edit the
drawing from right there, where I can double-click
it to edit the drawing. When I click that again, you'll see I can add a caption. This is a B drawing. Then there we go. Then I can also add a reaction. I want to, if I right-click, I can cut copy, duplicate, delete, download
SVG, group into column. So remember we did that
for the notes where you can have a whole bunch
of things in a column. And just like here, like
I dragged a column. Columns are your friend. I can lock a two
position and I can bring to front and
bring to back. And I can change the color. Just like this column. I can drag it into an
already existing column. I can turn that caption
on and off if I want to. From here, my goodness, so many different things
9. Milanote: Color Swatches: So when we go back to
the three little dots, Let's drag a color here. Okay, so what is
a little swatch? A cute little swatch. It has the hex code
and a hex code is essentially the HTML
code for a color, and it also has the name
of this particular color. This really helps when
you're planning websites, but then it also really
helps if you are, let's say, painting a house like I
recently had swatch for Sherman Williams and I have Sherman Williams white
dove as the name. And then I tried to
get, of course is close to it as possible
for the swatch. So when you tap on his watch, you'll again see the
left-hand menu will change. And you can pick a
color from the menu. Or you could say show color. And it'll pop this out. And you have the color wheel where you could say if
you like this color, you can start building
your own color palette. And here's RGB if you prefer, red, blue, green codes. And it also has a CMYK
slider and an HSB slider. And then it has
the apple colors, the spectrum, it gets
into all the things. So depending on what
you're comfortable with, know that there's an easy
way to pick a color. But if you're very particular
about a certain color, know that it allows you
to do the hex codes, CMYK, RGB, which is really
important for some people. Okay, so I'm just going to
click off of this thing is it allows you to choose what you want to
display on the color. So for some people, they want to see the hex code, but you'll see it
will also display. If you look over to the left, what I'm clicking on is display. And so it has hex, RGB, HSL, or off. If you don't know what
any of those mean, don't worry about it. Just click off and you can
name this anything you like. And so just know that
you have options depending on what you're
using this color swatch for. You can also to the
left in the toolbar, either choose to show or
not show the caption. And of course, again, you can add a reaction. And of course, you can
right-click and it will give you the options for this particular thing
that is a Color Swatch. And so you can of course, have multiple Color Swatches, which is super helpful. And that is how you create
your color swatches. Okay, you are becoming a
master of Milanote, my friends
10. Milanote: Document Tool: Alright, so if we go back and we click on those three
little dots again, on the left-hand side, I'm going to drag the
document. It says Documents. Let you write longer notes. And so I'm just going
to put article. If I double-click in here, this is where you can write
something in long form. I just pasted a
piece of an article, a finance article that I wrote, just to kinda show you that
you can write in long form. And of course, you could
change the text style just like with anything else that has texts within milanote, bolded, italicized strikethrough,
bullets, numbered lists, align center, and if
texts was selected, you can also do Link. It also lets you export your content out to
a PDF Word document, Markdown, or plain
texts, which is nice. If you craft something in here, it is easily transferable to what endeavor or wherever
you want to put it. I'm going to click out
of there and then you'll see that the article
is right there. And of course, if you have
one of these cards columns, you could throw it in there. I just wanted you to see like
you could throw anything into a column card,
like anything. Seriously. Just to show you the flexibility of this
program, it's fantastic. So essentially that is how
you create an article. If you so choose to have
article as part of your setup
11. Milanote: Audio, Maps, & Heading: So let's go to the three
dots and let's do Audio. Here. It lets you paste the link
from Spotify or Soundcloud. So I have just putting here
my Studio 70 a podcast. And voila, there you go. So any link from Spotify or
SoundCloud will work in here. And really cool,
you can put this inside a column
if you so choose. If you right-click,
you'll see that this one, you can add an image if
you wanted to and copy the link address that's different from some
of the others. And on the left-hand side, you can add a color bar, as we've done before. You could choose to get a
preview or not a preview, you could choose to show
or nacho the description. And of course, you can add a
reaction and PR ready, cool. Alright, and so
there you have is if you wanted to add
audio to your board, you could, which is really nice. Okay, so homestretch people, you also can paste in
a link to Google Maps. This is great when you're
planning anything, of course, with a location. So what would this be good for? Planning trips, planning
events, you name it. So adding a location
is fantastic. And here it says Map cards. Let us save and interactive
Google Map Vermeer, if you're ever come into DC and the National Museum of
African-American history and culture is amazing. So I just pasted the shared
Map location in here. You can go to any location
and copy the link. It literally says Share
and you paste it in there and voila, there you go. Okay. I just want to remind you
guys with these cards again, when you hover over it, the bottom, you can size them. Right-click, it gives
you all the choices. The left bar lets you
do all the things. Getting the hang of this, that my friends is
how you add location. Okay? Then I Heading. So if you go over here, it says headings help you label important
parts of your board. So I'm just going to
call this my life. If I click on it, you see it gives me all of the same things that
a note would give me, essentially a Heading to
me as just like a note, you get all the same
options for it. So yeah. We already knew how
to do this and you could put it anywhere
because remember, all of this is draggable. So that essentially
is the toolbar
12. Milanote: Bottom Bar: Essentially is the toolbar, and then down below
are the mainstays. So for example, at an image says at the web clipper
to your browser, instantly saved images, links, videos to your boards
available for Chrome, Safari and Firefox,
install it now. And so if you know how
Web Clipper works, once you add the extension
on to your browser, you can be on a
website and then you click the Milanote extension. And it'll give you a choice of the images you want to save. And then you can save
the image into milanote. You can also, here, I gave my this throwaway
account a name. So it's funny. It's giving me examples of things
or dream in life. And here it also gives
you upload an image. And if you click on this, it will take you to your folders and you can select an image. Or if you want to, over 3 million free images
provided by Pexels. Let's look for, I wonder if they have a picture of a nebula. So I'm going to drag
this over here. And that is how you add
an image, my friend. And you can make it
as large as you want. And I wish I could
see you guys in person because what
am I about to say? What can you do to
modify this image? You can right-click on it. And what's unique for images is you can replace this image
with something else. You can download
the original image just in case you need
to use it for later. And you can crop the image
to fit the dot grid, which is now, if I uncheck that, you see how it's more free form. If I check it, It's more snappy. And then the normal
group into column, if I wanted to have a whole
bunch of images in a column, locked position,
front-back standard. And then over, of course, over to the side, what can I do, my friends? I can add some
colors at the top. I can show or not
show the caption. I can edit image and I could
crop it if I wanted to. I could rotate it left
and right all the ways. I can hit Save. And then there's
my cropped image. If I click on it again, you can see I also have
the option to draw on top. And this, of course, would be easier if
I had my tablet, but I'm doing this
on a computer. New abuela, hit Save. I'm going to click
on the image again. I can add a drawing. And know that when I, when I click on this that
texts that I created, if I wanted to edit the drawing, I will have to come back here. If I wanted to, I could click the
Selection tool. I can highlight this. I can hit Delete and that
would take away the texts. And then over here
you have upload, which is when you
have add an image. I could have uploaded
my own from here, but they also have a
where you could just directly upload a file
or image right here. And then you have the draw. That is a quick little shortcut at the bottom there too. Okay. Oh my goodness. That is all of the
different tools. I know that was a lot, but I wanted you to have a good understanding of what
you could do with each Tool. Because I think it's
essential that you know the basics
before you really start creating your
template in Milanote. Let's get to some other
13. Milanote: Settings: Look over to the top,
you will see a bunch of icons and then also
options at the bottom. I'm going to start at the absolute furthest
end of the corner, the little wheel for Settings. This is a generic account that I created in order to
create this class. And so a couple of things. One, you can upload a
photo if you so choose, and I think that's great, especially if you start
inviting people to your boards, you will see account settings. When you go to Account Settings, you're here, you'll
get the generic stuff. You'll be able to delete your
account if you no longer want to have it anymore
and have it on there, I guess their servers. You choose your
e-mail notifications. And especially if
you're in teams, this is really important. They'll send you stuff. You could choose if you
want to receive it or not. Your appearance, the interface, you could do small,
medium or large type. I always do large display
headings in the Milanote it. So you could turn this off if
you choose. I have mine on. The color scheme
is light or dark, or you can have it match
your operating system. And this is essentially
if you have dark mode, light mode turned
on for my iPhone, I do have it when
after a certain time, my phone goes to dark mode. So if I wanted to, I can have this match my operating system. If I didn't have a setting
on my operating system, I could choose high,
wanted to always be, which is light or dark. And then here you have preferences prevent
cards from overlapping. Automatically move
nearby cards when editing causes a car to grow. So you could choose if you want that to happen
or not happen. It depends on how you work. So I would turn it on and off and play
with things just to see what you prefer enabled 3D effects
when dragging cards. So other machines like you
might want to turn this off just to so you can have
a smoother experience. Show grid by default, if you turn this off, those little dotted
lines that you saw, I think you can see them. You could just turn that off. So now it's just a
regular gray background. If I go back into
account settings and into appearance
or excuse me, preferences and turn it
back on and go back out. You'll see that there's these
little faint dotted lines. I kinda like it. I'm used to journaling in
the law each term journal, which has the dotted grids. So I don't mind that it helps
me keep things straight. Also, show template suggestions. Recommended templates will
be shown every time you create a Board while
you're starting, I recommend keeping this on. I've turned mine off
on my main account. It says when a node
is duplicated, ask keep this copy in sync. I think that's good. Just so you can make sure
you want to sink or not. Because remember
that goes back to earlier where anything you cloned is sink to what
you've cloned it from. So you can choose if you want
to keep stuff sinks or not. If a note becomes too long, you can convert it to
a document when you create a multiple to-do items, ask, add a title to this list. I like to have that on because maybe you forget to
add a title or you, maybe you forget
how to add a title. So it's nice to just
have that reminder. And when items are
checked off To Do list as delete completed tasks. So that's personal preference. If you want it to clean
up stuff for you, enable ink effect when
drawing speed and pressure will affect the line
thickness when you draw. I like that, especially
on my tablet. Double-click tab
to create notes, useful for quick, the
Creating Notes on the canvas. And essentially what
that looks like. If I double-click real quick, a note will automatically
be created for me, but I can turn that
off and Settings. If you're a serial clicker, maybe you want to turn that off, then it has Toolbar Options. This is where you can decide what you want displayed
on the left-hand side. Remember we had the three dots and I'm going to just
go back for a second. The three dots where some of
the items work nested away. And those three dots, if you go to Toolbar
Options and there's something in the three little
dots that you're like, Oh, I want to see always. You can then turn it on. You can have all
of them turned on, but you just would then
get a really long toolbar. But if there are things that
you just don't use, often, you don't have to have them show up on the
left-hand side. You can customize that
how ever you like. And then also at the bottom there some things like at image, upload image and draw. And you can choose to
show those things are not so depending if
you're working on a laptop or your tablet, you might only want the bare minimum in your
toolbar, and that's okay. But this is where you choose
which items you want to see. Then the last but not least is privacy saved viewing history. It says it lets the owners of the public boards see
when you viewed them. So personal preference,
and that is my friend's account Settings. So if we go back up
here to the wheel, you get to logout and then you'll see that I am
on the free plan. If I click upgrade
from unlimited space, you'll see that with a free
plan you get 100 notes. Images are links. You get ten file uploads and
unlimited shared boards. If you're using this
for small projects and then you're going to
delete the project and then do new projects. And the free plan
is great for you. It was not great for me
because I had lots of images, lots of links, lots of
boards, lots of stuff. So I ended up getting the
one that is 999 a month. If you are billed annually. If you do monthly, it's 12, 50 a month. I just pay for the year. And then everything is
unlimited, which is great. And then you have teams. I didn't need teams because
I'm not working with a team. And for the pay per person, I can still have like my mom and friends be on
a board and do stuff. So that was perfect for me. Then you'll see refer a friend. And when you refer a friend, you can increase your
storage by 20 cards every time someone signs up
using the link below, but it's a max of 100 extra. It's funny when I first
started on a free plan, I initially got my mom and my other friend and
another friend and sign up so I can get like
free notes and stuff. Then you can only
get up to 100 free. So I just quickly
ran out of them. So I just ended up paying. But for now until you know, this is something
that you are going to use because who needs
another subscription? If you're not going to use it, use the free one. But if you find that this is something you like
and that you love, you might want to
consider the paid plan. So personal preference, again, clicking out of that,
going back to the wheel, that's all in that section. Off set up. Okay, so other things
to know and understand. You have the notification area, so if you share, bore will notify you when someone
makes a change. So when my mom and
my personal Board my mom has her own boards so she doesn't mess
up blackboards. I said that up. I'll get a notification
when she adds something
14. Milanote: Search Board in a Board: You can search your boards, which is really nice. So you can search green. And let's say if I
have multiple boards, it would show there. And I could click it. And because here's the green
side, just hit Search. And then I click this
link one match in your current board and Boehm. But let's say if I had just
to show you how this works, okay, so over on
the left-hand side, you have where you can create
a Board in your creative. It says you're creating a
new board inside dream life. Put boards inside each other to create as many
levels as you like. So for this, I'm just going
to name this Vision Board. Then I'm, I create another board and I'm going
to call this planning. So now I have boards
within boards and I'm just using the bread crumbs at the top to get back to my
main dream life Board. And you can let
say this planning, I can drop this into the planning board
and the Vision Board. Let's say I can
drop these in here. When I double-click into
the Vision Board, things, the things I drop go into this unsorted been over
here and then I can drag and drop them and put
them where I want them to go. It's cool because I now can start to organize my
content a little bit. And I'm just going to
create another board. And just for the heck of it, I'm going to call it content. I'm going to drag this
and that in there. That in there. And when I
didn't drop it fast enough, it just took me into the board. And then you see how it has some things off to the
right as unsorted? Yeah. And then let's say I'm like, No, I didn't mean
to put that there. I just hover over back
over to dream life. I could have dropped it. But
since I hovered over it, it just put it right back there. So you can see how
oh my goodness, this is an organized right now, but you can see how you
could do a ton of stuff. So let's say in the content
Board is the museum. If I go back to the
search and I hit museum, it knows that it's
in content and then it'll show me
where Museum is. So great Search function. I love a good Search
function in a program
15. Milanote: Help, Share, Export, & Zoom: Here is the help and
from your phone. And here is where you can share. You get invite people
to be editors. You can either
send them an email or you can send them a link. And then here at
the bottom it says notify me when somewhat
edits this board. So you could do that and
then share a read-only Link. And this means that
person can't edit it, they can only see it. This is good, especially let's say if you're a muralist and you want someone to see your sketches and what
you're thinking about, but you don't want them
to be able to modify it. This is where you would send
them the read only Link, so great for clients or other people that you just don't want touching your stuff. Then you have at the top
right, the export function. You can export your
current boards as a PDF standards size hi-res, you can export it as a PNG. Won't have a background like
a white background to it, then convert to a
linear document. So a Word document marked
down in plain text. And then if you had
images on a board, you could download
all images and files. So I love that too. Then here is Zoom. So I'm gonna go in here. So essentially I went
into the vision board. When I go view. I can
drag this to zoom in. I can reset to 100. I can scale to fit, which will center everything. And I can put this
in present mode, which might look funny for you guys because of
how I'm recording. But really nice. Know that you can depending on if your PC or Mac, I am Mac, so I can hit command
plus and minus, which will also zoom in and out. And I think for PC it's probably Control plus or
minus to do that. And of course, I can
do Command zero to get it back to 100. Or I could go back to View
and I could do Scale to Fit and it'll
center the content. Another thing that I want to
mention is at the top-left. So we're in the dream life
board and I'm gonna go home. But remember, you
can drag an Eigen, have another board called
website design, right? Then I can, and this
is my main board. So if our home, these should all be
your main boards. And then when you click into it, that is like one of the
Projects that's off of your main board and then
you can have a nest. So I want to show you now what
one of my boards look like
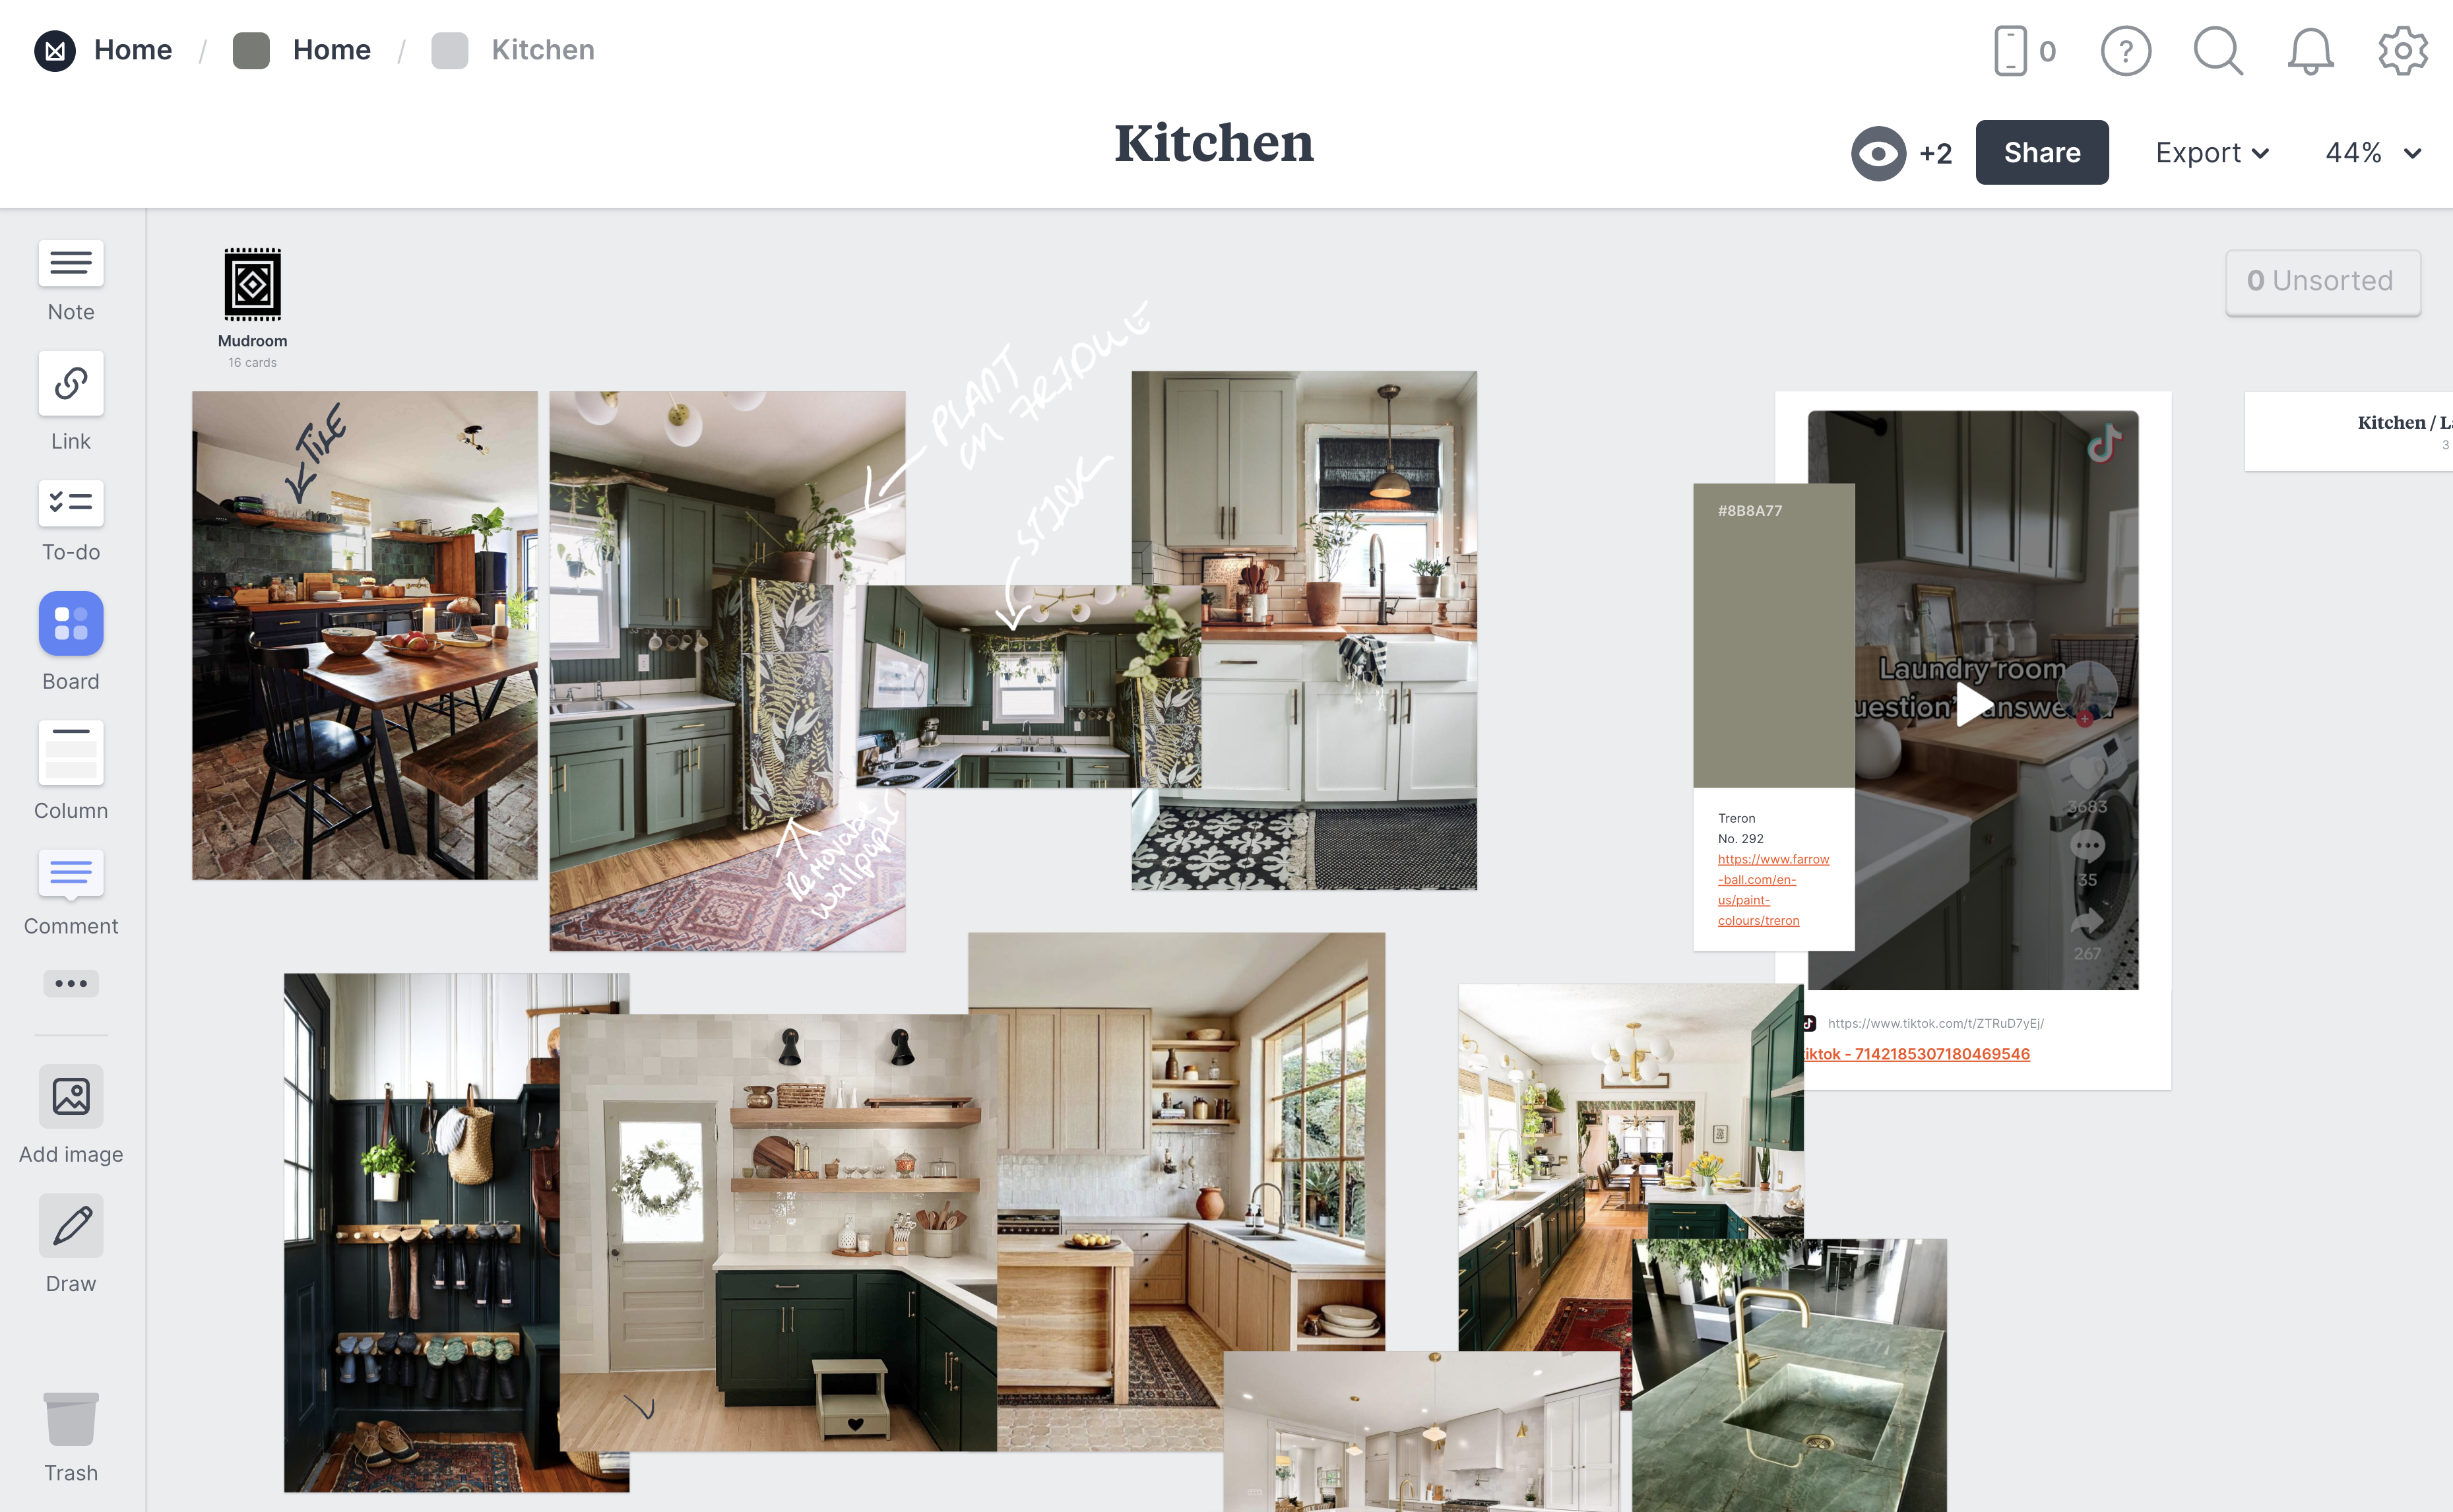
16. Milanote: Project Example: So this is an example of what one of my boards look
like from my house in, so I have when you click in, I have it where there's this general area where you can see for the main
part of the house, things that I wanted to
consider before and after pictures that I got
from Pinterest and Google about what I wanted
my house to look like. Because when I first
bought my house, it had dark wood, but I wanted
it to have light would. And so these were the examples. And you see, this is, I'm just using a note to
go over these images. And then I wrote
before and after, I have things overlapping. Also. You also see that I
have different boards, but you'll see that
my boards have icons. So I'll put a link to where
you can get free icons. But when you click on a board, on the left-hand side, there is a color
in there as icon. And you can make it a solid
color or you can add an icon. And they have recommended, they got letters and numbers or custom images in
the Zong as it's, they tell you that 160 and
hundreds by 160 works best. But I found all my
own custom icons and I wanted them to have
a similar look and feel. So I got them from
all the same place. And so these are the icons. And so this is the
schematics from my house which I
won't share because I don't want to overshare
on the Internet. But let's go to the
kitchen board here. If you'll see that I have pictures of the original
listing of the house. And so when I first
purchase the house, I've put the images right there. Then you'll see like
some of the ideas that I wanted to do with this. I have, for example, a color that I really liked. So you see the hex code, but I also have a link to
where I saw this color. So you can add
links in the notes of the Swatches, which is nice. You'll also see here I have a TikTok video
that I brought in. And so that just
kinda shows you, you could bring in video
from social media. Then you'll see where I've
written in different places. And I have some things that I love to help me plan
out the kitchen space. And then I even nested
within the kitchen. I have ideas for a mud room and I'm just going to zoom out
here a little bit. And so even though these seem like the same,
there are different. I have a Link card, but then I have also
alternative images to how this actually
wardrobe looks that I'm considering because I
want something like this, but look and feel, I'm about to go back
home and I'll show you one more board. I'll do the living room. And so here is my inspiration
for the living room. And actually I ended up
doing the green bookcases. I'm in the process
of getting lights. But you're gonna see
how I have links in various places too,
like the colors. I have information about the fireplace insert
that I want to get. I have notes like
I ended up going with the Oak moss by
Sherwin Williams. And Let's random then
here, mirror in lighting. And I'm like talking to
my mom about what I need. And then here is a link to
an Instagram post again, and this is a link to
a real on Instagram. And then here is a link to the original pictures
of the house, which this looks
very different now, which I'm really proud of. Steel a lot of work to do. But you can see how I kinda
storyboarded this stuff out. Then my mom, she
has her own Board, which looks very
different than mine of things she thinks that
I should consider. So you can see why I gave her own board so she doesn't
mess up my aesthetic. But she dropped stuff in here for our different
ideas for the house. That at least gives you
a little bit of a sense of how one of my projects looks and how I
use this to Mood, Board out different parts of my house is I work on it
the next several years.
17. Milanote: Wrap Up: Okay, project time. My friends. I hope you guys have
enjoyed the course. I really wanted to give very
weedy with it so you can understand all of the different
tools within melanoma. There may be one or two
things I didn't mentioned, but I hope it gives you
enough to get started. Now, it's time for you to
create your first project. Remember to experiment with
the boards within boards. Definitely check
out the templates. The templates are a great
way to get started. You can modify them
however you see fit. And it will also
highlight some of the features because they
will already be on the board. Or if you want to be daring, definitely try to create
a board from scratch. Remember the sky is the limit as far as what you
could use this for. You can use it for a
traditional life vision board. You could use it
as a recipe board. You can use it to manage
projects for your work. You can use it for home
decor like I have. You can use it to
schedule your week. You use it for so many
different things. So just think about anything
in your life right now that you want to add a little
bit of organization to, that you would
need a robust tool like melanoma to help you with. Now, once you've finished
your first project, please, please take some screenshots and add it in the
project gallery. If you discover a feature that maybe I didn't mention or a tip, please also include that
in the project gallery so other people can learn
about it and use it. Also. If you have any
questions, please add them. I really look forward
to helping you guys use this as something to
unleash your creativity. Alright, thanks again for
watching this course. I hope you found it useful. And I hope you have a wonderful
day or night. Take care
 Nache Snow, Educator // Speaker // Author