Transcripts
1. Introduction: Hello, and welcome
to the course. My name is Richard Anderson, and I am your award
winning instructor. In this course, we'll
be exploring how you can use Microsoft Designer, Microsoft PowerPoint,
Microsoft Excel, and Microsoft Power Automate
in order to increase your overall productivity when it comes to Microsoft products. With awards in FS 100 companies and experience in
Fortune 500 companies, as well as my experience
in government boards, I'm sure that I can help you. Let's begin your
Microsoft journey.
2. What Is Microsoft Office and How to Access: So to begin with, the
real question is, what is Microsoft office
and how can it help you? So Microsoft Office is a suite
of productivity software, which has been
developed by Microsoft. It also includes
applications like word, which you can use for word
processing, for example, you've also got Excel, which you can use
for spreadsheet. PowerPoint, which
we'll be using today, which you can use for meeting productivity and
presentations, outlook, which you can use for e mail, and also personal information management, and so much more. It is widely used in both personal and professional
settings for creating, editing, and managing
various types of documents, and also data. So today, what we'll be
looking at is how you can actually access the
Microsoft products, and also how you can do that
using the online service. You may already have it on your desktop But in
addition to that, we'll also be looking at
how you can actually use the Online Cloud in order
to manage your data, too. So to begin with, all
you need to do is to head along to your
search engine, just type in in Google or whatever search engine
that you may be using. And then from there, all
you're looking to do is to just type in Microsoft, or even you can just type
in office Office 365, if you want, and there you go. You can always type
in Microsoft 365, or else you can literally
just type in Office 365. The domain itself is
office.com that's office.com. Once you've managed
to locate it, the next thing you'll
look to do is to actually go along and log it in. So if you already have
a Microsoft account, such as an e mail, you can just log in using that. You may already have it
in your office as well, so that's something you can do. We'll also be looking at how you can use power automate desktop, also, which may already be
installed on your system. So we'll be looking at that So, once you've actually located it, you'll need to just head along to this wonderful bit here. And to explain the general
layout, as simple as this. You'll find all your favorite
ones all located here, such as Microsoft Word. You've got Excel. You've
also got PowerPoint, outlook as you've
mentioned there. You've also got one drive, which you can use
to store your data. You've also got Microsoft team, so if you do want to
collaborate with other people, that's something you
can do there, too, and you've also got one note, which you can find here as well. If you did want to explore
other Microsoft products, then what you can do is you can go to this little grill here, which is up here,
call it a grill. You can actually just
go along and find all your favorite
Microsoft applications, which can be found here. If it's not listed
there for any reason, then you can go along
and press more apps. And then that will
load this page here. And as you'll see, it will
just come along and give you some great new editions which may not have
appeared previously. So some great ones
include designer, which we'll be looking at today. And also some great ones
including to do, as well. And, of course, as you can
see here, the Power Automate, which is the Power
Automate application, which is available
in Cloud form. However, what we'll be looking at will be the desktop one. So it'll be Power
Automate desktop, which you'll find
just by going along to Power Automate
on your desktop, and you'll find it there. So we'll be back in
the next section.
3. How to Create with Microsoft Designer for Increased Productivity: So in this section,
we're looking at how you can use Microsoft Designer. So Microsoft designer as located here within
your suite of products is this fantastic bit of software that you can use, which is powered by
artificial intelligence. So in looking at that,
what you can actually do, as you can see here, is actually bring your
ideas to life. So if you're having a
really great meeting and you're about to walk into some team meeting presentations or put huddle
packs together for your team. Really great thing that
you can actually do is to log onto Microsoft designer. So this will enhance
presentation. So all you need to do is to click on Designer,
which is here. You can find there once again just by clicking on the Grill. And then going
along if you don't find it there on
this section here, you can actually just type
in Designer at the top here, and then it will
appear like that. And then from there, just
click on that there. Once you've managed
to get through to it, it will load this page
here, and from there, all you'll need to do is scroll
down, and in particular, we'll be looking
at how you can use generative AI for your
meeting presentations. So all we'll do from here is
we'll click on Generates, which is on Image creator. And once you've
clicked to generate, the art here is of prompting. And one of the things that
you will need to know, and you will need to
pick up, if you will, as we go through this course is the art of
prompting so that you can use it in your
Microsoft PowerPoint slide. So all we'll do from here is we will type in what
we're looking for. So I would always suggest using
the who, what, and where. So in this case, we're looking to incorporate
a bit of art. So I would always say include
who, what, and where. So, as you can see here, there's some great examples, and it actually includes
some prompts here already. So it said a simple painting
of two deers with trees, traditional, and it
said the style as well. So that's also something
you can include if you did want it looking
in a specific way, then that's something
you could do as well. But you can talk in
natural language, and what you're able to do
is to generate these really, really great pieces of
artwork, if you will, which you can actually take into your meetings and
enhance your presentations. You can use it in places
like Microsoft teams. So if you're sharing slides, for example, that's something
you can do as well, or simply put if you're
just sharing slides or if you're just having an in person meeting,
for example. That's something
you can do as well. So all we're going to do is
we're going to type in who. So in this case, I'm
having a meeting, and I really really want to convey a message of
team leadership. And I also want to
convey this message of people coming together
to work in the office. So what I'm going to do is
I'm going to write so who, which is a team.
What are they doing? They are going to be working. And where are they doing it,
they're going to be doing it outside in a park. So we've got a team
working outside in a park. So that's your basis. If you want to build anything on top of that, then
you can do that. You can add things like they
should all be wearing suits. And if there's anything
in particular, you might even say it be
animation, Pixar style. There we are. And all do
is Wall Press generates. And all we're going to do is we will wait
for that to load, and hopefully that gives
us exactly what we want. Remember that this is AI, so it may not come out exactly the way that you're intending, but either way, you're
going to have some really, really great pieces of work. So as it generates here, we've got this great team
working outside in a park. They should all
be wearing suits, and it's got it as animation
Pixar styles. We requested. It has actually gone ahead and made it
exactly the way we want. I can actually go along here. It has actually
created some really, really great cartoons, and it's exactly what
I'm looking for. So in which case,
then, all I'll do is I will go along and select
the one that I want. So in this case, I'm quite
happy with this one here, so I'll click on that,
and then from there, I will press download. If I wanted to download
all four of them, that's something I
could do as well, as you can see here it's
already downloaded. So if I did want
to grab the rest, I could just download all four. In this case, I'm actually quite happy with the
one that I've chosen, so I'll leave it
specifically at that. And then from there,
I need to get this image over to our
Microsoft PowerPoint. So we're going to be
exploring PowerPoint in the next section.
4. A Beginners Guide to Microsoft PowerPoint: Now that we have successfully
got our wonderful image, we're going to go along
to Microsoft PowerPoint. Microsoft PowerPoint is an
online presentation software. You can also download it, and it can actually be installed on your computer as well. So all you need to do is to click on the Sites
that's available here, so Microsoft Office 365. Just go along and
click PowerPoint. Then from there,
it will actually give you the options
here for some really, really great
templates and themes. In this case, I would
always suggest just using the themes unless you want to create one from
scratch, of course. There are some great themes
that you can find here, which can actually speed up your presentation
productivity as well. In this case, I'm
actually going to go ahead and click this one here, so I'm going to click
Create. Quite like to it. Again, you can pick
anyone that you wish if you're following
along there as well. And as you can see here, it gives us some really,
really great options. We've got the general layout, so if you did want to
make any amendments, you can always click on the
image if you want as well. Then from there, of
course, you can always just change that image,
how you see fit. In this case, I'm actually
going to go along and I'm going to delete all
the additional images, assuming that we
won't need them for this example and this
presentation as well. So I'm actually going to
go along and just press delete on all the options
that I don't need. If you didn't want to do
a bit faster, of course, you could always just
go along whole control, as in the control button
on your keyboard and then scroll down and then select all the ones that
you're looking for, in this case, I've
selected all of these, and then I'll press delete
in order to remove them. And then from there, once
I've pressed delete, let me just go ahead and press that delete button. There we go. So now that's gone, I've
got these three slides, which is I'm going to use for
our hypothetical meeting, and then I'm going to
write team presentation. And if you're following
along, you can do the same for the sake of your example there. I'm just following along. And then we can actually change
our little subject here, and we can just write Team
meeting presentation. We've got team presentation, and we can write team notes, and I'll delete the extra
point there. There we go. And in the process there, we can actually see it's
coming along quite well, and we can change anything
that we wanted here. So we've got some bullet points. We can say meeting
in three and 57, and I'll go along and I'll
just update that there. And then of course, if I didn't want another subject
heading here, little notes, we can actually
say team coming together. At and we'll just pick a random location in
Sweden at 3:00 P.M. At the City Center.
There we are. So that gives us some
really great points to work off of and we'll
just write notes, for example, and we can
change that around, and we can change it to how we see fit in this
instance as well. So what we'll do is we'll
change this part here, which is we can even call it project deadline
and there we are. We're just updating
that as we see fit there. And there we go. And we'll just say
is fast approaching. You can update this
to whatever you want for the purpose
of example there. Is fast approaching.
There we go. And we'll just call
that news. There we go. And there we are. So
we've got a really, really great start to
our template here. It's already looking quite good. Of course, we can always change things like this
if we did want to, as well, so you don't have
to keep these images. You can just click on
them in the press delete, and of course, whatever you prefer there,
and there we are. We'll even just
write coming soon, and we'll say new
office equipments. And I'll just write coming
soon, office equipment. And in this case, we've got team presentation
and team notes. So we've got our
great notes here. It's a basic presentation, which is about ready to go. All we need to do from there, if we did want to add
some transitions to it, then that's something
we can do it as well. We can apply that to all. So if we wanted it to
morph or push or swipe, whatever we preferred there, so I'm going to press morph. I'm going to ask it to apply
it to all of the slides. And you can actually see
right at the side here. It's actually just put up a little star for
us. That's Solace. It's actually applied
those transitions to our slides as well. So this is going to
make for a really, really great meeting
presentation. And, of course, what
we'll need to do next is we'll need to insert our AI art. So all we need to do is to click on the image that
you want to replace. And then all you'll do is
you'll go to change picture. In this case, I'm going
to say from this device. And then I'm going to
go to our downloads, because that's exactly
where it went to. You can actually see our
fantastic picture here, which came from
Designer as so labeled. And then all we'll do
is we'll click Open. And as you can see,
it's already bringing this fantastic
presentation to life. So you can see that we could
actually easily use this in the context of our teams
meeting, our teams presentation. I can even move this down a bit. Nothing is set in
stone when it comes to Microsoft
applications as well. So all do is, we'll
move that down here, so we can see our lovely team, as you can see them all
smiling away there. So it's now brought this
presentation to life, and as you can see
this lovely team sitting there smiling away. And now we've got these
wonderful transitions and also this great slide deck, which we can present
information on as well. So now we've got
the basic layout of exactly how we're expecting
our presentation to look. All we need to do from
there is to go to file, and then we can go to Save as. And then from there, you can just go ahead and save it as, and then we'll go ahead
and give it a name. So we'll just insert
this name here. We'll tell it where to go to. So in this case, I want
it to go to desktop, and then I'm going
to give it the name of team meeting notes. And then we'll press Save. And from there, you can
see it has then saved, and we've got this
fantastic presentation, which is now ready to go, and it will be saving to
wherever you've saved it to. So now that we've got
this all set and done, we're going to be exploring
how we can actually get this presentation up and
running using Power Automate. But before that, we're going
to be having a look at how you can access Microsoft Excel.
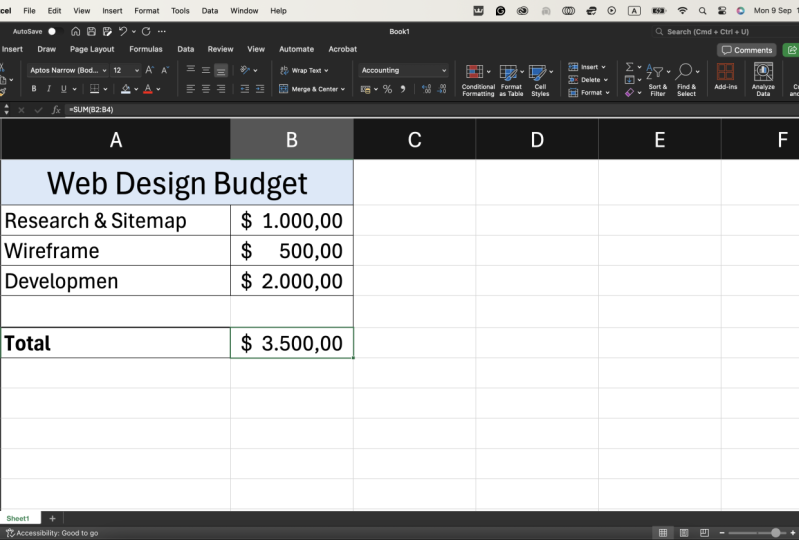
5. Microsoft Excel Hints and the Basics: So another great feature is the ability to open
Microsoft Excel. Excel is really great
for managing data. Specifically when it comes to managing numerical data as well. And that might be, for example, if you have some personal expenses that you wish to track, some calculations, for example, and we'll be looking
at some very simple calculations
for that as well, so if you were
receiving an income, and you wanted to know
exactly how much you were receiving across
all your payments, for example, and that's
something you could do. That might be a great
tool for business. It also might be a great tool for your personal life as well, and we'll be having a
look at that just now. In order to access it, the first thing you'll
need to do is to click onto Microsoft Excel
just at the side here. From there, you can go ahead
and select blank workbook. Then from there, it will load, and it will bring you to
this fantastic page here. And all you'll look to do is, first of all, give it a title. So in this case,
I'm going to say, we'll call it income, and it will be personal and
business income, in fact. So in this case, I'm
looking at having a spreadsheet which captures our personal and
business income. I deliberately left it across two columns
here, as you'll see. And all I look to do is to give this fantastic bit of writing here a nice
and wonderful home. So as you can see here,
it's spread across two, but I actually want
it to be one cell. So all I'll do from here
is I will go ahead and I will go straight to the
home button at the top here, and then I'll click Bold. From there, I will click
this little grid here. As you can see, it says borders. And then I will go ahead and
I will click all borders. So as you can see, it's already
starting to do its magic. So all I'll do is I'll
click Merge from there, and I'll click Merge in center. And as you can see the line in the middle had actually
disappeared. I'll press Undo. And as you can see,
there's a line there now. And then what will happen
is as I press that, you'll see that it
will immediately disappear. There we go. And now it's merged
and centered. So this is now
actually one cell, which is actually great. So the next thing
we'll need to do is we'll need to insert our values. And also, we'll need to
insert some of the names of the income that we're
looking to capture, as well. So in this case, I'll call
it business income one. And then we'll go ahead and
call it business income two. And then we'll call
this personal income. And we'll call
that number three. So as you can see here, the columns are actually split. However, in addition to
our business income one, business income two,
business income three. We can actually have our
values, which will show here. Next, I'll want to have a
total for all of this income. So all I do is, I'll
press total here, I'll type that on the keyboard. What I want to do is
I want to capture the total number of all
of these values here, which will be contained
in these three cells at the bottom here. So all I'll do is I'll go
ahead and give it a border, first of all, so
I'll go ahead and put this outside border. Fantastic. Already looking
really, really great. I'll go ahead and I'll also
click to fill this color. So we'll go ahead and click
this wonderful gray here. Very nice. I'll also want
it to show as a currency. I don't just want it
to be specific values. I want it to be a currency. So we'll be doing that in
just a moment as well. So in this instance, I'm going to go for the pound simply in the United Kingdom. And what I'm going to do
is I'm going to press ten, which will stand for ten pounds or whatever currency
you're using. You can always change it depending on what
you're looking for. I'm going to say business
income 110, personal income, business income two, made ten, and also personal income
three also made ten as well. So all I look to do
from here is I will go for equals, then
I will type some. Then I'll do bracket open. And I'm going to select
all of these cells here. So these are the cells
which I want to add up. So I'm telling you, go from B three all the way to B five, and I want you to
add up those values. Then I'm going to
press bracket closed, and then I'm going to press
Enter on the keyboard. And as you can see,
it's actually added up all three of these columns and given us a wonderful,
wonderful value here. So all three of these
roads have been added up, and it's given us this
wonderful value of 30. And that's just the start of exactly what you
can do in Excel. If you wanted to give it a
bit more of a cleaner layout, you can go ahead and give
that a border there. If you wanted to it
usually does this, so it gives you a second column, you can press revert if you want to just go ahead and
keep it as it was. And then from there, go
ahead to the bottom here and do exactly the same thing,
give it another border. And there you are, you
can go ahead here and give this a border as
well, and there you are. So the possibilities
are endless. It's now given us this
fantastic toll tool. We can actually see exactly
what we were looking for. I'm going to go ahead
and make this bold, so we'll stand out a bit more. And if I wanted to as well, so I didn't just want it
to be the numbers here. I actually wanted it
to be in a value. So if I wanted it to be
in taller, for example, or in Great British pounds, then that's something
I can do as well. So all I'm going to do is
I'm going to press home. And then from there,
what you can do is you can go along to accounting here. And then you can just select the one that's most
appropriate to you. So if you're using
Euro, for example, or United Kingdom
Pounds, for example, you can go ahead and
just press that there, whatever is most
appropriate for you. In this case, I'm going to click the English Pound, so
Great British Pound. And as you can see
here, it goes ahead, and then it's given us
the pound sign with it. And again, depending
on the currency, you can go ahead and select
that, so in this case, I've said ten euros, and it's now equal to
30 euros there as well, or if it was the US
dollar, for example, and it was dollars that
we're talking about, then it would go
ahead and update that as well to United
States dollar, as well. So that's how you
would make all of these values into
currency as well. So the possibilities with Excel are extremely wide and endless. So this is just one tip or trick that you can use when
it comes to Excel. So, in this case, all you
need to do from there, if you're happy and
you don't wish to make any more changes or
do anything else. You can go ahead
and press Save as. And then from there,
all you need to do is click the Save
as to one Drive, meaning save that to the
drive as in the Cloud drive. And then from there,
you can see it loads. I'm going to tell it
to go to desktop, and I'm also going to tell it what the name will be.
I'm going to select. And then I'm going to press
this wonderful name here, and we'll just call it doc
and then we'll press save. And now that will save to wherever I've
asked it to go to, and it'll be
available there too. So now that that's saved, it will be accessible anytime. And of course, that's
exactly how you get started with Microsoft Excel.
6. Training Power Automate to Open PowerPoint for Productivity: So the next thing
you'll need to do on your Microsoft journey is to
load Power Automate desktop. So you can actually
find it just by clicking on Power Automate. You might find it right there, or else you can just
type in power in your search and type in
Power Automate specifically, and it will load it from there. So once you found it, go
ahead and click Open, And what it will do is it will load this fantastic
program for you. And as you can see, I've
got some flows already. So flows are effectively
automations, which make things so much easier when it comes to doing
repetitive tasks. So applications
or even documents that you might continually open. So rather than having
to go ahead and find them in your desktop and
do whatever you need to do, you can actually just go
ahead and run a flow. So in order to do that, all
you'll need to do is you'll need to click on new flow,
which you can find here. From there, you'll need
to give it a name, so in this case, I'm going to call
it Open PowerPoint. And then I'm going to go
ahead and click Create. So if you're following along,
you can do the same too. And then from there,
you can see it begins to load and
in the background, if I minimize that window, you'll see it has a new window that says
Open PowerPoints, which is exactly what
we want it to do, and it's on the Power
Automate software. So all we'll do from
there is we're going to press the record symbol, which is here, and you can
go ahead and click Record. It will load another window,
which you'll see here. I'll move that to the side. Then all you're
really looking to do is to click the record button, which you can see located here in order to
start recording. So go ahead and click
that record button, and then from there,
it will record any actions that we
do with our mouse. The first thing in
order for me to open PowerPoint is to actually
go to Microsoft edge, which would be my
browser of choice. I'm double clicking on
that Microsoft edge icon, and as you can see, it
immediately loads this page here. The next thing I'm
going to do is I'm going to double click on the window pane because I
want it to be enlarged. As you can see here, it gives me the option to click in here. And it says, Wait for action. I'm going to type in office.com. And then from
there, I'm going to click to confirm the action, and then I'm going to press Enter so that it
does the search. And then from there,
I'm going to click PowerPoint. And there we are. It's now immediately
loaded that. And I'm going to press on the notes that
I wanted to open. So I'm going to press
image, which is here. And as you can see, what
it will immediately do, will then open this
fantastic slide show for us. So this is now loaded
our presentation for us. So it will be a lot easier than having to do
any of this myself. So all I'll do from
here is I will click Done on Power Automate. And then from there, all I'll look to do is I will need to double check that it's working
exactly the way I intend. So I'll be doing that
in the next section.
7. Saving and Testing - Power Automate Desktop: So now we need to
actually check that it's actually working
the way we intend. So we're going to do
is we're going to close the tabs just to ensure that is actually the computer doing
it rather than me. And then we'll do is I will press the play button
which is found here. And what it should
do is it should replicate everything
that I was just doing. I'll press the run
program button, in order to run the flow, and all it will do
is will minimize us. This is no longer
me taking control. This is now the computer effectively doing
the job for us. And as you can see here, it's now maximized the
window as we requested. It's now wrote in office.com. It's now gone to PowerPoint, and also it should
open our presentation, which is our team meeting notes. And it has now
successfully done that. And this is exactly it. So it's now made life so much easier because I've now
no longer had to go along and navigate all of those steps in order to get
to this meeting note as well. So if I did want to simplify
this down the line, that's something we
could do as well. So that's a great example of how you can
actually run this. Once you're happy, what you can do from there is
you can go along back to Power Automate and just ensure that
you've saved it. So go to file and then save. And then it will automatically
begin saving there. You'll see the window
becomes a bit grayed out, just confirming
that it's actually processing the instruction
and saving it, and once it's saved,
there you go. You can actually
close the window or press exit if you wish. And then that will be
it saved there too.
8. Adding a Shortcut key - Power Automate Desktop: So once you've got the result
that you're looking for, you can navigate back to
this initial screen here, and you can select the one
that you're looking for, on where it says, My Flows. We've called it PowerPoints, so Open PowerPoint here. All you do is you'll click on the three dots for more actions. And from there, you can
click on properties. And under properties,
as you can see here, you can add a description, which explains how
your flow works. Just in case you're wanting to remember next
time, for example, it's not necessary,
but if you do want to, you can, if it helps you jog
your memory a bit later. From there, all you need
to do is press control, shift, and any other
options as well. So in this case, I'll press
H. It can be any set of keys. So whenever I press
control, shift and H, it will therefore open
the open PowerPoint flow. So that's exactly what we want. We want to automate
this whole process. So if I needed to open
that slide deck again, I could quickly and easily do it just by pressing control, shift and h. So all I'm going to do is I'm
going to press save in this instance here, and it will save this action for me. So I don't have to have power automate open in
order for that to happen. So all I'm going to do is press control shift
in H at any time. You can always double check that it's working the way you intend. It should appear once again. So if you go out and back in, you can actually
see it there, too. So, what we'll do is
we're going to give it one final test
to see whether it works without the assistance of power automate or
in a demo setting. And we'll be back in
the next section.
9. Final Presentation: So in order to ensure this is working exactly the way
that we're intending, we'll need to ensure
that our shortcut key works exactly
as we are hoping. So in order to do this, remember
that we'll need to press control shift and
on the keyboard. That's control shift
and H on the keyboard. Of course, if you've given
it something else and you can go along and change
it to whatever you want, it doesn't necessarily
have to be that, but this is the one that we're
using for the sake of this even be control shifting
O for open PowerPoint or control shift and P for PowerPoint or whatever
you deem it to be. So all do from there is we'll actually close this
because we'll need to double check that it works without power automate
actually being opened, so we'll close this window. Then we'll go ahead and
press control shift and H H. And it should open Microsoft PowerPoint
for us just as we are. So I've actually
just gone ahead and pressed control shift and H And exactly as we're hoping for, it should now open
power automate for us, and it should actually start appearing to do exactly
what we're hoping for. I'm no longer in control of the mouse just so you're aware. This is actually all the
computer doing that for us. This is Power Automate
doing that all for us. So it's now going along and it's opening up the PowerPoint
presentation that we asked for, and it should open the exact
one that we're looking for, which was meeting notes. And it should go ahead and
get to that one for us. Once it has done that and
it's finished loading, we can actually just go ahead and press the present button, and that will allow
us to present this wonderful presentation
for us as well. I'll go ahead and I'll click
Presents, which is here. And then that gives us this fantastic slide
deck, which is here. It looks absolutely beautiful. And it is just one of the most beautiful
things I've ever seen that we I'll
play it once more. There we go. So this is
a great example of how you can use these
Microsoft applications, including Microsoft
Power automates, we've also got Microsoft
Designer, which is there, we've also used the fantastic
PowerPoint application, which is there as
well in order to create this beautiful
meeting slide. We've also used Excel, which you can use
in your day to day work or even your personal life, as well as well as your
professional life. And these are some
great examples of how you can use this in
order to increase your productivity when it comes to presentations and meetings. And also when it comes
to your personal life, such as if you're managing
your own numbers and finance. Whether it's business
as well, in year to add numbers for a department, or counting how many
people are in a team, and you sent out a survey, and that's something
you needed to get back in terms of the
number of people. You can always go for
equals some bracket open, select the number of colleagues, then bracket close, press enter, and then that will allow
you to have this wonderful, meaningful data all
in one place as well. So that's exactly how you'd use these wonderful power
automate systems, as well as Microsoft 365 and all the applications
attached to it as well in order to increase your
overall productivity when it comes to
Microsoft applications.
10. Congratulations : Congratulations. You reached
the end of the course. You'll now know how to use Microsoft Designer,
Microsoft PowerPoint, including Microsoft Excel and Microsoft Power Automate to increase your Microsoft
productivity. All the best on your
Microsoft journey.
 Richard Andersone l Finance, Author, Voice Over, Finance Expert