Transcripts
1. Intro: Hi there, creative
friend. Welcome. I'm Sarah. I'm an
artist and designer. And in this one class, I'll show you my process for
creating metallic effects in the Procreate app that can be used for all
kinds of projects, such as hand-lettering, patterns and illustrated
elements to name a few. You can even sell these
as design assets. First, I'll show
you how to create some reflective
metallic effects. Then we'll create some
dazzling glitters. After that, I'll show
you how to apply your new digital metallics to text and
illustrated elements. And as a bonus, I will show you how to create a multi-colored glitter
metallic effect. All you'll need for
this class is an iPad. The Procreate app,
and your creativity. Are you ready? I sure am. Let's get started.
2. Downloads: I'm going to quickly
show you how to download the class resources. And something important to remember is that you
will need to be on a web browser and not the Skillshare app to
access the download's. I'm using Chrome. Right below this video, you will see some tabs go to
the Projects and Resources. And you will see the file
available for download. Click on the color
swatches file, and the download will
open in a new tab. Click on Download, then tap on, Open in and select procreate. And your file will automatically import into the Procreate app. Most of the time, it will place your
new color palette at the very bottom of
your palettes panel. So we can move that
up to the top. I've also included a Pinterest and metallic and
glitter inspiration board. So go to the About tab located
right below this video. Scroll down and
click on the link. That will take you directly
to the class Pinterest board. Have a look around at the
gorgeous textures and effects for some
project inspiration.
3. Class Project: For your class project, create one of the
metallic effects demonstrated in the class. And as a bonus, apply your new effect
to an existing project. You may have like a hand
lettered piece in illustration, or maybe your favorite
quote using a cool font. Okay, let's get started.
4. Reflective Metallics: So the first thing we're going
to do is create a canvas. And the canvas size
really doesn't matter. It will be dependent on your project that you will be using these glitter
and metallic, metallic effects for what? For the purpose of this class, I will be making my canvas size 11 inches by eight inches. So I will just
create a new canvas. And I will make sure
it's at 300 DPI. Now I can click on Create. So if we go under
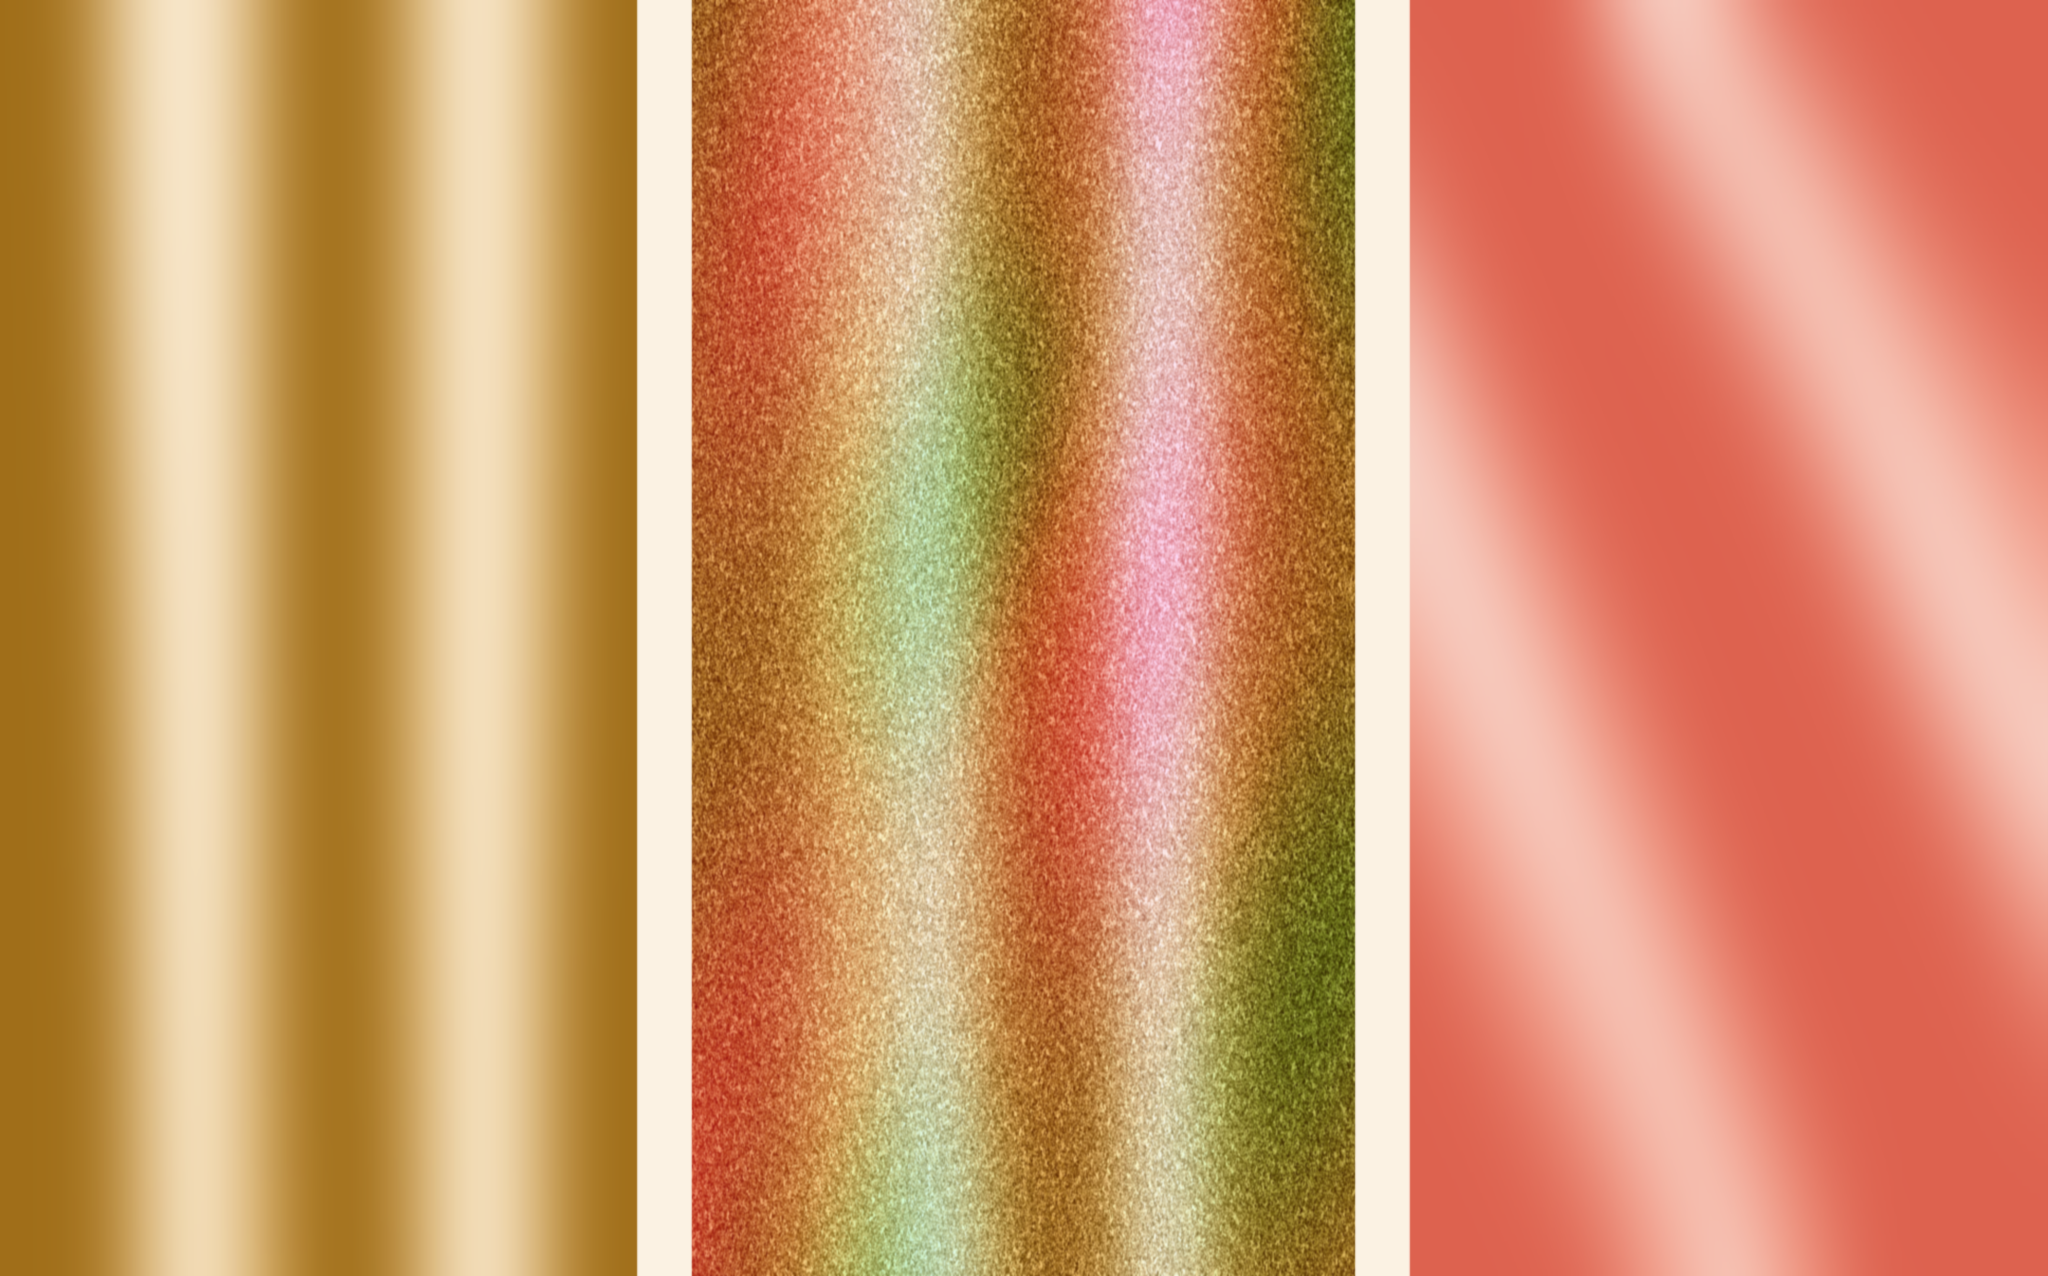
our color palettes, you will see I created for
many metallic palettes. There's the classic gold, the rose gold, the
green gold, and silver. I'm going to be using the classic gold for
this first effect. And you can see we
have a dark tone, mid-tone, and a highlights. So I'm going to grab
my dark gold color. For our first effect. I'm going to show you just
a basic metallic effect. And I'll be using the classic monoline brush that comes with
the Procreate app. And you can find that under
the calligraphy section. So I'm going to start
off by creating two thick stripes on the sides. We will have one highlight
color in the middle. And just keep these
lines organic and loose. You don't want perfectly
straight lines. So now I will just drag and drop the color into the
two-sided portions. And now I will get
my highlight color. For the middle. I will go and grab
the lightest color, our gold palette, and just
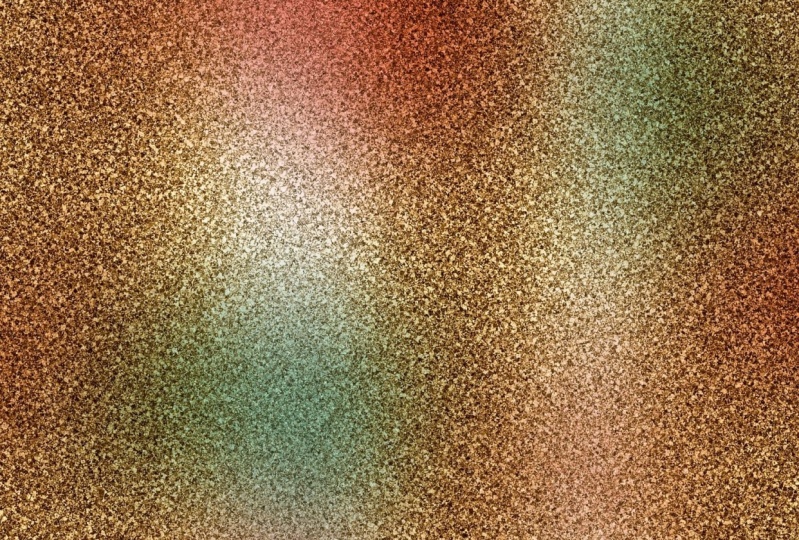
drag and drop the color in. Now I'll go to my adjustments panel and I
will click on Gaussian Blur. And this is where
the magic happens. This is where we create
our metallic effect. So we will just slide. We're slider all the way up. And as you can see,
the higher up you go, the more blends
everything together. So for this effect, I'm going to go pretty high
and keep it probably add 75. That looks really nice. And there is our first effect. Now let's try a metallic
effect that has more depth. So I will go to my layers panel. You're going to turn that effect off and create a new layer. I am going to grab my dark tone. This time. I'm going to make a three thick sections too in the corners and
one in the middle. And now I can just drag and drop the color into those spaces. And next I'll be
using a mid tone. So we will go to our metallics and get
the mid tone color. And I'm going to
add some mid tones right next to my dark tones. I will just add on both
sides of this center. And on this side. Now I can just drag and drop
the color into these spaces. And now we're left with
are highlighted portions. So I will grab the
lightest color and just drag and
drop the color. Now we will create
our metallic effect. So I will go to my
adjustments panel, click on Gaussian Blur, and just slide it up tail. I am happy with it and you
can leave it less or more. It's totally up to you
and your preference. I want there to be some depth. So I think I will put
that at around 41%. You can see this
one has more depth than the previous
one we created. Now let's try a diagonal
metallic effect. I will turn those layers off. I'm going to create a new layer. And this time, let's
try rose gold. I will start with my dark tone and I'm going to do
the same thing we did is we did the two
sides in the middle, but this time I'm
going to do it. Diagonally, you can just
play around with this. There is no right or wrong. You can add as much dark
and light highlights, make it more subtle,
make it have more depth. It's totally up to you. Once you start, this
can become really addictive and it's so much fun. I love creating different
kind of metallic effects. So I have my two
edges, my middle. Now I'm going to
add my mid tones. So I will grab my next color. It's the middle one. And I will just add that
on, like we did earlier. This time we're doing
it at on a diagonal. So I'll just drag and
drop the color in. And now I have my two
highlighted areas. So I can grab my lightest color. Just drag and drop that. Now I'm ready to
create my effect. We will go to our
adjustments panel, click on Gaussian blur, and slide it all the way up
till we are happy with it. I like to just play around
with it and see what I like. I think I will make
this one around 40%. That looks really good. Now I'll show you how to
make a more subtle effect. So let's create a new layer. This time, let's go
with the silver. So I'm not going to be
using my dark tone. I'm only going to be using my
mid tone and my highlights. So I will grab my mid tone. I will add to the sides. I want to make that
a little thicker. Drag and drop the color in. I'm going to add a thinner
strip in the middle. And now I will feel these
two with my highlight color. I'll grab my lightest color
and my silver palette. And just drag and
drop that color. I will go to the Adjustments, gaussian blur and
slide to adjust. This one, I'm going to leave
at thirty-seven percent. And as you can see, it's a much softer and subtle effect then these other ones
we created earlier. So just play around with the different areas
of mid tones, dark tones and highlights
and see what you like. Create diagonals, maybe add more of a dark tone and highlights, maybe make it more subtle. It's totally up to you
and what you like. So in the next lesson, I will show you how to take
these metallics and turn them into some really neat
glitter effects.
5. Glitter Metallics: In this next lesson, I'm going to show
you how to create some metallic glitter effects. So we're going to start with
one of the metallics we created in our previous lesson. And I will show you
how to turn that into a glitter effect. So we can choose from any of
the ones we did previously. I'm going to create the glitter effect from
this gold when we made. I'm going to just duplicate this effect and I will turn off my original one that
we did earlier. Now I'm going to go again
to my adjustments panel. And this time I am
going to go where it says noise and I'm
going to click on that. And here we have options. We have clouds below
those ridges and we will show you what each one does and
we will play with that. So the first thing we're
going to do is use our slider again to
create some noise. So the more we slide it, the more noise we will have. And the less it will be. A softer, kind of finer
glitter will start at about, I'm going to start
at around 30%. And now is the part where I will start creating
more of a texture. So here are my options. We have clouds, which will give us a finer
looking, a glitter. We have pillows and that
gives us a bit more texture. Then we have ridges and
that gives a darker effect. So my favorite is a below, so I'm going to put it on below. And then right here we can play with the scale
of our glitter. The higher up you go, the chunkier and thicker, our glitter will look. And the lower you go, the finer the glitter will look. So I'm just going
to see what I like. And I'm liking it around
here, which is 45. Now on turbulence, I'm
going to go all the way up and this kind of smooths it
out a bit. As you can see. That's more of like a
line kind of effect and I want it to look
like a glitter effects. So I'm going to bring
that all the way up. And as you can see, it
really makes it look like a glitter texture. Now for here the octaves, you can see the higher we go, the smaller it becomes. And unless we put it, the thicker and chunkier,
darker it looks. I like to leave
this at around 17%. We can play with our
noise and make it a little more textural or less. You just play with these
settings and see what you like. If you want a finer glitter, you can go to
clouds and then you would just work on the
scale and the noise, if you'd like, below, can make the skill up a bit. So just kind of play around with these settings and
see what you like. So I'm going to just tap up, I'm going to bring the
noise up to about 32%. The scale about 40, 44%. I'm going to keep it on below. And I think I will bring
this one to around 20%. And that looks good. So there is my first
metallic glitter. So now I'm going to
show you how to create a nice kind of Omri, glitter. I'm going to create a new layer. I'm going to turn this
glitter effect off. I'm going to grab
my monoline brush. And this time I am going
to use my green metallics. So I'm going to start
with my dark metallic. And I am going to
just fill in half of my canvas with
the darkest color. Then on this side, I'm going
to grab my lightest color. And I will just drag
and drop the color in. Now we're going to do the same
thing as we did last time. We're first going to create
the metallic effect, and then we'll add
the glitter effect. So I will go to my adjustments. I'm going to click
on Gaussian Blur. And this time I'm going to
slide it all the way up to 100% because I really want a nice ombre effect
on this glare. So now that I have that, I will go back to
my adjustments. I will click on noise and
we will do the same thing. We will just play around with
the adjustments until we're happy with our glitter effect. So I'm going to start by. Creating some noise, and
I'll leave it at around 30%. I'm going to click on below. Now I can play with my scale. Going to bring that
up to around 42%. I'm going to bring my
turbulence all up. Then I can play with my octaves. I think I'll put that at 20%. Let me see. I'm just
going to see if I want more noise or less. I think I'll bring
that up to 38%. I like that. So I will
just click again on my adjustments and there is
my second glitter effect. And as you can see,
it's a nice kind of Omri green effect. Now I'm going to show
you how you can create a glitter effect
with just one color. So I will turn my
glitter effect off, my green glitter effect off. I'm going to create a new layer. And this time I'm going
to drag and drop and fill the whole canvas with
this dark gold color. Will drag and drop. And now I will go
to my adjustments and we will click on noise. Again. We'll raise the noise. Gonna go to below. I will play with my scale. And I'm going to bring this high this time since we
only have one color. There's not much contrast. This is just a plain
gold glitter effect. So I'm going to
bring it up to 47%. By turbulent all the way up. I'm going to leave
this octaves at none. I really liked that, so I'm going to
leave it like that. But play and experiment with the settings and
get it exactly to the texture and size you'd like. That's how you can create
glitters in you can craig glitters from any of
the metallics you make, or create new ones as we
did with our green Omri, or just create glitters
from one color. Now that we have our glitter, we will just save it so we
can import it to our project. I'm going to go to my
little wrench icon up here, which is my actions panel. And I will either say, you can either save
this in JPEG or PNG. I'm going to save it in j pic. I will just click on Save Image. And that will save it
to my camera roll. And I will be ready to
import it into my project. When I'm ready. In the next lesson, I
will show you how to apply these glitter
and metallic effects into some of your projects like text or patterns
or illustrations.
6. Metallic Application: Now I'm going to show you
how to apply our glitter and metallic effects to some
text and a pattern I have. I will create a new canvas. And I'm going to create
it the same size as we did our metallic effects. 11 inches by eight inches. I will just create a new canvas. Now I'm going to fill this layer in with
a background color. I'm going to make sure I'm
on a new layer and just drag and drop a color
in to the capitalist. Now I will create a new layer. I'm going to grab a
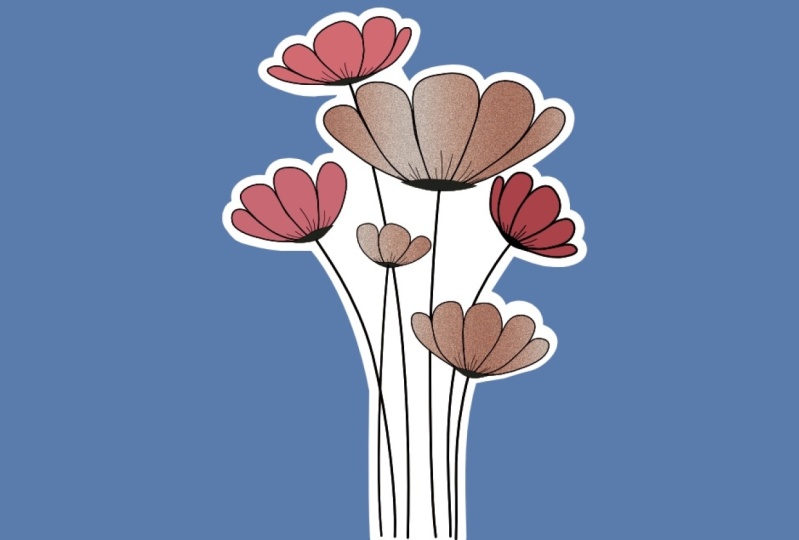
lighter color for my text. And this is the part where you can use your favorite font. Or if you want to hand
letter something and apply your metallic
anything you'd like, I'm going to be
using just one of the fonts that comes
with the Procreate app. But feel free to use any kind of lettering or font
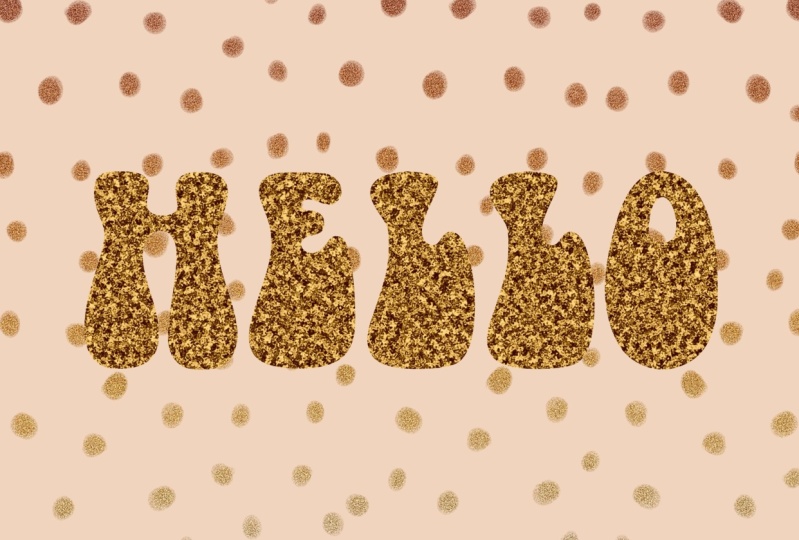
you want to use. I will go to my wrench icon. I will click on Add text. I will just type in hello. And I want to
change this font to a thicker font so we can see it and I will
increase the size. That looks good. So I will click on Done. Now I will center my letters
to the center of the canvas. Now that I have
that, I can insert my metallics and apply
the effect over the word. Again, we will go to the
wrench icon and make sure you're on Add and
then insert a photo. And as you remember in
the previous lesson, we saved our metallics
to our camera roll. Now we can use them
for our project. I can pick from any of
the metallics we made in our previous lessons
to apply to our text. So I'll just use this gold
one we created earlier. And that's good. So now I will go to
my Layers panel. And something very important to keep in mind is that our effect must always be on
top of the layer you want the effect
to be applied to. So I want to apply this
effect to my text layer so I will make sure that my
metallic Effect is above, my texts layer is underneath. It will not work. You
just hold your layer and drag it up above
your texts layer. Now I can tap on that layer and click right here
on clipping mask. And as you can see, it applied the effect
on to our text. We can move that
around if we want. You will just make sure you are on that metallic effect layer. Will click on this
arrow icon and you can move it down around. You're happy with where you want your different
shades and shadows to be. And that looks good. So
now I can de-select. That is how you would apply
this metallic effect to text. Now I will show you
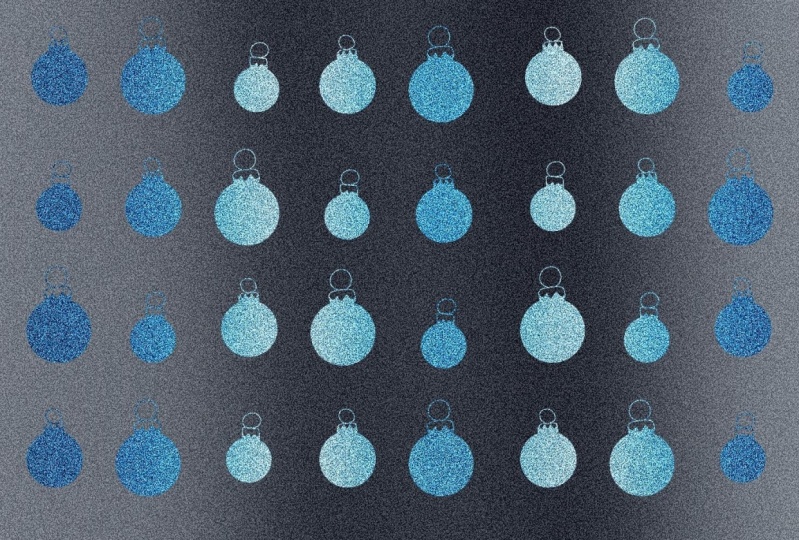
how to apply it to a pattern or a
illustrated elements. So I'm going to go
back to my gallery. And right here I have a pattern
tile I created earlier. And I want to add a gold
glitter effect to my dots. So I will go to my wrench icon and I'm going to insert a photo, one of my metallics. And I'm going to use this one. This is all gold glitter effect, so I will tap on that. And if it comes out smaller
than your canvas size, you can click right here, Fit to Canvas, and
it will fit it into your Canvas. That looks good. Now I will go to my
Layers panel and make sure that my effect
is above the element. I want to create this effect to. That would be my dots. So I need to make sure that my metallic effect is
over my dots layer. And that's correct. So
now I will just tap on that layer and click
on clipping mask. And as you can see,
it has applied my effect to all of my dots. Now I can save my pattern. I will just click
on my wrench icon, click on Share, and
I'll save it as a JPEG. And that will place
it in my camera roll. I can do the same
thing to my text. I would do the same thing. Click on my actions,
panel, Share, and then save it in
any format I want, I will save it as a
JPEG to my camera roll. I'm ready to use it
on social media, on my Instagram, my blog, maybe apply it to a product like a mug or a pollster
and it's ready to use. I will just go to
my camera roll. And there they are.
7. Multi-Color Glitter Effect: In this bonus lesson, I'm going to show you how to create a multi-color
glitter effect. So the first thing you
will do is create one of the reflective metallic
effects from our first lesson. I'll be using the classic cold. After you've created
your first defect. We will move on to
creating a glitter effect. And we'll use the same
process from lesson two. Now that we have
created our base, it's time to add our colors. You can use as many colors as you'd like for as
little as one color. I'll be using a bright
pink and greenish blue. Make sure you create
a brand new layer above your glitter
effect for this to work. Now, I'll grab my monoline brush and start dropping color
blobs on the canvas. There's no special
method to wear. The colors should be placed. Just play and
experiment with it. Once I'm done adding
my color blobs, I'll go to my adjustments panel, tap on Gaussian Blur. And again, use the slider
and adjust to your liking. I'm going to bring it up to 51%. Now it's the fun part. We will experiment
with color molt, so-called to your color layer. And you'll see a little
n symbol click on it. And this is where you will
change your color mode. I like to go through the
different molds and find my favorite one that works
best with my glitter. So take your time
and test them out. I'm going to pick linear
light for this time and I'll lower the opacity of my
color layer slightly to 80%. And that my friends
is how I create in multi-colored glitter
effect needs, right.
8. Final Thoughts: Thank you so much for taking
the time and joining me. I hope you enjoyed this class. As much as I enjoyed
creating it. I would love senior new
dazzling metallic effects. So don't forget to share your work in the
project gallery. Remember to have fun. Play with different
color tones for your metallics and experiment
with the settings. And if you have any questions, please don't hesitate to ask. You can post your question
in the discussion tab. You can find that right
below this video. Thanks again, and I'll
see you next time.
 Sarah Raquel, Artist & Designer