Transcripts
1. class introduction: Hello, everyone, and
welcome to my new class. My name is Milan
and in this class, I'll be showing you how to use this little thing
called proportional divide. I've been a painter and
draftsman working with murals such as these
oil paintings, hotels, watercours and stone. Occasionally I would hear about this thing called
proportional divider, but I never had a
chance to use it. Just recently I bought it on Timo but you can also
try it on Amazon, Ebay and it's
really inexpensive. You can find it like $210, and you can have this
great little dog. So just recently, I got it. Never used it before,
and immediately, I saw a chance for you to get better drawing by
using this set tool. So in this class, we'll talk about how to use it or how it's
beneficial for your work and why you should
start using it early on because I really hope
I really missed using it. I think about it when I started, that would really be beneficial because you train your eye to see not just the
outlines of object, but it also forces
you to familiarize yourself when you're drawing and focus on the
masses of objects, negative, positive shapes and overall proportions of each of the elements that
make your drawing. So I hope you find
this class helpful, useful that you will get for yourself one of
these small things, and it will be
really beneficial. Because there are two
main takeaways when it comes to using this
proportional device. First of all, it can help you scale objects that you have on your reference image or real life onto your drawing
without any distortion. So you can use it both
in your studio work or when you're outside and making pioneer paintings
and stuff like that. It also fundamentally changes
how you see and process the visual information
and forces you from guessing to focus your
attentional to masses, proportions and
individual shapes, both positive and negative. Imagine this tool and this
class that by the end of it, it will serve as the bridge from your subjective guessing, to objective observation of the things that
you want to draw. And it will be great, the fact that you
will permanently get better abilities to draw reality and translate
it into your drawing. So this sounds interesting. Let's see you in the
next video where we talk about more of the features that are great and that this
tool help you with. See that.
2. How to use Proportional divider: Before we move on
to the next video, we will show you how you can
use this tool for drawing. I just wanted to have
this brief video, brief lesson to show you what will you get with your
proportional divider. As you can see, we have two longer plastic parts that are held together with
this clip in the middle. And if we put it together, now we see all parts. The clip in the middle contains with these two or three parts. And depending on
the manufacturer, this can vary slightly. But what is most
important is that when you have this
main question is, where do you want to
position this clip? Well, for starters, if you want to draw
something one to one, so the thing that
you're drawing is the same size on the
reference and on your paper. For example, if you're
using this drawing, and if we put it in the middle in this
first hole on the left, you'll see that on both sides, proportions will be same. But if we slide this clip,
somewhere around here, things start to change, and it's up to you depending
on the size of your paper, where you want to put
the clip because if something is like is here, we'll see how big this ball can actually be on your
drawing. This is too much. So for this paper, we'll maybe slide it
somewhere around here. But that is all
that we're going to talk about in the next video. For now, I just wanted to
show you what you get. And like I said, in
the previous videos, price for these
proportional dividers are like, I think, $5-15. There are more expensive ones that are used by architects, but you don't really need it. Those because these plastic
ones are just as good one and they can help
you tremendously to get your eye trained. So eventually, you don't
use this as a crutch, but as a tool that will improve your
drawing on long runs. So this is basically it. And after you acquire your
proportional divider, we can move on to the
next part of the class, and we'll talk about how you can use it in
your own drawing. S there.
3. class project intro: Okay, now that we familiarized ourselves with this tool and
talked about this feature, and before we go
into actual drawing, it's time to talk
about the project for this class because like I mentioned a couple
of times before, if you're not
participating and doing the work based on these
videos that will follow, this class won't
be much helpful. So the best way that you can use this class is after watching
the video material, go on and practice with
your own propulsion device. So when it comes to the project for this class,
it's very simple. Watch the videos, maybe take it apart by making your
own observation, taking notes, sketches, while I explain and
stuff like that. But then with your own
personal proportional divider. Do your own work. And the more you do it,
the better it will be. And I know there's still a learning curve when it
comes to using this tool, and it might take a few drawings to familiarize yourself how to
best use this tool. But trust me, when
you get better at it, it will be really, very cool to see how much your
work has changed. After using this tool and
how it looked before. So I hope you'll
find that useful. So that's it for this video. So once again, watch videos, take notes if needed. Or take your own personal
proportional divider, make drawing, post it on
project section of this class. You can use it even
with your phone, with camera, whatever,
on the other hand, will try to answer all your questions and serve all your needs when
it comes to drawing, and I hope it will be a good feedback loop
between you and me, and I hope it will be
beneficial for your work. Without any further delay, let's go and jump in next.
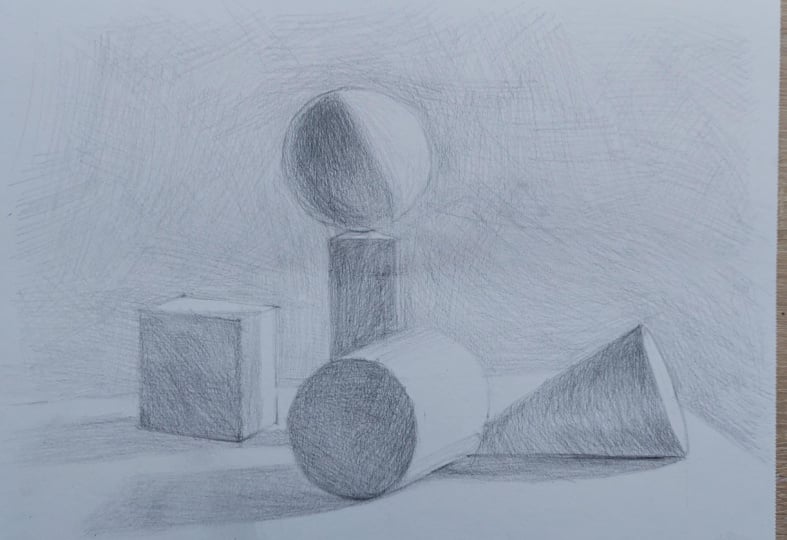
4. your starting point: So here we have a reference
image and a paper to draw on. The idea is by using the proportional divider to
learn how and train your eye how to do it even without
using this tool that is true practice and carefully observing what you're drawing. The next step would be to use this tool for the
live drawing when you have some pieces of still
life in front of you. But to get there, first off, I think it is good practice to draw from the reference
image and use these skills that you
learn by drawing from reference image in your
drawing from real life. Of course, see, it will be easy if we want to draw
this in the same size. And the way you do it
is if you can see, one side is used for measuring
the reference image and the other side is to translate that same measure
onto the drawing. So for example, if we
use this measurement, to see the width of the ball, you'll see how this will
be this big on this paper. But as you can see, that is too much. And that's why there
are these holes. And the further it's
away from the middle, like you can see here, The
further it is from the middle, the bigger it will
be on the drawing. So for example, if we do this, I think I already discussed
it in the previous video, but it's not bad idea just
to show it once again, I say, I don't think it will be possible to put it
here, but we'll see. Let's say, we do it like this. This measurement
will be even bigger, so it will not fit
this piece of paper. On the other hand, if
you go straight to middles put it here. You'll see that then both
sides are basically the same. It's same here and
it's same here. So how can we then make it to this drawing to
approximately fit this page? And that is through observation. So for example, if I look at
this and try to guess it, let's say, third hole, that from the middle,
we can check it out. So how can you do it?
For this example, we can turn our paper on the other side and try
to measure something. So for example, measure this distance here. And then translate it, let's say, from this to this. So what we did we did We made this measurement
here with this side, and it's very important to
remember which side that you're using for measurements and which for translating
to your drawing. So for this case, I use this for the
drawing and I made this use this side for reference image and this
side for the drawing. And then we will also
measure this side. I'm trying not to
move it too much. It's a good idea
to keep it steady. Not move because if it moves,
it changes perspective. Basically, with this
third whole drawing or this space from
left to right, will be this much on this paper, and that's probably okay. We can also see how it goes
when it comes to the height. Let's see if we can measure
the entire drawing, it is something like this. And pops it will be
something like this. So that entire, let's say, frame should basically be like this on this
piece of paper. So you know that
whatever you draw, there will be no chance
for any of the parts of this setup here to go
outside outside your pipe. And when it comes to
these initial steps, it is very important to pay attention and try to be
as precise as you can. And if you have to take a
couple of measurements, that is perfectly fine. And one of the other things that I would suggest there is, let's say, always a
question of where to start. One idea would be to find the center point of the drawing. You take it from there
and it is printed paper. It's very easy.
And in this case, that center would be here. But what I like to do is to find a certain edge or certain spot on the
drawing that you can, let's say, have a
starting point. I also print out
two other examples. Find something that is relatively let's say at the center and that you
can use as a reference. So in this case, that spot might
be this one here, so you can measure the width
and the height of this cube. Or in this case,
let's say we can use this spot right here
to start measuring. And it's basically
close to the center, so we can use that as our
glaze for the drawing. So if you turn on
the other side, may ask how we can find
that in our drawing. The easiest thing
would be to find the center of this
paper and use this. But if you're not that much
concerned about the position, then you can start
with this as well. So that all depends on what
you're trying to achieve. But like I said, if you want to be strictly
100% sure that it will be just the same spot as it is on the reference image,
then start from here. If you're not that concerned, if it will move a little bit
to the left or to the right, you can find some other spot. But if we do want
to be that exact, you can quickly find
that middle spot here. Well, you can measure, of course, with a ruler
or something like that, or you can even use you
are proportional divider. But for sake of speed, I'll just mention like this
and no now that this will be the center of
our entire drawing. And now that we know that's the center and we
know that center is here, we can start measuring. And let me just make sure it's as good
fit as it can be. Oops, sorry.
5. taking measurments: This way, it ensures
that it will not. So if we move, you see
it doesn't move much because even the
slightest move can make for the mistakes. So now that we have
this spot here, this spot here, we know that this is a center,
this is a center, and we can start
measuring it from there, measuring this distance here, this height here,
this distance here, this and basically
move from there. But what you also want to do
is not maybe just measure, let's say, here to here and
then from here to here, you can measure that later. But as a start, try to have these things from
there from the center. Just to position. This is maybe the crucial
and most important part of this kind of drawing is
to find the right spot. And also, it will train you
to see for yourself with your own eyes these distances because sometimes we
can omit and say, Okay, this is the same as
this and stuff like that. But the proportional divider will tell you without a
doubt if this is what some measurements are and will train your eyes to spot
these distances with enough, of course, practice and
without using this tool. But for start, let's get going. Start this place here. And then we can also sure. Now that we have that we can start drawing. We now know these
are vertical lines. Due to my other obligations, haven't been drawing
for a while. And I feel like some of the first lines may
not be that great. But That's okay. We then continue to measure from there to be careful with
these smaller ones, and then when you're
measuring with the smaller ones with one hand, you hold this here
and you can freely move with other hand to measure. Let's see how this is
speak like this. It. And remember, don't feel afraid to move your
piece of paper. And now what we want to
determine is where is this point here based
on the entire drawing. We know the height
but where exactly. So this also can be helpful
by using this tool, we can measure this
distance from this side and say, Okay, it's here. And through connecting this, we now know that's where it is. And we also know
this goes there. Okay. So now we have
this and we can also measure the ball the
ball starts somewhere? Now, let's see. It This is basically the height of the ball. And if we look at it, I think this is the center. Let's see how wrong was I. And we can then here. Here. Now we have this place. Okay. That's basically it.
And as you can see, if I put this line down here. We can measure and we
do it here as well. We can measure now this distance here and this
distance from the bottom. So by holding this part, not that we are not
moving this side, we're moving just this piece. We can put their finger there, measure just to make sure this is here. Then we can also
measure this distance here and translate it. But then again, where should we put
all these other parts? So as we can see in
this circular form, I'd say the most left side of
the subject is around here. So we can measure that thing
compared to this spot here. More as you go along, you can divide this paper
just to have an idea. If you have portage you
don't want to let's say, mess with all this folding, you can photocopy it and
have it as a reference so that you don't feel uncomfortable on folding
the paper or marking them. If it's precious,
something precious to you, then you can copy
it so you can have a spare image that you can use. So basically what we want to do is measure then this place here. We know that it is here, and this is like a
game of coordinates. So you find one
measurement here, and then translate it here. If I did everything correctly, which I seriously I have
doubts that I've done that. But try to measure this. As this is okay. And then measure this.
That's also okay. And then measure if I've
done these things correctly. Then let's measure
this once again. Here. Yep. I'm trying to recognize these shapes here. And this will be lower sometimes our eyes can
play tricks on us. And when we're
using these tools, we are avoiding those
guessings until we train our eyes to have a better
grasp of things that we see. And like you see, sometimes
it is very good to even if you're drawing for a
long time to practice
6. Putting shapes into their positions: In my example, due
to my obligations, new obligations at the school, I didn't have much time to
draw in the past, let's say, more than a few months,
and I feel like I more like half a year. And I really feel rusted
when it comes to drawing. And all this measurement. But I find it, let's say, liberating to go back to drawing and see what I've been missing. And you can see that in
this drawing as well, and approach it and
how I draw lines. Once you have this
line here as well, you can use it as
another measurement, see if that line is here, going like this, this would be here and
this is the width. So you can translate Yeah. No worry later on, I'll get everything
looking better. But for start, I want
to piece everything and it's a good idea to check
if you did everything, and you can do it by measuring something
that you haven't done. I've measured this
already. I measured this. Let's say if I measure
this distance? And it's that way here, and this one here, Okay. And it's a good idea since
we have this line here. If we look at it, it is just above where it intersects
with this other object here. So if we had this line there, this object, this point here
is just below this one. And when we look,
if we eyeball it, this here is, I think, higher than this thing here. And we can use this tool to
check if that's correct. It's exactly the
same. I was wrong. I thought it was higher. That is exactly why this tool is useful because when you
look at certain things, you can have the impression that something is
higher or lower. But by using this tool, it will without a question
or doubt explain to you and you can see it with your own eyes that they are
exactly the same height. Now that you have that,
let's try once again, see the entire height
this object. Yes. Now, you know that you can put the line you know that this should
coincide with this. But where how long is this? Well, now that we know this
spot here, all we can do, all we have to do is measure
from the center and go up, let's say, here, or we can hold this let's
say if we made. Yep. And we can measure this. And now we know
that this line and this line and this spot and
this spot are these two. It's a good idea, and
it's very helpful if you can draw with
both of your hands. Okay, we can also try to try but measure and
see if this is correct. If everything we've
done is correct, then this will translate
to this and it does. So that's okay.
So let's measure. This here. So we can measure that here
and where it intersects, we know that this line is here. So how about this spot here? Same as before. We can measure the distance
from the middle. Or now that we know
that this here, we can use even
this measurement, but I feel it's safer to go from the middle
and it's not big paper, so it can easily be measured. Okay. Then see where that is based. Where on this line should it be? No, we can extend this
middle line here as well. It doesn't have to be perfect, but fast enough to
be straight line. We can measure this thing here. I do it correctly.
Yes. Oops. Okay. Since this is a circle, you know, now we can even
measure this distance here. But you can try it
on your own for the sake of speed.
This is too much. As you can see,
when I'm drawing, I'm using very faint lines lines that can be easily
erased if needed. So when I measure, I can erase and then let's see. This is this. So as you can see, it must be in its thickest part and that's somewhere
in the middle. In the middle is, I think, here. Let's see if I'm right. Say that that. This is how thick it
is in the middle. And we can then write like this. And after we're done with that, we can either leave these
lines or erase them. It all depends on what you
are trying to achieve. If this is an exercise
drawing like it is here, then you should leave all
the lines as you made them to help you understand the
process and how you did it. Now we have this
one, two, three, four shapes and the only
one that is left is this place here and it's more of the same as
we've done before.
7. Finishing the construction drawing: So how should we go about it? I'll give you a second
to think how we can find the right spot for this object based on the previous examples. You can pause the video
if you want or wait and come up with your ideas
and see how we can do it. As far as I'm concerned, looking at the subject, we should measure
this distance here. This distance here,
this distance here, this distance here, and the entire distance from this side of the
cube to the middle. And that's what I'm
going to do right now. If you thought of that, well, good for you. Or maybe you have another
idea how to get this object, and that may be valid, anything that works for you as long as measurements
are correct. And we also measure this side and this
side and this side. So we know all the crucial
spots of this object. So let's do it. Maybe for this part of
video, I'll speed it up. So you can also get
straight to your drawing.
8. final bservations for the construction drawing: This is basically it when it comes to drawing and of course, we have few these lines. We cannot measure
without using the tool. Where is this dot here
compared to this? In my opinion, it's a
bit higher than this. It should be around there. So we'll try to eyeball. And then we also look
at this, let's say, slope and it goes
something like this. On the other hand,
we have this side of the table going at
the slight angle. It starts here somewhere, then it goes here. And whenever you can, at the beginning stages
of your drawing, you should always
draw through objects. Draw line here then miss this
sphere and then continue. You can easily do it like this. Correct on the way if necessary. Because if you're not pressing hard with your pencil,
you can easily, even with this kind of eraser, remove all the
unnecessary lines. But now, it's much more calmer now that we
have all these things. And the amount of refinement that you will do on this drawing depends on what you
want to practice next now that you have these basics. I hope it will help you
understand the process. But as you can see, in my case, drawing after a long time, it takes some time to get
adjusted and get things moving. And the more you measure, the more you practice,
the more you draw, the better you will become. Now it will be no
matter if you've seen seen the process
and you see me draw, that is just half
of the process. Now it's time for
you to measure. And if you have any questions
about this process and have problems in
starting up drawing, using this tool, send you a message and I'll try to
answer as soon as I can. And now and rest or
maybe in the next video, you'll see me when I'm done
positioning all the elements, what I'll do with the
rest of the drawing. See you there.
9. first pass of shading objects: What I'm doing here is marking the separation
between light and shadow. And maybe Aton. Let's see if I was wrong
or if I was right. So we can measure
this thing here. That's thing here. No, no, I'm making a mistake. I measure this thing this side, and then put it here. That's right. Okay. Then
let's measure this thing here and try to see
if that's here, good. So it should be maybe
a little bit higher. Is that remove. And now let's see
the shadows go here. Everyone goes here, and
then it leaves the page. So we now know that this place
here is in shadow and see this shadow is curved because this surface
here is curved as well. And because this part of
the shadow is closer, it has more define line, and as it goes away, it blurs so that's what we're
going to do here as well. Then we have this shadow here. Let's say, compare
to this object, the shadow goes here. And it slowly fades away here. So that's a good start for us to know where
everything is. And we also have some bounce
light here and shadows. And when it comes to sharing, what I like to do
is do it in layers. Drawing takes time, patience, and really shows if you like
the process and enjoy it. So take time. There's no rush in this process. The hardest part, and that is positioning all these
elements is over. And it all now depends on what part of drawing
process you like the most. Some people find it
enjoyable, you know, cracking the case,
so to speak and finding all the elements. And then rendering is not
important too much to them. Other people really, let's
say, maybe struggle, have problems and don't
like this starting process. They like to go
straight to shading. It all depends on the person. But it is important to understand each of these
processes and go from there. Objects that are flat
like this side of the cube if there are no
other lights in the scene, equal, let's say, amount
of light or shadow. This part of drawing may
be boring to some people, but I much feel this part
of the step relaxing or zen because all other things concerning this drawing
are already done, and you can just
zone out, relax, and look at the reference image and enjoy the process of
drawing, shading, whatever. But you can freely
skip this part, then, see you in the next one. I'll show you the
finished product.
10. hatching and crosshatching: It comes to this kind of drawing and the way I like to draw, it's all about not
applying pressure, but moving in constant
layers and layers of lines. Now, there's time and place where you can use
that kind of drawing. Some people may say that style, but when you're learning, you should try to get to get good at
all kinds of drawing. Even if it's something
that you don't feel like it or you feel like Man, that doesn't suit my style. I like to do try it out, even stuff that you don't
feel comfortable with because that can really be
good sometimes, you know, going outside your comfort
zone and trying out something that's how I feel about using
this proportional divider. Like I said maybe earlier, this is also one of my
first times trying out proportional divider because
I've been drawing for years and learning and getting measurements
and stuff like that. But I just recently came across this tool and decided to give
it a try and after that, I wanted to, of course, share it with you
all on Skillshare and see if that can help you. So I'm really looking forward
to seeing your projects and seeing your comments
and see how this tool, if any, helped you and
your drawing journey. So that's what I really hope to see and see how useful
did you find it. But I hope it will just for this limited amount of
time that I've been using it, I really thought, Wow, where was this sooner? I wish I had this too sooner. And as you can see this shadow, I'm constantly looking at the reference and seeing
bounce light reflected light, shadows, core shadows
and trying to let's say, translate that into
my drawing as well. In nature, there are
no lines per se. We people, humans use them to describe things in a
simpler way to each other. That's a great invention
of the human mind to help each other translate the ideas they have in their
heads onto the paper. So much right line,
but in lines. But in this case, I want to
put the drawings that know. I mean, the image that
I see onto the paper using as much as possible shading to give
this idea of the space, space and objects that I see. And this is how
it's going so far. So here we have a
terminator, not a movie, but a line that separates from dark
areas from shadow areas. And when it comes to shading, there is one thing I talked
about in previous classes, but I think it's important to
maybe talk about it again. That is that when you're
shading and making all these dark areas that are in the light is that even the lightest part in
the shadow area should be darker than even
the darkest part in the lit area of the drawing. That means that this part is in the shadow and this
part is in the light. Even the darkest part in
here that is lit should not be darker than even the
brightest part in the shadow. So that's, I think, very important when
it comes to shading because that's one of
the main, let's say, spots or mistake people make when they are shading that some parts
in the shadow area are lighter than the parts in the light that should be
something that we avoid. That's why when I'm shading, unlike in the first pass, like I'm doing here is to
go and give it all one pass of shading that way when I'm determine which parts are in the light and
which parts in the dark, then it cannot happen that some parts that in shadow
are lighter than these parts that are
in the direct sunlight or in the area that is
lit by some light source. And when it comes to
shading circular objects or that objects that
have curved surface, I with my shading, try to follow this line and think about also the
reflections, bounce light, and stuff like that
because it's always different way that you shade objects that are circular regarding to shading
objects that are flat. And that will be seen mostly when you add certain
shadings in the background, and that's what I'm
doing what I'm doing after I've done all the
preliminary shading, most important shading
of the object. And whenever I can, when I'm shading, I'm trying to look through my eyelashes, just squinting at
the object that I'm drawing just to sit in less detail and get the try to understand these
areas of light and shadow. So I can do a better job. Even if my shading is not perfect or detailed
or something like that, I try to shade this
as good as I can, to divide these areas of shadow and areas that
are in the light. So it all works in the end. I can go now for hours
drawing this way. But I think it's important
to stop at a certain point and see what can you do lastly, that would be to shade the area that's
behind these objects. And that will give
a good, I think, separation between objects that are the main focus
and the background. And you'll see it and
then just to finish. Like I said, maybe earlier
when I'm shading this way, I try to have a consistent
pressure on the pencil, not pushing it too down. And you can see it with pencil, I didn't break once because I was using the same pressure
all through the process of shading only adding more and
more layers and more as you crosshatching hatch
each layer of the crosshatching
gives a deeper shadow.
11. finishing touches and final thoughts: Of course, the background
is not important. But whenever you can, you try to do your best play around and
make complete drawing. Sometimes you do it as an
exercise, and then it's fine. You can try to exercise
and practice your goal. But whenever you can feel
you have enough time, then try to experiment and
push your drawing further. For example, in this
case, for this class, I always planned just
to show you the process of using the
proportional divider and how that is beneficial. I hope I achieve that. And if you disagree or
have any other comments, you can leave them in the comment discussion
section of our class. But more I progressed, I thought about adding
more and more details and showing you how
you can go from using a proportional divider and then show the entire process
of basically shading. And you can see as I do here when it comes to
shading these big surfaces, I like to change
direction of the shading just to give this flat
area a little bit more, let's say, of interest. So after, let's say, just a little bit less than
hour and a half of drawing, measuring and stuff, here is the final result of this work. And that's something that is good for your
project as well. Maybe you don't have to do this hatching and crosshatching. What is important
for your project is to use the proportional
divider that you have that you bought or made yourself because it's
very simple tool, and then just using
a reference image, create as much as many drawings as you can using
this tool just to get things rolling and getting to getting to know
how to use this tool. So let's hop for this video
and see in the next one.
12. class overview and student projects: Well, congratulations
on finishing the class. And once again, thank
you for watching it. I hope you found it useful, and I hope it will be beneficial for your
drawing journey. So once again, when we say
goodbye for this class, let's take a look at the process or the
project for this class. Like I mentioned earlier,
watch the videos, take notes, take your
proportional divider, and make your own drawing. And after that, post to
the project section. The more you do it, the
better because like I said, there's a slight learning curve by learning how to
use these tools. So it takes for some
people one drawing, other maybe two or three
drawing until they get, let's say, used to how
to use these tools. Take as much time as you
can post as much work and you can in your project
section and I'll try to answer every single
one of them because I think that's the
best way to learn by exchanging our
experiences and that helps us grow together whenever we are if you like this class, you might also check
out some other classes that I have here on
SkillShare platform. They are on my profile and they're about
shading proportions, measuring perspective
tips on drawing, and you might find
that useful as well. Post your work on the project
section and see you there. Until then, keep
drawing and have fun.
 Milan Glozić, Painter, illustrator, Designer