Transcripts
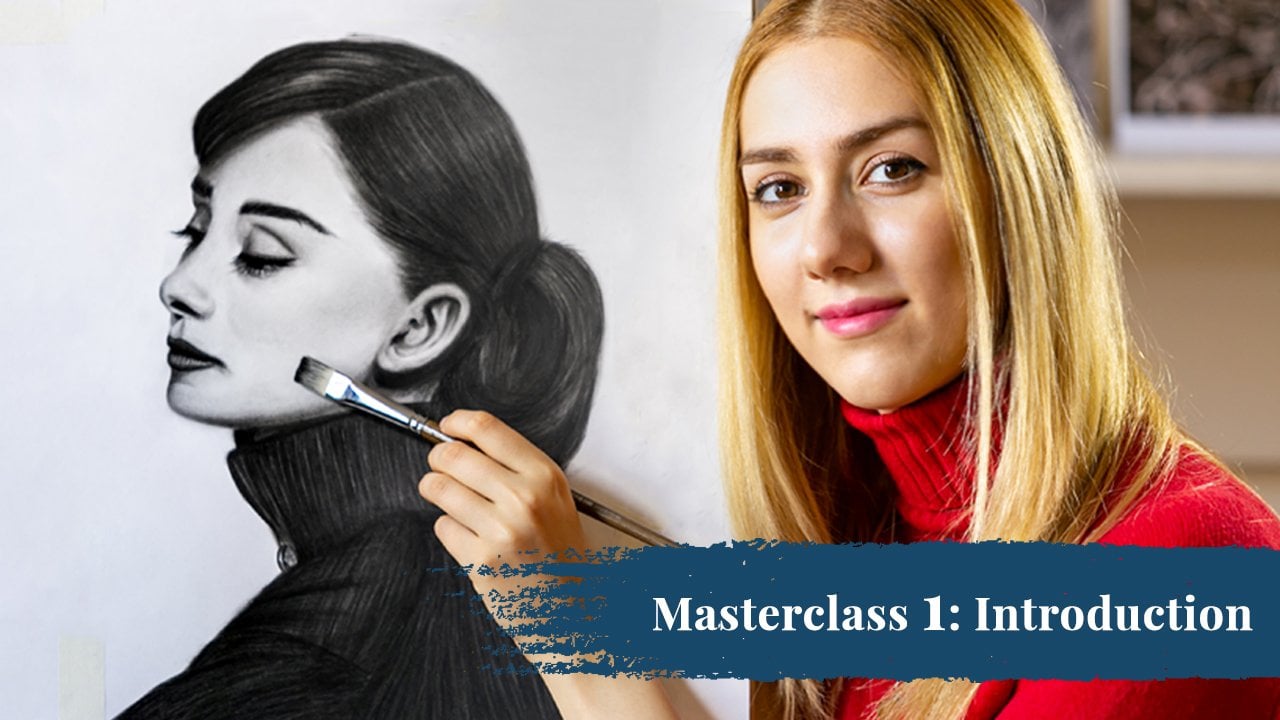
1. Introduction: Hi, my name is Ava Moradi and welcome to this Masterclass of Drawing, Design and Creativity, with Color Pencils and Pastels. In this course, you will learn drawing with color pencils it's techniques, and will understand the fundamentals of shapes and forms and how to implement them into different drawings and designs. This drawing course framework is BTTVC, which starts from the Basics, go through all the Techniques and Transform the structure and the fundamentals that you have there through all the lessons. Then form Vision and Shapes creativity. This ultimate color pencil course, we'll show you how to begin drawing, create and design, advance art in the simplest way that it will stand up as professional artworks. This course does not need prior knowledge and it will take you step-by-step how to draw in different styles. So you could achieve realistic drawing, expressive drawing, imaginative drawings, and creative illustration with color pencils, mixed media pastel, and how to come up with new individual design styles to create original artworks. You will get to know the tools, materials, and techniques, in new and simple way. This course is from beginning to advanced level, that will cover knowing their colors, main shape and forms, how to turn each shape into different objects. Each lesson, will begin with simple shape, Learn about it's lights and shadows, how to color them in different ways, turn them into different realistic and imaginative drawings. Then, how to turn those drawings into a variety of creative designs and illustrations. Then the course will take you through different individual lessons that we'll cover designs, fabric, creative facial features, different animals, and combination of different techniques. This course has been compressed over 200 hours of HD videos, tutorials into this Masterclass of color pencil. Even if you have never drawn before, as long as you go through this course, you will be able to learn, draw and design from simple shapes and lines to realistic drawings and creative designs. You will also learn advanced mixed techniques by using different materials such as tone papers, variety of color pencils brands, liquids such as solvent, and how to apply these techniques such as blending, burnishing, and many more onto your drawing models. You will get instant access to 23 lectures and 44 lessons of the course and also gain access to bonus topics sections, which is about artistic topics. These topics cover different subjects; such as how to produce more art, to create art portfolio, or how to get into art galleries and so on. Getting each chapter, I will guide you how to compare different styles and combine what you have learned into different art path, such as jewellery designs, architecture, interior and exterior designs, and many more. No matter if you're an art lover, art Hobbyist, university students who want to improve your art portfolio, Someone who wants to learn new skills of drawing, artists who want to learn a new medium. And if you want to improve your art and design and style, in not just drawing, but also art installation. Or you just want to draw for your loved ones as a gift and, surprise them, you're on the right course. We don't want you to just copy what you learn in this course, but to implement your own creativity and be an artist. By the end of the course, you will not only be able to draw and use a combination of color pencils techniques and styles, but also apply the techniques and draw in your own art style. As long as you can write down your name, you can draw. So what are you waiting for? Pick up your color pencils, grab a paper and enroll the course. Now, this drawing together today and feel free to look at the free lessons, say how easy they are. And I hope to see you on this course soon.
2. Get to know your instructor Ava Moradi: My name is Ava Moradi, and I started painting when I was six years old and learnt different art mediums such as charcoal, color pencil drawing, oil on canvas, watercolor, and also glass painting. I consider myself an artist and an art teacher. I live in London, but I've been teaching art in different countries in different mediums for many years. I have completed my master's degrees in art business at Sotheby's Institute of Art and further my education at the University of the Arts London, Central St. Martin's. My artistic medium is stone and light installations. Few years ago, I started going to different mines and stone warehouses in different countries to find different materials for my artworks, so I could engrave low relief sculptures. I've had exhibitions in London, Manchester, Saint Moritz, Paris, Seoul, and Beijing. Now I design light installations for both public and festivals. My artistic inspiration is coming from nature and movement. The inspiration for what we love and what we love to do is all around us. We just have to be passionate about what we want to start. Either is in drawing, painting, installations, or designs. Being a teacher taught me a lot. As a person. As an artist, I found my path and passion in creating art and also teaching it. I learned the most enjoyable moments in life is seeing my students improvements in art. It's been few years. I've been teaching thousands of people like you how to create impressive art. That stands off professional artwork. You spent lots of time and effort to make this ultimate drawing design and creative course in the simplest way possible for everyone. If you're an art lover and looking to find your path and style in drawing this course could take you through color pencil drawing, and also how to get inspired for your art by all the shapes and forms around you. To create more art, we just need to have motivation to Start doing it. I put everything about color pencils and the techniques in this course, I hope you learn all the skills and techniques you need, ideas for your passion, your career, and most importantly, enjoy the course.
3. Color Charts: Hi everyone, welcome to this course, Introduction color charts, color pencils use in this course. Faber-Castell polychromos, Caren d'Ache, Derwent colorsoft and normal pencils. For you that you have Prismacolors, Caran d'Ache and Prismacolor pencils have the same effect, but Caran d'Ache are higher-quality and the colors wont fade away after a few months, unlike Prismacolors. However, if you have Prismacolors or any other brand, you don't need to replace them with another band and keep using them in this course, as the techniques are the same. Why we need color charts? It is true when it comes to choose colors, most of us might stop if the color seems complicated. So what can we do? The best way is to prepare a color chart. Pickup all your color pencils and start drawing them from dark to light so you know the value and the hue of your colors. We have two color charts in this course, Faber-Castell polychromos and Caran d'Ache. Real version color charts are better than the online digital versions. Please download and keep the color charts from this course for your practice. This chart shows Faber-Castell polychromos and how a color chart can be done. I use my color pencil from dark to light, which means I put on pressure at the beginning and gradually leave the pressure towards the end. Now, here's an example of how we can choose colors and how color choice can be very helpful for both beginners and professionals. I have the color chart next to my model. And easily I can see if each color is closer to the version I need or I have in my mind. Sometimes you don't need to combine and mix different colors, but you can use only one pencil. However, if you need to mix colors, which we call this technique layering, you need to get familiar with the colors and what you have. Also, as you have a set of colored pencils with lots of different colors, it will be hard to remember all of them at the beginning. Therefore, this chart very helpful. First is familiarize you with the colors faster and it's easier to choose the colors when look at them. I recommend all of you to prepare a color chart for yourself. And if you have the same set of pencils of Faber-Castell polychromos and Caran d'Ache Premier, You can just download it from this course and use it. If you have any other sets of pencils, with different brands, you can go through the whole course with your own color pencil preference in order for you to get familiar with different pencil brands, I have used Faber-Castell polychromos, Caran d'Ache premier, Derwent colorsoft, and also very normal pencil that I bought the whole 30 pencil pack for only one pound. So this means with any pencil you have, you can create your own artwork. Now please have a look and how I mix the colors and try them at the beginning to see if I can choose the right colors. I gradually add and mix the color pencils together. Your first try doesn't need to be the right one, you need to try more than once to get the right color for your artwork. Before I start mixing the colors together, make sure to study an examine your model. Look at the colors and guess what colors have been used and mix before trying them yourself. Then we need to write down the color names. So if you need to use the same colors, you can easily pick up the rights principles and use them again. Regarding the history and the brand of colored pencils they are a relatively new medium. They were first introduced in the early 19th century, but it wasn't until the early 20th that they began being used by more and more artists to create works of art. In 1761, a small factory in Germany, began making pencils, Kaspar Fabel, later to become the war famous Faber-Castell company. They are oil-based colored pencils that are used in this course. In 1832, a British company, Darwent, began manufacturing pencils. Next pencil brand Caran d'ache, is a Swiss manufacturing company established in 1915. In 1938, The American corporation barrel introduced prismacolors. Prismacolors is one of the most popular brands of color pencils today. They are now manufacturers by Stanford and considered more affordable comparing to other brands. Darwent, Caran d'Ache and Prismacolors took all backspace colored pencils that are being used in this course. Now, what if I don't have a complete set of color pencils? This is a question that a lot of us could ask. If you don't have a lot of color pencils and you have the main basic ones, even that's enough. Only few colors we can create tens or even hundreds colors, different color pencil layers. As I mentioned before, about layering, layering is ad one color on top of another color with light pressure. Start off with a light layer of a color. Then keep adding different layers up another color on top of another, using light to medium pressure, until the desired results are shift. Also we have color wheel, which you can use primary colors, red, yellow, blue.. with only few colors, We can achieve more and more colors.
4. Color Pencil Techniques: Hi everyone, welcome back. In this section, you're going to cover the techniques related to color pencis and how to achieve realistic feeling for our artworks. First, let's draw a circle. You can use anything to draw one. Use a coin, circular ruler, or even freehand. For the first circle, we are using layering and burnishing techniques. with Faber-Castell pencils, which are oil-based. Oil-based pencils are harder than wax based pencils, which are softer. Oil-based pencils are also great for detailed drawings. Now first thing first, make sure your pencil is sharp. Always keep your colored pencils sharp when drawing. On this circle, I gradually start from the left side of the circle. And with circular hand movement, go towards the right side of the circle. I have divided the circle into three parts and use the color; salmon, beigered, and pale geranium lake. You can use any color and it doesn't have to be three colors. It can be one or two colors as well. Therefore, it depends on your hand pressure, how your circle looks like, or how your artwork looks like, not on how many pencils you use. We should not use a lot of pressure for the first layer. When it comes to the second layer, use more pressure to understand the colors better. And then we can see the shininess of your colored pencils more. For the third or fourth layer, we will use the same colors. but with more pressure. Now please look at my hand movement and how it moves. You can see for the first layer, I barely brought any colors onto the paper. For the second layer, I'm adding more pressure. If you want to draw realistic color pencil artworks, you should always follow this rule and don't be hasty to color your drawings with lots of hand force. In this way, you won't damage the tooth or the texture of your paper. And if there was any mistake, it will be easy to correct it. Spreading the color and equally spreading in the color is very important. Please look how careful I am not to leave any noticeable trace on this circle and evenly go around with the color pencil to make sure the circle comes out spotless. As I mentioned before, your hand movements with pencil should be fine, Circular motion. You need overlap the circles so there won't be any harsh stop and start points. When you do lots of circles, hand movements and overlap them, it's impossible to see where the lines start and stop. In this way, we can avoid harsh scribbly lines. You can also avoid scribbly lines by going through the same direction with your pencil as I'm doing here. Now I'm adding more pressure. I can't say it is the maximum pressure that I can bring on this paper. But then I'm careful not to leave too much pencil trace. With this technique, which is called burnishing technique, you can get smooth, creamy layer. And why brand colors? This technique is burnishing with the same colors that we did, our layering and not changing the colors to lighter colors or white burnishing. You will see those techniques after this circle the hand movements is the same as I did the layering, but only with more and even pressure. I will continue in the same color until I reached the middle section. You can see my hand movement is the same and circular motion. Now, I changed the color to a lighter one for the middle section and get the same head movement, the circular motion. But the same pressure. I go forward from the left side to the right side. Also, please pay attention. I go back and forth to make sure there are no start or stop trace point left. Also, the reason I touched that circle is to show you when we'd do burnishing technique. Tip of the pencil powders on your paper. Don't touch the extra powders lease, either blow it with your mouse or with a big brush to get rid of the powders. Powders that burnish and techniques create our more with wax pencils than oil-based pencils. Therefore, this brand that I'm using, Plychromos, creates less powders than Prismacolors or Caran d'Ache pencils. Now without the speeding up the video, please look how slowly my hand moves. Color pencils have a slow techniques and require patience when completing a drawing. If you take your time for a drawing, you can definitely see a better results. When I receive messages from my students and they ask me why they drawings look different than what the model looks like. And after they send me their practice, I can't see how hastily and without patients is been done, a good practice is not about to finish it fast, but it's about quality. Your drawing will look polished and realistic. If you don't put time and effort. Therefore, you won't get the right results at the end. So I would like to ask you during this course to watch each episode carefully and repeat after me. When I'm doing this circle practice, which is layering plus burnishing. Please pick up your paper and colored pencils and repeat after me. It's not about just watching. You need to have your pencils in your hand every time you've worked this videos and repeat until you get the desirable results. Even to this practice is in a circle, but it's the same technique for face colored pencil drawing or animal drawings. Instead of circle, you apply these techniques on a face model. Since this episode is all about techniques and hasn't started the drawing and design sections yet. It's a good practice to warm up your hands and gets you ready for the upcoming lessons. We will have two or more episodes. that will cover, more mixed techniques. We will start the drawing and design parts. Now on this circle, I'm applying the pencil various mostly. And we detail pressure. Keep building up the layers until you get his most coverage. If you're not a beginner and you're familiar with colored pencil techniques, you can still skip this episode. But I will recommend you watch the techniques at least once to refresh your memory and maybe comparing with techniques that you have learned before. This is almost the last layer of burnishing technique in which I go wrong with all the colors, which I use three colors here to make sure they're all done carefully. You can see I'm adding more pressure here. Going around the circle. Also look at my hand movement. I'm not adding too much pressure, but just adding a soft layer to make sure the circle looks more round and three dimensional. In this way, we have distinguished the highlights, mid tones, and core shadows. You're not doing the cast shadow and reflect the highlighted, and we will cover that later. So what we learned so far, To summarize, we learned about layering and burnishing, blending kind of process for small shading. Layering is to apply the pencil very smoothly and the little pressure keep building up the layers until you get a smooth coverage. Your pencil needs to be sharp all the time. When you have a fine point pencil, it can get into all the services and gaps of the paper. So the white grainy mess, one show a lot more layer, the less wideness you will have on your paper. Your hand moments with paths that should be fine circular motion. As you saw before. Here you need overlap the circles. There won't be any harsh stop and start points because you do less of circle hand mobiles and overlap them. So it's impossible to see for the lines start and a stop. In this way, we can avoid harsh, scribbly lines. You can also wait scribbly lines by going through the same direction with your pencil on the right side of the example. Here, you can't see an example of layering and banners in a fix. For achieving Hues layer colors, a single color of one give the effect of main results. So we need to mix colors and build up heavy application, lend and burnishing, then adding the details. Next, we learned about burnishing. What was burnishing? Burnishing when you put a lot of pressure onto color pencil, which means you will flatten out this hoof of the paper. With this technique, you can get a smooth, creamy layer and vibrant brand colors, please remember, when you burnish, you can damage the tooth of the paper. This means its is hard to apply more layers and it's hard to fix mistakes. Therefore, if we continue burnish him for a long time, you might get painful wrists. So if you need to rest in between your work, please do so. What we are going to learn later, we are going to learn mainly water above other burnish and techniques. Layering with white. Layering the colorsless Blender layering with the same color, which we learned previously, using lighter colors, mixing and creating different layers with heavy blending. Also, apply just blending. Now, moving on to the next technique which is using solvent liquid. Lets draw another circle with another three different colors. Violet, Ultramarine Pink, Violet Brown, we will create our first layer, like how we did before with the first circle. For this technique, you don't need to have a perfect first layer. As long as you have enough color on your paper, you can use the solvent on it. Now this part is going to be exactly like previous part until the first layer is done. So please look at my hand movements, how I use the colors from left to right and change the colors gradually from darker to light, then to darker colors. If you have sharp pencils, you can go through all the graininess of your colors. Eventhough is your first layer and the are using solvent, which we don't care about the first layer to be perfect. You can't have less graininess and it's going to create a better layer for your drawing later. So as you recall, I chose three different cars, which one of them is darker. I used a darker color from the edge of the circle, the right side. Why did that? Because I want it to be careful when I'm going from the right to the left part and not to create a line in between. Now I'm going to repeat and going from the right again into the next color. And you can see how gradually I'm bringing that dark color to the light colors in the middle. Then I'm going to pick up the lighter color. It doesn't have to be exactly this color guys. So it can be any colors that you have. And then you can go through all the colors again and keep the last layers before using this liquid. As you can see, I'm using just plain then make sure when you put here a brush into this liquid not to bring too much or too little from this liquid onto your layers. Now you will see how this liquid is good to act exactly like burnishing that we did in the previous technique. Please look at the brush and how gradually I'm going to bring the liquid on it. With the previous technique. If you are doing a large drawing, you will have a very painful wrists, as I told you. So if you are doing a background or blurry background, this is the best technique to use, is better not use. Burnishing techniques are doing large drawings. You can use solvents few times on your layers, but you have to let it dry, for example. But he did the first layer of your solver on your pencil drawing. Let it dry and then move on to the next layer. At pencils. Then you solve but didn't, you can't repeat this process. Also, the good thing about this technique. This technique is not going to damage the tooth of your paper. So you can add as much as layer as you want. So what we learned here will enable solvent. We have different versions of solvent. We have just sit pencil blend, paint thinner, council or baby oid. The best solvent liquid is just in pencil blended because it has is specially made for this technique. But if you can't find it, mainly in the UK, therefore, so many of my students, they buy baby oil, which has the same effect and it's cheap as well. With solvent, You can blend the color pencils without damaging the tip of the paper. Also, you can apply yourself layer on top of the solvent. So when you are using solvent, you don't need to have a perfect initial blending, but you don't press down too hard. Because if you create lines, With solvent and your brush, you won't be able to blend the lines mostly after it dried. When it dries. You can add multiple layers with colored pencils. If you have a pencil, then the paper is still wet. You can damage the paper. Therefore, solvent kinda speeds your drawing process, but make sure it dries first, this technique is the best to use on animals and landscape, but not on skin. So use it on animals or the background or for blurry background, as I mentioned before. Moving on to the next technique using pencil blender. This is an actual colorless blender to blend the layers with. The best blender is Caran d'Ache, but each brand has its own blender as pencil Blender sometimes cannot be perfect. We need to mix it with adding more layers on top and then burnishing method as well. This technique is not my priotity technique that I use on my own drawings. And I prefer to use burnishing or solvent techniques, pencil, to be honest, mainly burnishing. All these methods are better to be used in conjunction with each other to get better results according to your model. As you can see, like the previous two examples, I'm completing the first layer before using pencil blender. The first layer is almost complete. So now I'm going to use the pencil blender, which you can see how it looks like. This is Caran d'Ache pencil blender. Now, gradually going to blend all the pencils and complete this layer. Please look at my hand movements. You can see that is creating powder as well. So I made it sharp, it wasn't sharp before. You can use a normal shop owner to shop this pencil blender. So don't worry about that. Now you can see I'm going around and how when I'm using it on darker layers, real color is coming out. Just be aware, like burnishing technique. If you use too much of this technique, you will have very painful wrists. So again, if you have a large drawing, your solvent instead of burnishing pencil blender. After I get rid of the powders on the paper, I will create the second layer, the same color pencils. I will go around it. So even with this technique, you can do this few times. It doesn't have to be one time or twice or three times. It depends on you. If you haven't damaged the tooth of the paper, you can continue layering and then use your pencil blender. But unlike solvent, this will damage the tooth of the paper more comparing to the solvent. I'm almost done with the second layer. And after I finished this layer, I'm going to go back to the previous technique, which was solvent because it's already dried. And I, if you remember, I told you let the solvent dry on your colored pencils, then go on it again and use the second layer. Now you will see after I add the second layer on solvent, how the colors become more wide breadth. Please have a look. But comparing it to burnishing technique, solvent will not be shiny. But if you don't want to have a shiny surface on your drawing, It's better to use solvent. But if you don't mindhave a shiny surface area I recomment burnishing technique to you. And I can keep adding the layers and more layers. So here are almost done with the last layer on our solvent, which was the second technique. I know we are in the third technique that we're going to summarize it very soon. What we learn here. Moving on to the pencil blender technique. This technique is to blend any kind of cancel. Each brand has their own type of pencil blender. We can use Caran d'ache colorless blender. And if you use Prismacolor blender, works the same as they are both, wax based pencil. You can apply these pencil blender and get a good result if you have enough color pencil layers, and it would only blends smoothly. if your pencil has been applied smoothly and not scribly, and don't apply too much pressure at the beginning as pencil blender sometimes not come out perfectly. So we need to mix it with adding more layers on top and then use burnishing method after. As I mentioned before, all these methods, blending, burnishing and this pencil blender, are better to use in conjunction with each other to get a better result according to your model. Before moving to the next technique, first, make sure your pencil is sharp at all times. I'm using Darwent super point sharpener here. If you have used this sharpener before, then you are familiar with it. But if you have not, please have a look how it's been done. In these techniques, we will learn about white pencil blender. What do I mean is that each brand has a white pencil. So we create our first layer as we did with our previous circles, didn't for burnishing part, we will add white pencil on black and burnished entire surface. This technique is similar to the first circle that we learn here, but instead of using the same colors, we can use white pencil, and bandage the entire surface. When it comes to different brands. Faber Castell, a white pencil doesn't have any burnishing effect. So if you want to use a white pencil for burnishing techniques, use Caran d'ache or Prismacolor white pencil and not part of Polychromos as it doesn't have any effect on your drawings. I'm going to complete the first layer with three colors, cobalt green, turquoise blue, a metal cobalt blue. However, if you have any other colors, which are similar to this and you're using other brands. It doesn't mean that it exactly have to be these colors. For instance, if you don't have cobalt green, or cobalt blue, you can use a different version of green colors and blue colors. So finish the first color pencil. I start using the white pencil, going to blend all the colors were there. You can see how I'm getting rid of the graininess of surface with this technique. And if you imagine this circle, it can be part of a C or an ocean color pencil drawing, or a background of a forest for the blurry effect. So this is the best technique for these examples. Later in this course, we will use this technique on different examples, such as a blurry background or an ocean or withdrawing. Now I'm going to continue with the same colors that are using before. And going through the second layer, adding more pressure, you can see how the blue is coming out. More shiny. And then I'm going to add the white pencil again. As the tooth of the paper hasn't been damaged, I can add more layers on top of it and blend the colors again. Please have a look at my hand roadmap, which is circular motion. As you learned previously. Don't touch the powder, take them away with a big brush as I did now. We create a final version of the blending, making sure that there's no graininess on my Surface. Please have a look how circular. I'm moving my hand and now we are done. So to summarize this part, Let's have a look again. You a close-up example. On the right side. When I did the first layer, I tried not to do a perfect first layer. You can see there are lots of green and mix on the paper. However, when I added the white pencil, it blended perfectly. You can't use other color pencils as blender, especially delight colors. Apply several colored pencil base as usual, but instead of using the same colors for burnishing, use white pencil, the colors will come out lighter, but after the white blending, then you can place all the other colors again with the size of the pencil. Also, this method doesn't rudeness buffers that you have created on her Surface. Now looking at burnishing and solvent techniques again, I will draw you to surveys. We can dash colored pencils and tell me about their differences. I'm using burnt ocher. I'm going to draw you two layers. Then I'm going to add solvent, liquid with a brush. And after it dries, I will go on if it's burnt ocher again, regarding solving techniques, Sultan, take this. They are good for wildlife and fair, detailed and texture strike. You, don't need to use pressure. That's why they are good for is it a, you can add more layers, cover large areas. I'm not going to suggest it for portraits at it is hard to get smooth surface and skate, but it is still can be used for portrait if you want to. You can add a lot of layers and these cells, when using solvent, we don't need to use a lot of pressure. As I mentioned before, It's easy to get rid of white graininess of your paper. Used less than sell. It means many are adding more layers. You don't have to use another color. Pencils make color vibrance, but not shiny. They worked very well for VR counselor polychrome most. But it can be used with all other types of colored pencils as well. You need to wait until it dries to add more pencils and Solver layers. It is good for biliary or glass backdrop. Also, it has a very strong smell, so you need to use a ventilated room. It doesn't damage. There are two of the paper, so you can add few more layers. Also, it's very hard to erase. Now I'm using the same colors, burnt ocher, two or three layers, then I'm going to add burnt ocher 50 percent. It's a lighter color for burnishing. So when I'm using burnt ocher and I want to burnish it not be the same color because it's going to look much more richer. I'm going to use a less a lighter color, which is burnt ocher 50 percent for this color. Talk more about burnishing, branching. It's good for portrait and smooth skin or cartoons. When you put a lot of pressure onto your colored pencil, which means you will flatten out the tooth of the paper. That's means burnishing, as I mentioned, is good for portrait drawing. It flattens the texture of the paper. No wide grains stay on paper up and you do branching. Also, it creates a smooth and creamy coverage. Makes your drawing and artworks shiny. And it's good for dark or black colors. Spatially cartoon drawing, you need to put a lot of pressure. So you might have a heavy hand. Risk is good with facts pencil based, such as Prismacolor or Karen dash. Also it's easy to get highlights it sharp or craft knife shall show it to you later. Don't have to buy extra materials, but you need to use more pencils when using burnishing techniques. It's hard to face mistakes due to pencil pressure. However, it is hard to fix mistakes with both techniques. I've talked about having a sharp pencil all the time. So now I'm going to show you just about sharp pencils and how important it is to have them for our realistic color pencil drawing. If you have a look, sharp pencils doesn't have too much graininess in it. But when it's done sharp, you will have a lot of whiteness on our surface. Now, let's go into layering detail. In this practice, I will use few colors, which is Karen dash, sepia, burnt ocher, and also all use brown ocher, 50 percent and burnt ocher. Now let's have a look how a combination of two colors looks like. In the second example, you will see two individual layering on how they look like together. In the previous example, if you recall, I mentioned that so one surface is good for textures and details drawing such as animals. So when I draw individual strokes representing fair, for example, they show perfectly on the surface. Let's try the same technique. The strokes are not visible anymore on a burnishing surface. Just to let you know, I'm putting a lot of pressure on the parser, but it's still not visible. I will draw a few more strokes, maybe representing i birth or animal textures. And please have a look how solvent technique and version technique can be done on burbs. Examples of reviews, Karen dash pencils, sepia, and burnt OK. The same goes for soap and surface. After we have enough colors on the paper, use your solvent, let it dry and grow and more strokes the same colors. I'm going to use brush. It's sold on it. The same direction that I drew the strokes. So you can see her doing it perfectly. It can be blended. This time, I'm not going to use the stove on technique, but the burnishing. So there's no liquid in volt. The absolute, the first layer of strokes, I'm going to use the sedia. And then I'm going to use the same color over and over again until the old plan together. So then we could furnish them as Bob. Gradually adding pressure. After the first layer. I will add more pressure to the second layer, then add more pressure into the third layer. Then there are all blended together, as we call it varnish technique. So the previous example which I used solvent is dried. Now, that's why I'm using the colors again to give more textures or why brand colors and create depth into it. Please have a look how it looks like. So you would look more natural after I go on it again, the same colors. One of my pencils, not really sharp here. So it's better as I mentioned, for half sharp pencil. So you can create better strokes. And going back to the example again, the banishing example, I'm adding more layers. I believe this is the force one. And then now I'm adding the maximum pressure. You can see how it's being burnished. I'm taking my time and try not to be hasty and be patient. Colored pencils is all about patience guys. So take your time. Put more effort, and do it gradually, not in a hasty way. Compare these two techniques together. You can't save one of them has more textures and more shiny. And the first one which was solved that has less shininess, but it's better for textures, as I mentioned to you before. So guys, I hope you enjoyed this episode as I covered the main techniques of colored pencil drawing. In the next episode, we will learn more about other techniques on how to combine them together. For the last technique, which is pastel, pastel powder and using it with brush or stump. Not so many teachers use this technique. So like to cover it here in this course. If you have pastels, any kind, scrape some powder of your pastel, to spread the powder onto the surface of your paper. The amount of the color depends on you and your model. Then we do color pencil. You can add layers on top of the pastel layer. Also, when you're using a brush or a stump blending, if you are not doing a realistic color, drawing the brush and blending, it can give you beautiful effect on your pencil drawing dependent on our model. Again, I hope you enjoyed this episode. You learned a lot, and I'll see you in the next episode. Don't forget to have a paper and your pencils in front of you. So whenever we go to any of the episodes, we will go through them together. Well, Bye.
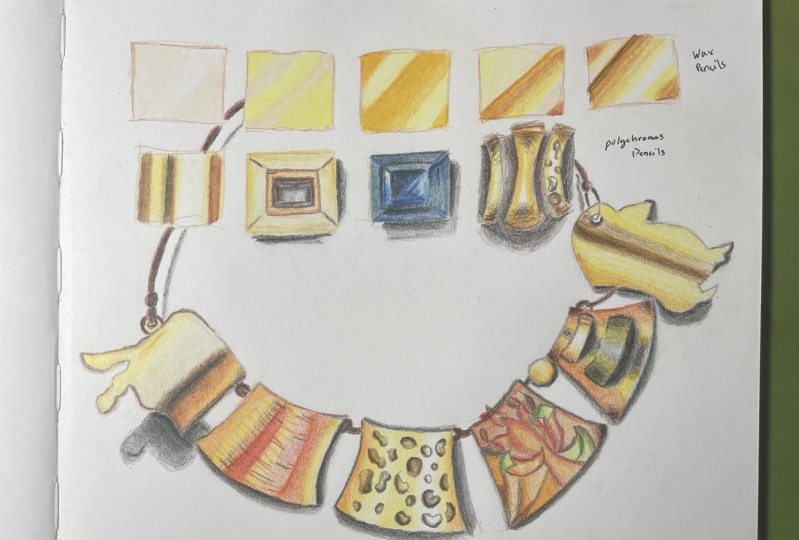
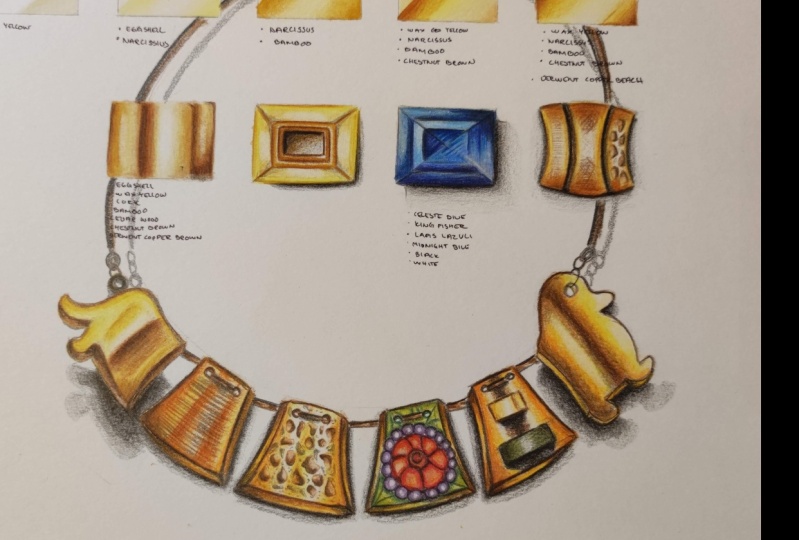
5. Layering, Color Mix and Design 1: Hi everyone, welcome back. In this episode, you will see and learn how to use color pencils, how to mix them, But most importantly, how easily it is to come up with different designs It's very basic level of drawing and colour pencil techniques. This section has been divided into three parts. In this episode, which is the first section, we will go through the mixing and layering part. In the next episode. You will take this into the next level and turn squares into different textures. And then in the last episode, you will use the same squares techniques and we'll turn them into an exciting design. This part is very important as we will demonstrate how to come up with different textures, layering is simple techniques that you learned in the previous lesson. So if you already have the piece of paper, your color pencils in front of you. Of course, the colors that you have and want to use, it all depends on you. And start repeating and practice after me. I'm using heavyweight cartridge paper and the paper you choose, also, it can be any brand that you can't get. But just make sure that it's heavyweight, as you can see. Firstly, we will go through five squares, starting from light colors, gradually adding darker colors. Using this technique of an demonstrate barriers stages, we can choose any color brown, as I mentioned here, I'm using Colorsoft, Derwent And also next section, I'm going to use Faber-Castell polychromos, so you can't see the difference. You can use the same techniques and design with other materials such as pencils and markers. So just don't limit yourself to one medium. First I'm using is a mixture of two colors. I started with the Derwent colorsoft, as I mentioned, cream and white. Into second one, I'm using more colors and layering more. As you can see, I'm using circular motion with my hand going through the same colors, which is cream and lemon yellow. I'm using more force here. So after I laid out the cream color, I used a lemon yellow. You can use any kind of yellow brand you have. And the start layering it So start with the lemon yellow. You can lay out the cream first, then go on it and use Highlight. This is amazing for when you are drawing gold or any jewellery. Have a look how its going to turn out. I'm not going to add more in this one, but in the next one, we will see more highlights with darker colors. So now I'm going to use pale orange and lemon yellow. It will be the same technique that I did in the previous two squares. Then working with color pencils, use several layers of color to create good compact shading. To achieve a satisfactory effect on blending, we need to go through the basics of this color pencils, overlay the colors at the time on paper using finely thin strokes, as you can see on the screen, the need to use a color scale that goes from pale to dark yellow to oak And then to represent the yellow goal for this model. Now go through the first square. I'm going to use lemon yellow, pale orange, cream for burnishing and mid-brown. So it all depends what colors you choose for burnishing. And I chose cream because it's a lighter color instead of white, as you learned in a previous episode, I use Caran d'Ache for burnishing. But Faber- Castell and Darwents white are not that good for burnishing. So I'm going to keep either using cream or lighter colors instead of white for here. So we can start with light pencils from the top left of the square. The light hits the first half of the square and start to shed diagonally from the pale to dark yellow or to oak. For the model as it represents a mid-tone color chart. We are having a reflective surface, metal as a whole host reflections. And we will use one in pale yellow at the bottom right to make the surface looks glossy. So heavy highlights is very important for this example. That is why I'm layering and mixing in different colors. So as you can see, sometimes I don't bring the whole color to the surface, but I let it be and then overlay two colors together. So those graininess will be covered with different colors. For instance, here, orange and lemon. So I'm just trying to get rid of the graininess of the paper. I'm gently touching the paper and not bring it too much pressure because lemon is not as light as the cream that I used before. So you can see how the corners looks like. I'm going to use more force now to create the shade and the highlights that we need for this example. You can use either oak, or brown here. Look how it's coming out. For instance, if your metal is not gold as I'm doing, as I'm coloring here. And it's silver for instance. You can use different versions of gray. So from white to gray, for instance, if you are using Caran D'ache, we have gray one, two, three, warm gray or cold gray. Now I'm just going to add more shadow there. For the next square, I'm going to use more colors. As you can guess, I'm using all the colors that I've used in the previous ones. Cream, pale orange, lemon yellow, mid-brown, white, And also I'm going to use dark brown, which in other brands might they call it Sepia. Each brand has different names. For instance, as I mentioned, when you're using brown, mid brown, or dark brown in Darwent and it's not the same eventough If you have the same color in, for instance, Faber Castell, or Caran d'Ache, you're not going to find the same name. You saw the first episode, we had color charts. That's why those colour cells are going to be very helpful. So make sure you have one next to you when you're creating these drawings and design in this course. Please have a low time mixing the colors and create different layers. Sometimes I have to use less pressure and sometimes more pressure. So the top part, the left top part, I use less pressure and use cream, gradually went into darker colors. Layer different colors, mix them together, then highlight, which I left it to be white, the whiteness of the paper. And then now I'm adding the darker ones on the corners. In the next two episodes, we will use these techniques and use them on actual models, the models that with your imagination you can create, so you don't have to go online and download a photo to create something, to draw something. So you can always come off with very easy designs. Here, I'm using various simplest squares. Then I'm going to turn it into a necklace. This is the last square, which after I laid out all the colors in the previous squares, I'm going to add dark brown as well. I hope you are practicing after, even though if you're good at mixing colors, layering, burnishing, I would like you to practice, as I mentioned, to warm up your hands before the actual sections of the course starts. Also, it's important to try your pencils. If you have a set of pencils, but you haven't use the colors yet, or softer colors completely unused. After you do this practice on you have used them, then he know better what to use, when to use on exactly how to use them. So it's all about practice and experience. It's not just coming off just by watching a video one time. I want you to practice and practice. We're almost done. Now I'm going to use the actual speed. So you can see how I take my time. I don't rush it. I go over the layers gradually at the color pencils on top of it. Here's slowly go on it Don't put too much pressure at the beginning. And I see you in the next episode, which we will continue. And then go through different textures so you see it. And bye bye.
6. Layering, Color Mix and Design 2: Hi everyone. Welcome back to the second episode of this section, layering, color mixing and design. In this episode, we will go through different techniques on different squares. The first square, as we learned in the previous episode, we will cover mixing colors. So firstly, I would like to ask you to prepare your paper and color pencils, as usual. I want you to complete new sets of the squares with, your own imagination designs, and submit your assignments online. As you can see, I have done four different colored rays digitally for you. So you can see different textures. Also, you can do these with markers and pastels. So if you have any other mediums, such as normal graphite pencils, charcoals, water color or oils. Please practice this section, it will help you with other mediums as well. However, as you're focusing on color pencils only here also practices square and layering different range of colours, and it can be any colors. For this square, I started off with light layers, cream and light yellow glaze. As I'm using Faber-Castell polychromos. We created white highlights in the middle, then started layering and adding that darker colors, green gold, burnt sienna, walnut brown. In the previous episode, I use Derwent colorsoft. Now you can see how they are similar or different in layering be applied colors to darker colors. Also whitewashing, best practice as well as it will help you with the color patterns and how I'm mixing the colors together and get through it off the papers graininess. This example helped you to color in and layer and different example such as this cool fish, as you will learn in this lesson and how turn it into a new creative design. The hand pressure is very important when it comes to layer. And guys, as I mentioned, I started with light colors, but I didn't put too much pressure so I wouldn't burnish and damage the paper. If I did, I wouldn't be able to add more layers, color layers on top of the cream and orange layer here. So always start off with lesser pressure, gradually add more colors. And this goes for most of the color pencils examples. Unless you're completely sure the area requires one certain deep color, which usually that is not the case for realistic drawing, but for cartoons. You can't see this mixing colors and color pattern can turn into different drawing and design such as this oval inspired jewellery drawing have a look at this example and this square and how the colors are similar. If you look at the layering, they're the same exactly. Therefore, each of these squares and how the color are important for your progress and practice during this course. Here I'm using walnut brown. I'm adding less pressure on the side to create dimension. Then I go on it, with lemon color to cover both sides. Now moving on to the next square, please follow how I'm going to change it with adding different lights to create a three-dimensional square. We deep shadow and also cast shadow. I would like to ask you to follow this example at the same time you're watching it with your pencil. For the outlines, I'm using a normal pencil and bear in mind using both color pencils and graphite pencil for outlines are okay. But if you use graphite pencil, make sure they're not too bold to show it on your paper and under your colored pencils. However, if you have color pencil as your outline, it can smudge all over your paper if it touches it, unlike graphite pencils, especially if you're working on a large drawing, with lots of outlines. Now, after I made sure I have the line, I go on them one more time to make them more visible, as you can see, starting with the same color pattern as a previous square. But this time let's design a different shape. I'm using polychromos again, unless it started with color Naples yellow, on the side. When they are near the lines, Put more pressure on your hand and pencil and when you go further away from the first outline, we'll reduce the yellow color pressure. Then for the inside lines, I will start with cadmium orange and use burnt sienna to bold the lines to create depth. And then I will repeat these colors again. And then for the inside square, here's a combination of walnut brown, and black vessel, which I'm theory using any other colors, you need to use different color to create. Depth for us. If it's orange and red, use brown and deep red for the inside square. Also, you can see I'm layering to Walmart brown line with orange to create two color layers there. And use more Walmart brown to go on the line Again, it's better not to use too much black. But the combination of darker colors such as brown or indigo blue and a combination of brown, indigo blue for black parts. This way, it will looks more realistic. To create more shadows, you can use darker pencils. However, going through another technique, as you learned in the previous section, we can also use our dark pencils and a combination of brush to spread the pencils pigments on your paper and makes it look deeper. After I used this black pencil, I'll use a small brush, a size 0 or two. And the dark pigments and you can see how it looks like. Then I will go on it, this black pencil again. And you can repeat this part using brush and pencil a few times. Also, each pattern on line can lead different artworks and designs. After I finished the second square practice for this part, I was wondering if these patterns can be close to any installation or an inspiration of another artist's. Therefore, if you look at this picture, you can't see the similarities between your second square practice and this artwork. So every practice and drawing you do later can be a beginning of an inspiration, a painting and installation, or even an exterior or interior design regime. So this course is aming, not just to teach us you colored pencil techniques, but also teaches you how to use them on your drawings that you will practice here and go through different inspiration and visions that exists in the art world. But most importantly, come up with your own designs and drawings ideas in the future. As you can see I add a black lines on the right side of this graph, which are for the cast shadows. But this time I didn't use brush, but using my hand pressure from more to less pressure to create a three-dimensional square. You can draw the cast shadow on the two other sides as well. Now moving to the further square, please have a look how we can change the square to a new design. I'll follow this pattern and then again start practicing at the same time. Yeah, good to try sapphire diamond, on this square, using different colors, such as cobalt blue, greenish, black, white, and phthaloblau hell as well. We are done with the outline. All use the same light brownish color that I used for the outline to covers a surface. You can't see how I'm using the color going through the lines. This is mainly to cover the whiteness of the surface and the graininess of our paper. Without relive the areas that are supposed to be highlights allow and form color down. So we could use the whiteness of the paper for the shininess later. Now I'm going to start off with light blue near the line. You can't use any lights colors that would be close to this one as I'm using the colors that are the closest to the real example of blue sapphire, as you can see here. So what about brand? Pencil brand you're using, try to match the colors for your color chart. And a start practicing with me while watching this. If you don't have blue color pencils, use a different range of colors to replace that. For instance, if you are using red, use medium red, light red, dark red with white. So you can create a red diamond following this pattern. If your first practice wasn't close to what you are watching this practice more to get better during the session, which every good examples, comes with good practice. Near the center of the square. As you can see now, I'm using the same medium pressure and cover with the blue. And when it's further away, you can see I use more pressure near the line and lift the pressure gradually, Again. When I go near the center of the square for the second layer, I will use darker blue and add the layer on top of the previous one. Now let's use white pencil to cover the light areas. You can see how using white colors can change the blue colors and burnish that area. And top of it, I can use lighter blue to combine the colors together. This is an example of what I meant in the previous sentence. So I use a darker blue a little pressure then use white, then use the lighter blue. Then I'll go on it with white again to cover the area. So you can add different layers depending on what colors you need to put there. So please follow the hand movements and also the pressure that you can see on the screen and start practicing this Sapphire, Now. I'm going to add the third layer for the center. It a darker blue. As you can see, I'm trying to cover the areas that I feel it needs to be darker and also get rid of the graininess. I'm not using a lot of pressure. It all depends on how much color is going to be there and how much I wanted to cover. So I'm using less pressure here because I needed to be more highlight. Then I'm using the white and burnish that area. You can see how the medium blue and white create a very dark and shiny blue. Now the darker blue, I'm just going to add few lines on that area dissimilar to create dark highlight on our Sapphire. And then we didn't light or white pencil. I'm going to use the same lines on the other side. Now using the light pencil or white pencil or cream, in the middle of those blue lines that we created. Also i will go around to see what areas need more color. It blue, darker colors or with white colors. You can see These are all about details and how I'm using the example, previous examples that we did together. And using those examples, the highlights of those practices on this one now, I don't use all the colors at once, and I tried to minimize using all the colors at once. We're going to add lighter blue on both sides and then go on it with white color. It can white pencil or cream pencil. Depends what kind of pencils you have. Since Faber Castell white is not really usable for burnishing. That's why I chose to use lighter other colors on our light colors, such as cream here. And then adding black for the detailed parts. You will add on the left part and also on the right side. This would be the line details on our sapphire. You can see how adding these little details will give us this shiny effect for this diamond. After the black lines, Let's go on a bit darker blue. And then burnishing with lighter colors. These are all layer that you learned in the previous sections. Now we're going to repeat the layering effect. Since the texture of the paper has not damaged, I can add more layers as I want. Now we have to make sure that the lines are straight and not shaky. That's why I'm going on the lines with darker color to create more depth and also give highlights to places that it needs. This part when you're practicing and if you feel it's fast for you, pause the video, finish the parts and the section that you are doing, then start watching the video again. Now slowly, I'm going to add the final details with all 3 and 4 colors that I'm using. You can see for creating a drawing, a design, you don't have to have a lot of pencil colors need to have a range from dark to light, three or four of them to create a good drawing and design. So now it's all about details and layering. Now we're going to draw the cast shadow. Like how we did with the previous examples. I'll choose the right side. And that depends where your light's coming from the sun or the light of your place. So I choose the right side here because these will be easier for this practice. And then I'm going to apply the brush on it. As you can see, see how the dark pigments are spreading on the paper. You can use brush and if you don't wanna use like the last examples, you just have to reduce the pressure on your hand from dark to light. So now you can see that our drawing, this design, is becoming a three-dimensional. Don't forget to add a little less pressure and go with your dark pencil around the cast shadow as you can see. So we are almost done with this practice, just going to apply a little more brush on this area. And we are done with our third example. Going through the force example. The camera didn't record those two lines, but I'm going to complete the rest of it and zoom in a little more later so you can see how this example is being done. So on the first square, I started drawing concave design and shapes. And these depends on how you wanna do the same thing. If you want to follow exactly this practice, pause during the times I'm drawing and start repeating after me. Draw your lines very easily. Add that little lines on the corner side that you can see I'm adding. In the middle. At the third concave example. You will learn more about concave and convex later. We'll go through a lot of shapes and design in this course so you can learn how to draw them and also what kind of drawings we can come up with that. Unless we are done with the shape. Unlike the other two examples that we added, a dark pencil at the end, I'm going to use the dark pencil at the beginning to know where I have the debt. And there are the shadows. Then I'm going to start using the yellow after I'm done with this part. So gradually from the line at more pressure, then Benny go away from the line less pressure. Alright, let's zoom in a little so you can see how it's been done. Starting with light yellow glaze and also a mixture of cadmium yellow later dark chrome yellow truck cutter will not brown and sepia. We will create three different examples. So you will see satin brushed and Hammer example on these ones. And learn how to do the extract textures on your drawings. Now you will see how we are going to use the previous examples on these funds and the same effect in use and learn the previous squares. I'm going to use them on this design. Now I'm using cadmium yellow in the middle, going around the concave shape. And then we are using the dot chrome yellow, which looks like orange. Now on the sides, the corner, the edge, use the same color. Please start repeating here so you can practice together. Then after this, I'm going to use Track, which looks like dark orange or a very light brown and mixture of those two. I get the color how it looks like. A little, we're just layering, burnishing. So the texture of the paper is untouched yet so much as layer one I can add here. Can see I go even a little more inside and then start adding darker colors, which is formal brown. You can see where I'm putting more pressure and putting less pressure. I'm going to complete the cast shadow around our shape. And then now you're seeing this part without the misspeak. So you can see how slowly going around it. And I take my time when I need to. So again, a little more speed and complete in the cast shadows. After we are done with that black color, I'm going to add another layer with lighter brown. I'm going to use light yellow glaze, cadmium yellow, and dark chrome yellow again to add the last layer before bringing the textures. Our shapes. Not going to go into the middle highlights, which is the white dust of our paper. Kinda let them be. Now if you're done, I'm going to start from the right side and then start adding the textures. Here. I'm going to add hammered textures which harm had finishes are used in the production of trays, way says, and other handmade objects. If you look around, you can find hammered textures around you. This technique also allows to decorate external surfaces with a finish objects. So as you can see, I'm drawing irregular circles on the surface. And then I'm going to color them the darker colors. But next to the lines, to ERA velar circles lines, I'm going to add more pressure, darker colors. Then I go inside less pressure to create depth, as you can see. So this is an example of Polish metals. As you can see. We are done with the first example when it comes to your own practice and as much as irregular circles as you want and the way you wanted to. So that depends on your imagination. Now if you're going to the second example, which is called brushed. Brushed means to achieve brush effect, of course, draws small groups of marks. It can be horizontal or vertical marks in multiple directions. Then you can add a group for parallel marks as well. Defects looks like a fabric. Also for a thicker brush effect, use crosshatching to add density. I'm doing a small marks off crosshatching. So it might not really show it, but they're very, very tiny lines which they actually cross each other. So I'm going to the third effect which is called Satin I'm going to apply first layer in different shadings. Didn't add a Satin finish with darker pencil. We need to use lighter strokes, small sudden lines. It can be any direction you want in a brighter area and heavier strokes in the darker areas. So please have a look how it has been done. And then I'm going to add the last cast shadow on the sides. Darker pencil next to the line and the less pressure. But I'm going out, have learned this technique. Then I'm going to of course add the brush. You're almost done with this effect. So we can start our next section, which going to use all the squares and effects in a real design. So I hope you're full of energy. Because the next section I want you to start right away and start using old this that we've learn today. And repeat after me on your paper and have your pencils ready. All right, so let's move to the next session and see you soon.
7. Layering, Color Mix and Design 3: Hi everyone, Welcome back. In the last two episodes, you've learn about all the techniques and the textures we are going to use for today's design. Once we are going to learn, we are going to learn how to implement everything that we have learned so far and create a necklace. So we'd almost square shapes design. I'm going to draw a curvy line. Then I'm going to add square shapes that almost looks like concave on it. You can see and follow after. I'm done with drawing the lines. If it's too fast for you, you can pause the video and repeat after me. Therefore, if we are going to spend the next few minutes drawing this part before applying all the textures. So please have a look. When it comes to the end and the beginning part of the necklace, I would like to draw a shape. That shape that I'm drawing is in my imagination. So if you would like to draw any other shape, which this one looks like a duck. If you want to draw any other shape or it doesn't even have to be animal, you can do that as well. So try to use your imagination. Also, If you want to follow these, please do so. So we can start applying the colors. The first layer the shape is almost finished. Now after this we have to go on it again, To make it bolder. You don't have to do it at all just because I want you guys to have a better look and how it looks like I'm bolding the lines. So you can leave it be and you don't need to make it this much visible. Actually, that might be better when it comes to drawing. If it was graphite pencil i wouldve asked you to make it less visible because if it's graphite pencil its not good to be that visible under our color pencil. Now's the time to make it looks like 3D, some adding a parallel line on the sides. You can see how it's been done. And the Corner. This is my personal preference. How and where I'm adding. It can be yours as well, you can it means like you can add your own preference of 3D design. And where lines should be. Now I'm going to start adding the details like the chain and how this necklace can be connected together. This part, please follow what I'm doing. Since I haven't taught you yet how to draw the chains, Now's a good time to see and follow the hand movements and the lines. You can see I'm drawing different circles and ovals that they're being connected together. Now a very thin line for the chain. So as you can see here, I decided to shape the eye of the dog and also make it into a chain as well. All these things can be your creativity. It can be the tail of the dog, or it can be something else like a hair. However you want to connect them together. That depends on you. Make sure the size of the chain, they're almost the same. Doesn't have to be exactly the same, but it's good to look nice on your paper. Now I'm just getting rid of any extra lines so it won't be a hassle later when I'm drawing. And there will be too many extra lines that it doesn't need to be there. I'm just adding the circles that is going to connect in between the squares together. The first one is done. now im going to do connects these two as well. Even I'm still deciding it will be on chain, or I'm going to connect them with additional details. If you repeat after me exactly at the time that you are watching it, it will be very easy for you. And then you can see how you can create something, a design very beautifully and very easily on your first try. So here I was not planning to add a pare, but because the gap between the squares with too much. So I decided to add a circle shape. Which later is going to look like Maybe a pare. So now's the time to use all these effects that we learn on the actual design. I'm going to save each colors exactly where I'm going to use. Therefore, I've written all the colors that you see on this design. So please have a look what colors is going to use. I'm just going to name the colors in an easy way, like yellow, orange color, or dark brown. Because you might have a different pencil brand and it depends on you what pencils you are going to use on this design. For the first piece, I'm going to use the techniques that we learned in the first episode of this section. If you remember, if we have five squares that you can see on this screen So I'm going to use one of them and apply it here. Just follow my hand movements from dark color, more pressure I made to light pressure. In the middle, I'm using the highlights and on the corners as you can see I'm using darker colors, then going on the sides and on the lines, the parallel lines that if you recall, I drew them to make it 3D. Now you can see is becoming more like a shape. The same shadow on the surface. Now, for this part, you can place it anywhere you want, depending on you and how you want it to look like. Now for this part, I didn't add too much pressure, the pencil, barely touching the surface. So now I'm adding the pressure. And then for the first layer, more pressure. I'm doing it this way because I don't want to damage the texture of the paper, which we call it tooth of the paper. And down the sides I'm going to use the white pencil, which here I know I told you I'm not going to use Faber Castell that much for blending and burnishing, but I did use it to see how it's going to looks like. Its better to use either Prismacolor or Caran d'ache for burnishing and highlights with white. Now adding more black near the lines to make it more visible. Now this is blending and layering different colors together. So if you are repeating now, following my hand movements and this practice right now, it is fast for you as I mentioned, please pause the video, finish the surface, and then again start watching again. So going through the chain and put more pressure on the circle parts. You can see how gently the pencil is touching the Paper in order not to bring too much color onto it. Now moving onto the next part, Let's use the same range of colors, maybe orange, depending on what colors you have. If you have oak or different yellows, use it here. Now, this point, It all depends on how much pressure you will bring. Bring more pressure, less pressure, and keep layering it. This is amazing for your practice and achieving more realistic results in the future on your drawings. Change the pencil to lighter color, which is more yellow here. And then I'm not bringing the same pressure on every parts. I'm just bringing more pressure, less pressure, as you can see in this example, after another digital point, So you can see the different layers and different shading you can use, and different colors you can use here, maybe from yellow to black. And the textures that I taught you in the previous episode that I'm going to bring here as well. You can see it on this example. In the meantime, please also check out the assignments and their PDFs because you're going to find out all these designs and more information on those attached to this course. Now back to the design I decided to use for reddish pencil layers on this design, on this part. So you can't see it stands out more. If want to use, for instance, brown or any other color. Or even it can be cold colors like blue and green. You can do that, but it's going to change the color range. If you use blue or green, start going to be this bright and this obvious, it's going to be more gloomy. So make sure you know the color chart, you know what kind of colors you want to mix before, maybe try them before actually applying them on your design. Now you can't see, I'm going to apply the textures that you learned in the previous episode. You can't see it actually on those four examples above. So now I'm just creating different strokes. It can be either horizontal or vertical, depends on you and how you're doing it. So after we are done with the strokes, I'm going to go on and again with same pencil, maybe you can use yellow or red. So it will be less wrong. It will look more mature. And then we're going to use the dark color pencil, such as brown, sepia or black to create the shadow. I'm using black here, going round our shapes. And then you can use brush on it. So when we are applying the cast shadow, the amount that you're going to create, draw. It depends on you. It depends on the sun and how far you want to go with it. On the left example, the last shape, I'm going to show you two slides. I'm going to make it bigger, one, which is different than this one. And you can see what I mean by a bigger shadow. So now let's draw a different cast shadow. As I mentioned, that I'm going to show it to you. Followed by hand movements when you are practicing right now. Create the shape almost the same shape as what you have. The similarity should be almost the same. Go on at very smoothly covered the surface of the cast shadow. So this part, it can be bigger. It can actually be in a different place depending, as I mentioned to you, depending on where it should be and how you see the light is coming towards this shape. So make sure when near the lie, you use more force or pressure. And then when you go further away less pressure, as you can see on this example. So now I'm going to go on if it's a brush just to spread the pencil. You can do this with the stump blending as well. I'm going to introduce the materials at the end of the course and you can find it's also on PDFs and download it. So now we're almost done with this part and go on the chain. We're going to move on to the next example. I'm going to do the first, second layer. After I layered the pencils, I'm going to use one of the textures that we learned in the previous episodes which would be hammered. They are irregular circles that can be done and drawn on this example. If you want, you can use any of the examples that we learned in the previous episode. You can use the diamond shapes or the fabric textures or even The second example, if you want. Now please have a look how we are mixing the colors how we are, putting the layers, leaving the highlights alone. I'm going to make the highlights and bring the white or cream and mix them together. You can even use less pressure. It doesn't have to be lighter colors. It's easier if is lighter color, but if we don't want to use that or if you don't have it, just reduce the pressure on your hand. So as we have graininess on our paper, you have to use few layers to get rid of those graininess. So always remember this rule. When you are near the lines, use darker colors, more pressure to create the dimensional feeling on your shapes. All right, now we are doing the second layer. I'm not using a lot of pressure just to let you know. Keeping the highlights on the right side using white color. Now I'm going to start drawing the irregular shapes, Irregular circles on it. However you want to do that, you don't have to exactly follow these ones. So when I see your assignments, when you submit them here, I want to see how you came up with your own shapes and designs. So again, following the rule that I told you, near the lies, Let's add more pressure. When we're going through the circles. Have a look how it's been done. It should not be completely around the circle. One side of it should be darker, and the other ones are going toward the other side, less dark. For instance, here, you can see from the right side to the left side, the color is changing. So at two layers on each, have a look. This time is from left to right. I'm adding more pressure to less pressure. So what we're going to continue doing this to fill up all the circles. So while I'm going through all these irregular circles, I want to let you know that practicing with color pencils are the most important parts. This design and everything you're going to learn, they're very easy. And all the techniques you're going to learn in this course is mainly about your efforts and patience. And how much you practice. Just bear in mind color pencils are very slow mediums and needs to put more effort, more and more effort, Of course. But when you finish a piece of artwork that is done with colored pencil is very rewarding. Also we are going through and lots of examples in this course from all the shapes and forms that you gotta learn, which are very important because if he knew more about shapes, forms, and how to draw them, what are their techniques and how to apply the techniques on those shapes. You can come up with any design, with any kind of drawings and apply the techniques that you have Nan, for instance, onto realistic drawing, onto cartoons. Depending on your preference, you can use them on what kind of drawings you like. This is a simple example of what I mean. It very simple circles. You're coming up, you're practicing a very interesting design right now. For instance, all these shapes, they are very basic shapes of a square. And you adding different textures, different layering, different colors. You're coming up with a very beautiful, intriguing design, a necklace. So I'm really looking forward to see how you're going to change this necklace and how you're going to finish it at the end. Now I'm gonna make sure the darkness inside the circles on the sides, there are enough. Then, We're going to apply the shadow on the third square. Because our first example is in the middle. The shadow should be on both sides, as you can see on our lines, a black pencil on both sides of the shape and also on the top part. So just go on it with a brush and complete this cast shadow and this, For the first example, we're going to do something different that we have done before. I'm going to apply different patterns. And I want you to apply either the same example or come up with your own patterns as you can not do it. In a minute, you're going to see, and I hope you're going to follow it and do it at the same time you are watching this screen. I'm just making sure we have enough cast shadow. And also let's make sure we are not going to forget how to connect these shapes together, to connect this jewelry and chains. So don't fall apart. Just simply going on day circles. And the line I draw there, it darker color, darker pencil color. So we're going to move to the fourth example. by now we know how we should do these examples and why we are going around them with the darkest colors and of course it is our shadows. Now I'm going to start drawing the pattern. This one you haven't learned in the previous examples. So please pay attention, how are we going to draw a symmetric shape or shapes on this ones? This one is called enamel work. Tell you more a little about enamel. Enamoly is the art of fusion glass onto metal under high heat conditions to create colorful designs. As you can see, this one is going to be very colorful. I'm going to use different colors, like red, green, orange, and mix. It looks like very nice and very bright. So depending on the compensation of the glass, enamel can be transparent or opaque. You can use, like for instance, silver or gold. Iron and steel are the usual foundations to reach. Enamels are applied. Through the years and variety of enamel and techniques has been developed from the colored metal or embedded across the glass forms. The process is quite complex. The real ones. I'm not talking about the drawing for us. But when you're doing the real enamel works, they really need a lot of skills and experience to do it. Also, when I'm teaching the physical classes, when I'm teaching glass painting. And lots of students use Different colors, different versions to bring this on it. And it's very interesting when they actually applied on glass. So I'm going to complete the shape now. The right side and the left side, they're both the same, almost symmetry. So again, you can follow this design. And also I'm going to attach this design on the PDF at the end of the course. So you can actually download it or print it out and practice on that. If you printed it out and draw on it, it might actually help you with drawings and your practice. So after you're done, please have a look at those and see if you want to print it out and actually coloring it. So now let's start with the red color that we have. It can be cadmium red or any kind of red that you have in your color pencils I'll say it doesn't have be red actually. So depending on you and what kind of pencils you have, please start coloring this part. So let's be make sure of the pressure and how much pressure you bringing that near the lines, more pressure and then further away from the lines less pressure as you've learned in the previous three example. I'm just adding extra details. Since it depends like if I feel like it needs to be there, it's going to make some more beautiful. That's why I'm adding more details while drawing. Please have a look at the rest of this example and also starts repeating after that and practice this part. It will really help you for the rest of the assignments that you have on the PDF. So also, make sure you check out the PDFs and assignments at the end. And as I'm always online to check and see your progress through the course. As I'm finishing this example, you can see how it's been colored. Therefore, if you remember at the beginning of the course, I mentioned, there will be other talks and topics I'm going to cover during this course. Which of course we can then start those topics as well. The topic today that I'm gonna talk, and I believe it's a very important topic, is how to be a self-taught artists. Maybe some of you taking the course as hobby or some of you already are teachers and wants to learn a new medium. And some of you just wants to do it to see if you want to progress more or you're trying it out as a new media. Anyhow, it's good to know how you can be a self-taught artists. So I'm going to talk about that more right now. So now as I'm completing this bar, you can see how I'm using different pencils and a combination of different colors. I see remember at the beginning of the course, I mentioned during some of the examples, I'm going to talk about different topics. So today's topic going to be able to how to be a self-taught artists. Some of you might be an artist and all teacher or took this course as a hobby. Whatever it is, it's good to know some of these details being a self-taught artists and take this more seriously. The first question is, should we consider art school? I myself didn't graduate from an art Major. I did graduate from art school in which for my master degree, I studied art business and for my PhD as art philosophy. However, if you want to be a self-taught artists, there are few things we should consider. Mainly is about what mediums you are going to focus on. Are you going to focus on different mediums or is going to be one medium? First things first, I have to tell you that you should know the rules for us, then break them on purpose. So when it comes to art, we have different ways of doing it like realistic drawings, abstract, or it can be in sculpture. But when you are doing it is better to know the rules that techniques. And then on purpose you're going to break down. However, it's important to have an understanding of the rules and techniches. So we can start with having an art curriculum and a structure to keep on track as a self-taught artist. If you want to seriously consider art and you want to do more than usual or hobby, there are many ways to learn on yourself and practice better. I'm going to go through different numbers. Number 1, if we are still at school, try to take advantage of your art classes is very important. And you can take advanced art courses in high school as well. Also a lot of Art University offfer short courses like Figure Drawing, oil painting, and digital art classes. which you can participate. Or there are many affordable local communities art classes which you can take. And they are not official art schools, but they're being taught by professional art teachers in different mediums. I myself had helped so many of these classes over the years. And it has so many students coming into my art classes, either for one single session plan or sign up for like bundle 5, 10, or even yearly classes. Number 2 is online art courses. One of the best way to improve your art in different mediums is to go on internet and find so many free tutorials, either on our art website, YouTube channels. And if you want to go further and to have complete and comprehensive understanding of art techniques, you can purchase those as well. The next option would be books and e-books, which they are still very effective and very affordable as well. The next one who did the most important point of how to be self-taught artists is to simply paint or draw, then you need to buy your art supplies. Don't overwhelm yourself and go over your budget to buy our supplies when you just started to learn drawing, painting. But it's important to remember not to have lack of art supplies as well. At the beginning of your art practice, you need to explore and learn more until you find out the best way for yourself and your art. By limiting your art supplies, you might get discouraged to do less art because your artworks are not good enough, because you didn't have to write or enough supplies. So what you need to know search before you apply your art supplies. There are a lot of reviews and comparison between different brands of supplies that you can learn from them. If your medium is colored pencils such as this course, search about different brands such as Faber-Castell, Darwent, Prismacolor or Caran d'Ache and read the reviews, looking at YouTube videos and see even an artist using a specific expensive brand and how their artworks comes out. Remember not to compare your art to them. So by taking this course, you're actually learning about these brands and you will be able to see how they are in different examples during this course and compare them. There will be lots of examples in the future episodes. So when it comes to other mediums such as oil painting, watercolor, and other mediums. You can go through different examples, different artists. They're YouTube's, their courses and see and compare how they are. And then you can choose the best for you. So I hope you enjoyed this topic, which was about self-taught artists. And we'll talk more about artist topics, but going back to this design and what we are doing. Now for the fifth example, I'm good to draw two convex rectangular shapes, one smaller and one bigger due to the size of the square surface. And then I'm going to start coloring it with yellow color, as you can see on the screen. So it starts on the sides. And then I'm going to leave the middle section like BMT, the white color of the paper. So if you have the actual highlights without adding white pencil, now I'm going to go on both sides with an orange color, which is going to be the second layer. As you can see, the pencil gently touching the paper because I don't want the second layer really damage the tooth of the paper. So if later we want to bring more layers on top of it, it will be easier. So it means I'm not going to burnish this part. On the right side, I drew two lines. First, I drew the orange line than on it. You're going to use are either sepia or darker brown. And then bring out the highlight in a dark gray. And underneath this, create the shadow and then go on into the brush. After this, we are going to repeat the process. This part depends on you. If you want to have a dark shadow or a light shadow to make it darker. I didn't hint of black, just a line there. Now adding the third layer with the orange. As you can see, that orange in fabric castle, a dark chrome yellow. So for this part, I'm actually using light yellow glaze, cadmium yellow, dark chrome yellow, terracotta, wall, not brown and sepia. While not brown and said, Yeah, they're almost in the same range of colors, which is brown. So if you want a very dark brown which is close to black, you sepia. And if you want a lighter brown, US will not brown. For this one, I'm going to use the same color range. However, I'm going to add more gray into it. I'm going to use cadmium yellow, dark cadmium yellow, also cream, burnt sienna, white for the highlight in the middle. The cadmium orange tractor. Cadmium red, also orange, light green, cold gray one called great free and orange glaze. And then all this, they come together by layering. See how careful I am and I go into the highlight in the middle with the cold gray. And then with the lighter coat gray, I'm going to go in the middle. This is almost like burnishing. So with light colors, either do our y's cream like cold gray one called Grade tool. You can actually burnish. Go on. It's been slot, you go on the layers, then you make it a smooth. Now I'm going to repeat the process for the shadow as I did in the previous one. Adding dark layers with sepia and also hint of black. Then I go with brush. If you don't have brush, no worries, you can actually burnish it with more darker color. Or if you don't want it to look that dark, you can use lighter colors and burnish it out. This part, if you see I'm just adding details now if it dark colors going around the shapes, around our convex shapes. After this, with the orange color, I'm going to go. And color the background. Can also start from the background and then the shapes. This is easier because he know what colors you have and how it looks like the detailed powers in the middle. Then you can easily go around them and color it. So I suggest you first do the same thing as I did here, and then color the background for this specific square. I mean, gradually start with a darker color next to the line. Then lift the pressure when you go more inside. Changing the color to a lighter color, maybe yellow chrome. So as I mentioned for the background going to use cadmium yellow, dark cadmium yellow, and cadmium orange. Maybe a hint of cadmium red as well for the highlights. Then for the edges as if you remember in the previous episodes you saw even you can see it in the above examples. We can add those hint of darkness with sepia or what Walmart brown. Making it stand out. This part is depends on your preference. The ray at the Highland Umberto I added, I'm adding it exactly in the middle. If you've won for enzyme, you can add it a tiny line. Also more to the right or more to the left. Also for your practice, is good that you start with this practice and follow what I'm doing. As I mentioned, always had a piece of paper and your colors in front of you. So it doesn't matter if they are not this exact range of colors, any colors you have. Mainly we're talking about being a self artist, self-taught artists. I told you about having sufficient amount of art supplies. So that means you don't have to go over budget. And also if you have a certain brand, just keep using it, practice fit it. That lack of supplies should not really discourage you because it absolutely does not matter. It matters if you practice and follow the techniques that you're learning in this course. So we did brush for instant because I have other course, I have another course on Udemy and that's really, it really matters what's found out bronchi use because it's very realistic charcoal drawing and shading. But for this one, you don't have to use specific brush. So whatever brush you have or even you can make that if you don't have brought on you don't want to buy. So if you wrote papers, have a piece of paper, roll it and make it sharp. Did the T part make it sharp, didn't. You can go on the dark pencils and shady. That's another tip I can give you for the shading parts. I keep continue going around this example. Just because I don't want to spend more time on the shadow. That's why am I using more brush here. Now it's time to go around the PR. If you remember, I told you I just edited on. I didn't actually expect to add any kind of circle shape in our jewelry. It happened because the gap was too wide. So I decided to add something there. First. It starts with the dark bars, then go on it. I think few layers from orange to yellow. Then again, you're going to go between the lines, between the yellow and the orange line, try to eliminate that lives with layers. Then actually layering and burnishing with white or cream pencil to make so it looks like more three-dimensional. Then we're going to complete the chain part after this. And then of course the last example. So now we are going through the chain and the circle part, that rope actually goes in and out and connect these parts together. To simply add the colors. You don't have to do much. Slack coloring, get going with the darker pencil that you have. Makes you stand out. For Good last example, it's almost going to look like the first example that we did. I decided these two parts going to look the same because as the beginning and the end part, which actually this is a dog and animal design. So it's good that you begin and end with the same texture, with the same kind of feeling. So if you want to have another picture, another design on this, please do, sir. I'm looking forward to Sierra assignments, and as I mentioned before, I'm always online to see all your works, to comment on those and we could progress together. Any questions you have or you want to more details about this part, please message me and I'm always there to answer you. And actually guide you throughout the whole process, throughout the whole course. Simply learned this before, just layering with the dark orange to delight our part. Then adding the Walmart brown or actually darker brown in the middle for the dark highlight. And they're reduced the pressure when you go around this line. As you can see how I'm doing it now. Using a brush is because I'm using the brush. It doesn't mean that you have to use brush. You can use actually white collar, white pencil color here to get rid of the graininess, that part. Adding more layers. In the next episode, you're going to learn more about other forms and shapes, how you can connect them together, how to create more designs and actually come up with realistic drawing techniques. So oldest since they come together and then teach you all the techniques that you need to know in color pencils. So with patients, it's practice. With more effort. You're going to complete this course and even to come up with amazing practice, amazing drawings and the drug own concept drawings at the end, which is the best part in my opinion. So this is the last part of the layering. And after I finished it last example, I'm going to go through the rest of the row, which you can't see on the sides. For this part, I'll go into complete the cast shadow for the last piece while I'm doing this and you're looking at the screen and of course practicing after this, practicing while watching. I'm going to tell you a little more about the self-taught artists and the topic that's actually covered in the middle of this episode. So the last topic can be, what should I paint? What should I draw? Today you learned that with very simple squares, with simple designs, you can come up with a complete neoformans shapes and create actually France as a jewellery here. So this can be anything. So the question is like, what should I paint? For instance? This point goes back to how to get inspired, but before that, you need the skills and the techniques. Paint a briefing. And don't limit yourself or draw everything. And don't limit yourself. Just because your friends as you love portrait, doesn't mean you should not learn landscape and animals or vice versa. You don't have to start painting or drawing realistic. Maybe try abstract and get yourself familiar with the canvas or the paper. The materials pencils or the oils, paintings and the surface of the colors, mixing colors and all these things around it. So the best thing is to get yourself familiar with all the materials that you have tried them out. Don't be scared. Did you just try everything out that you have. Of course, practice makes perfect and thus actually is true. In the next episode, we're going to focus more on techniques rather than just designing a couple with different forms and shapes. So we will go through different nine mixing techniques, which will cover also pastels. So it was color, pencil drawing and also a mixture of pencil drawing and pencil. Pencil graphite, shading the charcoal, and also a combination all these things together. If you know the techniques and if you think you're comfortable with the colorful techniques, you can skip the next episode. But I advise you at least watch it one time, even if your experience and even if you're familiar with this technique and you'll want to go more forward, go to the design parts sooner. I still advise you to watch it and then compare it with what she know. Then we can move on to the next section. So as you saw here, after I draw down a rope, I went next to it, maybe a little further away to the right and left with a gray color. And then added it, which is the shadow part. And that actually going to makes it looks like three-dimensional. Have a look how it looks like. You're almost done with this part, and we are almost done with this design. I hope you enjoyed it practice this part. I'm looking forward to receiving all your practice and assignments and see you in the next episode. So good luck and bye-bye.
8. 9 Pencil and Color Pencil Mixing Techniques: Hi everyone. Welcome back to another episode of drawing and design color pencil course you have already learned different techniques of colored pencil in the previous episode and also who started to practice how simply to turn those techniques into a design. However, today we are good to learn a combination of mixing techniques with different materials and tools. Before I summarize what we've learned today, please have a look at this page presenting colored pencil pressure. We have already used these techniques in their previous episode and examples. But just to review again, we have different pencil pressure, light pressure, medium pressure, and heavy pressure. So whenever in the course, I tell you to use less pressure and gradually add more pressure with your pencils. You can see here how it looks like and how it works. So you can actually follow this progress. Moving on, I have drawn you five different colored pencil techniques on the right side that you can see which you can use in your examples as well. First, stippling lots of small dots. This technique needs lots of time and patience, since you need to use a lot of small dots in your drawing, that means all the drawings is going to be like small dots. Next one is Hachure, which is the French word of hatching, and also cross hatching. You can see the examples what hatching and crosshatching it means, moving onto the next one we have back and forth strokes for the squares in any direction you want. Next one is scumbling, involves making continuous circular marks on your paper without lifting your pencil. This is another good way to fill in different areas with lots of color we use and lots of circular motion, different combination back and forth, square, In this course. You use these techniques and blend them a few colored pencil layer and create different textures on your paper. So this is one of the main techniques we're going to use in this course. So now moving on to the drawing part, you are good to learn to draw nine squares. First of all, the size of the main square is 15 x 15 centimeter. Then we need to divide them into three equal squares. Each of them would be five centimeter, please, while watching, followed this part, have your paper and pencil so you can draw an accurate one as well. If you zoom in, you can see I started dividing them each line, 5 and 10. So go through all of the lines, divide them equally. Then I'm going to connect the lines together, And then the other side. Don't forget to connect the lines equally. So if we're almost done, the next part is again, to divide each line. And each square into 4.5 centimeter and the numbers would not change at all. So please have a look. I'm going to go through 4.5 and then connect the lines. Then 4. If you follow as you do, it will be very easy. But if you want to practice this part, and then after watching this, you might get confused. So it wouldn't be accurate as this one. So again, 4.5, the numbers can change according to your own style as well. And if you don't want it to be 15 by 15 and you wanted to be different, Of course that's your decision. Just make sure they're all equally divided. Now we are done with this part as well. Now for this part, please have a look how I'm going to divide the squares and repeat after me onto your paper. For this you, only need one ruler and one normal HB graphite pencil. It doesn't have to be special pencil. So whatever you have at home, you can use that. For the centre, we go both sides. And therefore this part out divided by 0.5 or one centimeter from each side. Go in between. And then make sure the rest of the three squares are the same as well, you can see on the screen. So now we are done with the drawing part. We are going to start techniques and going through each of them together. The first one, I'm going to use forward Faber Castell Polychromos, blue, violet and dark indigo. And a combination of these two, from heavy pressure to light pressure, as we learned at the beginning of this episode. So please look at my hand movements, how slowly I'm going to go with one pencil from the edge towards the top part. When you are using one pencil at one time, from dark to light, you can create one layer, its better not to damage your paper, the tooth of your paper, and use sharp pencils to have less graininess. As you can see on the screen. You don't have to start something new from the edge part, the bottom part, and then from the top part. So it depends on your own style. But since I want to do this gradually, I'm going to put more pressure on the pencil. And then you can see from I'm using circular motion right now. Let's have a look at the screen, the very normal speed. We can see how slowly I'm going through the paper. Don't ever rush colored pencils. Like you have to move very slowly, especially your wrist. And then look at the circular movements. So the pressure on bringing in not that much. Now I'm going to go on a little faster. I change the direction of my pencil. More crosshatching now as you can see. So if you want to keep doing circular motion, please do so. And then if you're going to do in one direction, you can do it as well. And also the way i did it I added a little texture which was cross hashing, as I mentioned, or cross hachure. Have a look. This how you do the cross hachure. Now I'm going to repeat the process. So I'm going to repeat the process for the left part as well, it the same amount of pressure. And then gradually I'm going to do for the pressure, for the lines to give it a darker feeling. I'm going to use dark indigo, just very small amount because I just want you to see how only one pencil with one layer looks like. And of course the grain. And of course the graininess of the paper, which we didn't do, burnish or blend a lot. So that's how we added the dark indigo. And then from here, I'm going to gradually add the darkness, I'm bringing more pressure. Even when you're doing this part. Make sure those lines doesn't stay unless you want to. And the texture of your drawing requires that. I'm just trying to make sure there are not too much lines Stay. Have a look even if you do that in the middle of your drawing and then gradually you connect them, the lines will not show up. Then I'm doing the cross hatching. And then repeat one more layer. Now let's look at it with normal speed. It would be great if you could repeat after me and fill up all the squares and practice them here at the same time. That's the last cross hatching that I did for this example. I cannot call this the third layer. I'm just going on the second layer to make sure. Everything's fine. So add the dark indigo to make it stand out. To make a three-dimensional. Great, Now we are done with this example. If you wanted to choose any other color for the first example, please do so. Now moving to the second one, this use to color fuchsia, pink madder lake, magenta, and also white for burnishing. For this part, I'm going to use Faber Castell white. They're all Faber Castle polychromos brand. However, for this brand, if you remember in the previous episode, I mentioned here that Faber Castell, why it is not a good vanishing. And you will see here that is not going to take away the graininess that much. But I will show it to you how it looks on video so you can see an example and for your experience, so you don't have to try it yourself if you don't want it or actually feel like this is the right pencil for you. Please look at the screen. I'm going to combine two techniques that have been learned at the beginning of this episode, back-and-forth strokes and scumbling, which is circular motion techniques. I'm going combine them. Also combine two pencil colors before adding the dark pink underlines. I'm bringing a lot of pressure here, especially at the beginning, wrote the most pressure. And gradually I lift the pressure. So now you can't see but a normal speed. Adding the second layer for there. Now you can't see how it's going to blend better. Adding this much pressure is going to take away the white spots, the graininess of the paper. And then I'm going to add the third layer and burnish the bottom part and gradually go to the top. And create the cross hatching technique on this one as well. Keep repeating this part the same way you are looking. And then after this, I'm going to start to use in the white pencil to burnish apart. This is white Faber Castell polychromos. Have a look how it doesn't have that much effect. We can see how it's blending. It is doing the job but not as good as prismacolor is that we'll do better burnishing, which you will see in the next episodes. Going to finish this part. I'm at a maximum pressure here. I'll go into slow down the speed so you can have a look. Now with pink matter lake, I'm going to add the second layer. As you have learned in the previous episodes is called layering, which is mixing two colored pencil together. You can also mix one color of pencil together that means you add one layer. Then you add the second layer and third layer until you are happy. Now you're going to burnish the surface. Now moving onto the sides part's the same technique just next to the line. I added more on darker color, as you can see now. You see I'm not going to add this color to all the parts, just next to the lines. So one thing you saw on the right part, I first created the light layer and then gradually added the darker layers, which you can see here. And add burnishing with white pencil. Now going to add the dark layer for this part, do not bring too much color. Just gradually bring the dark pencil, the darker pencil brushes here dark red. But if it's not too much pressure, easily you can erase it. So this part is one of my favorite parts because not so many other teachers going to teach you this technique or they're going to use it. This is a combination of pastel and pencil. So easily I'm going to use. Two different colored pastels. It's orange and yellow pastels. With a cutter, I'm going to create the powder and a bit of simple brush and whatever brush it is, it doesn't matter. You can spread the powder onto the surface. But here, be careful because for this specific example, I put two different colors on the surface. You can put only one. So it will be easier for you. But if you wanna do it faster and you're confident you're not going to mix the colors too much together. Please repeat after this example. After you spread the powder the way you are seeing on the screen, please blow it away, If you do your mouth, don't touch it with your hands or tried to cleaning it with your hands because both your hands and also the paper's going to get very messy and dirty. And you don't want to have that around your papers because you need to use a lot of eraser. Now I'm going to add the pastel directly onto the paper, not with powder. You can see how it's going to look like. So it's going to create more shade. And then I'm going to continue this a few more times, because his soft pastel, so it's not that strong. This means, You need to add the pastel few more times. As this is Faber Castle soft pastels, a pack of 24 as you saw few seconds ago. Now let's add a little darker passages. Dark brown or oak. And then blended into the light pastels. So if you want to do more, a few more layers is going to look darker. Again, that depends on you. And guys, if you don't have pastels for this course, that does not matter. We are not going to use that much pastels for this course. It will be a combination of the techniques that you can easily, instead of pastel, use a layer of color pencil, for instance, for this part, if I wanted, I could have used pencil and use brush on it. As you have seen in the previous episode with the necklace example how I use pencil and also I use brush on it. So for the first example, we are going through a few different mixing techniques. First, like previously square, I'm going to use the pastel powder on it. And then with the brush, just going to blend it on surface. And then I'm going to use the pencil on it. So it's a mixture of pastel and pencil. And then I'm going to teach you how to burnish it, without the speed. This try different range of blue colors from dark to light. I'm going to show you if you don't want to add the powder, pastel powder, directly to your surface, for example, how we can do it. You can have it on the side, on a plate, then gradually with your brush added to the surface. Now if you're going to add the light blue. So it's going to start from dark blue, gradually going to go to the light blue. Now with Faber Castell, polychromos, cobalt blue, greenish blue, greenish light fallow blue. I'm going to complete this example and also burnish it. First I'm going to do layering and then burnishing of course. Have a look how it's going to be done. And this part, because it's going to be burnish, this means the maximum pressure you can bring onto your surface. Now you know how it's been done. We can speed the drawing and go through it. There is a point in this example that you have to notice and the pencils are not sharp. That's why you will not have a perfect surface. And therefore be a little graininess, the whiteness of the surface will stay there. So please have a look at this part. Now moving to the next part, slowly, we're gonna go through the lines adding darker colors. And then start with light pressure. Here I'm using light fallow blue now. The previous one was cobalt blue, greenish. layering it now, I look forward to see your practice and assignments when you send me. So I could see what kind of colors you use and how many textures you use here. If you have changed the use different colored brands, such as Prismacolor, Caran d'Ache, even Derwent. And also we do have normal pencils that you can't buy much cheaper than these brands that I mentioned. Now moving on to the next example, if you have done my other classes, online classes, which is about realistic drawing and shading techniques on human features. You should be familiar with this technique. This technique is mainly about shading with charcoal pencil or conte pencil, which You can see how I'm using it. I start from the middle, gradually add more pencil on the surface. And this is very raw. So I need to use brush on it. Slowly. I'm going to use the brush and shape This space, i will shape the whole surface now, as you can see how it's been done. So if you can combine this technique bit color pencils in your drive and created side that will be very beautiful. We will have this technique in this course, which you can see in fabric section when you're learning about fabrics and different textures on a combination of these techniques. So you will get more familiar but for now, I want you to have a look how this work is done. Gradually, I'm going to add more layers of charcoal. And then I'm going to use a bigger brush to blend more. The brown I'm using is called Conte a Paris, either 2B or 3B. Let's spread the charcoal and entire surface. Like the colored pencil example, from dark to light. You can't see how gradually and reducing the pressure, with heavy pressure and light pressure, and of course, the mid tones. You can create a very, very interesting three-dimensional example here. Now in a circular motion, like how we learned with pencil, the color pencil, I'm going to use it with rbush as well. And then for the last part, I'm just going to make sure the lines showing and then go on. And again. This is the last part. Before we move on to the next example. For this part, I'm going to use to be graphite pencil, hatching and crosshatching. Quickly, I'm going to go through the example. Because of the lighting of the studio. This section, this example didn't come out as dark edges should be quick. This is much darker. Now slowly and without any speed. How I look at my hand movements. After the long stroke. On this example, I started adding smallest strokes. And then gradually I'm going to put more pressure. And this part that you're seeing, It's very easy. Then you start adding layers and layers. So if you want to add different textures, different ways of drawing. I have attached an example on the left side of the screen. As you can see, there are so many ways with pencil, with your graphite pencil, you can add the textures on this specific example. So have a look. And if you can, for the assignments, please add these textures onto the squares and then submit them online. So now you have a look, how I'm going to complete this example. If you want to know more about graphite pencil, charcoal pencils, and please have a look at the other course that I mentioned earlier, which is about realistic drawing and shading. It will cover all this techniques that you need to know with pencils, graphite pencils, charcoal pencils, bursh, and how to create a realistic drawing and shading. Mainly focusing on portrait, but also in that course, all the techniques that you will learn, you can apply it in other topics such as landscape, still life, and so on. So we are almost done with this example. And we can move on to the next one after we added few more layers. For the next example, I'm going to use Derwent colorsoft, and I'm going go through it. Different color version from the only other examples, going to use, actually green. So for Derwent color soft, I'm going to use seeagreen, light green, and also a normal green. You have already learned about coloring and layering. with Polychromos, Faber Castell Polychoromos. So now's a good time to compare different color pencils, brands, which is between Polychromos and Derwent. And to see how the textures are different and how they're maybe similar. For this course, I'm going to Derwent Colorsoft on a landscape and a very expressive landscape. So if I need this example and this technique that can actually apply this example and how we are learning it right now to the example we can see on the left side. Now let's add the rest of the colors. Make sure all the lines are neat. I'm going to layer it and then burnish it with colorsoft Derwent. You can see I'm using the lighter green now. And then gradually, I'm going to add the color pencil. I'm not going to destroy the texture of the paper here. With a slowly, I'm going to layer it down before burnishing it completely. Now I'm adding more pressure. Haven't looked a bit at normal speed. You see how slowly I was doing it? We are done with this part. Now I'm going to move to the sides with the same color range. We're going to complete this part as well. This is the first layer, so we're going to add the second layer. You see how the color actually changes. When I add two different green here. the first green was almost too dark and an added, a lighter green completely changed the way the color look like at the beginning. Just be careful not to go out of the line. Now for example, I'm going to use Derwent color soft one color, which is dark terracotta. But this time I'm not going to burnish it on, Add a lot of layers. But I'm going to use different textures, hachure and crosshatching. And I'm going to show you how you could do it with colored pencil. Derwent colorsoft as well. Like how we did it with a graphite pencil. The above example. Lets fill up the whole space. For this example, I want the textures, the lines, to be very visible. I don't want them to be realistic. So this is a non realistic example that you can use it in different. Models in the future. look at the lines, how much gap each line has. And I'm going to make them more visible one more time. when you're happy with all the textures. You can add one more layer near the lines. And then that's it for this example. However, I'm going to present you with a few more textures and the right side before moving to this example. While you're looking at the screen and what kind of textures I'm going to ask you to practice. On these is squares. You can use any of this and then use your imagination to combine this together. Different pressure, you can see with light. It heavier pressure. In a wavy way. It's very important to practice these things, even on the sides if you don't want to do it on your main examples, main models. Even an oval shapes, would be interesting to add. So it depends on you when it comes to creativity and designs. The next example, I'm going to use the stump blending. You don't have to have this and you don't need to buy this for this course, but it's good to know this texture. So whenever you wanted to practice this and add this onto your drawing. So you know that technique before that. As you saw, I added the graphite pencil. Then I'm going to blend it not with brush this time, but I'm going to blend it with the stump. Some blending is made of paper, rural papers, which you can make it at home as well. And they are very cheap. I think one of these are a set of five, would be maybe one pound or $1. So I don't think they're expensive. If you want to have one. And then I'm going to use same as some blending but on a color pencil set so you can see the difference and similarity between graphite pencil and also colored pencil. How some blending go into down. If you use a stump, stump is not going to give you a realistic effect. So bear that in mind that for realistic drawings, you cannot really use the stump blending that much, but is still possible. So now I'm going to repeat the process. Which means one layer of pencil than one layer of stump. And blend that color pencil. Then again add the color pencil, as you can see on the screen. Since we're going to blend it, it doesn't matter if their graininess, whiteness on the surface, but it's better to completely get rid of it. As you can see, there's a line in the middle of the example has been created. So look how going to get rid of it. By adding, by gradually adding layers, you can get to rough that obvious line. And then you can go on the layer again without too much pressure to get rid of it. We learned so many different techniques and how to mix them together. Combine them from cutter pencil, graphite pencil and charcoal, and also different textures that we went through. However, why I taught you all these techniques on this specific example, which is the beginning artists guide to perspective drawing. So not just knowing and learning the techniques, but I wanted you to apply them on a more creative design. So if you want to practice, takes techniques and all these layers of color pencils, please don't practice them. Just on a simple paper. Draw something draw a design. Then bring and practice all these textures and techniques on a paper. I'm going to show you this example of a very important pop art artist, Mondiran. You can see on the screen. And how it's simple square, simple shapes. He created iconic art. It very simple shapes. That's why I want you to learn these techniques and actually apply them on different designs and shapes this way you can come up with original ideas and create really beautiful and simple artworks from scratch. So I hope you enjoyed this episode and see you in the next one. Well, Bye.
 Ava Moradi, Art and Design Instructor