Transcripts
1. Introduction: Hi, my name is itivari. I'm a watercola artist
based out of Pune, India. Over the years, I have had
the privilege of teaching both online and
offline students via my workshops or my individual
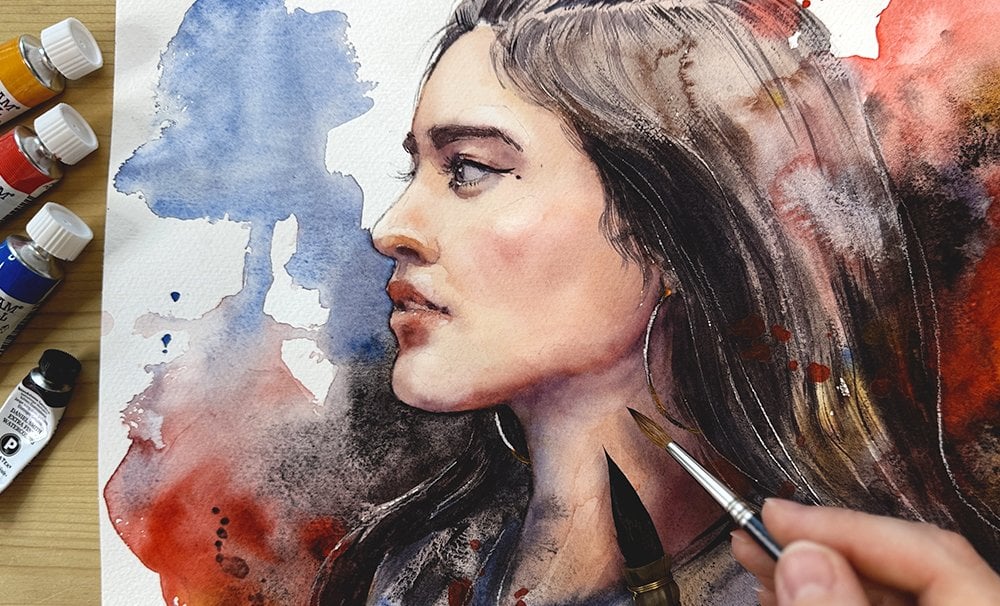
classes across the world. This is my first cilia class, and I'm super excited to share my otical love with all of you. In this class, you will learn
about how to paint magnolia in three different ways along with the leaves and the stems. We will also learn about the
materials such as papers, paints and brushes that I
have to use in the class. Then we will go and
learn more about watercolor techniques that
we'll be using in the class. After that, we'll deep dive into sketching the elements of
the flower, like the petal, the stem, the leaves, and then work towards individually learning to
paint these elements. At the end of the class, we'll tie everything together to form a composition of
various flowers, leaves and petals,
and then we'll create a beautiful composition of
a final painting together. So join me in the next
lesson where we will talk about materials and supply that we have to use
for this class.
2. Art Supplies: Conference. In this lesson, we will talk about materials or art supplies that we have
to use in this class. You can use any
artrae materials. I'm just giving you some
reference to get started. This does not intend
that you have to use exactly same materials that I have been talking
about in this class. Okay? So let's start
with our paints. So I'm using paint
from multiple brands. I'm just showing
you these brands. There are more brands
available in the market. So these watercolor
paints come in the tubes, they come in tubes, they come in pants. Right? So these are the pans
of the same watercolors. They are the same brand
as white knights. Then I have selenia
over here and then some Camlin
watercolors here. This is all about the
paints that we have. They come in different sizes, colors, different brands, right? So this is the colors
that we are going to use. In the next section,
we will also talk about the exact
color that we will be using for this lesson
and we'll be swatching those colors so you will have a better idea of what
colors we are using. Apart from colors, you
will need palettes. So here are some examples
of the palette that I have. Now, pallet comes in different
variety of sizes, shapes. So I have few ceramic
palettes over here. This is the ceramic palette. This is an ordinary tray
from a grocery store, right? And then something
similar like this. So yeah, I have converted
them into palettes, and then I bought
some plastic bowls and I converted them
else well into palettes. This is all about palettes. Then I have a masking tape, so these are washi tape
that I'll be using. These are optional. If you don't have washi tape, you can use on carpenter's
masking tape as well. We will also need inadb eraser, a sharpnt, sorry,
eraser and a pencil. Now, if you don't have
ndable eraser, that's okay. I would recommend you to sketch very lightly when
we are sketching. We will need two jars of water. So one jar we'll be
using for clean water, and then one will be washing
all our dirty brushes with. Then we have papers. So there are a lot of papers
available in the market. So this one is
cellulose based paper. This is cold press
watercolor paper, which is 300 GSM again, but it is sorry, hot press watercolor paper, which is 300 GSM. Then we have rough
watercolor paper. Then we have cold
press watcular paper. There are different kinds
of paper available. For this class, I will
also be showing you difference between
cellulose paper, hot press paper,
cold of rough paper, as in how the
techniques differ in these three types of paper and
what you have to remember. For this particular class, we'll be using cold
press watcular paper throughout all the resins. So while we have learned
all about water jars, colors, masking,
taping, et cetera, let's talk about the brushes. So I have a collection of
Princeton brushes in my hand, and I'll be using a couple of round brushes from Princeton for detailing the
smaller brushes and then long round brushes
from Princeton, right? So, yeah, you can choose any
brush that you have handy. I have this flat brush in case we decide to
add a background. So for background
and big washes, we'll be needing a flat brush. So we can use these brushes. And then I would
recommend to have some paper napkins for dabbing brushes or
lifting something. And I use a good old
cotton cloth with me. For me, the cloth
works perfectly fine. When I'm working with
water and we are working with heavy waters,
washers and et cetera, I think instead
of tissue papers, I think this or paper napkin, the cloth works
perfectly fine, right? So yeah, I think that's about
all the uh art supplies. Join me in the next
lesson as we learn more about watercolor technique that we are going to
use in this class.
3. Swatching: Everyone. In this lesson, we will be swatching all the colors that we are going to use, and I will start listing all the colors one by
one so that we remember. This is a palette that I'm going to use
throughout the class. I'll be taking out
all my colors here. This is rose madder from Camln. This is carmine
from white Knights. So I'll be swatching these two, and then we'll move on
to swatch the rest. So I'm just dipping my brush in water and then taking
a bit of color. Okay. And then coming to paper and then just making the swatch. So swatch is nothing but a
small patch of color that we create in order to understand what the color looks like, okay? Again, I wash my brush,
will take some water, and then pick up the other
color, which is caramine. So yeah, if you see, and there's a reason that I'm doing these two
colors side by side. So Caramine and rosemder they
quite look very similar. I'm going to just dip
my brush in water, I'm going to extend it to
show you the difference. If any, what I've done is I have dipped my brush in water, again, dip my brush in water, and then now only using
water to extend the color. Now I'm using a clean
water to extend the color. I'm going to do the similar
thing for this one. Again, dip my brush in water. Take clean water, dip my brush again, take
clean water again. Okay. So we're trying to find out the color
value of these colors. Now we'll move on to the yellow. This is cadmium yellow
from white knights. And this is yellow ochre. This is from selenia. Now we'll be swatching these two colors. So I'm taking
cadmium yellow now, and I made a swatch and
I'll be washing my brush. Next, I'm going to pick yellow
ochre and making a swatch. I now we're going to
repeat the same thing. I'm taking clean water,
extending the color. Now, you will see me always
washing my dirty brush in the dirty water and then picking up clean water for anything
that I have to do. Okay. So I'm going to keep my palette here and jars
here so that you can see, dip my brush, take a clean
water, extend the color. Wash your brush, take
clean water again, and then extend the brush. Again, extend it. Okay. Now we're going to try
the shades of green. I'm taking out my green color. This is cadmium green
light from selenia. The other one is from whitens. So this is verde green. This is a bit dark. This is Cepia that
I'm taking out now. So let me just watch
all these now for you. So we're going to start
with cadmium green light. Follow the same method. Okay. The Bidian green
now I'm picking. See the darkness of
the color, right? This is very, very dark. Count. Usually, I've seen that I try to mix my own greens because most of the
time I don't like the greens which are
available on the palette. So I end up using my own greens. Okay. So this is done. I'm going to take another paper
to complete the swatches. Now. You can take a
bigger paper if you need. Okay. So this is our
swatches of those colors, and now we are going to move
to the different colors. So next time swatching is
CPM from white Knights. And I'm going to extend it in a similar way as we are doing. Okay. Next, there
are two colors left, so raw umber and born sienna. I'm going to just
take them both out. Raw umber, I'm swatching nesk. So this is raw umber. Take clean water. Okay. And the last
one is burned sienna. So I'm taking some
burned sienna now. Okay, take clean water. Okay, so that's our color that we'll be using
for this class. Join with the next lesson as we talk more about
watercolor techniques, and we learn more about
how to blend these colors, how to do different types
of washes and whatnot. Okay, so see you guys
in the next lesson now.
4. Watercolor Techniques: This lesson, we are going
to learn more about watercolor techniques
that we have to use. So for this, I'm going
to take this paper. So I'm using the same paper
that I've done my swatches on S because it's the paper, 300 Jason what color
paper, I can still use it. So I'm going to make use
of it back and forth. You can do all these
exercises even in your sketchbook if you
do have a sketchbook. Or you can take pare paper and then work on all
of these things. While we learn to do these
techniques in this paper, I'm going to also show you the difference of how
it looks like when we work on a cellulose paper and then when we work
on a hot press paper. Let's start. The first
technique is wet on wet wet on wet weaning when I will
be wetting my color paper. On a wet paper, I
will be putting wet color is called as
a wet on wet technique. Okay. I'm using caramine to just
show you guys. So see this. So when I'm putting wet
colour on wet paper, how it is spreading, right? This is what wet
on wet looks like. Okay. Now what is wet on dry? So I take the same color, but then my paper
doesn't have any water, and then I try to do
this color, right? This is wet on dry where
nothing is happening. Okay. The next technique is
splattering technique. We'll not be using
that technique, but I'm still going to show you, so you take the color
and then splatter it. Okay. Now I'm going to show you the same technique
if I have wet idea. Let's say that this
side of my paper is wet and I want to do
splattering here. Now, this is going to
be different because this splattering will behave
exactly like the wet on wet. The last technique is
driver's technique. So for driver's technique,
I'm taking color, dabbing on my cloth, and then coming on paper. The texture of the paper plays a very important
role here, see. Okay. So this is all the techniques. We'll be learning
few more techniques before we dive into that. I'm going to show you
the difference between these two papers and we'll
look at the techniques here. Let's say that I
want to practice wet on wet on a cellulose paper. This is cellulose paper. It is not 100% gotten, it is 25% cotton, right? So this is cellulose paper. And then this is how my colors
react when I do wet on. Okay. And this is my colors will look if
I'm not doing wet on, if I do wet on dry. Okay. Now, let's see how it will
behave on a cold press paper. So on a hot press paper. So on a hot press paper, I'm going to just water it. Okay. Then we are going to take colors and
then we'll drop it. Okay. So this is how it will
react and we'll also wait for the end result as in once this is dry, how
it will look like. Now I'm just doing wet on dry. This is how the colors behave. Okay. Now let's move on to watercolor mow techniques where we are talking about
watercolor washes. Okay. So let's talk
about the first wash, which is flat wash, meaning the same it is
same across the paper and I'm just going to divide it roughly again into four parts. Okay. And then I'm going to
just wet the whole thing. Okay. And this time I'm going
to try a different color. So we'll take green. Okay. Then because
it is flat wash, meaning the whole color is
same across the square, right? So the color is all same so you can paint
in any direction. Just blend it all nicely. It is same across the square. Now, because this is wet, I'm going to just water here. In this, we will talk
about graded wash. What is the graded wash? I'll be bringing the
same color down, so it is going to
change the total value of the color from high to low. Okay. I'm just going to
pull the same paint down. Okay. So for this, I'm going to use, what
should I show you? Say we'll use the screen. Okay, Cadmium green light. So I'm starting
from the top. Okay. Painting in a zigzag motion
using my entire brush, Washing my brush,
coming down, right? So I'm dragging the paint down. That's it. Right?
Okay. So that's it. This is a graded wash where the color value is high on the top and
low at the bottom. Now let's talk about
variegated wash. So variegated wash
is nothing when I'm blending two
colors together, like two or more
colors together, it is called as variegated wash. Okay. So for variegated wash, I'm going to try the
green and yellow, so I'm going to
start from the top. Okay. I should have taken
blue, actually, to show you very nicely, but that's okay because
I've already picked up now. So and then yellow
at the bottom. Okay. So because I picked
up green color, which is not too prominent and let's see if you are
not able to understand, I'm going to just repeat
this exercise and show you with a different color. Okay. So now yellow
from the bottom. And what we have to do, I want to drag both the colors in the center so that
they blend together. And what are they going to form? They're going to form a
light green shade, right? See. Okay. Now let's try the same slice with a
different set of colors. So I'm going to again paint
this thing. Clean water. So we are putting clean water. And all these watches
that we are doing, we are using wet on wet
method that we have lon here. Okay? So Okay. So now I'm going to
take my rose madder. Okay. I'll start from the top. Take some more colors. Okay. So Rose madder, I'll come halfway
with this color. Wash my brush, and I'm going to take yellow
and start from bottom. Okay. And now I'm
gonna wash my brush, and then I have to just
blend the colors together. So I brush the brush and then blending both the
colors together, right? So now when you see
what is happening, Both the colors got mixed and it has formed a peachy color in the middle between this
pink and yellow shade. That is called variegated wash. This is variegated wash,
this is variegated wash. I can even do three colors at a time and that would
also be variegated wash. This is all the
watercolor techniques that we'll be using
throughout the class. The last one that
I want to show you again is the difference of these techniques
on these papers. Why do I recommend working
with watercolor paper, which is 300 GSM.
Let's dive into that. So I'm going to
show you one wash. So let's say that. I think that is very
important in order to understand the difference
between these papers. Okay? Okay. So I'm going to use the same
color combination as here. So we'll start with
caramine on the top. Wash my brush, take yellow,
start at the bottom. Come at the top and then
blend both of these together. See? First of all, the paper is coming out as I'm rubbing because it is
not 100% cotton paper. Now let's talk about
the hot press paper. Hot press paper is very
smooth in texture. It doesn't have
those mini grains like the cold press
or rough paper. Okay. Then I'm going
to take my yellow. And then we're going
to do the same thing, so we are going to
just blend it. Okay. We'll wait for some time
to see the difference, but you will get the difference between all the colors, right? So sorry, my paper is still wet. So yeah. So if you see
the difference right, the blending has come
out very smoothly. It will even come out
very smoothly here, but then the water
doesn't react like the way react in a cold press
paper or a rough paper. It would be too smooth, right? And then here, I think
you can control how the color flows much better. I've used artists
use hot press paper for mostly their
botanical illustrations. Okay. And then here is
25 person cotton paper, which is cellulospas, you
can see the rough edges, the paper is basically
coming out, right? Now you can also
see the difference between these methods, I show you this is
our cold press paper. This is cellulose and
this is hot press, how the color has reacted in all the three papers and the difference
between them, right? It is very important to learn
these differences between your paper in order to decide what works best for
you and for your subject. The last method that I want to show you is the
lifting technique. I'm going to show you
the lifting technique. So just take clean water, right? And then swipe across the area where you want
to lift the colors. Okay. See. So this is the
lifting technique. It works everywhere,
so it will work here. Okay. And it will
even work here. Okay, so I think we
have learned all about the technique that we are going to use in this class. So join me in the next
lesson where we will learn a ball about sketching as in how to go about
sketch a flower, and then later we'll proceed up painting all those elements
of the flower one by one.
5. Sketching Flower and Elements: Hey, guys. Welcome
back to this lesson. In this lesson, we will be doing sketching of the magnolia, the stems and the leaves. But before that, I
will also be putting this picture in the class
description section. So this is the same
thing that we did. So it is also talking
about flat wash, gradient wash and
variegated wash, right? So whatever we have tried
in the previous section, you can also try
something like this using different colors would be a good exercise to
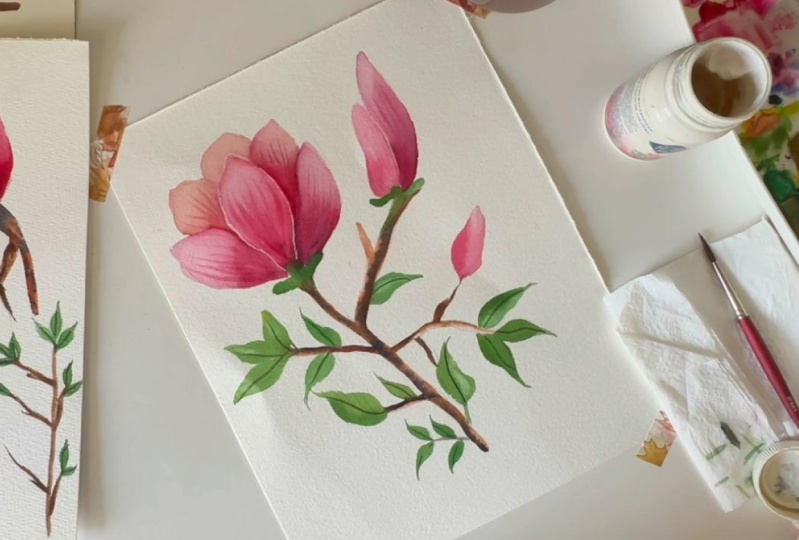
understand the technique. Okay, so I'm taking this
paper on a landscape mode, and we'll be continuing creating the magnolia
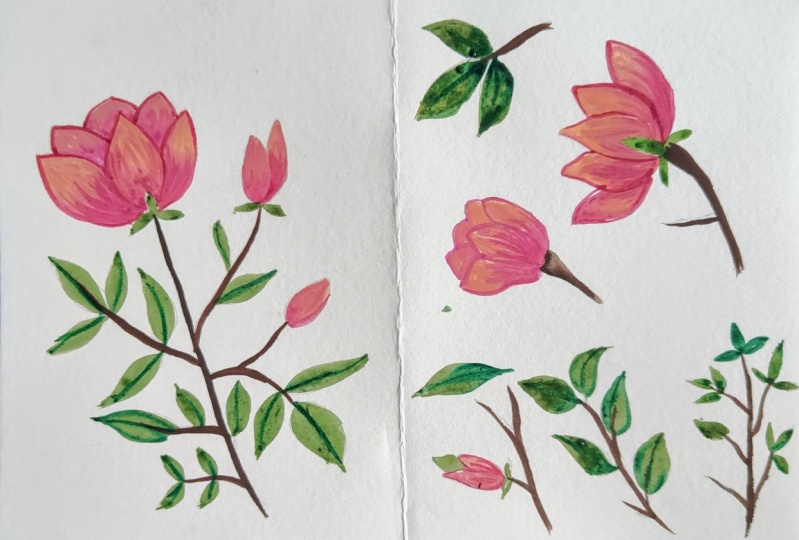
in this one. So this is how the magnolia is. So we'll be practicing the bud, half bloom, full bloom, different types of leaves, how to make stems and
the leaves together. This is what we are sketching. Okay, so let's get started, and we'll do the quick sketch of these I'm using my pencil,
regular pencil pencil. Okay. So let's start by
sketching and learning. So I'll start with
sketching the bird. Fine. So I just look at the shape of the bird and then I start sketching it. If you don't want to
sketch this yourself, you can skip this lesson and
jump onto the next where we'll be directly
learning to paint this. And anyways, I'll be
putting a snapshot of the sketch in the
description section, you'll be able to check
that out later. Okay. So this is the bud. Now I'm painting the
half bloom, this one. Okay. So for the half bloom, I'll concentrate on
painting the main petal. Then we're going to do
surrounding petals. One this side.
Petals are behind. Like the main petals. Okay. So I'm taking a very rough
idea of how the sketch of the artwork is and then taking inspirations and
then drawing these shapes. And now we can make
the full bloom. Okay. So I'll be doing
a full bloom here. Right? Yeah. And here would be a tiny leaf, right? So this is the leaf. And then I can take out branches as I want. Okay, so this is the full bloom. So I feel the petals on the
side have gone like too flat. So we're going to correct that. And in order to correct them, I'm going to just erase this
part and redo these petals. So I'll be erasing them and
re using redraw the sketch. It's okay that if
you have to erase quite few times in order
to perfect your sketch, I would say that take out time, do that because when it comes
to watercolors, um, yeah, I think sketch if you
have a nice rough sketch, um, you're already halfway
through your painting. Okay? So going to sketch some stem, right? So let's say this is my stem. Okay. And then a small leaf
coming out of it. So you can decide where you want to pull out the
branches and all right. So yeah, that's good. So here, I'm going
to add one more, and then one here,
and I'm going to take some branch here and a
leaf like two leaves here. So here, okay? And here I'm just going to
leave that stem coming out, but no leaf. Okay. So now moving on to leaf. So we're going to make
two kinds of leaves. So let's say that this is
my stem, the cutout stem, and then I have a leaf here, a leaf joining it, and a leaf coming out here. Okay. Then we have a
bigger leaf as in if I take one leaf and then
zoom it and then paint it. So it would be
something like this. Okay, one leaf. Then we'll
see how to paint that. And then instead of the leaves
and then this smaller one, let's say that I have to
make a bigger one, right? So I would be doing this. What we are doing is
we're zooming this one, this one, like up close. Okay. So the leaves would
also become bigger. Okay, so that's it. This is how it will look
like the sketching part. Now, what we'll do
in the next lesson, we will learn to paint all
these individual elements, and in the final lesson, we'll just pick up one of these flowers and then create a composition
around it alone. So let's not wait and join
me in the next lesson.
6. Coloring the Flower: Okay, so let's start sketch
painting these flowers. So till now, I have used only one single brush
for the entire thing. So we'll see how
it goes further. And still I'm using my
Princeton long round brush. We'll start with the petals not petal as in the bird, right? And then as we were using, we will use my palette. This is this is my caramine and I'll start with using the caramine as a
very light shade. Okay. Now, before I
start with caramine, we can also work on
this petal wet on wet. So let's wet this petal. Okay. And I'm going to just
back and forth so the water goes inside
the sheet very nicely. Okay. And now start by I'm
using a diluted version, if you see, there's a lot
of water in my color. So we'll start at the bottom, see how the color is flowing. So this is watercolors
and this is wet on wet. I don't have to do anything. So Watercolor does the job that it is supposed
to do best, right? So I'm just going to spread. So this spreading technique, if you remember, we have learned in the
technique section. With this right, we were
spreading the paints, right. So we have already
learned this technique. Okay. And then the
bottom top section of this bird is a bit lighter
and then yellow in shade. So we're going to do that.
Like put some yellows. Okay. And now I'm wetting my brush and then just
going over to make it a bit lighter and then using our caramine colour
to paint this area. Okay. Okay. So we'll just let
this one dry before we do a second layer or do
another round of the colors. So I'll now jump onto this one. So the technique is same. So I'm going to again
show you a couple of petals as in how to do it, and then I'll just
speed up the video. So let me show you a couple more before I speed
up the video. Again, same thing.
Dropping colors. Now let me just
show you a method. Now because I'm painting it and I'm mostly painting
it upside down, I want to keep the colors. On the bottom more, the color value is high, and as I go on top, the color value is
going to reduce. See what I'm doing is. I've just tilted my paper and I'll just let
the colors flow. Okay. And then we will just soften everything so
that there is no hard edge. Okay. See. And then
when you do this, just return it and then just
do some strokes like this. Okay. It is a very
easy technique instead of painting
the right way. You do upside down. It helps in building
the color value. Moving on to the next one. So because this is still wet, I'm just going to cover the
petals which are behind. Okay. Now for this one, I'm going to just make some peachy color. To make peachy color,
we have seen this. I'll be mixing a
bit of yellow to this mix and it down
using yellow ok. Okay. Then I'm going to use a
very watery version of this at the back very nicely
around these edges, right? Okay. Watch my brush and then just
blend everything together. So in case you're wondering
what is softening methods, I also wanted to
show you something. So let's say that I have done this color which
is wet on dry, right? So now, see the edges around
this is too sharp, right? Now, how I want to do? So
if I want to make it soft, I will just dip my brush
in water, take the water, just wipe across, right? See? And just lift anything
that is unnecessary. Now you see the edge that is as hard as this line
has become so soft. That is what I
meant by softening, softening the edges, the
border, blending it together. Moving on to the next one
because this is dry wet. I'm going to just leave
this and then do this. Wash my brush, and again,
blend all together. The other thing is why I keep jumping from
petal to petal. Let's say that I have
painted something. I have painted something here. Now immediately I go ahead and then paint something beside it. See, you can see the color
is flowing backwards. This is what we try to avoid. Hence, if the layer is wet, I will wait for the layer to be dried up before I move onto it. Okay. Okay, so let's see that
this is dry enough. So it is not dried, but it is dried that I can
jump onto the next petal. So we'll start wetting
the petal here. Okay. And I'm taking some rose madder and just putting all the
colors here at the bottom. Wash my brush, take
a clean water, again, wash and then
just blend it. Right? Okay. I'm going to do the
same thing here. So just going to speed up this video because
the same thing that we are doing
again and again, the methods are same,
not changing anything, so I'm going to speed
up the whole video. So I'm also lifting when I feel I have to lift the colors. Okay. Any area has to
remain light in tone, I will just lift it up. So let's do our third flower, and then we can do
the leaves. Okay. So again, same method. I'm going to just
show you this petal, and then for the whole flower, I'm going to just
speed up the video. So you can go slowly
and then cover all flowers all
petals one by one. Okay. So I'm taking rose matter. Dropping it here because
this is the leaf we set, so we want to avoid that. Now, to make this
flower a little bit dark and then show that
it is connected to stem, I'm going to just drop
some burnt umber here at the bottom to make it dark so the colour at the bottom
is a bit dark. Okay. Say clean water and just go
through the whole thing. Okay. And then we're going
to just repeat entire thing again and
again for all the petals. Okay, so now we have completed all the petals
of all the flowers. Now it's time to move on to
leaves and then the stems. So see you guys in
the next lesson.
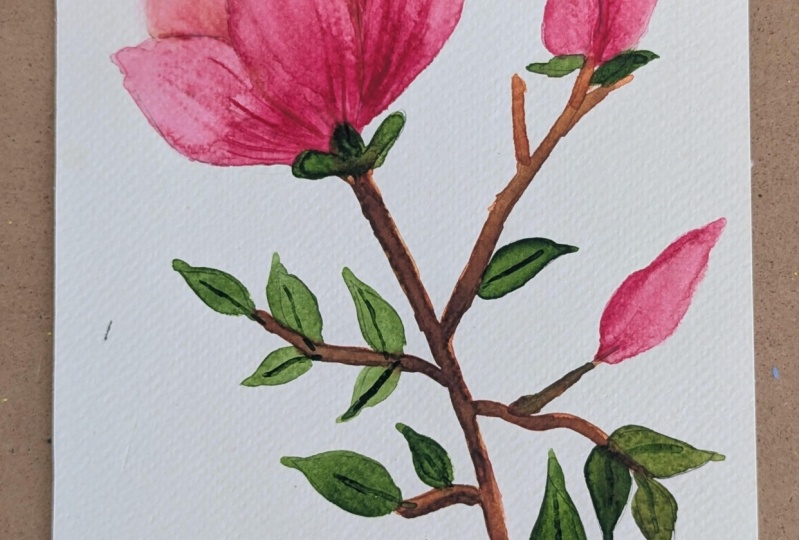
7. Colouring the Leaves and Stems: In the last lesson,
we have learned all about painting the petals. Now it's time to move
on to our leaves, and then the last
would be our stems. So let's say how we want
to paint our leaves. For painting knees, I prefer
to mix my own green color. So what we'll do, we'll do
a combination of yellow, the cadmium, green light, and odigreen in a mix
and match quantity, and then we'll create our
own greens to do this. Okay. So I'm putting water first. We'll take a yellow color. And I'm gonna drop the yellow. Then we'll take my
cadmium green light, and I'm going to drop it
on top of the yellow. Okay. And then I'm going to drop some water green as well. And now it's time
to bring it all together by blending them. Okay. So I'm gonna drop some more green at one
side of the leaf. Right? Okay. Now, this is one method
of painting the leaf, okay? What is the next method or the best method that
I love to paint. Leaves is what I'm going
to just teach you next. This is a game changer because then you don't have to
do one leaf by one leaf. So take any round brush, okay? And what we have to do
is take your brush. Okay. To your brush. Swipe lift. Okay? No dip your brush in
water because it's just too dark. Tick for me. Again, touch your brush, press it down, and
swipe and then done. Right? See? This is
so easy to paint leave instead of doing
the leaves in this way. Now what I was saying this
method, it's a game changer. Let's try with two
different colors. I'm going to take
this verde green over here and then green on the
other side of the brush. Then let's go ahead
and try again. Press the brush,
drag it, lift it. I'm going to take
a bit of water. Press the brush,
drag it, lift it. This is how you can
make any leaves, and then for that
matter, if you want, you can make any shape
also, press, lift. Press, lift. Then if I want to
drop some colors, I can just go ahead and
drop in later. Okay. So yeah, I will be
making glass the next two leaves in
the similar manner. So let's go ahead
and create them. So I'm taking the ordigreen
and bit of yellow and touch, drag and lift, touch,
drag and lift. Okay. And now this one. For that, I'll take
a bit of green, touch, drag and lift. Okay. Touch, drag
and lift. Okay. Then if you want to
correct the colors, you can just go
ahead and lift from wherever you want to lift. Okay. So this is how you
can paint the leaf. Now, even the bigger one that
I want to do here, right? So I'm going to do same way. So touch, drag and lift. Now, I'm just going to take some water and
some lemon yellow. So I've just mixed green with the yellow mics it
makes it lemon yellow. Okay, so touch, drag and lift. Okay. Now, just
blend all together. And then I'm just going to
just take this drag it. So it forms my stem. So now I'm taking a smaller brush because
we are doing the branch, which is comparatively
smaller. So let's start. So clean water, and then we
are going to wet the branch. For this one, we are
going to use born sienna. Born sienna, and then we
just go over this branch. If there is any extra water, you can remove it because
it's such a small area. So one thing to make sure is when you're painting
with watercolors, if your paper has
a lot of water, make sure that your brush
has less water in it, and if your brush
has a lot of water, paper should not have
a lot of water, right? That's how you can control
the water quantity, the ratio between the
colors and the water. It works out perfectly, and it helps you in
blending everything. Okay? So let's start
by adding the leaf. So I'm going to just
take my yellow mix with cadmium green. Okay. This time, I'm going
to do wet on dry. Okay. So for smaller spa areas, if I'm looking for a detail, I will not go for
wet on wet mostly. I'll go for wet on dry. It gives me the upper edge, like I can control it, right? And then as you can
see, one very important thing that out of all two
jars of the water that I had, one jar is dirty because
I have been washing all my brushes in
this jar while I'm maintaining the clean water. That is how we have to
work with watercurs. Okay. So let's do another one. This time, I'm going
to show you how it looks like when
we do wet on wet. So this we did wet on dry and this we are
doing wet on wet. So I'll take the same color, dropping the color
only on one side. Okay. Now washing my
brush, taking clean water. Every time I wash my brush, I'll go on paper towel
or my cloth to dab it. I prick up clean water to shed away extra bottle,
I didn't dab it. And then just blend it. Okay. Now try more. Again, take the color. So wet on wet has its own charm if you know
how to work through it. And after a while, you will also understand the importance
of working wet on dry. So it all comes from
experience, right? And this one I'm
making wet on dry. Okay. And then the last one Okay. So I've shown you three or
four methods to paint leaf. You can opt for anyone of your choice and
whatever you like. And then create these awesome,
amazing green leaves. Okay. Okay. I'm done. Now, what we'll do? I'm going to add a bit of CEPIA to this stem to
give it a shadow. Okay? So on the one side, only on the one side, I will be filling this
with a touch of CPR, it is also a very
diluted version of the CPA that I'm using. We have another branch to finish and then we
have branches of these to be finished that we are going to cover in
the next class lesson. Let's go to the next lesson.
8. Finishing Stems: Come back. And today, now we are going
to in this lesson, we will just complete all
these stems that are pending. We also have one leaf here that we did not complete
in the previous lessons, so I'm just going to do it now. And I have changed my water
jar legs I was too dirty, so I have changed it, and then bought a very fresh
jar of water to start, okay? So the leaf, it is, again, we are going to
do in the same pattern. Okay. Okay. Now I'm
coming to the stems. So this one is pretty simple. So we're not going to do back
and forth filling, right? So we'll just try to
create this in one go. And now I'm taking burn
sienna and Sepia as a mix and then using dabbing
extra water on my cloth. Okay. So we'll just
go in one stroke. Okay, in one stroke. And make sure that you're using
a pointed brush for this. Okay. And now we're going
to just read the leaf. I'm mixing my Verdi green and
chrome cadmium green light, and we'll just use the
method that we learn. So this method, right? So I
did it with a bigger brush, but then now we can do
it with a smaller brush. See, the same thing, Touch your brush, press down, lift, touch, swipe, lift. Okay. Okay, so this covers our smallest branch. And then now I'm just
going to do the stems of these things and then
we'll complete this one. Okay. I'm going to show you
something interesting here, so we'll cover that in a bit. Okay. So again, I'm doing whatever I'm
doing is wet on dry. Here I have not wet
the stem beforehand. Now the other thing that
I wanted to show you, so I'm going to use some
of my ultramarine blue. Now this stem that we have pasted or painted
just right now, I'm going to just
take my ultramarine in a diluted quantity, of course, and then drop it
here and there in that stem. So blue mixed with ultramarine to form
a paints gray color. But now whatever will happen
will happen naturally, and then we do not have to
interfere in the process. Okay. For this one, I'm adding sap green, sorry, CPA color or sap green, CPR then I'm going to take
out the Dan using CPI itself. Okay. Now we'll move on to this and this and then
lastly, we'll come on this. This one, I'm going to
keep it pretty simple. Born Sienna, and then CPR and some ultramarine blue at
the one side, like Okay. At one side, I've just
dropped that color. Okay. So what does that
mean? So let's say that I have painted
this branch, right? Now I'm doing it
bride so that it is visible and then you
can understand it. Okay? So this is how it will be. And now I'm going to just
take my ultramarine blue, drop it. That's it. That's what we are
doing. What it will do, it will turn that color
into darker shade. Even if I have to
go and drop Spa, I'm going to do the same. So I'm just dropping it. I'll let watercolor do its job. So we're not trying
to control too much. Okay. Now coming to this one. Lightly added bon sienna, then took a lot of water on
my brush coming through. Now I'm taking CPA. If you don't have CPA color, you can mix paint gray in your bonsiena a brown shade
and you'll get a CPA. Now to make it more dark
around this corner, I'm just going to drop
ultramarine blue. And then drag
everything to one side. Okay. So that one side stays dark and then you can
lift also colors, right? So wherever you feel you
want, lift the color. We have already learned the
lifting technique here. Okay, now we are on to the last. For this one, I'm going to just turn the paper upside down. It is too easy to
paint this way. And now let's start by
wetting this branch stem. Okay, I'm starting with raw
umber and bon Sienna mix, and I'm going to just drop it. Take some Cepia
and then drop it. Okay. So I'm going to wash my brush and then
again, put water here. Okay. This is not brown, but this is going to
be green in shade. To take your green color, you can mix your
golden green with cadmium light and some bit of cadmium yellow to form
your own green color. It would be too vibrant. See. Wash your brush and then
just finish it off. At the bottom for this branch, when I'm going to add
some ultramarine. If I have to create pattern, what I'm going to do
when I drop the color, I drop the color in this motion. Then I am able to create some
patterns within that stem. Okay. This will naturally form a very nice blend of brown CPR, the altamarin going to
form it very nicely. Now, what is left, right?
So we have done this. But now, detailings
are missing, right? So join me in the next
lesson and we'll complete the detailing and
then we'll move on to the final composition. See
you in the next lesson.
9. Sketching the Final Composition: So let's start the
new composition of whatever we have learned. So how are we going
to do that, right? So if you remember
rule of third, then I divide this paper into three columns and then
three rows, right. This area would be
my focal point. Okay? So I'm going to draw the biggest
magnolia that we have. So we're going to draw
this biggest magnolia that we have here. Okay. Or we can make the composition using
a half bloom. Okay? So that also works perfectly. And in the size of paper, I think that will fit nicely. So instead of making the composition with
the biggest flower, I think we'll use
the half bloom, the bird, and then the branches. Okay. So let's go ahead and
then do this half bloom. So Okay. We have and then
the center petal. Yeah, I think this looks
more good rather than that full bloom because
it gives me a lot of room to add extra stuff, right? Okay, perfect. I think
this looks nice. Okay. So I think I like this
composition better. And now what we are going to
do is I'm going to just use like this small leaves
around here, right? So So leaves around here,
something like this. And then we'll pull
the branch down. So my branch is
coming down. Okay. And then I'm going to take out this branch for
the bud from here. So let's say that I have this, my branches coming out, the stem is going, and then
here I have the bud, right? So here I have the bird. See, how it has
naturally tied up. So now it looks like
one single branch. It should not look like
to segregated also, right? So this is important. And then now let's go ahead. Right? So magnolia, so it is a lot of branches can
come out here and there. Um, we can try something from our composition
as well now, right? So we can add some
leaves to this one. So let's say that. I have
some leaves to be added. Okay. Even I can add
a leaf here as well. Okay, or we can
add more branches, more blooms, whatever, right? So it is up to us as
in what we want to really focus on when we are trying to create
that composition. So we can have a leaf branch coming here in a
different direction. Okay. So something like this. And then it can
also have a branch coming out that
we just leave it. Okay. What else? So I can have a stem
coming out of here. And this can be a super closed
bid right not this one, a very teensy, tiny bird flower
bud that is there. Okay. Now, just going it down and
I can have something here. Okay. Yeah. And
from this Branch, I can have more leaf,
even leave here. And that's it. I
think otherwise it's going to just overdo
the composition. I like this, so it's
flowing like this. Looks good to me. Because of the focal point, the viewers attention
is going to go here, then here and will come down. Okay? So I think this is good. Now to paint this, I'm going to just tape the
paper so that my paper is not moving and then we can paint all the individual
elements very nicely. Before we get down
to the painting, I'm going to use my
kneadable eraser, uh, to lighten the colors
of the final artwork. If you don't have
kneadable eraser, you can just dab your
current eraser like this and the graphite
marks should come out. Okay. So this is how your
pencil sketch should look like.
10. Painting Final Composition: Okay, so let me just
tape it down and we'll start with our lesson
for painting this. So I'm going to
use my washi tape. And because we are not yet
painting the background, I'm just going to tape it
from two sides like this, so the paper stays in the place, or you can also tape
it from four sides. All right. If I have
to paint a border, then I'll just tape it
from all the sides. Okay, so that's it. Now, let's get started. So we are going to just do the same thing
whatever we have learned. So with this petal now because you
already know this, I'm going to draw two, three elements just to show you and then we'll just feed up the video to cover it. Okay? So I'm using now two brush at a time to speed up the process, so I will wet it with one brush. Okay. I'm going to use the second brush to
quickly color it. I don't have to wait
to change my brush, wash my brush again and again. Okay? You don't have to do this. You have to just
take your sweet time in doing whatever
we have learned. We have already
learned everything. I just trying to tie all
together in this composition. But we have already
painted all this, so you know how to do it. Okay. So now, I'm going to put on a
very nice soothing music so you can paint along. But this is what we
are going to do. Now my stem part is done and you're going
to do the leaves. I'm going to do the
leaves very quickly as we have learned in
a different method. Okay, so touch drag swipe. Okay. I'm going to
show you one more. It some water, use your
entire brush, dry. This way, I'm going to
cover all the leaves. So now we are done
with this, right? The next thing for us is
to complete our flowers, so we'll just
continue doing that. Okay, so this is done. Now I have to do the detailing. So for me to do the detailing, I'll have to wait
for this one to dry up and then we can
do the detailing. Okay. In the meantime, I think we added a bird here, but I converted that to a leaf, so I'm going to add a
bird over here now. So that's it. Then I have to wait for this to dry up to
add the final detailing. See you in the next lesson where we'll be adding detail to this particular floor of composition that
we have created. So see you all in
the next lesson.
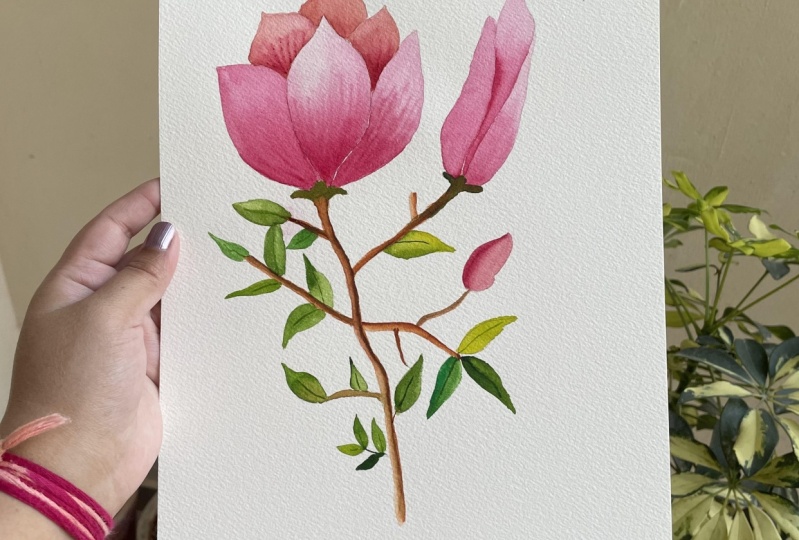
11. Adding Details and Finishing: Okay, so for the finals, we are going to just add
the veins to these petals. And last time as we did
for the other ones, you go to have it like
a debuted portion. Okay? Okay. And just to
finish that off, either you can use a white
gel pen or a white gauche. If you don't have both, you can also use
white watercolors. I'm just going to show you one little difference trick as in how to make
this fork, right? So what we can do is
I'm using white gauche. I have using whitewash. You can use white watercolor
or even a white gelpin. So it also works perfectly fine. Now with this white gauche, what we have to do is make
sure that your artwork is dry and then you just create a very small separation
between them, right within the petals. Shadow and a highlight, which will tie
everything together. Okay. Mostly to be done
in the center petal, which will lift the
center petal and then it will give an upper edge
to all the other petals. This can also be
done by lifting, but because we have already learned lifting in
a lot of areas, and I think we also left the
color light in this one. There are different ways
of how to achieve that. I just showed you
another way of doing it. Now you see this with
such a small detail, it has made that whole
flower stand out. Okay? So I think that's it for this lesson where we have
added all the details. I'm not going to add tiny
details to these leaves, but I'm going to show you
one if you want to add, so maybe very thin lines
of watery green color. You want, you can go ahead
and add details like this. Okay. Okay, so I think that's it and see you
all in the next lesson.
12. Conclusion: Congratulations on
completing the class. I hope you're feeling confident with whatever techniques we have covered and that you enjoyed painting Magnolia in
three different ways. I would love to see
what you have created, so don't forget to upload your project to the
Project Gallery. Whether it's your final
project to progress shot, I can't wait to see how you applied the techniques
you have worked upon. If you enjoyed the class, I would really appreciate
if you could go and leave a review and follow me here on Skillshare to stay updated
on future classes. Your feedbacks help me improve and create
content tailored for you. Thank you so much for joining me on this
creative journey. I can't wait to see how beautiful your works are
in the Project Gallery, wishing you a very
happy painting.
 Kriti Tiwari, "Watercolor Artist | Teaching Beginners