Transcripts
1. Introduction: Hi, my name is Kriti Bivari. I'm a professional
watercolor artist working for Watercolors
for the past six years. I have painted variety
of subjects in watercolors, including
florals, pile, marine life, and have made multiple collections that I found home with the collectors. I've taught over
100 plus students through my online and
offline workshop. This is my third
class in Skillshare. I'm so happy and excited to
invite you into this class. I know watercolor can be
difficult and daunting, but with the right technique, they open up a whole void
of expressive vibrant art. Hence, I have created
this class for you. In this class, you're
going to be painting vibrant Phoenix in watercolors. It's an expressive
Phoenix step by step, starting from sketching to building rich layers
in watercolors, how to control watercolors and pigment for bold
vibrant plants, how to create movements and
energy with brush strokes, how to layer and balance warm
and cool colors together, and finally, how to let go of the perfection and paint
freely with confidence. By the end of this class,
you won't just have a beautifully created
Phoenix bird, but you will also have the tools to bring more expression, colors, and emotions into
your particular works. I'm so excited to get started, so let's get ahead and
we're going to learn in the next class all about materials and supplies.
See you in the next class.
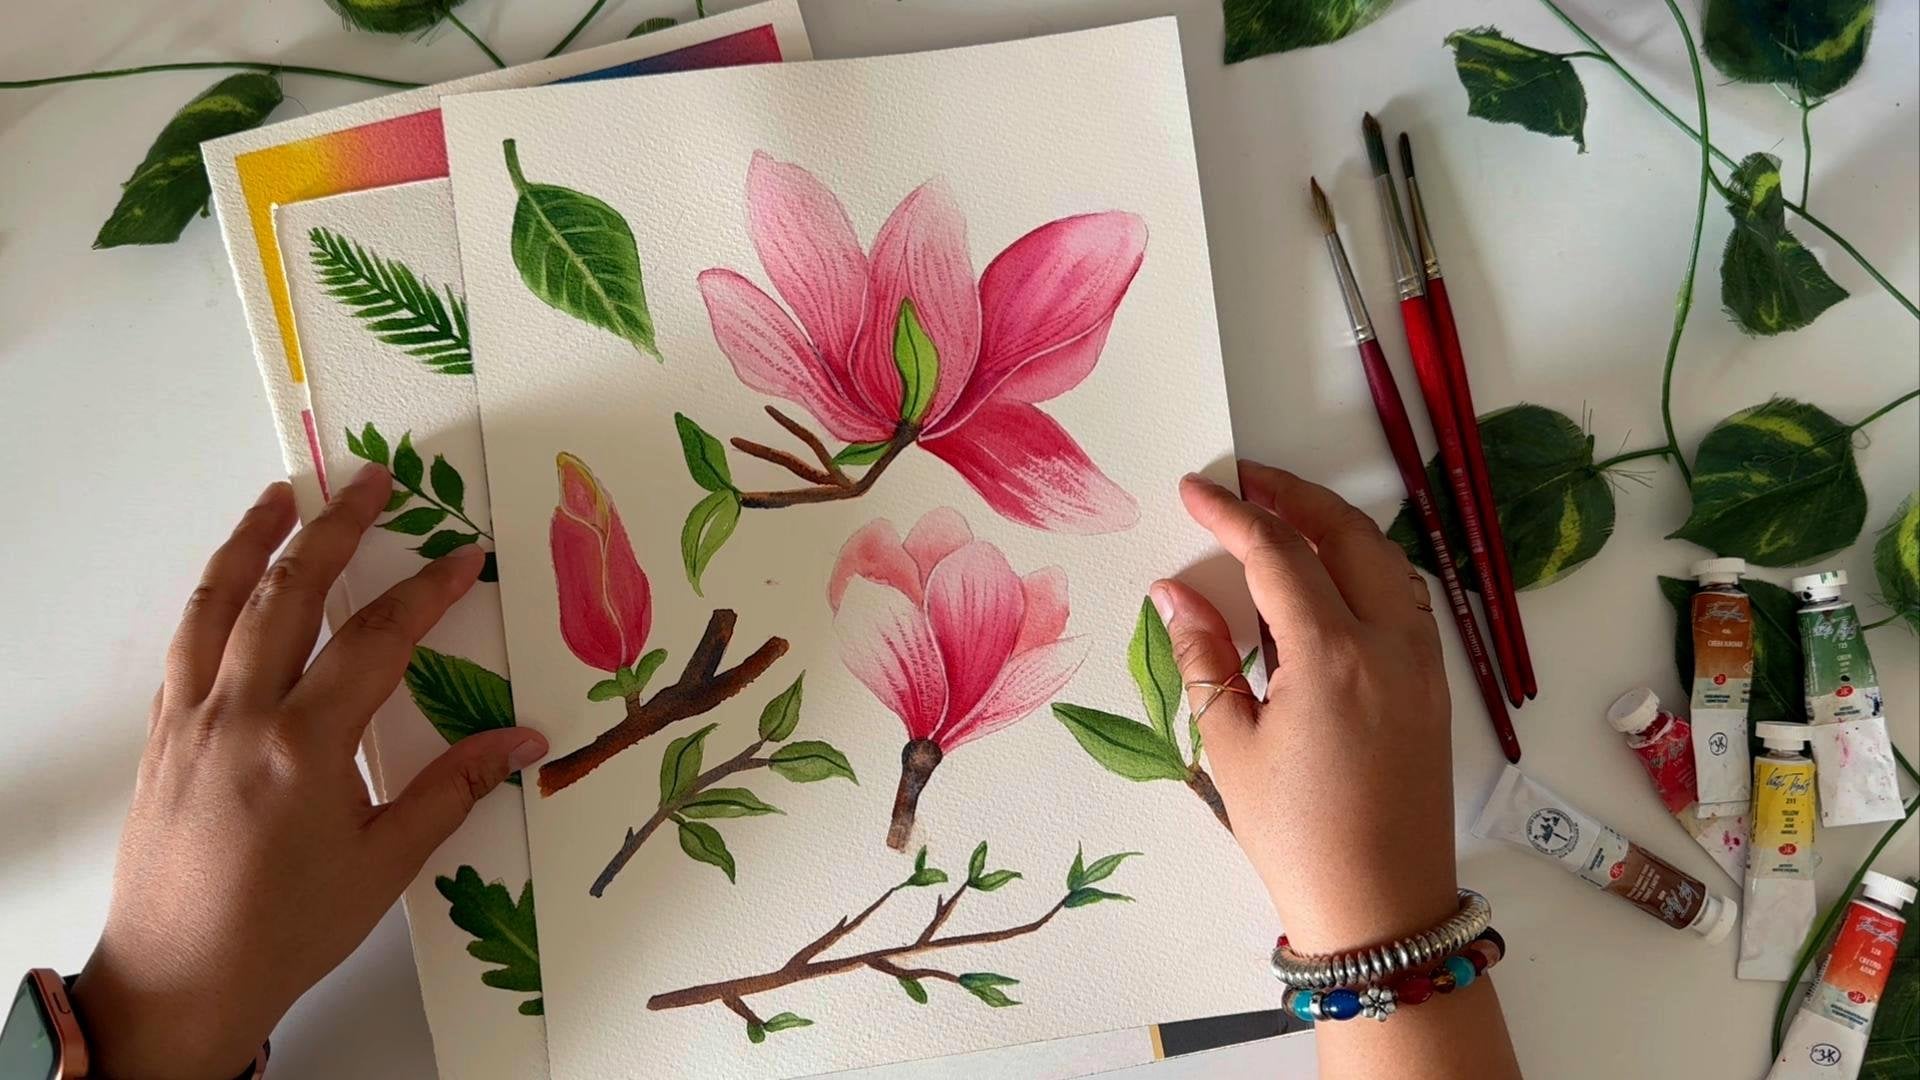
2. Materials and Supplies: Hey, guys, welcome
to this lesson. In this lesson, we're
going to learn all about art materials and supplies that we need for this
particular class. So we'll get started.
The basic things that you all know by now is we need two sets
of jar for water. One is for cleaning the dirty brushes and one is
for picking up clean water. This is a k for watercolors. Apart from that, you will
need cloth, masking tape. Then regarding the brushes, we don't need a lot of brushes, but I'll just tell you what
ran of brushes you can use. I'll give you a couple of
example and then you can choose what works best for you. I'm just showing you a variety of brushes that you can use and you can pick anyone
for that matter. So these are some brushes
that we're going to use. I'll just show you. These are the brushes from
Princeton brand. Now, these two are
long round brushes. They are very good,
they have a pointy tip, and that's why we need them. Then we have angular brush. It would be good
for the feathers. If you have anglo
brush, it's good. If you don't have round
brush, will work fine. And these are other round
brushes from Princeton. A kind of round brushes
will do the job. If you have a mop
brush like this, which is also pointy or
you have silver brush, or even if you have regular brown brush, that's also fine. What we need a down brrush. So you need round brushes. Regarding the colors, I have no issue if you can go
with any brand of colors. I'll specifically lay out
what colors we want to use so that you know these are the colors
you'll be using. So yeah, the colors we need are because we are
painting this, right? Let me just move it aside. So we are painting
this. So the colors that we need are cadmium yellow, golden deep, crimson, scarlet. Then we also need
shades of blue, so erilium blue, this is eriliumbue copa
blue, royal blue. Okay. And then this
is deep indigo. Okay. So that's all the
colors that we need. And I'm using colors
from white knives. You can use any
colors that you like. Okay. Then, of course, we need a watercolor paper, which is 300 GSM. So for that, you have
multiple options. There's no need to go with the brand that I'm recommending. You can go with anything. So this particular artwork is made on a big sheet of paper, but then we'll be doing this on a smaller sheet
of paper this time, and I'll be using this particular
watercolor pad for this. I'll be using Bohn
watercolor paper. I'm not using an
artist grade paper. I'm using an academy grid paper, and it works fine for
practice purposes. So this is a fantastic
paper to use. Okay. Then after this, you will also need a
pencil and eraser for drawing or making the sketch of the Phoenix bird onto
your watercolor paper. If you don't have blocks
like this, don't worry. You can always go ahead and
tape your paper like this, like I have taped it. And hence we need the masking. Okay. So that's all about the materials and supplies that you'll be needing
for this class. I'm so excited, so let's go ahead in the
next lesson where we are going to learn all about techniques used in
this particular class.
3. Techniques: Hi, so welcome to this lesson. In this lesson, we're
going to learn all about techniques
that we want to use for creating our Phoenix
expressive bird, right? So if you see here, let me just show you quickly. So if you see here, the colors
flow in a harmony, right? So they start with yellow, orange red, purple, blues,
and they end, right? So that's how we
are creating it. The attention and if you
look at this painting, it will go to this I because then if you follow
the one third rules, the I and the head of the body
is actually placed there. That's very important for us to understand before we
actually move forward. There are a couple of
techniques in watercolor that we want to know
and understand. Let me just divide this
paper into two parts. Okay, let's divide
this into four parts. That's going to make
it easier for us. And what we're going to
do is we're going to follow the color wheel, okay? And so I'll show you how to follow the
color wheel and do. But before that,
we're going to learn two techniques, mostly
two techniques. Wet on dry versus wet on wet. So what they are and
why it matters so much. Okay? So this one, we are going to do wet on wet. Here we are going to do wet
on dry and what it means. Okay, so the technique that I'm going to use
here is wet on wet. Now for the wet
on wet technique, what it means is you
are actually going to put the color on paper when
your paper is already wet. Hence, the technique
name is wet on wet. Okay. So see very clearly. So what I'm going to do is I'm
going to wet my paper now, so just putting
lots of water here. Okay. And we're going to go
a couple of times. We want the water to actually
go inside the paper. And any putters if forming, we don't want these putters. We can just lift it up and
then dab it on the cloth. Okay. So once you're sure that
the paper is wet nicely, then we can go and move ahead. But make sure that you do
this couple of times so that the paper is thoroughly
wet and not unevenly wet. Okay? Once done, now, when
we take the color, we want to take that color
in its pure format, right? Like, not very diluted. So 50% water, 50% color should be working
fine with this ratio. So now when I go ahead
and I lay out the color, I'm going to just
randomly show you now. I was drawing a line, then I'm going to just
randomly show you, see? So what happens when I'm
just putting the color, it's moving apart. It's flowing, right? Why is flowing because
the paper is already wet. Now let's talk about wet on dry. Wet on dry meaning dry
paper and wet color. So when I take the color now, so I take the same color, but the paper that I'm using inside is not dry,
how we do it see. Okay. It's not moving, and
then when I drop the colors or if
I make anything, see if I try to make
no, will just disperse. But here, when I try
to make anything, it's going to stay in
the exact format that I have made it because
the paper is dry. Okay? That's all about wet
on wet versus wet on dry. Now, the second part
of this section is that we want when we are actually making that
expressive Phoenix, what we want to do is we
want to follow the color. While following the
color so we don't accidentally start mixing
complimentary colors together. Now, what are
complimentary colors? Complimentary colors
are the colors opposite in the color. Let's say that I have
blue and orange, if I try to mix both of them, I will end up getting
a shade of brown. Red and green are
complimentary colors. Let's try this out as a
lesson on what not to do. Let's say that I
have a blue color. I have a blue color here. And I wanted to put
orange right beside it, and then overlap
and then color it. What's going to happen?
Then I have orange. On this section where the blue and orange are
mingling together, see this is the color forming, which is kind of a
muddy shade, right? So that's what we want to avoid. Let's try another two
complimentary colors. So another two
complimentary colors are your wallet and yellow, red or green, you
can try anything. I have the wallet
here in front of me, I'm going to make use of that. Wallet here's the wallet color. And then we'll have our yellow. Just thoroughly
wash your brushes. I'm doing exactly the same, and take a fresh water
for picking up new color. And then yellow,
see? So mix them together. What it is forming. What it is forming, see?
Slightly muddy color, right? Muddy color. That's
what it is forming. Okay. So these are
complimentary colors. And when mixed together, they form, they end up
forming muddy colors. So complimentary colors. Okay. Sorry. Complimentary colors, form, muddy shades. Okay. Now these are also useful. It is not always the
wrong thing to do. These are always also useful, but then you also
have to learn how to use these colors
in harmony. Okay? Now, how will be working
on the feathers, right? So that's the most important
part of this lesson. So I'm going to use my
round rush for this one, and just wanted to
show you that I also use the spritz
bottle that I have. So if my palette is
dry, I want to wear it, then I basically use this to spray and the colors
get activated. Okay? So what we want
to do is we'll be mostly working wet on dry
for the feathers part, but it's not completely dry and not completely
wet on wet. I'll tell you how what I mean. Okay? So let's start by putting some yellow
colors on the paper. So this is now when I'm
picking up the color, I'm picking up like a
heavy water quantity. So like water and color in
the same ratio and more. I want that heavy quantity. Now when I put this color, I'm going to just
lay it on top of it. Okay, I'm going to
lay it on top of it. And then if I have to do
another color on top, I'm going to do exactly
the same thing. I'm going to lay that
color on top of it. So I'm going to be
using now Crimson. So see, I'm starting
from the orange. Okay. Now, let's say that if
I want to use scarlet, where is my scarlet. Yeah. Then I'm going to start
on top of the pink. What I'm doing is I'm starting every color on top
of the other one. That's how we'll be doing the feathers of the
Phoenix as well. When we do wet and wet is also like when you lay out another color on
top of another color, the bottom layer is already wet. That also acts as a
wet and wet technique. It is not always the water
has to be as the base. Both the things basically
go hand in hand. Now if I do mix red and
blue together, right? What will happen? So you see here, when I mix that blue, it's going to not
form the muddy color, but it's going to make
the dark more red. Otherwise, what will compliment? If I mix my blue and red
together? What's going to form? It's going to form
a purple color. So I can actually lay
out purple color here, which is a good
start for me, right? And then slowly start diving into all shades of blue
that I want to work with. So any shade of blue that you want to
work with, have two, three shades of blue that
you want to work with ready, and you start laying out those blues one
after the another. That's it. That's
what we are doing. I even ended up with mint blue. Okay, so that's
what we are doing. Now, if there are some areas like this which are
forming darker, that's completely okay
because we're going to anyways do the outline
for those feathers. And we're going to do a
lot of platters detailing, so that we'll cover. But I think you understood
the gold, right? So what we did was we laid out color on top of the
previous color. That actually helps
us. These are the techniques that
we're going to use. So if I talk in terms
of the Phoenix bur, we're going to do yellow, orange pink, red, purples, dark blues, light
blues, whatever, right. That's how we're going to form these feathers of the bird. I hope this is clear, right? So that's it for this
particular lesson, and we're going to jump onto the next lesson where we are
going to learn all about sketching the Phoenix and how to transfer that image in case you don't want
to sketch yourself. So I have both the
options available. Let's go to the next
lesson and learn that. Bye.
4. Sketching: Hi, so welcome to this
particular lesson. So we have learned all about the art materials
that we are using. Then we have also learned about techniques that we want
to use for this class. The next step for us to basically learn to
sketch this, right? So you will have an image
in the resources section. You can download that image and then draw it for yourself. In this particular lesson, I want to explain
you guys method, which is all about tracing your hand drawn artwork
onto the watercolor paper. What I recommend is
I don't recommend sketching here and
then rubbing again and again because then it
actually spoils lot of thing. It spoils your watercolor
paper also is not good uh, when you start working
professionally. There are some techniques
that you can learn. I've taken printout of this. This is a photo of my artwork. I've taken printout of this I've sketched it and
taken a printout. Now I want to show
you guys how you can actually transfer this onto
your watercolor paper. What are we going to
do is we will start by shading the
back of the paper. Let's say that this is my paper, and we'll start shading
this paper on the back. The pencil that I'm using
is a regular pencil. This is my This is a
regular it's me pencil, normal graphite
pencil, basically. So you take this pencil, put like this and don't use tip, do like this, and
then start shading. Okay? So what we want
is we want this all graphite marks at the
back of the paper. If you have a darker
pencil, use that. Do not use carbon paper or
something like that. No. We will be only working with graphite because later
we can also erase it, we want to sketch lightly so
that when we do watercolor, the reflection is actually of the graphite is not visible. As you can see, I'm going all
the way to even the corners where the sketches and we'll just This is a good method. I recommend you to always
do your sketches on an A four printer
paper or normal paper, and then transfer your images
onto your watercolor paper. This prevents a lot of erasing
if at all, you are doing. Now, once you're done with this, once this is completed,
what do we want to do? We want to attach this paper
onto a watercolor paper. Now, this is very crucial step. Now, when you're doing this, I don't want your
paper to move while you're sketching.
It should not move. What are we going to
do we'll just take our masking tape or
any other washi tape, whatever tape you have,
and we're going to secure this paper
from the sides. Now, what it will
do, it will help me. My paper will stay at one
place, it's not going to move, and it's going to
make my life easier and now start tracing it. What I have to do, I
just now have to go over the sketch which
is on this paper. You have to make sure that
you have trace everything. Follow along, make
sure you do not not pressing way too hard that
it rips off your paper, but it has to be soft also
that it doesn't do anything. Keep the balance
and then sketch. Okay. So I have done this sketch on
Procreate my iPad. Okay. And then from iPad, I have exported this
particular document, and then I took the printout and we're using
that particular printout. Usually on my offline
workshops also, I do the same. Okay. So I have done now
the complete sketch. Once you're done, you
are free to remove it. Okay. See. Now, the sketch
that you have got, let me bring it
closer to you guys. I don't know if you're
able to see it or not. Are you able to see S? Yeah. I think, see, this sketch that has come
out is very light in color. Very, extremely light in color. So now what I'll go I'm going
to do is I will just come here with very light
pressure on my pencil, very light pressure
on my pencil. I'm going to redo the sketch. Now, this ensures secure
transfer of our design onto the paper without the need of rubbing again and again
on the paper itself. It saves your paper, saves your watercolor paper with lots of eraser marks
or anything like that. See now and I'm also
doing this sketch, I'm keeping my hands very light. We want to sketch it very lightly because
when we work with watercolor sketch or
the graphite marks should not be that
prominent. Okay. So this is one way of sketching. The other way is you can directly see the picture
and then sketch. Normally, I will not
be covering sketching, how to sketch animals or birds because that's a full
class in itself. The sketching is a big class. So yeah, this is another way
that you can make use of. If you have printer, you can take my sketch actually
download that sketch, take a printout and get going. If you're comfortable, if you feel comfortable
sketching yourself, then you can go ahead
and sketch yourself. Now you have two ways
to sketch this Phoenix. That's it about this lesson. I'm going to see you
guys in the next lesson where we will start
actually now laying out the wash on the Phoenix and will
move ahead step by step. I'm going to see you in
the next lesson. Bye guys.
5. Paint Pheonix Part 1: Hey, guys. Welcome to
this particular lesson. In this lesson, we're going to learn about painting
the Phoenix. So I'm going to divide this
into a couple of parts. So earlier, first
thing that we are going to do is we're
going to paint the head, the neck area, and the belly. Okay. In the next lesson, we're going to do
all the upper wings, and then we'll continue
with the bottom wings. The last lesson would be all about detailing
the beak the nose, and then the splatters on. Okay, that's how we'll
proceed. So let's get started. I'm going to keep it here so you have an idea
of what we are doing. Okay? So we're going to
start with the head now. So for the head, we are using cadmium yellow. Followed by orange, scarlet, crimson, and then we're
going to go to blues. Okay? So this part
we are doing wet on. So leaving the ice and the beak, let's start by putting
water onto the paper. So make sure that
you're not covering the beak and the ice. Okay. And you're going to
come all the way till here. Till the belly of the bird. Like before the
wings are starting, we're going to cover
everything down here. Like till here. Yeah. Okay. I'm starting with the
calmin yellow now. So we're going to put
yellows here on top. Make sure that the
water is not too much. Okay. Come down. Okay, start taking your oranges and blend your
oranges into this. Okay? If it is
changing a little bit, that's okay. Don't
worry about it. I'm going to just do
the crown also a bit of orange. Okay. Down. Just bring it down and now start taking your
crimson or scarlet. Start with your scarlet
actually first, okay? Changing a bit on
how it is done here. It's on our control. We
can change it. No problem. So don't worry about
if the color is different,
intentionally doing it. Okay. And now we're just
taking our crimson color, crimson or caramine whatever
you have available. Okay. Come all the way.
Okay, so that's it. That's how we are doing. So this is like all crimson. I'm going to take a watery
version now, too much water. There's no water
on the paper now. I'm going to do crimson here
and then just ignore it. Take your clean water and
then just do a wash here. Just stop it here. Okay. We're not moving ahead. Now take clean water. Come back to your bird and start blending the existing colors. Okay. Start blending
the existing colors. The detailing that you
see, we will do it later. One, this is dry because
if you do it now, everything, the
color will spread and you will not be
able to move forward. It's all about timing. We have to wait for the timing. We will continue in this
lesson itself about the feathers on upper
body like till here. And then we'll move on to the next lesson to do
the rest of the body. So let's get going. And we're not doing
anything wet on wet now, but it's just that
your brush has to have a lot of water to take
watery version of your cadmium and then do the wings followed
by your orange. We have done this in
the lesson, okay? I've showed you guys how
to do this in the lesson. Just keep making some strokes like feather like
strokes, right? So that is something additional that you
have to focus on. Now, start with your scarlet. Make sure that your
brush has, like, a watery version, then your brush will
flow like a butter. Okay. So make sure that it's buttery consistency with water. It makes your brush blide on paper. And
that's what we want. Okay. After that, I'm
going to take crimson, again, watery
quantity of crimson. Okay. So every quantity that
we are taking is watery. And then I'm doing is
like a couple of strokes like this on the outside. So what I'm doing
is some strokes like this on the outskirts. Okay? Okay. So we have yellow,
orange, red, crimson. And now as we go downwards, we want to also start
the shades of blue, black, and purple, right? So we're going to do crimson, a very light quantity
of crimson now, and this is going to get
mixed up with your purple. Okay. This is going
to get mixed up with your purple and form like
let color, purple color. So that's what we want to do. Okay. Now, you see here there is a segregation.
We don't want that. So just come here with your damp brush and
just go over it once. Slightly blend.
And this portion, which is kind of empty, I'm going to put more color. So I'm just putting more color. No blending. Okay. Yeah. We'll move on to the
next chapter for the remaining half of the body.
6. Paint Pheonix Part 2: Okay, guys, so we'll continue. Okay. So now we're going
to move on to the purple. So you can create
your own purple by mixing ultramarine
blue with crimson, or you can use straight
out of the tube. Anything is fine,
make sure that you're taking the watery quantity
of the color again. Okay, so nothing has changed. We are still doing
the same thing. And we want to take
watery quantity of the color. Don't forget that. And if you would
like, just switch for a bigger brush so that it has more water capacity
to hold more water. I'm going to just touch base from here and then
flow downwards. So as of now, we're putting all crimson purple color. Okay. Later, we're going to
change the consistency. I've started adding
ultramarine blue to this pole. Make sure and let these dry
brush marks come, okay? Don't completely erase them because that gives life
to your painting, okay? I'm moving to a different blue, so this time I'm
taking Kobal blue now. I've moved on to a
different blue, okay. So this is bal blue. Again, watery quantity
of the bal blue. These are the guiding lines. Make sure that your
brush follows a rhythm. So you go according
to the rhythm. You don't have to be very
strict about these lines, okay? That way, phoenix, your expressive
phoenix is going to be different from my
expressive phoenix. And that's what
art is all about. Is going to be more
you and less me. Okay, so I'm going moving
to serlemblue now. And I picked up more water
intentionally picked up more water so that
the color becomes lighter as I move this side. I'm going to take some aqua blue now with milk to blue
mixed with sarilum blue. If you don't have this
color, don't worry. You can actually mix a bit of gauche color in your blue or use a
pastel shade of blue. Anything else fine. Okay.
That's it. This is done. Now just flare, we want
to give them flair. So if there is no flare,
you can start giving them. Now what I see is my colors is flowing back because
it was all wet, right? So I'm going to just
correct it now. So how I'm collecting, I'm just lifting the color from that area and then just taking
color which is not that watery and
putting it back. Okay. Yeah. Go with your damp brush. If your color is moving, go with your damp brush
and try to blend it. Okay. So wherever it is not correct, you can go ahead and correct it. After this, I want this one to dry before actually we move ahead and not actually completely
dry, not semi dry also. So we are going to move
on to the next lesson and cover the rest of the
word with the wash, background wash, platters,
and the detailing. That's all we are
going to cover in the next lesson.
So let's go ahead. No.
7. Paint Pheonix Part 3: Okay, so we are now on the
completion of this artwork. So I have to add, a lot of details using pains
gray to grab your color. Okay. Make sure it is not too watery and your artwork
is not too wet. Okay? When you come before
coming back to the paper, just make sure that
you're dabbing your brush onto the cloth or tissue, whatever you're using, so
it takes out extra water. Okay. Now what we are going
to do we just want to separate these feathers
using the pins. So just like one quick line
between all these colors. Okay? Okay, that's it. And then we're going to just
do this now the detailing. Here, there's a leg, right, feet of the bird, but we want to slightly give
that impression. Actually don't want to
draw anything like that, so we're going to just
leave it with that and then just cover this up
with some strokes as well. Okay. Even if I'm
drawing my artwork, you can see it
will never be like same because at that moment, how watercolor is reacting, only watercolor knows
how it reacts, right? So even if I'm drawing
my own artwork again, results will vary drastically. Okay? And that's the
beauty of watercolor. No two paintings,
no two painting, even if drawn by same
artists will never be same. Depending upon how they
are following, right? Now, I'm going to drab, a very small brush,
very small brush. Why we want to do that
Because we want to do the detailing here on
the beak and the eye. But before that, we're
going to do detailings here, take scarlet red. Okay, come here, and
then draw lines and then make them go outward,
something like this. Okay? These are small, small
strokes that we are making. Very fine, very thin strokes. Let me show you see. So what we are doing is we are doing this very fine strokes. So grab your brush very near so that you have full control,
and then you can do this. You can practice on
rough paper before actually going on
the main sheet. Okay. So once that is done, we have to do these
ribbon ribbon kind of feathers here on
top of the head. So I'm taking my pointed brush. Okay. And this would
be a combination of yellow, orange, red, right? So I first grab or sorry, yellow, D one strokes
half here, half here. I'm going to pick my orange now and don't so strokes orange. And then I'm going
to take pink rimson and do the strokes again.
That's a fun part, right? Yeah, add a few a little extra. Okay, so that's what we did. Now, we have to do the
detailing on the neck. Again, go for your
smaller brush. Go for your detailer brush again and take your
scarlet color. Okay, dab on cloth, come back to the paper and start doing the same
thing that we were doing. It's just that we are
adding details here. So tiny tiny strokes
is what I'm doing. Okay? Tiny tiny strokes in
bottom direction and in upper directions
is what we are doing. So what we are doing
are tiny strokes. So see. Okay. That's it. That's it. Okay. Now we
will come back to the Is. For the I, we are going
to do paints gray. But before the I
let's go do the B. So just draw one
line here, right? Beak, draw the
outline for the beak. Okay. And then wash your brush, take some clean water, and then just go ahead
and then try to blend it. What we're doing is pulling
the color from there. So whatever color we have put, just pull that color, right? And just bend. Yeah, that's it. Okay, nothing fancy. Nothing fancy that
we have to do. So then take your
paints grill again, the bottom beak it will be dark. Okay. And now the eyes. For the eyes, we will not be painting a
smaller section here, but then other than that,
everything is painted. So we're going to do
a teeny section here, and this I'm going
to make it lighter. The rest is actually filled
with colour. Make it dark. Okay, take your brush again with water and we're going
to just fill this up. Okay. But we're not
going to fill the I. Okay, so that's like I. Roughly, we want to
give hint of this leg. The last thing, few more things. So we'll just go ahead and
complete the strokes here. We're going to bring all
the strokes still here. So now teeny strokes
that we are making, keep making them
in the direction. Okay. And then when we
come here near yellow, you can actually take
some yellow color, some red color, and then we can basically make some
feathers like this. Okay. Now, the fun part. So we want to make
more feathers, like, more dynamic feathers.
I want to add here. So what I go, I'll just add a line or two in
between all this. Okay? So I'm going to do
this with different colors, and we're going to do this with white also white gosh also. So that brings out
all the flavors. Okay. Now the last thing
for us to do is take clean water and make
sure that this is dry. Okay. Before we do the wash, I think we have missed out adding the feathers
on this side. So take your crimson, very light watery
quantity and start making the feathers
here downward. Okay? And then just Wash it out. Okay? That's it. Okay. Yeah. I think
this is good. Now the last part is splatter, so just put some clean water around the edge of the phoenix. Okay? Some colors
will flow outward, and that's okay. Let them flow. Let them flow. Okay,
so just a minute. So we are wetting
this area, okay? And do a gentle wash here
if the waters coming back, erase, like, soak it up. Okay. Now take a brush that
you're comfortable with. Take your crimson color. Your crimson color, and then just do some
splatters like this. Okay. And after that, take your blue colour. Splatter. Okay. So you're just making
some splatters. On the top, either
you want to do a contrasting splatters
or you want to do the same flatters up to you. Again, wet this area slightly, go over it. Do not rub. We don't want to take out all
the colors that are there. Okay? See if you rub,
this will happen. So you don't have to rub. Okay? That I wanted to
show what will happen. Yeah. As long as you know how
to correct it by lifting, it should all be good. Okay. So I'm going to just put some yellow and orange
splats over there. Okay. I'm going to one
to here this time. And we can also do
some splatters here. Okay, that's it. So that's done. And we'll take some white gelpin or white gauze to do
a bit of detailing. And because I have a lot
of space left here also, if you are interested, I think it would be
good to add a couple of splatters down
below here as well. Okay. I'll take my purple
and just do some splatters, take some blues, and
do some splatters. Yeah, that's gonna
tie the artwork. Beautiful. Okay. I think
that's looking good. We'll just take white
gash a white gelpin. Anything is fine. If you
don't have both, don't worry. You can use white
watercolor or you can skip this step, not mandatory. Okay. So I'm going to do, like fine lines of feathers like a highlight
on the feathers, some broken lines like this. Okay. And see I'm holding
my brush from far because I don't
want any control. It's just random lines
that I wanted to do. And that's it. So we are done with this one. See you in the next lesson
for the closing remark.
8. Signingyourwork: Thank you guys for
taking this class. I really appreciate
it. The last thing pending is actually to
sign your name, right? So sign your artwork. Make sure your paper is
dry before you start signing in That's it. Okay. And I will just
take out this paper now. So I have a palette knife that
I insert between this gap, and you take out
the paper, okay?
9. Thank You: Thank you so much for
taking the class. I hope you enjoyed the class
and this class will actually allow you to paint
any other bird in the expressive format. You can try different birds, search, you can go
for a penguin also. But I image of a penguin as in how I made it that
bird expressive. Okay. So please upload your class projects in
the project section. Do not forget to
leave a review that actually helps more
people find my class, and I can't wait to see the results and interact
more with you guys. But for this class,
I think that's it. Stay tuned for my upcoming
classes to make sure that you follow me on Skillshare
or on Instagram. Bye.
 Kriti Tiwari, "Watercolor Artist | Teaching Beginners