Transcripts
1. Welcome! Start Here: Welcome to Premiere Pro Sound
Design for video editing. I'm glad, and I'll
guide you through making your video
sound professional. Same video, three
different feelings. In any video, sound shapes
the mood and holds attention. How do you control that feeling by getting three things right, voice, music and sound
effects working together. This course is for anyone who edits videos and wants a simple, reliable audio workflow
inside Premiere Pro. We'll skip the jargon and focus
on the moves that matter, making narration easy to hear, snapping a track to your story, and adding sound
effects with purpose. Together, we'll set up the
Audio workspace in presets, clean and level voice, balance it with music, and play sound effects that
lift the moment. You'll learn to read
meter with keep loudness consistent and finish with short form or long
form projects, built from the same
repeatable systems. All practice files and presets are included in
the resources section. And if you're wondering
who I am, I'm blod. I've spent over a
decade editing videos, managing two of the biggest YouTube channels
in their niches. I've built editing systems
that generate millions of we, and I'm showing you how to
bring the same level of craft and polish to your
own or clients videos. I recommend watching videos and every lesson builds
onto the previous one, giving you a smooth and natural curve that can pounce as you go. You can control the volume and the playback speed
of every video to learn at your own pace. If you get stuck
having questions, be sure to drop them in
the Q&A section below. Just make sure to
check the existing questions first because there's a good chance that the
question you want to ask has already been
answered in detail. At some point, you'll be
asked to leave review. Please wait until you've
had a good chance to really experience
the material. Your honest feedback
helps improve the course and better serve
you and future students. Thanks again for
joining this class. I'm excited to help you Master Sound Sign Premiere
Pro and give you the confidence to use
it in real projects whether personal
or client based. Let's jump to the first lesson.
2. Why Sound Design Matters for Video Editing: No Audio vs Music vs SFX: Video, talk about why
sounds and music matter. I'd like to show you an example. I have exactly the
same video for the scary and for the happy video. Exactly the same. It's
just in the woods, the cameras going
left to right, right, left, and let's take a listen to the difference.
So this is the happy one. It sounds like a
peaceful morning. Everything's great
or the evening, but it does sound
like the morning as if the nature is
about to wake up. And let's listen
to the scary one. So how do you feel? For me, the difference is just, I mean, it's completely
different videos. Although we have
exactly the same video, we can completely change the way this video is
perceived with the sound. And that works with music, with sound effects, with everything. We can make that feel
childish or mature. We can make it feel
scary or happy. We can make it feel
expensive or cheap. We can influence the mood. We can influence the pacing. We can influence the
quality, the clarity, whatever you think about
music and sound effects play a ginormous oh, that's exactly what
we're going to learn. The sound effects, the music, we're also going to
learn how to work with your own sound so
that it sounds crisp, expensive, and just
easy to understand. I'll also show you real life
projects of short form and long form videos from
the very beginning to the very end of editing everything in terms of
the sound, the music. So let's get to the
next video and jump into Premiere to begin. If you have any
questions, let me know. Other than that. See you.
3. Premiere Pro Audio Workspace Setup: Essential Sound, Meters & Presets: Video, let's set up
audio workspace. When we open Premiere,
your workspace might look slightly
different from mine. That's a great thing about
premiere is that you can customize the way
your workspace looks. Usually, in order to
work with the audio, you have to go into workspaces
at the top right corner, then go into audio and here,
you will have the audio. For example, I have
this audio piece here. Whenever I select it, I have my essential sound here at the top right corner and I can
choose what to do with it. Here on top, it says
that it is the SFX, but I can clear the audio type. I can say it's a
dialog and then go ahead and customize
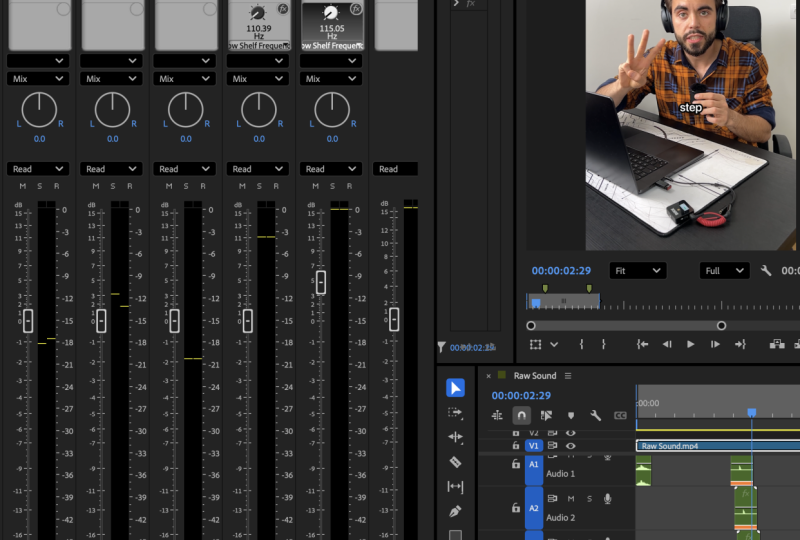
it and so on. That's the central sound panel, which we are going to use a lot. Another important aspect
is the audio track mixer. If we click on this button here, we can open it and you'll see
that we have these columns. The column number one is
the audio track number one. This is number
two, number three, and one until we get
to the very last one, which says mix and mix, it's just all the
audio tracks together. If we come to the
first one and we add any of the
effects from here, it's going to affect
track number one. If we had our audio on track number two and we
had lots of effects, let's say on track number
one, something like this, and let's put something
else, like that, it wouldn't affect
this audio piece because it's on the
audio track number two, so it's on this one here. But on this one, we
have lots of effects. It's pretty important
because we'll be able to save time for us by using the
audio track mixer and by using the
essential sound. I to make things as
simple as possible, we'll be using mostly
just these two, and it's going to save
a ton of time for us. There's this very
interesting phenomenon life where 80% of the work
can be done with 20% of the effort and 20% of the work can be done
with 80% of the effort. It's like the first 80%, is the easy stuff
that can be done quite easily with least amount of tools, least amount of time. But then that last part that this optimization,
it never ends. I lasts forever. So these are the main tools
that we'll be needing. I mean, of course, we can
go so deep into this, but there's no need
for us to go there. We always should ask ourselves, is the audio good?
Can people hear? Can they understand
is high quality? If so, then there's
no need to try to squeeze anything else out
of already squeezed lemon. We can leave it as it is. Now, let's jump back into
Premiere and let's say you don't want to switch the
workspace all the time. Well, there's another
way to do it. Let's say I go into the
vertical workspace. I can go into Window, and then I can add here
the essential sound, which is already added for me. And then I can also add
the audiotrack mixer. I can add here. Now, you'll see that I'm in the
vertical workspace, but I have the audio track mixer and the essential sound here, so I can select it, and it
will be exactly the same. So if you don't want
to switch workspaces, this is an easy way to do this, and I do it quite
often like this. Usually it depends on the type of project that I'm working on or the project or the
season that I'm working in. So that's how you do it. If you have any
questions, let me know. Other than that. I'll see
you in the next video.
4. Micro-Project: Premiere Pro Audio Setup & Real-World Sound Awareness: Seen why sound design matters. You've seen the workplace
optimization premiere pro. Now, two quick tasks for you. First of all, go
into Premiere and customize the workspace
to your liking. Either open the audio workspace, just make sure that it does exist for you or
go ahead and open your main workspace
and add a couple of panels like Essential Sound
and audio track mixer. Once that's done, I do recommend paying attention to
sounds around you. It's a really good practice just to understand what's
around you all the time. Whenever you go for a
walk or to do any sports, just pay attention to
the things around you. It's going to be like
cars, other people, animals, insects, just
some sort of machinery. It will help you in
the future because you will be familiar
with the sounds. Oftentimes, we'll go through
our life on autopilot, but it really helps break the pattern and really
remember the sounds better. So go and do that. If you have any questions, let me know. Other than that, see
you in the next video.
5. Premiere Pro Voice-Over Cleanup: Noise Removal, EQ & Limiter: Well, in this video,
you learn how to clean up your voice in Premiere, specifically through
a four step process. First of all, you'll
have access to this video in the downloadable
resources section. So go ahead and access that,
download and open Premiere. Next, we need to
select the speech, which is going to be the
green line at the bottom, or lots of green
clips, small clips. First thing we need to
do is click on automat, you'll see that it says
automatch to target loudness of -23 loves. When it comes to human speech, it should be roughly at
about -16 to -19 loves. By clicking this button, we
get premier to do it at -23. Now, in order for us to
get it to -18 or -16, we need to still having
the clip selected, press and G. Let's select again, press and G. And
to adjust gain by, in this case, five, to make it louder by 5
decibels and pressing okay. You can see, it just became
a little bit louder. Now, specifically, why are
we doing this sequence? We're trying to make
our audio as loud as possible but so that
it doesn't clip. Clipping of the audio
means whenever we listen to it and it reaches 0 decibels, the sound cracks and
it becomes pretty bad. Well, we don't want
that, but the same time, we don't want our video
to be very quiet. So this is exactly
where we're doing it. There are also many
ways to achieve the same result in
the same effect, the same loudness, but this is the easiest and most
convenient way to do it. If a person G, we can also
click on normalized peaks or normalize peaks Max peaks or peaks to a specific
decibel number. We're not doing that
because we don't want just the peaks to be high, we want the average speech to be higher because if we
just lower the highs, then it's not going to help, then it's going to be quite in the middle. If you
know what I mean? They're highs,
middles, lows and we want everything to be
adjust a little bit higher. When I think about this, I
think about the lumetri color. So if I quickly show you this, if I go into color, it's
similar to the lumetroscopes. Let's think of the highs
as the highlights. We have highlights
here at the top and we don't want to increase
just the highlights. We want to increase
the whole image, brightness of the
whole image so that the middles go up as well. That's what the
middles are the loves and the peaks are
here at the top. If it sounds confusing
at any point, totally understandable if
you have any questions, please reach out in the
unit section below. Once we did the first two steps, we go into our workspace
and we need to go into the audio workspace and
we'll do two things here. We have our audio on track number one and
on track number one, which is this one, once
again, track name, number one, we need
to click here. The first one we need is amplitude compression,
hard limitter. Hard limiter is going to
limit the audio from reaching 0 decibels and picking or
cracking or losing its quality. Because for example,
at some point, for example, here, let's listen. Hook. Okay, it almost reaches
it. It grabs attention. It's about to reach
it like here. In step three, all
right, let me open. Open it up a little bit. Step
three, almost reaches zero. We need to limit it.
And the reason for that is because the next effet
that we're going to do is we're going to increase the quality of the
sound of our speech. And if we increase it, then it might go over zero, but we're going to
limit it in advance. So hard limiter, we can either just double
click on it and we can customize the settings
here or we can right click and press on
Limit two -3 decibels. If I double click, it's
going to be exactly the same as let me press
Command, double click. So we -0.1, if I press
minus three here, it's the equivalent of just
pressing minus three here. It's exactly the same number. And then the last step
that we need to do, the fourth step is click here, filter in the queue,
parametric equalizer. Once again, very similar thing either double click
or right click. So we can double click and
click on vocal enhancer. You'll see that instead of it being a straight line,
which is default. We put the vocal enhancer and makes the audio sound better. It's more crispy.
There is more base. Everything about the
audio becomes better, and you can see that the
different frequencies, it either lowers the frequency or makes it a little bit higher. That's the way we achieve this very good and
high quality voice. Now, let's listen to this
video and I'll be pressing Command set to turn off the effects and you'll
hear the difference. Every viral short
you've ever watched follows this exact
three step formula, and once you know it,
you'll see it everywhere. Step one, the hook. It grabs attention the first 2 seconds. Step two, retention, every line, cut or visual keeps the viewer watching just
a little bit longer. Step three, the report
that satisfying payoff or call to action that makes people like, share or follow. Master those three, and you'll
never post another flop. So you could hear
throughout this video there we points of the audio being a little bit more crisp and the other portion was
kind of muddy in a way. I wasn't crisp. And this is
what the vocal enhancer does. So once again to recap, we to select our audio
clicon Auto Match. Then we to press on G
and adjust gain by five. That's how we make
it to -18 love. We need to add the
hard limiter so that our audio doesn't peak
at zero and we need to add the parametric cecizer to make our audio better
to enhance it. By the way, this video that was playing
in the background, it was made for you as well. It's the information on how to structure short from videos. If you have any
questions, let me know, add that. I'll see you
in the next video.
6. Balance Voice & Music in Premiere Pro: Clear Dialogue Over Background Tracks: In this video, let's
talk about the voice versus music balance. There are going to be
separate videos on how to choose the right tracks, how
to put everything together. In this video is
just specifically how to balance the two together. It's pretty simple as well. First, we need to
select our music, go into our effects and search
for parametric equalizer. But in this one, we need
simple parametric Q. So simple one and then put it in. Now, a
very important part. I'm just going to
apply a preset, which is lower music for voice. You'll see that it is
a simple prometric Q. If you put these numbers,
these specific numbers, it's going to lower
the heights of the music so that they don't
compete with your voice. By searching simple
parametric EQ, just apply it onto your audio
and then copy the setting. In the end, you should
look like this. Then once you have this, just go ahead right click
Save preset, give it a name. In my case, it was lower music
for voice and good to go. Anytime in the future,
whenever you add a music, just add this effect and it's going to lower the
highs of the music, so that is going to be better. Now, let's take a look at the difference. Why
are we doing this? So let's turn of the effect, and this is going
to be the song. Can you hear the difference? It is unbelievable. This was a game changer
when I first heard about this and learned about
this and started using this. The videos became just
ten times better. I really recommend
you to use this. It's going to completely change the quality
of the videos. Let's put this
clip to our video, having the simple Primag
and let's listen. 2 seconds. Step two,
retention, every line, cut or visual keeps the viewer watching just a little
bit longer. Great. However, it still competes
a little bit just because the background music
is a little bit too loud. And what I recommend you do
is selected press and G, and this is a personal choice. Some people choose -30 deciols, some people choose -15, and also depends on
the loudness of music. The best approach that you
should use is just practice, and then you'll be able
to easily identify this. But for example, for this song, I would put it roughly two -15 and I would listen
to how it sounds. Blaine, cut or visual keeps the viewer watching just
a little bit longer. Step three, the reward
that satisfying payoff or call to action that makes people like, share or follow. Master those three, and you'll
never post another flop. One, the hook. I grabs
attention the first 2 seconds. Step two remains pretty good. You can hear the song. You can hear myself. So pretty good. I mean, there's not necessarily need
to optimize it any further. However, based on
the personal choice, you can make it a little bit quieter or a little bit louder. For clients, I usually put it to -20 to 25 to 30,
depending on the music. They preferred it when it was a little bit more quiet
rather than loud. So let's give it to minus
five extra and see how tones. At tension every line, cut or visual keeps the viewer watching just a little
bit longer. Mm hmm. Well, for me, it's just
a little bit too quiet. So I'm going to press
Command and you can see it becomes a little
bit louder again, so it comes back to
-15 instead of -20. It's also important to know that different devices have
different loudnesses. So in headphones,
you hear it one way, but then on a laptop, you will hear it another way. And then on a phone, it's going to be even
further other way. It's impossible to optimize it for all devices that exist. I would just try to make
it as good as possible, and that's going to be the 80%. Don't try to optimize those last 20% because once again it's going
to take forever. This is good enough. Just put the simple parmigQ
save this as a preset, then select it G, roughly -15 -20 -25
depending on the song. If you hear that it
just competes with the voice a little bit
too much, lower down. If you cannot hear it in the
background, raise it up. It's a simple set. There's
no need to overthink this. It's just super
straightforward like this. If you have any
questions, let me know. Other than that, I'll see
you in the next video.
7. Micro-Project: Clean & Balance Voice-Over: You've just seen me
clean up the voice and balance it with music. Now, it's your turn to do so. In the downloadable
resources section, go ahead and find the clip. Download it Open ten premiere and have a practice yourself. Follow the four step
process for the voice, create preset for the
music, and try to listen. It's a little bit too loud,
it's a little bit too quiet. It's all personal choice,
but have a go at it. If you have any
questions, let me know. Add that. I'll see
the next video.
8. Choose the Right Music Fast: BPM, Energy & Loops for Video Edits: Video let's discuss, how do you pick the right track fast? Well, first thing, to understand what is your video about? Is it a documentary? Is it a software video? Is it a fun video?
Is it a tutorial? Is it drama? Is it comedy? Like, what kind of genre is?
What is the video about? Once you understand that,
that's a good starting point. Well, one way you can
just easily ask GPT and it will literally create a an answer for you like this, based on what's already been created hPT doesn't
have creativity, doesn't come up with something that's going to be relevant. It just takes
everything that's ever existed on all the
information that it has, and then it gives you the
answer based on the history. Anyway, let me show you
Epidemic Sound as an example. Let's say we have
a comedy video. The first thing I would
do and specifically on Epidemic Sound is I would go into music because
that's the track part. That's where we find the music. Then I would scroll down a
little bit and at Come here. We can choose any of
these, so for example, tutorials, trial, podcast,
cinematic, and so on. So let's choose comedy. Goofy moments. Let's
open this one. And we can listen
for the trucks. The next step is
literally to just go ahead and listen to the
songs and try to understand, is that what you're looking for, or will that work
for that video? Sometimes I do have
to go through, let's say, dozens and
dozens of tracks, and I literally mean dozens. So I would scroll down
and potentially get to the very bottom and the last song might work
or it might not work. Then I'd have to
go, for example, back to comedy or to different
themes and just see, maybe there's something else that's going to be a
little bit better, and then I just go
ahead and open that and search one of the very
important things is, let me show you by going
into travel and for example, sounds of Japan. Let's come here. You can
see that, for example, an epidemic sound shows
that if there are vocals, if there's speech or
somebody singing, if not, it's not going to show it here and then it's just going to be beats, melody, orchestral. But if you have this one,
I recommend avoiding it. Why? Because it's going to
compete with what you say. You either have to technically
get rid of that so that you can barely hear the speech or the singing or just
don't use that at all. You to make things simple, I never use anything
with vocals. It simplifies my job. If you go into the
bottom left cornea, you can see stamps
here, you can open it. And then you can
download specific parts. You can only
download the melody, the instruments bass trumps. Usually, I don't do it. If there's something
very specific, I might if let's say one of those is distracting and I
want to get rid of that, then I might download, like, three of them and use the
three instead of the four. But it's pretty rare. What I oftentimes do is
just go ahead and click on Download and you
just going to download. It going to premiere,
see if it works. If it does work, I'll just this is the
part that I really, really like about epigram sounds because it's already structured. You can search by genres, by moods, by themes, by artists. If you have artists
that you like, you can go ahead
and click on them. It also simplifies our
job because, for example, if we're doing something
in terms of the tutorial, we can click on Tutorial, and then instead of us
having to figure out, does this work for
tutorial or not, this mus will work
for tutorials. They put it together on purpose. But if you use
something like Pexels, which is a bit more limited
than epidemic sound, and I'll talk about
the difference between those two websites in
a couple of videos. But let's say we're here
and went to search for music and we would
search for tutorial, and then I'd still have to
just go ahead and listen. And then if I like
it, once again, download it, put it in
premiere, and that's it. Let's recap. Note
likect the right track. First, avoid the vocals, understand what your videos
about and try to match the dynamic or the mood or
the genre of the video. Then just go ahead
and try it out, put it into Premiere,
see if it works. Oftentimes, I find a song
that I think will work great, but it doesn't work.
That's not a problem. I just do it once
again and that's it. I might do it five, ten times. The more you practice, the
more you understand with time you can also build the library
of the music that you use. Oftentimes. You wouldn't even
have to think about this. You'll be able to just click on the song and know exactly
where it's going to go. That's how you do it. If
you have any questions, let me know than that, see
you in the next video.
9. Cut to the Beat in Adobe Premiere Pro: Beat Markers, Intros/Outros & Endings: Come in this video, we'll
cut the music to the beat. First of all, I just want
to show you one feature on Epidemic Sound where I
just found a great song. There's a feature playlist slash themes and there's now trending. And when I open this one, this is the song that
I actually quite like. When I was listening
to the song, I found specifically
three moments. First, the very beginning, which is this sound in the
very beginning, this one. Then the beginning of the song, which is the beginning
of the bit and this is exactly cutting to the bit. This is what I'm talking
about when I mentioned this is this part here
when the bit starts, and then the very end, when the song ends. So let's listen to it. First of all, there's this
very interesting beginning, and then there's a clear bit
of when the song starts. I absolutely love when it's like this because some of the
songs sometimes, like, just like flat
throughout the video, just beat throughout song,
throughout the music. But this one, it starts
in an interesting way, and the very first
sound is interesting. And then as the beat begins, it's also quite interesting. And then in the very end,
it's also pretty good. So if you listen to it, so. I look for those three parts, and then I download the song, and I know right away
which parts will go where. So let's the song. I'm going to use the full
mix and click and Download. Then I'm going to open
Premiere and literally just drag and drop
this song over here. I'm going to double click on it, and we'll see the same waveforms as we saw on Epidemic und. Let's listen to this
very beginning. This part is quite long. I'm not sure if we'll
use everything. But specifically trying I will try to find the bit
first for and starts. So we hear three bits here in the very beginning, this
one, two, and three. Listen again. It's
like two, two, two. And then we have
this very big bit, which is the main one. So we had pom. Then when we hear the big bit, the music and background
begins as well. For me, it's very
important to use this, and if we take a look at
people like aseNisa or the Big creators or anyone who's in the editing workspace. When the cuts are precise and
the music bits are precise, it becomes a lot more expensive. Cutting on the beat is
super super important. I'm just going to
market over here and then I'll go a
little bit further. Doesn't matter where and
I'm going to mark out. The reason I'm doing
this is because if I don't and I click
on drag the audio, it's going to drag the whole
song. Don't need that. I can just mark it out, like so and just drag a small part, and then I can make it a
little bit more if I need to. And let's come to the
very beginning and Okay. So I want the beat to start when the middle
portion of the video starts. When there's an intro, I want to use the
beginning of the song, which is going to be
this part over here. But since we are now
putting the middle part, I want to use the middle part
to start after the intro, where we have the main
part of the video. Where? Step one. The hook. It grabs attention
first 2 seconds. Step two, retention. Every line had more visual, keeps the viewer watching
just a little bit longer. Step three, the reporting
satisfying playoff or culture that many
people like, share follow. Pass to those three and you'll
never post another film. When we have the end or the
payoff or the reward part, we'll use another part
of the song as well. This is the middle part
because this is the intro. The first 5 seconds is
the intro, roughly. Every viral short you've
ever Worse follows this exact three step formula and once you know it,
you'll see it everywhere. Step hook. It grabs ten. Great. I also like that this music is not
overpowering my voice. So even though we didn't
do any adjustments, I can hear myself pretty well. Now, let's come to the very end and let's
find the end part. Great. I'm just going
to mark it out. We have a couple of ways
to do the ending here. The place where I
marked the song out. We have sort of like a
riser the ends like tune, two, two, tune tune. So
we can use this part. We can use just this
very last part, which is just the last
kind of sound that this music produces.
We can try both. I would say that let's
actually let's cut it here first, and
we'll put it here. And let's just listen.
What it sounds like. Follow. Mas today's three, and you'll never
post another flop. If you don't like, share follow. Masdas three, and you'll
sounds a little bit abrupt. So let's try to figure out. I'm just going to
put another track, and I'm going to make
it a little bit longer. Post. I'm going to start when the rises starts
roughly around here. What if we make it a
little bit shorter? Like, so and then I'm going to apply this transition
so that at the end, it's not just as abrupt. Actually, we can make it
a little bit shorter. Hm? Great. Okay. Let's see
what we have here. Like follow Master desideFol
Master dt outside the pop. Actually, I don't like the
way it sounds in the end. I don't like it at all.
I don't like this end. It's like it doesn't work
here because we don't have any riser here at the
end in terms of the visuals. So I'd like to actually
get rid of this at all, put this part here
in the very end. Maybe we can just use this very end part and maybe we can connect this part here as well here follow up. Master those three, and
you'll never outside the pop. Master those three,
and you'll never Look, Must to those three, and
you'll never armor follow. Must to those three,
and you'll never another Hmm. Sure, follow. Must to those three, and follow. Master is three and you'll
never post another flop. Actually, I like
this one a lot more now that I heard it
for the second time. A lot of the times it's
just experimentation and seeing if something
works or not. And if it doesn't work, then
just try something else. One thing I also like
to do is we can apply default transition using the shortcut Shift
Command D here as well, and it's going to make it
a little bit smoother. Let's here share follow. Master is three and you'll
never post another flop. Sure, follow. Last these three, and you'll never
post another flop. The end sounds beautiful. Now, let's work in
the very beginning. Let's work with
what we have here. So let's mark it out here, drag it and see how
long this part is. Every viral throw
you've ever wor following this exact
three step formula, and once you know
what you see it everywhere it grabs attention. Hmm. Actually that
sounds pretty good. H since it's doing it like so, there are a couple of
things we can try. We can disable
this one by person Shift Command E and just
literally disabling this one. And let's try to just let's
listen to what it does here. Every viral short you ever worse follows this exact
three step formula, and once you know what
you see it everywhere. Step one. The hook it grabs
attention first 2 seconds. Step two, retention. Hmm. Which one sounds better? Every viral short
you've ever worse followed this exact
three step formula, and once you know what
you see it everywhere. Step one. The hook it grabs attention the
first 2 seconds. Hmm. Actually, both versions sound unbelievably good.
Usually, it doesn't happen. But what we're doing here is just extending
the original song. But this one, by using this one, we're mixing it
because you can see it's basically exactly
the same part. It's just slightly
misaligned here because the intro of the
video is a little bit shorter than the intro of the
song. Let's listen again. Every viral short
you have a voice follows this exact
three step formula, and once you know we
see it everywhere. Step one, the ho What
if we cut it like so and do it like
so enable this one? And once you know we see
it everywhere. Step one. Okay, let's listen to this. Every viral short
you've ever Worse followed this exact
three step formula, and once you know it you'll see it everywhere. Step
one, the hook. This works pretty well, and I would go into the effects. I'd select all the audio, put the lower music for voice. Evil short Ever
Voice follows this. And now make it lower
by Let's try 15. Every viral shortcub
Ever voice follows this exact three step formula and once you know it,
you'll see it everywhere. Step one, the hook. I grabs attention the first 2 seconds. Let's make it louder by five. Every viral short
you've ever watched follows this exact
three step formula, and once you know it,
you'll see it everywhere. Step one, the hook. It grabs attention the first 2 seconds. Step two, retention, every line, cut or visual keeps the viewer watching just
a little bit longer. Step three, the report
that satisfying payoff or call to action that makes people like, share or follow. Master those three, and you'll
never post another flop. This is really good. So
for this song, usually, I told you I put it to like -15, but this one works at minus ten. We're going to
keep it like this. So once again, to recap, the intro of the song we use
for the intro of the video. The middle of the song we use for the
middle of the video. The end of the song we use
for the end of the video. The only thing we have to
mix together is the cuts. We want to make sure
that it sounds great. For this song, it was
quite straightforward, but when it's not
straightforward, just try moving it
around a little bit. Try to find patterns in the
song because oftentimes when the song doesn't work is when
the two patterns collide, and those patterns
are different. That would be a specific
bit throughout the song. And then you put another
bit of the same song is just a different melody already. You don't
want to do that. Maybe you to start the bit
half a second earlier or half a second later and then it becomes smooth and seamless. The idea behind this is just to put everything together
so that it's seamless. Basically, we're using the song, but we're just making
it a lot a lot shorter. That's it. That's how you do it. If you have any
questions, let me know. Other than that, I'll
seeing the next video.
10. Music & SFX Sourcing: Epidemic Sound vs Pixabay & YouTube Audio Library: Video, I'd like to walk
you through the paid versus free sourcing of the
music and the sound effects. There are two websites we've
already looked at which is epidemicsund and pxcells.com. Now, Long Story
short, epidemicsund is better simply
because they are paid. Their subscription doesn't cost a lot of money, and I
understand for some people, it still might be a little
bit of a lot of money, so that's why I'll be
covering both of those. Epidemic Sound is able
to get the money to work with professional artists,
to get music from them. Whereas with Pixabay, you can
find great songs here and I'll show you a specific one
character who does amazing. You will find just a
lot of trash here. And that's the sad
reality about this. In the resources section, you'll find links
to both website, Epidemic sounds going to have a 30 day free trial for
you to get started. Even if you're not going
to use it in the future, I do recommend
taking a look at it in order to get the practice in. You don't need to pay
anything in advance, 30 day free trial, so there's
absolutely no risk for you. When it comes to Bigby, it's this person
here, some music. You'll find that his songs
are absolutely next level. I used a lot of his songs and
it's been great honestly. I really recommend you
this music composer. And one thing to mention about pixies that some of the songs
were created by humans, but a lot of them
were created by AI. Without even scrolling,
we have this one, which is original
and this one AI, AI, AI, AI, AI AI. We have one, two, one, two, three, not AI, and one, two, three, four, five, six AI without even scrolling though AI sometimes
produces good results, most of the time it's not
good yet, once again, it's just putting patterns together and it doesn't
have any creativity, something for you to
pay attention to. We'll cover sound effects a
little bit later as well, but on both websites you
can do sound effects. For example, on Pixel Boy, we need to go into
sound effects, which would be here on
epidemic sounds going to be sound effects here. For me, I've been using
Epidemic Sound for, I don't know, six plus years. At this point, I've been
using that with my clients, and even though I
had subscriptions to websites like art
list, motion array, invito elements, the
best one in terms of the music and sound
effects is still Epidemic Sound because
that's what they focus on. So I've mentioned
like 2000 times that Epidemic Sound is super
great and it truly is. If there are any
specific questions about either of these
websites, you can let me know. You can also find
royalty free sounds and songs on YouTube. However, most of the time, you need to put their
details in the description, which is an extra step and
I don't like to do that. For Pixabay, if you
go into, for example, if we download the song and
we go into their license, you can take a look
at their license here to make sure you adhere
to their license as well. Epidemic Sound, you just put the channel where
you'll use the song. For example, on YouTube, you put a link to the
YouTube channel or to the Instagram
page or to Tik Tok. Just does everything
automatically. If you have any questions about these website,
you can let me know. Other than that, I
recommend epidemic sound. Even just get a 30
day free trial for you to test out and get
some professional practice, and if not, then you can
always go back to Pixabay. If you have any
questions, let me know, than that, see you
in the next video.
11. Micro-Project: Hook & Drop Music Edit for YouTube, Instagram & TikTok: I just want to mention
that once again, in the downloadable
resources section, you can find files
to practice in order to cut to the
beat in premiere. And in order to get
exactly the same song that I used for the practice, please use the 30 day
trial for Epidemic Sound. If there are any
questions, let me know, I see you in the next video.
12. Congratulations!: Congratulations. If
you're watching this, it means you made it halfway
through the course content. And we've covered lots
so congratulations you for making to this point. There's a lot more valuable
content coming soon, but before we get
to the next video, I want to simply ask you if you found value in this program
up until this point, it takes 60 seconds to
leave you honest feedback. Of course, I will immensely appreciate this
and feedback will massively help future students in deciding the best
program for them. So leave you feedback
now, and of course, if there's anything
I can help you with, let me know in the
Q&A section below. You're doing great. Keep going. And without being said,
let's get to the next video.
13. SFX in Premiere Pro: 5 Essential Sound-Design Recipes (Whoosh, Impact, UI...: Well, in this video,
let's talk about the sound effects fundamentals. Whenever I work
with sound effects, I like to play a game of
associations in my head. For example, there's
some sort of graphic coming onto the screen. What kind of sound does
that associate with? Usually, when something
moves quite fast, it's like, sort of like
windy sounds like. So that would be
like, Whoosh sound. You will face a
lot of the sounds that exist in real life, and you will also
face with a lot of sounds that don't
exist in real life. Like, for example, something just appearing on the screen, what kind of sound
would you use for that when it's just just
instantly appearing? Well, a lot of the
times, sounds like pops or some sort of
switches are used, even though it doesn't
exist in real life. The best way to
understand this is to practice and practice
as much as possible. That's what I recommend
us to do here. Let's take look at this video. In the very beginning,
for example, we have this very sharp
and instant zoom. Every. By the way,
I'm going to mute the track with the music
so that we don't hear it. And we can also mute the
sound where I'm speaking. In the very beginning, we
have this very fast Zoom. With fast Zooms, we usually
use some sort of swooshes. Let's search for swoosh
on epidemic sound, and let's go into
sound effects. Swoosh. Okay. This is pretty good.
I'm going to press and download and
just download it. And then we're just going
to track and drop it here. And let's listen
whichever works best. I like the second
one. It's quite fast. I'm just going to mark it
out and then drag it here, so maybe make it a
little bit shorter because we have swoosh
from the very beginning, start fast and end here. This is great. Then when we have these three things
coming onto the screen, once again, here we
would use a swoosh. Some people could probably use pops and sometimes it
does work for this one. I just because it's
like a long movement, swoosh would be best. Let's try to use another
maybe like this one. Let's find this
part where it comes onto the screen and that's going to be the very beginning. We can see the first one. Let's see. Let's
test how it sounds. Okay, pretty good. I'm going to copy it by pressing
option and pressing down and move it a little bit to the right, two
frames to the right. One, two, and then we have
the third one up here. I'm just going to
put it even lower. Move it a little bit to
the right. Let's here. Let's move it a little bit to the start because if I feel like it's a
little bit too slow, one, three, maybe
a little bit more. So I'm just going to
select everything but shift and move
it to the left. Let's decrease the
loudness by ten. For this one, another
very important one which is used quite
often is UI sounds. So we can go into Editing sound, search for UI I quite
like this sound. You can see the sound,
it doesn't make sense for what we have
appearing on the screen, but let's give it a try. Let's put it in and let's see where it starts
appearing here. Quite like the fact that it
has a couple of stop points. It's not just one long swoosh
tuk tuk and because we get that works as if we have different letters
appearing one by one, so it's pretty good. For this one, we can
also use the UI sound, but let's try to
find another one. Maybe this one. Let's
drag and drop it. We can drag and drop it
writing timeline and see what it sounds like. Hmm. Pretty good as well. I like it. So you can see, there's no sort of sound for the text
appearing, right? But we're just using our creativity in
order to put it in. Let's find another
one, last one. Maybe we can use this
one. Let's give it a try. Maybe we need to cut
it a little bit, because it's quite long. Let's cut it maybe soil. This is pretty good as well. Then here we already have a sound effect,
which is swoosh. This one comes automatically with this transition
and I'm going to show you in the next video how to get that setup
for you as well. Now, let's listen to
everything with sound effects. And then one thing here as well, for this transition,
you can see we have this transition
which is going down. And for this transition,
we can actually use another swoosh and we can actually just go ahead
and copy this wooh. I'm going to dragon
drop it and press Option and going to just
make a copy it here. Then why don't I put
it roughly so Okay. Now we just need to make
it a little bit quieter. This one and this one
in the beginning. Let's put it to minus ten. And this one the sound
effect quieter as well. So let's put these to minus
five. What about this one? Let's try this one
minus five, as well. Maybe this one's a
little bit too quiet. Let's make it louder by three. Let's enable everything
and listen to everything. Every viral short
you've ever voiced follows this exact
three step formula, and once you know
it, you'll see it everywhere. Step one, the hook. I grabs attention in
the first 2 seconds. Step two, retention, every line, cut or visual keeps the viewer watching just
a little bit longer. In step three, the report
that satisfying payoff or call to action that makes people like, share or follow. Master those three, and you'll
never post another flop. Perfect, You can hear it in
the background. It's subtle. Doesn't compete with my
voice or with music, but it adds that little bit just improvement
to the video, which makes it a lot more expensive and a lot
more pleasant to watch. Now, some of the sounds
that are used quite often, for example, pops, we
can search for pop. These sounds are
used quite often. Then we can search for impact. It's going to be a hit. Something like this. You
will also get access to 38 of my most
used sound effects. I've gathered this library of sound effects over the
years of editing videos, so it's going to
be super useful. You have things like
bushes, beeps, dinks. What is this dramatic
rise, errors, film projector, and a lot more stuff you're
welcome to use. It's going to be in the
downloadable resources section. So go ahead and access that. One of my favorite ones by
the way, is this ratchet. So if we zoom in here, especially in the end,
Oh, I love this sound. If it's number is changing
rapidly or is shot after shot, this can be used very well. So this is just one
of my favorites. Then there's Sci Fi sounds,
which is also good. Go ahead and explore this. If you have any
questions, let me know. Other than that, I'll
see you in the next.
14. Instant SFX with Free Extensions: Premiere Composer Walkthrough: Video, I'd like to introduce
you to Premiere Composer, which is an extension to
Premiere Pro into after effects. If you go to this website, which is going to be in the
downloadable resource section and you go into products
for Premiere Pro, premiere composer,
this is the one, you don't only get a lot
of the sound effects, but you also get a lot
of the other stuff. I think this is going to
be super useful for you. Now, let me show you
what do you get. By the way, it's
absolutely for free. If you want, you can
get a paid version, you're going to get more, but honestly with
the free version, you get more than enough. This is premiere composer.
You get a lot of the sounds. First of all, you
get text boxes, text breezes, but you are
welcome to explore that. We are going to
focus on the sounds. Here's what you get. You get
approaches, buzzes, beeps, plus booms, click
click drum pop, slide, swoosh tap
knock transition. One of the great
things about this, you can also search
and why don't I have swooshes in the fax folder is because I have swooshes here. If I search for swoosh, you have five different swooshes
and in order to use it, all I have to do is to,
for example, click. It's going to preview, and then I have to press and add and it's going to add it.
That's it. Simple as that. If I want to delete,
just press delete and press on Commandt and
going to delete it. Super super useful. I really recommend you to explore this. I don't use all the
sounds all time. Swooshes probably
the most used ones. Transitions are
also pretty good, but it's also kind of swooshes. Pops is pretty
good here as well. So if I search for a
Pop, super super well. And yeah, really
recommend you to use it. Super Great is
absolutely for free. I have no affiliation with them, so go ahead and test
it out for yourself. Let me know if it's good or not. Let me know if you
have any questions. If you don't, then
I'll see you in the next video. See you.
15. Practice Sound Design in Premiere Pro: Timing, Layering: That you've seen me work
the sound effects and now that you have access
to put me a composer, go ahead and give it a practice. You don't necessarily have
to copy me sound to sound. The most important thing
is for you to practice. If you want to use another
sound, go ahead and do that. If you're a little bit hesitant, go ahead and just
copy me exactly. If you have any
questions, let me know and that's in
the next video.
16. Hormozi-Style Content Piece Explained: Structure, Beats & Audio Choices: Video, we're going
to take a look at $100 million leads by Alex Ramses specifically on
what the content piece is. A content piece
consists of hook, retain reward, or hook value
reward or hook retain CtA. There are many versions of this, but it's like you hook people
in, people watch the video, and then you reward
them with something in the variant or you
give CtA at the variand. Every short form content is a piece of content which
has these three parts. A very important thing is that what is a long
form content? Will long form content is just a lot of the content pieces together. You've seen me do sound design for a short from content and the way you do sound design for long term content
is exactly the same. You just have to
do it many times. If we take a look at
this, for example, we can see here, long
equals more content units. So we have short from content
which is hook retain reward and long term content is just a lot of these
pieces put together. A content unit is
a shorten content. And the long from video
consists of just like five, ten, hundred of these
small content pieces. You work exactly the
same long from video. You just do it many times. Remember that the way
we worked on the short from video is the beginning of the video was the
beginning of the song. The middle of the video was
the middle of the song, and the end of the video
was the end of the song. So we just have to
do it many times. If you were looking
for a secret formula, that's a secret formula. If you have any
questions, let me know and that's in
the next video.
17. Short-Form Video Build: Voice Clarity, Music Edit & SFX Polish in Premiere Pro: This video will focus
on the sound design for a short film video from the very beginning to the very end. We'll do the audio, we'll
do the sound effect, we'll do the music, everything. So here's the video
that we have, and it's already
in edited video. And let me quickly show you
what this video looks like. Premiere Pro or DaVinci Resolve? Premiere. Premiere Pro or Final Cut Pro. Premiere. Premiere
Pro or cap gut. Premiere. Premiere
Pro or After Effects. Mm. Premiere. Premiere
Pro or blender. Premiere. Premiere
Pro or Sony Vegas? Premiere. Premiere
Pro or I movie? Premier. Okay, so this
video follows a format that a video for my clients
got 3.7 million views. These type of videos
when there's a choice, they get millis and millions of views very popular right now. So that's why I'm following
this format as well. Specifically, what I did here to walk you through in
terms of the audio. So we actually have my lady ask me in the background
these questions. So she gives it to me, but then it's a
lot better to use the voice overlay that
was generated by 11 labs. And so this is what I use here. The green one is the AI
generated voice from 11 labs, and the orange one is me. By the way, if you
want to learn how to create viral videos
just like this one, you can go ahead and
click on my profile. I have a number of
courses that teach that, so just go ahead and learn it. Specifically, I recommend
starting with how to MastersofFm video
editing in Premiere Pro. And then after that, you can go into Master Short
from video editing, Premiere Pro and after effects, and then after effects. And there are three
courses like this. Just go ahead and
click on my Pfund. You'll be able to find it easily. This part at the bottom. So if I enable just this one, if I enable just the solo track, you will hear this just, like, a little bit of the
sound in the background. And the reason for this
is because my voice, it has a little bit of
this background noise. But then the AI generated
one is crystal clear. And so there is a big
difference between those two. It's sort of like when you're
photoshopping something, you want things to look similar. You want to overlay
some sort of effect on top so that both
images look the same. And I kind of use the
same approach here where we have two audios, but then both audios will
have the sort of, like, just a slight noise
in the background, which just makes it a bit
more human and it's not as abrupt and contrast when we
switch between AI and myself. So I'm not going to touch
this. You can say as it is, but I'm going to
select all the audio. I'm going to click on Automatch. I'm going to select again, pressing G, five, pressing K. Okay, P. Premiere. Premiere Pro or cap gout. Premiere. Premiere Pro or after Effex? Press commands to disable
the audio game by five. The reason for that is
because when we add it, for example, here, we have a lot of noise
in the background. Like, listen, the contrast the difference here when it comes
from here to here. Premier Pro or cap gout. Premiere. So that's a
little bit too much. I want to avoid that, so I'm
going to press and Kamanjt. It's still quite loud and
people can still hear it. It's just not going to
be like at the very top. Now, I will also go into
audio, select everything. And for AudioTrack number one, I'm going to add a hard limiter, which is going to be here, and I'm going to add
parametric equalizer. So for hard limitter,
right click minus three, parametric Q vocal enhancer. Premiere Pro or DaVinci Resolve? Premiere. Premiere
Pro or Final Cut Pro. Premiere. Premiere
Pro or cap Got. Sounds very good. This
is the first part done. We'll come back to the
vertical workspace. Now, we need to work
in the sound effects. And the only sound effects really that we need to use
here, well, first of all, here in the very beginning
when we have this abrupt Zoom, and then we need one
for the checkmark. And technically, we can animate, you know, everything
that's moving on and out of the
screen with swooshes. But we'll see how it goes. So first of all, I want
to find the checkmark. And for that, I'm
going to go once again to Epidemic Sound and let's search for Chuck Mark. Sun. What did I use
here with clients? Ali or Bangkok. Bangkok. Okay, so that's some sort of YUI sound that I use
with the client. Let's see if we can find
something similar here. YUI success. Actually, might be this
one. Let's double check. Bangkok or Cheng Mai. Cheng Mai. Yeah, I think it's exactly
the same one, this one. So because the sound worked, why don't we just go
ahead and download it and then see if it
works here as well. So I'm just going to put it in. I'm going to select it. And whenever we have the check mark appearing
on the screen, we are going to have
this sound as well. Premiere, press G and
put it -15 premiere. And I'm going to drag it with option and it's just
going to duplicate it. Premiere. Potentially, we need to move it slightly
because I think, like, it's just a little
bit too fast. Premiere. Because you can see
that we have the sound start before I actually start
saying the word premiere. So I'm just going to select this and move it a little
bit to the right. Premiere. Premiere Pro or cap Got. Premier. Premiere. Here as well. It's like, too early. Hm. Interesting
steward here as well. Premiere. Premiere
Pro or blender. Mm. Premiere. Premiere
Pro or Sony Vegas? Premiere. Premiere
Pro or I movie? Premiere. Yeah, let's
double check it again. Premiere. Premiere
Pro or Final Cut Pro. Premiere. Premiere
Pro or cap cut. Premiere. Premiere
Pro or After Effects. Mm. Premiere. Premiere
Pro or blender. Premiere. Premiere
Pro or Sony Vegas? Premiere. Premiere
Pro or I movie? Premiere. Okay, this
is really good. By the way, the reason
why I always like premiere out of all of these is because even though I absolutely love like
blender and after effects, I teach both of those, so hard to put everything
together in blender. I mean, I think
there's an editor, but I never used it because it's just a little
bit too complicated. In after effects, you
can work with audio. And premiere with latest updates that's about to be launched, like it is absolutely
next level. It will be just as
good as after effects. Not in terms of the
motion graphics, but in terms of, like, for
example, Roto brushing, which is going to
be done with AI, and it's going to be
unbelievably good. And so that's why
I choose premiere just because more versatile. Okay, so let's do a swoosh
in the very beginning. Composers swoosh.
The fast swoosh. Premiere. Make it minus ten,
just a little bit quieter. Premiere Pro or DavinciRsolve. And now let's search for music. Let's think what kind
of music can work here. And actually, we can
ask SAGPT about this. Hey, GPT, I'm doing a short form video
comparison where I compare Premiere Pro with DavinciFinal
cut after effects, blender, things like that. What kind of background
song can we use here? Not background sound, but
background music, can we use? Like, what's the
genre or what can we search for on Epidemic
Sound in order to find it? Electronic bit. Yeah, I
think that could work great. Okay, so we have two
very good candidates. We have the first
one, the second one, which is just bits,
but different bits. This one is a little bit slower. This one is a little bit faster, and you can also see the
BPM bits per minute. So we can go and
try the first one. If it doesn't work, we
can try the second one. Both are pretty good. There's no big
difference between them, so let's just give it a
try. So I'll put it in. Mm hm. So roughly, we have the beat here,
so I'm just going to drag and drop it. And I'm going to start when
we have the first check mark, so I'm going to start the
beat here. Let's see. Premiere Pro, What Premiere. Beat is a little bit too fast. Starts a little bit fast, so I'll just move it
a little bit further. Pre me a prop. Pre me a pro or PP Let's try to download the
second one and see if we feel like the second one is going to be a
little bit better. So I'll do exactly
the same thing. Find the beat roughly
here, I believe it was. Okay, so literally just put it in the same place around here. So we'll mute this
track with the one that has the song, and
let's give it a try. Premiere Pro or final cut, pro. Premiere. Premiere Pro or Canada. Premier. Premiere Pro or Afro Okay. I can tell right away, this
one is a little bit too fast, so we'll stick with this
one. I'll go to the effects. I will add the lower music for voice, which is
good to be here. Then Pres g minus
ten. And let's see. Mm. Premiere. Minus
ten, as well, T -20. Premiere Pro or DaVinci Resolve. Premiere. Premiere
Pro or Final Cut Pro. Premiere. Premiere
Pro or Cap cut. Premiere. Premiere
Pro or after effect? I want to decrease it even
further because it's a little bit too loud. Mm. Premiere. Premiere
Pro or blender. Mm Premiere. Premiere Pro or Sony Vegas? Premiere. Premiere
Pro or I movie? Premiere. I think that's it. Let's try to put the
swooshes in as well. We need a little bit longer swooshes. Maybe
let's try this one. Or DaVinci Air Pro
or DaVinci Resolve. Let's try to put it hears well when we
have Premiere appearing. Premiere Pro or DaVinci Resolve. Set it with the
other ones. Here. Premiere Pro or final?
Pro or final cut Pro. Premiere Pro or final
cut P. Premiere. Premiere Pro or cap cut. Put it roughly in the middle. So I'll just copy it. I'll get it until the middle, so I'll cut until
the middle and then I'll just copy it and then
put this one back in. But then the next
time I paste it, I'll be able to just put it in the middle
somewhere like so. I'll do the same for the other
ones. Pro or after affix. This one is good. Let's
search for blender one. Put it here. Or,
what do we not do? We did not do the
end of the song. I'll just fine the
very last bit. I think the very last bit
is going to work well. Maybe not even the bit.
Maybe like around here. Yes, this part's going
to be very good. So I'm going to select it, go to the Vx control copy
the simple parmgQPs it here, G -25, and make it a little bit higher
and put it like so, and let's listen to the solo. Something is not working here. Let's see. Maybe,
let's see, like so. Yes, this is going
to be working well. Guys listened with
everything else. Air Pro or eye movie. Premiere. Premiere
Pro or DavinciRsolve? Premiere. Premiere Pro or Final Cut Pro. Make this one quieter by ten, or the swooshes Premiere
Pro or DavinciRsolve. Premiere. Premiere
Pro or Final Cut Pro. Here. By the way, there's no
such thing as perfect video. Sometimes I will forget things. Sometimes, you know, I will
not put something on purpose, and then the audience
will notice that because oftentimes you might think that people notice too many things, they'll notice that
something's missing or something is not enough
or not good enough, but oftentimes, like, people
don't notice anything. I think there's a stat
that people don't notice 60% of your imperfections,
the ones that you notice. So if you notice 100%, people will notice only
40% of your imperfections. So less than half
of what you notice. Anyway, for this
video, I'd like to export this video,
and that's it. I think this video
is good to go. So we have this Wush
in the very beginning. We have swoosh here
for every movement. We have the Check Mark premiere. Nothing is competing with
the background voice. The background music is good. The voices are optimized. I mean, everything is great, so I like to keep it this way. So if you have any
questions, let me know. Other than that, see
you in the next video.
18. Long-Form Segment (3–6 min): Pacing, Music Arcs & Consistent Dialogue: This video, we'll
do sound design for a long form YouTube video. Let's jump in so that
it is a little bit easier for you to understand everything that's
happening in the screen. Let's take a look at
the audio waveforms. I mean, the visual waveforms are all kinds of
different colors. It's just a little bit easier for me to organize this way. But if we take a look
at the bottom here, we'll notice certain patterns. So we have one color here, and this purple color
is the intro color. We have intro for the
first 23 seconds, and then we have content
pieces. We have the blue one. The blue one and the blue one, oops, and then we
have two orange ones. So this one and this one. These are all different
content pieces. Basically, this video is about five different
after effects plugins that are basically
the best plug ins that exist. And each of the plugin
is like a content piece. And when we put it together, we get long from content piece. Something we discussed with
you a couple of videos ago. Basically, we'll have
to do everything very similar to what
we did in the past, repeat it five times
or in this case, six times because
we're going to have in so for this video, once again, let's
do it very quickly. Let's select the audio. Go
to the audio workspace. We are going to automatch
it person G, person five, and then here we will
click and do hard limiter, and we'll do parameter kickser, Right click, and right click. So it's as fast we'll go
into the editing workspace. We'll begin by
working on the music, and then we'll do
the sound effect sound effects with
long from video, especially with this
one when just tutorial. It requires medival
sound effects, which we'll focus on once
again a little bit later. But now let's focus
on the music. So I'll go onto the music tab. I'll scroll down, and I
will go for tutorial. So we have creative skills, educational software tutorial. This is the software tutorial. So let's open this one in a new tab and see
what they have here. I like the song, so I'm
going to download it, and we need five different
songs to get this video done. Kind of like this
one as well, so let's download it,
see if it works. If not, we can always come
back and find something else. Don't like this one. One thing I like about
Empatican sounds, you can click on, for
example, the song, and it's going to give
you similar tracks, so we can search it, like, so Or we can go ahead
and click on the artist, like, for example, here, and it's going to give
us the artist, then we can take a look at
the artist that produced it. But I'd like to go back
to the very beginning. This is pretty good. And let's find one for
the intro as well. This kind of style can work for the intro as well. Pretty good. So let's try to find it. For the intro, I'd like to choose something
a little bit more dynamic can be as dynamic
as some of the other songs, but I don't want it to be,
like, slow and sleepy. I want to be active
and energized. Kind of like this one. I don't know why. It
doesn't have a beginning. It doesn't have a proper
end, but I kind of like it. So let's give it a try.
So this is the 80s. Just downloaded
six of the songs. This is the 80s, so I'm just going to drag
and drop it here. Actually, I can try and
organize this a little bit better so that we have
all of our songs here. This is going to be
the one for the intro. Let's find the part
when this song begins. So for the intro, I mean, we can definitely start with
the intro with just a bit, so we'll put it in, like, and let's
see what we have. These five aftereffect
plugins will completely change the way
you edit them anyway. Over the years, I've
tested dozens of plugins, but only a handful tree stuck. I kind of like the melody,
and I want to find the melody a little
bit later, maybe. Okay, I like this part, so
I'd like to use it somewhere. This pipe aftereffect
blackness will completely change the way
you edit and animate. Over the years, editing animate. Over the years, just edit and I. Over the years, I've
tested dozens of plug ins, but only a handful trees stop
the ones that save hours, repetitive tasks, and make
motion design actually fun. In this video, I'll show you
the tools that became part of my everyday workflow
and ones that get spit up first and stick
around because last one is the custom tool I guilt to
solve a post. Well plugin. And let's find a part
at the very end. Maybe around here. Pick around because last one is the custom tool I build
to solve up to effects. Problem. Plug in number one. Let's pick ups and stick
around because last one. Okay, so a couple of things. First of all, let's use the lower music for voice so that we can hear it
a little bit better. Mute the mute my voice so that we can hear
the music only. Extend this one a little bit. Hmm. Okay, let's
work in the intro. Maybe we can do it,
like, so at this point, I'm just going to move things
around because I'm not sure what's going
to work well and what's not going to work well. So I'll just move things around. Okay, this one worked flawlessly
here, like, so Perfect. Now, let's just
do the beginning. Very good. However, you saw
me just moving things around. Like, I don't know
what's going to work exactly 100% all the time. I'm just moving things around
trying to make it work, trying to make it
in a way that it just it sounds
like it's flowing. Like it's not abrupt. Now
let's work on the end. Basically, what I'll
try to do at the end is find the pattern of
the middle song, and then I'll try to find where the pattern ends and there I'll try to insert
the end part there. Okay, so here is where it ends. Let's listen to it. Lo so. Let's try to do it like so. Because they have lots of small beats here closer together, I'll try to put this bit here as well so that it's very close. Actually, the intro turned
out to be pretty good, especially here in
the very beginning. For the end part, at this point, my hearing got a
little bit blurry. It's not sharp anymore because I listen to the
song so many times, so I'll just keep it
for a little bit. I'll add the other songs, and I'll try to put it together, and then after that,
I'll see how it goes. So I'm just going to put the
five songs that we added. Right away, I'm going for the
part when the bit starts. And I will put it
right after, you know, when you get listicles, and you get, like,
number one, number two, number three, number
four and number five, like presentation of the
title screen is called. So right after the title screen, I will put the bit
basically on the cut. And then we just need
to find the end part. We don't necessarily have
to use the very end part. We can use, for
example, like, the end here when it's just going down. Or we can try to
use the very end. Yeah, let's try to
go to the very end. Okay. Just try to fit it around here. Let's try to find a
pattern of this song. Okay, so here I
hear it right away. The song ends here, and so when I put
this one together, it should work pretty good. I'm going to give it
a default transition. Let's see. Mm, pretty good. And I'm going to
lower it, like so. Then I'll use another song. Once again, going for the bed right away,
putting the bit here. Let's see. I'll put another
track because I want it to overlap a little bit so that there's no complete
silence at all times. I think we need to make this one just a
little bit faster. Like one frame, move
it a little bit. Pretty good. And then let's find the end. We can use it here. So here, we'll put
this part here. Oh, actually, wait, wait.
This is not the end. This is going to be the end. Because this is the end
part, kind of the end, not the end of the song, but
the end of this sequence, let's call it. We can
actually keep it. Like, so, we don't necessarily have to search for this end, which is the one we were
going to use anyway. It comes from the song from the original song,
we don't have to mix it. So I would always
prefer to keep it rather than to try
to mix it somehow a little bit better
because this one is a lot a lot better
than me trying to mix it. So I'll just lower this one down at the very end, like so. We'll use the other one. Great. We have done
a very good job. So we have the intro. We have the five different
songs, intro five songs. Now we just need to add the sound effects in
the very beginning. So I'm going to disable the song and add
the sound effects. Now for the sound
effects, we have a couple of arrows here on the screen, and then we have pop ups. For the arrows, we can use, if we go into the Sex folder. We can use the marker.
We have marker. Which can work for arrows as well as if somebody is
drawing the arrows. Let's see where the movement
stops for the arrows here. So we need this very end part
to be here. So let's see. Yes, so may make it just a little bit quieter in the very beginning so
that it's not abrupt. Great. Now for the pop ups, we can try and search
for the word pop up in the premiere composer
for the pop sound. This one's good. Let's see. Put it on a different level. Surely, we can keep
it on the same level. The litter from here. Here, here and here, let's see. Great. So we have pop ups for every single
number that appears, and then for every single arrow, we have this marker sound. Let's see if there's
anything else. For this, I want this to keep minimalistic and not
use any sounds here. This is just a personal
choice, but, of course, we can add a little
bit of the sound here, something like we used
in the past, like, using the UI sounds, which is going to work
pretty well here. Actually, I'm not
sure if there's anything else we'll need
in terms of the sounds. We can definitely
add, the keyboard sounds and some sort
of movement sounds, especially for these parts. Kind of a personal choice,
a lot of the times. But to be honest, I'll say that the more sound
effects you use, usually the better,
it's better to add a little bit more
than not enough. Because if you take look at, for example, Misty Beast videos, those videos are full and full and full of some sort of action. Movement sounds, there's
never a quiet point. It's almost like pop up, pop up. It's a very similar story here. Actually, for these intros, let's add a sound here. We have some text
coming onto the screen. We have text coming
here and here. We can add sound for this text, and actually quite like the sound that we used in
one of the previous videos. I think it was this
one. Okay, let's give this one a try and see if
it's going to work well. Mmm. I think the sound
works very well here. So I'm going to paste
it, paste it in here. Make it a little bit
higher. Put it here. Okay, let's do exactly
the same thing for everything else. And the last one as well. Now, in terms of the loudness, we need to work on the loudness of the music
and the sound effects. So let's see for
the first of all, let's lower the music
by at least ten. These five after effects
plugins will Too loud, right away, minus ten, as well. Completely change the way
you edit and animate. Over the years, I've
tested dozens of plugins, but only a handful truly stock. The ones that save hours, repetitive tasks, and make motion design
actually fun again. In this video, I'll show you the tools that became part of my everyday workflow and the ones that can
speed up yours too. And stick around because
last one is the custom tool I build to solve after effects
most annoying problem. The pop ups. We can
make it at minus ten. These aftereffect plugins will complete and make the marker
a little bit quieter by -15. These five after
effects plugins will completely change the way
you edit and animate. Over the years, I've
tested dozens of plugins. Now, we'll say that my voice
sounds pretty bad here, and it was my problem because I did not record it properly. That's also kind of
a big lesson that you cannot always revive some of the sounds
that you create. And unfortunately,
that's the reality. And I record it in bad quality, and I cannot really
revive the audio, but I can still do my
best not to try to make it the best it
can be. My problem. Plug in number one. Okay, for all of these sounds or songs, let's put it to -15 and
see if it competes. Give in Paris quick. Wait for quick. For
reference, what? Then just match it to your
brand usage and reduces. Definitely need to
reduce it by I don't remember what we reduced it
for and doesn't show me, but let's reduce it by -20 now. Here's or give in Paris quickly. Still a little bit too loud.
Let's do minus five extra. So it's a total of
-25 You installed the extension cleaner and
great for quick iterations. Instead of manually and
after effect users. Perfect. This video is ready in terms of
the sound effects. This video is quite short, so under 4 minutes,
but it's good. We have quite a lot of changes
in terms of the music. We have six different songs. We have a number
of sound effects and sound effects
here in the middle. Lots of visual stuff,
but the visuals, if you want to learn how
to work with the visuals, go ahead and click
on my profile. You'll be able to get some
of the other courses there. This video is done. If you have any specific questions,
let me know. Add than that, see you
in the next video.
19. Micro-Project: Final Deliverables — Short + Long Form Content: That you've voted me do
sound design for two videos, it's time for you to practice. Go ahead and choose whichever
project works best for you, either short term content
or long form content. Go and download necessary files
in the resources section. If you have any
questions, let me know. Other than that. See
you in the next video.
20. Last Step!: Congratulations.
You are nearly 100% done with sound design course. There are just two
small steps in today. First, take action. As Kafia said, a journey of 1,000 miles begins
with a single step. So if you haven't already, take your first step by
editing your first video. All the best information
in the world means nothing if you
don't act on it, and even small steps lead
to massive outcomes. Lastly, if you found
value in this program, I would really appreciate
if you could take 60 seconds to leave
you honest feedback. I will be immensely grateful to you and your feedback
will massively help future students in
deciding the best m. Although this course is complete, your journey
has just begun. I'm excited to see
you edit online, so be sure to keep me and
fellow students posted. Remember, I'm here
for your success. So if there's anything
I can help you with, please let me know in
the Q&A section below. Thanks again for choosing
me as instructor, wishing you all the
best and looking forward to seeing you
in future courses.
 Vladislav Sateev, Video Editor