Transcripts
1. Hello Welcome !!: If you always wanted to paint a loose and expressive
watercolor painting, but do not know where to start. This class is for you. Loose watercolor
painting emphasizes on capturing the essence
and mood of a scene, rather than painting
a detailed image. Hello, I'm suckered into watercolor artist
based in India. In today's class, we're
going to learn how to paint a beautiful lose
winter cityscape. First, we will start
by getting to know what all the art supplies
that we're going to need. Later we will learn a
few simple tips and techniques on how to paint
a loose style of painting. After that, we're going to get started with our class project. This class has basically
three techniques. Wet-on-wet technique, wet on dry, and riveting techniques. Since perfect for intermediate
and advanced level artist wants to try a fun and
adventurous painting. And if you're a beginner, you can learn a new style of painting in this class as well. Are you ready?
Let's get started.
2. Art Supplies: Coming to that supplies, I'm going to first
talk about papers. I have used Fabriano, 100% cotton, 300 GSM,
cold press papers. I these papers in roles and I
cut them up using a cutoff. Especially allow the
texture of these papers. But you can use any
papers that you have. Make sure there are 100%
cotton and 300 GSM. Have only use three brushes and they're from
Zillow Blackwell wet. This is hockey brush. I use this for the
initial washes. These brushes, silver black
velvet number 14 brush. This is the brush that I mostly used in this class project. And this one is
number six brush, I use this for fine detailing. I have used Winsor
and Newton masking fluid for this class project
to cover up a few areas. If you don't have this, you can use white gouache. Instead. I have used palate, tissues and water jar
and masking tape. These are all
important by the way. A special color palette for this class project which will be discussed in the next video.
3. Color Palette: I have used only three colors. And all of these three colors are from a brand
called White Knight. This color is golden deep. It's somewhere between
yellow and orange. And the second color
is burnt sienna. You have seen me use
this color a lot. The final color is pines gray. Use these colors
in combinations. That is, I have mixed all of these colors
together at some point. So now I'm going to discuss all the color combinations
that I've used here. Finally, I have used white
watercolor to paint this. No, this is not Gosh, this is white watercolor. Let me swatch these colors
out first and later I'm going to tell you the color
combos that I've used. I will start from light to dark. This is golden deep. I'm going to take burnt sienna next and binds Greer at last. Let me label this with my pen. This cafe bar that you see here, I have used golden deep
mixed with burnt sienna. For the top part of the paper
beside that black door, I have used a mix of
burnt sienna with pines gray to get
that dark shade. And for those buildings
in the background, I have used a very
light shade of golden, deep burnt sienna and
pints gray mixture. Like I said, it is
very, very light, so very less pigment
and a lot of water. I've used pines gray to paint those doors for those buildings. So these are all the
color combinations and the colors that
I've used to paint the cityscape have White
Nights brand colors. You can use any brand of
the colors that you want. And for the shade, Please be particular
to all of you will be having the golden
deep shade so you can use orange color instead. That is it for the color
palette for today's class. So we'll jump into next
video and see WhatsApp.
4. What Is Loose Painting Style ?: Let's talk a few things
about loose painting style. When you paint the
essence of a landscape, instead of painting a
very detailed picture, it is called loose
painting style. Now, I'm going to list out a few things about
this particular style. And as we move into the video, I'm going to explain all of
these things into detail. Have an example,
a landscape here. I've just drawn a few
buildings and a car. And I'm going to start
by wetting the paper. Last point about loose
painting style is to paint only the shapes and
structures in the landscape. E.g. I'm gonna be only emphasizing the structure
of the buildings. That is, I'm going to be
painting very lightly, very loosely, the
buildings and the doors. If this was not a
loose painting, I would have given a lot of attention to the
details, This buildings. But for now, I'm only
painting the right shapes. Loose painting can be
done mostly wet-on-wet. But in this landscape
we're going to use wet on dry
technique as well. And we're going to use reverting to the second tape in loose painting style is to
avoid very sharp detailing. E.g. I. Could have done a
lot of things to the store. I could have added shadows, I could have added the border
and Gilmore structure, but I'm only adding one
layer of pines gray, and I'm leaving it
at that because the shape is important
and not the detail. The last step is to
lose the control. I know losing control is not something we can
learn in a minute. It takes a lot of power in us to stop ourselves
from being perfect. But loose painting
is all about that. The goal here is to have fun and to feel relaxed
while painting, instead of burdened
by perfectionism. Capture the emotion you feel when you see a scene
in the nature. All this is nice to hear. I know, but it's not going
to happen in a single die. So I would suggest
to consider Hi class as a practice for you to
learn loose painting style. For me, it took a
lot of trials and practice to paint
loose painting style. It's quite difficult
than I thought. But finally, I'm here. I hope you guys give this
class a try. And who knows? You might just fall in
love with this style. Are you ready to find out? Then let's jump into
the next video.
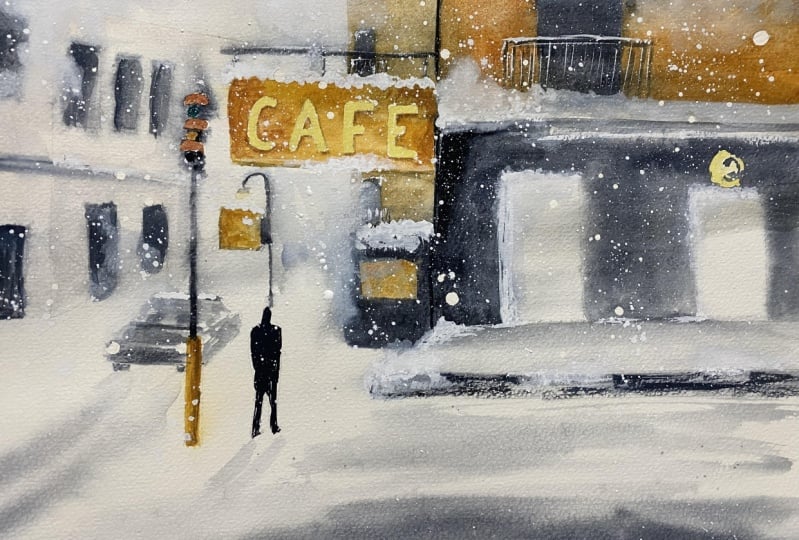
5. Class Project - Sketching: Let's start sketching. I'm going to draw the sidewalk. Sketching the sidewalk first also gives me
perfect perspective. Find the process of sketching with me a little bit difficult. I have uploaded
the final sketch, MAs in the resources tab below. You can download the image and directly trace it onto
your watercolor paper. The sidewalk. I'm going to
draw that big cafe board. That's our main highlight
of this painting. And for your convenience, I'm going to place
the final image here on the screen so that you can understand what I'm
sketching here. I tell it as Cafe, and it doesn't have
to be perfect. You can always correct it
with white quash later. Now this is the sidewalk and this cafe board are the main things that you need to watch out for in this sketch. So if you get these
two things, right, you can build remaining
structures one by one. And this is the
phone booth that I'm sketching just
beside the sidewalk. Now sketch those three dose that you're seeing in
the final painting. I'm going to sketch
those traffic lights. The car and be careful
when painting the car. Because I believe if
you are new to this, if you are painting the
car for the first time, it can be a little bit
confusing where to add the shadows and where
to leave the whitespace. So I would suggest to
draw and paint carefully. Now, let's sketch the
man in the sweatshirt. I think it is a jacket. Right now, wearing
a jacket as well. It's very cold here. Forgotten to sketch
the door here. So I'm gonna do just add onto the buildings on my left. The remaining part of the car. I actually forgot to
sketch it before. We're done with the sketch. In the next video,
I'm gonna show you where to add the masking fluid. And if you don't
have masking fluid, that's fine as well. I'm going to tell you a little
trick in the next video. So let's move on.
6. Class Project - Masking Fluid: Start with applying
the masking fluid. Always apply the
masking fluid with the brush that you
don't always use. And also it should be very thin because you can get
the details right. I'm going to apply the
masking fluid to this cafe. Only the letters tapply on this traffic
lights as well. Structure you see
on this door about. If you don't have masking fluid, you can always use
whitewash, e.g. for these letters
on this cafe board, you can use whitewash
to write those. And if you don't
have white quash, also, it is okay. You can use white
watercolor paint. You just have to take a lot
of paint and very less water. And now I'm going to
splatter some masking fluid in order to get that
snow effect at the end. Before we move on
to the next video, we have to let this masking
fluid to completely dry. So yeah, I'm going
to do just that. And I'm going to see
you in the next video.
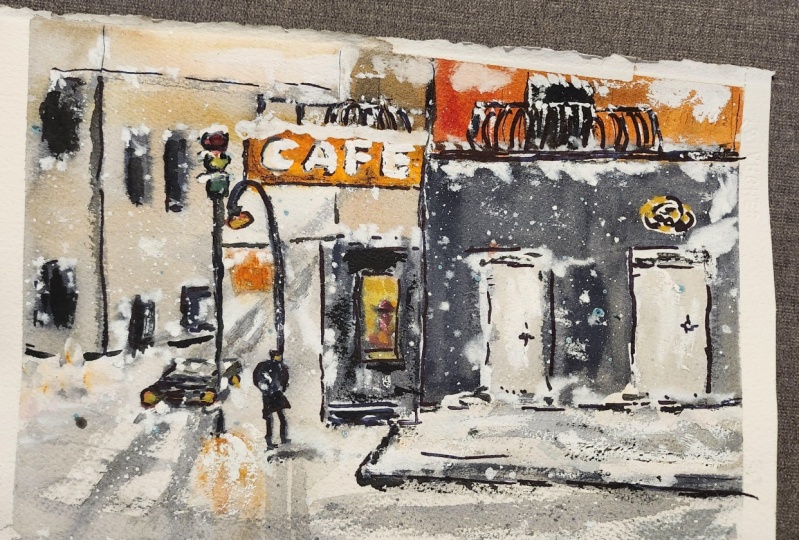
7. Class Project - First Layer: First things first, keep
your paper at an angle. Trust me, it really helps. I'm using my masking tape for this paper using clean
water and hockey brush. I'm going to now mix burnt sienna with a little
bit of Payne's gray. To get this light brown shade. Keep in mind, this color should be very light because
we're going to paint the left side of the
buildings using this color. And they have to be very light. Until you get to share, right? Start painting. And we're going to paint this top part of the building as well using the same color. But we're going to come back
and add burnt sienna later. Remember, this is a
loose style of painting, so do not worry too much about the color flowing
through the edges, the borders of these buildings. It's perfectly alright. Now we're going to
darken a little bit. So I'm going to use burnt
sienna just a little bit. A mix of burnt sienna
and pines gray, a little darker mix because I have not
satisfied with the color. I'm going to add that
color over here. And here as well. I'm going to take a little bit
light shade of pines gray, and I'm going to paint the doors for my comfort. I'm gonna be turning
this board a lot. So if you are like me, do not hesitate to work
at your own comfort. For now, I'm going to be adding the pine screen light shade, but we're going to
work on this again. Can see the paper is still wet while I'm adding this pines gray and the color is just
flowing out of the border. And that is perfectly okay. We are going for that. I'm going to add darker
shade of pines gray. So these two dose here. I'm going to move on to add more details to this
side of the building. And I'm using a lighter
shade of pines gray, and my paper is
also getting damp. It's not completely wet. It's drying. So I'm going
to have to work faster. I'm gonna completely
covered this part of the building in
light Payne's gray. And for the dose I'm going to be highlighting with dark
shade of pines gray. Continue painting the dose using the darker
shade of pines gray. Painting loose style of
watercolor can be very intimidating if you're
just starting out. So that's why I will keep
reminding you throughout the class to let go of the control and to just
paint what you feel like. Your feelings and
emotions should be highlighted when you are going for a loose
style of watercolor. All of those doors are done. We're going to move on to
right side of the painting. And I'm going to get started with darker Payne's
gray this time. And I'm going to paint the
building with pines gray. And I'm going to leave the
dose without adding any paint. The paper is still wet. You can see the pines gray is just seeping into the door area, which I told you to be left
alone without any painting. And this is perfect. If we are going for
a detailed painting, this would have
been a nightmare. Hope you guys are enjoying this free flow
watercolor painting. I'm having a lot of fun here. Now I'm going to mix this
golden deep color with burnt sienna to get this
bright orange color. And I'm going to paint
this area with this color. This is the highlight
of the painting. It'll look very bright. And I'm going to mix
a little bit of pines gray to this burnt
sienna mixture. And I'm going to paint
this area with that color. Now with a damp brush, remote access of a pines gray that is here
in the door area. Remote as much as possible. If your paper is dry
it up, it's okay. You can add water,
whitewater color later. We're going to
paint this one but with fines great as well. I'm going to paint this area
with burnt sienna as well. And this is it for
the first layer. Very simple and
very adventurous. So I'm gonna see you in
the next video and see what's up in the second
layer of this painting.
8. Class Project - Second Layer: Let's start with the second day. I'm going to first paint this little door here
using pines gray. And the one that is right
about this phone booth. I'm going to cover up this
small mistake that I made. I don't want this door
to be this lengthy. So I'm going to add burnt sienna and golden
deep mix a little bit, you know, to reduce
the size of the door. This is not actually a mistake. I just made a
different decision. The middle of the painting because the door
you see right here looking a bit larger than the one that is right
below it, the white one. And it did not look good. I'm going to paint this
traffic light pole using burnt sienna
and golden deep mix. Width, golden deep color. I'm going to paint the board, the little board here with pines gray. I'm going to paint that
smart traffic lights board. Same colors. That is burnt sienna and golden. Dave, I'm going to paint the
window of this phone book. So I'm using lighter colors
here instead of pines gray because there is a light
that is inside the boat. I want to highlight that part. Because pines gray
to show the shadows. Now with that pines gray, I'm going to paint
the door here. Want to let you guys know that all the techniques that
we used in this video, the second layer video, is wet on dry technique. So in the previous video we
have used wet-on-wet a lot. So like I said, there will be three
techniques in this class. I think you can guess what's
coming in the next video. That's right. It's
re-weighting technique. All these techniques that way
that we have used so far in this class have been
in a very loose sense. Are, you can say in a free flow. We are not very particular about details here and
that's very important. Like I said, I will
keep reminding you throughout this class to let go off the control and to enjoy
the feeling of painting. And not just the, not just getting the perfect
landscape at the end. Now, I'm going to take
golden deep color. I'm going to paint this
cafe board with it. But this is not the only time we're going to have
to paint this board. We're going to have to
add the details later. So for now, go with only
one color, golden deep. Now I'm going to take
Payne's gray and I'm going to complete painting
this poll here. And of course the poll that
is holding this cafe board with the same pints gray, I'm going to complete
painting this balcony railing to distort
door at the top. And don't forget to paint drill links to these
two doors as well. We're going to paint the car. I'm using Payne's gray for
all of these things so far I have used pines gray only and a little smaller brush. You're not these are
all small details, so I have to use
a smaller brush. We're going to paint this pole
as well using pines gray. Again, with pines gray, I'm going to complete the sidewalk as well
as you can see, I'm not painting in
a one swift motion. I'm kinda using a
dry brush technique. It also shows there
is a snow there. Now, like I said before, in the next video, we're going to go for
reweighting technique. For robotic technique to work, you have to let this layer
to completely dry up. So I'm going to come back once this paper is
completely dried. So yeah, see you in the next video where we're
going to go for third layer.
9. Class Project - Third Layer: Start the third layer only
when your paper is completely dry so that we can
rewet. For riveting. I'm going to take my hockey
brush and I'm going to very gently lay
down the strokes. Though I have been very
careful about trying time. You can see a little bit
of pigment coming out of the borders for these e.g. for those poles and dose. But it's okay because we are anyway going for
a loose style of watercolor painting and we are actively avoiding
the perfection here. I have reread the paper mainly to add this white watercolor. I'm doing just that. Not going for any
specificity here. I'm just picking random places and I'm adding this
white watercolor. Now, it's time to add the white
color at specific places. So I'm gonna take my
small number brush and I'm going to take the
white watercolor again. First, I'm going to start
with the door right here. And this car and all of
those traffic poles, and especially that cafe board. Be generous with
the white paint. If you have white gouache, you can use that as well. Now I'm going to add a
little bit of Payne's gray in the foreground to
indicate there is a road. Some paint. It gives more depth. I'm going to add snow to the store at the
top of the paper. Now, I'm going to proceed
adding the snow at all the places that
I think it could collect like on this. Especially on these boards and the buildings and
the door right here. On my right. I'm going to add the snow, but this railing as well. And lots and lots of
snow on the sidewalk. The next video, we're going
to remove that masking tape and we're gonna work
on that cafe board as well. And a lots and lots of details are there even though this
is just a loose landscape. So I'm gonna see you there.
10. Class Project - Final Details: Let's paint the final
details of this landscape. I paper is dry. I did not want it. And now using pints gray, I'm going to first paint
the human figure here. Lot of white paint to
show the snowfall. I'm going to remove
this tape for now, but if you guys want
to keep it, you can. So after that, I'm going to walk on removing the masking
tape and few other details. Let's work on a few more
details using white color. There is no specific
protocol here. I'm just looking at
the landscape and I'm seeing what else
I can add to this. Gonna remove the masking fluid now for this traffic light, and that's no droplet. We're going to work
on cafe later. Add green color. After that, I'm gonna be adding golden deep and finds grave
for this traffic light. On the top of the slides
you can paint burnt sienna. I'm going to add one more
layer of gold and deepened burnt sienna for this
pole right here. It got washed away when I
was rewriting the paper. Are bright red color for
this car lights here. I'm going to read this cafe
board with plain water. And I'm going to
add burnt sienna, especially at the edges in
order to show the depth. Next step, I'm going to remove the masking fluid
for this cafe board. So you're going to
have to wait until this burnt sienna is
completely dried up. The board has dried. Now I'm going to remove
the masking fluid. Now. I'm taking this
Naples yellow color. If you don't have it, you can
use the golden deep color. I'm going to use it
just a little bit. And lots and lots
of white color. I'm using Naples yellow to
not q this white color. Now to those letters, you can see how little of Naples yellow I
have taken here. It's mostly white color. This is also time character
shapes of these letters. So take full advantage of it. And now to the important part, if you don't have masking fluid, you can directly go with white color while
writing these letters. And it will make a little
bit of difference. Like you can't see these letters very
brightly, but that's okay. Now, using the mix of
burnt sienna and pines, gray color, I'm going to add the shadows for these letters. I have already worked out
where the shadows should be on a bit of paper
and a piece of paper. You can see that as well. For your reference. Not all do the shadows part. Now, this is the last part. I had lots and lots of snow. Wherever you think is necessary. That is it for today's
class project. I hope you guys enjoyed painting this very unique cityscape. And for the final part, I'm going to cut the
edges of this paper's a little bit because they
are looking to white. So other than that, we are done. Don't miss the next video.
11. Thank You !: We are at the end of the class. I hope you enjoyed painting
the class project. If you try it, please post it in the project
section below. If you have any queries, feel free to ask in
the discussions. Going to see you guys
in my next class. Thank you so much for joining.
 Sukrutha Jagirdhar, Watercolor Artist I Creative Entrepreneur