Transcripts
1. Introduction: Hello, everyone. I'm Richa, a professional Mandala artist with over seven
years of experience. And today, I am going to
share my experience with you all on a new class that
is Mandala on MDF. So in this class, we will
be learning how to create a beautiful mandala on MDF
board with white highlights. So what are we waiting for? Let's start our class, and I hope you guys will enjoy this session.
Thank you so much.
2. About Art Supplies: Hello, everyone. Warm welcome to all of you in my new class. And let's see what
are the art supplies that we need for this class. We need an A four
size MDF board, and these two are A
five size or 4-5 size. So for precision, you can
take the A five size board, and we need a
predector a compass, ruler, a mechanical pencil, and a thick tip marker. This is from domes and these
are easily available on the near a stationary
by you and if you want, you can also get it
from the online stores. This is thin tip marker. This is from SLO
from a line that I use because when
you are working on MDF you need thick lines and if you're going to work
with 0.3 or 0.4 MM, so it won't give you a much pins because when
you look from a distance, your details won't be visible. We want them to visible in a very beautiful
and refined way. That's why I'm using this. This is a thin tip
marker. Let me show you. See, the tip is thin. This marker we need. You can get it again from the local stationary or
any of the online stores. This is Signo white Gelpin
UIBL signo 0.7 white gelpen, we will use this to create the
highlights in our Mandala. Without any delay, let's
started with our session. Thank you so much guys.
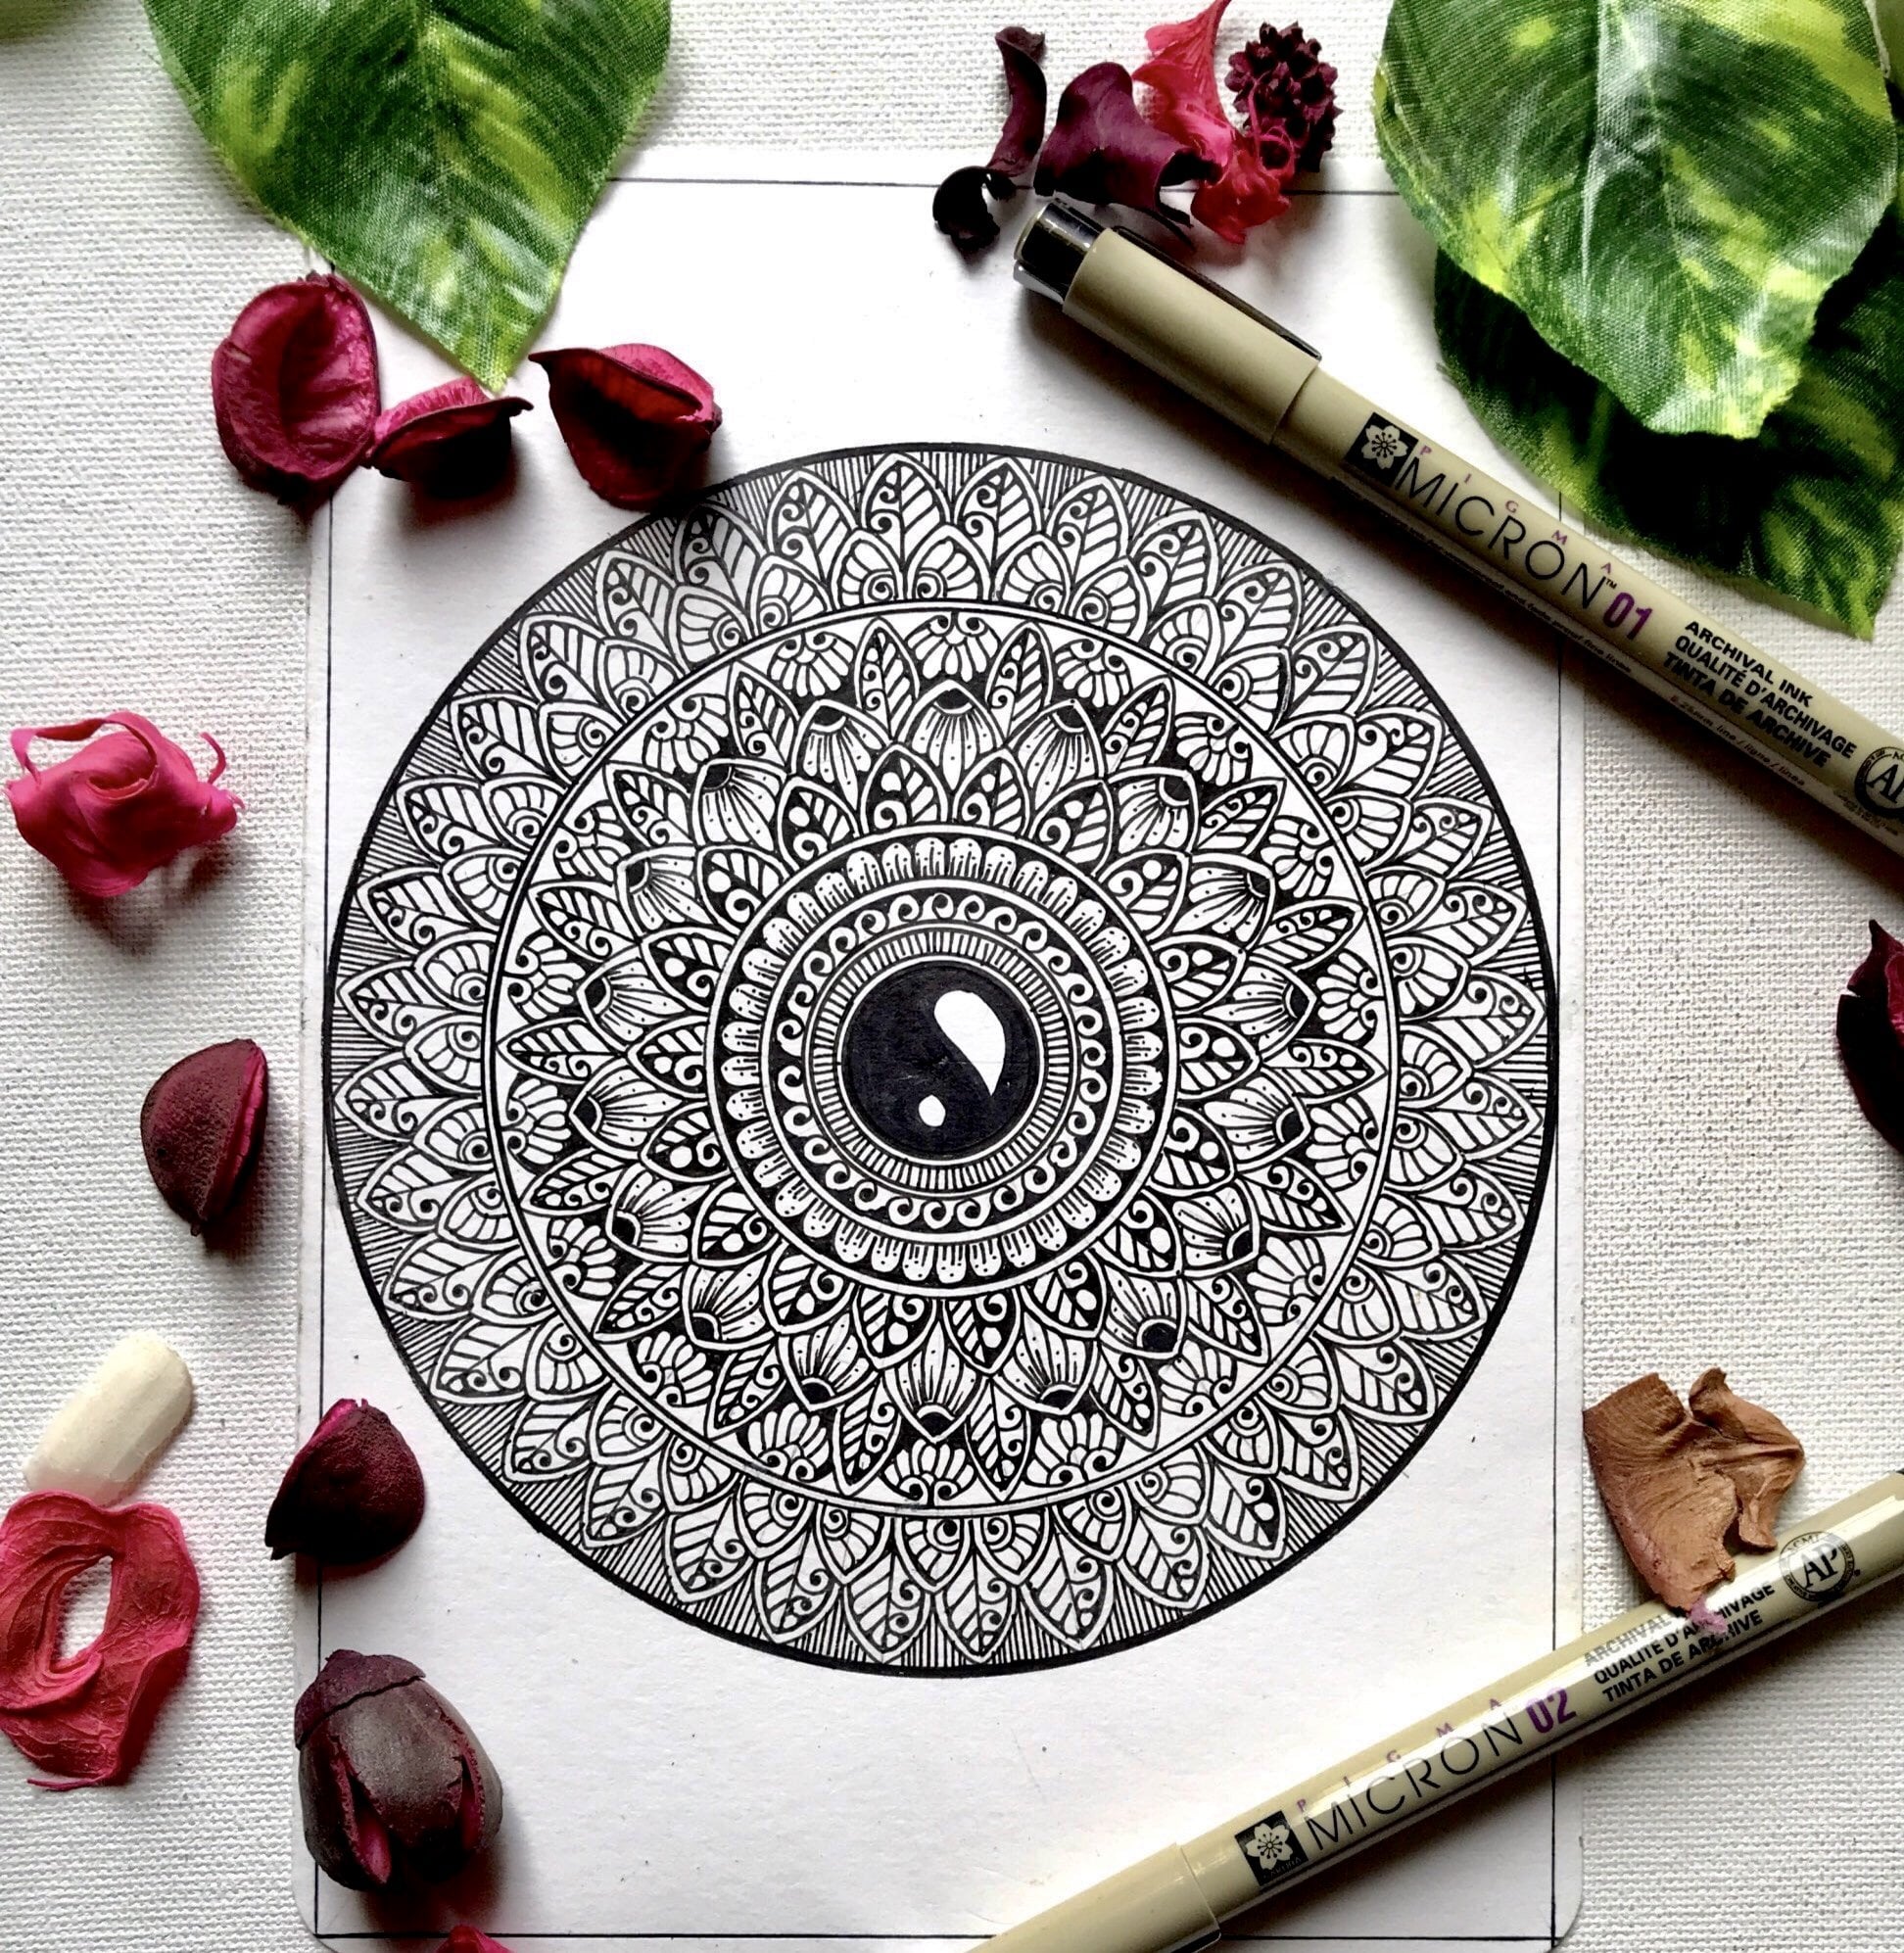
3. Chapter One- Creating the Layout: Hello, everyone. Welcome back to the first chapter of
manda on MDF class. In this, we will be creating a half circle grid on MDF
for the base of our mandala. I have taken one
horizontal line and I find the center of it,
the horizontal line. Now I'm placing the pull
protector on the baseline, aligning the center
of the protector with the center mark
of our half circle. Okay. Now we will
start by marking key points at ten
degrees of angle each. If you want to if you want
big details in your mandala, you can take 20 degrees or 45 degrees or 90 degrees
as per your requirement. But for this project,
we are going with the ten degrees angle. Okay. Now we have marked the
dots and using a scale, we are going to connect
each degree mark on the baseline with the
top of the half circle, creating the radial lines
from the center point. These lines will give
structure to a design helping achieving symmetry and precision
in all over the mandala. Now we have marked the
first half of the circle. Now let's continue joining the dots to the center
of our mandala, drawing the radial lines. Now set your compass to
different radius and draw smaller concentric half circles within the male half circle. These guidelines will help you
align details as you build your pattern here as you can see the first circle I have drawn with a five
centimeter of gap. Okay. And after that, I will be doing
constantly 1 centimeter, then two centimeter gap, then four centimeter,
then 1 centimeter, you have to draw different
constant rig circles of different measurements. Depending on the details, how do you want to create
those details in your mandala? For inking the layout, I am using a thin tip marker. If you don't have
a thin tip marker, you can use 0.5 fine
liner or 0.8 finer. Because on Mandala, if
you're drawing with a very thin tip
marker or fine liner, the details won't be
seen from a distance. So whenever you are
drawing on Mandala, whenever you are
drawing mandala on MDF, please make sure
either you are using a thin tip marker or 0.5 fine liner or
0.8 m fineliner. These markers, the one I'm
using, thin tip marker, these are easily available in the local markets
or any sin shop. If you didn't get it there,
you can also order it online. They are quite competent
to work on mandala in MDF. Now let's start
creating the layout. I am starting from Uf
towards the center of our mandala and we will be drawing the basic
shapes like U shape, pal leaves, and a small dome. These are the shapes
we are going to use in our mandala layout. Remember, this grid
is essential for precise and symmetrical
designs in Ara Mandala. While the 1 centimeter border frames the design beautifully, these guidelines will
make it easier to add intricate detail,
repetit patterns, and ensuring a balanced and beautiful that grid is almost complete and I hope you guys have enjoyed this
session as much as I did. One advice I want to share
with you all is that whenever you are drawing
shapes on your mandala layout, please make sure that
you double outline them. When your mandala is complete, it doesn't seem
that your patterns will be merging into each other. There will be a pines and precision when you
do it in this way. Okay. And definitely,
please do share your work in progress pictures and your project in
the project section. I would love to share
them on my Instagram. And if you have any
questions or queries, please drop them in
the comment box. I would love to help you out. Can't wait to see you
guys in the next chapter. Thank you so much guys for
joining me in. Take care.
4. Chapter Two- Adding Details: Hello, everyone. Welcome back to the second chapter
in this chapter, we will start filling
up the details in our mandala on NDF. We will start designing by the basic pattern
within the circle. For the initial design, we are going to
sketch a petal shape and adding a U shape directly
on above each petal. With the U shape in place, focus on the space between them. This negative space are
essential to the mandala's flow and need to be filled to bring
the pattern to the life. Now we are going
to double outline our petal shape pattern
and once it is done, we will start filling
up the details. Please ensure that space
filler is consistent, allowing the pattern
to look balanced and harmonious when viewed
from a distance. So let's complete the double
outlining of our layout, and after that, we will
start adding the patterns. So now we will start
adding the detail. And within each petal, add three slanting leaves, starting from right to left. This laying of shapes add complexity and texture
giving the mandala a three d dimensional
look and continue this pattern across
the circle being mindful of spacing to
achieve a unified look. Now let's start focusing to the inner detailing
of each hue shape. Inside each hue shape, we will draw a single
line or we will draw multiple horizontal line of different sizes and we will
put a dot on top of it. Then repeat this combination across all U shapes
in the circle. This is simple yet
precise detail, create rhythm and enhance
the Mandalas intricacy. Consistency is the key here and as even spacing make the
design look polished, now we will fill up the
details which is left between the two petals and we are
going to draw a swirrel and a small circle which is left in between the two petals. Let's complete this detail and then we will move
on to the next one. Now we will move to the next concentric circle and begin crafting a leaf pattern in which leaf shape should join at the top of the corners. This creates a unified
and flowing design around the manl center, ensure that each pair of leaf
is consistently shaped and connected at the top to form
a smooth continuous pattern. We will fill up
the space that is left between in the upper
side of the petals with a small circle and fill up the negative space that is left after drawing the
circle with black. Okay. Now let's come on to the next petal that
we have drawn. Begin by drawing two swirls
within each large petal, start both from
the center point, allowing each swirl to extend outward and curve in
opposite direction. This creates a dynamic
flow within the petal that adds movement
and visual interest. Now split the petal vertically
into two equal sections. This division will help structure the space
for the next detail, maintaining a balanced
appearance in each petal. In one half of the petal, sketch a series of
straight leaves spaced evenly to create
a need cohesive look and ensure each
leaf is consistent in size and shape
for visual harmony. In the other half of the petal, we will draw two parallel lines, one larger and one smaller, placing a small circle
at the top of each line, forming a simple
yet elegant motive. Repeat this process
consistently across each petal to enhance the
mandalas intricate details. Now, the space left between
the two big petals, we are going to
draw a lotus there, and we will repeat this
pattern consistently till the last end of the
considerac circle where we are drawing this lotus. In the next concentric circle, we are going to repeat the
leaf pattern that we have done before and we are going to
do it in the exact same way. Please make sure you
are doing it with a consistent hand and leaving the event spacing to
be precise to make it look good and a
flow in the patterns. Let's move on to the
next part where there's a half circle on the edge of
the mandala, and in that, we are going to draw two
army patterns facing next to each other and space left in the corners below the left
and the right corners. We are going to draw some
leaves and the top section, we are again going
to add some leaves. Okay. And we will
repeat this pattern in all the half circles
that we have drawn in between the two petals,
two big petals. Start creating two
small sections at the bottom corners
of the large leaf and this section will
serve as a foundation for the next detail adding
structure to overall design. Within each of these corners, we will draw a series
of slanting leaves, angling them consistently to create a smooth and
flowing pattern. Ensure the leaves are uniform
in size and direction, giving a cohesive appearance. Now add a double outline around the entire
leaf shape to define its edges and enhance
visual clarity. We are going to fill these
lines with U shapes, created a repeated pattern that brings intricacy
and depth, okay? Space each shape evenly to
maintain a balanced look. Lastly, we draw another set of slanting leaves
within the leaf shape, arranging them so that
they face each other, forming a mirrored pattern. This adds symmetry and harmony contributing to the mandalas layered and detailed aesthetic. Now let's come on
to the next part, the part that this
small concentric circle above the half circles
that we have drawn, we are going to
add swirls there, and we will fill the
negative space with black that is left between
the two swirrels and we are going to repeat
this pattern all over the section till the
last end of the mandala. Et's come to the end part of Armandala here we are going to shape one teardrop
shape in the center, and then we are going to add multiple shapes in the same way that we have done earlier. This gives a very nice
and finish look to Armadala the patterns
are getting big. Okay? Now, in the last biggest
petal of our mandala, we are going to draw squirrels that are facing in
opposite directions, and we will draw a drop
like shape, a tiny drop, and we will give it a
bold outline and then we're going to draw
line dot line dot. This pattern we are going to follow in all the
remaining leaves. And our detailing for this
chapter is almost complete, and I hope you guys have
enjoyed the session. So please do upload
your projects in the project section
and your work in progress pictures in
the project section. If you have any
questions and queries, drop them in the comment box. I would love to help them out. And definitely I will do share your projects and work in progress pictures
on my Instagram. Thank you so much guys for joining me in.
Thank you so much.
5. Chapter Three- Adding Highlight: Hello, everyone, and welcome to the third chapter of our
Mandla on MDF class. In this class, we will be adding white highlights to Mandla
that we have created. And for creating
white highlights, I am using UI Ball,
Signo White Giltin. And there are many options
available in the market like Bruce rose White white ink pen. But this is the best one
because when it dries, just give that beautiful
contrast to the whole artwork. Now here, what I am doing is I am creating
the highlights in the first concentric
circle where we have drawn the
slanting lines. Then I am creating highlights in the leaf pattern that we have
created about the U shape. Okay. I will give
a contrast look. Now I am doing the
shading part in the lotus that I have created in the third concentric
circle and also giving highlights to the slanted
leaves that we have created. In a similar way, in
the leaf pattern, the second leaf pattern we have drawn above the big petal, I'm doing the shading part. And rest, as you can see, I am almost filling
every negative space that is left in the mandala to give it a proper highlight. When you draw a white
highlight on brown paper, it just reflects differently. Okay. Here I am filling up the negative space that is left between two concentric
circles with a bold marker, that will distinguish each
layer from one another. This is a thick tip marker. You can easily get it at any online stationary or
local stationary store, and this is from camel. Let's finish doing the filling up the negative space with
our bold highlighter, and then we will move forward. Now on above the petal, we are going to create a
mini border of line line, different vertical
lines with dots. We have to repeat
the same process throughout the half
circle, right? Now we will give a bold look
to our half mandala by doing the fold outline with
a thick tip marker on the last edge of our mandala. Now let's complete rest of the details shading
part and everything in this section and the center
of our mandala is empty, so I am going to draw a lotus in that and I am going to
give it white highlights. Then after doing that, chapter will be completed, and I hope you guys have
enjoyed the session. Do let me know your comments in the comment section or if you have any queries or questions. I would love to help you out and don't forget to upload your projects in the
project section. I would love to share
them on my Instagram. Thank you so much guys for
watching in and joining me in. See you in the next chapter.
6. Chapter four- Adding details to the Backgroundd: Hello, everyone. Welcome back to the final chapter of our
mandala on MDF class. In this chapter, we will
learn how to beautifully fill the negative space
surrounding our mandala, enhancing the overall
look of our design. We will start by sketching
a medium sized lotus motif, an elegant choice
that complements a symmetry of the mandala. Together, we will add
delicate leaves to bring a sense of flow and natural beauty to
our composition. Okay? And after
the motif is set, we will shift our focus to filling the remaining
negative space. I am going to use a
black thick tip marker, and I'll guide you
through a technique that achieves a
balanced contrast, emphasing both on the
mandla and the lotus, this step will
complete our artwork, living with a harmonious
finished piece that is both intricate
and balanced. So here we have
completed one corner of our manla layout
and after that, completing all the details, I am going to fill up
the negative space that is left between the
lotus and the leaves. It is going to give a complete look to our
composition that we are creating. And now as you can see, one corner is complete and I am going to speed up
the process now because this is a process we
have to repeat in the whole remaining part that is left after
drawing our Mandala. After this, our class
will be completed, and I hope you guys have
enjoyed the session. Do upload your projects
and project section. Don't forget to upload your
work in progress pick also. And if you have any
questions or queries, drop them in comment box. I would love to help
you out and I would love to share your work
on my Instagram page. And thank you so much guys for joining me in.
Thank you so much. Let's see you guys
in the next one.
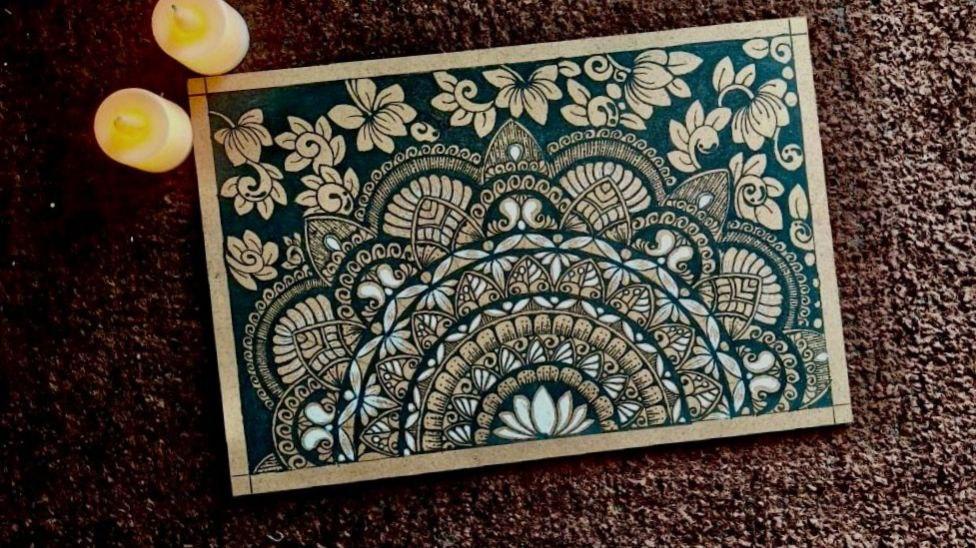
7. Final Project: Hello, everyone,
and welcome back. This is the final project that we have created
in our class. As you can see, the white
highlights are giving a three dimensional look to mandala and the tus motifs are also giving it quite a different
distinction in itself. I hope you love this class and please do upload your projects in the
project section. If you have any
queries or comments, do let me know in
the comment box and don't forget to share your project in the project section. I would love to share
them on my Instagram. Thank you so much for joining me in this
class. Thank you.
 Richa Saxena, mandala & watercolor artist