Transcripts
1. Introduction into Trello: Hello, everyone. Welcome
to this Skillshare class. My name is Silvia Jockey, and I'll be your course
instructor in this one. For the past few years,
particularly since 2017, I've been using Trello
as the core area that I use to really build
my different projects, particularly those
with Skillshare, as well as creative projects
that I want to explore, say things like setting up a
business or trying to push my creative clients to come to that side, as
well as my work. That whole period, I've jangled
between different tools, particularly things like notion, different tools that are
available in market, and I always keep going back to Trello because of its ease of use and ease of applicability
across different settings. I believe that the
tools we use to grow our businesses or the
tools we use to grow our hassles should always be something that we can
easily adopt and that does not take so much energy for us to try figure out which then dissuades us from creating any project and actually
getting to the end goal. Thing that I
particularly love about Trello is that it has a place where you
can dump everything. So say you have a project
where you want to work on, going to school, you
can dump it there as a work or school project. If you have a project
or like an idea for me, like, I want to paint
a landscape painting, and I have different
inspirational items, I can dump it on there and
follow up on it as I move things from whether work is
in progress or work is done. And that provides me
with a very good avenue to have a place where
I know everything is, and I can push every project. It's always terrible
when you think about something that you
forgot like six months ago, and now it's beyond season. Say, for instance,
if you're pushing your creative business
and you want to create products for
your Halloween season, and you find out in
January that you never got to it or when
Halloween arrives, but you had a very good idea
that you wanted to work on. This is what that
class addresses. It addresses those areas where you feel you might
be finding yourself having a gap in your
productivity or in your creation of different projects that you
want to work on. And it ensures that you never
are letting the ball drop or having ideas
fall off your rail because you always have
a place to dump all of them and move them
from ideation to completion through
setting timelines or reminders of when you want to kick start project or when projects
should come to an end. And I believe that's
so important, especially now when we have a large opportunity to grow and we have an exponential market. Based on the globalization
of the world. And I think it's about time we take advantage of these
opportunities and ensure that we are putting ourselves up to ensure
that we can really tap into them and build
our creative ideas and on any idea that you
want to have to completion. And that's why you
should join this class, and I'm so excited to share everything I'm going to
share with you on this one. I can't wait to give
you all the ideas and what I've learned in the years that I've been using the tool.
2. Your Class Project: For your class project, I want you to work on creating a trailer workspace
for your project. You could be a
designer or a writer or a creative whatever
creative thing that you do. I'd like for you to
work on a workspace, which you can create and have a point to dump all your
ideas into and try to see whether you can
move projects from the point where
they are an idea to the point where they
are done or worked on or progressing to something
that you're doing. Also add things like how you're performing on the
different projects. I encourage you to
go through first the course in completion
so that you have an idea of what things
you want to put into your workspace and
then create the workspace. But you can always choose
to do it as I do it, as I work along it and then
improve on it at the end. That's your class
project for this.
3. Why use Trello: So at this point,
I'm pretty sure you're wondering why
you should use Trello. The biggest reason you should
use Trello is because it provides you with an avenue
to see every project at a go. I know a lot of tools
are available where you can see a lot of
things immediately, but the way the app and the platform is grouped provides you with an
avenue to move projects. Let's think about it, it's sort of like you
have a white board, and you have different
sticky notes on different areas for
different projects. And you're able
to move different projects to a different area and also archive them to a different point or
have them in a history, which provides with
a good avenue for you to see what you
haven't worked on. You want to work on
and what you really have postponed or decided you're going to do in
a different quarter. That's very good for
project planning or particularly getting
things that you want to work on from dream to execution because you remove the
amount of time you think about working on something
because you already have the structures in place
to really implement it. Let's say, for
instance, you want to work on blog articles or work on setting up a website for
your creative business. It's much easier for you to
move from knowing that I haven't shortlisted
the inspiration that I have for the pages. And grouping them
together to move in to, I have three different options, and now moving to the coding
and development sector and then moving to the deployment and getting all the
resources that you need. But without having
that clear structure, it's much easier to
postpone projects, particularly those that you're
passionate about because you always think that there's another time that
you can do them. So I would say the main reason you need to use Trello I would advise and recommend
for you to use Trello is because it aids in how proactive you are in getting your dreams from
ideation to execution. And that's the most
important thing because you no longer have the
need or the pressure to feel like there are so
many things that you're postponing or
procrastinating because you effectively move projects
that you're passionate about from ideation
to completion. And that's why I would
recommend for you to use Trello for your
project management, particularly for your
creative business hassle, especially when you have
multiple interests.
4. Creating a board : Okay, so when you get
to the Trello homepage, as you can see here,
you're going to land on the homepage with a
page called boards. So the most important
thing when you are using Trello is
to set up boards. Boards present a workflow
process for you to use, and they provide you with an
avenue to paste everything. So we often work with
boards when you're thinking about different
projects layout. One case example I'll
give you is I have a personal workspace
on this board, right, on this homepage, but I also have a
guest workspace. So within my personal workspace, I can have different boards
based on different projects. I can also simultaneously
have a board on the guest workspace and be able to use it or view
it from my board. This is because the
guest workspace is where I'm working with a
collaborative team, and they can simultaneously see projects from their homepage, while I can see projects
from my homepage. But we can use that
as combined space because now that
visibility is different. So what we're going to
do for us to understand this a bit better is we're
going to create a board. So here we're going
to have an option of create a board from scratch
or create with a template. As you know, Trello has
a lot of templates, and in the interim, we're
just going to go into that. So the templates are here on
the left, as you can see, and they have very different um, they are very different
groupings or subject matters. So if you're in
the design space, you can try using something in graphic design options or if you're trying to work
on something for personal, this could be, like,
as you can see here, writing a book, which
is very interesting. You can try explore that board as we will explore it here, and that gives you an
avenue to use the template. For this, you don't even have to I don't think you have to pay for most
of these templates. You can just add them into your project and
name them, right? I can name this
writing board, too. Plate and then save
it into my projects, yeah, and then create and
keep everything similar. So you can choose to keep
the cards or not keep them. As you can see, it opens
up with everything, right? So the basics and fun stuff
that they've written, which is the summary, feedback, people they want to
send it to, ideas, which would be their
brainstorming page, as well as things
they want to do, things they want to
finish by week ten, which is very good
because they've set a timeline for that board. Things that are completed, and I think now
the rest of it is inspiration of things
they're looking at, right? Now, let's just go back home
to our different boards. And at this point,
we're just going to create a board from scratch. We're going to name
this board Skillshare. Trello board project. I'm going to have this
as publicly visible because I want everyone to be able to see it
as well as you, as well as you, and
I'm going to put it in the project resources later, and we're
going to create it. No, we're going to not
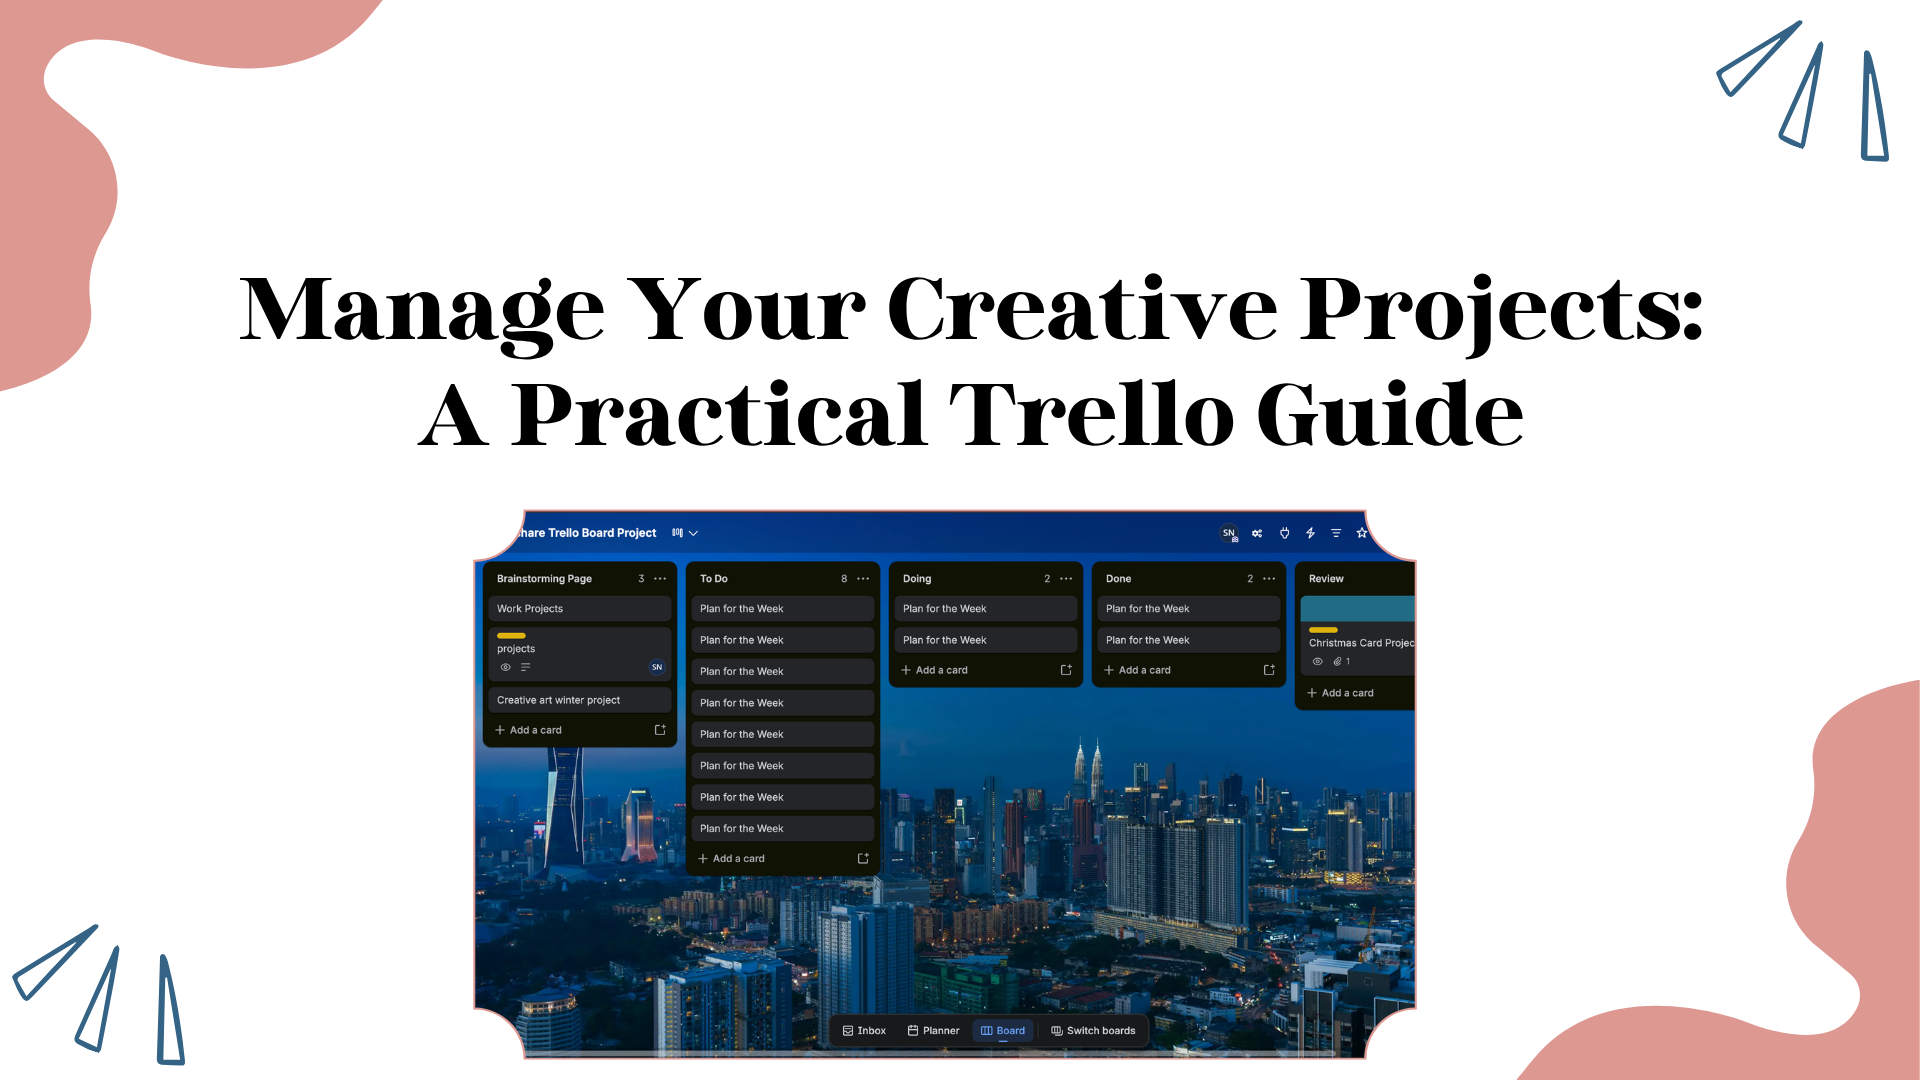
work with a template. And as you see, this is the normal basic page
it will come into. And here we have
things you want to do, things you're doing,
things you've done. What I'd like to do or add
is a brainstorming list. I never go without a
brainstorming page. This is because when you
want to work on something, you always want to have an option of what
you're working on. And because this is the first thing that
you're going to think of is I want to slide this
page to be the first thing. So before I have things to do, I want to think about what
do I actually want to do? And what am I then doing? And then what have I done? You can also have is what
is in review, right? Say, for instance, you you worked on different projects
or you're working together. The review page is
important because while something is done from
a team member's perspective, someone else could want to review and give feedback on it, and that would be here. This point now, we're
just going to now go ahead and show
you how to create cards and lists which
are very important as the breakdown item
for the project.
5. Creating Lists and Cards: All right. So now we're going to be explaining what are
lists and cards, right? So a list is like
this whole layout. A list is in sense the grouping in which you have
named the item. So where you're going
to be brainstorming is the list of items
you're brainstorming. And here we can
have brainstorming about work projects, right? Brainstorming about creative
art Winter Project. At the moment, I kind of want to work on Christmas projects, so I want to think of ideas that I want
to paste on there. As you can see, these
are a group of items, and now here it's
showing you a card. So a card is now the
option of the actual item. And within this item,
say, for instance, C Christmas projects,
once I open it up, I'm only going to be talking
about Christmas projects. And here I'll write a very
random description area to share all ideas
on XMAS projects. I'd like to work
on Across YouTube, Skillshare, website, art pieces. So this in essence gives
a guide that this is a Brandom for me to put every
idea I have on this, right? And I can just leave it as that. Once you open the card,
once you open the card, you have an option of just
giving it a description, but you also have an opportunity
to explore a lot more, which is add members, add labels, add
dates, a checklist, and people you want to work on with on the different items. I believe this is
very important, particularly when
you're trying to group different projects or projects that are in different phases. As you know, when we started, I mentioned how this
point in our lives, due to the globalization
of the world, we have so many things
that we can actually explore and share out
into the universe. So you could be a YouTube
while you also are working while you're also sharing your creative business
and building, creating stickers like I do. So you can be able to do
so many different things, right, at the same time. Now, consider this to be the
avenue where you're able to now see what things
are in progress, right? If this is a life board, for instance, do I have
projects for work? Do I have projects for winter? Do I have Christmas projects that are moving forward, right? And as you grow and develop this further,
say, for instance, I have a Christmas project
Christmas Christmas. Card project. I can group this by now making sure that all things that are aligned
to one similar theme, I now have labels for them, and that's why we use
things like labels. So I'm going to give
it a new label. I'm going to go into
the card itself, click on label and
create new label. Here I'm going to create a
label for Christmas, right? And I'm going to put everything that is Christmas
in bold yellow, right? And that's it. So once I see bold yellow, even if I don't name
something Christmas, I will know it is under
Christmas projects. So the beautiful thing
about that is once I move a project to
do, for instance, and it's just named projects, but it's still under the
label for Christmas. I know this is grouped together with my
Christmas project, and I can associate things
with one main grouping. So if I have
Skillshare classes I'm teaching and their name like,
they have a pink color, I can see what's in progress in the pink color
or what I haven't done in Skillshare that I
am really desiring to push. And that's how you use labels. Other than labels, we also have the option of adding dates
and checklist and members, as well as attachments
at the top, right? At this point, you see,
we've already added a checklist label
onto this page, but now we can choose
to have a deadline. Deadlines are important particularly when
working with teams, but also even when you're
working alone because say, for instance, you wanted to
post something by February 2. It's very important
to create a date for when something
needs to get done by because now you ensure that you are able
to either receive a notification or have a due date for this day so
that you're able to post it. So as you can see
on this drop down, you can either have
the notification on the day off or 2 hours before or 15 minutes
before the time you set. But I like to have
it the day before, particularly if you
haven't done something. Right? So once you set a
due date for something, you're able to now go to
this page and also see, Oh, this project is actually due on June 30, and it's on the timer. What if the timer
is actually today? You see that it
will actually shift to red and show
that it's overdue, which is important
because now you're able to know what
is running late. Say, for instance, if you're on the Team view page and you want to know
whether things are late, this is a much easier way
to review things and make decisions or understand whether you're moving in the
right direction or not. Okay, so now we're
going to remove that date or set it
to another date, update. Or even remove it. That's an option as well. The other thing I want us to add on or review is checklists. Checklists are very important
when you're thinking of how many to do items or do you have in
a project, right? Say, for instance, I'll share with you a project that I had
already worked on for here, which is project
planning with Trello. This is something
I've done before. So I created a checklist, and it's very easy to
create a checklist here. You just click on Checklist and create checklist on to do list. You can name it. Honestly, you can name it whatever you want. You can choose to copy
items from something else or use your own
checklist from scratch. So once you create a checklist, you're going to add an item like share Slo list with students, and then edit homepage on
website to add new class, create cover for new class and
then create discount code. Discount code for new class. These are sample items that you would have to do
before the class. Like the project that
I'm working on Trello. For instance, this
class is posted. So once I've shared
the exported list or the link with my
students, I'll click on it. Once I've edited my homepage to include the new class,
I'm going to update that. Once I've created the
cover, I'm done that. And then, as you can see here, it's like six of eight done. It doesn't show
that it's complete because it's still
not completed. Then once everything
is complete, it'll show it's 100% done. And the whole reason it
shows seven of eight is because we have another
list at the top here, which I will just remove
for the meantime. If I want to create
an editing list, so I'll do one known
video editing. Once I do that, I'll go
into name all videos, export in four K or 1080 P. What other
thing do I need to do? Color grade the videos? Upload videos. Name videos. Name correctly. Correctly on website. Creating a check list like
this one is very important because there are different
stages of in this case, for instance, creating a
class where I want to upload the videos or I
want to edit videos and ensure that they are
posted on the website. So once I export or
remove the videos from the camera to
the editing software, I need to make sure they
are named correctly so that I can sync
them up correctly. Once they're done that
I can choose to export them and then have
them color graded, but this tends to be on top, so you can switch
that up as you've done here and then
upload them on the website and name
them correctly on the website so that they're
not confusing anymore. Once you've done all that,
you can choose to just close the item or have it completed
as you've seen here, and that's how you
use checklist. The other thing that I want
to show you how to use on here is how to use members. Members is particularly
important when you're trying to add more
people into a board, particularly when you're working on a collaborative project. Is important and integral
only when you have a list of people who you're sharing the workspace
with or like, for instance, the one I showed
you on a group workspace. At this point, I only
have myself on the board. So the only one who can be accessed on the
board is myself. And as you see here, it has
an option to add more people. But because this is
a private board, there's no room to add that. Additionally, I can
add an attachment. I can choose to choose a file or past a link
or display a link. At this point in time,
I can choose a file. And that will touch
anything that I want to attach from my homepage
or, like, my laptop. I can upload this cover
image, for instance. But this won't be
the cover image, but it will appear
on the project. Now, because I
don't want it to be this cover, I'm just
going to remove it. I just want a plain
cover at the background. And as you can see, here is the item that
I have uploaded. This is good when you're having a lot of resources
for a project. Say, for instance, you writing a paper and you want to
reference some articles. It's much easier for you to attach a link here
to a website or a blog title and paste it rather than not have the resource of it or have
to share it on email. Now, think about it as an
avenue to have everything in one shared space and then show you're moving
the project forward. Beyond that, there isn't much more to be added
on this page, honestly. And that's a lot about
how you can move a project from or have a very detailed board
or a colorful board, and you can easily
and effectively have all the details on the
board because you have all the resources and all the things you want
to work on them. At one selected place and move the board effectively across different regions
based on how you're progressing on the project to the point where the
project item is on review, and you have all your successes
or all the bottlenecks shared on there and try to resolve what issues
you may have with it. And it's important for you to just do this for your
own ease of mind. That's generally
everything I'll show for how to work on
boards and list, and that gives you a
detailed overview on how to effectively use
boards and list to get your idea from thoughts to actual execution because you can effectively move
an idea that you have, for instance, for
YouTube video from a point where you're
scripting it to actually executing
it because you have all the ideas in
one shared space.
6. Adding Workspace Members: So here is where
you add members. And as you can see
here on my workspace, I can invite other people
and share an email address. Once you do that, you're able to have people
on your workspace. And when you add them
into the workspace, they are able to see everything that is going on
within our workspace. And now, as you can see, in this work board. For instance, this is after it's updated the project
that we're working on. I can now add more
members on here, and they can work on the project from the end and
see the same view, but they will have different rights if
they're not there admin. Yeah, that's how you add someone into our workspace
or add other people, and then you're able to assign
them into different tasks or projects that you want
to work on together.
7. Creating Automations: Now that we have a
good understanding of how to set up
projects on Trelo, it's important for
you to consider ways to make your workflow much easier for you to work on, and that's when we're going
to go into automations. Automations are things that you can use to make your
work much easier. Think about it as a
way to, for instance, when you have a checklist, and you have one unchecked item, but you've actually
completed the task. You don't want to go
through the process of checking in all the items. You just want to click on
one button and make sure everything on card is completed. In the same way, if it's at the start of the week and you
want to plan out your week, you don't want to go through
the hassle of creating a card to plan your week
every week of the year. You want that card to be created automatically at the start of
every week so that you can effectively go into
actually creating the plan for the week rather
than creating the structure for the
plan for the week. We're here on the board page of the project that
we're working on, and you're going to
click the button at the top, which
brings automations. In this particular one,
I'm going to show you a few automations that I create for my workflow,
but predominantly, I tend to use one on the
checklist and one to create new cards at the start of every
week or every month, one for planning the month
and one to plan the week. And I'm just going to
show you how to do that. So you're going to
click on automation. Alternatively, you can
click on the three buttons on the right and go to
the automations page. So once you do that and you're
on the automation page, you're going to see
different automations on the left side. Think of rules as like a guideline of how you
want your board to work. On here, I've already
created an example of when I want a card to be added
into my brainstorming list, and we're going to click. And for us to create a new one, we're going to click
on Create automation. Once you click on
Create Automation, you're going to
click Add a trigger. So a trigger is now
what should happen. Like, in essence,
what do you want to happen when something occurs? Like, do I want a
card created at the end of every week,
something of the sort, right? I want, for instance,
for a card to be added to the to do list by me. When a card is added to
the to do list by me, I want it to be moved
up to the top of the list on the to do list list. So when you're thinking
about scheduled automations, scheduled automations, you can create
automations based on, like, something that has
a time bound restriction. So I'm going to
create a trigger that automatically adds
on on every Monday, and then I'm going to have
it create a new card with the title Milton in the
list name to do or doing. Let's just have it on
doing because that automatically means
that's something that's going to keep
going on and on. Then we're going to
add that and save. So automatically on
every Monday morning, I'm going to have a card
with a title meal plan. Then one based on due date. So when a card is due, what do you want
to happen, right? So I'm going to add a trigger one day before
a card is due, right? Then I want it to be
moved to the top of the list on the
task to doing just so that I have a reminder on what things
should be going on, and I'm going to
click Save on that. And those are the
key automations that we use when
working on our board. So we're going to now go
down into custom button. For me to create a
custom card button. I'm going to click
on Create Button, and I want to work on one
that completes a checklist. And I'm going to name
it complete there. So I'm going to
click on Checklist, and I'm going to swipe down to the bottom here where it says, check all items in all checklist on the card
when the button is clicked. Finally, we can have one that archives all the
cards on a list. To an archived list at the
end of every period, right? So for this button named ARC, we're going to click
on archive lists that are on review
upon pressing. So that's just going to make sure that when I press on it, all the items on the review list are done or completely
moved away. So for us to just check
the functionality of the new things
that we've added, we're going to click on this
Christmas card project, and I'm just going to
unlist some of the items. Then we're going to go here on automation and click on
the button complete. Once you click on
it, you can see that all the checklist items
are marked as complete, and that's how you check
on the automations. Another thing that you'll
see on here is, like, I've had different plan
for the week come up. This is based on an automation
I had created before. So on every weekday, something new will come up, something new will keep
coming up until it's done. That's how you're going
to use automations to make your workflow
on trilo much easier. We've just given
you a quick snippet on what the automations can do, but you can definitely
keep on customizing this as you go along to
have different features. One of the features
I tend to think that could work very
well for generally everyone is having a feature for once every three days
if you work out three times a week to remind you
which workout to do or which region of your body to focus on because now
if on Wednesday, I want to do back workouts. I don't want to think about what back workouts I should do, particularly if I'm
working out from home. I just want to have a list of the work come up and
pop up every Wednesday. And by doing so, I
have a clear workflow, and I can know that
things are moving on well and effectively
assess things upon review. At the end of every week
and know that I am making very good progress
towards my future.
8. Final Thougts: We've now come to the
end of our class today. Our class has been
on learning how to use Trelo for your
creative projects. I believe in this class,
you've seen how I use Shilo for my own
personal projects because it provides me with an avenue to share everything that I'm
working on at a going basis and also see what things or
ideas I have that I have yet to work on and want to push on across different phases. As you've learned
on this project, we've generally used the
free version of Trello, and there's definitely
more features that are available for use on
the premium version, but I don't advise for you
to go for that immediately. Particularly, try see whether
this could work for you for your life or for
your creative hassle, whatever it is you're pushing
across different phases. As we saw, there are
very many templates that you can try work on, including the one
that I'll share on the project resources below. And you can use
that to effectively move your idea from
ideation to completion, which is the main vision
that I had for this class, and my main goal for training
you on how to use this tool to get your projects to
fully come into reality. I'm so glad that you
joined on this class. Please share your
comments on how you found this class to
be and whether you'd like us to explore a bit
more or questions that you may have on how to apply the
class into your real life. Let me know whether this
tool has worked for you and what other tool you'd be interested in using
in the future. Thank you so much and
be blessed. Goodbye.
 Silvia Njoki, Creative, Artist & Marketer