Transcripts
1. Intro: Hi. If you have a camera, you probably have one of
these things attached to it. This is your standard comes with the camera or you get it in the camera store camera strap. And frankly, they're
a pain in the neck. When you put it
around their neck, the whole weight of the
camera is on your neck, banging against your chest. And if you try and do it like cross body style
and tuck it away, then it's it's impossible to get the camera out when
you want to take a shot. Plus this strap is attached
to it all the time, which is a bit of a hazard. My name is Rob
Davidson and I've been our commercial photographer
for around 40 years now. I'm in Toronto in Canada, and I specialize in making
food look really delicious. I also traveled quite a bit and love taking travel and landscape photography
when I'm out. So a camera strap is
sort of important. In addition to being
a photographer, I also teach photography. I teach in Toronto
metropolitan university through Skillshare. And I also have workshops
in my own studio. And one of the things that
I've seen over the years, unfortunately too
often, is what I call strap related
camera injuries. Because when you're not using your camera or when
you put your camera down, this strap is a hazard. It's easy to catch on
a piece of equipment. Someone walking
by, kids grab it, boom, down goes your camera
smashed on the floor. Strap related camera injury. So I thought about these cameras straps and
I've seen some alternatives on the market that struck me as not all that perfect
and really expensive. So I started evolving. I tried a couple of
different ideas. And in the end, I've
come up with what I think is a really
good solution. I call it the deluxe
sliding camera strap. And it works really well. It allows you to wear your camera cross body if
you want to tuck it away, even underneath a jacket
so nobody can see it. And yet you can
whip the camera out and have it in your
hand into your eyes. Absolutely no time at all. Best of all, when you
don't need a camera strap, you can just unclip it and it's not hanging around the camera
behaving like a hazard. So nice thing about this camera strap is you can make it in any color you want. It's very simple. You just need a length of webbing that you can pick
up at an outdoor store. A couple of simple fittings. I'll show you
step-by-step how to put it together with a
little bit of glue, some scissors that you're
away to the races. It's quite amazing. And best of all, it's
really inexpensive. So if you like
walking around with your camera and you value
your cameras security, you like making things with your hands and saving
a lot of money. This class is for you and I
think you'll really enjoy it. And I know you're going to like the camera
strap that result
2. Project: Your project for this class is to build your own camera strap, your de-luxe sliding
camera strap. And you're going to have
step-by-step instructions. You'll be able to
choose the color and the width of strap that
you'd like to build. You'll pick up a few things. At the outdoor supply store. You're going to use a few
inches off your rear. Existing cameras drop, or you may need to buy an
inexpensive one at the store. Or you can buy
some thin webbing. And we're going to make
loops for the camera, which are very handy
and I'll show you why. And then we're going to actually build the sliding camera strap. And you're going to
really enjoy the process. And when you're done, you're gonna be
so happy with it. Take some pictures of
yourself using it, shoot a little video, and posted to the discussion
forums for the class so other students can be as
inspired by your success. So let's get going and see
what you need to put together.
3. Stuff You'll Need: This is everything you'll need. And then some for
doing this project for making your deluxe
sliding camera strap. So we're going to need
first and foremost, the webbing that we're going to actually make the strap out of. And there's a whole bunch
of options out there. And they're all available at outdoor stores or
climbing supply stores. All kinds of places.
And I'll include some links to some online
suppliers as well. So the first thing you
need to decide is, what color do you want? Webbing comes in a wide
variety of colors, but also a wide
variety of widths. All right. So I've
seen webbing from half-inch webbing like this to 1 " one and quarter 2 ",
two-and-a-half inches. And I find I've tried a
couple of different widths. And for me, I like
the one-inch width. It's small enough to easily
slip under your jacket. It's inobtrusive. It supports the camera Well, it's very, very strong. And I find it distributes the weight of the
camera just fine. The thicker straps, I find
them a little cumbersome, but it's purely to taste. You can try it in a
store, see what you like. Now. Webbing comes in a number of different styles
or I guess styles, it's called different things. This stuff is called
tubular webbing. And it's actually stitched. It's a stitch, two
bits glued together. Now, this is used for
weight-bearing applications in mountain climbing or rock
climbing or indoor climbing. They make slings and all
kinds of things out event. It's a little bit
more expensive, a couple of dollars a foot
in the sort of 1 " side. I find it's a little bit
on the thicker side, which you might like, or I prefer it a
little bit thinner it but it's very, very slightly. So it slips under clothes
really like under your jacket. It slips along your
clothes very easily. And the little slider slides
along it very, very easily. So that's one option. Now. The other one is flat webbing. And that's what this stuff is. It's woven. You can see
the woven pattern in it. It works perfectly well. I really, really like it. The slider slides
along it great. And as I said, I'm going
to build the strap for this class out of
1 " flat webbing. It also comes in wider widths, different colors,
whatever you'd like. Some some places call
it accessory webbing, meaning it's not designed
for weight-bearing. For human weight-bearing, this tubular wedding webbing is, but this flat webbing
works perfectly well. So you can choose the width and color that you think
will work best for you. And you'll need about 6
ft or 2 m at the most. Because basically
it's going to go, you're going to want to size it so that you can make it like cross bodies style make a loop and have the cameras sort
of sitting on your hip. And sometime you'll shorten it up or make it a
little bit longer. So you want to have a
little bit of extra, will look when we
start to assemble this at how to measure it and cut it. But I got to meters. These are sold by
the meter there usually $1 or $2 a meter, so it's not a big expense. And so I usually buy a little bit extra and then
I cut it to size. And if you start
with it a little bit longer and you find you're
not using that length. It's very easy to cut it down and make it a
little bit shorter, a little more compact for you. And it will vary depending on your height and what you're
wearing underneath it. I like to leave a little
bit of extra room. So if I wanted to go out in the winter and I have
heavy clothes on, it's not too tight. I still have room to expand. So that's the flat webbing. Now, once you decide on the
width of your flat webbing, you're going to have to get
two things to match it. The first thing is this
sliding clip, right? And this is what's
going to actually attach to your camera. And I really like these ones. These are like a
heavy-duty plastic. This is the 1 " size to match
the webbing that we have. And they come in sizes to
match every width of webbing. So we need one of these. I really like this closure
because it catches on the opposite side
and it really traps Makes it so that your camera is basically fully
attached to the strap. It can't slip off. You can't just
easily flip it off. So it's a really good fitting. And these, as I say, are available in a wide variety
of outdoor supply places. And then the other thing
you'll need is one of these little
sliding buckle clips. We're going to attach
this to one end of the webbing and then have the other end loop through it so that you can adjust the
length for longer or shorter depending on
what you're doing and what you're wearing the
day that you're doing it. So that this is your choices for the actual
camera strap itself. Now, in addition,
we're going to be making little loops
for your camera. Right? There is the little
triangular attachment that comes with this camera. And I'm gonna make a little
loop just big enough to slip my finger into right
now, these are really, really handy because when you don't have the strap
attached to your camera, which is how I would advise
you have it if you're not actually walking around, you have these little loops
to slip over your finger. So when you're shooting, the camera gets bumped
or something happens. It's not going to fall, it's going to hang
from your finger. And these little loops, we're going to make
them very secure. So I prefer to make the loop out of the
camera strap that came with the camera because
this is designed to exactly fit through this little
triangular attachment. Now, if you don't have
the camera strap, this is what we're going
to use for the class. If you don't have a camera stop, you can buy some
flat webbing that fits the attachment
to your camera. Or if your camera only has
these little openings, the little I don't know
what you'd call it. Open with a hole in it, then you could use a
properly sized piece of string and just tie it into
a loop with a square knot. I really prefer using just a bit of the webbing that came with
the camera strap, right? Means the camera strap
isn't totally wasted. You can still use
it if you do want. But I prefer doing
this because it makes a nice sort of stiff loop, very easy for me to
slip my finger into. And I make loops for
both sides of the camera because I also find
these little loops are a great way if you're
cameras in a bag or in your knapsack or
whatever the loops are a great thing to
grab the camera by. It's nice and secure. We're going to make sure that those loops
are super secure. They're not going
to go anywhere. It's a great way to
grab your camera, to pull it out of a bag, slip your finger through it, then you are attached
to your camera, which is the most
important thing. So that's what this is for. Now, there are a couple
of things that you probably have around
the house or you can just get at a local dollar
store or the hardware store. First thing is we
need to glue up these little loops and we'll
need to glue this webbing. And I did some
experimentations before this class and then
making other straps. And for my taste, my favorite glue for doing this is the good old reliable
contacts cement. This stuff is amazing. You painted on both surfaces and then you wait for
it to dry and you carefully positioned and
press them together and bank they are joined
really permanently. This stuff works great. What I like about it is it's also available now in
small tubes of contacts. And that because we're, we're only going to use a couple of drops really on this project. So there's no point in running
out and buying a full can. What I don't like about these
is if they're half-full, they tend to dry out and
the little tubes are great. And now they're available in hardware stores and Dollar
Stores, stuff like that. Now the only downside to contact cement is it is undeniably
a little stinky. It does have that
glue smell to it. I don't really mind if I've
got a lot of space here, open the door, opened a
window, that's not a problem. But if you don't like
that smell or if it is particularly
sensitive to it. I did a little testing
and this stuff is great. This is gorilla superglue gel. Now, I need to warn you here. You can't use regular superglue. I know it holds everything to everything and they advertise
it on TV for exactly that. But the problem with your regular superglue is
it's very thin and watery. And when you put it on webbing, it tends to just absorb into the webbing and then it
doesn't stick to anything. Alright. This gel glue. And I know this is the
gorilla brand superglue gel. Alright? I know that the other super
glues make thicker versions, but I find that this
one is really thick and it doesn't absorb at
all into the webbing. It just glues it together
really, really well. And it doesn't have any smell. So you can either use
contact cement like I do, or use this Gorilla
glue I tested them. They both work
absolutely perfectly. If you're going to
use the Gorilla glue, it takes a little while to
set up to be fully attached. So if you have a couple of
these little office clips, bulldog clips, um, or a small spring clamp
from a hardware store. These things are great
for holding the webbing together while this
glue is setting up, the contact cement is
instantly attached. You let it dry. And then when you attach
it, boom, you're done. So you don't necessarily
need the clamps, but if you liked
the Gorilla glue, the clamp really helps see
you are not standing there holding it with the glue
sticking to your fingers. So that's that. Now as I mentioned, when we make the little
loops for the camera, we're going to make
them super secure. I'm just totally paranoid
about stuff like this. I've never had any of these loops that have
been glued together, come apart in any way. But that doesn't make
me any less paranoid. So what I like to do
is where the, the, at the ends of the overlap,
right at either end, we're going to put
in just a stitch or two just to be absolutely sure. And what I like for that
is this stuff which is a 25-pound test casting line. It's not like the
plastic fishing line that's impossible to tie. This stuff ties beautifully. It's easy to sort
of stitch with it. Alternatively, you can
just use a good strong, what's called the button
thread or any strong thread will do the trick
because we're really just doing a secure, we're making ultimate security here in a couple of
stitches will just do it. Just to accomplish that. You need a needle with a nice wide hole so that
this stuff can fit into it. And I like to use these little needle
thread is because my needle threading skills
are not that great. Makes it very easy to
thread this into a needle. So that's how we're
going to make the loops. We're going to use
this and this stuff, make it super, super secure. And you'll just need a couple of other things from
around the house. A good pair of sharp scissors
for cutting the weapon. Or alternatively, you can use a really sharp like box
cutter style knife. These both work. And then once you've
cut the webbing, you'll want to seal
it from unraveling, to prevent it from unraveling
and just irregular lighter, you can just melt the end. I'll show you how it works, but you'll need to have a
little lighter on hand. Or if you have a
barbecue lighter that any little source of
flame works just fine. So that's everything we
need for this project. It's not going to be
inexpensive project. This stuff is quite inexpensive. These fittings or like $1
or something like that, depending on where
you order them from. And I will give you some
links to order from or just go to your
local outdoor store. And they usually have
a wide selection. And this is everything. And so in the next lesson, we'll look at how to
put it all together
4. Making Camera Loops: Now we're going to make the little loops to
attach to the camera. And that's what you will use to attach to your camera strap. Now, if you have these
little attachment rings, these little split rings, that's what I prefer to use. But if your cameras
didn't come with those and you just have
these little holes, you can either you can go
out and buy a split ring, a triangular, or a
D ring if you want. You might be able to find
one in the cameras store or you can just make the
loop out of simple. This is in climbing term, this is called static cord. They sell it in outdoor
stories in a variety of sizes. And you just need to
get one that will fit through the little
hole in your camera. And you just slide that. This camera came with. Some cameras have
the little slot built right into
the camera body. And if you're using the camera strap that
came with the camera, that'll fit it
absolutely perfectly. That's why I like this. So what I'm going
to do is I'm going to just cut a piece
from either end of this that's sort of the size of my finger plus a little bit. It should be big
enough to accommodate your finger with a little bit extra and you want to have a good overlap and that's
what we're going to glue. So I'm going to cut
it too this length. Then we're going to play with
it a little bit from there. But I can just kind of cut it. Now, this end has already
been sealed, right? So I don't have to
do anything to that. But this end that we just cut, all I do is I grab my
lighter things out of the way and just touch
the flame to the end, the cut end of the webinar. Sure. Just melts it
ever so little bit. And that just seals that shot. And then I'll cut a
similar sized piece from the other side just in case I ever want
to use that strap, although I can't imagine why I would seal that end. These are formed by two loops. I think they may
be a little bit on the long side. But let's see. If I just sort of
slipped this in here. Make a good overlap. I think it's a little too long as I showed
with the string. You don't want the camera
hanging down too much. So I think what
I'd like to do is just tighten it up a little bit, like attaching these loops
to both sides of the camera. Even though when you
use the camera strap, you're only going
to clip into one. I like the security of
having the two loops because they're very handy
for pulling cameras, that camera out of
a bag or whatever. If you're if you're
holding it on this hand, you can slip your
finger through. I often carry them around
just by these little loops. So it's very handy having those. So here's how we're
going to do this. And to take one
last measurement. There we go. So
it's overlapped by about three-quarters of an inch. Should do. What I'm going to do is put some contact cement
on this side and this side, just enough to
allow the overlap. There. We Carol and I just use the context cement container to spread it around
a little bit. And then this side, if you don't have
your contact cement in a tube like this, you could just use a cotton swab or a Q tip to just dip into
the can and spread it around. So this needs to dry
for a few minutes. Meanwhile, what I can do
is show you how to make the other side with
this gorilla glue. That works for my
finger, like that. But three-quarters of
an inch of overlap. So I'm just going to
put the glue on you don't have to put
it on both sides. And you can see
it's quite gloopy. Probably gone a little overboard
on it, but that's okay. Once you've done
that, seal it up. Do not put the glute end
through the camera parts. That's not a good thing. And you can just line it up, clamp it together
with your fingers. And then I like to just clamping it with your fingers
is always tricky with superglue because it does tend
to stick to your fingers. So I like to just put
a little clamp on it. There we go. Meanwhile,
the contact cement has dried up nicely. I can still feel it, but it's it's good and dry. So paths ready to go
into the loop, overlap, line it up carefully
because you only get one shot and squeeze
it together. There we go. Now, I'd like to leave it a little bit before I put too much stress on it, just so that it doesn't
pull apart well, it's still a little bit damp. But that's the loop made. Now he's can see while loop just fits my finger beautifully. I do like to secure
it with thread as well or with this
25-pound test line. Just because I like
being absolutely sure. And I never I never trust glue
altogether for everything. And since y, I'm going to
be wandering around with my camera attached
by this little loop. I want to be absolutely sure. So I'm just going to grab my needle and I use these
little needle thread, hers. And if you want to be totally, totally secure, a drop
of instinct global, definitely make sure
that never That's moves. I'll do that at the end. So one more of the
other end of the world, as I said, totally,
totally safety. But glue, they're storing
strings. One of them here. There we go. Now that
movie is totally secured. Meanwhile, the glue on this side has dried,
nice and solid. It's pretty stiff to and
I'm happy with that. So I'll go ahead and just put a couple of
stitches in this end, but you don't need
to watch me do that. These are two straps
for our camera. Finger fits in. It's totally secure. When you're holding your camera, somebody knocks it
out of your hand. It's not gonna go anywhere. And then we're
also going to clip into these to attach
our camera strap. So next, we're going
to learn how to measure and make
our camera strap
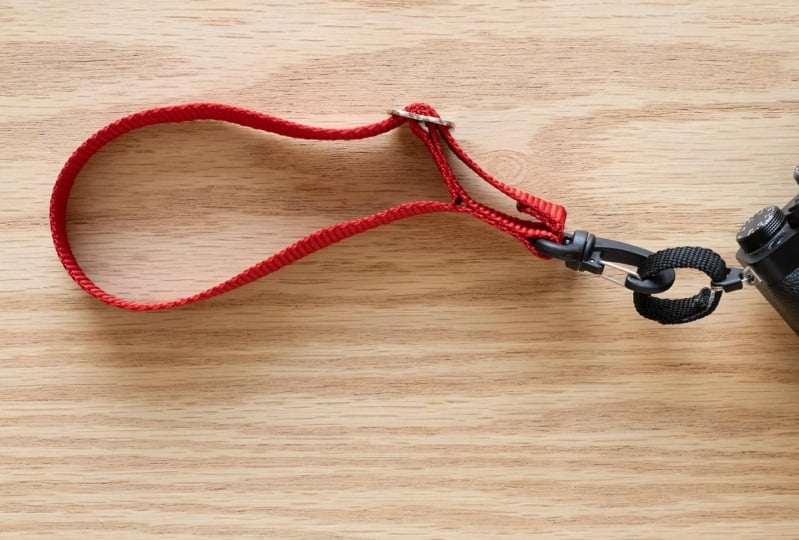
5. Making the Strap: Now that we have the loops attached to our camera
and then nice and secure, we now can make the
actual strap itself. So the first thing
we want to do is attach the little buckle slider, this metal piece to the
end of the webinar, to one end of the weapon, doesn't matter which end. And we're going to
secure it with glue. And I'll probably put
a little stitch in there as well just to make sure this is in
place because this is going to be what holds
everything together. So let's go ahead with that. I'm just going to grab some
of the contexts cement. So the glue has
setup on this end. So I can now just press
the two surfaces together. And it's glued. There we go. And I know that's
not going to let loose. But just because
I'm very paranoid, I am going to put
a stitch in right at the top where the
two pieces meet. I'm going to put a stitch
a little loop in there and tie it off so that
this can never, ever work its way loose. When I'm all done, I'll stick a little dab of the instant glue on there just to seal
it off. For now. We are good. Keep that
for the other end. So now I have my length of
webbing with the buckle on it. The one thing you want to
remember to do before you take another step is put
the slide and clip on. Because I can't tell
you how many times I've done things like this and sealed it all
up and then went, Oh, wait a minute, I forgot. Reached down to the end. So this will be the inside
of the loop like that. So you want the clip to go so it's hanging
on the outside. This way. I have a lot here. So there's the sliding clip
with the blue on the inside. And this is now hanging
on the outside. So what I'm gonna do is
just pass the webbing through the buckle slider. That will make loop
and adjustable loop. You can pull it through. But when you try and pull
it out, it doesn't go. Now, here's where
you want to make. So there's our loop with this on the outside and this will
clip to the camera, right? So at this point, you want to measure and
fit it to your body. And I always advise, leave a little bit of extra because I don't have a
coat on. It's not winter. I don't have a sweater
and all this stuff. And you want to have
enough room that when you're fully dressed
up with all everything, you can adjust the length. So what I recommend,
It's just okay. So this is a bit long. This is too long. It's hanging well below
and bear in mind, your camera is going to hang
down from this, like this. So I like to have the option of putting the camera
at about my hip. So I'll just slide this up. And the nice thing is it's
easy to adjust the length, but it's not like it's not
slipping, it doesn't slip. This works really nicely. I'm just adjusting the length To be at a boat, my hip or a
little bit longer like that. And that way, if I attach the camera and the
camera clips on, very easily, you just
put the loop over the clip and then
pass it in there. And that clip catches on the opposite side so you can the camera can't slip
out of the clip. So if I have the
camera hanging down, that's a little bit low. But it's not so bad. And if you start with it a
little bit longer, right? You can always shorten it. If you find you've
got too much length, you can shorten it. You know, he just
cut it and seal it. And it's very easy to do. So. I think this is a little
bit on the long side, but I'm going to leave it that way because I can shorten it up. I'm going to leave a little
bit of extra hanging out. All right. And as I say, if I decide later I really find it too long, then I can shorten it. But meanwhile, I
can cut this end. There we go. I had a
little bit of extra, but not that much. And use the lighter
to just seal it up. There we go. And now this is a trick. I want to be absolutely
sure that there's no way that this can slide
out of this sliding buckle. Alright? So I, I can't imagine
it actually happening, but to be super
on the safe side, what I am going to do is just
glue this over on itself. And this way it cannot get through the buckle
slider, right? So as secure as this end is, I want this end to
be secure as well. So just put a little bit of glue on the last
little end of this. Just let that set up and
I'll be back in a moment. Okay? So the glue has
magically set up. I'm just going to fold this over to the two surfaces meet. And what I like about contexts, and that is when it's bound, it's bound, That's it. Now this is not a stress point. So I don't really feel compelled to put a stitch on
there because I mean, I could, but this
isn't going to come undone and it's not
taking any actual stress. So if it ever shows any sign of letting loose stitch on it, but I don't think so. So now we have it very secure. I can move it. This
is not going to slide out of this at all. So this is now totally secured. We have a stitch in here making sure that
this never releases. This is folded over and glued. And so we can slide to adjust our length up and down depending on how we want
to where the camera. So you can put this over your shoulder,
adjust the length. And what I like
about the way this hangs is because this is
attached to this loop. It hangs with the cameras, so to flat against your body, which I really like if
I have the camera here, comes up to my eye
and it's ready to shoot instantly can
have it ready to shoot. I could drop it down, tuck it in behind me. It's lies nice and flat. And it really,
really works nicely. There you have your deluxe
sliding camera strap, right? You're all ready to go and
make one for yourself. Choose your color,
choose your width. And I think you'll
enjoy making it. And I know you're going
to enjoy using it
6. Using Your Strap: So now that you've made your deluxe sliding
cameras strap, you probably want to
know how to use it. Well, first off,
these little loops on your camera are really handy. They're great for
cameras in a bag. You want to quickly pull it out, just hook a finger
through and out. It comes nice and secure
hold of your camera. Your hands aren't going to
slip off if they're slippery. And then when I'm shooting
what I like to do, and this is why we size
the loop to our finger. I put my finger through
the loop and then I hold the camera so that the camera
is attached to my hand. If somebody knocks
into the camera or if your hands slips for
whatever reason, it's not going to fall. It's going to stay attached
to your hand and you're just going to grab it again
and be nice and safe. So I really like
these little loops. Now in terms of the
actual camera strap, I tend to like to wear
it cross body style. You can wear it one shoulder if that's comfortable for you. I have sloped shoulders so
it tends to slide off now. I like so I like to
wear it cross body. It's also the most secure
way of wearing it. So you just slip it over. I like to adjust
the length so that the camera is going to sit
approximately on my hip. So it's very easy to
adjust the length. You just grab the
little sliding bracket and pull the webbing, threw it up or down. And once it's adjusted, it doesn't slide anymore, which is really nice. It's super secure. Then flipping the camera into
the loop is really simple. These clips are really
great because they're very easy to attach
to the camera, but they're actually
hard to unattached. You just slip the clip through
the loop and then pull. And that opens the little gate. And your camera is securely
attached to the strap. Now to undo it, you have to hold the
little gate open and then like work the loop
around to get it out. It's a little trickier
getting it out, which is very frankly
a good thing. So putting the camera
onto the strap, very simply just slip the clip
through the loop and Paul, and it's attached
nice and securely, then it's ready to takeaway. I could use it a
little bit shorter. So I just slide it up like that. And I tend to put the buckle on my back so it's out of the way. The camera tucks just behind me. When I want to take a picture, it slides up the
strap really easily. I'm ready to take a picture and then just tuck
it away again. I love that action or just
bringing the camera out. It's ready to shoot at anytime, but it's completely
out of your way at other times. So that's perfect. The other great thing is
if you're wearing a jacket or if it's raining like it's just going to
start doing now. You can have a rain jacket or a heavier jacket
over the camera. And that way,
nobody can see that you're carrying an
expensive piece of equipment on your hip. But all you have to do is take your hand and
brush open the jacket, grabbed the camera, pull it up, take your shot,
slider back away. And if it's raining, that
means your camera only has to come out when you want
to actually take a picture. Other than that, it
stays tucked underneath your jacket, safe and secure. So that's why I really like this sliding camera strap
and I'm sure you will too
7. Conclusion: Okay, So here is your beautiful new deluxe
sliding camera strap. And I'm sure you're going
to have fun making it. And I know you're gonna love using it because it
really does work well. It's nice because it's
adjustable for your height, your clothes that
you're wearing, you can wear it around your neck if you want, over one shoulder, over two shoulders, which
is how I usually carry it, holds the camera very securely. And when you don't need a strap, you just slip the webbing
out of the little clip. And you still have a nice secure way to hold
your camera without a strap. But it's nice and securely
held to your hand, which I really like. So I think you'll enjoy it. So in terms of cost
for this, now, I'm quoting Canadian dollars
because I'm here in Toronto. But basically
here's how it went. I got 2 m of this webbing, which was plenty enough to
make a strap big enough for me with room enough for clothing underneath it
or whatever I need. So a little bit of extra
space to meters covered that. And this webbing goes for
$2.50 Canadian per meter. So $5. This little clip
was at dollar 75. This slider was $1.50. And then the glue, the thread, the needle
came to around $10. All told. So basically for under $20, I've put together this
whole cameras drop and cameras securing system. And I've been using these for years now and it really,
really works well. So I think you'll
enjoy making it and I know you're going
to enjoy using it. So when you make it and
when you enjoy using it, take a couple of pictures
or shoot a little video of yourself using your
camera strap and post it to the discussions
section of this class so other students can see it and be inspired by your work. Also, if you have any questions, if you run into any
snags and making it posts something on
the discussions forum. And I will respond as
quickly as I see it. So I have other classes
available on Skillshare, which I think you will enjoy if you've enjoyed this class. So you can subscribe
to and you'll be notified when I
published new classes. And you can also check out
the existing classes I have. I have a couple of courses in black and white photography. One in color grading
your photographs. For those of you
who make artwork, I have a great class on how to photograph your own artwork
and create beautiful, high-quality photographs
of your art work. That can be really handy
if you want to create your website or may put
your workup for sale. And I also have a
fun little course on how to create a setup to
shoot modern photographs. If you're familiar
with what those are, if not, have a look,
you might enjoy it. Have fun building your
deluxe sliding camera strap. And I will see you
in other classes.
 Rob Davidson, Food Photographer and Videographer