Transcripts
1. Make Painted Paper Pads For Collage - Introduction: Hi, I'm Helen and I'm a maker, an artist and
crafter from the UK. The basis for my
work always stems from the exploration
of materials. I love to reuse, recycle, repurpose, I love making with what I have or what
I can easily find. In this class, I'll
show you how I make painted papers for collage or decuipage using a perfect
bookbinding technique. I make them into pads, perfect for all your
crafting needs, and you can even give them to your creative
family and friends. This class is great
for beginners, even for those working
alongside children. I hope that you'll
come and join me and make some
painted paper pads.
2. Project Description: For this project, we
make a collection of painted papers
using found materials. These are then bound using a perfect bookbinding
technique to create your own unique
painted paper pads. We explore different types
of paper that you can use and also different
painting techniques. These paper pads of your
own unique painted papers are fabulous for your
own crafting purposes, for your own projects. But they also make
wonderful gifts for all your creative
friends and family. They're also wonderful
if you'd like to take your own pack of art materials with you when you go traveling, I'd love to see
your painted papers and your finished
painted paper pads. Please post a photograph in the gallery section of this
class for us all to share. Let's get started making painted papers for our
painted paper pads.
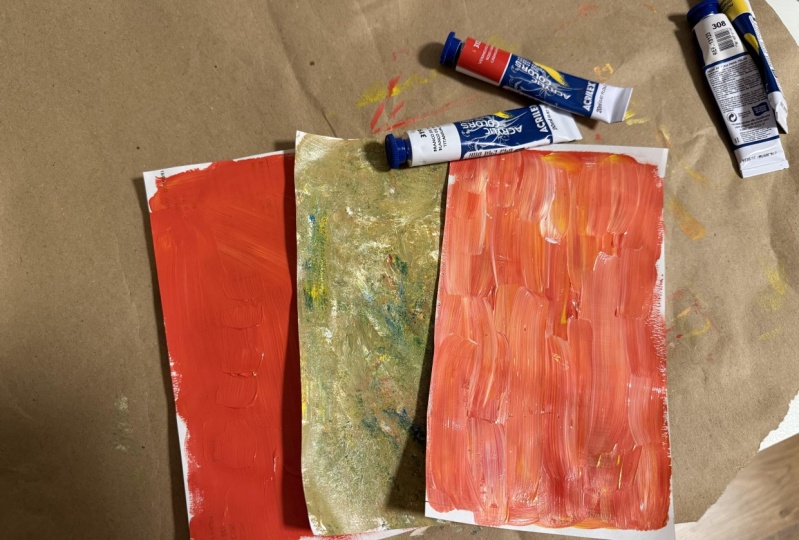
3. Some Materials Used In This Class: For this project,
I have collected together some of the materials that I am going to be using. I've collected together
some reds and oranges. These are all acrylic
paints. Reds and oranges. Greens, blues, and some white. I've already cut some paper
down into a five size, so I've got a combination of
different sorts of paper. Just printer paper, newspaper
books from a cut up book. Some old journal, paper grid,
paper, music, anything. It doesn't matter if it's got any printing on it or
any writing on it. This one is a little
bit doodled on. You could be painting over
your old shopping lists. It really doesn't
matter for the books. It's useful to have a card back. I've just found some
pieces of cardboard. This is from a paper pad. Drawing pad. And this
is just some mount. I think it's called mat board. In other countries,
cardboard doesn't matter. In one of my books,
I've actually used corrugated cardboard
from some packaging. It doesn't matter what
cardboard you have, but it's useful to have a piece
of cardboard on the back. What else have I got here? I've also collected
together for painting. I've collected together,
I have a little tray with some kitchen paper
on or some tissue on just to put all my dirty
brushes and things on. One of my favorite brushes
is a household brush. I'm going to be
playing with that, I'm going to be
doing some scraping, old credit card gift
cards, that sort of thing. I've got some cut up
household sponge, I've got some texture fabric. I've got some lolly sticks,
and I've got a spoon. And that spoon is
just basically to get the paint out of that pot there. Anything you might find
useful, we may add to that. Of course, as we go along,
when we make the book, we're going to need
some glue. There we go. This is just some PVA. I've got decanted
into a jam jar here. I've got a very old spatula
here which I'm going to use to glue on with when
you're making the book. You're going to need to clip
it together while it dries. I've got some bulldog clips, but you could use elastic bands. You could just weight it
down with something heavy. That's the basis of what we're going to be using
to make painted papers, which we're going to make
into paper block books.
4. Painting The Papers Part 1: Start with the reds
and the oranges. First of all, this is old paper paper that
you would throw away. You are just going to make
it into something beautiful. Don't worry about the fact
that it's thin paper, because by adding the
acrylic paint to it, you're actually
stabilizing that paper. As you can see, I added the
paint straight from the tube. These are cheap acrylic paints and nice and convenient to use
straight in from the tube. If you're getting too much
of the print coming through, then add some white
and that will blend in and obscure
some of the text. White is always a good thing
to have nearby as well. Let's try a bit of music paper. I'm going to put some white on. First of all, I'm going
to do a different color, red and more of it, and just use the two together. I'm using a household brush and I haven't really wet it yet, I'm just using it dry This
time I'm going to do swirls, and basically you're mixing
the paint on the paper. You stop when you've got a coverage that
you're happy with. Actually, let's
add a deeper red. I could add some more
on there and just go with a deeper red of
darker swirls on top of that. This is just dry brushing. Okay. That's our first
two papers done. Now, I have got quite a lot
of paint in this brush. I'm just going to start
off on another piece just by working what's on here out. If I like that as a finish, then I might leave it at that. Or this one is the basis
of something else. This one had an
image underneath it, a picture of a peach
plan, I think it was. Don't waste the paint on
your brush use every little bit and then we'll
go from there. I'm going to put the brush away. Now I'm putting that in some
water so it doesn't dry. I've got a credit card, it's not a credit
card, a store card, a plastic credit card size. I'm going to work
on top of this. I'm just going to put a
little bit more paint on top. I'm going to scrape some
orange on top of the red. Do I like that? I don't think
I do quite like that yet. It's not too bad. But I'm going to
add some blobs of white and smudge
those in as well. If you have any
projects in mind that you want to use your papers for, then obviously you can make
your papers accordingly. If you know that you want to make a collage of some sheep, then you can make your paper sheep color and
give it the texture of wool. We've done some dry brushing and we've done some scraping. You need to choose
some sturdy paper. I've got this grid paper here, which is quite nice and strong. I'm going to put quite a thick layer of
paint on for this one, so I'm going to use
some of this deep red here and some scarlet. Let's see what that does. Again, I'm going to scrape. It doesn't matter
that there's still some paint on from last time, but I'm not going
to scrape it fine. I'm going to scrape
it. So I'm spreading a layer of paint all over. I've got quite a thick layer, you can leave blobs if you
want to in the middle, or you can cover your
paint paper completely. What I'm going to do now, I've cut a skewer in half, so I've got a piece
that's got flat ends, and I've still got
the piece which has got the spiky point. Now I'm just going to scratch
some circles into this. This is scrafito. It's a design process that
you can use with paint, but it's also used in ceramics
to make a design on pots. Just scraping your
design on there. It moves the paint around, it digs in and leaves
lovely patterns. When you're happy
with what you've got, then you can stop. This works better
on thicker paper, especially if you're
using something like I'm using here with a spike on it because you don't want to be gouging
holes in your paper. That's a scrapitoI'm.
Use some of this one. Again, I want to
make it thick paint, Layering it on quite thick. If you think like, I'm beginning to think, have I put too much
paint on here? What you can do at this stage is put another piece of paper on top and do a mono print from
it I've scribbled on there. And then you can
pull a mono print. You can add to that
if you want to, but that's taken some
of the paint off of that original surface. If you don't want to leave that circular mono
print on there, just scrape it away again. And what I'm going
to do on this one, this is non slip stuff that
you put underneath rugs. I'm just going to
squash this down. Not really doing quite as
much as I wanted it to. It should leave a bit
of a grid pattern. You can see it a little bit, but it gives a different
texture to the paint. I don't know if you
can just see that.
5. Painting The Papers Part 2: Okay, I'm going to speedy along with the next demonstrations. This piece of paper, I'm just scraping
two colors together. I'm doing with a scraped base. For this one I'm using a sponge. I'm sponging different colors
and textures onto the top. Just keep sponging until you get the result
that you'd like. White base does cover
up quite a lot of unwanted text or unwanted
images helps obscure. I'm drying off my brush, putting paint directly
onto the brush. The brush is quite
dry and I'm using the end of the bristles
and I'm stippling. Just dabbing with the very
end of the bristles to get a different stippled
texture look. And again, go over
with a couple of shades just to add a little
bit of tonal interest. A couple of colors. Again,
a dry ish brush and again, swirling those patterns on. I've got a smaller piece of
credit card or store card, so I've cut a strip. I'm just using that
as a scrapers, narrower scrape lines than
what you would get if you use the flat of regular credit card
type size store card. I'm pulling the paint
in one direction to give raised, stripy texture. There was too much
paint on there, so I pulled a monoprint. This monoprint was lovely because it was a green
paper underneath. Just random. I really like that. So I pulled some more
prints from that. Just wiping off my brush. Get the excess paint off of the brush and
off of the edge of the scraper and
off of the sponge. I'm going to put a bit
of blue with the red, red and blue gives a
more purple color. Lightning up that up
with a bit of white. This is insulation foam
that goes around pipes. I've put some elastic
bands around it. I'm printing with
a found object. It's making circle prints
again, putting darker colors, darker shades for
that total variation, working off some excess
paint just as a background. Now the edge of this foam has got
elastic bands around it. I'm trying to use
it like a roller. The bottom piece of
paper is acting as a palette so I can pick
up some paint with it before rolling the
stripy texture onto the paper above here, I've cut a comb from
a piece of cardboard. I've cut some Vs into the
edge of the cardboard. You could actually
use a hair comb. I'm using that as a scraper, and scraping and mixing
the paint with the comb. If you have any DIY equipment, you may find that a
tile adhesive scraper will give a similar effect. Here I've got a piece
of embossed wallpaper. I am going to paint
on top of that. But because it's embossed, when you work your brush
on top of the paper, it gives a bit of a
textured pattern finished. It works better
with a dry brush. Let this one gives
us a Bobby pattern, but it is another way of getting texture and interest
onto your paper. Anything textured underneath. Try painting using your piece
of paper on top of that.
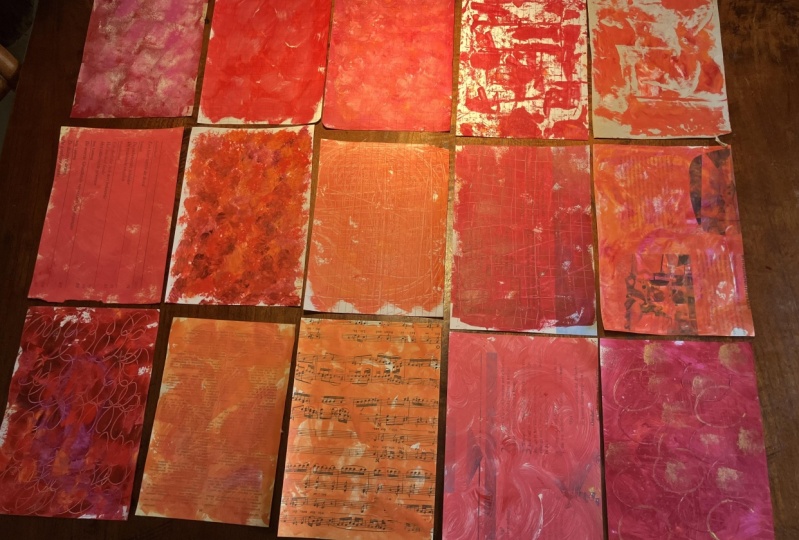
6. Flattening Your Papers: My pile of red reds and
oranges painted paper. They're all dry, but as you can see, they're really curly. What are we going to do? How are we going to get those flat? Well, I've got a
couple of boards here. I've got some pieces
of wallpaper. I'm just going to put a
piece of wallpaper down. First of all, I'm going to start laying the
papers down like this. I'm going to give them a bit
of a spritz with the water, leave the curlier ones until last you want to make a big
pile of all the papers. You can do this individually
if you want to, with a little bit of a spray and laying down one
on top of the other, working quite
quickly because you don't want them to start
curling the other way. We want the one on top to
be holding one underneath. Leave that one for a
bit. That's a nice one. Not really to sunched up, you'll find that it
is the thinner paper that does go a bit curly. That's your newspapers,
that's the dictionary paper. If you're using anything,
telephone directory, paper that might still
have dent issue, try and save one of these. I'm going to save
that one till last. A nice firm one to last. I just keep stacking up. Okay, let's stack it. Because you're using
acrylic paint, it's not going to smudge
the paint underneath your acrylic paint
is stable now. This is just going to
encourage them to be a little bit flatter at
the edge. Let's go there. That's a copy paper,
that's not too bad, and this is a heavier
quality book paper. When you've made your pile, put the other piece
of wallpaper on top, put a board on top of that. Somewhere underneath my desk, I've got an old fashioned iron, which is marvelous as a paper. I'm just going to leave
that on there to dry, and the papers should
be quite nice and flat. The papers have been underneath the iron weight all night, so they've been flattening and drying in a nice warm space. So let's have a look,
see what they look like. It might still be a little
bit damp, maybe, maybe not. So I continue to
layer up the papers, I feel that they are a little bit glued
together on there. I'm hoping that they are
going to be transformed. And as you can see that crinkly piles now a nice flat pile. They will feel the acrylic paint does tend to stick
on itself gently, loosen it through
these middle ones. They do feel a little
bit damp still. I think I will be putting these back under the pa,
under the weight. Just drying them off
a little bit more. Maybe new fresh pieces of wallpaper to help
absorb that dampness. They don't feel wet, they
just feel a little bit damp. But as you can see, they
have flattened beautifully. The papers have had an
extra 6 hours drying, so I'm just going to
have a little look now. I spread them out a bit more with larger boards and
put them underneath in between some newspaper so
hopefully they have dried. And look at all of these
lovely flat papers. Like I said before, acrylic does have a bit of a
tendency to stick. If you've ever used acrylic
in your sketch books, you may find that
the pages do need gently easing apart
after a while. But yeah, I, on first glance, I'm pretty pleased with all
of my lovely collage papers.
7. Glueing The Paper Block: Now I've got my papers
all dry and they're flat. I'm going to make them into my found book of collage papers. I need a piece of cardboard
and I'm also going to need to have some cover on the front. That's the cover piece and
that's the binding side. Going to do that this morning. I have got my
papers all divided, so I'm going to keep
the mint color theme. It's very easy for me to
pick up and think, yes, I want to blue or I'm going
to go to my blue pack. That's what I'm
going to do there. Now these ones I did
a wrapped cover. This piece of paper
on the cover is one whole piece of paper you can do that cut a longer strip, then your five or whatever
size book you're having, You're gluing some on the back
and then folding it over. I'm actually going to use
one of the pieces of paper that I have painted
here as a cover piece. I'm going to use one
of the thicker pieces, that's probably for me, that's going to be the
music paper, I'm thinking. Yeah, I'm going to use one of these two
pieces of music paper. For the red one, I'm going to use this
one because there's quite a lot of music
showing through. It's probably one that I'm less likely to use for collage. That's going to be
my cover piece. You can still chop
it up if you want to use it, that's fine. I'm going to put
that to one side. I might use that one. I'm going to put
that one to one side and quickly choose a green one. Okay, we're going to use that
one. That's my cover piece. What I'm going to
need this morning is my blocks of paper. I've cut three
pieces of card for the back glue and spatula. I've box of bald off clips. Like I said before, you
could use elastic bands or big paper clips,
whatever you've got. Let's go for this
wider piece of card. First of all, I think
I'm going to have the cleaner piece on the
outside with your paper block. You want to tamp it
down so that all of these edges are pretty
much straight and even. Okay. And then tamp it down with
your piece of cardboard. I've got a couple of bits
of extra cardboard here which I'm going to use to
protect my paper a little bit. That's nice and flat there. Another piece in
here, once you've got one bulldog clip in
the rest, holds on. Okay. So you're
looking for a nice flat, smooth edge here. Okay, that's a sandwich. You've got the cardboard and then you've got
your paper on top. The very simply, all you're
going to do is run some glue. I'm going to run some
glue along the edge. Just.it on I'm
hoping you can see. All right.it. Along that edge,
covering the edges, the ends of all of
those pieces of paper. And then scrape, make it
as smooth as possible. Working that glue in along the
end of the piece of paper. If you've got any
glue along the edge, then just wipe that off. Then just for extra security, I'm going to put another
couple more clips in. Putting a clip
onto the pieces of paper being held together
as close as possible. My badog clips, as you can see, the point of pressure is here. I've got lots of gaps
that's not going to be touching the
edge of the paper. That's all there is to it. You're going to
leave that to dry, for them to crack on
and do the others. I've got these pieces
of cardboard gas, I don't mind about those bits
of those marks on there. That doesn't bother
me tamping it down, making sure you're nice
and level and straight. Put a clip on there. Once
you've got one clip on, it's easier to get
the other one. I want to leave that cardboard down just a little
bit because I don't actually want to glue the
cardboard to the paper block. This edge is nice
and flat and smooth. And then dabbing glue along just the end of the cardboard and the end of all of those pieces of paper. It's working it in. Take, take a little
bit of that glue off. That's fine. So
that is now glued. I'm going to put another
couple more bulldog clips on just to hold those pages as close
together as I can. That's number two. That's the three blocks all with their bulldog clips. Then I'm going to leave to try before we go on
to the next stage.
8. Attaching The Cover: Here are my final
glued books bit, rickty. It's holding together. This is what is called
a perfect binding. In book binding terms, pieces of paper of glued
at the edges like this. This is perfect binding, I want to put a cover on these. Now we've saved our pieces
of paper for the cover, but obviously this is the
same size as the pad. That's fine, because
I have also cut some strips of paper
to act as joiners. I'm going to be using,
this is the spine. You can use tape if you want to, if you have some book binders tape or you could use fabric. But basically we're
going to be attaching the cover by gluing
over like that. You've got a little bit
of flap over one side and onto the back
you could have, it'd probably be easier if we carefully not creasing
it too much but just nudging it into a
half long length was I'm not doing
a sharp crease, but I'm doing a bit
of a curve crease. And that's going to help us. I think we've got
the joining pieces. We've got our pads of paper
and we've got our covers. I've also got my pieces of cardboard because I am
going to be holding it together with clips again to attach the cover onto my block. I've got my cover
sheet and I've got a, a piece of paper just
to hold it in place. I'm going to blue on one side, see going to glue one side and attach it
to the cover paper. Get your paper in
place just to hold it. And then blue the edges so that it attaches onto
the back of the board. Touch piece of card. Pick all dog clip on
and leave it to try.
9. Ideas For Using Painted Papers: We've made all our papers. What do we want to
make with them? I just thought I'd show you some ideas and things
that I've done with my painted papers in the past
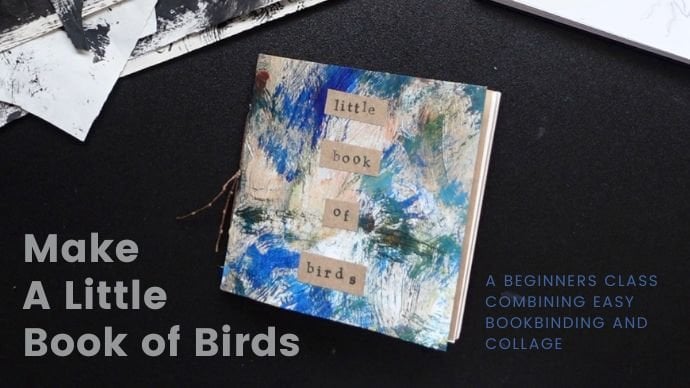
in previous skill shares. You've seen these little
books, little books of birds. I use the painted paper
to cover the book as well as make the collage
birds inside. A projects that we've seen
here before on skill share, other things I have done, I've used them as part of
one of my 100 day projects. Again, to make collaged
birds within a sketchbook. I did some bugs. I've done some
different flowers here. This one is slightly
different because it's got a painted paper
background and I've torn the shapes of the flowers
and then drawn on top, The one I got here are just
Seagull and the Penguin, very simply cut out
collaged birds. Other ones have been more pictures rather
than characters. I've got some flowers here. I've got some mugs. Again, this is a piece of paper, three strips of paper. The mugs are drawn and cut
out on the painted paper, and then I've inked
on top of them to make the pattern on
the mugs For that one, I'm just trying to show you, this is again the painted paper to cut the shape
of the vessel out. I've applied them
on top of blobs of watercolor paint
in this case, then I've inked the
outline of the jug on top. Then I've done more
of a seaside scene. This is actually a collage of a place in the south of
France called Culio. These are all just
collage items. The only thing I've inked
on here are I think I in the window details the clock and obviously the details
on the bird as well. That's for those ones. Then other birds that
I've made similar way. I've got a rabbit here
on some newspaper. Sheep are very easy to do. The body of the sheep
is the painted paper. And then I've cut out black heads and
attached them on again, some more flowers in a vase
with drawn details on top. And there's one of my peacocks. That's for pictures. And the other thing I
thought I'd show you is I've used them for
covering books. I've basically, this
is a file that I made. I've used the painted paper
as a cover on the file, and then I've added a
fabric spine detail on there is just, this is just newspaper
underneath here, you can just about see
some text here with a little bit of text
coming through showing here just newspaper
for that one. Then I've done for this one, this is just a
notebook ready to go. This is one that I bought in
a store, probably in a sale. Didn't really like
the cover too much. I have pieced some
painted papers on top. So this is basically
all the snippets and off cuts of
my painted paper. And I've layered
them on top to make a mosaic decupage cover
of different papers. I hope that helps.
There's a few ideas for what to do with
your painted papers.
10. Conclusion: How did you get on? I
hope you had fun making your painted papers and gluing them into your
painted paper pads. Remember that they're not
only an art supply for you, they also make wonderful gifts for your creative
family and friends. Please don't forget to share some photographs in the
gallery section of this class. We'd all love to have a look. See how you get on. And I'd love it if you could
leave a review. This class was actually
as a result of a suggestion from a previous participant in another class. I'd love to hear your thoughts
and ideas and reviews. Thank you very much for
coming along and making your painted papers and turning them into
painted paper pads. And I hope to see you
next time. Bye for now.
 Helen H, UK based artist and maker