Transcripts
1. Introduction Video: Making fancy birds from everyday papers is a
beginners class where I show you how I use collage to make too fancy bird pictures. Hi, I'm Helen and I'm a lifelong artists and
maker from the UK. And I believe that
creativity isn't all about fancy materials and
the latest equipment. I believe that we can all
create with everyday, simple, easily found materials. My work has always stemmed from the love of materials
and processes, and collage and assemblage have always been my favorite
ways of working. Collage and assemblage of
always featured in my work. And I love using materials that other people perhaps wouldn't consider so
unusual materials. So quite a lot of
my canvases have got unusual found
objects buried in them. I find that using
abstract painted papers and liberating way to work. When I'm painting the papers, I'm not worried about
the end result. I'm just having fun
putting paint on paper. I enjoyed the happenstance
and the happy accidents. In this class, I'll show
you my process of using collage to make too
fancy bird pictures. I discussed the materials I use, show you alternatives that
you can experiment with. I provide templates
to guide you and there's an information
pack for your reference. I would really love it
for you to come along and join me to make some
collaged fancy birds. Let's get cutting and sticking.
2. Project Video: In this class we'll be
covering two projects. So we're gonna be
making too fancy birds, one using painted papers and the other one using found
papers from magazines. I chose this project because
I feel that for some of us, it's important that
we step away from the screen and we need to remind ourselves
we can make art, we can create with easy
everyday materials. And the cutting and
sticking can be fun. I loved the happenstance
of the process, and I love the way the collage
and the characters evolve. The first step is that we need
to go on a bit of a hunt, a scavenger hunt
around the house and find some papers that we
can use to collage with. These papers can be painted so you can have fun
with the kids paints or some felt pens or just you can use them
exactly as they are. We need to look at
colors that we want to use and the shapes that we need. And finally, we'll
be adding details to your characters will
break down the birds into basic shapes that
we can easily cut out and fit together to
make our fancy birds. You'll find that
process along the way. You, your fancy boats. Each one will be unique and
have its own character. And that's the fun of it. Don't forget to post your
pictures along the way. Show me what you've been making. I'd love to see them. Because like I said,
every everyone is going to be different. There's not gonna
be any one looks can make a fancy bowed like you or collage like you because they don't
have the same resources. They're not cutting
in the same way. They're not using the paint, the colors and the
paints in that same way. So each individual thing that you make will
be unique to you. And that's exciting. If you'd like any
guidance and feedback. I'm here and happy to help. So let's get started. Let's make some fancy birds.
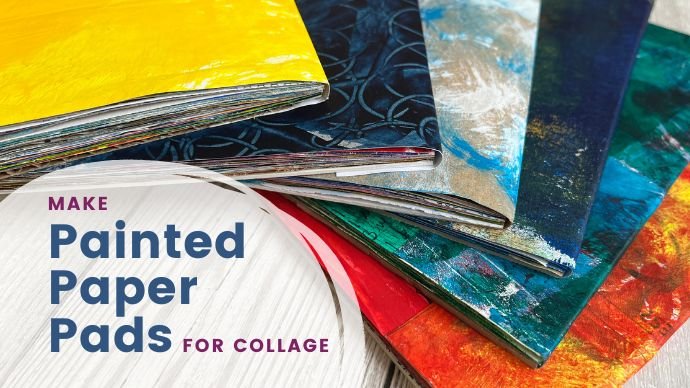
3. Papers to Paint on.: I want to chat about paper, and I must admit I'm
a bit of a hoarder for paper, for collage. I have used magazine papers,
newspapers found papers. I've used junk mail, anything that's got
color or texture on it. At the moment, my
current collage practice is using painted papers. I've got together a little bit
of a collection of papers. I've obviously painted here, or they've got mark
making of some sort. I just thought I'd show
you exactly what they are. This one here is
random painted blue, abstract with a
pink bit of white. It's already got a tear on
it because it's newspaper. Newspaper is fabulous because
this is acrylic paint. Acrylic paint will help to stabilize the newspaper as well. But you get a different quality. You get a slight crinkle
in the record to it. But when you come to paste it, because it's a slightly
more flimsy paper. It's easier to work with and
your layers are thinner. This one is actually
probably newsprint, but it's packing paper. So this came in a parcel or
it may have been left over from when I moved or
that sort of thing. Again, it's got no text underneath or anything to show through when you paint on top. But it's a bit more flimsy
and it does the recoloring up and crinkles so you get a texture with
your paper as well. So if newsprint say if
all you're packing paper, this was an interesting one. So this is actually died paper. So this, I made some die by collecting the fallen
petals from peonies. And these were
actually read peonies. But when you save them,
soak them in water, boil them to make the die. You get this purple. So these, these are actually
fragments of the fibers, but this is dyed paper as
opposed to painted paper. But this is written
probably here. It's a little bit firmer. And this is lining papers, so this is wallpaper
that you buy. It's the cheapest wallpaper that you can buy it on a real. And it's lining paper
that you would put on the wall to then paint onto. And this is a really, really lovely
surface to paint on. It's a lovely surface
to use for dying. It's very absorbent,
dries, nice and flat. And it's very cheap. And it is because
it's on a roll, you can cut it, it's long
or short as you want. A role of lining paper is a good thing to
have in your stash. This one is a book that I
picked up from a charity shop. It's an old encyclopedia. And I was doing some printing. And these, this is
some of the pages that I practiced the printout on. So this is just some
scrap paper that I had leftover from bringing
the text shows through. And that adds another quality. This one, as you can see, it is manuscript paper. This is music from, again from a charity shop. And as you can see when
you paint onto it, I've scraped as well. I've made marks. You can see some of the
music showing through. So you've got a
different quality of mark-making underneath
your paint. And here's another one I used. This time I've painted
with two colors. I've painted some yellow and
probably painted some blue. I've got yellow showing through and I've got green
sharing through. This one is, this is
actually quality paper. So this is like cartridge paper. I was having a practice
with doing some art. The painting, the prints
didn't work out well. So I actually cut them down
into A4 pieces of paper. And so I've got collection
of these which were old bits of artwork that
didn't quite go right. This one is an interesting one. So this is an out-of-date
local magazine, parish magazine. And this comes through the door every I don't I think we have
one about every quarter. I take my two pieces, I take the center
staples out and I use them for painted papers. That's another one
that you can use. Here's another old book
from a charity shop. This one is a
gardening encyclopedia telling you all
sorts of different, about different plants. And so I've got painted on this old book paper is, is nice. It's got a rough surface to it. So it's nice and absorbent. It dries nice and flat. And you've got the text
showing through as well. So that's a useful one to have. This one is a pack of news print paper that
I bought years ago. And, um, so this is another
flimsy piece of paper. You could use either side. I quite like that muted side. Obviously that's the
side I have painted. And that's what we'll
use in my collage. Now you have it as a collection
of different papers and some ideas as to what
papers to start saving, to paint on or to
use as collage.
4. Finding Colours - Magazine Pages: So here I've got a selection of torn out magazine pages that may be useful to put in my
stash for collaging. So this, as you can see his
front page of a magazine. And I like this because it's a close-up of some watercolor. And although I wouldn't
use this as a, as a complete image, there are elements as
textures and details and, um, and I think I
would probably cut those patches out and use those. So those are the elements
I'm looking for here. In fact, I might just grab my scissors and do exactly that. I'm going to cut the words out. And then I'm left with just an abstract color blocks that I can use to
call our SH wave. This one got my attention
because it's a photograph. It's very obviously a
photograph of some fireworks. And although I wouldn't
want the people, I'm liking this patch up here. I think I'm just going
to cut this out. Save these bits. Images of textiles is
always useful to have. You wouldn't want
it to look like. So for the small details, patterns of textiles, it's always useful to
keep in your stash. This photograph. I've got my attention because
if the color is basically, but also you've got lots
of texture in these, in these elements here. You've got a strip
of texture here. You've got the water texture, but you've also got lovely, lovely, big color blocks. So again, I'm going to
just cut the texts way. So I'm not distracted by
what the words are saying. And I'm just looking at the images as abstract forms. The people out here as well, because I don't want
people in my corner. She's probably don't even
really want fielding. Those are elements
that I could use. It's nice stripes
happening here. So that would be useful. Another landscape image, lovely
detail on the sky there, lots of color there, and lots of color in on
this, on this Heather. That would always be useful. Start looking at images
from a color block. Interview. Start and collection of images that you could use. As I'm even going to keep that strip at the
bottom there that you could use as abstract
shapes and colors. And this one, again, I was, I was drawn to the close-up
nature of this image, but also the colors. So I'm going to just
cut those words and use this in
my stash as well. So you can easily start collecting images
from magazines today.
5. Other Materials and Equipment: The things we're going to
need to make our fancy birds, or we need a piece of
paper to glow onto. So this is a square
piece of white. It's actually our paper, but you could use
anything you like from envelope paper to copy paper. Anything that you want
to use as a base paper, you need a pair of scissors. I've got couple of pens here, so I've got a thick sharpie
pen and a finer black liner. Both of those are permanent
marker so they work on, on shiny paper and
over paint as well. We're going to need some glue. I very often use a glue
stick or I will use PVA. This is the candidate
into a jar because I buy my PVA in
large quantities. So this is just a jam jar
that I've kept my clue in. I'm going to use
PVA. You're going to need a brush of some sort. This is just a kid's paintbrush. And I popped put some water in so you can keep
that paintbrush moist. And so it doesn't dry out. Whenever you're doing
any craft or activities, it's always useful to have
some more pop available. So there we go. So that's us and we're all ready to start making our fancy birds.
6. A Flip Through the Templates: I've included within the
supplemental material, I've included a template pack. And so I'm just
going to run through what the template pack is. You've got an
eight-page PDF document that you can print out. And I have drawn two
sets of fancy birds. They are once we've beaks open and once with beaks closed. So with H fancy bird, you have got the separate shapes and where they would
go on the body. So the separate shapes
and the way they would go with the beak closed, with the beak open. Same again, separate shapes and where they are on the body. You can use the templates
in various different ways. You can cut out all
the individual shapes. Use them to draw around
on your Found paper, your painted paper, and then stick them onto
your base paper. You can, if you want to be a little bit more, work
with happenstance, you can cut the shapes out, a stick them onto the reverse of some Found paper
before cutting them out. So you haven't really got a clear idea of what that image is going to look like
before you cut it out. So it's a little bit
of an experiment and find your own way. The other thing I've got here is I've done the four
fancy birds as individual images for different
landscape formations. And you can, if you wanted to, you could use this
as the base to then stick or collage
your elements onto. You could, if you wanted to, other ideas or coloring, doodling, you could
actually draw on here. I wouldn't say paint depending on your printer
because obviously when you get any printed out
home printed out paper, you, you do run the risk
of smudging the ink. But felt pens, crayons
work very well. So you could, you could
color in, you could do it, or you could do illustrations
within those shapes, cut them out and
stick them together. So I hope they're
going to be useful. And it just gives you a bit of a guideline
as to what sorts of shapes that you can use to
put together a fancy bird. I hope you have fun making them. I'd love to see the results. So please share them on the relevant pages and
tag me on Instagram. If you make any of
these fancy birds, that would be great.
7. Cutting the Shapes for the Painted Paper Bird: So before we start gluing, we need to decide what
shapes we're going to cut out and what papers
we're going to use. So using these fancy
birds as a template, I have itemized the
different shape elements. So we've got a basic body shape. What a basic wing shape, tail shape, head feathers shape, beak, and some feet. As you can see, the eyes and the feet and the beak
I've drawn in afterwards. So these append on afterwards. If you don't have a white pen, now I have a white posca pen and other permanent marker
which I use for the eyes. If you don't have
that, you can always collage your eyes as well. So finding some white
paper and then putting your Blackboard or
however you like. So we're going to decide
what we're going to use for what shapes. So I've put together
a collection of scraps of painted papers. So these are from
other projects. So I'm thinking, okay, so the two basic shapes
that we're looking for, first of all, other
body and the wings. So I'm quite liking that one. So I'm thinking I'm going to
use that one for the body. And then it's a case of what
do I want the blue wing? Or do I want to
go some contrast? For cutting out, I tend
not to use templates, although I've drawn these out. And you could use
them as a template, I tend to just cut. I find that this is
much more liberating and you get an element
of happenstance. And that's when, that's
when the character evolve. So these body shapes,
they're not all the same. This one is a bit more elongated and these ones in
their heads are a little bit more upright. So just by cutting the shape, the character of the
bird creates itself. So you want to
just have a bit of an idea as to how big
that bird is going to be. And actually I might just make one bird in the middle of
this piece of paper because this block of color sits quite nicely in the middle of
that piece of paper. Next thing to do is to decide which way your bird is
going to be facing. I think my bird is going to be the beacuse onto
the left-hand side. And let's just go for it. I'm just going to roughly cut my body shape and then
see if I like it. And if I don't like it, I can cut another one. I can adapt to it. So as you can see, it's basically, you're
looking for an L shape. And with a bit more of
a point for the tail, bit more rounded for the head. I'm quite happy with that. That is gonna be my
basic body shape. But the next thing we're
gonna do is decide on the wing and quiet night, but I quite like that. Do I want two contrasting wing? So I'm going to cut a
wing shape in paper. The wing shape isn't a
tear shape piece of paper. This one actually, I've
got a point at both ends. So it depends. You can have it rounded at one end and pointed
at the other. For this one sits
a little bit more on top and it's a
bit more pointed. So let's cut a rounded
one to start off with because I can
always change it. So the wing needs to
be about that long. That's going to be my size. And I'm just gonna catch it. Just going to cut and
see what happens. The beauty of using newspaper. You're painting papers
are found paper is that it's not precious,
precious at all. The other thing I'm
now going to need to do is tail feathers. Now the tail feathers sticking
out quite a long way here, but I don't have too
much room on this one. So I could either
cut my body down a little bit or in fact, I might just trim his belly, that's the breast a little bit. A little bit more like a duck. Yeah, I like that a bit better. Now, the beauty is you can adapt as you go along. But of course, once
you've cut it, you've got it's done. You can't put that back other than sticking
on another piece. So we could either have
the tail feathers going up or we can have some shorter
tail feathers going out. Let's just cut and C, tail feathers you
can either cut out, you can cut them how you want. I can either cut them out
as individual segments or I can cut them out like I've drawn this one here is one segment. And I think that's what I'm
gonna do to start off with, I'm going to do one segment. So I'm going to cut
a rounded triangle. And then I'm going
to cut into that to make the feather pieces. And I find it easier to do it backwards and
forwards like this. I'm going cutting in, turning over and cutting
around and going in. So there's my tail. So we've got the beginnings
of a collage bird. So we're going to cut
some head feathers. I'm going to cut a
wide rounded triangle. And then again in to
make the feather shape. There's my head feathers. I'm not liking that one. I think that's too big. So I'm just going to
trim him down a little bit more pleasing to me. I'm wondering now
as well whether they wing is just a
little bit too big. So I'm just going to trim that. So there we are.
There's the basics of halberd and now
we need to blew it.
8. Glueing the Painted Paper Bird: We're ready to glue the
paper collage bird, this is the painted papers. So I'm going to use
glue stick with this 1. First of all, I'm just
going to put some glue on the bottom of the head feathers and
nothing's attached yet. Pace paper. I'm just going to attach the
head feathers to the bird. I'm going to do the same
again with the tail feathers. So just put a little bit
of glue at the bottom. The tail feathers. As you can see, I'm
using a cover from a magazine as my
mat. That's fine. So it's been glued
on lots of times. But then when the glue is dry, you can use it again. And I'm going to
put my going on. So I'm going to put
some glue on the wind and state that on there. Now with glue stick you can, there is a little
bit of wiggle room. You can move and slide
around a little bit. So my bird is essentially
all together, but not attached
to the base paper. So now I'm going
to glue it all on. Being very careful
with the the feathers, that wing feathers and
the head feathers. It's useful just to hold the base of it so
you don't break any. If you do break any, you can very carefully
glue them all back in place and your bird on
the paper and press down. Let's see, kitchen paper here, which there's the beginning of our painted
papers collage bird.
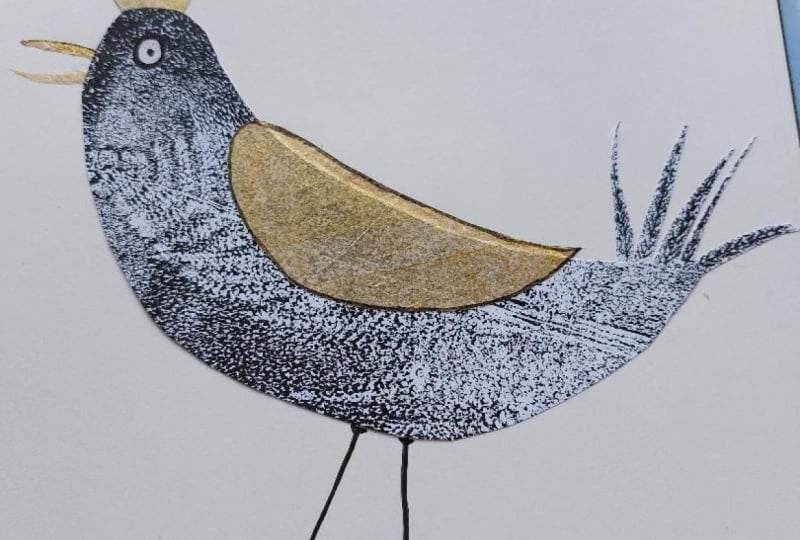
9. Final Flourish for the Painted Paper Bird: We've got our collage bird, and now we're going
to start adding the details for the
painted paper one, I am going to add
drawn on details. So this one I've added
details to the feathers on the head to tail and the wing. And I've also done some, some zig-zags on the belly here. I've got a drawn on beak, a drawn on I and
Syndrome on legs. So that's what we're
gonna do with this one. So I'm going to use two pens. I may use a third one. So the pens I've got, I've got a Sharpie. I've got a uni pin pen in 0.8. And I've also got a Posca pen in white. As you can hear me. Shaking, the posca
pens need a shakeup first and before I draw onto. But I just want to make
sure that it's working. So give it a little press, makes sure that the ink
is running smoothly. The first thing I'm
gonna do is I'm going to draw the eye on the bird. So as you can see from this one, and from these ones, the eye is pretty
much in the middle, or I've even got them a little further back than the
front of the bird. So I'm going to draw the white
of the eye first of all, and then I'm just going
to leave that to dry. Let's just go for it. This is where the
characters will come alive. I may just leave that center blank so I can do
the black in there. So that is going to be at the moment the
center of my eye. So we're going to
leave that to dry. What I'm gonna do, I
think I'm going to draw in everything
else with uni pin. If I need to fix
them the lines up, then I'll go over
with the sharpie. We need a beak. Now I haven't got too much
room here to have a long beak. So I'm going to have a
bit of a shorter one. So my beaks are coming
pretty much a bit level, just a little bit down
from the, from the eye. So I'm gonna take
my beak to the, just to the edge of the paper. And it's gonna be a bit of
a skinny pointed down one. And if I liked the look of that, then I'll just color it in. If I want a little bit
thicker than I can do. So I'm just going to
color it in like this. And already just by adding
that little curvy beak, we're getting a bit of a
character coming through. We go That looks a bit
like a bird already. Legs. I've got two legs
here and I've got three toes for want
of a better word, coming forward and a little
bit going backwards. I'm just going do two simple
legs to start off with 12. And then I can add onto them. So I'm going to have
3123 and then 1123. And then one. I'm going to thicken those
legs up a little bit. So maybe just sort
of thick lines up a little bit on the fate. Just draw these in a
little bit thicker. Again. That just evolves as we go. The ankles need to be a little bit thicker
to support the bird. I'm going to do two little
triangles at the top of the legs to indicate where
it joins onto the body. And very carefully just come down those legs and make those legs just a
little bit thicker. They don't have to be accurate unless you want
to make them accurate. This is stylized bird and can be fun and as
wonky as you like. So there we go. There's my
bird standing on two legs. I'm going to start
doing some details on the feathers. Here. I've just got done a center line just with some indications
of the feathers. I'm going to do
that on the tail. A central line coming up. Each one of those tail
feathers. Then just do. Some indication of
some tail feathers. You can absolutely leave
this and not put any detail. If that's what you would like. Your bird, you make
it how you want. This one here with
the two birds. I haven't got any details on any of the feathers on
the wings or anything. I've just left it completely. Painted papers are obviously
I've done the eyes and the beak and the legs bow. So either way you can
do it either way. But I just thought I'd show you how I just put a little
bit of detail on. Again, it's stylized. It can be however you want. You can make it
really fancy and put all sorts of
doodles, doodles on. You can do flower shapes, you can do whatever you want to make your bird as
fancy as you would like. Then doodles on it or anything. I'm gonna do the head now
but the head feathers. So again, drawing a center line and then just some
indication of the feathers. So I haven't actually used
the Sharpie pen at all. Yeah, that's fine. The wing feathers. I've done elongated
ovals on this one, but I think I might just do
just some lines with two, match these feathers here. Okay, It looks like
it's gonna be four. Then I'm just gonna do some, add some more if you want. Then I'm just going to do
some simple triangles. Just to indicate the
breast feathers. She did a zigzag line
on the other one. Now I'm going to
do for this one, I'm just doing some simple viz. Can be U-shaped, so it can be
V shapes. And there we go. I can see that my
eye is dry now. So I'm going to put a pupil. So I'm just going to fill
in the center with black. And I'm just going to outline
it with black as well. I'm just going
around a few times. Just to define that some more. I think I'm quite
happy with that. I'm quite happy to leave
that and say that that is my painted paper
collage. Bird.
10. Cutting the Shapes for the Magazine Bird: I'm going to do a
fancy bird using the magazine papers
instead of painted papers. These are actually
painted papers. But I'm going to do on with, they found papers
that we cut out from the magazine earlier on to
know what shapes with doing, I have traced the basic
elements on here. We're looking for
basic body shape, a basic wing shape, our basic tail shape, basic head feather shape. And then you can
either cut off and cut a beak on an eye and legs, or you can draw these
elements on afterwards. This piece of paper we need quite a big image to use
for the main body shape. So I'm thinking, I
quite like this. What is haver on a hillside? I'm quite liking that. So that's what I'm going
to use for my basic shape. Although these are provided as guidelines and you can
use them as templates, I prefer to cut these shapes, these elements out free
hand because that's where the characters of
the birds evolve. And as you can see
by these ones, each one of these body shapes
is slightly different. This one is a little
bit more elongated. This one is a bit more city up, and this one is heads
down a little bit lower. So did the characters
evolve from the cutting? And this is what I find liberating about using found
papers and painted papers to create. I'm not tied to the
big decision of making the mark on the
paper and sticking to it. So I need a basic body shape. I think it's gonna
be about that long. And the head is probably going to probably just keep it at the height of the
head over there. I'm going to just cut it out
and we'll see how it goes. The shape for the fancy birds, I make a curvy L-shape. So just keep trimming
away until you get the shape that you like
that works for you. And I'm going to cut that
back down a little bit more and make the neck
a little bit longer. Now we've got a skinny one, then that's fine. That's fine. I'm going to leave it at that, not play with it anymore. So the next thing
we need to do is we need to look at
the wing shape. So I can either
keep same sorts of colors from that same image, but just a different section. Or I can cut an element from
a different look at that. That would make a lovely
weighing, wouldn't it? From a different image. And I'm going to
do exactly that. So I'm going to talk
a wing out of here. So just perfect round. I've heard a little
bit more pointy. Round it a bit shorter. And that's gonna be my wing. So I've got some
petal shapes here. So I'm going to just try
cutting around those. I'm seeing whether we like
that as a as a head feathers. No. I'm now going to just
cut the head feathers. So I'm just going to cut down and cut some
head feathers out. If this shape, for me, collage is just playing and experimenting and just
working out door like this. No. Okay. What am I going to do? And
it's just the freedom to play. And because you're using
non precious materials, it, it takes the pressure off. This is just scrap paper that you would have
put in the recycling. And why has come through
come through the door free. And we're making
something from nothing. I'm going to leave that as
my head on my on my wing. So I now need to make a tail. I'm going to use that shape. There is the tail a bit. I'm going to cut some
tail feathers into here. I had a bit of a preconceived idea as to
what I wanted to make. I had no vision in my head
as to what this might look like or how it's going
to work together. I'm thinking that's going
use a little bit pointy Now. That's the beginning
of my found papers. Fancy bird.
11. Glueing the Magazine Paper Bird: Let's get gluing. I'm going to use PVA. So
I've got some kitchen paper. I've got my kinda what
I use Mr. Gluing mat. So it's the cover
of a pad of paper. And as you can, probably, it's been glued
on lots of times, but that's my, my glowing mat. You can also use an
old magazine and turn the pages over as you go. So we're gonna get
ready to glue. I don't want to do is to
make this paper too wet. I'm just going to fold up a
piece of kitchen paper there. And so with a wet brush. Just going to dab
that a little bit. I don't want it too sticky, but I don't want it too wet. And I'm just going to paste
on the back of my shape here. Now, my method is used.
The glue that you've got. This can make it quite
wet, but don't worry. Now I've left no glue at
the top and the bottom. Four. Then adding on my tile. Hello. I'm just going to
smooth it onto the paper. Because it goes it's quite wet. You can get some records and
wrinkles and that's fine. So as you can see,
these are lifted. And I'm just going to decide
where I'm going to put my head feathers and
put some glue on those. And just put those on there. Then I can put some glue
on the back of this here. Then placed down on top. So I can do the same again
with my tail feathers. You could attach the tail
to the body before you actually put it onto
the backing board. Whatever works for you is
the best way to do it. It may be that you you change your method
as you go along. Can't go there because
that's a little bit off of the edge. So I got to work quickly just to pick it up and replace it. I'm not gonna do
that. I'm just going to glue. I've got an n. I'm going to cut that
last tale for the two fit because we're using the
magazine paper, paper. I'm getting a little bit of a pull up of the image
that's underneath. You guy. Now I've just
snipped his tail feathers. That's two it has, you can see using PVA, it is a little bit, it makes the paper a little
bit record for drawing. It's a good idea to put it
under some Andhra heavyweight. I'm just going to
attach the wing on and then I think
I'll just leave it to dry before I add
any more details. Going on. Doesn't matter. Doesn't really
matter where it is. So that is my collaged bird.
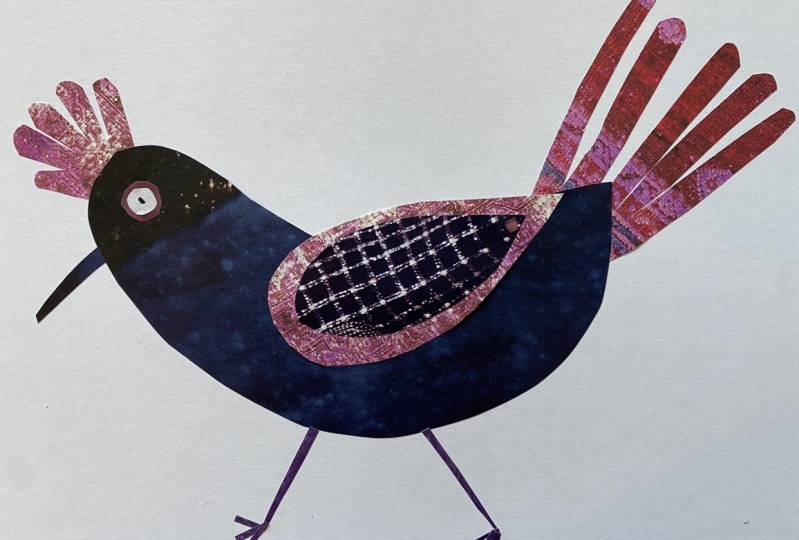
12. Final Flourish for the Magazine Paper Bird - part 1: This is the magazine
paper collage bird. So it's all dry. And I fought for this one. I would continue with the magazine paper and
actually add the detail by collaging on my glue. Matt. I've got a glue stick, I've got some tissue. The first thing we need to
do is we need to make an I. So the easiest thing to do is to find this
magazine paper. And I've just got a hole punch. I'm just going to punch
a hole and see whether I like the size of that as an I or whether that
needs to be a bit bigger. I think that's fine. I think we are the hole punch
is going to be too big, so I'm going to
leave it at that. I will want to put that onto some black black
leggings, kid. Okay. So that's what I'm
going to use for the outside of my
so I'm going to glue the white of the eye on. And then I'm going to cut
around the outside of it just to make the eyes
a little bit bigger. So that is going to be my eye. I think if I am going to cheat
and I will be able to put a black dot in the
center of the eye. So we're going to just pop that in place on there. Now. I've got my piece of black. Can I make a beak out of it? Of course I can make
a beak out of it. I'm just going to cut curvy beak and see where that takes us. Do I like that? I do quite like that. So I'm going to leave
that exactly as is. Obviously, you can
have several attempts. You can try a trial and error
and see what pleases you. Doesn't have to be black, you don't have to
have black details. You can go for any
color you want. That is going to be my beak. The next thing we
need to do is we need to make some
legs and some feet. Now I'm wondering, do
I want to have them the same color as the
rest of the bird? I could do or do I
use those legs there? I could do the same magazine. I have found a
picture of the GLA. So I'm going to use that as
the legs and see whether I can fashion a couple of
feet and legs from there. I'm gonna just kinda
in half because I've got space for two legs. I'm just going to
just go for it. My legs are going to be spade shaped to start off with. I'm just going to cut in. There's some triangles. And see whether I like that. I'm going to cut the white off. I might make those legs shorter. So that's gonna
be the first one. I'm going to do the
same again with the second bit of a spade shape. Then catching some
triangles to make the toes. So this one's got a little
bit of work writing on it. So I'm gonna make that shorter. So that is going to be the
leg length of my birth. And obviously you can, you can then arrange your
legs to be however you like and place them, however, is pleasing to you. Now these bits are a
little bit fragile. So you do have to
be careful gluing. It may be that once you start doing collage
details like this, it may be that you won't
find a pair of tweezers, will have a cocktail stick or a, I've got a bamboo skewer. One of my toes have come off. But anyway, I'm still
going to carry on. And I'm going to place the Lego. And then I've got my other Tau, which is going to go
into that space there. And I'm just going
to nudge it in place and press it down. Now I can leave it
at bat if I like. I'm actually going
to put a dot for an I just tested on there to see
whether or not that bleeds. I don't think it will. So I'm just gonna do a
little circle for an eye. And you can make that
as big as you want. So the question is now, how do we want to put any
more details on the bird?
13. Final Flourish for the Magazine Paper Bird - part 2: So I think I might just cut some elongated feather
shapes to go on the wing. So I'm basically just
going to cut some lengths. And then I can cut them
to size and shape. Once they're in place. This is from the original
picture that made up the body of the bird. So you could just have
strips along like that. And that is, I think
what I'm gonna do, I think what I might do
is glue that 1 first. So we do the center 1 first column is making
it up as you go along. And like I've said before, the fact that it
is non precious, papers takes the pressure
off of getting it wrong. You can be as simple
or as on a tissue. Like keeping your colors from the same palette does
help to unify the image. If you remember, these are
all from two photographs. So we've got the
picture of the haver, then we've got the
picture of the flowers. And I'm now putting the more Heather details
on top of the flowers. For the wings. We could go one step further and do some tail feathers
coming off of here. That might be quite nice. So I've got five
tail feathers there. I'm going to make
two out of this one. And the tail feathers
it in a beat. A little center strip of color. Growing up. 12345. I'm just going to make
that one a little bit thinner and a little
bit more rounded. Now, this is where a
scalpel can come in handy. I've got my scalpel or you
could use a craft knife. And what we're gonna do is
actually cut on the fly. So what you do is just blue and then place it in place. And then with the craft
knife where you want to, if you just gently
hold on there, you can tear it in place so you don't
have to cut and know exactly where you're going
to need to make that cut. So I'm just gonna do some
more tail feathers like that. Actually gives you a bit more
non gluey bit to hold onto. So I'm gonna just
should we go there? Let's go there. So we're just going to
put it down in place. Decide where you
want to catch it. I'm not putting too
much pressure on here, but it is, the blade
is pointing down. Obviously you don't want to
cut the rest of the image. I'm just going to go there. So I'm going against
the edge of the body. Good enough glue on
the edge of the body, press it down and you basically tearing against the blade. Sometimes be useful to have
either a wet wipe or a damp flannel nearby when you're doing collage like this because your fingers do get very sticky. And instead of jumping
up and having to wash your hands all the
time it is might be an idea to just give them a
wipe every now and again. Obviously if you're
working with children, you want to be careful with your craft knife that blends
in actually quite nicely. So I'm not even going
to cut that bottom one. I'm just going to put a little bit more
glue on it and let that sit just going over
the body a little bit. Those are my tail feathers. And I'm going to do exactly the same with the head feathers, but I'm going to use this slightly different
bit of haver. Again. I'm just going to cut
some skinny kind of feather shapes and see
what they looked like. Just glue those. I keep my scalpel in
an eraser to keep them safe and sound like
poking myself with it. If you've got a craft knife, obviously, these retractable. So there's my fancy bird.
14. The Final Birds and Three More: So these are the collages
that we've made. This was the first one
using the painted papers. Then we've got the
magazine paper one. But I wanted to just show
you some other papers that I have played with to make
small little collage birds. The first one is, this is using envelope paper. As you can see, I've used the blue from the
inside of the envelope. So he's a white envelopes with the blue paper patterns inside. So I thought that was
quite a cute little bird. This one is using
old book paper. So it gives a nice
beige color book paper. You can find old
books in junk shops, charity shops, thrift stores, or even in your own home. Books are broken, damaged, you don't want anymore. You can cut up and use those
as paper for collaging, of orientating the texts and in different ways to add more
interest to the piece. So that's just using book paper. And the final one
I've got here is just using regular newspaper. This was from TV section
on the newspaper. So I've got two different
colors of paper. So this is quite a bit more
of a pink tinge to it. And this one is the regular text because newspaper
comes in columns. What I did was I cut
several columns up. So there's a very, there's a wavy edge to this cut. And I have just
arranged three columns, glued those together before
cutting out the body shape. Then cut out the wing and the tail and the
head feathers shape. On this one I've added extra detailing on
with a black liner. So these are three more birds that can be created
using found papers.
15. CONCLUSION: Wow, How did you get on? I'd like to thank you
and congratulate you for coming all the way
through the process with me. And I hope you've enjoyed making your fancy birds
and found lots of lots of inspiration
around the house and lots of materials that
you can create with. So we've reminded ourselves that it can be fun and
cutting in sticking, that we don't need to be
in front of the screen. And that we don't need to have fancy materials and expensive
equipment to make art. Don't forget to post your
pictures of all you're makes. I'd love to see them. And please follow me on
Skillshare and leave a review. You can find me on Instagram. So come and check out some of the work that I posted there. If there's one thing
that I hope you take away from this class is that you are never too old to have fun cutting
and sticking.
 Helen H, UK based artist and maker