Transcripts
1. Introduction: Hi. I'm Sarah, I'm
a surface designer, Illustrator and digital planner. In 2017, I decided to
combine my design skills and love up organization to create and sell digital
planners and stickers. Since then, I've learned
the ins and outs of the many different programs to make digital planner stickers, and I've become an expert on streamlining the process to
create beautiful stickers. In the world of planners, there are two types of stickers functional and decorative. In this class, we'll focus on learning about making
functional stickers. Okay. For the class project, you'll create functional
planner stickers using Adobe Illustrator. For a second class project, you'll use those
planner stickers to create a sticker
sheet in good notes. Whether you want to create
custom stickers for your own use or dream of
opening a plan or sticker shop, this class will show
you how to create digital planner stickers with these using Adobe Illustrator. I'll see you in class. Okay.
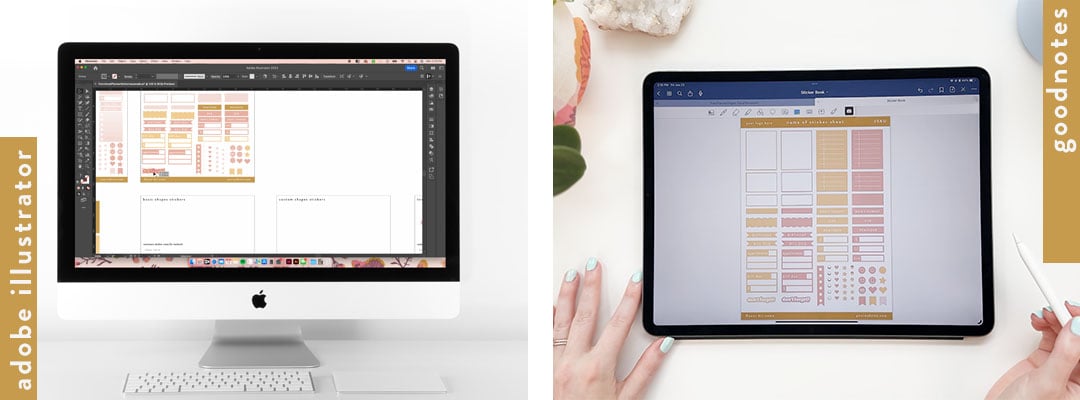
2. Class Projects: For this class, there will
be two student projects. The first project, you'll be working in Adobe Illustrator, and the second project, you'll be working in GoodNotes. If you don't already
have Adobe Illustrator, you can get a free trial for seven days from
the Adobe website. Good Notes has a free
version for iPad and desktop that allows you to
create up to three notebooks, which will work just
fine for this class. For the first class project, you'll design various types of stickers using
Adobe Illustrator. You'll learn how to
create basic shapes, custom shapes, tech stickers, icon stickers, and then
you'll learn how to combine techniques to create
your own unique stickers. We'll go over each type of sticker in detail
in the next lesson. For the second class project, you'll take the digital
stickers that you created in Adobe Illustrator and format them into a pre cropped
sticker sheet in good notes. This is the sticker sheet
you will be able to use in digital planners in the
Good notes app or to sell. Like I said earlier,
the good notes app is available on the iPad
as well as desktop. For this course, you'll
see me deming on an iPad. But the steps would be the
same on the desktop version. I'll see you in the next lesson.
3. Types of Digital Planner Stickers: Before we jump into learning
how to make stickers, let's learn about what types of stickers we can make first. All digital planner
stickers are images that are meant to be used
in digital planning apps, such as good notes and act in the same way you would use a physical sticker in real life. Functional stickers have the
purpose of drawing attention to or organizing specific
information in your planner. These stickers have
an emphasis on function rather than
being purely decorative. Compare it to highlighting your notes to draw attention
to the main points. Functional stickers can also be visually pleasing while
serving a purpose, which is what will be
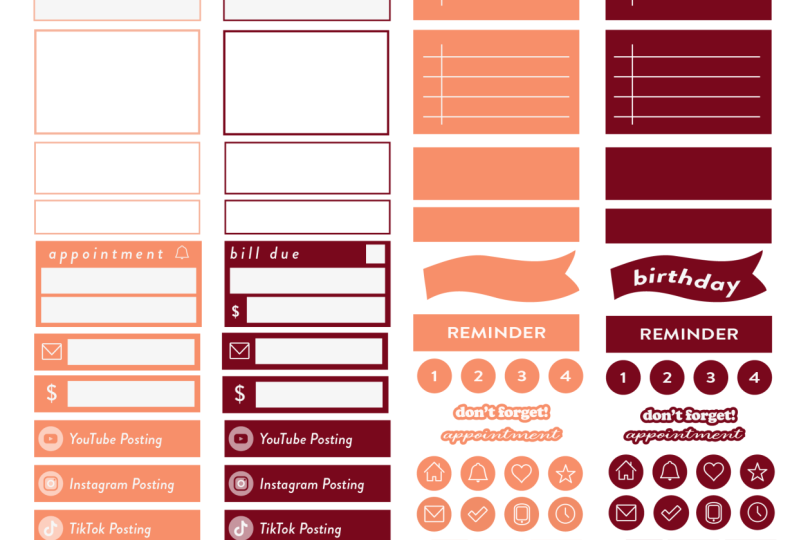
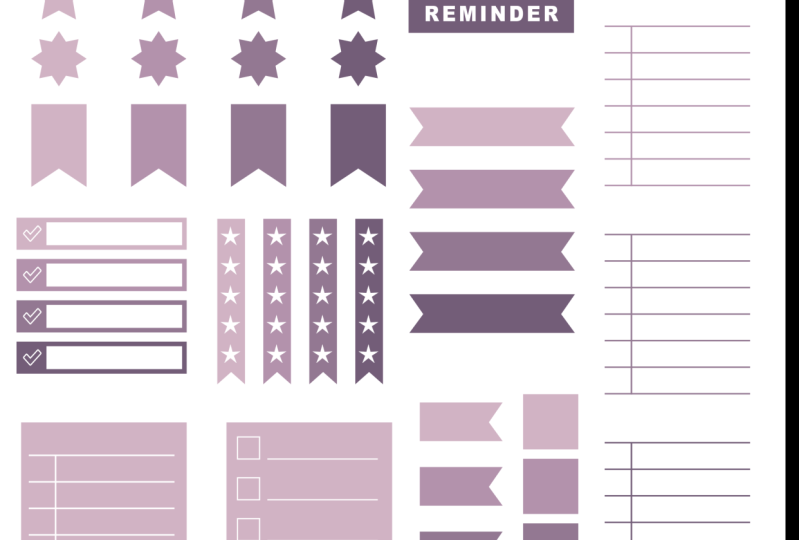
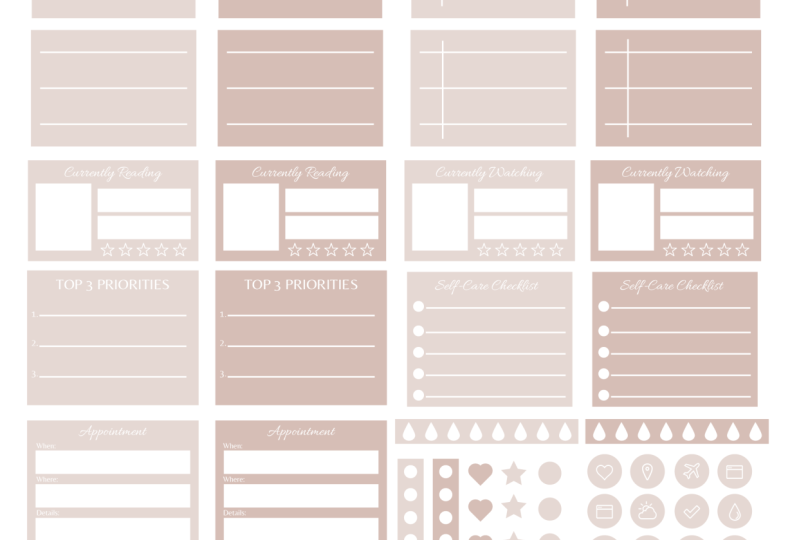
demonstrated in this course. Here are the types of
functional planner stickers we'll be going over today. Box stickers, Notepad
style stickers, text label stickers,
appointment and bill stickers, flag stickers, heart
and star stickers, icon stickers, outlined
text stickers, what I like to call
bubble box stickers. And checklist stickers. Now that you know what types of stickers you're going
to learn how to make, let's get started setting
up our document in Adobe Illustrator and reviewing the tools we'll be
using in the program. I'll see you in the next lesson.
4. Tools & Setting Up Your Workspace: Let's open up Illustrator
and get started. In the class resources, I've provided an
illustrator file that includes a reference
sheet of the tools, keyboard shortcuts, and everything else will
go over in this lesson. I highly recommend
downloading that if you're not very
familiar with Illustrator. It also has a sticker
sheet artboard already set up for
you to work with. Next, I'll show you the
steps of how I set up that illustrator example file so you can learn how to
set it up for yourself. When you first open
up Illustrator, you're going to
click new file in the top left corner and you'll see a screen
that looks like this. On the right side
where it says whip and height is where we can set the measurements
of our artboard. The size that we're
going to use today for our artboard is 7.25 " wide. By 9.75 " tall. The reason I use this size is because it's a size
that's compatible with print and cut methods for stickers using machines
such as cricket or so. This class is all about
digital stickers, but you could easily
use the same file for creating print and
cut physical stickers. If you don't care about that, you can absolutely use
any size that you want. Some common sizes are A five, eight by ten, 8.5 by
11 or seven by nine. And all of those
sizes are in inches. Next on the screen, right here, we have the measurements
for your artboards, so you can have any of these
measurements selected. I typically use
inches or pixels, and we can change that
later on as well. I'm going to keep
mine in inches today. We're going to keep
the color mode in RGB because these are digital stickers and
the RGB color space is what's used for screens. We're going to keep
the PPI at 300, which is the pixels per inch, that'll be the
highest resolution. Then you'll press create. Okay. So as soon as you
open your new document, the artboard tool is going
to be selected over here. So we're just going to
come up here to the top left and click
the arrow tool. Now, if your background
is not white like mine and it's gray and you
want to change it to white, you can go to the top
left Illustrator settings and user interface. And then right here where
it says Canvas color, you can select white. And press. Oh. Now we're going to set up your workspace so that all of your tools are in the
same spot as mine, and it's easy to follow
along with the lessons. In the top right hand corner, you'll see this button
that when you cover over it says switch workspace. Click on that and
then I want you to click Essentials Classic. This gets us most of the way there for setting
up our tool bar, but we're going to make
a few customizations to get all of the
tools that we need. To get those tools,
we're going to go to the top menu bar and press
window. And press a line. You'll see a pop up box. You're going to click
up here and drag it anywhere over
to the side panel. You can move things around
after you get them in place. Then we're going to go to window again and go all the way down to type and glyphs and drag
that over into our toolbar. Okay. Okay, let's rearrange some things so that we have what we'll use most towards the top. I'd like to have my layers
panel towards the top, click and drag that all
the way to the top. Okay. Next, we can get rid of a few things so that we have a tidy tool bar that
has only what we need. The fifth item down, you'll see a picture
of some paint brushes. You can click and drag that out here and then
exit out of that. Then right below
that is symbols. Click and drag that out
and exit out of that. Then next is our
appearance panel, which is this circle
with a dashed outline. Click and drag that
out and it out. And graphic styles. And commons. We're pretty much done with arranging our tool bar
on the right side. If you want to move
anything around, you can do it now, and then we'll save it
as a new workspace. That way, we can have this setup anytime
we use Illustrator. To save this as a new workspace, you're going to go to
Window, workspace, which is the fourth item
down and new workspace, and you can call that
whatever you want. And press. Then whenever you open illustrator
in the future, you'll press this button on the top right for
your workspace, and you can select that name to make sure that
you always have these tools in the
exact same spot. There are a couple
of other things that we're going to
turn on to set up our workspace that will be helpful when we're
making stickers. We're going to go to view and make sure that smart
guides is check marked on. Then also under view, we're going to make sure
that Snap to Pixel, Snap to Point and snap to
glyph are check marked on. Those settings will be
really helpful when we're trying to perfectly
align our stickers. Okay. All right. Next, we'll do a
brief overview of the tools panel on the left
hand side of your screen. Starting from the top,
we have our arrow tool, which is called the
selection tool. You'll want to make
sure that that's highlighted to be able to click around and
move objects around. Then we have our
direct selection tool, which is this white arrow here. That's good if you want to
just select an anchor point or just one portion of a shape and move that around
instead of the entire shape. Then hopping two down
is the pen tool. You can use that to create lines and curves and custom shapes. And below that, we have the
type tool, self explanatory. To the right of that, we
have our line segment tool. Then next to that, we have
our line segment tool, which is different than
the pen tool because it's only used for drawing
lines and not curves. The below the type tool, we have the shape tool. If you click on this, you'll see the selection of shapes that you
can choose from. To below that, you'll
see the rotate tool. To the right of the rotate
tool is the scale tool. And right here is
the eyedropper tool, which you can use
to sample colors. Then down here, we have
the artboard tool, which you'll use to
edit your artboard, change the name of your
artboard and add new ones. Below that, we have
the hand tool, which you can use to
pan around the screen. Then underneath that, we have our stroke and fill colors
that are currently selected. The filled in box is
for the fill color. And the outlined box is
for the stripe color. You'll see this
double ended arrow. If you click that,
it allows you to switch the fill
and stroke color. Below that, you'll see a square with a red
diagonal line through it. If you click this, it'll change either your fill or your
stroke to have no color. Those are all the
basics of the toolbar. We'll learn how to use
them more in depth as we go through the
sticker creation lessons. For all of these tools that
we just learned about, several of them have
keyboard shortcuts. I love using keyboard
shortcuts to optimize my workflow
and Illustrator. Throughout the course, you can
look to the bottom left of the screen to see which
keyboard shortcuts I'm using. I'll try to call
them out as well. Here is a list of my favorites. These are also written in the
Illustrator demo file I've provided in the class resources for you to refer to later on. Okay. We're ready to get
started working an illustrator. Let's get our artboard set
up so we can stay organized. We have this artboard here that we can use as our sticker sheet, and we'll make another one right below it to use as a workspace. I'm going to zoom out so that I can see the
screen a little bit better. And I'm going to go to my
artboard tool over here. You can change the name of this artboard to sticker sheet. Then we can press
the plus sign right here to create a new artboard. It'll automatically create
a new one right next to it. But let's move it below our
sticker sheet artboard. We'll call this
one our workspace. Creating names for
the art boards will really help when we're
exporting the files later on. Next, we're going to
make a color palette to refer to or the
rest of the course. We want our functional stickers to enhance our
planner, not distract. I recommend sticking to
one or two colors and having a variation of a light and dark
shade for each color. To make our color palette, we're going to go to
the rectangle tool here and we're going
to draw a rectangle. You can create this in
any size that you want. By default, it's going to be a white fill color with a black stroke color
that you can see here. So to change the color of this, we can change the color in
several different areas. We can change the color by
double clicking over here. We can change the color up here, or we can also come over to the right side toolbar and
select a color from here. So I'm going to double click
over here and I'm going to pick kind of a
peachy pink color. Okay. I like that,
and then we'll change our outline to be no color. So to do that, we'll
press x on the keyboard. And now we know that
the stroke color is selected because it's in
front and we'll press, and then we'll switch back
to our fill color here. Okay, so we have our
primary color now. Let's create a lighter shade. So we're going to hold down the option key on the
keyboard until we see the double headed
arrow and click and drag and release all while
holding the option key. Now to make this
a lighter shade, we'll double click
and over here, you can see an S that stands
for saturation and a B, which will change the amount of brightness that's in the color. By manipulating those amounts, we can create a lighter shade, you can just edit that until
you're happy with that. We have our color palette here. Now we want to move
these colors into our swatches panel over here so that they'll be saved
for us to use later on. So if we look at
our swatches panel, the default has a lot of colors that aren't
really my style, and I'm not going to be using. So I want to clear those out. So I'm going to leave this no fill color and the white
and the block and I'll click on this red color and then
hold down shift and click to the very end so that all of the colors I don't
want are highlighted, and then I'll press this
trash can to delete them. And then to add colors
to the swatches panel, you can have an object selected. And press the plus sign
to add it or you can highlight your colors and
press the folder icon, so I'll create a folder. I want you to create a folder
with your colors in it because we'll use it later
when we use the recolor tool. Now that we've got our
colors picked out, let's start making stickers. I'll see you in the next lesson.
5. Basic Shapes: Okay. All right. Let's get started
making stickers. I'm going to be using
the demo file that I've provided in the class resources, so you can follow
along with that, or you can use the
file that recreated from scratch in the
workspace setup video. First, we're going
to learn how to make basic shape stickers. For most of these stickers, we're going to be
using the shape tool. This tool over here
on the left toolbar. Okay. We'll start out
with circle stickers. Let's select a color for our circle sticker by going
to the swatches panel, and I'm going to select
this pink color. Then I'm going to toggle
to the stroke color by pressing x and pressing none and then toggle
back to the fill color. Then I'm going to come
up to our toolbar and right click on the
shape tool and select the Ellipse tool and
click anywhere on the screen and you'll
get a pop up box where you can enter
in the dimensions. Let's say we're making
a date circle sticker and we want to use this
common sticker size. Let's put in 0.313
3 " by 0.313 3 ". If you make a sticker, that's too large, or small, and you want to change
the dimensions of it. All you have to do
is select it and you can come to the top tool bar in the Transform panel or your side tool bar to
the Transform panel, and you can change the width
and height right here. Next, we'll make star stickers. Star stickers work pretty
similar to the circle stickers. We'll click over here and
select the star tool and click once and enter in
our dimensions. Okay. And if you notice, you can also specify the number of
points that you want. And when this pop
up box comes up, the radius one is the
outer points of the star. Radius two is the inner
points of the star. Again, you can resize these
using a transform tool. Or we can also use
our scale tool. For the scale tool, the keyboard shortcut is S, and all we have to do is click outside of the object
and drag on a diagonal. This doesn't lock
the proportions unless you hold
down the shift key. Okay. Let's learn how to make a box sticker
with an outline next. We're going to come to
our shape tool and right click and select
the rectangle tool. I want this box to be a white background
with a yellow stroke. Let's double click on this. Press color swatches and select white and double click
on the stroke color. Click color swatches
and press yellow. And we'll toggle the fill
color to be in front again. Let's click on the screen, and we're going to enter
in the measurements for a quarter box from
our common sticker sizes. And press. We can change the
size of our stroke up here. A stroke is automatically applied to the
outside of the shape. This is actually slightly larger than this measurement
that we typed in. In order to keep
the measurements exact when you're
using a stroke, you want to press
stroke up here and select a line stroke to inside. If we zoom in here, you can see that the
stroke is inside of the shape versus before
it was centered. For any of our shapes, you can also adjust the corners, and we can do that by
coming up to shape up here. If you hover over
this icon here, you'll see it says corner type, or you can come to the transform tool over here
and you'll see the same. If we press the up bio, we'll see that it
makes it more rounded. And you can also enter in
your own measurements. Another way to adjust the corners is by clicking and
dragging this symbol here. You can even just select one corner at a time with
our direct selection arrow, press the keyboard shortcut A, and click on one of those dots to select your corner
and click and drag that. Let's learn how to make this note pad style
box sticker next. We'll start out by making
the base rectangle, which is this size
right here, a full box. So we'll select our shape tool and let's change our color. I'm going to click and enter in the measurements. Press Enter. Now we need to draw
some lines on top. We'll use the line
tool for that. We'll come over to our toolbar and select the
line segment tool. Now, the difference between
the line segment tool and the shaped tools is
that the color of the line is based off of the stroke color,
not the fill color. Let's come over here
to our fill and stroke and switch those so that the fill has no color and
the stroke is a color. I want to change
the color to white. Okay. Let's draw our
vertical line first. Don't worry too much
about the placement of this because we can
change this later on. We're going to click
and drag and press the shift key and that will snap your line to be
perfectly vertical, and then you can
release your mouse. Now let's draw some
horizontal lines. Let's use a keyboard shortcut
to duplicate those lines, so we don't have to draw
each one individually, and we can make sure that
they're all the same size. So we're going to use the arrow tool and
with this selected, hold down the option
key until you see this double arrow head and click and drag and
release your mouse. Now, to duplicate that action, we can use the keyboard
shortcut Command D. Okay. Next, let's make
sure that all of these horizontal lines
are centered within this box and also
lined up because I can see some of these
edges are uneven. So you'll select all of
your horizontal lines. First, let's line them
up with each other. You can see immediately when
I select several objects, all of these align tools
pop up on the top toolbar. If they don't, for some reason, over in our tool bar on
the right over here, we have the align tool, you can click that as well, and we're going to align
the horizontal centers. Now all of the edges are even. Now, if for some reason you
had one of these lines off, you can also use the align tools to evenly distribute the
space between the lines. You can do that by vertically distributing the centers like that for you can also use
the distribute spacing tool. Okay. The difference
between these is this one distributes between the centers
of the objects. If your lines were
different sizes, it would be based on the center
of the lines themselves, and for spacing,
that would make sure there's an equal amount of
space between each object. Now let's group all of these
horizontal lines together. We'll use the keyboard shortcut command G to group
them together. Then I want to center them within this rectangle
background. Let's also select the rectangle background
by holding down shift. And then we want to make this rectangle background
a key object. That way when we use
our align tools, it will align based on the
position of this key object. To make a key object, hold down option and you'll see the double arrowhead and
click on your object. We can see that this is now a key object because of
the bold red outline. Now when we center these, it will center based
on the rectangle. Okay. Let's click off that. Now I want to move
the position of this vertical line
because I want someone to be able to use these as a checklist and have
room to check off items. I'm going to click on that, and I'm just going to nudge that over using my arrow
keys on the keyboard. I like that location here. Let's make sure
this vertical line is also centered within our box. Let's select our rectangle. Make it a key object by
pressing option and clicking. And then we will
align it. Perfect. Looks great. We want
to click and drag to select everything and
command G group it together. That way, this is
one movable sticker. Now, let's say you
want to go back and edit the width or
color of these lines. We need to go into
this group so that we can click on the lines
and just edit those. So we'll double click, and now we've entered isolation
mode within this group. So we can't edit anything else
that's not in this group. If we go to our layers panel, we can see that as well. Everything in the layers panel is only what's in this group. So let's select
all of our lines, hold down the Shift key to
select multiple objects, and let's change the stroke
color to a light paint. And you can change the
stroke size as well. You can also make the ends
of the lines rounded. And then to exit out
of isolation mode, you'll double click anywhere
away from the group. Let's review what
we just learned in the basic shape
stickers lesson. We learned how to make circles, rectangles, stars, and lines. We learned how to use
the transform tool to change the size of an object. We learned to use the scale tool to change the size of an object. We learned how to
adjust the stroke on an object and how to
group objects together. We learned how to duplicate objects and also
duplicate an action with the keyboard shortcut Command D. We learned how to work within an isolated group and we learned how to align objects
based on a key object. I'll see you in the next
lesson where we'll learn how to make unique
and custom shapes.
6. Custom Shapes: Okay. Hey, welcome back. In this lesson, we're
going to learn how to make more unique shapes that aren't available
in the shape tool. Let's get started with
this flag sticker. This one's really easy. We can just build off of
a rectangle to make it. Get your rectangle tool
and draw a rectangle. Let's change our color to
something in our color palette. I'll pick light
pink and no stroke. Then we can use our pen tool. We're going to add a point
to this line segment here, if you hover over this
line towards the center, you should see a pink line
that snaps it directly to the center and click and then we'll grab our direct
selection tool and click this
point and drag up. And there you have it. Next, we'll learn
how to make a heart. The easiest way
I've found to make a heart shape is by combining two rectangles and rounding
the corners on one side. Let's come to our rectangle
tool and drag a rectangle. At this big, then we're going to get our direct
selection tool, which is the white arrow. We'll press keyboard A and hold down the Shift key
to select two corners. And drag those towards
the center to round them. Now, if your rectangle
is really long, it's going to end
up looking funny. You can see that doesn't
really look like a heart. It needs to be on
the shorter side. Let's duplicate that by holding option and clicking
and dragging. And then we need to
rotate it by pressing R, click and rotate
and hold on shift so that I'll snap into perfect
alignment and release. Now, let's make sure these
edges are perfectly aligned. We'll highlight everything align the right sides of the
object. And the bottom. To make this one solid object, we'll highlight everything and we'll come to our
pathfinder tool, and we'll press Unite. Now you can see when
I click on this, it's just one solid object
versus this example over here, that's still two
separate objects laid on top of each other. We can rotate that
to be right side up. I'm holding down the
Shift key for it to snap to 45 degrees. As you can see for
these custom shapes, we can make most of them by manipulating
our basic shapes. And this, what I'm going to call a bubble block
is no different. This is comprised
of six circles, and these just have a straight
edge. They're cut in half. Let's come to our ellipse tool. Click and drag and hold down shift to make
a perfect circle. Don't worry too much about
the size of this right now. Then we're going to option, click and drag until they're
intersected about halfway. Okay. And press command D
until you have six of those. Okay. Now to get
these cut in half, we are going to use another
one of our path finder tools, which is called divide, and that will separate objects that are laid
on top of each other. We're going to draw rectangle, but before you start drawing it, I want you to hover
over this end circle until it snaps to the center and then click
and drag from there, and we'll lengthen this so that it covers the entire circle. Repeat this process
on the other side. Now, we're going to
highlight all of the circles and unite them as one object just like
we did for the heart, and then we're
going to highlight our two rectangles and our
bubbles and press divide. What this does is out everywhere they're overlapping and it automatically groups all
of the objects together. So we'll double click on them
to go into isolation mode. Okay. Click on all of the
areas that you want to delete. And just press the delete key. Then we'll double click
to exit isolation mode. Let's go over what
we just learned. You learned how to use
the Pen tool to add an anchor point when
you were making a flag. You learned how to
move anchor points and round corners with the
direct selection tool. You learned how to
rotate objects. You learned how to use the
pathfinder tool to unite objects and also use the pathfinder tool
to divide objects. You're making great progress. I'll see you in
the next lesson to learn how to make tech stickers.
7. Text Stickers: Okay? I'm going to show you how to make
three different types of text stickers, label sticker, a date sticker and a simple text
sticker with an outline. First for our label sticker, this is just comprised of a rectangle and a text
box. Pretty simple. Let's draw a rectangle
for our label sticker. I'm going to make it similar
to a quarter box size, but a little bit smaller because I want it to
be more of a label. Then next, we need
to add our text. We'll come to the type tool. I like to make my text box
outside of my shape first. We'll type a reminder. Let's make some adjustments. If you come up to
the top toolbar, I want the text to align to the center of the
toolbox vertically. So we've changed
that. Let's come to paragraph and center
our text horizontally. Then I want to make it all caps. So we can come to character
and press all caps. I want to add some more
spacing in between. We'll set the tracking. Let's try 200 and then make
it a little bit smaller. I also want to change the
font to one that I have a commercial license for since I plan on selling
these stickers. All of the fonts that I
use are from Adobe Fonts, which is super easy
because all of them are available for commercial use and they're free with
your Adobe subscription. The font that I'm
going to be using for this sticker is called IV mode, and I'm going to
use the semi bold, and this is an Adobe font. Let's start arranging this
over our label sticker. I'm going to make this
text box a bit smaller. I want to change the
font color to white. Then I want to center these. We'll highlight both of them, if you come up to
the top toolbar, you can see that this is
set to align to selection. This is very important
because if this is set to anything else like
align to artboard, it's going to align it
to the artboard int of in regards to the
selected objects. We'll align the
horizontal centers and the vertical centers. I'm pretty happy with that, and then we'll just highlight them and group them together. Next, we'll make our
date circle stickers, which is the exact same method that we just used for
our label sticker. We'll go to the Ellipse tool. I'm going to use this size. I'm going to make that pink. Text box type in four, make that a lot
smaller align those. Then let's say
you've already made a text sticker and your
next text sticker, you want it to have the
exact same font settings. You can have your text box highlighted and press the
keyboard shortcut or come to your eye dropper tool and select the texts
that you want to copy. Okay. And this doesn't
look perfectly centered because we didn't
change our text to be centered in the text
box yet. There we go. And we'll group that together. Now, the nice thing
for text boxes is that even when they're
grouped together, you can still edit the text without going into isolation
mode for the group. Let's say we want to make another label sticker
that says, don't forget. We'll hold down the option key, click and drag to duplicate. Now, without even going
into isolation mode, we can click T on our keyboard or click the text
type tool and click. That way that you can
edit the text pretty quickly and create several
different stickers. Those are great for
basic text stickers. Now let's make something
a little bit more unique. To make something like
this, don't forget sticker. We're going to start
out with our type tool again and type out what we
want our sticker to say. I'm going to write
out appointment Let's center the text
within our text box. Change your font if you want to. Again, I'm only using
font that I have the commercial license to
Let's zoom in a little bit. Once you're sure
that you're happy with how your text looks. We're going to turn this
text into an object. We're going to come to
object expand and press. Now if we really zoom in here, you'll see that each
of these letters are separate objects
because I can see the outlines where they overlap. Let's come to our pathfinder
tool and join them together to create
one seamless object. Okay. Now we're going to
select our text object. Press the keyboard
shortcut Command C to copy and command B
to paste behind. We'll come to our layers panel, so you can see what
that looks like. We have one behind and
one directly in front. We want to make sure the
one behind is selected. Let's change the color
of the object behind. You'll see y in a minute. And still with that
object selected, which you can tell
by this red square in this double circle here, to object path, offset path. What this does is it will offset the path by a
certain measurement. You'll have to figure out which measurement looks
best for your sticker. I think that looks
nice. We'll press. Just like our text, this is separate objects and we want to unite
them to be one. We'll come to our
pathfinder tool and press unite and we want
to group these together, and then you can change the
size if you want to Okay. Let's say you made a bunch
of stickers and you want to change everything that's
one color to another color. We can do that really easily
with the recolor tool. Let's highlight all of our stickers that we want
to change the color of and come up to the top
toolbar and you'll see this circle with Pi cutouts. We'll click that and
click Advanced Options. Now, this is going
to show us all of the colors that are in all
of these selected objects. These are your end
results over here, and this is what the
starting colors are. We can change these
in several ways. We can click on a starting color and drag
it over to an n color. That has changed everything that's yellow to be
the dark pink color. If you see black and white, don't have an end color. Just click and it will say, do you want to add a new color to the current harmony? Click? Yes. I'll do that again. Then let's change
everything that's black to white clicking and dragging. You can also click
on an end color and just use these
sliders down here. Or you can use our swatches
that we made earlier. Press this arrow
here and you'll see your folders all right
here under color groups. That's why it was really
important that we put our swatches into a folder. You can click one of
these and it will apply that whole folder and you can click this button to
randomly cycle through them. Or you can click and drag them to where you
want them to be. You can also double
click and press color swatches to directly
select one that you want. You can have a lot of fun
with the recolor tool. We're going to press
and then press now. Now that you've
finished this lesson, let's review what we learned. We learned what kind of fonts to use for selling stickers. We learned how to center
text within a text box. We learned how to adjust spacing between
letters with tracking. We learned how to use
the eyedropper tool to copy a font style. We learned how to turn text
into an object by expanding. We learned how to offset the
path of an object to create an outline and we learned all about using
the recolor tool. I'll see you in the
next lesson where we'll learn how to
make icon stickers.
8. Icon Stickers: Let's learn how to
make icon Stickers. Now, they are pretty similar
to making text Stickers. The main thing to talk about
is where to get icons from. You can make your own icons by drawing in Illustrator
with the Pen tool, but this can be time-consuming. You can find
commercial use icon, SVG images for sale
and purchase those. Or my personal favorite
is to find an icon font. These will usually be
called Ding bats fonts. And you can find them for
free or for purchase. The most important
thing is to make sure they allow for
commercial use. I prefer to use icon fonts because it's so much
easier to change between icons and add new
ones instead of importing different icon
images into your program. Okay, Let's get
started learning how to make this circle
icon sticker. We're going to make this
the exact same way we made a date sticker will make a circle with the
same measurements. Draw a textbox outside
of the circle. The icon font I'm using
today is called icon works. And then we'll come over to our side toolbar
to the glyph icon. The glyphs panel allows us to
see every icon in the font. To select one, we just
have to double-click. We can start aligning our circle and icon using the align tools. I'm going to zoom
in here to refine the positioning of this
icon a little bit more. Okay, that looks about centered. I'll change the color
of the icon to white. Highlight and group these
together and you're done to make this label sticker will start out with a rectangle. I'm going to do 1.5 " by 0.33 ". Then I'll create my textbox
and open the glyphs panel. Double-click on the icon I want. I'm going to zoom in so that
I can better align these. I'll drag the icon
where I want it. And I'm going to create
another rectangle, which will create the space for you to write up to do tasks. I'll drag that on top of the pink rectangle and make it bigger by
dragging out the sides. I'll change my icon color
to white by clicking on it and using the eyedropper
tool to select white. I like to double-check the
sticker by zooming out. I can tell that the
white rectangle is not quite centered
within the pink one. So I'll select the white and pink rectangles and hold down Option and click
the pink rectangle to make it a key object. Then I'll use the
align panel tools to center it vertically. That looks better. Let's
review what we've learned. We learned how to find icons to use for our planner stickers. We learned how to search
for an icon sticker font. And we learned how to use the glyphs panel to view all
of the characters of a font. I'll see you in the next
lesson where we'll learn to combine all of the skills
you've learned in the previous
9. Combining Techniques: There are so many ways you
can get creative and combine all of the techniques
that you've learned in the previous lessons. Let's combine our
knowledge of shapes, text, and icons to create
an appointment sticker. I'm going to start out with
a half box size rectangle. That's 1.5 " wide
by 0.95 " tall. Okay. Next, I'm going to select the type tool
and choose an icon. I'm going to pick this bell. Then I'm going to
make another text box and type out the
word appointment. I'll click out and select the text box with
the arrow tool, and then I'm going to
use the dropper tool to change the font so that
you can actually read it. Now I'll start dragging my text and icon sticker to
the top of the box. I want to make this
icon a little smaller, so I'll do that using
the scale tool. Next, I want to make
two white rectangles. These can be used
for areas to write where the appointment
is and what time it is. I'm duplicating this rectangle by using option, click and drag. Then I'm going to
adjust the size of these rectangles a bit and I want to center
them horizontally. I'll select all
three rectangles and use option click to make the
pink rectangle a key object. Then I'll center the
white rectangles. Let's zoom in to move things
around a little bit more. I'm going to move
the white rectangles down and the text and icon down as well so that there's less space on the
bottom of the sticker. Then I'll highlight everything
and group it together. Next, we can use
our knowledge of shapes to make this
flag checklist sticker. We'll start out by
creating a tall rectangle. I'm going to do 1.9 "
tall by 0.33 " wide. Okay. Then we'll use the pen tool to line
up with the center and add a point to the bottom
line of our rectangle. I'll use the direct selection white arrow tool to click and drag this point up to create
the V shape of the flag. Instead of circles
for the checklist, I'm going to make stars. I'll select the star
tool and draw a star. Then I'll use the
ye dropper tool to change the color to white. I'll drag that over to
the top of the checklist. I'm going to duplicate
the star by holding down option, clicking
and dragging. After you've done that once, you can use the
shortcut Command D to duplicate the action. I'm going to make seven stars. Next, I'll highlight
everything and hold shift to deselect the
yellow background. I'm going to make sure
all of the stars are centered and evenly spaced
out using the align panel. Then I'm going to group
all of the stars together. Now that they're grouped, I can align them to the center of the flag by selecting everything and using
the align panel. I'm going to move the
group of stars up just a tad by using the up arrow
key on my keyboard. Okay, that looks great. Let's
make another fun checklist. I'm going to go
to my shapes tool and select the polygon tool. I'm going to make
the checkboxes for this list hexagons and have them with a pink stroke
and white fill color. Okay, I'm going to
duplicate that. I'm eying my other checklist
to make sure they are about evenly spaced and I have around the same
number of checkboxes. The hexagons are a
little bit bigger, so I ended up creating
six of those. Let's select all
of those and use the align panel to make sure they're centered
and evenly space. And we'll group those together. I think it would be fun
to make this sticker a little bit more
interesting and combine it with the
notepad style sticker that we learned in the
basic shapes lesson. I'm going to make a full
box size rectangle that's 1.5 " wide by 1.9 " tall, and I'll drag my check boxes
over onto the rectangle. Let's select those and
align them vertically. Now, let's add some lines
using the line tool. I'm drawing my line
and holding down shift so that it snaps
to be perfectly level. And I'll duplicate
that using option, click and drag, and
then command D. Okay. Let's zoom in and adjust the
location of these lines. Instead of individually
selecting every line, I have a faster method. I'm going to select everything, hold down shift, and click
the rectangle to deselect it. That way, only the
lines are selected. Then I'm going to drag
those up a little bit and use the align
panel to center those. Let's select the lines and check boxes by selecting everything, holding shift, and clicking
the rectangle to deselect it, and then grouping the lines
and check boxes together. Then we can select everything, make the rectangle a key
object and center everything. Okay, I like where
this is going, but I want to make all
of those checkboxes a little bit smaller. I have a shortcut to
keep all of them in the same location and
just change the size. We're going to double click to enter the line and
checkbox group. Then right click on the
checkboxes in Ungroup. Then we'll select
them all and go to object, transform each. You can do a lot of
fun things here. I'm decreasing the
horizontal and vertical size to 75% each. Then I'm going to exit out of isolation mode and center
the rectangle in group of check boxes of lines. Perfect. I'll select everything and
group it and then you're done. That was our last lesson on learning how
to make stickers. I encourage you to
get creative and make any types of stickers you might want to put on
your sticker sheet. In the next lesson,
we'll prepare to export our files by arranging everything onto a
sticker sheet and more.
10. Preparing to Export: Okay. Now that you've made
some beautiful stickers, let's make your first
class project and learn how to put them together
onto a sticker sheet. I'm going to be working in the Illustrator demo file I've provided for you in the
resources of the class. I've added a header
and footer to my sticker sheet for a place to put your branding and
sticker sheet name, which is very important if you're going to
be selling these. But even if they're
just for personal use, it's nice to have a name for your sticker sheet
to stay organized. In the demo file, the sticker
sheet branding is locked, before making any edits, you'll need to go to the
layers panel and unlock it. You can do that by pressing
the lock icon right here. Once you have your sticker
sheet header and footer, the way that you want
it, we can start organizing the stickers onto it. I'm going to organize my
stickers from largest to smallest and keep similarly shaped stickers group together. I'm also going to
be making two of every sticker type using the option plus click
and drag shortcut. That way I can have two
different color options for each type of sticker. Don't worry too
much about getting them perfectly spaced right now. We'll use the align
tools in a minute to make sure everything
is perfectly aligned. Okay, now that we have all
of our stickers laid out, I'm going to use
the align tools to line things up and
even rows and columns, and I'll use the key object to help align things
when necessary. Now that everything looks
nicely spaced and organized, we are going to select all of the stickers and
group them together. Then we can align them
as a group to the center of the art board using
the aligned tools. And then we can group. Next, we can have some
fun changing colors. I'm going to make my
stickers pink and yellow, so I'll be selecting one
column at a time and using the recolor tool to change the color of several
stickers all at once. Remember that for
the recolor tool, the input is on
the left side and the output color is the small rectangle
on the right side. When I select one column
of stickers that are all different colors and
open up the recolor tool, I'll select one from this drop down to make them
all the same color, but it will exclude
white automatically. Then you can easily change
the color of every sticker. It's also important to open up this drop down menu and select. Otherwise, your colors
will be scaled as tints. Okay. Yes. Some of these smaller stickers
that are just one shape, I can select and click the color in the swatches
panel to change. Now you have
successfully created a sticker sheet in
Adobe Illustrator. There are a couple
of other things we want to make
that will help us create a pre crapped digital
sticker sheet in good notes. We're going to
make a template of our sticker sheet that will
help us to perfectly line up our stickers when we're
working in good notes because good notes doesn't have any of the align tools that
Illustrator does. Let's go to our layers
panel and just double check that our branding on our
sticker sheet is unlocked. Okay. Okay. Now we're going
to duplicate our artboard. Select the artboard tool, hold down option and
click the name of the artboard and
drag to duplicate. Then highlight all
of the stickers and we'll change the color to
black using the recolor tool. Under the drop down, select one, then I'll use the color sliders to change the color to black. Then I'll click
this drop down and select act so that it's pure black instead
of using tints. I decided to simplify this
even more and drag the white onto the color bar so that everything is
completely black. So this will be the
template that we'll use in good notes to drag and
drop our stickers onto. I'm going to make one more copy of this artboard
and delete all of the stickers off of it so that it just has our
sticker sheet branding. We'll save this as a PDF in the next lesson to be the background of our
good notes sticker sheet. Next, we're going to put all
of our individual stickers into the asset export panel
to get ready to export. You want to make sure that
all of your stickers are in groups if they are comprised
of more than one object. Let's open up our
asset export panel, highlight all of our stickers, and then over here on
our asset export panel, you'll see this box with a plus sign and multiple
boxes with a plus sign. One is for adding multiple
objects as separate assets, and the other is for
adding a single asset. You want to click the button
to generate multiple assets. Okay. Now you'll want
to scroll through the asset panel and make sure that everything
looks correct. If a sticker wasn't
grouped correctly, you'll be able to tell
because the components will be separate assets instead
of a single sticker. Okay, everything looks good. We're ready to get
started exporting. I'll see you in the next lesson.
11. Exporting Your Files: Okay. Before we get started
exporting our files, let's talk about where you
should save your files. You'll want to be saving everything in a
location that is easy to open up on the iPad if you're using good
notes for iPad. I'm going to be saving
everything to an iCloud folder, but you can use another type of cloud system such as Dropbox or Google Drive that you can easily access on
your iPad as well. Let's get ready to
export our files. Okay. The files that we're
going to be exporting are a transparent P&G
of our sticker sheet, a PDF of our sticker template, a PDF of our sticker
backing page, and individual PNG
files of each sticker. Let's export a transparent PNG of our sticker sheet first. There are several ways to
export an illustrator, as you'll see in this lesson, and one way is by artboard. To export an entire artboard, you'll need to know
the artboard number. By clicking on the
artboard tool, you can see the artboard
names and numbers. Our sticker sheet is
on artboard seven. Now, we'll go to
File, Export as. Then you can checkmark
US artboards and change the range to
your artboard number, which in my case is seven. You can also checkmark suffix
if you named your artboard, as this will add the name of your artboard to the
end of the file name. I'm going to change the file
name so I can keep track of what sticker sheet this is in case I create different
versions in the future. And make sure your format
selected as PNG and press okay. You'll see a pop up box with some options for
saving as a PNG. We're going to have the
resolution at 300 PPI. Make sure optimized is selected, and that the background
color is transparent. Then press okay. Let's
export our PDFs next. You don't need to take note of the artboard numbers because
on the PDF export screen, it will allow you to see them. We'll go to File, Export,
Export for Screens. Make sure the word artboards is selected at the top center, and then you'll be
able to check mark the artboards that
you want to export. Make sure that your
destination folder is correct under port two. We'll change the format to PDF, and that will allow us to select the option Export PDFs as multiple files to create two separate single
page PDF documents. Then you can click Export Rs. Here you can see the file saved as the names
of the artboards. This is why it's
great to name all of your artboards in your
illustrator document. We're almost done exporting. Now we just have to export
our individual stickers. Let's open up our export panel, and we'll need to make sure all of our stickers are selected. You can tell if
they're highlighted because they'll be
outlined in blue. If they aren't, you
can select them all by clicking on the
first sticker, then scrolling down, hold down shift and click on
the last sticker. Next, we'll change
our export settings to 300 PPI and P and G. You can change the suffix to whatever you
want or just leave it blank. I've experimented with
several different sizes and resolutions of stickers, but 300 PPI yields the best results for having digital stickers
that aren't blurry. Feel free to try out
your own settings and see what you like best. Next, let's press port and
choose our destination folder. I like to create a new
folder just for the sticker PNGs to live in because
it's a lot of little files. Then press choose and you'll get a green pop up that the
export was successful. There you can see
our sticker folder with our four types
of files in it. You've now completed the
first class project. Yeah. I would love to see the sticker sheet that you've
created an illustrator. Upload a screenshot or save an extra file of your
sticker sheet with a white background instead of transparent to upload
to the class projects. Let me know if you
have any questions or if you'd like some feedback. I love to help. In
the next lesson, we'll get started on our
second class project. I'll show you how to take these stickers into
good notes and create a pre cropped good
notes sticker sheet for use in digital planners.
I'll see you there.
12. Create a Sticker Sheet in Goodnotes: Hey, welcome back. Let's
dive into good notes and learn how to make a pre
cropped sticker sheet file. If you don't already
have the app, go to the app store
and download it. The free version is good
for up to three notebooks. I already have good
notes open here. Good notes is a PDF
reader app and is comprised of PDF
files or notebooks. We're going to make
a new notebook that will hold all of your
sticker sheet files. I'm going to tap this plus
sign here and press notebook. You can change the
cover if you want, but only you will see the cover. It won't be something you're
sending to customers. Keep the paper style as blank, and we'll change the
name to sticker book. Next, we'll import
our sticker backing and sticker template PDF pages. We'll click the four squares
in the top left corner. This will show us all of
the pages in our notebook. You can click the
plus sign to add a new page or import a page. We're going to press Import. Locate your sticker
backing and template PDFs. I saved mine in iCloud Drive, but if you're using
Dropbox or Google Drive, you would go to that
folder instead. Select both PDFs and
press open. Okay. Now we can delete
this blank page or move it towards the end. Let's open up our
sticker template page. Next, we're going
to start adding our sticker PNGs on top
of this template page. The easiest way to
do this is to use the split screen
view with good notes on one side and the
files app on the other. To enter split screen mode, swipe up from the
bottom of your screen, click and drag on the files app and pull
it over to the side. You can press the three dots at the top and drag it
around the screen. Then you'll want to adjust the corners of your
windows so that the apps are not overlapping but right next to each other. Now we can open our PNG folder and let all of our
stickers load. And then we're just
going to start dragging them over onto our good
notes template page. To resize the stickers, you'll select the lasso
tool in good notes. Draw a circle around
them and tap, select resize, and drag with the arrow in the bottom
right corner of the image. This ensures the size
ratio is locked. Okay. You can use your
finger or an apple pencil. I find I can get a little bit more precise with my pencil. My method is dragging all of the stickers of the
same type over at the same time and then using the lasso tool to resize
them all together. Sometimes good notes is a little funny and the exact same sticker will import onto the good notes
page at a different size. But that's why we have
our handy template page. I'm just getting everything
into their general position and not worrying too much about being precise with
the sizing yet. For these smaller stickers,
I like to zoom in. Okay. Okay, now that we have all of our stickers down in their general location, I'm going to be more
precise about resizing them and positioning them as close as possible
to the template. Here I have the
image tool selected, so I can just tap
on each sticker and that double ended arrow in the bottom right
corner comes up. Sometimes you have to be
careful with this because it's easy to accidentally
rotate a sticker. If you do this, the easiest
way to straighten it out is to enlarge the sticker and then
shrink it back down. If you somehow really
distort your sticker, just delete it and
insert a new one. The reason that we're making this pre crop sticker sheet
is because it allows you or the customer to have all
of your stickers readily available to copy and
paste in good notes, rather than spending a ton of time importing and
resizing them. This step is a little
time consuming, but it can actually be relaxing. I like to arrange stickers onto the templates in the evenings
while I'm watching TV. Okay, I'm happy with that. Don't over analyze and get
everything too precise. If it's not exact down
to the pixel, it's okay. Okay. So remember that
we put our sticker backing page in right next to this template page
in our notebook. Now we're going to move all of these stickers onto
that template page. We're going to use our
lasso tool and draw a big circle around all of our stickers on
our template page. Tap and press cut. Swipe over to your sticker
backing page and press paste, and try to just eyeball
these to be centered. Now take a moment to admire your beautiful and professional looking good notes sticker page. Now you or your customer can
simply use the lasso tool to circle the sticker they want to use and copy and paste
it into their planner. Don't forget about the free planner pages I've included in the class resources for you to test out your
new stickers in. If you haven't already uploaded your stickers to the
class project page, you can also take
a screenshot of your good notes sticker
sheet and upload that. Okay, so we've made this awesome pre cropped
sticker sheet in good notes. How do we share it
with our customer? Good notes makes
it super easy by allowing exports with
their native file type. There are a couple of ways
to get to the export screen. You can open up
all of your pages. Press the little arrow
next to the page you want to export and press port. Or you can press
the share button. This is great if
you want to export multiple pages as one
good notes document. For this, I'm going
to export this page. Select good notes, so this
will be a good notes file. Name your file. I like to put my brand name somewhere
in the file name. And then press port. Scroll down and select
where you want to save it. I'm going to save mine to file
so I can save it to Cloud. Next, I'll show you how to
import a good notes file. We're going to tap
the four squares to show all of the
notebook pages. Press the plus sign and tap just like we did to
import our PDF pages. Then you'll locate your good
notes file and press open. You can see, there it is
with movable stickers. In the next lesson,
we'll go over how to use our digital stickers in
other digital planning apps, and I'll demo using the notability app.
I'll see you there.
13. Stickers For Other Planning Apps: Okay. You just saw in the previous lesson that Good notes has a native
file type that allows you to export a sticker sheet and share with other
good notes users. There are some other digital
planning apps that have this feature to notability
and note shelf. However, it would be
time consuming to create a pre CO sticker sheet in multiple apps and export in
their native file system. My approach is to create a
pre crop sticker sheet in the native file system of the most popular
digital planning app, which is good notes,
and then provide a simple alternate method for customers that are using
another digital planning app. The alternate way
for customers to use our stickers in another
planning app is easy. We already have it saved. They can easily use the transparent PNG of
our full sticker sheet. This allows the customer
to import just one image. It keeps your branding on
the page versus providing individual sticker PNGs where
your branding can get lost. The customer will be able
to easily duplicate and crop the sticker sheet as
needed to use the stickers. I'm going to demo this
in notability for you so that you can see
just how easy it is. Here I have notability
open to a blank page. I'm going to use the same method of import that I
used in good notes. I'll make a split screen
window with the files app and navigate to the folder that has our transparent
PNG sticker sheet. I'll click and drag the
sticker sheet over. Then I can easily
crop or copy and paste the stickers that I want to use onto my planner page. You've learned so much today. I'll see you next
for our final lesson on how to package your
stickers for sale.
14. Package Files for Sale: Okay. Now that we've made our beautiful
sticker sheets and exported all of our files, how do we actually get these
files to the customer, and what do they need in
order to use our stickers? We're going to give them
at least three files, at good notes
sticker sheet file, which is the pre
cropped sticker sheet for good notes users. Dot PNG sticker sheet file, which is for other app users, a PDF guide on how to use the stickers and a PDF
with the link to download. The link to download can be on the PDF user guide or it can be on a separate
PDF. It's up to you. Why do we need to provide the customer with a link
to download their files? Some seller market
places like EtS have a file size limit for what you can upload for digital products. If your files are bigger
than the upload limit, you can get around
this by uploading your sticker files
to a cloud system. Then you can get a
sharable link to that cloud system folder
and put it into a PDF. The PDF with the
link to download the files is what you
would upload to EtS. Okay. I recommend using Dropbox
or Google Drive to upload your files to if they're too big to directly upload to
wherever you're selling. Both of these options will allow you to create a sharable link to your sticker folder that no one can access unless
they have the link. You'll take this URL, and that is where the link to download the
stickers will go to. After you've uploaded
your sticker files to the Cloud and have your
sharable link URL, we need to actually make the PDF user guide with
the link to download. I'm going to show
you an example of a combined PDF that is a user guide and link
to download in one. You're going to need
to use a program that can create a
hyperlinked PDF file. My favorites are Canva, Adobe Express, and
Adobe in Design. My example was made
using Adobe Express. Okay. So what does your
user guide need to include. I'd like to start out by thanking the customer
for their purchase. Then I'd like to
have the link to download their stickers
towards the top in a larger standout font because that's where the
customer is most excited to go. Next, it's a good idea to list what files are included
in their purchase. Then I'd like to include brief instructions on how to
actually open their files. I'll include one set for good notes users and
one for other apps. Adding in some brief
instructions on how to use your product
is helpful as well. I also like to add in a terms
of use to let the customer know that the purchase of these files is for their
personal use only, and commercial use
is not permitted. It might seem obvious, but it's better to have it in
writing so that it's clear. I'll close out the PDF with a personal message
to the customer, letting them know I'm
open to answering any questions they have
about their purchase. If you make any video tutorials on how to use your products, this would be a great
place to link them. Always make sure your name
and links to your shop and social medias are
on the PDF guide as well so that the customer
can easily know where they bought the stickers from and
return for another purchase. This example, PDF user
guide is attached to the class resources so that you can refer to it
when making your own. You have everything
you need to make and sell digital stickers now. I'll see you in the next video
for some closing thoughts.
15. Closing Thoughts: You did it. You
officially know how to make digital planner stickers
in Adobe Illustrator. Thank you so much for joining
me during this class. I hope you had as
much fun as I do making digital
stickers and that you learned some great tips
along the way to make the process faster and easier. You learn how to make
various shape stickers, text stickers and icon
stickers in this course. Next, I encourage you to use your new skills to get creative. Take what you learned and create unique stickers that would be helpful for specific events in your life and your daily plans. Chances are there's
someone else out there that would benefit
from them as well. If you have it already, don't forget to
upload a picture of your sticker sheet to
the class projects. I can't wait to see
what you've created. Be sure to follow me on
Skillshare to see when I create more courses on digital
planning in the future. I would love it if
you left a review and a comment of what you
would like to learn next. Thanks so much for
joining me today. I'll see you next time.
Until then, stay creative.
 Sarah Renee, artist, SVG & pattern designer