Transcripts
1. Intro: Okay. All right. Hello.
2. Get to Know Adobe Illustrator: Hey everyone. So here we have our Illustrator already open. And the first thing I'm going to show you is how to open your document here. So we're going to start by going here to the left and clicking Create new. Or you can go up here, click File and New, or shortcut Command N, or open it from here. So we want to open a file to make our folders right? So it really doesn't matter the size, the color, preferences, column preference. His very important, we don't want it to be in CMYK, we wanted to, we wanted it to be RGB since it will be used for screen use only and not to printing. So we will just go here and click this, since this is some desktop version. So the colors are in RGB. Or you can go up here, click Create New, and go to that. And you can use this common verb, large or anything else. So we're going to use that, go ahead, create. And here it is. So first thing that probably see is that to my Workspace doesn't look like yours. Well, that's not a problem since I'm going to show you how to make it like this, since this is the most convenient way to use your illustrator or debts what I think. Okay, so let's restart my workspace. So to do that, you'll go up here to the right corner and click on this little window. And this will open up. So we'll go to Reset Essentials, Classic. And now that's my workspace. But if it's still doesn't look like your workspace, you'll probably has some order or space selected. Maybe it's essential. As you can see, it's changed. Maybe it's painting, as you see it's changed. If you're familiar with Illustrator already, of course, go ahead, choose anything that suits you best. But also if you want to make your workspace look like mine. So it's easier for you to follow. You'll just click here, click Essentials, Classic. And the one thing that I have change here is my Layers panel. Since I like my layers to be visible. I usually have a lot of layers, so it's easier for me to see all of them. Of course, I can make my window bigger by dragging it here. You can do that with any other panel. So now to make my layers panel bigger, like it used to be over here, I'll just go and click on the layers panel, hold it and drag it here. Now when this blue comes up, I'll just drop it. And now I have my Layers panel and I will hide my art boards since we don't have any. And you can see it's a really big Layers panel. So the first thing that we'll do is get to know our tools panels. So this is a selection tool. Use it to move around to select sf. Obviously. Say this is our Direct Selection Tool. Now, I will show you later on how you will use this. You usually use it to transform shapes and objects. And one more thing that we're going to use here is our pen tool. Okay, so.
3. Create Outline of a Folder: Next thing we wanna do is finally start making our folder. We're going to do that by digging a screenshot or any other photo of a folder and drag get in your Illustrator. So I will just locate my photo and drag it here. I took a screenshot from my desktop. And as you can see, it's a regular folder icon over here. So I don't want this to move around my eye, it was my pen tool. So I will walk this over here. And you can lock this layer by going to the Layers panel and clicking on this thing like this lock will appear and you make your new layer. You will go down here and click on this little plus sign. And new layer will appear on this layer will make our folder. So we will go over here and select our Pen tool or use the shortcut. Now, I will zoom in and make corners. So the first corner should be about here. And hold Shift. So the line is tree. And click here. So draw, wow, Hope see I click hold Shift and draw it down, down that again, hold Shift. Go to the other side. And when these pink lines appeared, that means it's aligned with the top handbooks. So we'll just click here. And again, we want to close off this shapes. So will again shift and go up here to our first dot and click. And now we have our shape to transport her edges. The easiest way to transport it, transform, transform that using our direct selection tool. And we'll use that by clicking on our keyboard or up here in our two tools panel. And we're going to zoom in over here and click on our first thought. Go up here to the corner and put the size to maybe see what is the best. Will leave it as 22. Okay. Zoom out. And as you can see, our coronary is now hopefully ligase. Let's go to our other corner. Hold Shift, select three remaining, go up here and put in 22. Okay, So that will be our main part of the body. Also our folder has back. So just go ahead and create a new layer over here. So we're going to start over here like that. And hold Shift, drag it across. Okay. Hold Shift, drag it up. This. Okay, So this should be it. So click again here, here, here, and close off the shape. Again. Our corners R-squared. So we're going to use our direct selection tool. Click on these three. So this one here, this one here, and this one here, we want those to be like fruit, like Copley. So bled, the value rounded to 22. Yeah, that looks the best. So we're going to leave it like that. Click on our selection tool again. And let's drag this layer below our layer to solar tweet is going below. So you're just click on it and drag it below that layer two. We have our first folder. Here. It's little bit clique. So I don't want to hurt my feelings, But yeah, it doesn't want to best, we should make this part here too, a little bit more oblique. So I'm going to go again, choose direct, direct selection tool. Click off here and make this a little bit more oblique. So yeah, that'll be 22 pixels. Now it looks better. Okay, so let's go to 24. It's coloring.
4. Color the Folder: Okay, so let's color this baby. But the first thing that I want to do is remove this photo from the background. I won't remove it completely, but I can show you how to do that. I'll just turn off this I button here in the Layers panel and outside of this bowl, that's physically option. Okay? But to remove your layer, you will just click on the layer that you want removed. Of course you have it. It has to be unlocked for you touring little bit. So you will just click on the log here and go here to this little bin and you can bleed it. Of course, I don't wanna do that, so I'm just gonna go ahead. Good. So I'm just going to log it again. And this is our folder. So I'm going to unlock both of these. Select both of them with our selection tool. You cancel it. You can use that tool over here or click, or just click on your keyboard. So I select the both of our layers. And as you can see, Illustrator has really great way of showing you that some part of your illustration or object or whatever you wanna call it, is on another layer by coloring its lines in green or red or any other color noted chooses. Here you can see which layer is which. So the green one is lyric tree that does this part. And the other part which is arrived at is this one. So first thing that I'm going to do is go up here and remove the outline. So we don't have the outline. And I also want to choose another color or fault folder. And I'm going to use a gray so it's visible to us. Okay. So the back part, I'm going to do darker gray that okay. So I know which part is which also you can change your color and outline over here and as the part which we are going to use. So I've already created the color palette. I will leave the sites that you can use over here on the screen to choose your color palette. Or you can just go ahead and click, double-click on this part here and choose any color that you like. If you don't want to have a specific color palette, but it's much easier to use the color palette if you're making many folders. I'm going to show now how. So. Let's go and open our color palette. Okay, so here is our color palette that I made previously. So I'm just going to select all of these command CMD and drag it here. Of course, you can use some colors from the photos that you have or something like that. So let's say for example, I want to use this photo. Have to zoom out into the footage. Will hold shifts through, resize the photo. Now, before coloring it, you have to select the part of the yogic to 21 to color. So I select it here and I will go click I on the keyboard and click on the bars of the cup that I want to use. So I want to think it is really similar to this pink here. Or you might want to blow on here, or deep orange one here. It really doesn't matter. You can choose any color that you like. So the first part of our folders color, but I still want to choose some color from the palette decay. So I will enqueue just one here, okay? So that it's at, and I want the back to be darker. So it looks more realistic like it has a shadow or something like that. So again, I'm going to go and choose the same color that I used on the front. So that's it. And I'm going to click here, double-click here in our tools panel on this little square color. And I'm going to make it darker. So I will just drag this down. And you can see the contrast it has here. I want it a little bit darker. Yeah. Okay. So that's our folder. Now. You will select both of the ISS and you will hold Shift and make it smaller. Now, go copy both of them while they are selected. Command C, Command V, It's copied. And here is our another folder, and we'll color this one. I'm going to show you how once again. So click on the first part of your folder. Click your eye dropper tool. Choose the color that you want. So I want this one. And now click be 100 keyboard or use our selection tool from here. Click on the back part of our folder. Click. I chose an eyedropper tool. Click on the same color that you've used on different. So it was this one. And now we're going to go here to the panel, to panel, and click on this square and drag this color down to make it darker. So the contrast is right here. I like to contrast. We're going to click, Okay.
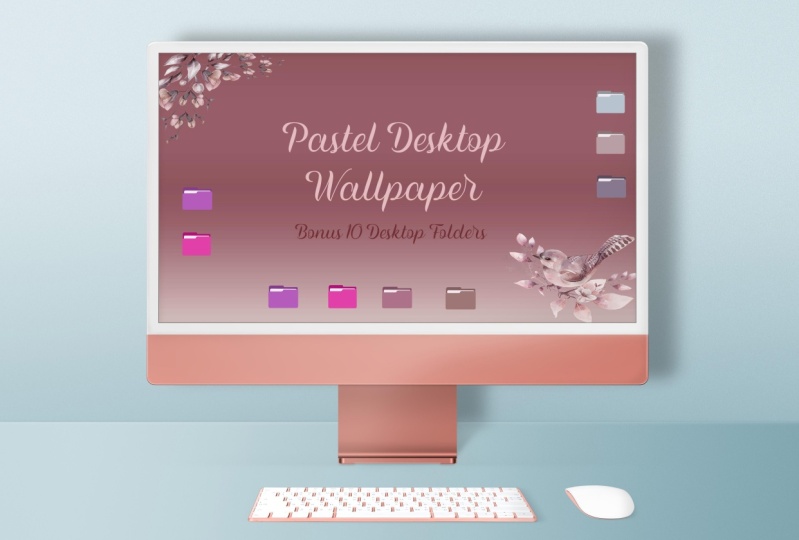
5. Export and Save the Design: Now that you've created your acute folders, I want to show you how to export them so it can, it was implemented desktop. Now, you'll want to go ahead and choose the selection tool. And you will just drag it across one folder like this. Okay? Now that you have your folder selected, you will go up here to the File Export Selection. Now that your folder is here, you'll go ahead and rename this. I will rename it. What? You can do that or you don't have to as you like. And I also want to export the second one. So I will go here and click Cancel. Now go again and select the second one. Again, File Export Selection. Go ahead, double-click and rename it to. And I want both of them to be exploited at the same time. So you will do this as much to, as much as you have. And I only have two. But if I had like many would do this for every folder separately. So, and when I come to the last folder, I will select, I will select all of them. And then I would export them. So if you had like 100 piles or something and you don't want to go selecting and one white one. You will just go here and select all acids and everything will be exported. Let's focus now on the right part of the screen. So we'll go click on this little folder here. Wait for it below. Find the folder where you want it. It's export it. So this is my Jews. Ok, so you want to go make sure that here is 300 ppi. All of these are de-selected and scale is selected. So here is 300 ppi. Suffix is none that automatically. So here you have a PNG select and you will just go Export S. It says exports for untitled one is assess successfully completed. And you can't open your files here. So here they are. Okay, one more thing that I want to show you is how to save your Illustrator file. And you can do that by going to the file up here. Say, choose the name or your folders. For a document, make sure the format is Adobe Illustrator. And go ahead and click Save. And this is Illustrator 2020. It might be any other Illustrator that you are using. Always say at the latest. I mean, why would just say the SDS CS6. So make sure thing is okay. So I'll click Okay, and your file is saved. Now, let's go and see how we can.
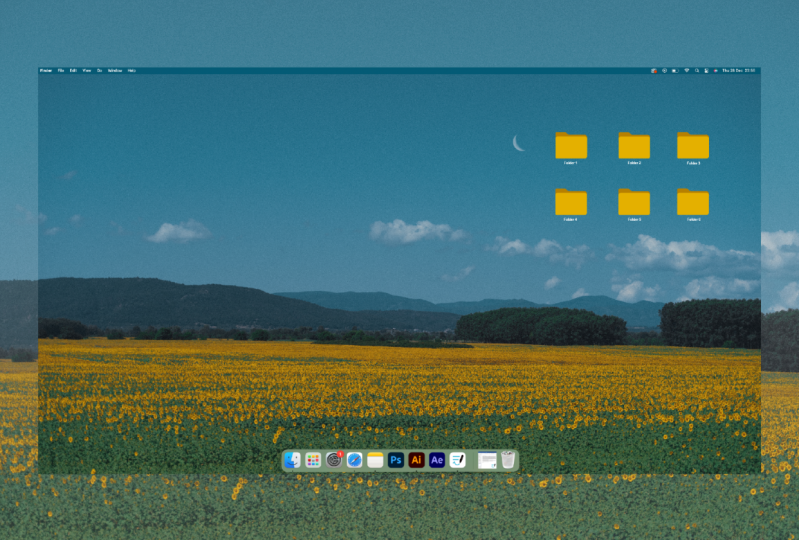
6. Apply Folders to Your Desktop: Okay, so here is my best shot. And I will show you how to put your freshly made folders to this one over here. So as you can see, all of my folders or cubed and everything. I want to make this one you do. So we're going to open our desired folders. So photo of our folder. We'll use this one. No. I think this one would be better for my, that's the top right. And go ahead and click Command a. So everything is selected over here. And click Command C. Now you can close that off. Go to your desired folder that you want to change. Go and right-click, get info. Click on this little icon over here, click on it, and click on it, and you will go press Command V. And your cooler. Red. Burgundy. Yeah, this is Berg. So that's it. Is yes. That in case you haven't been knows, I will leave a site down below with other files. So you can convert your PNGs to your dot icon files. Ic 00 00, 00, 00 am going to leave the Torreon. How you can set that up. Okay, so that will be it for this class. I hope you're happy. Please lever projects down below. I can't wait to see it. I can't wait to see what colors you chose and what's your desktops looks like. Okay.
 It's N Essentials, Empower Your Digital Creativity